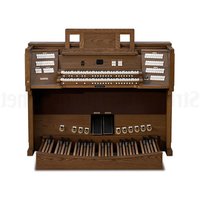
Unico 300 - Electronic organ Viscount - Free user manual and instructions
Find the device manual for free Unico 300 Viscount in PDF.


| Product Type | Electronic Organ |
| Brand | Viscount |
| Model | Unico 300 |
| Power Supply | Mains (check voltage on label) |
| Consumption | Not specified |
| Sound Generation Technology | Physis Physical Modeling |
| Number of Organ Styles | 8 (4 Preset, 4 User) |
| Keyboards | 2 manuals + pedalboard |
| Main Functions | Alternative voices, MIDI sequencer, recording and playback, general combinations and division, Tutti, Crescendo, couplers, tremolos, reverb, equalizer, programmable outputs |
| Connectivity | MIDI In/Out/Thru, USB (2 ports), headphone jack, programmable audio outputs, line input, microphone input, subwoofer output |
| Mass Storage | Internal memory and USB key (FAT/FAT32) |
| Maintenance and Cleaning | Use a soft cloth or vacuum cleaner; do not use detergents, solvents or alcohol |
| Safety | Do not open the device, unplug during storms, use a grounded outlet, do not expose to water or heat |
| Weight | Not specified (estimated: approx. 80-100 kg) |
| Dimensions | Not specified (estimated: width ~140 cm, depth ~70 cm, height ~120 cm) |
| Included Accessories | User manual, power cable |
Frequently Asked Questions - Unico 300 Viscount
User questions about Unico 300 Viscount
0 question about this device. Answer the ones you know or ask your own.
Ask a new question about this device
Download the instructions for your Electronic organ in PDF format for free! Find your manual Unico 300 - Viscount and take your electronic device back in hand. On this page are published all the documents necessary for the use of your device. Unico 300 by Viscount.
USER MANUAL Unico 300 Viscount
natural_image
Technical line drawing of a server rack with multiple control panels and rows of speakers (no text or labels)Guida Utente - IT
User Guide - EN
- FRGuide c
Ver. EU - 1.8
ATTENZIONE: LEGGERE ATTENTAMENTE!

WARNING
RISK OF ELECTRIC SHOCK DO NOT OPEN
AVIS
RISQUE DE CHOC ÉLECTRIQUE NE PAS OUVRIR


flowchart
graph TD
    A["The upper termination of pipe filters the right amount of harmonics"] --> B["The acoustic waves move independently on the wave guide"]
    B --> C["The regressive wave is reflected from the lower termination and is sum to the air flow effect"]
    C --> D["The regressive wave stimulates the air flow oscillation with a non linear law, and the effect is sum to the direct wave with a delay equal to the propagation time of the air flow"]
    D --> E["The air flow effect is a parameter of the supply pressure, that has an ADSR alike curve"]
    E --> F["+"]
    F --> G["Output"]
    G --> H["Feedback to A"]
    H --> I["Feedback to B"]
    I --> J["Feedback to C"]
    J --> K["Feedback to D"]
    K --> L["Feedback to E"]
    L --> M["Feedback to F"]
    M --> N["Feedback to G"]
    N --> O["Feedback to H"]
    O --> P["Feedback to I"]
UNICO 400
UNICO 300
1. Sezione PEDALE.
IMPORTANT SAFETY INSTRUCTIONS
WARNING: READ THIS FIRST!
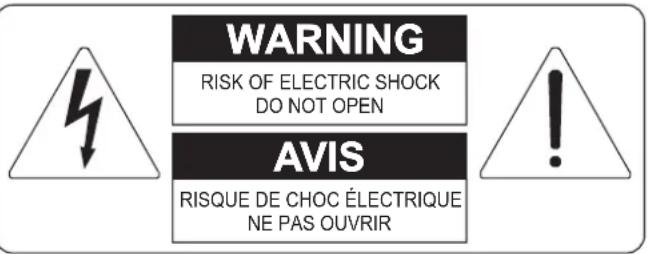

This symbol is intended to alert the user to the presence of uninsulated “dangerous voltage” within the product’s enclosure that may be of sufficient magnitude to constitute a risk of electric shock to persons.

This symbol is intended to alert the user to the presence of important operating and maintenance (servicing) instructions in the literature accompanying the appliance.
WARNING:
TO REDUCE THE RISK OF FIRE OR ELECTRIC SHOCK: DO NOT EXPOSE THIS APPARATUS TO RAIN OR MOISTURE AND OBJECTS FILLED WITH LIQUIDS, SUCH AS VASES, SHOULD NOT BE PLACED ON THIS APPARATUS. DO NOT REMOVE COVER (OR BACK) NO USER-SERVICEABLE PARTS INSIDE REFER SERVICING TO QUALIFIED SERVICE PERSONNEL
"INSTRUCTIONS PERTAINING TO A RISK OF FIRE, ELECTRIC SHOCK OR INJURY TO PERSONS"
WARNING:
1) Read these instructions.
2) Keep these instructions.
3) Heed all warnings.
4) Follow all instructions.
5) Do not use this apparatus near water.
6) Clean only with dry cloth.
7) Do not block any ventilation openings. Install in accordance with the manufacturer's instructions.
8) Do not install near any heat sources such as radiators, heat registers, stoves or other apparatus (including amplifiers) that produces heat.
9) Do not defeat the safety purpose of the polarized or grounding-type plug. A polarized plug has two blades with one wider than the other. A grounding type plug has two blades and a third grounding prong. The wider blade or the third prong are provided for your safety. If the provided plug does not fit in to your outlet, consult an electrician for replacement of the obsolete outlet.
10) Protect the power cord from being walked on or pinched, particularly at plugs, convenience receptacles, and the point where they exit from the apparatus.
11) Only use attachments/accessories specified by the manufacturer.
12) Use only with the cart, stand, tripod, bracket, or table specified by the manufacturer, or sold, with the apparatus. When a cart is used, use caution when moving the cart/apparatus combination to avoid injury from tip-over.
13) Unplug this apparatus during lightning storms or when unused for long periods of time.
14) Refer all servicing to qualified service personnel. Servicing is required when the apparatus has been damaged in any way, such as power-supply cord or plug is damaged, liquid has been spilled or objects have fallen into the apparatus, the apparatus has been exposed to rain or moisture, does not operate normally, or has been dropped.
NOTE: The socket-outlet shall be installed near the equipment and shall be easily accessible.
SAVE THESE INSTRUCTIONS
INDEX
- Important notes ....38
1.1 Looking after the product 38
1.2 Notes about the manual....38
- Introduction......40
- General description ...... 41
- Switching on and main video page 48
- Setting the volumes (Volumes function)....49
- Tuning the instrument (Tuning menu) ....50
- The organ styles (Styles menu)....51
- Selecting and regulating the voices (Voices menu) 52
8.1 Regulating the volume (Volume Level function) 52
8.2 Regulating the audio parameters (Edit Parameters function) 53
8.3 Selecting the alternative voices (Alternative Voice function)....54
- Instrument general settings (Set-Up menu)....56
9.1 Setting the routing of the voices on the rear audio outputs (Ext. Out Router function) 56
9.2 Configuring the audio outputs on the rear (Ext. Out Config function) 59
- Utility and MIDI functions (Util. & MIDI menu)....60
- File management functions (File Manag. menu)....61
- Playing and recording of musical sequences (Sequencer)....62
12.1 Playing back a piece (Play mode) 62
12.2 Recording a piece (Record mode) 64
12.3 Sequencer playback options (Play Options menu)....66
12.4 Songlists (Songlist function)....66
- Appendix ......68
13.1 Stop Local Off 68
13.2 Factory Settings....68
13.3 Upgrading the operating system 69
1. IMPORTANT NOTES
1.1 LOOKING AFTER THE PRODUCT
- Do not apply excessive force to the organ's structures or the controls (knobs, stops, push-buttons, etc.).
- When possible, do not place the instrument close to units which generate strong interference, such as radios, TVs, computer videos, etc.
- Do not place the organ close to heat sources, in damp or dusty places or in the vicinity of strong magnetic fields.
- Do not expose the instrument to direct sunlight.
- Never insert foreign bodies inside the instrument or pour liquids of any kind into it.
- For cleaning, use only a soft brush or compressed air; never use detergents, solvents or alcohol.
- Always use good quality screened cables for connection to amplification or diffusion systems. When disconnecting cables from sockets, always take hold of the connector and not the cable itself; when winding cables, do not knot or twist them.
- Before making the connections ensure that the other units (especially amplification and diffusion systems) you are about to connect are switched off. This will prevent noisy or even dangerous signal peaks.
- Connect the net cable to an earthed socket.
- Check that the voltage corresponds to the voltage shown on the serial number plate of the organ.
- If the organ is to be out of use for lengthy periods, disconnect the plug from the power socket.
1.2 NOTES ABOUT THE MANUAL
•Take good care of this manual.
- This manual is an integral part of the instrument. The descriptions and illustrations in this publication are not binding.
- While the instrument's essential characteristics remain the same, the manufacturer reserves the right to make any modifications to parts, details or accessories considered appropriate to improve the product or for requirements of a constructional or commercial nature, at any time and without undertaking to update this publication immediately.
- All rights reserved; the reproduction of any part of this manual, in any form, without the manufacturer's specific written permission is forbidden.
- All the trademarks referred to in this manual are the property of the respective manufacturers.
- Read all the information carefully in order to obtain the best performances from your product and waste no time.
- The codes or numbers in square brackets ([]) indicate the names of the buttons, sliders, trimmers and connectors on the instrument. For example, [ENTER] refers to the ENTER button.
- The illustrations and display pages are purely guideline and may differ from those actually shown on the display.
- The instructions provided in this manual only concern the instrument's operating system version that was up to date when the document was released. Therefore, such instructions might not describe faithfully your current operating system release. Please, visit the website http://www.physisorgans.com/download.asp to check for the newest operating system release and manual.
- Check the Reference Manual for detailed descriptions on the organ's functions. The manual can be downloaded from the Download page of the website http://www.physisorgans.com.
2. INTRODUCTION
Dear Customer,
Thank you for choosing the organ Viscount Unico. The Company, a world leader in the construction of fine classical organs, has installed in this instrument the latest and most sophisticated technology dedicated to the high fidelity reproduction of pipe organ sounds, with impressive flexibility and remarkable quality of timbre.
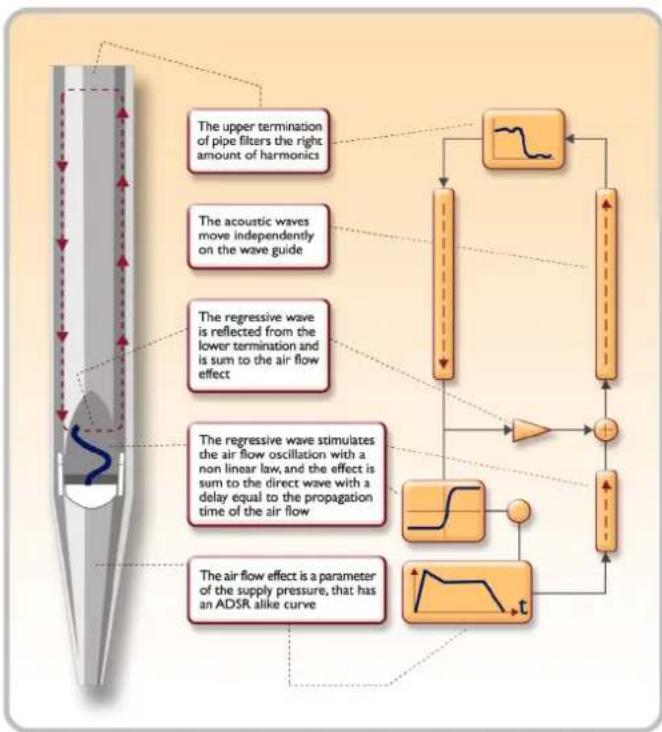
After years of research exploring musical synthesis techniques, our Research and Development unit, is the FIRST in the world to create the sounds of a pipe organ by using the “physical modeling technology” upon which the Physis is based.
Instead of using “sound samples” from pipe organs (previously the standard method) this revolutionary sound generation system involves the real-time calculation of the waveform generated by a precise mathematical model based on the sound emission physics of a pipe organ, incorporating the principal physical parameters ie. construction geometry, materials used, and pertaining air pressure, etc.
flowchart
graph TD
    A["The upper termination of pipe filters the right amount of harmonics"] --> B["The acoustic waves move independently on the wave guide"]
    B --> C["The regressive wave is reflected from the lower termination and is sum to the air flow effect"]
    C --> D["The regressive wave stimulates the air flow oscillation with a non linear law, and the effect is sum to the direct wave with a delay equal to the propagation time of the air flow"]
    D --> E["The air flow effect is a parameter of the supply pressure, that has an ADSR alike curve"]
    E --> F["Output"]
    F --> G["Feedback to Waveform"]
    G --> H["+"]
    H --> I["Output"]
The fact that the simple reproduction of memorized “sound” has been disregarded, permits the achievement of unimaginable realism, with the level of detail previously only created by a traditional pipe organ.
For example, the mathematical model allows the production of a different sound for each key since it provides the virtual reproduction of the original instrument by assigning a different pipe to each note, similar to a pipe organ. Furthermore, it will generate a different sound for each consecutive pressure of the same note, thus simulating the precise condition of the air volume inside the pipe as it is pressed.
The Unico also permits the “physical” editing of the sounds produced, by adjusting the parameters - just as the organ builder constructs the pipes. If however, “editing” is not your forte, you may choose your sound from a big library of pre-programmed pipe organ voices already in the instrument’s memory.
To conclude we suggest that you visit our web-sites www.viscount-organs.com and www.physisorgans.com where you will find information, updates, documents and news about our unique range of instruments.
3. GENERAL DESCRIPTION
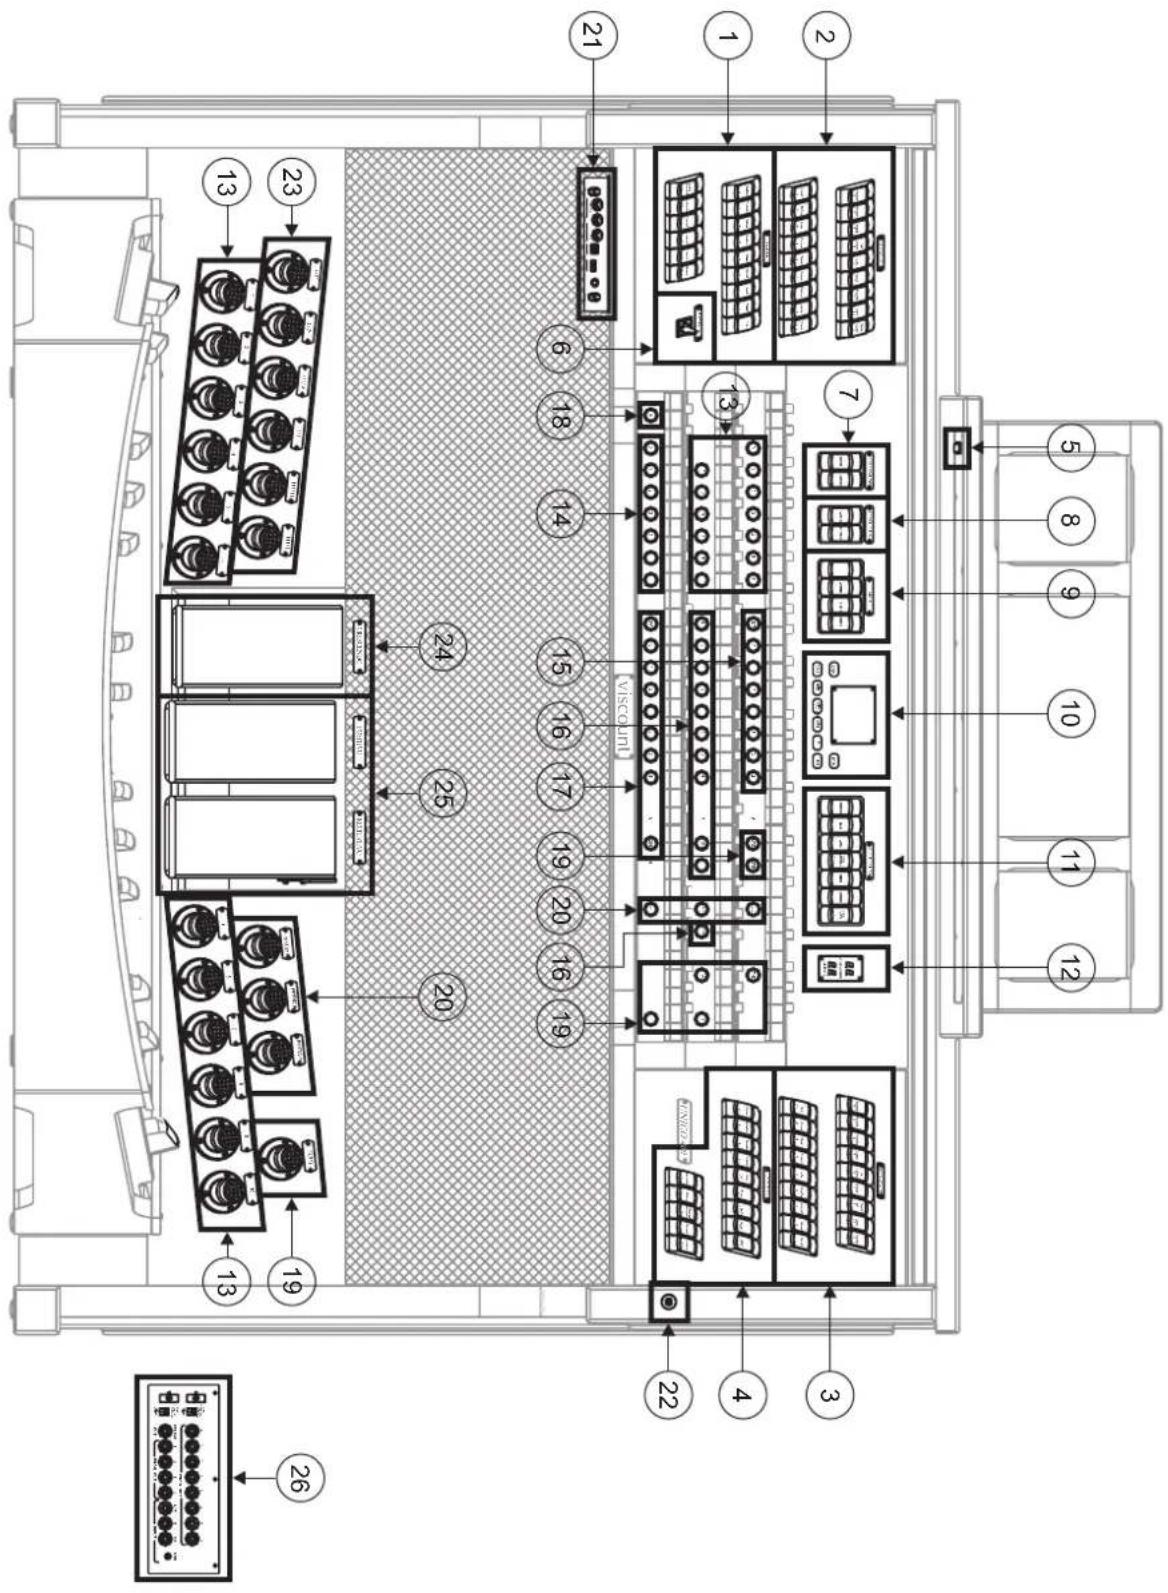
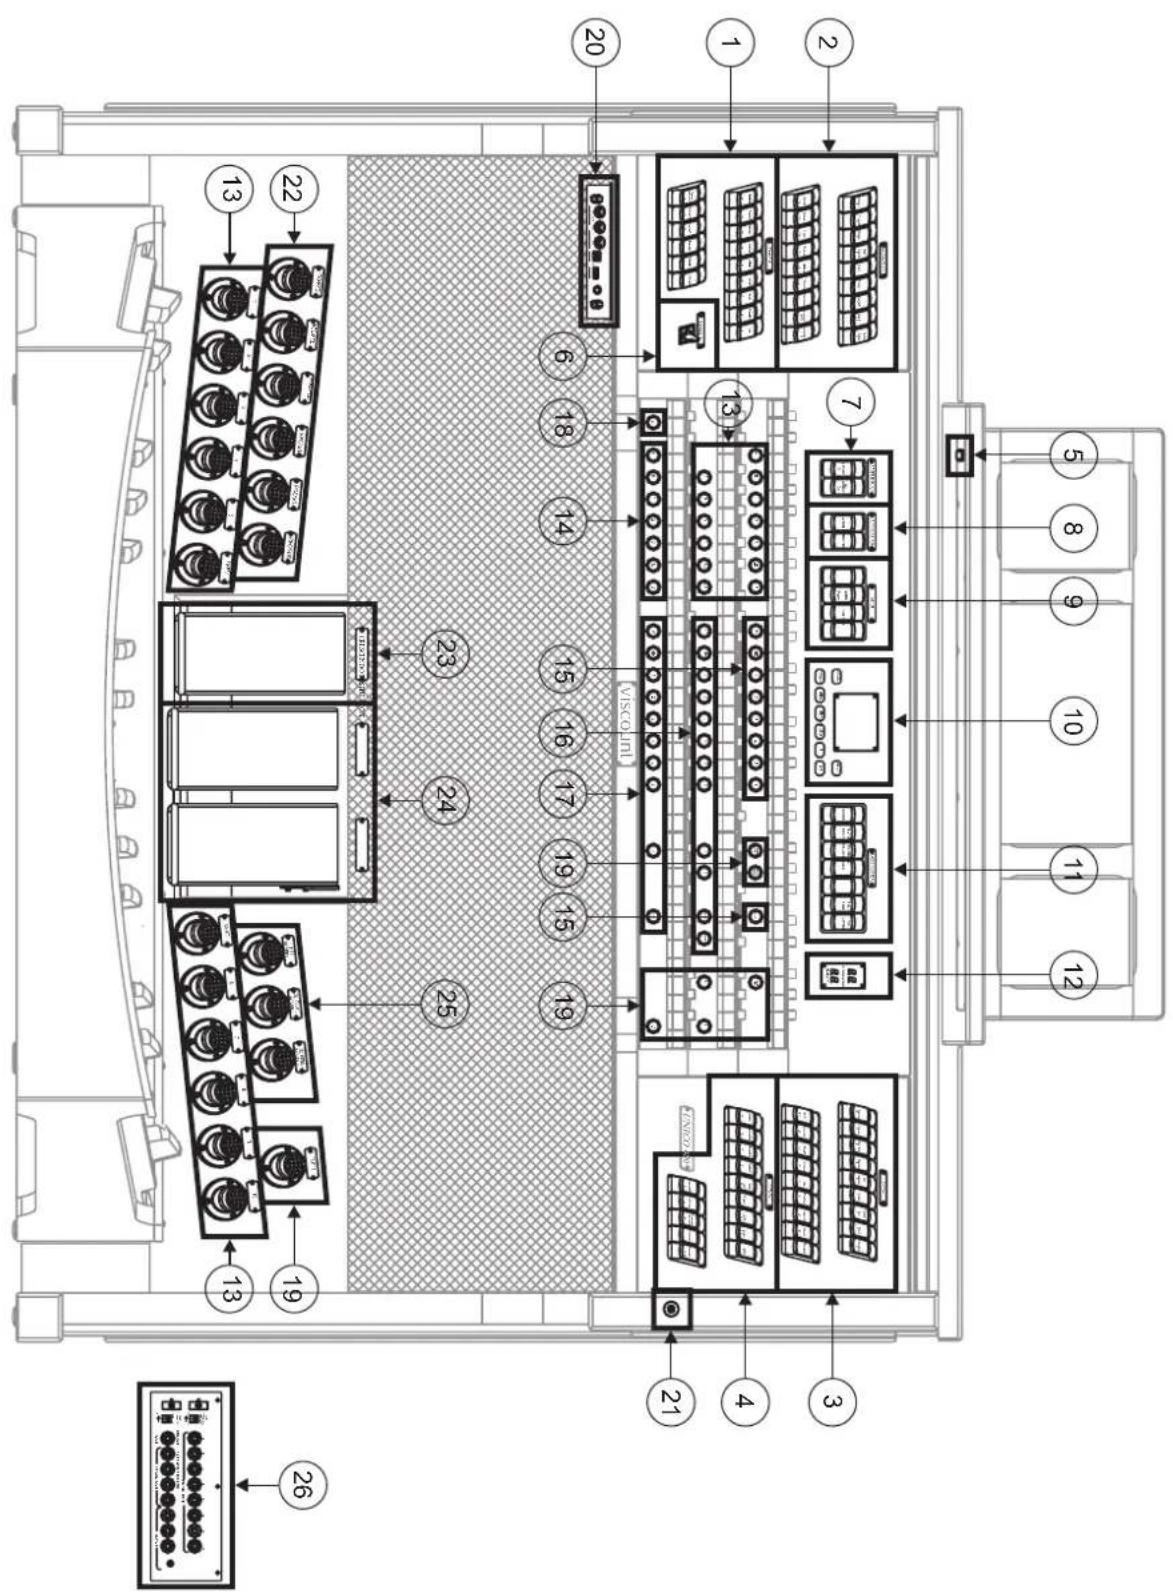
UNICO 500
UNICO 400
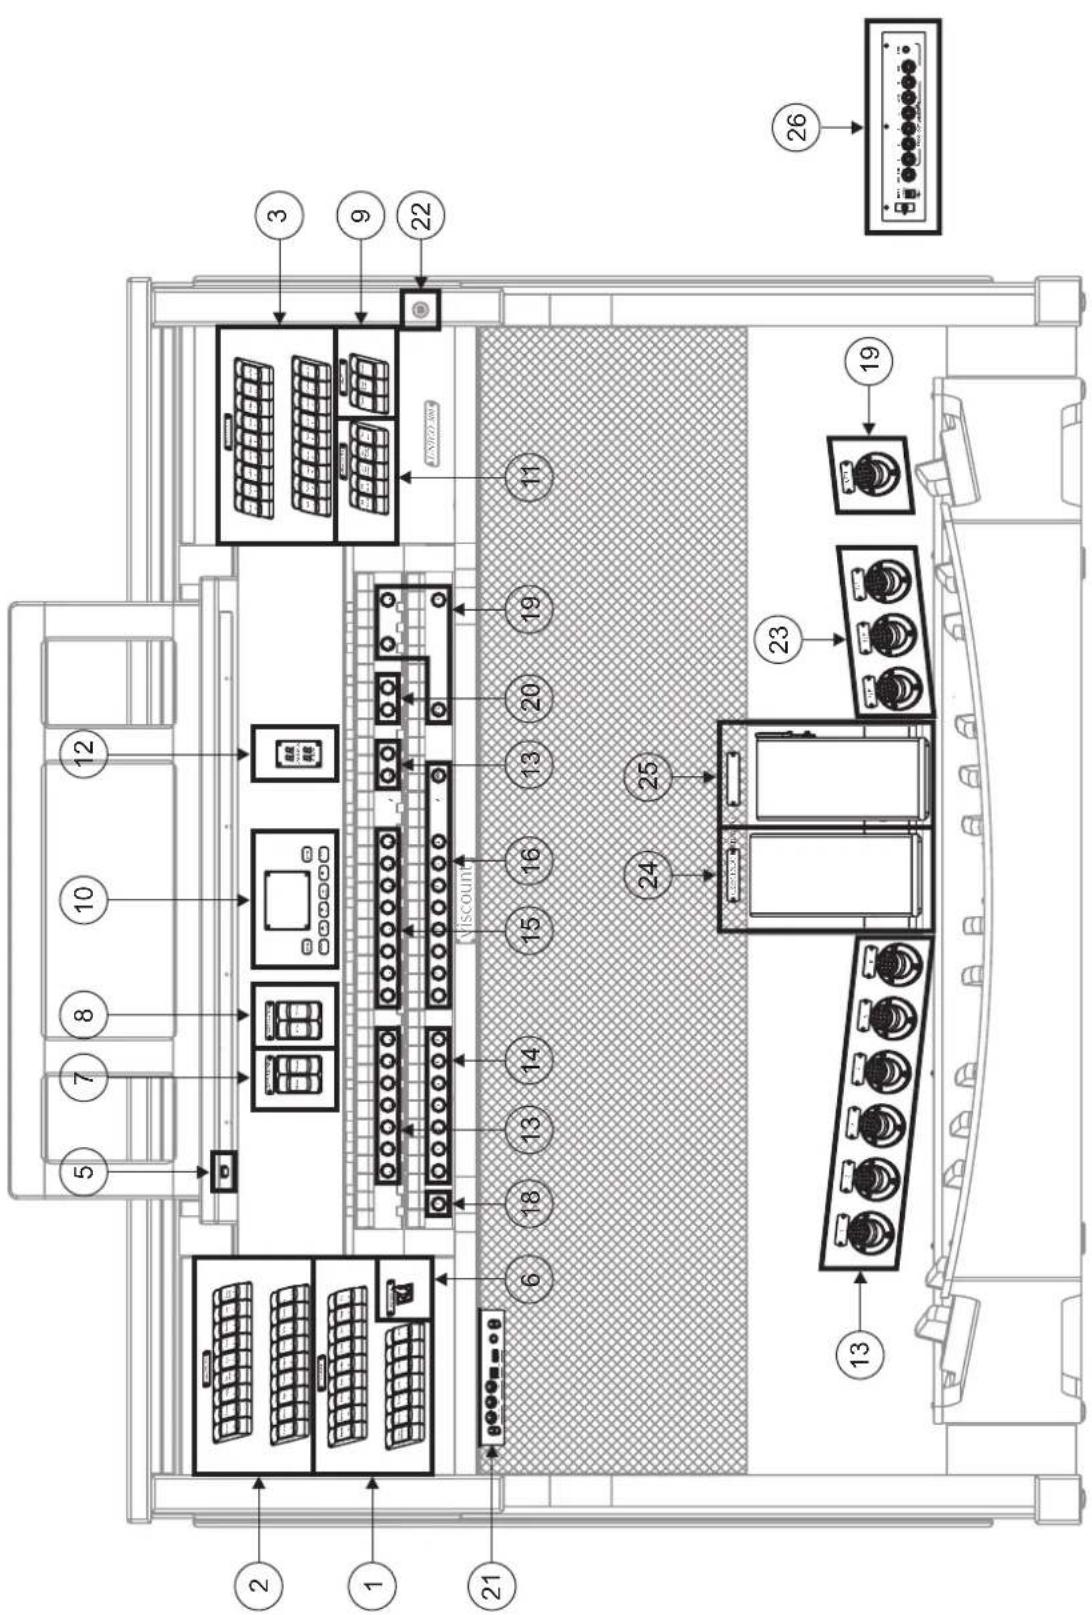
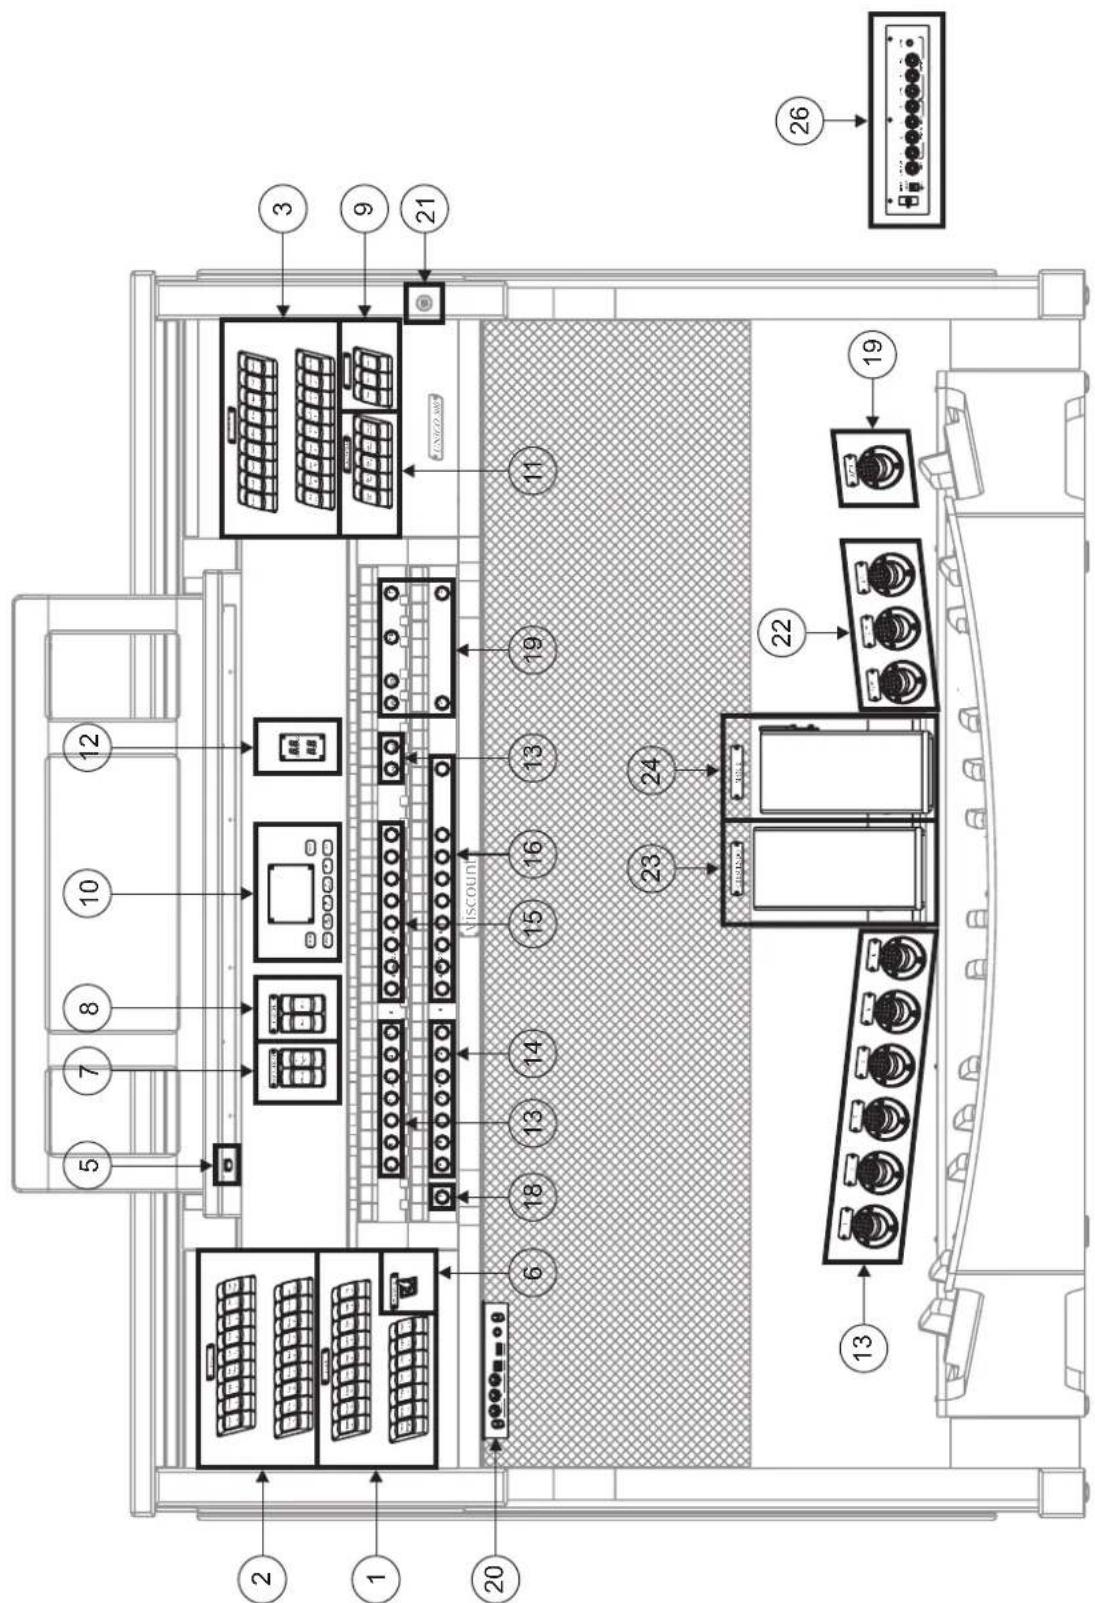
UNICO 300
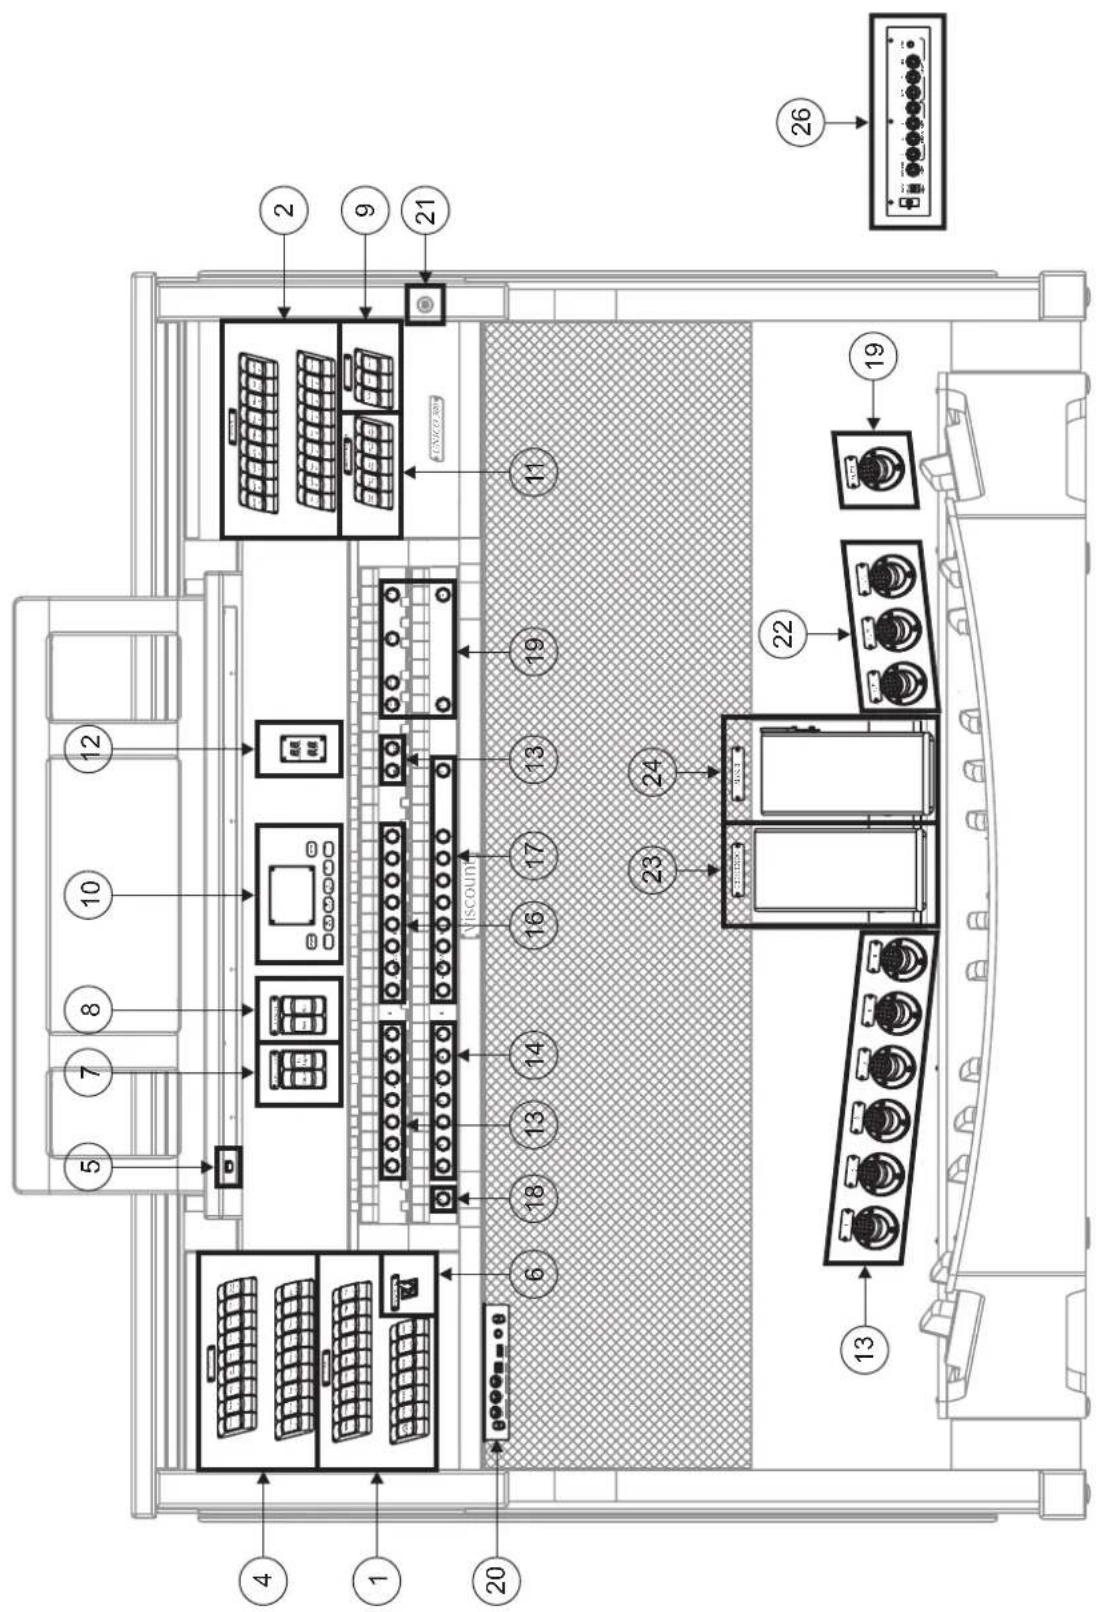
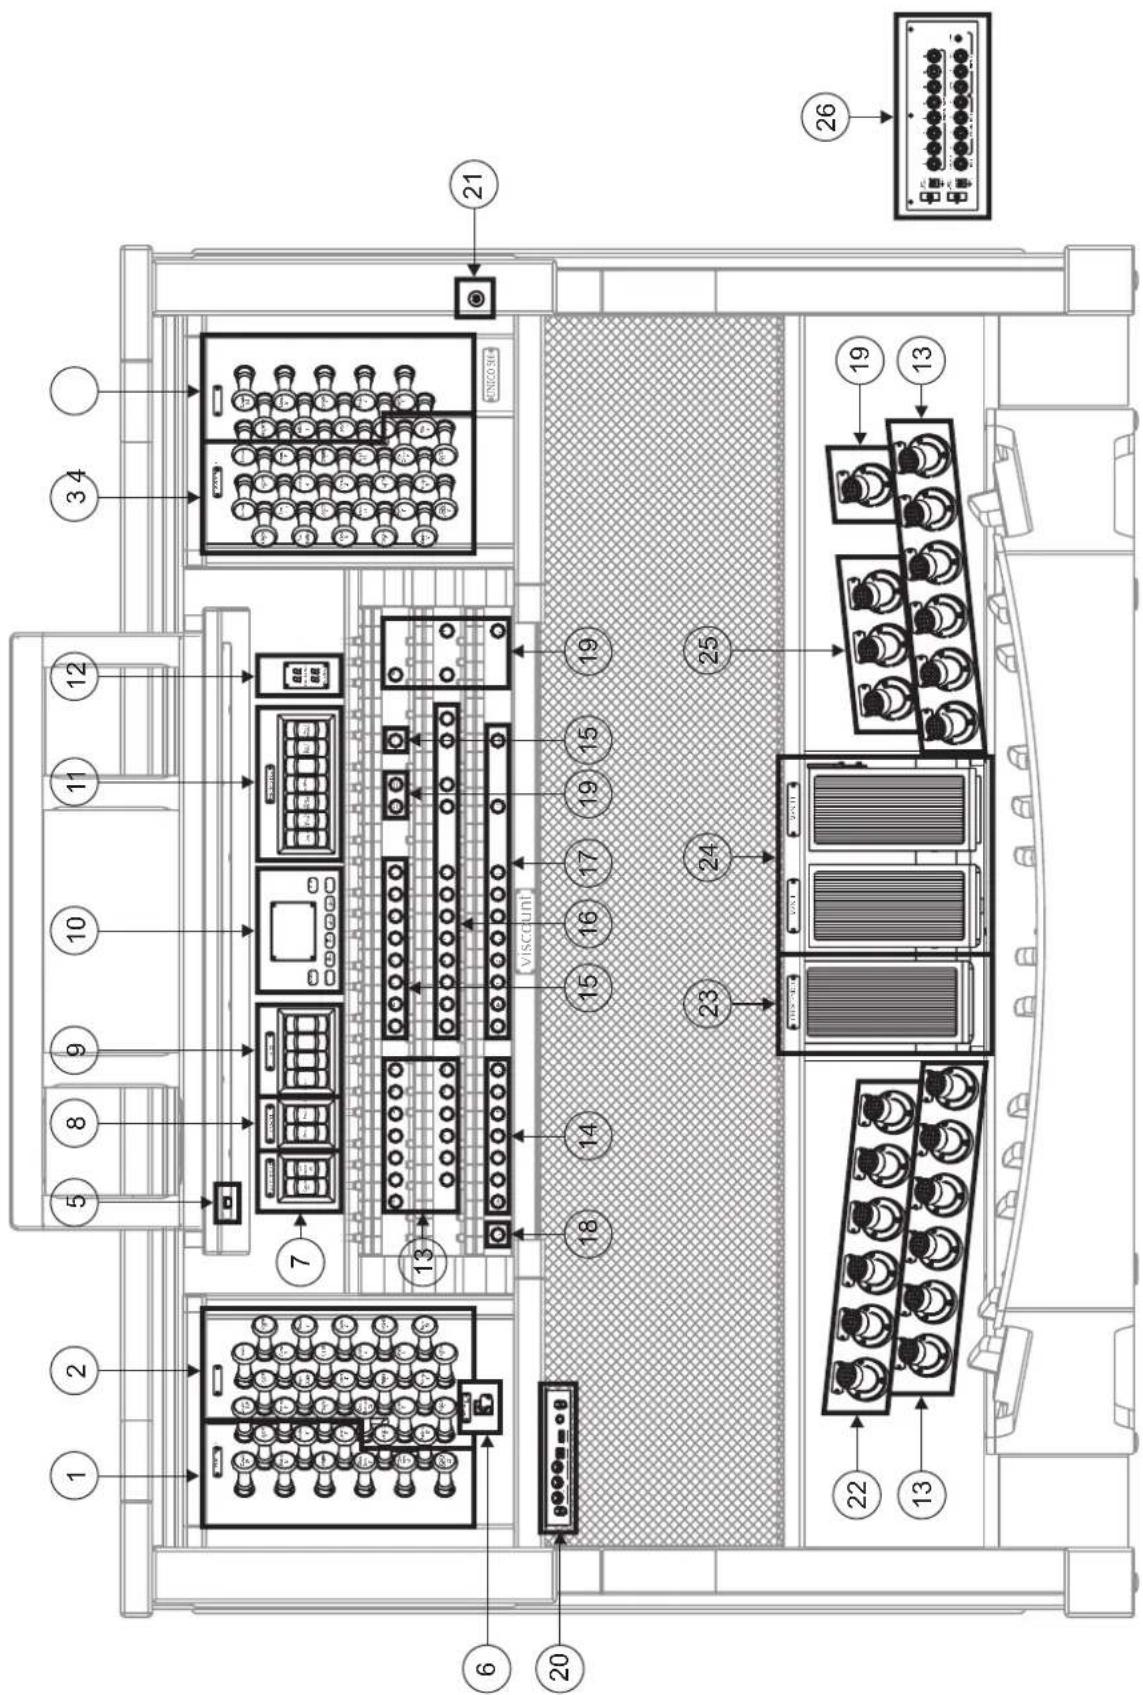
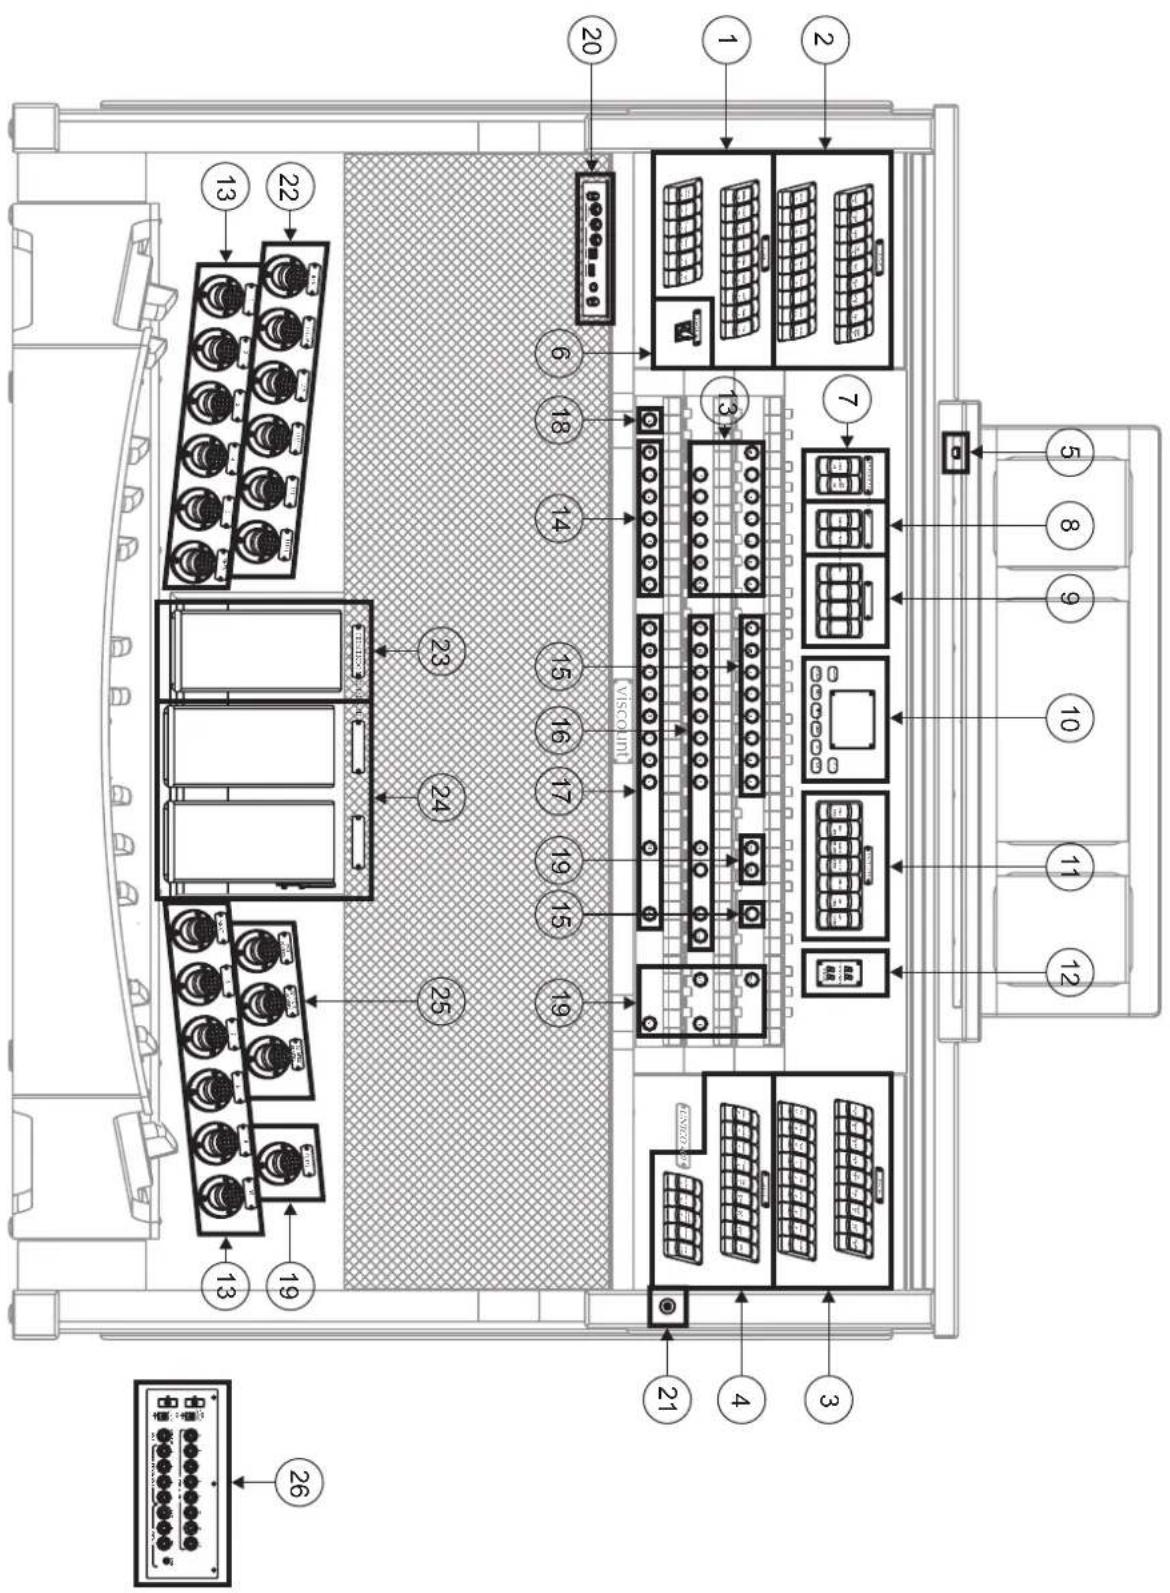
1. PEDAL Section.
Contains the pedal's stops and couplers for linking the manuals to the pedal board.
2. MAN.II Section.
Contains the stops, manual couplers (Unico 500 and 400) and tremulants of Manual II.
3. MAN.III Section.
Manual III stops and tremulants.
4. MAN.I Section.
Stops, manual couplers and tremulants for Manual I.
5. Lighting button.
On-off button for the music stand and manuals lights.
6. POWER Switch.
Instrument on/off switch.
7. AMPLIFICATION Section.
Organ amplification controls.
- [CONSOLE ON] switches on the instrument's internal amplification system.
- [EXT. SPEAKER ON] enables the PROG. OUT external outputs in the rear panel (point 26).
8. CANCEL Section.
Cancel buttons which allow disabling of all the Reed voices ([REEDS] tab) and the Plenum voices ([MIXTURE] tab).
9. MIDI Section
These controls, provided for each manual and the pedal board, allow transmission of the note MIDI codes on the MIDI [OUT] port to be enabled and disabled. All the instrument's other MIDI messages will continue to be transmitted, even with the MIDI control off.
10. Control and programming section.
Contains the buttons and display for viewing and programming all the instrument's setup and sequencer functions.
11. ORCHESTRA Section.
This section contains the organ's Orchestra stops.
12. Additional displays.
- [CRESCENDO] shows the step currently reached by the [CRESCENDO] pedal (point 23)
- [M. BANK] displays the memory bank of the combinations (general and customised) selected using the [MEM. BANK +] and [MEM. BANK -] pistons (point 19).
13. General pistons.
These pistons and foot pistons recall the general combinations of the memory bank selected using [MEM. BANK +] and [MEM. BANK -] (point 19). These combinations can be modified; the procedure for saving them is described in point 18.
[HR] restores the voice setup prepared in manual mode before a memory was recalled.
General combination sequencer controls are also provided, [PREV] in descending order, [NEXT.] in ascending order.
14. Pedal Board pistons.
This section contains the six pedal board combinations and the [HR] control for restoring the pedal board voice setup prepared in manual mode before one of these combinations is recalled. These combinations can be modified; the procedure for saving them is described in point 18.
15. Manual III pistons.
Pistons of the dedicated combinations of Man.III. [HR] for restoring the Man.III voices setup prepared in manual mode before one of these combinations is recalled. The combinations can be modified; the procedure for saving them is described in point 18.
[P] of the III/P coupling.
[M.SOLO] (MIDI Solo) piston, which allows mono transmission of the notes played on this manual on the MIDI [OUT] output, with priority to the highest note.
16. Manual II pistons.
Pistons of the dedicated combinations of Man.II. [HR] for restoring the Man.II voices setup prepared in manual mode before one of these combinations is recalled. The combinations can be modified; the procedure for saving them is described in point 18.
[P] of the II/P coupling. [III] and [I] of the keyboards couplings (Unico 500 and 400 only).
Unico 500 and 400 models also have the [O.SOLO] (Organ Solo) pistons, which allow the Man.III voices to be played in mono mode with priority to the highest note when the III/II coupling is active, and the [M.SOLO] (Midi Solo) piston, which allows mono transmission of the notes played on this manual on the MIDI [OUT] output, with priority to the highest note.
17. Manual I pistons.
Pistons of the dedicated combinations of Man.I. [HR] for restoring the Man.I voices setup prepared in manual mode before one of these combinations is recalled. These combinations can be modified; the procedure for saving them is described in point 18.
[P] of the I/P coupling. [III] (Unico 500 and 400 models) or [II] (Unico 300 model) of the keyboards coupling.
Unico 500 and 400 models also have the [M.SOLO] (MIDI Solo) piston, which allows mono transmission of the notes played on this manual on the MIDI [OUT] output, with priority to the highest note.
18. [S] Piston.
Fixing piston for saving the general and dedicated combinations, the Tutti and the Crescendo steps.
To set a combination or the Tutti, after setting the voices as required, press [S], hold it down and then press the piston or foot piston of the combinations you wish to save.
To save a Crescendo step, select it using the pedal of the same name, press [S], hold it down and press the [HR] of the general memories. To copy the contents of one step into another, select the step you wish to copy, hold down the [S] piston, select the step into which you wish to copy the contents, then press the [HR] of the general memories.
NOTE
If the LED of the [S] piston is off, programming of the organ is locked out by the Lock Organ function (chapt. 10), so it will not be possible to save combinations and/or view internal programming functions.
19. Organ general controls.
These controls do not refer to individual sections but to the entire instrument.
- [MEM. BANK +] and [MEM BANK -]: they select the memory bank displayed by the additional [MEM. BANK] display (point 12).
- [ENC]: enables the Enclosed function, which allows the organ's general volume to be controlled
using the swell pedal [MAN.III] in the Unico 500 and 400 models or [MAN.II] in the Unico 300 model.
- [A.P.]: enables the Automatic Pedal which allows the pedal voices to be played on Man.II in the Unico 500 and 400 models or Man.I in the Unico 300 model. In this case, the organ's pedal board is deactivated and the voices become monophonic, with priority to the lowest note.
- [T]: piston and foot piston for recalling the Tutti. The Tutti can be modified; the procedure for saving it is described in point 18.
- [C]: Cancel piston
NOTE
Memory bank n. 1 is always selected when the instrument is switched on.
20. Front connections panel.
This panel, on the left underneath the manuals, contains the connectors and settings most often used, for convenient access.
- [MASTER VOLUME]: regulates the organ's general volume.
- [REVERB VOLUME]: regulates the level of the reverb effect.
- MIDI [IN]: the MIDI input connector for allowing the organ to receive the data transmitted by a remote MIDI unit.
- MIDI [OUT]: the MIDI connector that transmits the MIDI data generated by the organ.
- MIDI [THRU]: retransmits the data received by the [IN] port for connection of several MIDI devices in series.
- [USB]: two USB connectors. The one on the left is used for connecting to a computer to allow the instrument's setup programme to be used. The one on the right is for use of an USB stick (not supplied with the instrument) for use as a mass memory for the organ instead of the internal memory. For further information refer to chap. 11.
- [PHONES]: the socket for connecting a headphone set.
21. Cover lock.
22. Coupler toe-studs.
These pistons duplicate the functions of the piston, draw-stop or rocker couplers.
23. [CRESCENDO] sweller.
You can use this sweller to select the Crescendo steps which activate a preset series of stops. The step currently selected is displayed by the additional [CRESCENDO] display (see point 12).
Each Crescendo step is programmable. The procedure for saving them is described in point 18.
24. Swell expression pedals.
The Unico 500 and 400 have two swell pedals for continuous control the expression of Manual I and Manual III. The Unico 300 model has continuous control of the volume of Manual II only.
The swell pedal on the right also incorporates a special lever system for control of the Sustain effect for the Orchestra voices.
25. Reversible toe-studs.
When activated, these pistons can be used to turn off the controls associated to them. Deactivating the pistons turns the control functions back on.
- [MIDI REVERS.]: switches off the MIDI controls. The MIDI control setup required can still be set even with MIDI Reversible activated.
- [32' FLUTE REVERS.]: switches off the 32' flutes.
- [32' REED REVERS.]: switches off the 32' reeds.
26. Rear connections.
On the back of the organ, there are various connections for making the audio connection to external speaker systems, and the line and microphone input for use of the organ's internal amplifier.
- [EXT. +12V DC] connectors: power at +12 Volt can be obtained from these connectors to switch-on any VISCOUNT speakers connected to the PROG. OUT. outputs.
- OUT [GEN. SUB] (General Sub-Woofer): dedicated output for the connection of low-frequency speakers (sub-woofer).
- PROG. OUT (Programmable Outputs): the instrument's general line outputs, allowing simulation of the wind-chests of pipe organs. The signals are distributed over the outputs on the basis of the display function settings, which allow setting of the type of wind-chest, its size and the position in space of the speakers used, for each stop. Each output also has dedicated level and equalisation controls.
- INPUT [L(+R)] / [R] : line inputs which allow other instruments to be played using the organ's internal amplification. If the source is monophonic use the [L+(R)] connector only.
- INPUT [MIC]: microphone input allowing amplification of the signal from a microphone.
- [GAIN]: trimmer for regulating the gain of the input signal received at the [MIC] connector.
WARNING!
This group of connections on the rear is not visible from the outside and the organ's wooden rear panel has to be removed to access it. Contact qualified staff for this procedure.
4. SWITCHING ON and MAIN VIDEO PAGE
After the instrument is switched on with the [POWER] switch, the system takes a few seconds to become operational. During this stage, the LEDs on the separate panels of the manuals come on in sequence, and the display shows the introductory screen.
When the main video page appears, the instrument is ready for use:
| TUNING | SET-UP |
| VOICES | UTIL. & MIDI |
| STYLES | FILE MANAG. |
| EQUAL | USER 2 |
| ENSEMBLE 2 | P.COMB NO |
| AIRPRESS -- | K.INV NO |
| A: 440.00 HZ | TRANSP -- |
The top of this screen contains the fields for selecting the organ's various setup menus:
oTUNING: instrument tuning parameters.
oVOICES: functions relating to all the organ's voices.
oSTYLE: style selection.
oSET-UP: organ general set-up functions
o UTIL. & MIDI (Utility & MIDI): utility and MIDI functions
- FILE MANAG. (File Manager): management of the files saved in the internal memory or the USB device.
To display the contents of a menu, simply locate the cursor (the field on which it is located appears in reverse mode) on the field required using the [FIELD ▲] and [FIELD ▼] buttons and press [ENTER]. [EXIT] quits the menu and returns to the main video page.
The bottom of this screen displays the instrument parameters the status of which it is always useful to know:
☐ [box in top left-hand corner]: (Equal in the screen shown) displays the temperament currently in use, selected in the TUNING menu.
oENSEMBLE: the ENSEMBLE value set in the TUNING menu.
o AIR PRESS: the AIR PRESSURE parameter value set in the TUNING menu.
- A: the instrument's tuning, expressed as the frequency of A4, set in the TUNING menu.
☐ [box in top right-hand corner]: (User2 in the screen shown) contains the style selected in the STYLE menu.
o P. COMB: the status of the PISTON COMBINE function as set in the UTILITY & MIDI menu.
o K. INV: the status of the KEYBOARD INVERSION function as set in the UTILITY & MIDI menu.
oTRANSP: the transposition set in TUNING.
These fields are for information only and cannot be selected. The menus referred to above have to be accessed to modify the setting of the relative function.
The buttons used to view and navigate through all the display screens are arranged around the display.
- [SEQUENC]: screens for use of the instrument's internal sequencer.
- [VOLUMES]: screen containing all the instrument's volumes.
- [FIELD ▲] and [FIELD ▼]: buttons used to move the cursor, identified by the field in reverse.
[FIELD ▲] positions it in the field above or the previous field, [FIELD ▼] in the field below or the next field. - [VALUE +] and [VALUE -]: buttons which regulate the values of the parameters, whether they are numerical or alphanumeric. [VALUE +] increases, [VALUE -] decreases.
- [EXIT] and [ENTER]: buttons for accessing and quitting the display screens and menus, or for confirming or cancelling prompts made by the system. [ENTER] accesses menus/screens and confirms, [EXIT] quits menus/screens and cancels.
5. SETTING THE VOLUMES (VOLUMES function)
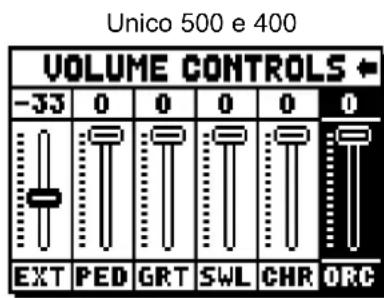
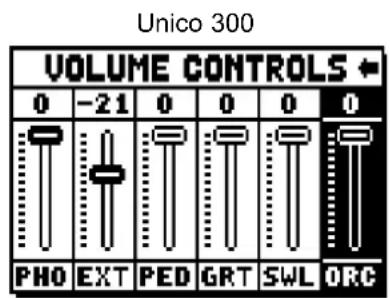
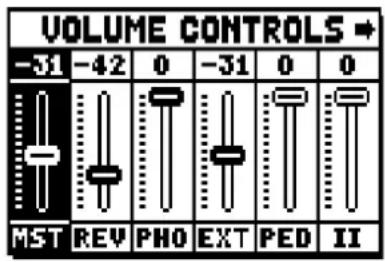
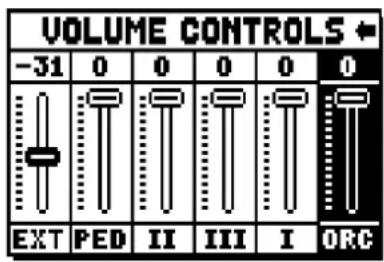
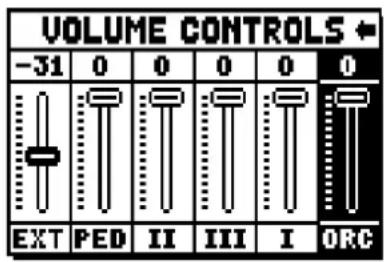
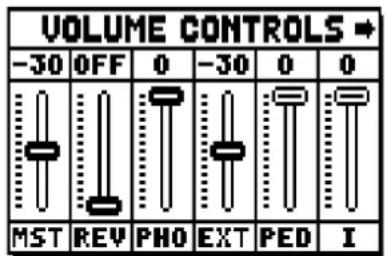
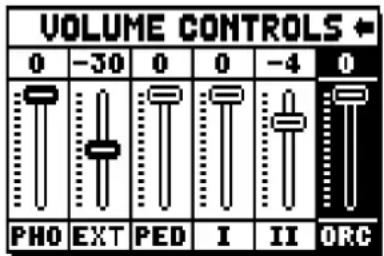
Pressing the [VOLUMES] button displays the screen relating to all the organ's volume controls:
Unico 500 and 400
Unico 300
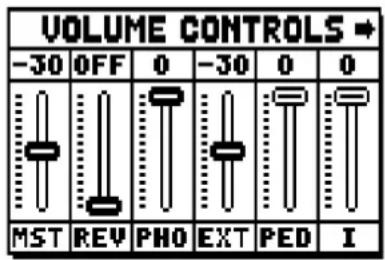
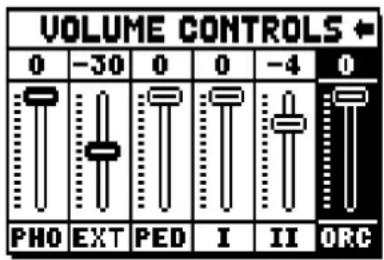
o MST (Master): the organ's overall volume, which can also be adjusted with the [MASTER VOLUME] trimmer underneath the manuals.
o REV (Reverb): reverb effect, which can also be adjusted with the [REVERB VOLUME] trimmer underneath the manuals.
o PHO (Phones): level of the output signal at the headphone [PHONES] connector underneath the manuals.
o EXT (External outputs): general volume of the PROG. OUT connectors on the rear panel.
o PED (Pedal): pedal board divisional volume.
o II (Manual II): second manual divisional volume.
o III (Manual III): third manual divisional volume.
o I (Manual I): first manual divisional volume.
o ORC (Orchestra): volume of the orchestra section.
Press [EXIT] or wait about 4 seconds to quit the screen and return to display of the previous video page.
6. TUNING THE INSTRUMENT (TUNING menu)
Selecting the TUNING field on the main video page gives access to all the instrument's tuning parameters.
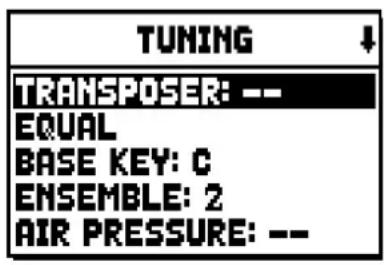
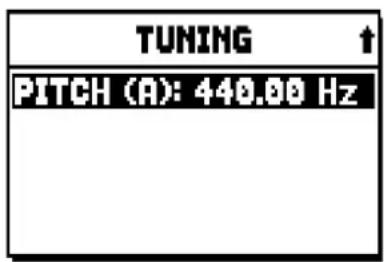
o TRANSPOSER: transposer with a range from -6 to +5 semitones. When switched on, the organ always has transposition equal to zero.
o [second field on the display]: (Equal in the screen shown) selector for setting historic temperaments of various periods and countries of origin.
o BASE KEY: the note on which the chain of the 12 fifths that make up the temperament starts.
○ ENSEMBLE: level of natural tiny differences in pitch between one organ pipe and another, simulating the tuning error that occurs in the organ's pipes due to wear over time and variations in temperature. The values range from – (pipes perfectly tuned) to 8 (maximum pitch instability).
- AIR PRESSURE: simulates the drop in air pressure when a large quantity of air is requested in a short time (e.g. when large chords are played with the Tutti). This is reflected in a temporary, gradual drop in pitch, more obvious in the longest, widest pipes (flutes, bourdons, principals).
o PITCH (A): fine tuning of the pitch, indicated as the frequency of A4 (an 8' pipe).
To quit the video page press [EXIT].
NOTE
Transposition does not have any effect on playback of pieces with the internal sequencer (unlike recording, where the notes are acquired transposed). A specific transposer is provided for this purpose (see point 12.3).
7. THE ORGAN STYLES (STYLES menu)
The Style identifies the setup of the organ stops, meaning the voice and the relative parameters of each stop, allowing the use of sounds appropriate to the repertoire to be performed.
The organ has eight Styles, meaning eight sound setups, in the same console. The first four of them, which from now on we will also call the Presets or preset styles, are programmed by our laboratories on the basis of the appropriate organ schools, and cannot be modified by the user. The other four Styles, called User styles, can be freely modified and customised to personal taste, making the organ extremely flexible.
Select the STYLE field on the main page for the Style selection:
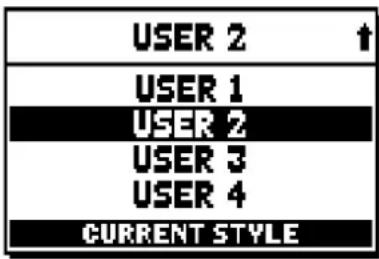
As we have already stated, the first four Styles cannot be modified, so accessing to the VOICES function the display shows the following warning message:

However it is possible to display and check the settings of these Styles, to continue press any display button or wait about three seconds.
8. SELECTING AND REGULATING THE VOICES (VOICES menu)
One of the main features of the new Physis synthesis technology used by the Unico organs for sound generation is that it offers the user a wide array of options for personalising the instrument with a very large number of organ timbres, and also makes available several parameters which can be adjusted to further increase the setup potential.
The VOICES menu contains all the functions for selecting and regulating the voices' audio parameters.
NOTES:
- The functions described below cannot be edited when a Preset style is selected. Select a User style to regulate these parameters.
- The voices selected for each rocker switch or draw-stop, and the sound generation parameters and volume, are automatically saved in the current Style. This means that when another style is recalled, the voices will be reset with new parameters taken from the last style recalled. The changes made earlier are not lost, and will be made available when the style in which they were made is selected again.
The first video page displayed allows selection of the function to be accessed:
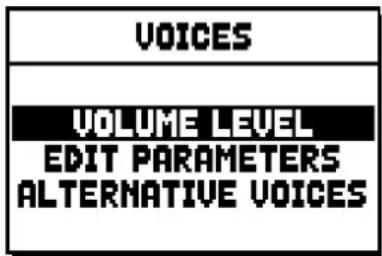
o VOLUME LEVEL: regulation of the volume of each individual voice.
- EDIT PARAMETERS: regulation of the sound generation parameters for each individual voice.
o ALTERNATIVE VOICES: selection of alternative voices.
8.1 REGULATING THE VOLUME (VOLUME LEVEL function)
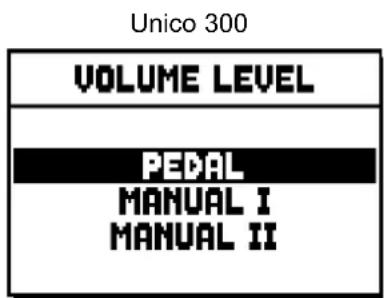
After the VOLUME LEVEL field has been selected in the VOICES menu, the display shows the organ sections. Select the section which contains the voice the volume of which you wish to adjust:
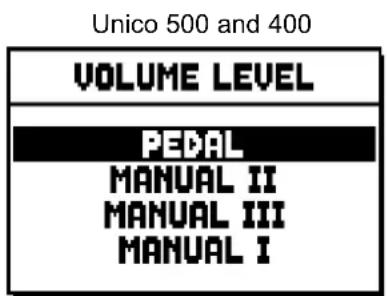
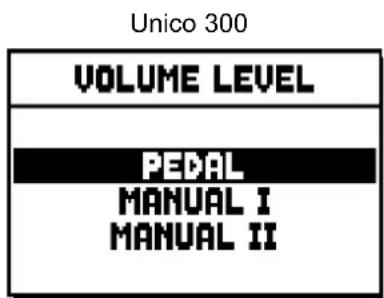
As usual, use the [FIELD ▲] and [FIELD ▼] and [ENTER] buttons to select the field on the display.
Another way of displaying and adjusting the volume immediately is to hold out the draw-stop or hold down the rocker tab for a few moments in the voice on position with the cursor on the VOLUME LEVEL field in the VOICES menu, or in the function itself.
| PEDAL VOICES VOL. ↓ | |
| Subbas 3/2 | 0 dB |
| Bourdon 16 A | 0 dB |
| Prestant 16A | 0 dB |
| Gedekt 8 | 0 dB |
| Octaaf 8 | 0 dB |
The LED of the stop the volume of which is being adjusted will flash to prevent modification errors; the stop will be on and can be played for better, quicker adjustment. Other stops can also be switched on to assess the overall effect of the changes.
To quit the function and save the values press [EXIT].
8.2 REGULATING THE AUDIO PARAMETERS (EDIT PARAMETERS function)
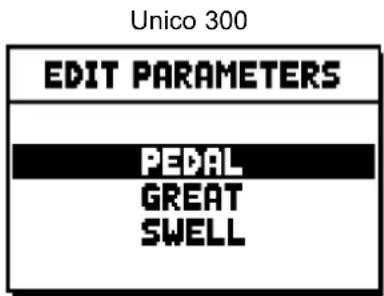
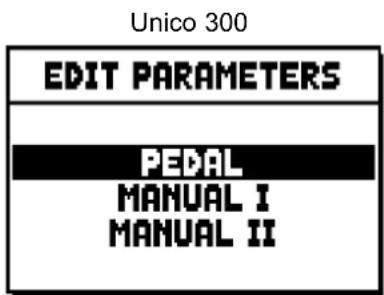
To view the screens containing the sound generation parameters of each individual voice, select the EDIT PARAMETERS field in the VOICES menu:
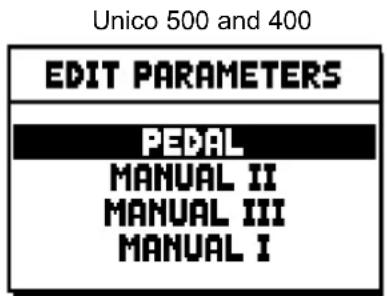
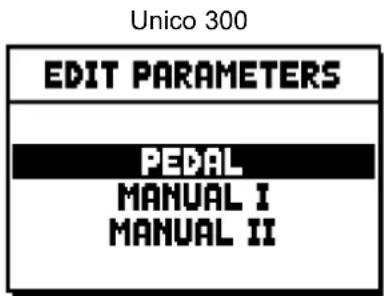
For this function the display again shows the organ's sections, allowing selection of the one containing the voice to be modified.
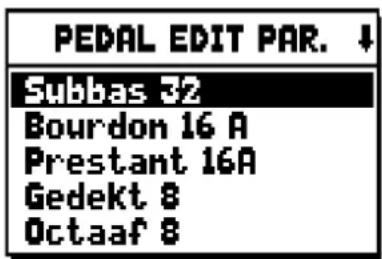
after which the voice the parameters of which are to be viewed can be displayed.
Another way of viewing the setting screen directly is to hold out the draw-stop or hold down the rocker tab for a few moments in the voice on position with the cursor on the EDIT PARAMETERS field in the VOICES menu, or in the function itself.
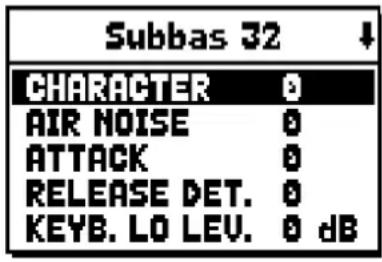
The LED of the stop being modified will flash to prevent modification errors; the stop will be on and can be played for better, quicker adjustment. Other stops can also be switched on to assess the overall effect of the changes.
The parameters displayed are not the same for every voice, since some families have specific setting parameters not required for other types of voice.
The settings which can be made are:
oCHARACTER: harmonic richness.
oAIR NOISE: noise of the air blowing through the pipe.
o REED NOISE: imperfect synchronisation of the reed throb period.
o ATTACK: attack time the sound takes to reach the maximum volume.
o REL. DETUNE: (Release Detune) detuning in the release phase.
o FREQ. SKEW: gradual change in the air's pitch during the attack and release phases.
o DETUNE: detuning to produce the throb effect in the voices concerned.
o KEYB. LO LEV.: (Keyboard Low Level) gain (positive values) or attenuation (negative values) of the volume in the low part of the manual.
o KEYB. LO LEV.: (Keyboard High Level) gain (positive values) or attenuation (negative values) of the volume in the high part of the manual.
o TREMULANT: select the first (1st) or second (2nd) tremulant. The selected tremulant will be applied to the register when activated through the dedicated stop or draw-stop.
To quit the function and save the values press [EXIT].
8.3 SELECTING THE ALTERNATIVE VOICES (ALTERNATIVE VOICE function)
Each stop on the panel has a set of voices, the default voice set by the current Style and the alternative voices, which are variants on the original. To select an alternative voice, the ALTERNATIVE VOICES function has to be recalled:
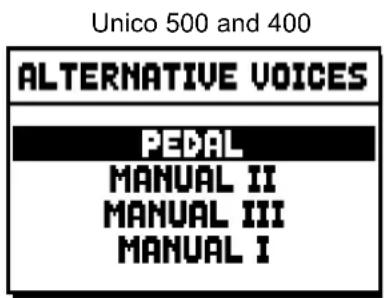
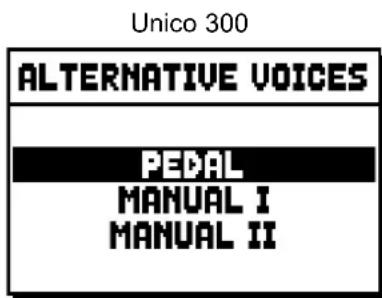
As for the other VOICES menu functions, the next step is to select the section of the organ containing the voice to be modified: this displays the list of the voices present in the chosen section.
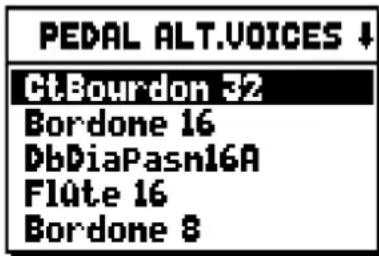
Here again, there is the option of displaying the alternative voices screen directly by holding out the drawstop or holding down the rocker rab for a few moments in the voice on position with the cursor on the ALTERNATIVE VOICES field in the VOICES menu, or in the function itself.
The LED of the stop being replaced will flash to prevent modification errors; the stop will be on and can be played for better, quicker adjustment.
The display now shows the list of the alternative voices:
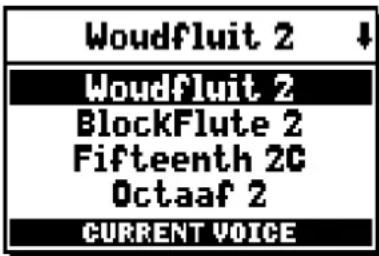
identified as "CURRENT VOICE" in the bottom of the screen.
It should also be remembered that the top of the screen always contains the name screen-printed on the draw-stop or tab, so that the stop the voice of which is being changed can be identified at all times.
When the [FIELD ▲] and [FIELD ▼] buttons are used to move the cursor to other voices, the prompt changes to "ENTER TO REPLACE".
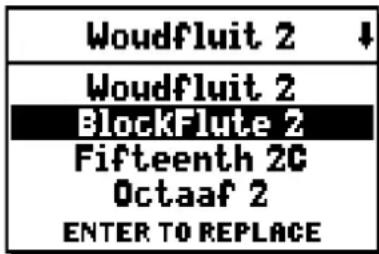
instructing you to press [ENTER] to confirm the new voice and render it usable. The voice on which the cursor is located is available and can be played even before [ENTER] is pressed, allowing the modification required to be evaluated immediately. Other stops can also be switched on to assess the overall effect of the changes.
Press [EXIT] to replace other voices or exit the function.
NOTE:
When an alternative voice is selected, the sound generation parameters in the EDIT PARAMETERS function are automatically reset to the default values of the new voice. The volume setting (in the VOLUME LEVEL function) remains unchanged.
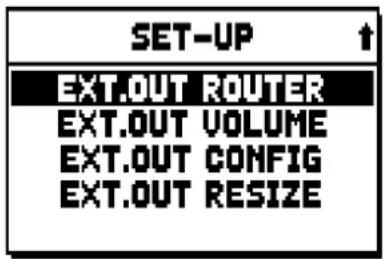
9. INSTRUMENT GENERAL SETTINGS (SET-UP menu)
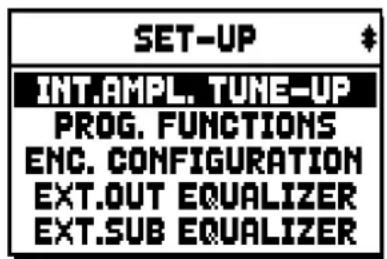
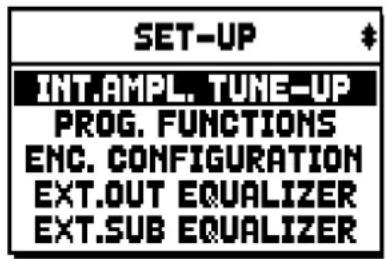
The SET-UP menu contains all the instrument's general settings except for the settings relating to the MIDI interface and the accessory and utility functions. To recall this menu, select the SET-UP field from the main video page:
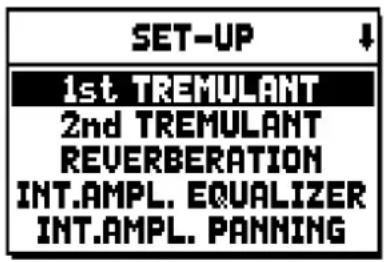
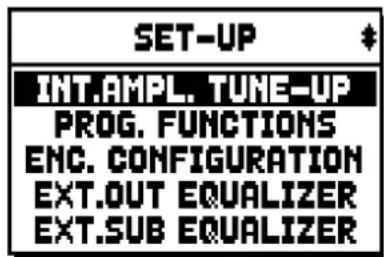
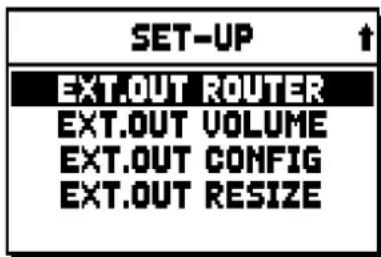
The functions available are as follows:
- 1st TREMULANT: setting of the first tremulant speed and depth for each individual manual.
- 2nd TREMULANT: setting of the second tremulant speed and depth for each individual manual.
o REVERBERATION: selection of the type of room for the reverb effect. - INT. AMPL. EQUALIZER (Internal amplification equalizer): setting of the 5-band equalizer of the internal amplifier.
- INT. AMPL. PANNING (Internal amplification panning): setting of the stereophonic distribution of the stops of the internal amplification system, to simulate different types of wind-chests for the various stops.
o INT. AMPL. TUNE-UP (Internal amplification tune-up): function not available in these models. - PROG. FUNCTIONS (Programmable functions): settings relating to operation of the combinations, the pistons, the Crescendo and the trimmers underneath the manuals.
o ENC. CONFIGURATION (Enclosed configuration): program the [ENC] piston function.
o EXT. OUT EQUALIZER (External outputs equalizer): setting of the equalizers of the PROG. OUT outputs on the rear.
o EXT. SUB EQUALIZER (External sub equalizer): equalizer adjustment for the external output on the back [GEN. SUB.].
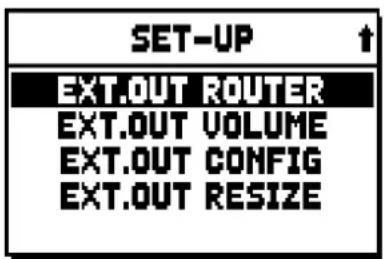
o EXT. OUT ROUTER (External outputs router): setting of the routing of the stops on the PROG. OUT outputs on the rear to simulate the position of the wind-chests and the arrangement of the pipes inside them.
o EXT. OUT VOLUME (External outputs volume): setting of the volumes of the PROG. OUT outputs on the rear.
o EXT. OUT CONFIG (External outputs config): setting of the PROG. OUT rear outputs.
o EXT. OUT RESIZE (External out resize): Adapts automatically the link between stops and rear outputs, according to the amount of outputs actually used.
9.1 SETTING THE ROUTING OF THE VOICES ON THE REAR AUDIO OUTPUTS (EXT. OUT ROUTER function)
One of the Unico series organs' key features is the capability for simulating the position of the wind-chests and the arrangement of the pipes inside them, for every stop. This is achieved by setting the routing of the audio signals, i.e. the way in which they are distributed, on the rear outputs. For each stop, the system is able to set an output configuration which reflects the layout of the pipes in real wind-chests, as follows:
- single or double cusp
- double wing
- left or right wing
- mono
- alternate keys
Moreover, each of these layouts can be further specified with regard to the width of the wind-chest and its location in space, defined by the number of outputs used. To access the rear audio output setting video page, select the EXT. OUT ROUTER field in the SET-UP menu:
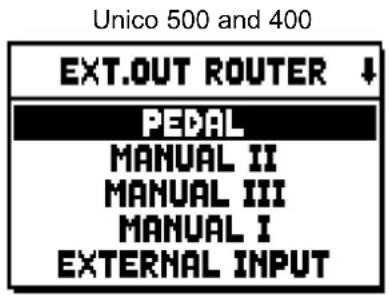
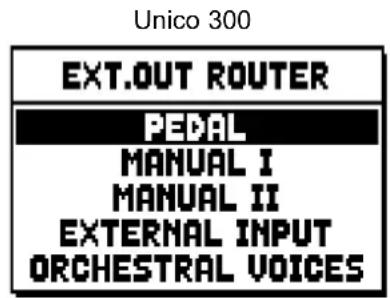
this displays the screen for selection of the section which contains the stop to be set up, which has to be chosen from the list of the stops in the section:
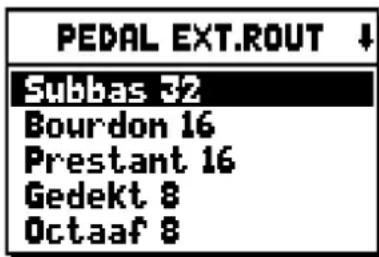
Here again, there is the option of displaying the set-up screen directly by holding out the draw-stop or holding down the rocker tab for a few moments in the voice on position with the cursor on the EXT. OUT ROUTER field in the SET-UP menu, or in the function itself.
The LED of the stop being set up will flash to prevent modification errors; the stop will be on and can be played for better, quicker adjustment. Other stops can also be switched on to assess the overall effect of the changes.
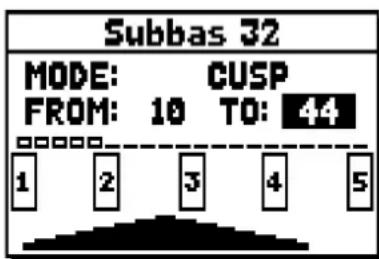
the screen comprises four sections:
oMODE: selects the type of wind-chest from:
- C - C# (alternate keys)
- MONO
- DOUBLE CUSP
- CUSP
- DOUBLE WING
-
WING
-
FROM and TO: they select the limits of the area, set in outputs, within which the wind-chest is to be located. The value is set as [output number-position between two outputs], bearing in mind that there are four positions between one output and the next (2-4-6-8 on the display).
A value of 40 means that the end of the range (FROM or TO) is on output [4]; a value of 82 means that the FROM or TO point is between output [8] and [9], close to [8] since it is in the first fifth of the area between output [8] and output [9]. The screen previously shown refers to a peaked wind-chest placed between output [1] and a position between outputs [4] and [5].
o [position indicator]: it consists of small rectangles located above the drawing of the wind-chest and indicates that the zone is displaying the part below the total number of outputs.
☐ [wind-chest on outputs]: in the bottom of the screen, it provides a graphic illustration of the wind-chest with the references to the outputs being used, to give an immediate picture of its position and the outputs which will carry the notes, in accordance with the wind-chest configuration.
To view the setup of another stop, simply activate the draw-stop / tab or press [EXIT] to quit the function. In both cases the set-up just created is saved automatically.
9.2 CONFIGURING THE AUDIO OUTPUTS ON THE REAR (EXT. OUT CONFIG function)
Thanks to this function, the PROGRAMMABLE OUTPUTS can be configured, so as to manage the Antiphonal signal (controlled through the AMPLIFICATION tabs), the general signal or just the reverberated signal of the instrument. Select the EXT. OUT CONFIG. field under the SET-UP menu; this pop-up message will appear:
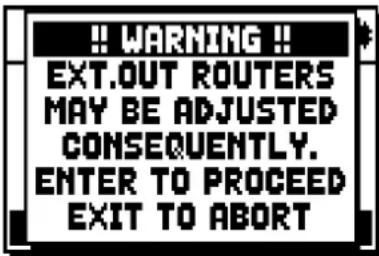
which means that the external panning (see par- 9.1) of certain stops might be modified automatically. Stops placed between outputs [2] and [3] (in organs equipped with 4 outputs), [8] and [9] (in organs equipped with 12 outputs) or between [16] and [17] (in organs equipped with 20 outputs), and/or outputs set as GENERAL or REVERB, will be automatically set as Mono on the first output of the previously configured panning. Press [EXIT] to abort the automatic panning adjustment and return to the SET-UP menu. Press [ENTER] to confirm - the display will show:
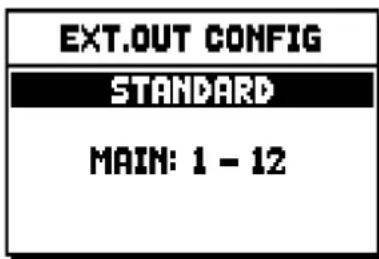
Functioning of different modes is described in the tables below.
Unico 300:
| MODE OUTPUTS 1-2 OUTPUTS 3-4 | ||
| STANDARD | As set in Ext. Router Conf. function. | As set in Ext. Router Conf. function. |
| GENERAL-REVERB | General si gnal Reverberated si gnal only | |
Unico 500 and 400:
| MODE | OUTPUTS 1-8 (or 1-16) | OUTPUTS 9-10 (or 17-18) | OUTPUTS 11-12 (or 19-20) | TAB AMPLIFICAT. [CONSOLE ON] | TAB AMPLIFICAT. [EXT. SPEAKER ON] |
| STANDARD | As set in Ext. Router Conf. function. | As set in Ext. Router Conf. function. | As set in Ext. Router Conf. function. | Internal amplification Outputs 1-12 (or 1-20) | |
| GENERAL-REVERB | As set in Ext. Router Conf. function. | General signal Reveberated signal only Outputs | 1-8 (or 1-16) Outputs 9-12 (or 17-20) | ||
| ANTIPHONAL | As set in Ext. Router Conf. function. | As set in Ext. Router Conf. function. | As set in Ext. Router Conf. function. | Outputs 1-8 (or 1-16) Outputs 9-12 (or 17-20) | |
| GENERAL-ANTIPH. | As set in Ext. Router Conf. function. | General signal | As set in Ext. Router Conf. function. | Outputs 1-8 (or 1-16) Outputs 9-12 (or 17-20) | |
| ANTIPH.-REVERB | As set in Ext. Router Conf. function. | As set in Ext. Router Conf. function. | Reverberated signal only Outputs 1-8 (or 1-16) Outputs 9-12 (or 17-20) | ||
NOTE
In the models equipped with 4 audio outputs, it is not possible to configure the registers output router in the EXTERNAL OUT ROUTER function selecting the GENERAL+REVERB outputs mode.
10. UTILITY AND MIDI FUNCTIONS (UTIL. & MIDI menu)
The UTILITY & MIDI menu, which can be recalled by selecting the field of the same name in the main video page, contains all the accessory functions and the settings relating to the organ's MIDI interface. The menu is displayed on three screens:
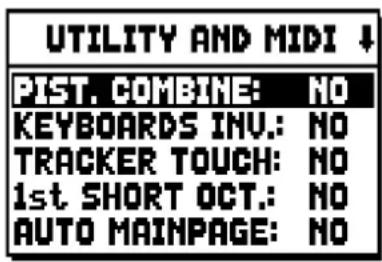
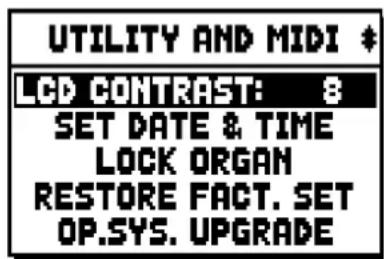
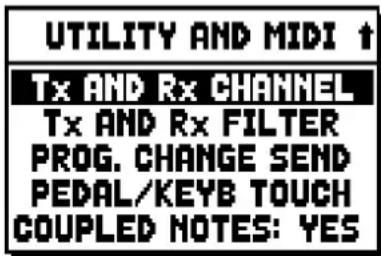
The first part contains the accessory and utility functions:
o PIST. COMBINE (Piston Combine): synchronisation of the dedicated combinations of manual II (Unico 500 and 400) or I (Unico 300) with those of the pedal board.
- KEYBOARDS INV. (Keyboards Inversion): inversion of the manuals, so that the Man.I stops are played with the second manual and vice-versa.
- TRACKER TOUCH: simulates the typical tracker touch of mechanical organs that affects the attack times. Attack time is delayed on flue pipes only, release is delayed on all stops.
- 1st SHORT OCT. (First short octave): activation of the short octave on the first octave of the manuals and pedal board.
- AUTO MAINPAGE: automatic return to the main video page if no display functions are used for 10 seconds.
oLCD CONTRAST: regulates the display contrast.
oSET DATE & TIME: date and time setting.
- LOCK ORGAN: setting of the code used to lock out the organ to prevent access to the instrument's set-up screens and the saving of combinations, the Tutti and the Crescendo.
o RESTORE FACT. SET (Restore factory settings): restores the factory settings.
o OP.SYS. UPGRADE (Operating System upgrade): operating system upgrade.
The second part of the menu relates to the MIDI interface settings:
- Tx AND Rx CHANNEL: MIDI transmission and reception channel set-up.
o Tx AND Rx FILTER: MIDI transmission and reception filter set-up. - PROG. CHANGE SEND (Program Change send): saving of the combinations and transmission of MIDI Program Change and Bank Select messages.
o PEDAL / KEYB TOUCH (Pedal / Keyboard touch): selection of the dynamic curves of the manuals for use of the Orchestra voices and the transmission of MIDI notes.
COUPLED NOTES: this control allows to select the notes to send through MIDI. Select YES to send both the notes actually played on the manuals and the ones resulting from the coupling controls. For example, by playing on the pedalboard while the coupling II/P is active, notes from the pedalboard will be transmitted both on the pedalboard MIDI Channel AND on the Manb.II MIDI Channel. Select NO to send only the notes physically played (in this example, notes will be transmitted only on the pedalboard channel).
11. FILE MANAGEMENT FUNCTIONS (FILE MANAG. menu)
The Unico series of organs is able to use two different types of mass memory: the internal memory, and a data storage device for connection to the [USB] slot underneath the manuals (USB pen).
These data storage units are used to save the organ's set-up or parts of it, pieces of music and lists of pieces. If the USB stick is connected, the system will use it as the mass memory. However, the internal memory can still be used for copying files (from and to the USB pen), but it is not possible to load, delete and rename files saved on the internal memory: the USB stick has to be removed before this can be done.
Selecting the FILE MANAGEMENT field in the main screen accesses the relative menu containing all the file management functions. There is also a screen which provides information about the firmware versions installed on the organ.
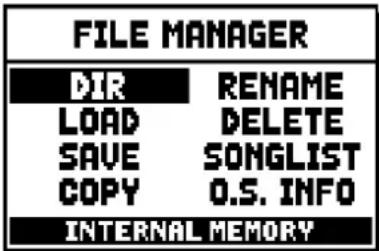
As the video page shows, the bottom of the screen identifies the memory unit currently in use:
- INTERNAL MEMORY
- USB STICK DRIVE
The functions available are as follows:
oDIR: displays the contents of the mass memory
oLOAD: file loading
o SAVE: saving of the set-up of the organ or parts of it in the mass memory.
o COPY: for copying files from one memory unit (e.g. internal) to another.
oRENAME: file rename.
oDELETE: file deletion.
oSONGLIST: programming of a list of pieces.
o O.S. INFO: display of the firmware versions installed in the system.
NOTES
- Once the USB pen is inserted please wait some seconds before displaying the FILE MANAGEMENT menu.
- When using a computer to rename files stored on the USB pen, remember that names can only contain numbers and letters, which must all be lowercase.
- Always use USB pens formatted with FAT or FAT32 file system (no NTFS).
12. PLAYING and RECORDING OF MUSICAL SEQUENCES (SEQUENCER)
The Unico organ is equipped with an internal sequencer (digital recorder) capable of recording performances on the instrument, and the commands and controls used. Recordings can then be saved on the USB stick or in the internal memory as MIDI files and played back at any time.
To recall the sequencer press the [SEQUENC.] button beside the display. The screen for selection of the system's three operating modes is displayed:
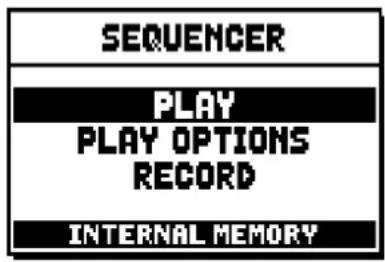
o PLAY: playback of the performances saved in the internal memory or the USB pen.
oPLAY OPTIONS: options for playing back pieces
oRECORD: recording of pieces of music
The memory unit currently used appears in the bottom of the screen. Remember that the USB stick has priority over the internal memory; to use the latter, first remove the USB device.
NOTE:
- Once the USB pen is inserted please wait some seconds before recalling the sequencer.
- Transposition set in the TUNING menu does not have any effect on playback of pieces (unlike recording, where the notes are acquired transposed). To do this you have to set the transposer described on par. 12.3.
12.1 PLAYING BACK A PIECE (PLAY mode)
In the sequencer mode selection screen described above, select the PLAY field. The display shows the MIDI files stored in the memory unit currently in use:
![1 [15] PLAY ↓ 001_BACH.MID 002_INDUL.MID 003_NUNLOB.MID 004_NUNFREUT.MID USB PEN DRIVE](/content/2026/04/723651/images/25b6fd81a009b3ec9eeea6dffd118f7bb2eb71e84e6e4d95a5b0fff9c031bdf5.jpg)
Now select the MIDI file you wish to play back:
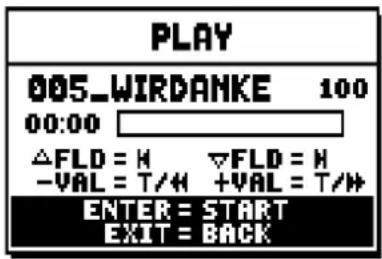
The new screen provides information about all the controls necessary for use of the sequencer:
- [ENTER]: starts playback of the piece.
-
[EXIT]: quits the sequencer function.
-
[FIELD ▲]: selects the previous piece saved in the memory or transferred to a Songlist (see point 12.4).
- [FIELD ▼]: selects the next piece saved in the memory or transferred to a Songlist (see point 12.4).
- [VALUE - ] (press once): decrease play speed (displayed on top left as percentage of the original value, 100 in the screen picture above).
- [VALUE + ] (press once): increase play speed (displayed on top left as percentage of the original value, 100 in the screen picture above).
- [VALUE - ] (press and hold): rewind.
- [VALUE +] (press and hold): fast forward.
Once playback of a song has been started, the display changes to:
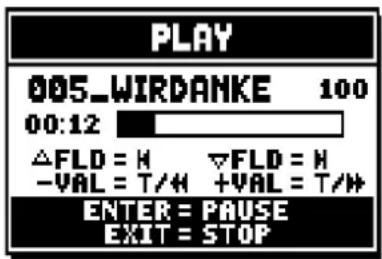
as the screen shows, the functions of the [ENTER] and [EXIT] buttons have changed to:
- [ENTER]: pause /restart playback of the piece.
- [EXIT]: stop playback of the piece.
[FIELD ▲], [FIELD ▼], [VALUE -], [VALUE +] keep the functions already described.
12.2 RECORDING A PIECE (RECORD mode)
In the sequencer mode video page, select the RECORD field. The display will show:
![[13] RECORD [ NEW SONG ] 001_BACH.MID 002_INDUL.MID 003_NUNLOB.MID USB PEN DRIVE](/content/2026/04/723651/images/d08449a1915fd50582ec7e70657fa4116acba069f3842bbc76b871de2a6adea7.jpg)
select [NEW SONG] to start a new recording. Otherwise, a MIDI file can be loaded to overdub it, or in other words make a new recording which will be added to the performance already recorded.
![RECORD [ NEW SONG ] 00:00 ENTER = START EXIT = BACK](/content/2026/04/723651/images/b077325965be5e7b0683f99520ce82959c2cce4cd198c171ed4f25dacbf78068.jpg)
As in Play mode, the screen again carries information about the functions of the buttons:
- [ENTER]: starts the recording.
- [EXIT]: quits the sequencer function.
Once recording has started, the functions change to:
![RECORD [ NEW SONG ] 00:01 ENTER = PAUSE EXIT = STOP](/content/2026/04/723651/images/faa189a2f041c15cb97e8416332534da8c336f6b6f02bdd86948ebad618e5296.jpg)
- [ENTER]: pause /restart recording.
- [EXIT]: stop recording.
Press [EXIT] to end the session. The display will show the screen allowing the recording just made to be saved:
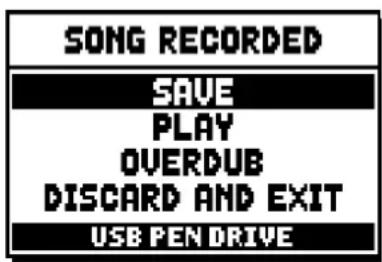
The functions displayed allow:
oSAVE: saving of the recording as a MIDI file.
oPLAY: playback of the recoding before saving it.
o OVERDUB: creation of a new recording to be added to the sequence just acquired.
o DISCARD AND EXIT: delete the recording and quit sequencer Record mode.
If the SAVE field is selected, the system prompts the user to assign a name to the MIDI sequence about to be saved:
![SAVE [ NEW SONG ] AS 000_■ .MID USB PEN DRIVE](/content/2026/04/723651/images/9ff76d4293d78566a8dd4790947f3aebfe7a9b10e4746ef709b0b58ef1259600.jpg)
When composing the name, use the [FIELD ▲] and [FIELD ▼] buttons to move the cursor and [VALUE +] and [VALUE -] to select the character. The first three characters can only be numbers, since they are required for future expansions of the instrument. To confirm the name and proceed to save the data, press the [ENTER] button; use [EXIT] to return to the previous screen, aborting the saving operation.
The following message confirms that the file has been saved:
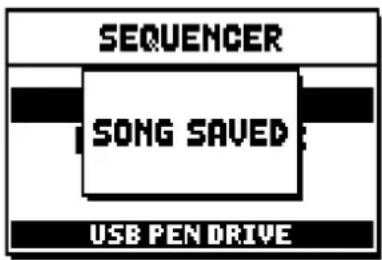
If [EXIT] is pressed from the save screen (i.e. when the recording has been acquired but not saved), the system warns that the recording is about to be lost:
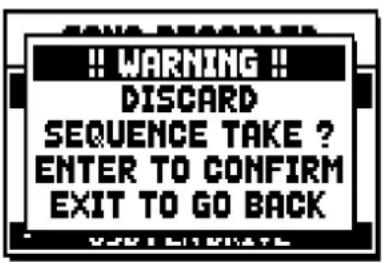
and that [ENTER] must be pressed to confirm that you wish to quit and delete the data acquired, or [EXIT] to return to the save screen.
NOTE
When using a computer to rename files stored on the USB pen, remember that names can only contain numbers and letters, which must all be lowercase.
12.3 SEQUENCER PLAYBACK OPTIONS (PLAY OPTIONS menu)
Selecting the PLAY OPTIONS field in the sequence mode selection screen gives access to a number of options relating to the playback of the pieces:
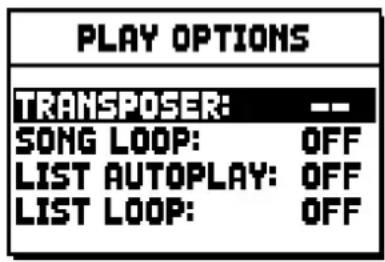
these refer to:
o TRANSPOSER: sets transposition in semitones of the pieces played by the sequencer.
o SONG LOOP: if this function is set as "YES", at the end of a piece it is played back again.
○ LIST AUTOPLAY: if this function is set as “YES”, during the use of the Songlist function, at the end of one piece the next one is automatically played with no need to press the [FIELD ▼] button.
○ LIST LOOP: if this function is set as “YES”, at the end of the last piece in a Songlist, the first piece is automatically played again.
12.4 SONGLISTS (SONGLIST function)
Songlist is the organ function used to create and save lists of pieces of music (MIDI files).
To programme a list of pieces, recall the FILE MANAGEMENT menu and select the SONGLIST function; the system asks if you wish to create a new one or modify an existing one:
![[6] SONG LIST [ NEW LIST ] 000_LIST1.LST 001_LIST2.LST 002_LIST3.LST USB PEN DRIVE](/content/2026/04/723651/images/b04484545ec223526509629b69c78b8432bbf132816ca3e48f90695a49ba4dd5.jpg)
Select the [NEW LIST] field to create a new list, or select an LST file to modify the list it contains.
In both cases, the first operation is to select the pieces you wish to include in the list:
![1 [12] SONG LIST ↓ 000_BACH 02 001_INDUL 002_NUNLOB 01 003_NUNFREU PRESS +/- TO SELECT](/content/2026/04/723651/images/1cf5c7e81a01be913a58008311e6fabd66e36e9c156158a6128d1492b32c92fc.jpg)
Use the [FIELD ▲] and [FIELD ▼] buttons to select the MIDI file, [VALUE +] to add it to the list and [VALUE -] to delete it. Its position within the list appears beside the name of the file.
Now press [ENTER] to continue the programming or [EXIT] to abort, in this case the system requests a confirm to proceed with the quit:
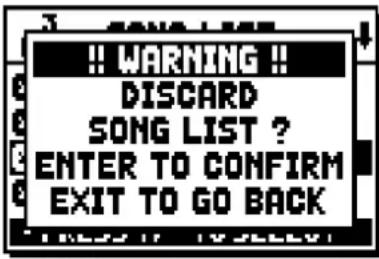
The second operation is to arrange the pieces within the list (or confirm the previous programming):
![1 [4] LIST ORDER 002_NUNLOB 01 000_BACH 02 001_INDUL 03 003_NUNFREU 04 PRESS +/- TO MOVE](/content/2026/04/723651/images/74c832844834d9bd21996a90d9aad601aca333483a058f8f3fbb572d2d020c97.jpg)
To move a piece into a different position, locate the cursor on the relative field of the file with the [FIELD ▲] and [FIELD ▼] buttons and use [VALUE +] to move the position forward or [VALUE -] to set an earlier position.
Finally, press [ENTER] to save the list or [EXIT] to return to the previous video page.
![SAVE [ NEW LIST ] AS 005_■ .LST USB PEN DRIVE](/content/2026/04/723651/images/3a79938096454d11e46a5f89ebe2ffc3f78a50903570497bcb255ff2c31da106.jpg)
As for MIDI files, the first three characters can only be numbers.
To enter the name, use the [[FIELD ▲] and [FIELD ▼] buttons to move the cursor and [VALUE +] and [VALUE -] to select the character.
Press [ENTER] to confirm the name and go ahead with the saving operation, or [EXIT] to return to the previous video page.
NOTE
When using a computer to rename files stored on the USB pen, remember that names can only contain numbers and letters, which must all be lowercase.
13. APPENDIX
13.1 STOP LOCAL OFF
Setting a stop in Local Off mode means that it will not be played by the organ's internal sound generation system, but the relative MIDI (System Exclusive code) message will be transmitted, so that it can be turned on and played on a connected instrument.
To set a stop in Local Off mode, while the main screen is on the display, press the [S] (Set) piston, keep it pressed and also press the [C] (Cancel) button. The LEDs of all the stops will light up and the display will show the video page:
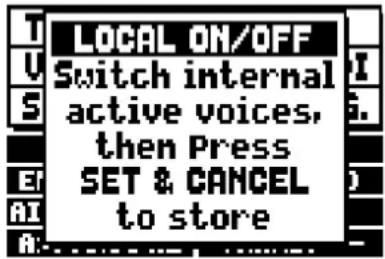
To set a voice in Local Off mode, operate its draw-stop or rocker switch so that its light goes out. After setting the setup required, press [S] and [C] together to save it.
Accessing the Local Off setting function after this will trigger display of the status of the stops as follows:
- Light on: stop in Local On mode (plays with internal generation)
- Light off: stop in Local Off status
13.2 FACTORY SETTINGS
The Factory Setting procedure allows restoration of the factory settings of all the instrument's internal functions, deleting all the changes made by the user.
The Unico organ also allows the user to choose which settings are to be returned to the default values.
To recall this function, select the RESTORE FACT. SET display field in the second page of the UTILITY&MIDI menu:
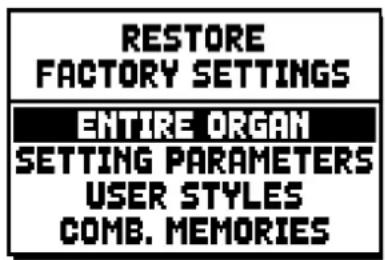
The following can be initialised:
- ENTIRE ORGAN: all the organ's settings and functions (TUNING, SET-UP and UTILITY & MIDI menus, the four User Styles, all the general and divisional combinations, Tutti and Crescendo and stop Local Off status).
o SETTING PARAMETERS: TUNING, SET-UP and UTILITY & MIDI menu settings.
oUSER STYLE: the 4 User Styles
o COMB. MEMORIES: all the general and divisional combinations, Tutti and Crescendo.
After the required Factory Setting is selected by pressing [ENTER], the display shows a warning screen indicating what is being restored to the default values:

Press [ENTER] again to start the procedure, during which the “PERFORMING” message is displayed after which will display “ACCOMPLISHED”. Press [EXIT] to quit the operation.
The operating system of the Unico organs can be easily and quickly updated. You just need to copy the install file(s) on an USB drive and plug it in the appropriate connector, under the keyboards, then recall the OP.SYS UPGRADE function of the UTIL. & MIDI menu.
In order to get the necessary files and all the information about the operating system upgrade, please visit the “Download” section of our official Physis website, at the address: http://www.physisorgans.com/download.asp

Disposal of old Electrical & Electronic Equipment (Applicable throughout the European Union and other European countries with separate collection programs)
Dir. 2002/95/CE, 2002/96/CE e 2003/108/CE
This symbol, found on your product or on its packaging, indicates that this product should not be treated as household waste when you wish to dispose of it. Instead, it should be handed overt to an applicable collection point for the recycling of electrical and electronic equipment. By ensuring this product is disposed of correctly, you will help prevent potential negative consequences to the environment
and human health, which could otherwise be caused by inappropriate disposal of this product. The recycling of materials will help to conserve natural resources. For more detailed information about the recycling of this product, please contact your local city office, waste disposal service or the retail store where you purchased this product.

This product complies with the requirements of EMCD 2004/108/EC and LVD 2006/95/EC.
CAUTION
This product contains a lithium battery.
Danger of explosion if battery is incorrectly replaced.
Replace only with the same or equivalent type.
The batteries shall not be exposed to excessive heat such as sunshine, fire or the like.
The battery must be replaced by qualified personnel only.
AVIS IMPORTANT!

flowchart
graph TD
    A["The upper termination of pipe filters the right amount of harmonics"] --> B["The acoustic waves move independently on the wave guide"]
    B --> C["The regressive wave is reflected from the lower termination and is sum to the air flow effect"]
    C --> D["The regressive wave stimulates the air flow oscillation with a non linear law, and the effect is sum to the direct wave with a delay equal to the propagation time of the air flow"]
    D --> E["The air flow effect is a parameter of the supply pressure, that has an ADSR alike curve"]
    E --> F["+"]
    F --> G["→"]
    G --> H["↓"]
    H --> I["→"]
    I --> J["→"]
    J --> K["→"]
    K --> L["→"]
    L --> M["→"]
    M --> N["→"]
    N --> O["→"]
    O --> P["→"]
    P --> Q["→"]
    Q --> R["→"]
    R --> S["→"]
    S --> T["→"]
    T --> U["→"]
    U --> V["→"]
    V --> W["→"]
    W --> X["→"]
    X --> Y["→"]
    Y --> Z["→"]
    Z --> A
UNICO 400
UNICO 300
- Section PEDALE (Unico 500 et 400) ou PEDAL (Unico 300).
Unico 300
Viscount International S.p.A.
Via Borgo, 68 / 70 - 47836 Mondaino (RN), ITALY
Tel: +39-0541-981700 Fax: +39-0541-981052
Website: www.viscount.it - www.physisorgans.com
- ATTENZIONE: LEGGERE ATTENTAMENTE!
- WARNING
- AVIS
- UNICO 400
- UNICO 300
- Sezione PEDALE.
- IMPORTANT SAFETY INSTRUCTIONS
- WARNING:
- "INSTRUCTIONS PERTAINING TO A RISK OF FIRE, ELECTRIC SHOCK OR INJURY TO PERSONS"
- INDEX
- IMPORTANT NOTES
- LOOKING AFTER THE PRODUCT
- NOTES ABOUT THE MANUAL
- INTRODUCTION
- Dear Customer,
- GENERAL DESCRIPTION
- PEDAL Section.
- MAN.II Section.
- MAN.III Section.
- MAN.I Section.
- Lighting button.
- POWER Switch.
- AMPLIFICATION Section.
- CANCEL Section.
- MIDI Section
- Control and programming section.
- ORCHESTRA Section.
- Additional displays.
- General pistons.
- Pedal Board pistons.
- Manual III pistons.
- Manual II pistons.
- Manual I pistons.
- [S] Piston.
- NOTE
- Organ general controls.
- Front connections panel.
- Cover lock.
- Coupler toe-studs.
- [CRESCENDO] sweller.
- Swell expression pedals.
- Reversible toe-studs.
- Rear connections.
- WARNING!
- SWITCHING ON and MAIN VIDEO PAGE
- SETTING THE VOLUMES (VOLUMES function)
- TUNING THE INSTRUMENT (TUNING menu)
- THE ORGAN STYLES (STYLES menu)
- SELECTING AND REGULATING THE VOICES (VOICES menu)
- NOTES:
- REGULATING THE VOLUME (VOLUME LEVEL function)
- REGULATING THE AUDIO PARAMETERS (EDIT PARAMETERS function)
- SELECTING THE ALTERNATIVE VOICES (ALTERNATIVE VOICE function)
- NOTE:
- INSTRUMENT GENERAL SETTINGS (SET-UP menu)
- SETTING THE ROUTING OF THE VOICES ON THE REAR AUDIO OUTPUTS (EXT. OUT ROUTER function)
- CONFIGURING THE AUDIO OUTPUTS ON THE REAR (EXT. OUT CONFIG function)
- UTILITY AND MIDI FUNCTIONS (UTIL. & MIDI menu)
- FILE MANAGEMENT FUNCTIONS (FILE MANAG. menu)
- NOTES
- PLAYING and RECORDING OF MUSICAL SEQUENCES (SEQUENCER)
- PLAYING BACK A PIECE (PLAY mode)
- RECORDING A PIECE (RECORD mode)
- SEQUENCER PLAYBACK OPTIONS (PLAY OPTIONS menu)
- SONGLISTS (SONGLIST function)
- APPENDIX
- STOP LOCAL OFF
- FACTORY SETTINGS
- CAUTION
- AVIS IMPORTANT!
Brand : Viscount
Model : Unico 300
Category : Electronic organ