
NovoScan Super 8 Normal 8 - To scan BRAUN - Free user manual and instructions
Find the device manual for free NovoScan Super 8 Normal 8 BRAUN in PDF.

| Product type | Film scanner |
| Brand | Braun |
| Model | NovoScan Super 8 Normal 8 |
| Use | Conversion of 8 mm and Super 8 films to digital videos |
| Compatible film type | 8 mm and Super 8 (3 or 5 inch reels) |
| Sensor | 3.53 megapixel CMOS |
| Recording resolution | 1440 x 1080P |
| Output format | MP4 |
| Frame rate | 20 fps |
| Display | 2.4-inch color TFT |
| Exposure control | Automatic/Manual (-2.0 to 2.0) |
| White balance | Automatic |
| External memory | SD/SDHC card max 32 GB (not included) |
| Power supply | 12 V DC (power adapter included) |
| Interface | USB 2.0 |
| TV output | NTSC/PAL (cable included) |
| Dimensions (L x W x H) | 269 x 166 x 114 mm |
| Weight | 1410 g |
| Available languages | English, French, Spanish, German, Italian |
| Package contents | Scanner, power adapter, USB cable, TV cable, 5-inch reel, reel adapter, cleaning cloth, user manual |
| Maintenance | Clean the light table with the included cloth; clean the film before use |
| Safety | For private use only |
| Compatible operating systems | Windows, Mac, Linux |
Frequently Asked Questions - NovoScan Super 8 Normal 8 BRAUN
User questions about NovoScan Super 8 Normal 8 BRAUN
0 question about this device. Answer the ones you know or ask your own.
Ask a new question about this device
Download the instructions for your To scan in PDF format for free! Find your manual NovoScan Super 8 Normal 8 - BRAUN and take your electronic device back in hand. On this page are published all the documents necessary for the use of your device. NovoScan Super 8 Normal 8 by BRAUN.
USER MANUAL NovoScan Super 8 Normal 8 BRAUN
natural_image
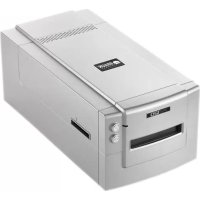
Exterior view of a Braun film camera with two reels and a digital screen displaying a photo (no text or symbols on main body)NovoScan Super 8 - Normal 8
User's Manual
Version 1.0
Table of Contents
Introduction....1
Product Features....1
Please Note 1
Package Contents....2
Film Type 2
Function of Buttons 2
Getting Started 3
Preparing the Film .... 3
-
Attach Power Cord .... 3
-
Insert SD/SDHC Memory Card (Max. 32 GB)....3
-
Turn on/off the Film Scanner 4
-
Clean the Light Table....4
-
Mount the Reels and Film .... 4
-
Menu Selections .... 5
Record....6
Playback....6
Rewind....7
Exposure 7
Sharpness....8
USB 8
Frame Adjust....8
Language....8
Format 8
Connect to a TV set....9
Specifications....9
Introduction
It has never been easier to digitize and save your old film treasures:
Just select between 8mm and Super 8, load the film into the scanner and start it.
The film is scanned frame by frame at a rate of about two images per second and is written as MP4 video in HD quality directly onto SD card.
No computer is needed! The digitized film can later be displayed on any kind of smartphone, tablet or PCs. BRAUN NovoScan Super 8 – Normal 8 can also be connected directly to a TV to playback your digitized . You can also edit, upload movie files to the internet or burn them to DVD's.
Product Features
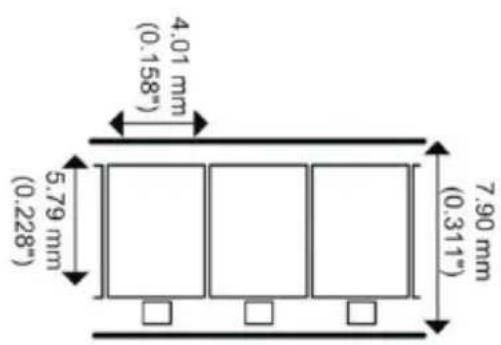
- Film Type: Super 8 and 8mm – max. reel size 5 inch (12,7 cm)
• Image Sensor: 3.53 Megapixels (2304 x 1536) 1/3" CMOS
• Output Resolution: 1440 x 1080 p @ 20fps (MP4) - Image Area: adjustable in x-, y- and z-axis
- Exposure Control: Auto/Manual (-2.0 to 2.0)
- Scanning Speed: 2 frames per second - ca. 30 minutes for a reel of 15 m
- External Memory: SD/SDHC cards with up to 32 GB (not included)
• Display: 2,4 inch (6,1 cm) LCD - Light Source: LED
• PC Interface: USB 2.0 (for data transfer) - TV-Out: NTSC/PAL
Please Note
This device is intended for domestic use only and is not suitable for commercial applications.
Do not record or rewind films in bad condition, like damaged perforation, misaligned or overlapping splices or showing damages, dirt or wear debries.
Package Contents
- BRAUN Film Scanner (1x)
- Power Adapter 12V DC (1x)
- USB Cable (1x)
- TV-Out Cable (1x)
- 5" Reel (1x)
- Reel Adapters (2x)
- Cleaning Cloth (1x)
- User's Manual (1x)

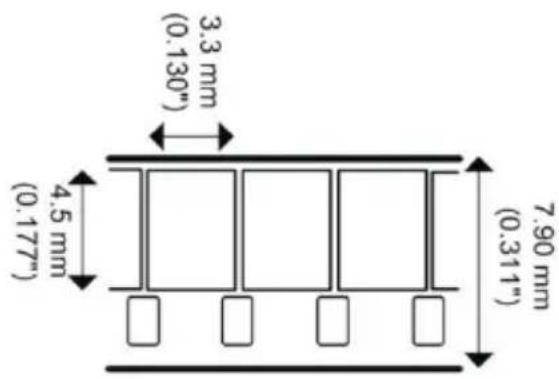
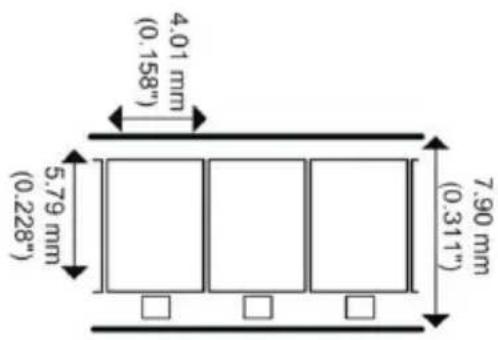
Reel Adapter 8 mm to 13 mm
Film Type
8 mm Super 8
Function of Buttons
- Power button: To turn power on or off. ⏻
- Up or Down arrow buttons: To highlight Menu item on LCD viewer.
- Enter/Start/Stop button: To Start/Stop highlighted item.
- Menu button: To go back to Menu selection; Press twice to go to Menu mode or record mode.
Getting Started
Preparing the Film
If your film is not in good condition (broken, damaged perforation, misaligned, taped overlaps, bent, thick splices etc.), please check and fix the problem first.
Before recording, it is good practice to use a lint-free cloth and/or anti-static film cleaner to remove dirt particles, clean any processing chemical residues, and to remove any debries on the film in order to prevent them showing up on recorded videos.
1. Attach Power Cord
Plug in the included DC 12V power adapter.
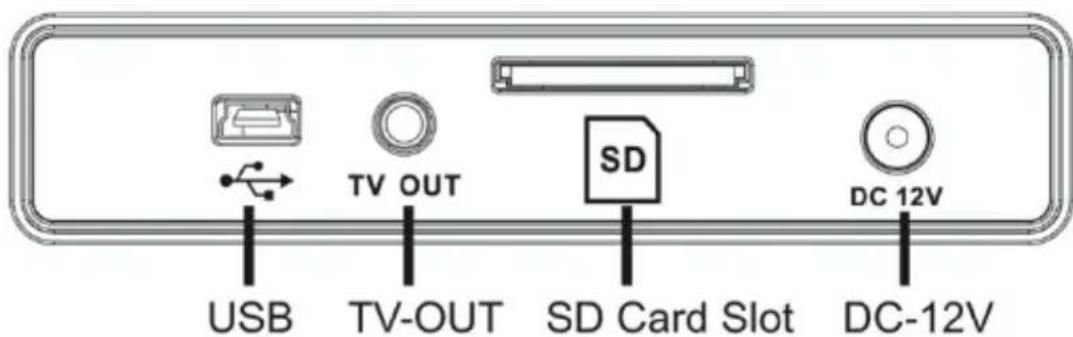
2. Insert SD/SDHC Memory Card (Max. 32 GB)
Insert the SD/SDHC memory card before powering on the Film Scanner device.
- Using a MicroSD card with an adapter, or SDXC card (64GB), which is not compatible with the Film Scanner will lead to a "Card error" message appearing on the screen. The Film Scanner can only take a SD/ SDHC memory card of up to a maximum capacity of 32 GB.
• Make sure the SD/SDHC card is unlocked (white tab in forward position). - Insert and push the SD/SDHC card inward until it clicks. Improper insertion may damage the card reader or the SD/SDHC Card, which neither is covered under warranty.
3. Turn on/off the Film Scanner
Press the power button to turn the Film Scanner on/off.
4. Clean the Light Table
Push the film door tab left to flip open the door. Use the included cloth, a brush or compressed air to clean the light table.
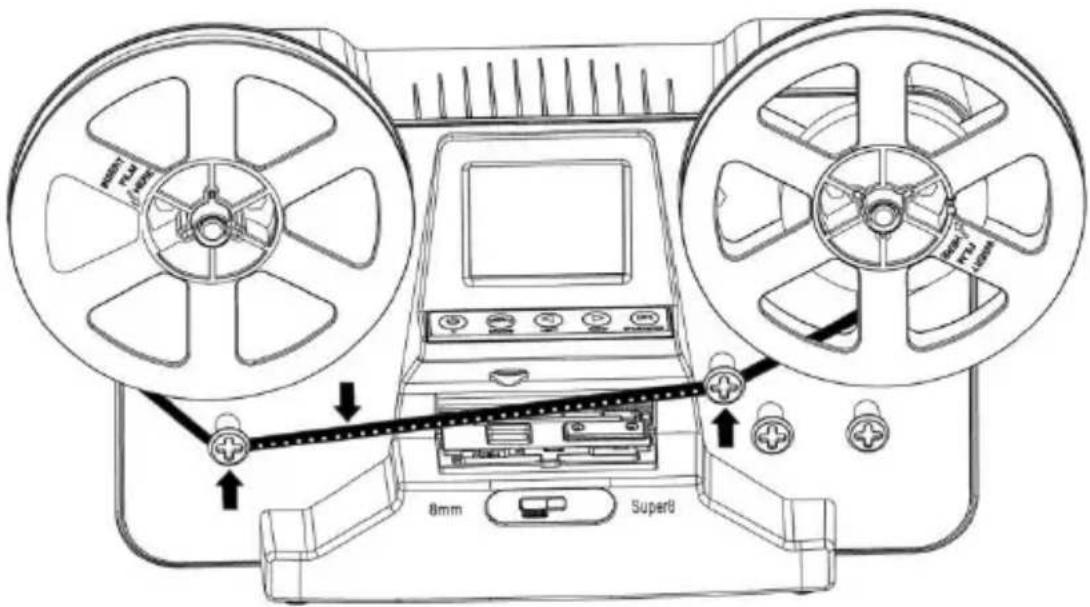
5. Mount the Reels and Film
a. If your film reel has a 8 mm (small) mounting hole, mount the reel directly to the shaft, otherwise use the provided reel adapter.
b. Mount the included 5" reel onto the right shaft.
c. Follow the film routing diagram printed on the face of the scanner to route the film.
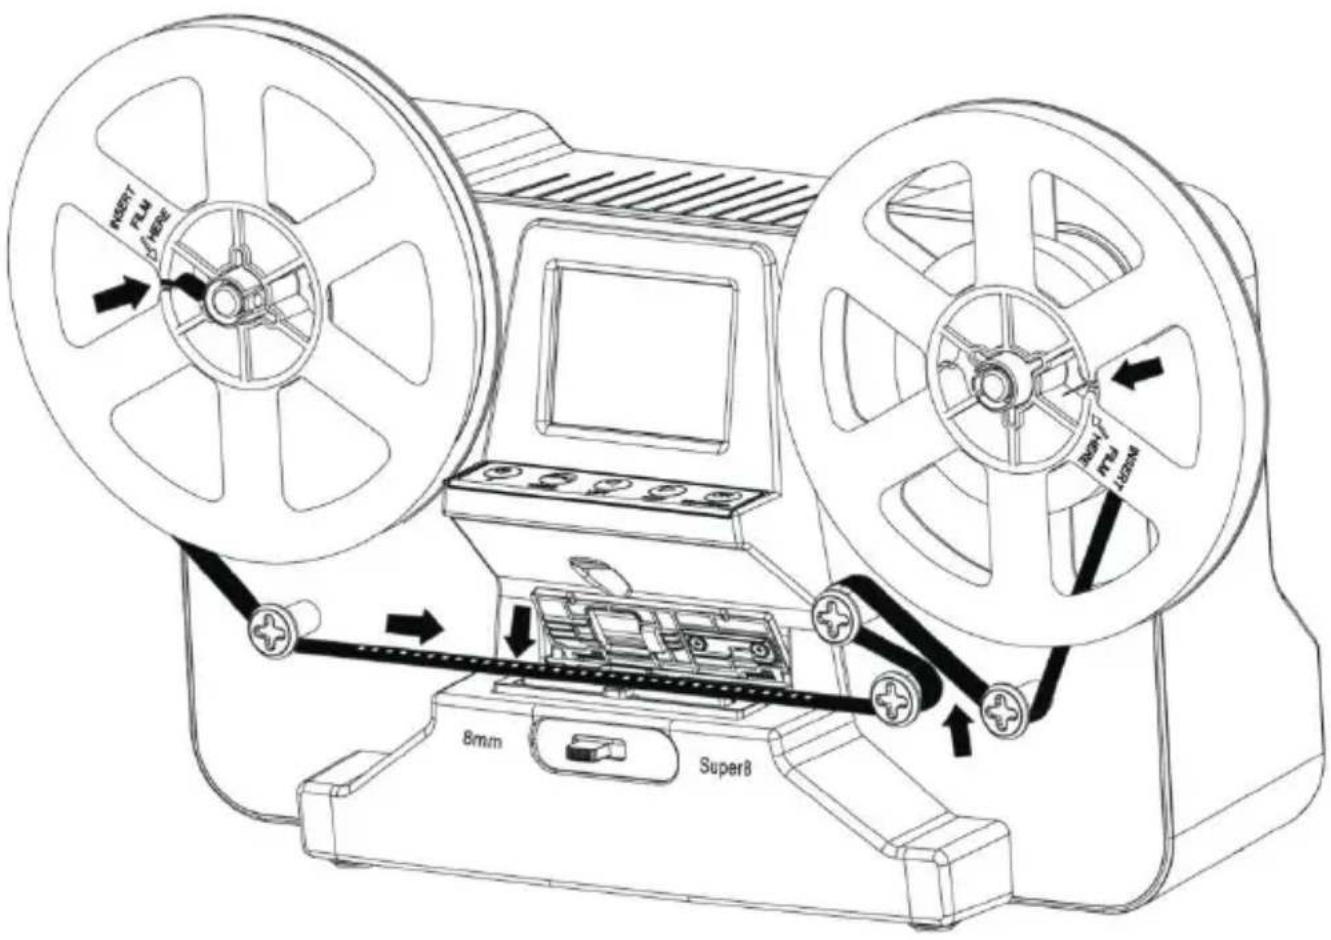
d. Push open the flap door, place film perforation holes at the top but under the two white tabs.
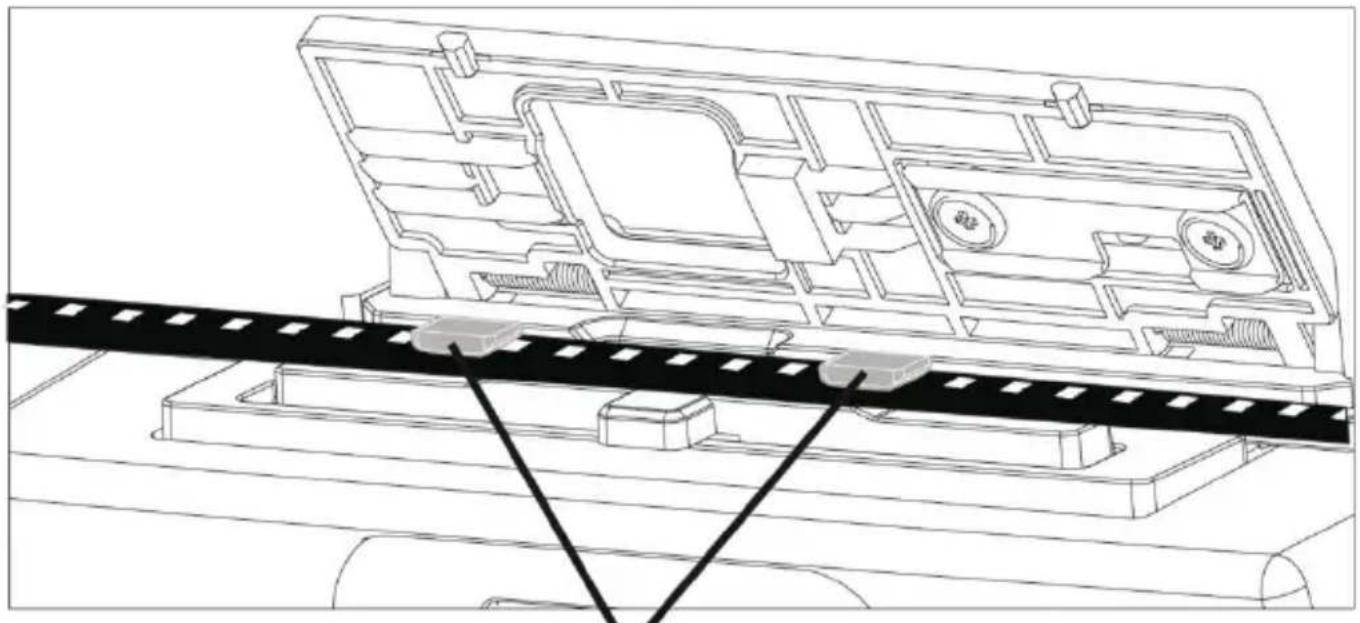
natural_image
Technical line drawing of a mechanical assembly with a conveyor belt and mounting bracket (no text or symbols)2 white taps
e. Close the film flap door after the film has been properly placed.
f. Select film type by pushing the film type lever to either the left or right.

6. Menu Selections
Use the Up or Down arrow buttons to highlight the Menu selection and then press Enter.

1st page 2nd page 3rd page 4th page
Record
- Move the film type lever left (8 mm) or right (Super 8) to select the film type then press the Enter/Start button.
- Press Enter/Start to start recording. While recording is in process, a red dot on the upper left corner will blink.
- The film scanner will stop recording 2 seconds after the user presses the Enter/Stop button.
- The frame counter at the lower right corner will increase by one for every scanned frame.
Note:
Adjustments for Exposure, Sharpness, Frame adjustment are available - please make adjustments before recording.
Playback
- Press the Menu button, highlight the Playback selection, then press Enter.
- Press the Up/Down arrow button to select the file to Playback, then press Enter/Start.
- Press Enter/Stop to pause the playback.
- Press the Menu button once to the enter Edit mode. Highlight Return (go back to Playback) or Delete (delete the current file).
- Press the Menu button twice to go back to Record mode or the Main menu.
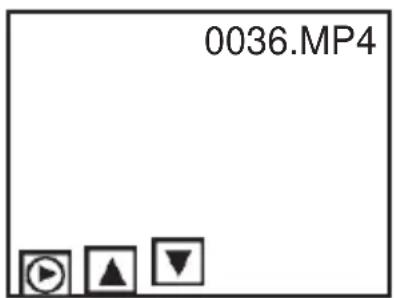
Note: Mac computers will create and add hidden files to SD/SDHC memory card each time the user playbacks the recorded MP4 movie files on the Mac. The hidden or modified MP4 files stored on the SD/SDHC memory card can no longer be played back on the Film Scanner. A "No File" message will be displayed on the Viewer instead.
Rewind
- Open the flap door and remove film, then close the flap door.
- Swap reels. Place an empty reel on the right shaft and place film perforation holes on the outside.
- Follow the instructions on the screen.
- Press the Enter button to Start/Stop the rewinding process.
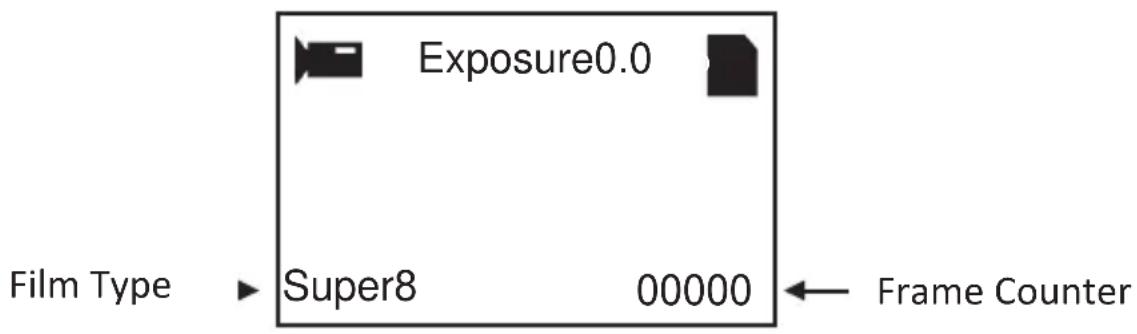
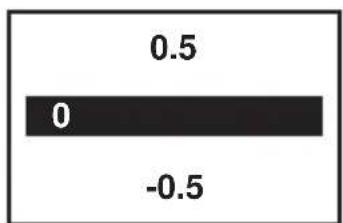
Exposure
- Exposure range is from 2.0 to -2.0.
- Press Up/Down to change the value and press Enter to complete the change selection.
- The default setting is 0.0. Negative values provide a darker effect and
an Exposure of 2.0 gives the brightest result. - Adjust the required Exposure before recording.
bar
| Value | |---| | 0.5 | | 0 | | -0.5 |Sharpness
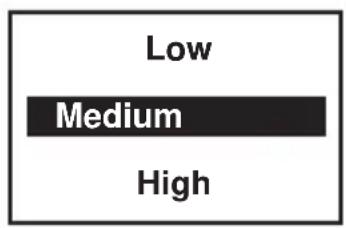
- Sharpness range is from Low to High. The default setting is Medium.
- Press Up/Down to change the value and press Enter to complete the change selection.
- Adjust the required Sharpness before recording.
EN
USB
Plug in the included USB cable to upload the recorded MP4 files. The SD/SDHC memory card is read as an External Drive, called NO_NAME drive. The stored MP4 files are located under the directory of FilmScanner/MOVIE.
Frame Adjust
You can make adjustments for the Movie Register (the film centre X and Y). It needs to be adjusted before recording if the default setting is off.
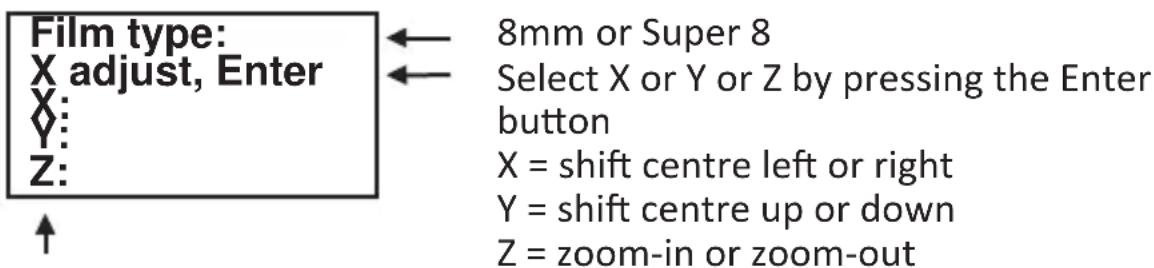
Adjust the values of X, Y, Z by pressing the Up or Down buttons
Language
English, German, French, Spanish, Italian and Dutch are available on the film scanner.
Format
Highlight Yes or No to format your SD card. This will erase all files on the inserted SD/SDHC memory card.
Connect to a TV set
You can use your TV screen as the default screen.
- Turn on the scanner and your TV.
- Set TV input to A (or TV, TV) mode.
- Connect the film scanner "TV OUT" port to your TV's Video-In port (yellow) with the included TV-Out cable.
- The LCD screen on the scanner will turn dark and the display will be on your TV instead.
Specifications
Image sensor: 3.53 Megapixels (2304H x 1536V) 1/3" CMOS sensor
Display: Colour 2.4" TFT LCD
Exposure control: Auto/Manual (-2.0 to 2.0)
White Balance: Auto
Resolution: 1440 x 1080 p
Playback frame rate: 20 frames per second
Film type: 8 mm and Super 8 film in 3" or 5" reel
File format: MP4 (AVC)
TV-out type: NTSC/PAL
External memory: SD/SDHC memory cards up to 32 GB (Max.)*supported
Power Supply: DC 12V
Interface: USB 2.0
Languages: English, German, French, Spanish, Italian and Dutch
Dimensions: (L/W/H): 269 x 166 x 114 mm/10.6 x 6.5 x 4.5inch
Weight: 1410 g/3.1 lb
Note:
*Each 50 ft film takes about 125 MB of memory and about 30 minutes to record.
Inhaltsverzeichnis
Einleitung .... 1
Produktmerkmale 1
Bitte beachten 1
Lieferumfang....2
Filmtyp 2
8 mm Super 8
Tastenfunktionen
natural_image
Technical line drawing of a mechanical assembly with a conveyor belt and mounting bracket (no text or symbols)weiße Laschen
6. Menüauswahl
Belichtung
8mm oder SP8 (Super 8)
8 mm Super 8
natural_image
Technical line drawing of a mechanical assembly with a conveyor belt and mounting bracket (no text or symbols)^e page
Enregistrement
FR
Exposition
8 mm Super 8
natural_image
Technical line drawing of a mechanical assembly with a conveyor belt and component layout (no text or symbols)6. Scelte del menu
Esposizione
Tipo TV-OUT: NTSC/PAL
8 mm Súper 8
natural_image
Technical line drawing of a mechanical assembly with no visible text or symbolsExposición

Spoeladapter
8 mm / 13 mm
Filmtype
8 mm Super 8
Toetsfuncties
natural_image
Technical line drawing of a mechanical assembly with a central component and a belt system (no text or symbols)6. Menuselecties
Belichting
Type TV-UIT: NTSC/PAL
natural_image
Abstract red curved shape with white outline (no text or symbols)BRAUN®

- NovoScan Super 8 - Normal 8
- User's Manual
- Table of Contents
- Introduction
- Product Features
- Please Note
- Package Contents
- Film Type
- mm Super 8
- Function of Buttons
- Getting Started
- Preparing the Film
- Attach Power Cord
- Insert SD/SDHC Memory Card (Max. 32 GB)
- Turn on/off the Film Scanner
- Clean the Light Table
- Mount the Reels and Film
- Menu Selections
- Record
- Note:
- Playback
- Rewind
- Exposure
- Sharpness
- USB
- Frame Adjust
- Language
- Format
- Connect to a TV set
- Specifications
- Inhaltsverzeichnis
- Tastenfunktionen
- Menüauswahl
- Belichtung
- Enregistrement
- Exposition
- Scelte del menu
- Esposizione
- mm Súper 8
- Exposición
- Filmtype
- Toetsfuncties
- Menuselecties
- Belichting
- BRAUN®
Brand : BRAUN
Model : NovoScan Super 8 Normal 8
Category : To scan