Moments Rapid - Saucepan TAURUS - Free user manual and instructions
Find the device manual for free Moments Rapid TAURUS in PDF.
| Product type | Pressure cooker (pressure saucepan) |
| Brand | Taurus |
| Model | Moments Rapid |
| Material | Stainless steel |
| Capacity | 4 L or 6 L depending on version |
| Compatibility | Gas, electric, vitroceramic, induction |
| Working pressure | 60 kPa (low) and 100 kPa (high) |
| Functions | Pressure cooking, steam cooking |
| Safety | Pressure regulating valve, safety valve, safety lock |
| Sealing gasket | Silicone, removable, annual replacement recommended |
| Cleaning | Hand wash with hot water, do not put in dishwasher |
| Maintenance | Regularly clean valves and air outlet tube |
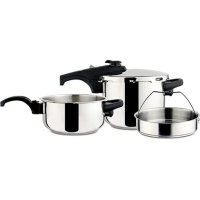
| Included accessories | Steam cooking basket (depending on model) |
| Handles | Side handles (body handles) and lid handle |
| Base | Reinforced double metal diffuser |
| Maximum filling capacity | 2/3 for non-expanding foods, 1/3 for expanding foods |
| Usage | Household |
| Standards | Compliant with Directive 2014/68/EU |
| Warranty | According to current legislation, TAURUS after-sales service |
Frequently Asked Questions - Moments Rapid TAURUS
User questions about Moments Rapid TAURUS
0 question about this device. Answer the ones you know or ask your own.
Ask a new question about this device
Download the instructions for your Saucepan in PDF format for free! Find your manual Moments Rapid - TAURUS and take your electronic device back in hand. On this page are published all the documents necessary for the use of your device. Moments Rapid by TAURUS.
USER MANUAL Moments Rapid TAURUS
Many thanks for choosing to purchase a TAURUS brand product.
Thanks to its technology, design and operation and the fact that it exceeds the strictest quality standards, a fully satisfactory use and long product life can be assured.
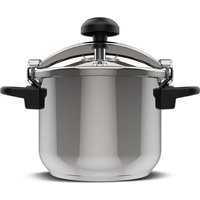
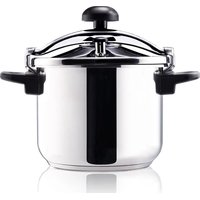
DESCRIPTION
A Lid handle
B Closure
C Safety valve
D Pressure release selector valve
E Lid
F Safety grille
G Sealing joint
H Body handgrip
Flame protection
J Body
K Double reinforced metal diffusing bottom
L Body handle
M Steam cooking basket *
(*) Only available in the model 4+6L
SAFETY ADVICE AND WARNINGS
- Read these instructions carefully before switching on the appliance and keep them for future reference. Failure to follow and observe these instructions may result in an accident.
- Clean all the parts of the product that will be in contact with food, as indicated in the cleaning section, before use.
- Before each use, make sure that the pressure release selector valve, safety valve, sealing ring, lid anti-blockage capsule and body are completely clean and free of dirt.
- This appliance can be used by people with reduced physical, sensory or mental capabilities or lack of experience and knowledge if they have been given supervision or instruction concerning use of the appliance in a safe way and understand the hazards involved.
-
This appliance is not a toy. Children should be supervised to ensure that they do not play with the appliance.
-
Do not direct the safety grille towards the user or anywhere people may pass by.
USE OR WORKING ENVIRONMENT:
- Do not place the appliance in an oven cavity or similar.
- Keep children and bystanders away when using this appliance.
- Place the appliance on a flat and stable heat source with a suitable diameter according to the appliance bottom's thermal diffuser. If case that a gas heat source was used, make sure the flame does not protrude from the appliance's bottom heat diffuser (Fig. 1).
- Do not cover the appliance with objects that may interfere the proper operation of the security valve/s.
PERSONAL SAFETY:
- Do not touch metal parts or the body when it is operating, as it may cause serious burns.
USE AND CARE
- Do not move the appliance while in use.
- Do not touch the hot surface of the cooker. Instead use the cooker's handgrips and handles. Use gloves if necessary. Position the cooker slowly and carefully and avoid knocks, jerking and spills.
- Use the appliance handle/s, to catch it or move it.
- Do not use the appliance if it is tipped up and do not turn it over.
- Do not use the appliance without water.
- Lack of water will cause serious damage to the cooker; therefore, avoid total evaporation of the liquids it contains.
- Do not use the appliance for frying food.
- Respect the MAX and MIN levels (Fig. 2A).
- CAUTION: Boiling liquids could overflow from the receptacle if it is over filled.
- This appliance is for household use only, not professional or industrial use.
- Do not put the appliance away if it is still hot.
- Do not open the lid while the liquid contained inside the recipient is boiling.
- Do not force the pressure cooker to open it. Before opening the cooker, check that the internal pressure has completely disappeared.
- Do not manipulate the safety systems except during the maintenance procedure indicated in this manual.
- Only use original spare parts of the particular model. It is especially necessary to use the
body and lid of the same manufacturer and check that they are compatible.
- Only use the heat sources permitted in this instruction manual.
- When cooking meat with skin (e.g., ox tongue), which may swell with the pressure, do not prick the skin while it is swollen. You may suffer burns.
WARNING
-
The pressure cooker generates internal pressure and the liquids it contains have a boiling point of below 120^ . After boiling, especially when the pressure is reduced rapidly, a large amount of steam and liquid will be generated.
-
Water condensation may appear on the surfaces and objects around this appliance.
- Do not cook apple jam, maize, pulses, algae, oat flakes or other foods which expand, in order to avoid blocking the air outlet.
- Do not boil soda water directly. Do not use an excessive amount of oil or wine.
- Do not use the pressure cooker to roast or fry foods under pressure.
- Do not open the lid of the cooker when it is under pressure. Before using it, make sure that the pressure cooker is correctly closed for heating.
- Liquids that are salted, alkaline or which contain sugar or vinegar should not be kept in the cooker for prolonged periods. Wash and dry the cooker after use.
SERVICE
- It is recommended to replace the sealing ring once per year.
- Any misuse or failure to follow the instructions for use renders the guarantee and the manufacturer's liability null and void.
FILLING QUANTITY:
- Foods which do not expand, the filling quantity should not exceed 2/3 of the cooker's volume (Fig. 2b).
- Foods which expand, such as rice or pulses, it should not exceed 1/3 of the cooker's volume. (Fig. 2c).
PROPERTIES
- This stainless-steel pressure cooker has been designed for domestic use. The double reinforced compound metal bottom guarantees that the heat is evenly transferred. The cooker is suitable for gas, electric and
vitro-ceramic hobs and induction plates.
- The pressure cooker has a variety of safety mechanisms:
- Pressure valve: The valve can be set between 60kPa . This load valve is stable and safe.
- Safety valve: When internal pressure is generated in the pressure cooker, the locking pin rises. The red pin on the valve indicates that the cooker is under pressure. In the case of abnormal pressure or mal-functioning of the pressure release selector valve, steam is released through the safety valve. If the lid is not properly closed, pressure is not generated in the cooker and steam will be released constantly between the handles and through the safety valve. In this case, turn off the hob and close the lid correctly. Do not open the pressure cooker until the valve pin has descended.
- There are various safety mechanisms for reducing the pressure which guarantee that the pressure cooker functions properly. (Fig. 3)
- While the cooker is at low pressure, the pressure release selector valve cannot be turned to the "0" position.
| The four positions of the arrow (▶) co-respond to the following functions: |
| Position for removing the pressure rele-asse selector valve |
| Position for releasing air |
| 1 Low pressure position (60 kPa) |
| 2 High pressure position (100 kPa) |
INSTRUCTIONS FOR USE
BEFORE USE
- Read this instruction manual carefully, especially the safety recommendations.
- Before using the product for the first time, clean the parts that will come into contact with food in the manner described in the cleaning section.
- To eliminate possible odours from manufacturing, you can half-fill the cooker with water, close the lid and heat. Ten minutes after having decompressed the air in the cooker using the pressure valve, remove the cooker from the heat source.
- Once cooled and with the pressure reduced, you can remove the water and clean and dry the cooker.
FILLING WITH WATER:
- Fill the receptacle taking care to observe the MAX and MIN level (Fig. 2a).
USE:
- This appliance can be used with ceramic hobs, induction hobs, electric and gas cookers.
OPERATING PRESSURE:
- This appliance can operate at 2 levels of pressure. (Fig. 3)
- It also has one position for pressure release and one position for extracting the valve. (Fig. 4)
CLOSING THE LID ON THE MAIN BODY OF THE PAN.
- Align the mark "▶" on the lid with the handle of the body pan.
- Turn clockwise until both handles are in line and close.
ONCE YOU HACE FINISHED USING THE APPLIANCE:
- Clean the appliance
CARRY HANDLES:
- This appliance has handles on the side of the body, which facilitates comfortable transport (Fig. 5).
OPERATION
-
- It is necessary to clean the air release pipe and safety valve frequently in order to ensure that the pressure cooker functions normally. Check the air release pipe and remove accumulated dirt with a needle or water. Also ensure that the safety valve is clean and that the O-ring is positioned.
- CAUTION: Before every use, check that you can easily move the safety valve, in order to guarantee safe use of the pressure cooker.
-
- Do not use the pressure cooker with less than 0.25 l of water or other liquid. Do not fill the pressure cooker to more than 2/3 the height of the pan. If you are preparing foods which expand or form foam, only
- fill the pan halfway.
-
- To close: Place the lid on the pan. The marks on the lid must be aligned with the O mark, located on the long handle of the pan. Turn the lid clockwise until you hear a click and then position the handle of
- the lid and that of the pan exactly on top of the other (see Fig. 6).
- CAUTION: Also make sure that the closure is in the correct position. If it is not, move
it forwards (Fig. 7)
-
- Set the pressure release selector valve to the desired position (see Fig.8).
-
- To heat:To cook, place the fast cooker on the hob and turn it on to maximum strength so that the pressure rises rapidly. When the internal pressure of the cooker reaches a certain pressure position, the pressure release selector valve will automatically expel steam.
- Next, lower the heat a little so that the steam is released evenly and constantly. (Fig. 9)
CAUTION:
- When carrying the pressure cooker, always grasp it by both handles and never only by the lid handle or other handle.
Carry the cooker carefully and place it on a hob with a flat, stable surface. - Do not heat the pressure cooker without supervision. Always use it carefully. If the pressure cooker does not function correctly, it must be adjusted immediately in order to continue using it.
- Never touch any hot surface, such as the stainless steel part. Grasp the cooker by the handles.
- Be careful when moving the cooker while it is under pressure. If necessary, use gloves to avoid burns.
- For safety reasons, always respect the filling quantity indicated in order to prevent the liquids from evaporating completely and dry cooking, as well as to prevent the safety mechanisms from becoming clogged.
-
- Turning off the hob: Once the recommended cooking time has elapsed you must turn off the heat source. When you do this,
- the temperature of the cooker will decrease while the food will continue cooking.
-
- Reducing the pressure: Turn off the hob. Next, let the cooker decompress until it reaches room temperature. Wait until the safety
- valve descends. There are two ways of doing this:
- 1)Rapid cooling: To cool the cooker quickly you can press the switch or rinse the pressure cooker slowly with cold water until the red safety valve descends. You can then open the lid in the described manner (Fig.10).
-
To prevent the food cooking for too long, or if you wish to open the lid during cooking, the cooker must be cooled rapidly. Place the cooker on a stable surface under cold running water. Be careful not to
-
wet the safety valve directly. The water flow must not be too strong.
- 2)Slow cooling: Turn off the hob. Next let the cooker decompress
- until it reaches room temperature if you want the food to continue cooking. Before opening the cooker, wait until the red safety valve descends. Do not attempt to open the cooker until the locking pin has descended.
-
- Opening the lid: When the locking pin descends, you can open the lid by pressing the switch downwards and turning the lid handle counter clockwise until the "O/▼" marks are aligned (Fig.11).
CAUTION:
- If you are preparing dishes with a doughy consistency or thick stocks, especially vegetable soups, you must juggle the cooker gently before opening the lid in order to prevent the food from spattering.
- Do not manipulate the safety systems except during the maintenance procedure indicated in this manual.
- Only use genuine spare parts for the particular model. It is especially necessary to use the body and lid of the same manufacturer and check that they are compatible. Contact a point of sale or the After Sale Service to obtain genuine spare parts.
CLEANING:
- After every time you use it, clean the equipment with a damp cloth with a few drops of washing-up liquid and then dry.
- Rinse the cooker with clean water and dry it with a clean cloth.
- In order to protect the shine on the cooker, do not use abrasive washing-up liquid or a metal scourer.
- Do not use solvents, or products with an acid or base pH such as bleach, or abrasive products, for cleaning the appliance.
- To avoid electro-chemical corrosion, prevent the cooker from coming into contact with other metals.
- The cooker should be stored without being closed so that the silicon joint is open to the air and can dry completely.
- If some food remains stuck to the surface, it is advisable to leave the appliance to soak for a certain time and then remove the traces with a cloth.
- The use of a dishwashing machine is not recommended, especially in the case of the lid.
CLEANING THE SILICON LID JOINT
- Remove the silicon lid joint and clean with hot water.
- Dry the silicon joint with a cloth and keep it dry before carefully returning it to its normal position. (Fig. 12)
CLEANING THE PRESSURE AND PRESSURE RELEASE SELECTOR VALVE.
- After each use, press and turn the pressure selector in a clockwise direction to the position " ", when it will separate from the base of the valve.
- Clean the pressure and pressure release selector valve with hot water.
- Return the pressure and pressure release selector valve to its normal position.
PRESSURE RELEASE SELECTOR VALVE, AIR RELEASE PIPE AND SAFETY VALVE:
- Clean the pressure release selector valve, air release pipe and safety valve in order to guarantee that the pressure cooker functions normally (Fig.13). Lift the pressure release selector valve and unscrew the slotted nut (see Fig.14). Next check for and remove any accumulated dirt and if necessary remove the dirt from the air release pipe with a needle. Turn the safety valve in a clockwise direction using a
- Recommendation: To prevent malfunctioning, do not dismantle the parts of the safety valve.
REMOVING BURNT FOOD
- Remove burnt food using a wooden scraper.
- Firmly stuck food remains should be dried in the Sun and left to soak in oil. Next fill the pan with hot water and leave it for a time. Then you can clean the pan. To avoid scratching the body, do not remove firmly stuck foods with sharp tools such as a knife.
CARE
- The pan, lid and joint must be cleaned after every use.
- Remove the dirt from the pressure release selector valve, air release pipe and safety valve with a needle and store the cooker in a cool, well-ventilated place. The lid should be stored upside-down on top of the body or separately.
CAUTION:
- Do not use abrasive washing-up detergent.
- Do not wash the lid in a dishwasher.
-
So that the lid may be easy to open and close, grease the O-ring with a little cooking oil. This will also prolong the life of the joint.
-
While stored, the pressure cooker must not be closed, in order to prevent the joint from becoming misshapen and to enable it to function correctly.
- Allow frozen foods to thaw before cooking them. Pre-soak pulses and dried fruit.
- Start cooking foods which form a foam without the lid and once the foam has been eliminated, with the lid closed.
- Little water is needed for cooking with a pressure cooker, since only a small quantity of water is lost if foods are not cooked for a long time.
- The high pressure and the steam make foods lose colour. You can use coloured spices to give the food a better, more appetizing appearance.
- Lower the focus of heat if soup spills out.
REPLACING THE JOINT
- The discolouring of the joint does not cause any problems. Depending on how often you use the cooker, the joint should be replaced every one or two years. If you detect damage, breakages or deformations, replace the joint immediately.
- Caution: Only use genuine spare parts. If you cannot find genuine spare parts to repair the cooker, contact your supplier.
PRACTICAL RECOMMENDATIONS
- 1.If the safety valve does not rise, this may be due to the fact that:
- The lid is not attached and closed properly,
- The strength of the heat source is too low and must be increased;
- The joint is dirty, damaged or misshapen and must be either cleaned or replaced;
- There is too little water in the pan (check the filling quantity).
- 2.If steam is being released from underneath the lid and not through the pressure valve, this may be due to the fact that:
- The lid is not correctly fitted and closed (close the lid correctly);
- The joint is not properly fitted or is dirty, damaged or misshapen and must be either cleaned or replaced;
-
- If you cannot easily open or close the lid, this may be due to the fact that:
- The joint is not a genuine spare part and does not adjust to the lid (only use genuine spare parts).
- the safety valve has not yet descended
when opening the lid (wait until it descends completely);
- the safety valve is misshapen. To repair or replace misshapen parts, contact an authorised service centre.
CAUTION:
- Only use genuine spare parts. If you cannot find genuine spare parts to repair the cooker, contact your supplier.
Reference table
- This table contains suggestions only. You can decide the optimum cooking times according to your preferences.
- The pressure cooker is designed for use on a stable heat source, such as an electric plate, an induction plate or a gas hob.
- The cooking time must be calculated from when a regular and constant quantity of steam is released through the pressure release selector valve.
- This may be influenced by the filling quantity, temperature and heat strength. The recommended cooking times are suggestions only.
| Dish Quantity | of food and water | Cooking time after stable actuation of the pressure release selector valve and on a low heat (minutes) | Pressure position | Cooking once cooled | Observation |
| Rice 1/3 4 - 8 | 60 kPa Done | ||||
| Milk rice 1/3 8 - 12 | 60 kPa Done | ||||
| Ribs 1/2 8 - 10 | 100 kPa The meat se- | parates from the bone | Cut into chunks | ||
| Knuckle of pork | 1/2 15 - 20 | 100 kPa The meat se- | Chopped | ||
| Veal | 1/2 15 - 20 | 100 kPa Well done | n cubes | ||
| Chicken | 1/2 10 - 15 | 100 kPa The meat se- | Whole chicken | ||
| Fish | 1/3 4 - 8 60 | kPa Done | |||
| Lamb | 1/2 10 - 15 | 100 kPa Done | Chopped | ||
| Rice croquettes | 2/3 10 - 15 | 60 kPa Done | |||
| Corn 2/3 5 - 8 | 60 kPa Done | ||||
| Sweet potato | 2/3 6 - 10 | 60 kPa Done | |||
| Morels | 2/5 15 - 20 | 60 kPa Well done |
ANOMALIES AND REPAIR
-
If the cooker is not functioning correctly, turn of the hob immediately, place the cooker on a flat surface and rinse slowly with cold water to cool it and reduce the pressure. The pressure cooker may only be used again once the cause of the fault has been resolved.
-
Take the appliance to an authorised technical support service if problems arise. Do not try to dismantle or repair without assistance, as this may be dangerous.
If any anomaly is detected, check the following table
| Anomalies Causes Solutions | ||
| The pressure release selector valve makes a noise and does not release steam after the cooker is heated. | Blockage of the pressure release selector valveBlockage of the air release pipe Cooking without liquid The hob is inclined | Clean the pressure release selector valveRemove the dirt Immediately turn off the hob, remove the cooker, reduce the pressure and check the cooker. Heat the cooker on a flat, stable hob |
| The safety valve releases steam or liquid. | Blockage of the air release pipe The pan has been overfilled The heat source is too strong | Remove the dirt Reduce the filling quantity Adjust the heat source to the steam being released by the pressu- re release selector valve |
| Steam is coming out of the safety grille. | The lid has become misshapen. Change the lid. | |
| Steam is escaping from underneath the lid | Malfunctioning of the pressure release selector valve and safety valve The sealing joint is not properly fitted Damaged joint Blockage of the O-ring Lid closed badly | Remove the dirt from the pressure release selector valve and safety valve Fit the sealing joint correctly Replace the sealing joint Clean the sealing joint Close the lid correctly |
FOR EU PRODUCT VERSIONS AND/OR IN THE CASE THAT IT IS REQUESTED IN YOUR COUNTRY: ECOLOGY AND RECYCLABILITY OF THE PRODUCT
- The materials of which the packaging of this appliance consists are included in a collection, classification and recycling system.
Should you wish to dispose of them, use the appropriate public containers for each type of material.
- The product does not contain concentrations of substances that could be considered harmful to the environment.
This appliance complies with Directive 2014/68/EU concerning pressure equipment.
François
FERMETURE DU COUVERCLE AU CORPS
PRODUIT ET/OU SI CELA EST APPLICABLE DANS VOTRE PAYS :
ÉCOLOGIE ET RECYCLAGE DE L'APPAREIL
ZAMKNIECIE POKRYWY Z KORPUSEM
a a a a a a a a a a a a a a a a a a a a a a a a a a a a a a a a a a a a a a a a a a a a a a a a a a a a
.1aiKo 3 a90
J. J. J. J. J. J. J. J. J. J. J. J. J. J. J. J. J. J. J. J. J. J. J. J. J. J. J. J. J. J. J. J. J. J. J. J. J. J. J. J. J. J. J. J. J. J. J. J. J. J. J.
. 1 1 1 1 1 1 1 1 1 1 1 1 1 1 1 1 1 1 1 1 1 1 1 1 1 1 1 1 1 1 1 1 1 1 1 1 1 1 1 1 1
.(7.gIFjzil)jgfo
.0j1rJrJrJrJrJrJrJrJrJrJr
45 10000000000000000000000000000000000000000000000
.
S ACD = S COD + S_ CDA.
.(b. giF) j 1/1011 a 1011 g 1011 g 1011 1011 1011 y 1011 aosb
.(cr.giF)j/1 jgljy yLgagllj jJl Jd
j
gao jao jao jao jao jao jao jao jao jao jao jao jao jao jao jao jao jao jao jao jao jao jao jao jao jao jao jao jao jao jao jao jao jao jao jao jao jao jao jao jao jao jao jao jao jao jao jao jao jao jao
. 1
.0xlll llogogg Joo oJolwry Ioo
. 1
.01 1
. 1
101
(a. gIF) NIM XAM 1
:Joo
. 1
1
.(giF).
(ε.giF).plall jjgssaogg bfoal aagg gJl
jU jU U JUU/puu U uuuu uuuu uuuu uuuu uuuu uuuu uuuu
:aaa
.1g 1111 1111 1111 1111 1111 1111 1111
auii1g puiw
J 1
JgUgU U K JI J I J J J J J J J J J J J J J J J J J J J J J J J J J
.
a_0 = 1
.iiu 3 10g 8o slg 10g 100
MOMENTS RAPID
baiai j
:Jyj
.SURUAT 1
J 1 J
上之dA
B
jloJy plco C
U2JI E
jolly aooF
alguDgauuLaoG
H
J 1
goo 0000000000000000000000000000000000000000000
Ld
*JwJgabLwM
L+εjbrb bgs()
aXwI I rJg J
JlloIg 1. Joo 4 10 10 10 10 10 10 10 10 10
.0g g uu 4uue
0 1 1
.
.1wglg yolj jyllg lalplpog bclpplp 0000000000000000
aagabg aolgl g aasbbl aalgl g aasll g aadll ldlgds no soaewj jgs
.4dL 1 1000000000000000000000000000000000000000000
jIJIyJyIyIyIyIyIyIyIyIyIyIyIyIyIyIyIyIyIyIyIyIyIyIyIyIyIyIy
j 1
JooJIg JoooiJoo
.1uLwLo jJjJgJgJgJgJgJg
jIJI JIJI 151 151 151 151 151 151 151 151 151
j 1 j 1 j 1 j 1 j 1 j 1 j 1 j 1 j 1 j 1 j 1 j 1 j 1 j 1 j 1 j 1 j 1 j 1 j 1 j 1 j 1 j 1 j 1 j 1 j 1 j 1 j 1 j 1 j 1 j 1 j 1 j 1 j 1 j 1 j
.(.giF)jJgJgL
Espanol GARANTÍA Y ASISTENCIA TÉCNICA
English WARRANTY and Technical Assistance
This product enjoys the recognition and protection of the legal guarantee in accordance with current legislation. To enforce your rights or interests you must go to any of our official technical assistance services.
You can find the closest one by accessing the following web link: http://taurus-home.com/
You can also request related information by contacting us.
You can download this instruction manual and its updates at http://taurus-home.com/
Français GARANTIE ET ASSISTANCE TECHNIQUE
COUNTRY ADDRESS PHONE
| Algeria Zone d'Activite, N° 62, Constantine 213770777756 | ||
| Argentina Av. del Libertador 1298,(B1638BEY), Vicente López (Pcia. Buenos Aires) | 541153685223 | |
| Belgium Mariëndonstraße 5, 5154 EG, Elshout 31620401500 | ||
| Benin 359 Av. Steinmetz, 1930, Cotonou 0299-21313798 | ||
| Bulgaria 265,Okolovrasten Pat, Mladost 4, 1766, Sofia 35929211120 / 35929211193 | ||
| Burkina Faso Avenue Bassawarga, 01 BP915, Ouagadougou 226 25301038 | ||
| Congo (Republic of) 98 Blvd General Charles de Gaulle, Pointe Noire 242066776656 | ||
| Cyprus | 20, Bethlehem Str. / P.O.Box 20430, 2033, Strovolos | 35722711300 |
| Czech Republic | Milady Horakove 357/4, 568 02, Svitavy | 420 461 540 130 |
| Democratic Republic of the Congo | AV. Pont Canale N° 3440, Kinshasa | 00243-991223232 |
| Equatorial Guinea | SN Av Patricio Lumumba y C/ Jesus B, Bata | 00240 333 082958 / 00240 333 082453 |
| Equatorial Guinea | Calle de las Naciones Unidas, PO box 762, Malabo | 240333082958 / 240333082453 |
| Espana Avda Barcelona, S/N, 25790 Oliana (Lleida) atencioncliente@taurus.es | 902 118 050 | |
| Ethiopia Lideta Sub City Kebele 10 H.NO 124, Addis Ababa | +251 11 5518300 | |
| France | Za les bas musats 18, 89100, Malay-le-Grand | 03 86 83 90 90 |
| Gabon | BP 574, Port-Gentil Centre-ville | 24101552689 / 24101560698 |
| Ghana | Ederick Place, Accra-Ghana | 302682448 / 302682404 |
| Gibraltar 11 Horse Barrack Lane, 54000, Gibraltar 00350 200 75397 / 00350 200 41023 | ||
| Greece Sapfous 7-9, 10553, Athens +30 21 0373 7000 | ||
| Guinea BP 206, GN, Conakry (224) 622204545 | ||
| Hong Kong Unit H,13/F., World Tech Centre, Hong kong (852) 2448 0116 / 9197 3519 | ||
| Hungary Keszmarik utca 11-13, 1158, Budapest +36 1 370 4519 | ||
| India C-175, Sector-63, Noida, Gautam Budh Nagar - 201301, Delhi | (+91) 120 4016200 | |
| Ivory Coast 01 Rue Des Carrossiers-Zone 3, B.P 3747, Abidjan 01 (RCI) | 22521251820 / 225 21 353494 | |
| Jordan 28 Basman St Down town, Amman +962 6 46 222 68 | ||
| Kuwait | P.O. BOX 3379 hawally, 32034, Hawally | +965 2200 1010 |
| Lebanon Damascus Highway; Sciale Building, Jamhour 9615922963 | ||
| Luxembourg | Mariëndonstraße 5, 5154 EG, Elshout 31620401500 | |
| Mali | BP E2900, Dravela Bolibana | 223227216 / 223227259 |
| Marruecos | Big distribution society 4 Rue 13 Lot. Smara Oulfa, Casablanca | (+212) 522 89 40 21 |
| Mauritania | 134 Avenue Gamal Abdener Ilot D, Nouakhott | 2225254469 / 2225251258 |
| Mexico Rosas Moreno N° 4-203 Colonia de San Rafael C.P. 06470 – Delegación Cuauhtémoc, Ciudad de México | (+52) 55 55468162 | |
| Montenegro | Rastovac bb, 81400, Niksic | +382 40 217 055 |
| Netherlands | Mariëndonstraße 5, 5154 EG, Elshout 31620401500 | |
| Nigeria 8, Isaac; John Str, G.R.A Ikeja Lagos 23408023360099 | ||
| Paraguay | Denis Roa 155 c/ Guido Spano, Asunción | 21665100 |
| Peru | Calle los Negocios 428, Surquillo, Lima | (511) 421 6047 |
| Portugal Avenida Rainha D. Amélia, n°12-B, 1600-677, Lisboa | +351 210966324 | |
| Romania | Dudesti Pantelimon 23, 410554, Bucharest | 031.805.49.58 |
| Serbia | Rastovac bb, 81400, Niksic | +382 40 217 055 |
| Slovakia Milady Horakove 357/4, 568 02, Svitavy 420 461 540 130 | ||
| Southafrica | Unit 25 & 26, San Croy Office Park, Die Agora Road, Croydon, Kempton Park, 1619, Johannesburg | (+27) 011 392 5652 |
| Tunisia | 2, Rue de Turquie, Tunis | 21671333066 |
| Ukraine | Block 6, Ap Housing Estate Topol-2, B, 49000, Dnepropetrovsk | 380563704161 / 380563704161 |
| United Arab Emirates | P.O.BOX 8543, Dubai | 14506246200 |
| Uruguay | Luis Alberto de Herrera 3468, 11600, Montevideo | 598 2209 28 00 |
| Vietnam Lot 7 Ind. Zone for, Ha Noi 84437658111 / 84437658110 | ||
taurus
Avda. Barcelona, s/n
E 25790 Oliana
Spain