
Sonar 112Xi - Speaker HK AUDIO - Free user manual and instructions
Find the device manual for free Sonar 112Xi HK AUDIO in PDF.
| Product type | Portable active speaker |
| Brand | HK Audio |
| Model | Sonar 112Xi |
| Category | Speaker |
| Dimensions (W x H x D) | 36.5 x 62.9 x 35.5 cm |
| Weight | 15.9 kg |
| Power supply | 220-240 V AC, 0.6 A |
| Output power (Peak) | 1200 W |
| Max. calculated SPL | 130 dB half space |
| Frequency response (-10 dB) | 54 Hz - 20 kHz |
| Low-mid driver | 1 x 12" with 2.5" voice coil |
| High-frequency driver | 1" with 1.35" voice coil |
| Horn | CD 90° x 60° |
| Audio inputs | 2 x XLR/Jack combo balanced, 1 x 3.5 mm stereo mini jack |
| Audio outputs | 1 x Mix Out XLR balanced |
| Bluetooth | Version 5.0, audio streaming, TWS, iOS/Android app |
| DSP functions | Volume Master, 3-band EQ, high-pass filter, Delay, Live/DJ/Monitor modes, Ext. Sub, screen saver, front LED, reset |
| Mounting angle | 0° / -7.5° |
| Suspension points | 3 x M10 |
| Handles | 2 x SingleGrip |
| Cabinet material | Synthetic material |
| Grille | Metal grille with black acoustic foam |
| Protections | Thermal, overload, subsonic filter, Peak/RMS limiter |
| Maintenance and cleaning | Clean with a dry cloth. Do not use liquid products. |
| Safety | Do not open the cabinet. Use only the supplied power cord. Follow safety instructions. |
| Spare parts and repairability | Repairs must be carried out by a qualified technician. Use original spare parts. |
Frequently Asked Questions - Sonar 112Xi HK AUDIO
User questions about Sonar 112Xi HK AUDIO
0 question about this device. Answer the ones you know or ask your own.
Ask a new question about this device
Download the instructions for your Speaker in PDF format for free! Find your manual Sonar 112Xi - HK AUDIO and take your electronic device back in hand. On this page are published all the documents necessary for the use of your device. Sonar 112Xi by HK AUDIO.
USER MANUAL Sonar 112Xi HK AUDIO
natural_image
Technical line drawing of a speaker or audio device with concentric circular components and mounting brackets (no text or symbols)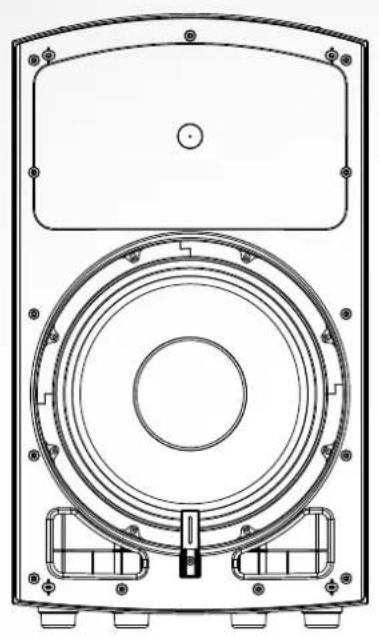
natural_image
Technical line drawing of a speaker or audio device casing with concentric rings and mounting brackets (no text or symbols)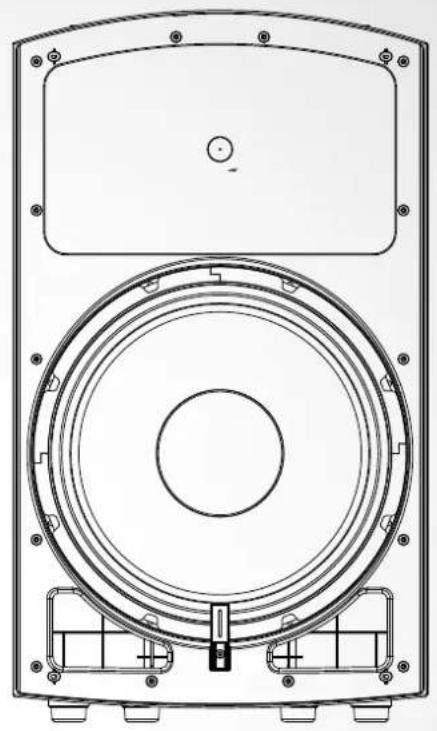
natural_image
Technical line drawing of a speaker or audio device casing with concentric rings and mounting brackets (no text or symbols)SONAR
110 Xi • 112 Xi • 115 Xi
Manual 1.0
Important Safety Instructions! Read before connecting!
This product has been built by the manufacturer in accordance with IEC 62368-1 and left the factory in safe working order. To maintain this condition and ensure non-risk operation, the user must follow the advice and warning comments found in the operating instructions. If this product shall be used in vehicles, ships or aircraft or at altitudes exceeding 2000 m above sea level, take care of the relevant safety regulations which may exceed the IEC 62368-1 requirements.
WARNING: To prevent the risk of fire and shock hazard, do not expose this appliance to moisture or rain. Do not open case – no user serviceable parts inside. Refer service to qualified service personnel.

This symbol, wherever it appears, alerts you to the presence of regulated dangerous voltage inside the enclosure – voltage that sufficient to constitute a risk of shock.

This symbol, wherever it appears, alerts you to the presence normally accessible hazardous voltage. External wiring connected terminal marked with this symbol must be a "ready made complying with the manufacturers recommendations, or must being installed by instructed persons only.

This symbol, wherever it appears, alerts you to important and maintenance instructions in the accompanying e. Read the manual.

This symbol, wherever it appears, tells you: Take care! Hot To prevent burns you must not touch.

All electrical and electronic products including batteries
should be disposed of separately from the municipal waste stream via designated collection facilities appointed by the government or the local authorities.

Read these instructions. Keep these instructions. Follow all gs and instructions marked on the product and in this manual.
- Do not use this product near water. Do not place the product near water, baths, wash basins, kitchen sinks, wet areas, swimming pools or damp rooms.
- Do not place objects containing liquid on the product – vases, glasses, bottles etc.
- Clean only with dry cloth.
- Do not remove any covers or sections of the housing.
- The set operating voltage of the product must match the local mains supply voltage. If you are not sure of the type of power available consult your dealer or local power company.
- Before connecting the device, please ensure that the mains supply you are using is equipped with adequate protection against short circuiting and grounding faults when the device is plugged in.
- To reduce the risk of electrical shock, the grounding of this product must be maintained. Use only the power supply cord provided with this product, and maintain the function of the center (grounding) pin of the mains connection at any time. Make sure the mains outlet used provides a proper protective ground connection.
- Do not defeat the safety purpose of the polarized or grounding-type plug. A polarized plug has two blades with one wider than the other. A grounding type plug has two blades and a third grounding prong. The wide blade or the third prong are provided for your safety. If the provided plug does not fit into your outlet, consult an electrician for replacement of the obsolete outlet.
- Protect the power cord from being walked on or pinched particularly at plugs, convenience receptacles, and the point where they exit from the device! Power supply cords should always be handled carefully. Periodically check cords for cuts or sign of stress, especially at the plug and the point where the cord exits the device.
- Never use a damaged power cord.
- Unplug this product during lightning storms or when unused for long periods of time.
-
This product can be fully disconnected from mains only by pulling the mains plug at the unit or the wall socket. The product must be placed in such a way at any time, that disconnecting from mains is easily possible.
-
Fuses are to be replaced exclusively by qualified personnel, and then only with fuses of the proper type and rating.
- Refer all servicing to qualified service personnel. Servicing is required when the unit has been damaged in any way, such as:
- When the power cord or plug is damaged or frayed.
- If liquid has been spilled or objects have fallen into the product.
- If the product has been exposed to rain or moisture.
- If the product does not operate normally when the operating instructions are followed.
- If the product has been dropped or the cabinet has been damaged.
- Do not connect external speakers to this product with an impedance lower than the rated impedance given on the product or in this manual. Use only cables with sufficient cross section according to the local safety regulations.
- Keep away from direct sunlight.
- Do not install near heat sources such as radiators, heat registers, stoves or other devices that produce heat.
- This apparatus is for moderate climates areas use, not suitable for use in tropical climates countries.
- Do not block any ventilation openings. Install in accordance with manufacturer's instructions. This product must not be placed in a built-in installation such as a rack unless proper ventilation is provided.
- Always allow a cold device to warm up to ambient temperature, when being moved into a room. Condensation can form inside it and damage the product, when being used without warming up.
- Do not place naked flame sources, such as lighted candles on the product.
- The device must be positioned at least 20 cm/8" away from walls.
- Use only with the cart, stand, tripod, bracket or table specified by the manufacturer or sold with the product. When a cart is used, use caution when moving the cart/product combination to avoid injury from tip-over.
- Use only accessories recommended by the manufacturer, this applies for all kind of accessories, for example protective covers, transport bags, stands, wall or ceiling mounting equipment. In case of attaching any kind of accessories to the product, always follow the instructions for use, provided by the manufacturer. Never use fixing points on the product other than specified by the manufacturer.
- This appliance is NOT suitable to be used by any person or persons (including children) with limited physical, sensorical or mental ability, or by persons with insufficient experience and/or knowledge to operate such an appliance. Children under 4 years of age must be kept away from this appliance at all times.
- Never push objects of any kind into this product through cabinet slots as they may touch dangerous voltage points or short out parts that could result in risk of fire or electric shock.
- This product is capable of delivering sound pressure levels in excess of 90 dB, which may cause permanent hearing damage! Exposure to extremely high noise levels may cause a permanent hearing loss. Wear hearing protection if continuously exposed to such high levels.
- The manufacturer only guarantees the safety, reliability and efficiency of this product if:
- Assembly, extension, re-adjustment, modifications or repairs are carried out by the manufacturer or by persons authorized to do so.
- The electrical installation of the relevant area complies with the requirements of IEC (ANSI) specifications.
- The unit is used in accordance with the operating instructions.
- This product is optimized for use with music and speech signals. Using this product with sine wave, square wave or other kind of measuring signals at higher level may lead to severe damage of the product.
General Notes on Safety for Loudspeaker Systems

Mounting systems may only be used for those loudspeaker systems authorized by the manufacturer and only with the mounting accessories specified by the manufacturer in the installation instructions. Read and heed the manufacturer's installation instructions. The indicated load-bearing capacity cannot be guaranteed and the manufacturer will not be liable for damages in the event of improper installation or the use of unauthorized mounting accessories. The system's load-bearing capacity cannot be guaranteed and the manufacturer will not be liable for damages in the event that loudspeakers, mounting accessories, and connecting and attaching components are modified in any way. Components affecting safety may only be repaired by the manufacturer or authorized agents, otherwise the operating permit will be voided.

Installation may be performed qualified personnel only, and then only at pick-points with sufficient load-carrying capacity and in compliance with local building regulations. Use only the mounting hardware specified by the manufacturer in the installation instructions (screws, anchors, etc.). Take all the precautions necessary to ensure bolted connections and other threaded locking devices will not loosen.

Fixed and portable installations (in this case, speakers and mounting accessories) must be secured by two independent safeties to prevent them from falling. Safeties must be able to catch accessories or parts that are loose or may become loose. Ensure compliance with the given national regulations when using connecting, attaching, and rigging devices. Factor potential dynamic forces (jerk) into the equation when determining the proper size and load-bearing capacity of safeties.

Be sure to observe speaker stands' maximum load-bearing capacity. Note that for reasons of design and construction, most speaker stands are approved to bear centric loads only; that is, the speakers' mass has to be precisely centered and balanced. Ensure speaker stands are set up stably and securely. Take appropriate added measures to secure speaker stands, for example when:
- the floor or ground surface does not provide a stable, secure base. - they are extended to heights that impede stability. - high wind pressure may be expected.
- there is the risk that they may be knocked over by people. Special measures may become necessary as precautions against unsafe audience behavior. Do not set up speaker stands in evacuation routes and emergency exits. Ensure corridors are wide enough and put proper barriers and markings in place when setting speaker stands up in passageways. Mounting and dismounting are especially hazardous tasks. Use aids suitable for this purpose. Observe the given national regulations when doing so.


Wear proper protection (in particular, a helmet,
gloves, and safety shoes) and use only suitable means of ascent (ladders, scaffolds, etc.) during installation. Compliance with this requirement is the sole responsibility of the company performing the installation.

WARNING! After installation, inspect the system comprised mounting fixtures and loudspeakers to ensure it is properly d.
The operator of loudspeaker systems (fixed or portable) must regularly inspect or task a third party to regularly inspect all system components in accordance with the given country's regulations and have possible defects repaired immediately. We also strongly recommend maintaining a logbook or the like to document all inspections.
Also be sure to provide sufficient safety margins for the rigging points used for flown systems. Observe the given national regulations when doing so.

Professional loudspeaker systems can produce harmful levels. Even prolonged exposure to seemingly harmless levels (ing at about 95 dBA SPL) can cause permanent hearing damage! More we recommend that everyone who is exposed to high volume produced by loudspeaker systems wears professional hearing condition (earplugs or earmuffs).
Manufacturer: Stamer Musikanlagen GmbH, Magdeburger Str. 8, 66606 St. Wendel, Germany
SONAR 110 Xi • 112 Xi • 115 Xi
natural_image
Technical line drawing of three views of a speaker enclosure (no text or symbols)Welcome to the HK Audio family!
Thank you for choosing a brand-name product made by our company. Rest assured, we engineered and built it with the greatest care so it will serve you well for many tomorrows to come.

Even if your experience with sound systems runs deep, some things about this product are sure to be new to you. This is why we ask that you do not set this manual aside without reading it first. Be sure to keep it in a safe place for later reference.
Here's wishing you the best sound at every occasion!
Your HK Audio team

Powerful electromagnetic interference and electrostatic discharges may impair this unit's operation. In the event of such interference, switch the device off and back on again. If this fails to restore normal operations, please move the unit away from the source of interference and try again.
Warranty
Use the convenient online registration option at www.hkaudio.com.

http://warranty.hkaudio.com
The registration is only valid if the device is registered within 30 days of the date of purchase.
HK Audio
Technischer Service
Postfach 1509
66595 St. Wendel, Germany
Fax: +49 6851 905 100
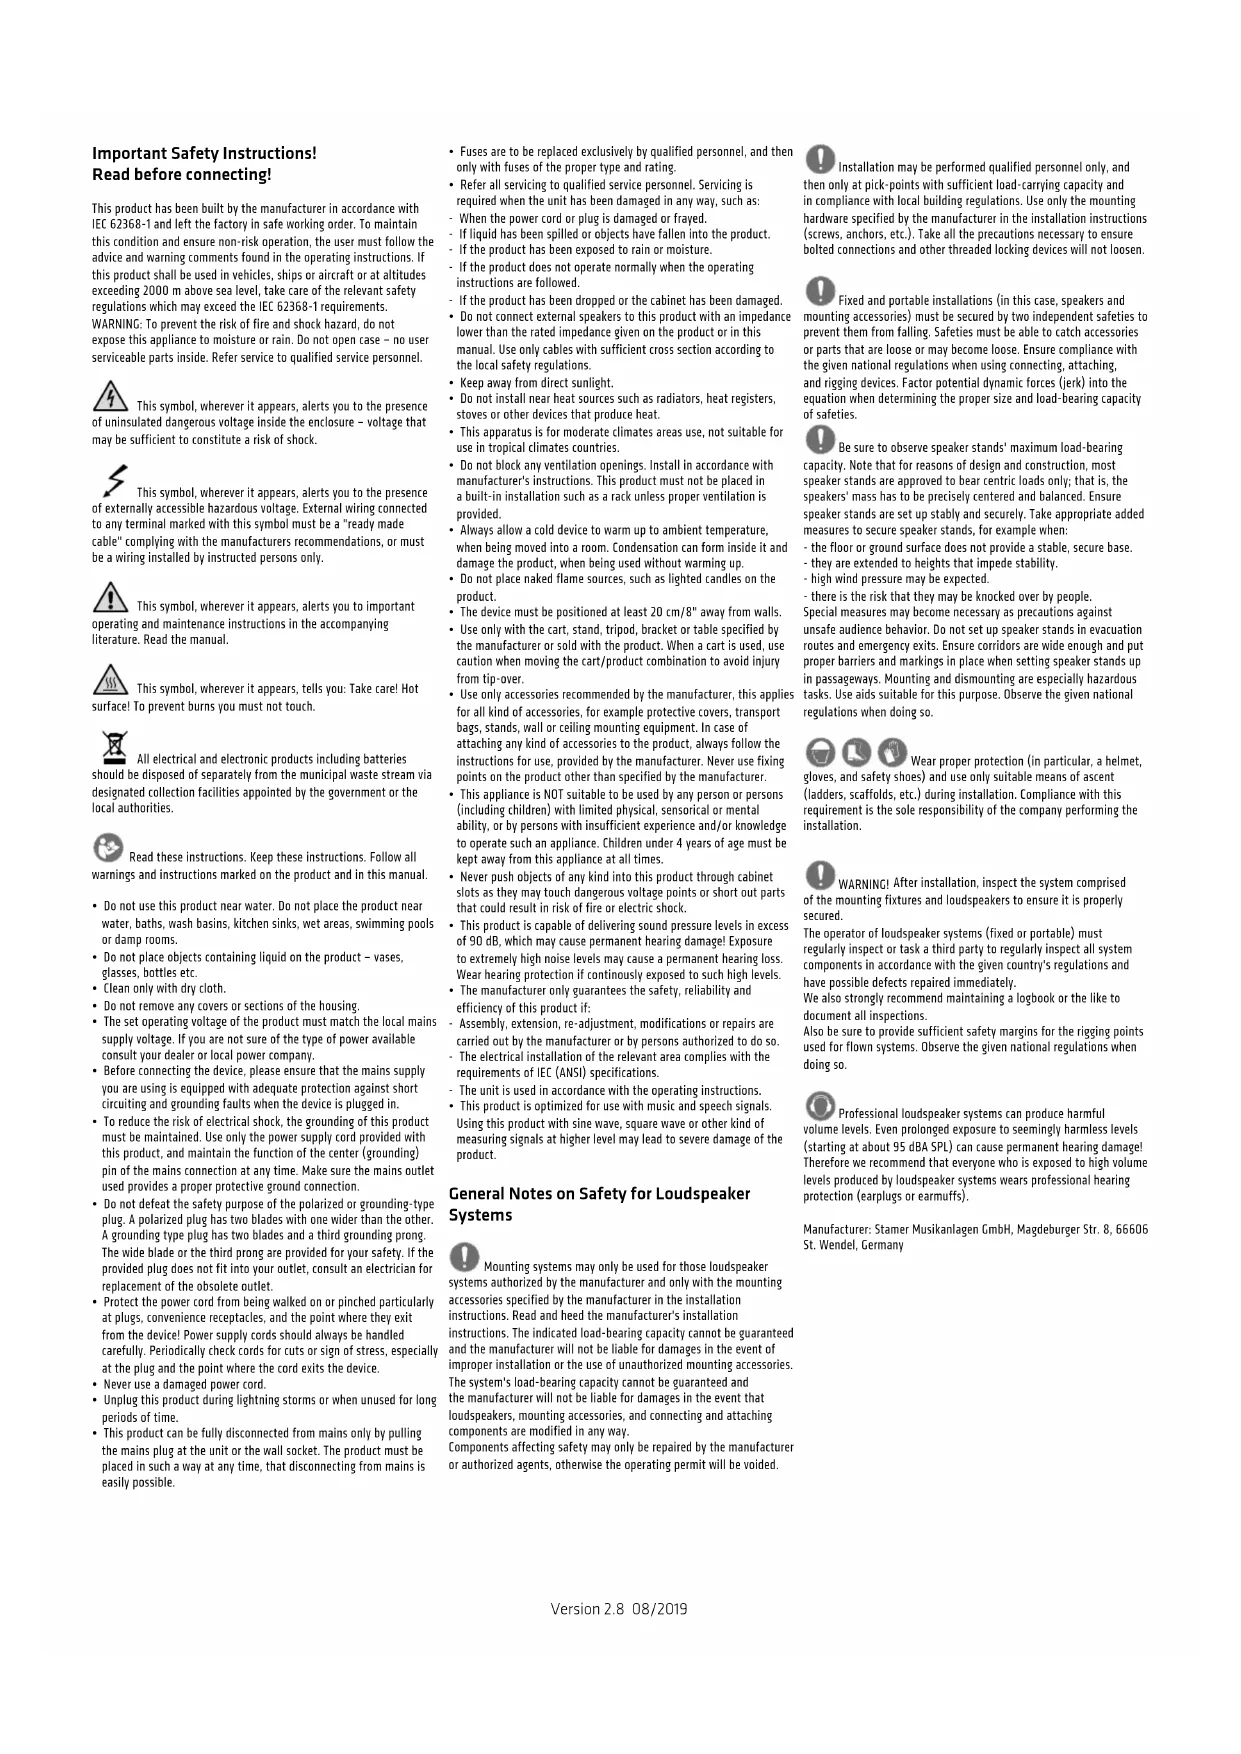
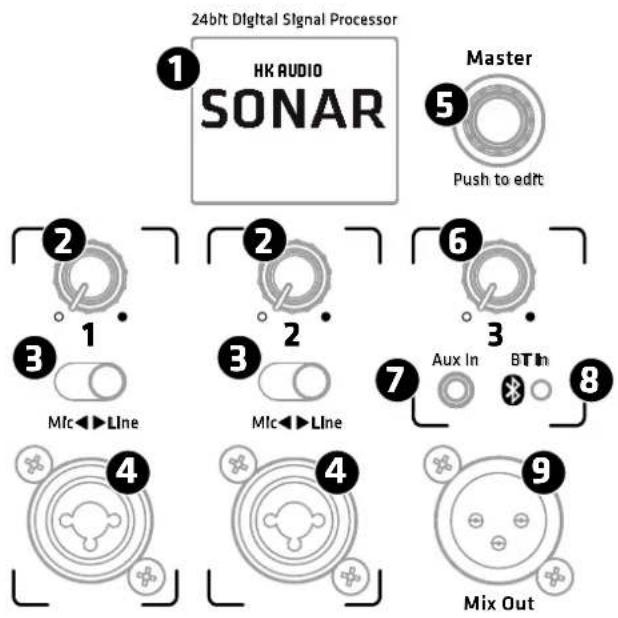
1 Connections and Control Features
flowchart
graph TD
    A["24bit Digital Signal Processor"] --> B["1: HK AUDIO SONAR"]
    B --> C["2: Push to edit"]
    C --> D["3: Mlc←→Line"]
    D --> E["2: 1"]
    E --> F["3: Mlc←→Line"]
    F --> G["6: Push to edit"]
    G --> H["7: Aux In"]
    H --> I["8: BT In"]
    I --> J["9: Mix Out"]
① Display
In standard operating mode, the color display indicates the input channels' signal level and the output level. It also shows the Bluetooth status and provides access to further DSP functions. See chapter 2, DSP Menu, for more on this.

text_image
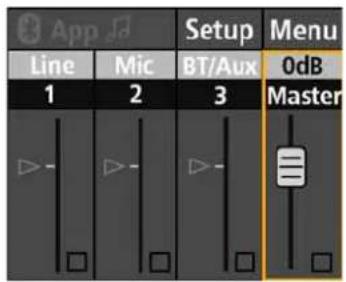
App Setup Menu Line Mic BT/Aux 1 2 3 0dB Master ▶ ▶ ▶ ≡② Volume (CH 1/CH 2)
This knob adjusts input channels 1 and 2's volume. Turn it counterclockwise to the far left to turn the level all the way down and clockwise to the far right to turn it all the way up.
The DSP menu accesses a three-band EQ with a tunable high-pass filter for each channel. See section 2.2, Channel EQ, for more on this.
Heads up: SONAR Xi has enough headroom to handle peak transients.
The SONAR REMOTE app monitor levels very accurately. If one of the overload LEDs below the level meter lights up continuously or it sounds like the signal is clipping, turn the given channel's volume down to prevent the distortion produced by an overloaded system.
Good to know: Setting the proper signal levels is very important to minimizing noise. The best way to do this is to optimize the channels' gain levels: Turn up the input channels' volume until the indicator lights up green even for the loudest signal and only rarely runs into red. Then turn the Master knob up only as far as you need it to go. Turn unused channels' volume all the way down.
3 Mic/Line (CH 1/CH 2)
This switch adjusts input channels 1 and 2's gain for use with a dynamic microphone or a line-level device such as a mixer or keyboard.
4 Input (CH 1/CH 2)
This balanced XLR/1/4" (6.35 mm) combo jack accepts an XLR connector or a balanced or unbalanced 1/4" (6.35 mm) jack plug.
Heads up: A balanced signal is always preferable because it is less susceptible to RF and other interference.
5 Master (Push to edit)
In standard operating mode, the Master knob on the right of the display adjusts the system's overall volume. The display indicates the current value; the control range sweeps from -80 to +6 dB.
Master is a push-to-edit knob that also accesses adjustable DSP parameters. Turn the Master knob to navigate the menu. Push it to select the current menu option and confirm the changes you make.
6 Volume (CH 3 Aux + BT)
Turn this knob to adjust channel 3's signal level. Twist it counterclockwise to the far left to turn the volume all the way down and clockwise to the far right to turn it all the way up.
Channel 3 serves to connect stereo sources such as DJ mixing consoles, MP3 players or computers and to stream music via Bluetooth. The DSP menu accesses a three-band EQ for this channel. See section 2.2, Channel EQ, for more on this.
Heads up: This knob addresses the Aux In and the incoming Bluetooth signal, so you can use two signal sources and adjust their volume simultaneously.
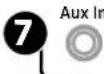
7 Aux In
Connect audio sources with high output levels such as a CD/MP3 player, smartphone, DJ mixer or a computer to this unbalanced, 3.5 mm stereo mini jack.
8 Bluetooth-LED
This blue LED lights up continuously when the SONAR Xi's built-in Bluetooth module is connected to a Bluetooth-enabled device.
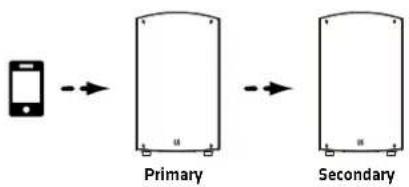
Heads up: Bluetooth-enabled devices are smartphones, PC tablets and the like that can stream music and audio to the speaker and run the SONAR REMOTE app to control the SONAR Xi remotely. This does not have to be the same device. What's more, every SONAR Xi model is a Bluetooth-enabled device, so you can connect any two of these speakers via Bluetooth.
flowchart
graph LR
    A["Smartphone"] --> B["Primary"]
    B --> C["Secondary"]
The speaker connected directly to the Bluetooth device is the primary speaker and the SONAR Xi connected to this primary speaker is the secondary speaker.
Note: Bluetooth TWS stands for True Wireless Stereo, a transmission mode that separates a stereo signal and sends each side of the split signal to the respective speaker via Bluetooth. This is where we get our primary/ secondary designations. Again, the speaker connected directly to the Bluetooth device is called the primary speaker; the second speaker connected to the first is called the secondary speaker.
The Bluetooth LED fl ashes while you pair a SONAR Xi to the Bluetooth device and while the second SONAR Xi connects to the first in Bluetooth TWS mode.
The Bluetooth LED does not flash while the speaker connects to the SONAR REMOTE app, but it does light up continuously once the app and speaker are paired. This light extinguishes when you close the app on the Bluetooth device and lights up again when you relaunch the SONAR REMOTE app.
App 1st
Heads up: The top left corner of the SONAR Xi display shows the current Bluetooth status. More on this in section 2.5, Bluetooth Settings, and in chapter 3, Bluetooth
9 Mix Out
This balanced XLR output provides a summed signal - that is, a composite of all input channels' signals. You can tap this signal pre or post (before or after) the Master volume knob. More on this in the section covering the Setup/Output menu option. The Mix Out signal is a composite encompassing all channel EQ settings, levels and delay. Other DSP settings such as Mode and Ext. Sub have no effect. They only affect the speaker's actual audio performance.
Heads up: Mix Out serves to forward the summed signal to other devices such as to additional SONAR Xi speakers. It comes in handy when you want to cover another area of the venue, referred to in the app as a 'Zone' configuration with additional speakers. Mix Out also provides a signal suitable for live recording and connecting a subwoofer.
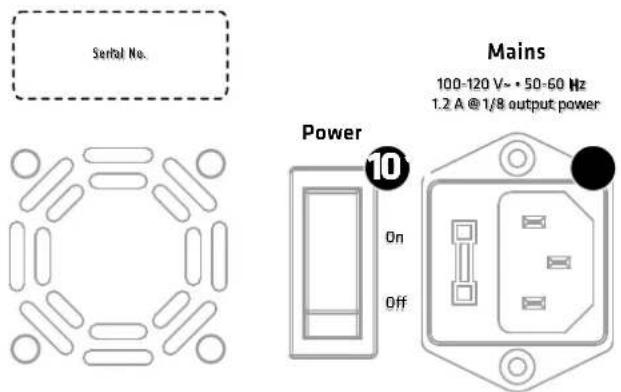
10 Power
This on/off button powers the system up and down. The speaker loads the most recently used DSP settings when you switch it on. SONAR Xi will be ready to operate within seconds when the start screen appears in the display with the Master Volume panel selected.
The system's memory stores all current DSP settings when you power it down and reloads those settings when you power it back up again.
text_image
Serial No. Mains 100-120 V~ • 50-60 Hz 1.2 A @ 1/8 output power Power 10 On Off11 Mains
Please use the factory-included power cable to connect this IEC mains socket to a wall outlet. Be sure to flip the Power switch off before connecting to a power supply.
Caution: Make sure the local mains voltage matches the voltage indicated on the speaker. Connecting the enclosure to the wrong mains voltage may destroy its electronic components.
Caution: Always make sure the vent remains uncovered and the fan unobstructed so it can rotate freely!
12 Pole Mount (not pictured)
The pole mount on the bottom of the speaker has an inner diameter of 36 mm and two positions that let you align the pole-mounted speaker towards the audience. The front position sets it to 0°. The rear position tilts the speaker downward -7.5°. Press the two buttons behind the opening to release the lock and adjust the tilt angle. The currently selected angle is indicated on the pole mount.
Heads up: SONAR Xi series cabinets are compatible with standard with 35-mm mounting poles and accessories.
13 M10 Rigging Points (not pictured)
The integrated M10 rigging points let you fly the SONAR Xi using steel cables or chains.
Caution: Speakers are to be installed and fl own by properly trained personnel only, in compliance with local safety regulations and using certified accessories.
2 DSP Menu
The Master knob accesses channel settings and other editable DSP parameters grouped in menus.
Turn the Master knob to navigate through channels and menu options. The currently selected channel/ menu option is outlined in orange. Push the Master knob to confirm your selection and edits.
text_image
App Setup Menu Line Mic BT/Aux 0dB 1 2 3 Master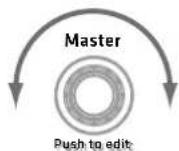
If you do not do any editing – that is, make any changes or confirm a selection – within eight seconds, SONAR Xi will exit the selected menu option and automatically load the Master Volume panel so it's readily accessible when you need to quickly adjust the level.
The system's memory stores all current DSP settings when you power it down and reloads those settings when you power it back up again.
Heads up: The SONAR Xi display shows all settings as they are adjusted in the SONAR REMOTE app, and vice versa. The two displays sync up in real time.
2.1 Example Screens and Menu Structures
• The main screen with Master Volume selected
text_image
1 2 3 App Setup Menu Line Mic BT/Aux 0dB 1 2 3 Master 7 4 5 6 81 opens Bluetooth settings and displays the current Bluetooth status. Audio streaming and the REMOTE app are disabled and therefore grayed out in this screenshot.
2 accesses Setup options.
3 accesses other menu options.
4 indicates that the Line input is currently selected for channel 1 and the Mic input for channel 2.
5 is a small triangle indicating the position of volume faders in the SONAR REMOTE app. Bluetooth is off and no app is connected in this scenario, so the triangles are grayed out and placed at the 0 dB position.
6 is a signal level indicator that alerts you to overloads.
7 indicates the overall volume or Master level.
8 indicates that Master Volume is selected. Turn the Master knob to adjust the overall level.
The level meters let you monitor incoming signal levels. The signal/overload indicators below these meters light up green to indicate an incoming signal and red to tell you that that signal is overloading the input. If the latter occurs, turn down the channel's input level and/or the connected device's output level.
Line Mute BT/Aux
Heads up: The SONAR REMOTE app provides a Mute function for each channel. A red Mute icon in the SONAR Xi display indicates a muted channel.
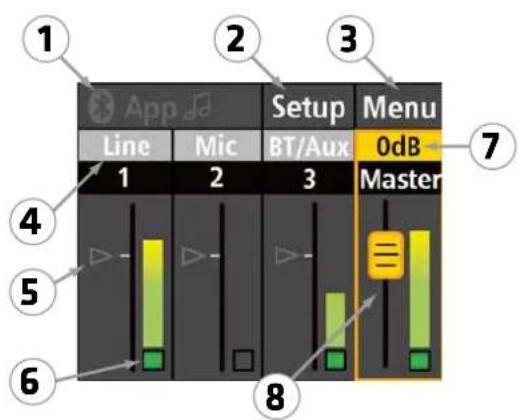
- How to navigate and select a menu option such as Channel EQ
text_image
App 1st Setup Menu Line Mic BT/Aux 0dB 1 2 3 MasterSelect a channel. The yellow outline tells you it is selected.

Push the knob once.

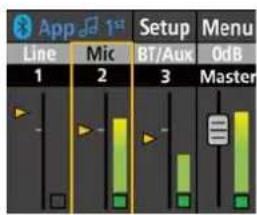
text_image
App 1st Mic 2 High 0dB Mid 3dB Low -6dB HPF 80HzThe display shows this channel's EQ parameters.
- A Bluetooth setup with audio streaming and App Control enabled
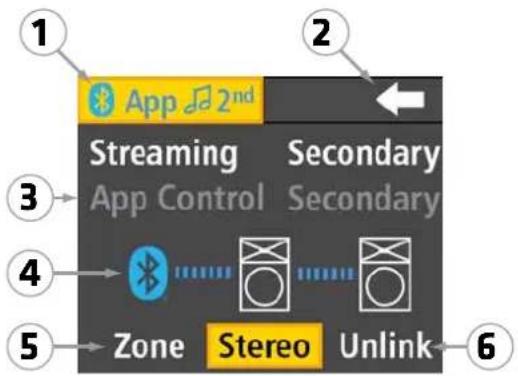
text_image
1 App 2nd Streaming Secondary App Control Secondary 3 4 Zone Stereo Unlink 5 61 indicates Bluetooth audio streaming and App Control are enabled. This SONAR Xi is the secondary speaker of two SONAR Xi units connected via Bluetooth TWS.
2 exits this page and returns to the main screen
3 is grayed out, meaning that this function is currently unavailable
4 appears in blue when a Bluetooth connection is live. In this example, the Bluetooth device is paired with the first SONAR Xi, which in turn is connected to the second SONAR Xi
5 Zone severs the two SONAR Xi's stereo link so they can be addressed individually in mono.
6 Unlink cuts the TWS connection between the primary and secondary SONAR Xi, in which case the app can no longer control the second SONAR Xi.
2.2 Menu Functions
text_image
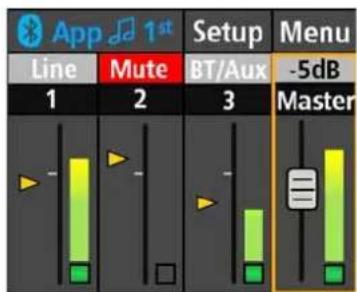
App 1st Setup Menu Line Mute BT/Aux -5dB 1 2 3 MasterMaster
The push-to-edit Master knob adjusts the SONAR Xi's overall volume level. Master Volume is always preselected (and outlined in orange) in standard operating mode. If another menu is open but you do not edit a parameter within eight seconds, SONAR Xi will automatically exit that menu and load the Master Volume panel so you can quickly adjust the level in every situation.
Depending on what action you took prior to this, you may have to press the Master knob once to enable the Master Volume panel. A yellow fader cap indicates it is indeed active. Turn the Master knob to adjust the overall volume. The display shows the current value.
Level Meter
Every channel has a level meter and signal/ overload indicator. This indicator lights up red to tell you the incoming signal is overloading the input stage, in which case you need to the lower the channel's input level.
Heads up: SONAR Xi has enough headroom to handle peak transients. If an overload indicator lights up continuously or it sounds like the signal is clipping, turn the given channel's volume down to prevent the distortion produced by an overloaded system.
App Volume Indicators
The small triangles indicate the position of the volume faders in the SONAR REMOTE app. The display grays out the triangles and sets them to 0 dB when the app is not connected. When the app is connected, the triangles in the display appear in yellow and show the current position of the volume fader in the app. If you adjust the fader in the app, the triangle in the SONAR Xi display moves right along with it.
If you see a yellow triangle at the 0 dB mark, this tells you that the audible volume corresponds to the level set by the SONAR Xi's Volume control. In other words, it has not been adjusted in the app.
If a grayed-out triangle appears anywhere other than the 0 dB mark when you do not have a Bluetooth device connected, then a volume level previously set in the app is still active. You can override this by adjusting the given SONAR Xi channel's volume. This also unmutes a channel silenced by the app's Mute button.
Mute
The red Mute indicator tells you that that channel has been muted. You can only mute a channel in the SONAR REMOTE app.
Heads up: If a channel is muted even without a Bluetooth device connected, you can unmute it by adjusting that channel's volume on the speaker. This overrides the app's fader setting and rectifi es any difference in levels.
SONAR Xi has a three-band voicing section for each input channel that lets you fi ne-tune the input signal. Channels 1 and 2 also have a variable high-pass fi iter.
Use the Master knob to select the channel whose signal you want to adjust. Once it is outlined in orange as described above, confirm your selection by pushing the knob. The EQ settings page for that channel will open.
In the SONAR REMOTE app, the channel EDIT button accesses this channel's voicing section. This three-band EQ serves to adjust the input signal's tone. The high-pass filter lets you attenuate lower frequencies.
| Channel 1 and 2 EQ parameters | |
| High +/- 12 dB 7500 Hz, High Shelf | |
| Mid +/- 12 dB 2500 Hz, Peaking Filter | |
| Low +/- 12 dB 100 Hz, Peaking Filter | |
| HPF 20 - 400 Hz Butterworth | |
| Channel 3 EQ parameters | |
| High +/- 12 dB 8000 Hz, High Shelf | |
| Mid +/- 12 dB 2800 Hz, Peaking Filter | |
| Low +/- 12 dB 80 Hz, Peaking Filter | |
Heads up: These EQ settings affect both the speaker's actual audio performance and the Mix Out signal.
Note: Activating Ext. Sub mode (Ext. Sub: On) bypasses and locks the channel EQs. Components are tuned and matched to deliver the best performance in this mode, so any further adjustments could undermine that. See section 2.4, Setup/Ext. Sub, for more on this.
2.3 Selecting Menu Options
Use the Master knob to go to the Menu button to access its options. The arrow pointing to the left will take you back to the previous screen.
text_image
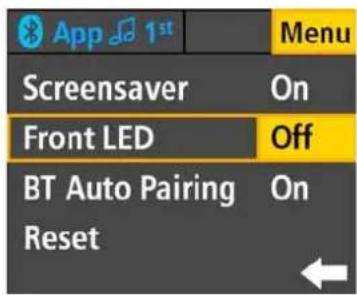
App 1st Menu Screensaver On Front LED Off BT Auto Pairing On ResetScreensaver
You can dim the display if it doesn't need to be illuminated all the time. Options: Off, On
Activate this option to have a screensaver automatically dim the display ten seconds after any control was last engaged. The display automatically lights up as soon as a control feature on the SONAR Xi or SONAR REMOTE app is engaged.
Front LED
You can disable the LED on the front panel of SONAR Xi or have it indicate limiter activity.
Options: Off, On, Limit
Set it to On, and the front LED will light up white to indicate SONAR Xi is powered up.
Set it to Limit, and a red light will indicate when the limiter is working to attenuate peak levels. The audience will be able to see it light up.
Caution: If the front LED stays red while the system is up and running, it is being overloaded. Turn down the Master knob! If you are not feeding a signal into the system and the front LED stays red, there has been a malfunction. In that case, get in touch with HK Audio's Technical Service.
BT Auto-Pairing
Enable 'BT Auto Pairing' to have the primary SONAR Xi automatically discover the secondary SONAR Xi to establish a Bluetooth TWS link whenever Bluetooth is activated.
Options: Off, On
Good to know: You may want to disable this option to prevent the primary SONAR Xi from automatically reconnecting to the secondary SONAR Xi after you have manually severed the Bluetooth TWS connection.
Reset
This option restores all parameters to the factory settings. When you activate it, you will get a confirmation prompt that reads, "Reset to default settings. Are you sure?"
Options: No, Yes
Pushing the Master knob does not trigger a reset. First, you have to confirm this security prompt with 'Yes.' Then this function irrevocably resets all DSP functions to the factory defaults and severs the Bluetooth connection.
Good to know: This function comes in handy if you frequently rent the system out. It lets you quickly restore the factory settings before handing the system over to the next customer.
Heads up: Triggering a reset via the SONAR REMOTE app is not an option because a reset also disconnects the Bluetooth connection and, by extension, the app. Instead, we recommend that you load the Default Scene to the app. This also restores the default settings.
2.4 Setup Options
Use the Master knob to navigate to the Setup button and open the Setup options. The arrow pointing to the left takes you back to the previous screen.
text_image
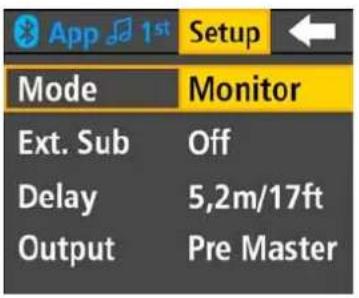
App 1st Setup Mode Monitor Ext. Sub Off Delay 5,2m/17ft Output Pre Master| Mode |
| Three preprogrammed modes let you tune the system's sound to suit the application. |
| Options: Live, DJ, Monitor |
Live mode is generally your go-to choice for live applications and playing all kinds of music. DJ mode's extended bass range makes it the best option for 'spinning' tracks and rendering electronic music. Monitor mode's extended midrange makes it the perfect choice for monitoring and for speaking engagements.
Heads up: Mode settings only affect the speaker's actual audio performance; they have no impact on the Mix Out signal.
Note: This menu option is locked and inaccessible when Ext. Sub mode is on.
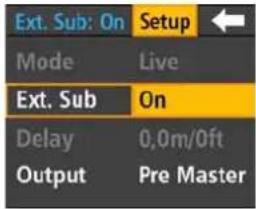
| Ext. Sub |
| This menu option activates a preset configured for operation with SONARsubwoofers. |
| Options: Off , On |
Select 'Off' to operate SONAR Xi in fullrange mode without a subwoofer and enjoy unfettered access to all DSP parameters.
Setting it to 'On' optimizes SONAR Xi's response for use with SONAR subwoofers and locks various parameters.
SONAR Xi will not load the Ext. Sub preset immediately. First, a prompt appears to prevent handling errors: "Activating Ext. Sub will disable/lock some settings. Are you sure?" The Ext. Sub preset is loaded only after you select 'Continue' and confirm your decision.
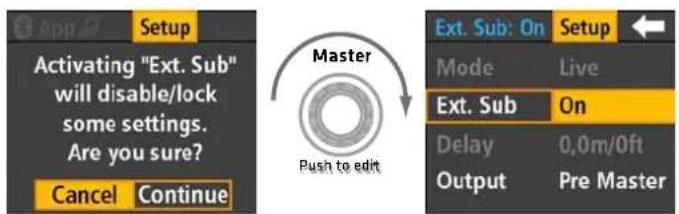
text_image
Setup Activating "Ext. Sub" will disable/lock some settings. Are you sure? Cancel Continue Master Push to edit Ext. Sub: On Setup Mode Live Ext. Sub On Delay 0,0m/0ft Output Pre MasterSelect Ext. Sub and push once.
Turn once, push once.
This activates Ext. Sub and locks and greys out other parameters.
Ext. Sub: On
The display indicates at the top left of the screen – where you normally find the Bluetooth settings – that Ext.Sub is active.
Heads up: The system automatically activates Mode and Delay presets tuned for use with SONAR subwoofers when you set Ext. Sub to 'On' and then locks these parameters. It does this to ensure this combination of speakers delivers the best possible audio performance and to prevent handling errors.
This operating mode generally involves an outboard mixer, which is why these presets deactivate the channel EQs so they dont adversely affect the signals sent from the mixing console. Bluetooth is also disabled, so you can't stream audio or control the system remotely via the app in this mode.
To regain access to locked DSP parameters, set Ext. Sub mode to 'Off.'
Heads up: You can only switch Ext. Sub mode on via the SONAR Xi display. Bluetooth is off in this operating mode, so this switched option would be of no use to you on the SONAR REMOTE app.
Good to know: If you want to combine SONAR Xi speakers with a model of subwoofer other than the SONAR subwoofer, we recommend that you disable Ext. Sub mode and instead use the onboard DSP's EQ, Mode and Delay settings to match this speaker to the other model of subwoofer.
Delay
Use this menu option if you need to delay the audio signal.
Options: 0 to 10 m/33 ft
This time alignment function comes in handy when you have to delay signals to compensate for the sound of different speaker signals arriving at different times. This could be the case when you combine SONAR Xi with subwoofers or use it as a stage monitor and have to sync it up with the main PA.
Heads up: The Delay setting affects the speaker's actual audio performance, and not the Mix Out signal.
Note: This menu option is locked and inaccessible in 'Ext. Sub: On' operating mode.
Output
Use this menu option to determine if the Master Volume will also address the summed signal routed to the Mix Out port.
Options: Pre Master, Post Master
Opt for Post Master if you want the volume of a second connected SONAR Xi to change when you adjust the first speaker's volume. Opt for Pre Master if you do not want the downstream SONAR Xi's volume to change, for example, because you're using it as a monitor.
Heads up: The Mix Out signal is a composite of all input channels, including their EQ and volume settings. Delay, Mode and Ext. Sub settings have no impact on this signal; they only affect the speaker's actual audio performance.
2.5 Bluetooth Settings
Use the Master knob to navigate to the Bluetooth panel and open the Bluetooth settings. The arrow pointing to the left takes you back to the previous screen.
text_image
App Streaming On App Control OffStreaming
This option gives you access to settings for streaming audio, which is a wireless way of piping in music from Bluetooth-enabled players such as smartphones and tablet PCs.
Options: Off, On, Secondary
Select 'On' to connect to a Bluetooth device. Select 'Secondary' if you want to use this SONAR Xi as a secondary speaker with another SONAR Xi that you have already connected to a Bluetooth device. Push the Master knob to start the pairing process.
Heads up: You can only activate one secondary option at a time in the Bluetooth menu. The system automatically enables and grays out the other secondary option for you.
For more on this, see section 3.1, Streaming Audio via Bluetooth.
App Control
This option connects the speaker to a Bluetooth device for you to use the SONAR REMOTE app.
Options: Off, On, Secondary
Select 'On' to connect to a Bluetooth device. Select 'Secondary' if you want to use this SONAR Xi as a secondary speaker with another SONAR Xi that you have already connected to a Bluetooth device. Push the Master knob to start the pairing process.
For more on this, see section 3.2, Remote Control via Bluetooth.
More Bluetooth Settings
Other functions are also available depending on the current Bluetooth status.
text_image
App Streaming On App Control Off Link App 1st Streaming On App Control Off Zone Stereo Unlink App 2nd Streaming Secondary App Control Secondary Zone Stereo UnlinkOptions: Link, Stereo, Zone, Unlink
Link
Select 'Link' to start pairing a second SONAR via Bluetooth. 'Bluetooth/Secondary' has to be activated on the second SONAR Xi to connect the two via Bluetooth. You'll find this option in the Streaming or App Control menu, depending on the application.
Heads up: The Link option is only available if this SONAR Xi has already been paired with a Bluetooth-enabled device.
Stereo
Select 'Stereo' to connect the two SONAR Xi units in stereo. Then they will render the Bluetooth audio stream in stereo. The left signal goes to the primary SONAR Xi; the right to the secondary SONAR Xi. The two SONAR Xi units' Master volumes are linked, as are their menu options. Change a setting on one SONAR Xi - for example, if you switch modes from Live to DJ - and the other SONAR Xi will follow.
The SONAR REMOTE app features a shared Volume fader and EQ for channel 3, as well as a linked Master fader that controls both SONAR Xi units.
All settings are linked. If you turn the Master knob on one SONAR Xi, the Master volume of the other SONAR Xi and the Master fader in the app will follow.
Heads up: Input channels 1 and 2 on each SONAR Xi are the exceptions to this rule. They are not linked in stereo.
Zone
The two SONAR Xi units are also paired in Zone mode, but they can be controlled individually. The Bluetooth audio stream is mono – the primary SONAR Xi and the secondary SONAR Xi get the same signal. In the SONAR REMOTE app, each SONAR Xi has a dedicated channel 3, Volume fader and Master fader each. You can edit SONAR Xi's sound, volume and menu settings separately.
Unlink
Unlink severs the Bluetooth link connecting the two SONAR Xi units. The first SONAR Xi remains connected to the Bluetooth device.
Heads up: Be sure to disable the BT Auto Pairing option on the first SONAR Xi; otherwise it will automatically start pairing with the second SONAR Xi after you disconnect it via Unlink.
3 Bluetooth
SONAR Xi lets you stream audio via Bluetooth. One speaker can render music on Bluetooth-enabled players such as smartphones and tablet PCs wirelessly. Two SONAR Xi units can do this in stereo (TWS). You can control up to two SONAR Xi units via Bluetooth using the SONAR REMOTE app. SONAR Xi's Bluetooth module can communicate with two Bluetooth devices at the same time, so you could use a smartphone to stream audio and a tablet to control the speaker remotely.
If you wish to control SONAR Xi remotely or stream audio, you have to pair the Bluetooth device with SONAR Xi. This pairing process and the general Bluetooth behavior can vary slightly from one enabled device to another.
3.1 Streaming Audio via Bluetooth
Connecting to a Bluetooth Device to Stream Audio
You have to connect the source device to stream audio to SONAR Xi via Bluetooth. Here's how:
- Open SONAR Xi's Bluetooth settings.
- Select 'Streaming: On' and confirm your selection by pushing the Master knob. This triggers the pairing process.
- Open the list of discovered devices on your other smartphone or tablet and select 'SONAR Xi,' which should be followed by the type designation and this particular SONAR Xi's unique four-digit ID code.

The blue Bluetooth LED lights up continuously once the two are paired. The Bluetooth icon and the icon with the two musical notes appear in blue in SONAR Xi's display.
Connecting a Second SONAR Xi for Bluetooth TWS (True Wireless Stereo)
Bluetooth TWS lets you pair two SONAR Xi units to render music in stereo. The left signal goes to the primary SONAR Xi; the right to the secondary SONAR Xi.
- Open the Bluetooth settings on the first or primary SONAR Xi that you have already connected to the Bluetooth player.
- Select 'Link' and confirm your selection by pushing the Master knob. This triggers a search for the second SONAR Xi.
- Open the Bluetooth settings on the second SONAR Xi, select 'Streaming: Secondary' and push the Master knob to start pairing it with the first SONAR Xi.

The blue Bluetooth LEDs on both SONAR Xi light up continuously once the two speakers are paired. The Bluetooth icon, the icon with the two musical notes, and the designation '1st' or '2nd' appear in blue in the SONAR Xi displays.
Heads up: Bluetooth TWS can only stream the audio signal from the Bluetooth device to the two SONAR Xi units. It cannot send microphone or line signals from one SONAR Xi to the other SONAR Xi. This requires a cable.
Heads up: All analog audio signals are slightly delayed because of this TWS link.
Be sure to confi gure the two SONAR Xi unit's Setup options the same way when operating a stereo system, for example, with Mode set to Live or DJ on both units.
Heads up: You could pair different SONAR Xi models to stream audio in stereo via Bluetooth TWS, but two different systems will sound a bit different by design.
Bluetooth Audio Stream Stutters or Drops Out
A cable is less susceptible to interference than Bluetooth, which has to send a constant stream of audio data via a radio frequency. To get a good signal without glitches, it is best to align SONAR Xi and the source device in line of sight of one another. Closer is better. And a cable is definitely preferable to a wireless Bluetooth link for very important events.
Good to know: Your source device may be set up to issue ringtones, notifications and system sounds. The speakers will render these sounds along with the audio stream if they arrive via Bluetooth, so be sure to disable these functions on your Bluetooth device.
3.2 Remote Control via Bluetooth and the SONAR REMOTE App
Connecting to a Bluetooth Device to Control the Speaker Remotely via an App
You have to connect the smartphone or tablet running the SONAR REMOTE app via Bluetooth to the SONAR Xi cabinet that you want to control. Here's how:
- Activate Bluetooth on the Bluetooth device.
- Set App Control in the SONAR Xi Bluetooth settings to 'On.'
- Launch the SONAR REMOTE app on the Bluetooth device.
The two should connect within a few seconds. When they do, the blue Bluetooth LED on SONAR Xi will light up continuously. The Bluetooth icon and the app indicator appear in blue in the SONAR Xi display. The SONAR REMOTE app indicates the connected SONAR Xi model and the Bluetooth signal strength.
Heads up: The Bluetooth link remains intact only when the app is open and running in the foreground. If the app closes, the blue app indicator in the SONAR Xi display and the Bluetooth LED on the SONAR Xi will extinguish, bar one exception: If you have also enabled Bluetooth audio streaming, the Bluetooth LED/ indicator will remain blue. Bluetooth reconnects automatically when you open the SONAR REMOTE app again.
The SONAR REMOTE app switches over to Demo mode when the device is out of Bluetooth range. You will still be able to work with the SONAR Xi display. Bluetooth automatically reconnects to the SONAR REMOTE app as soon as the Bluetooth device is back within range.
Connecting a Second SONAR Xi
You have to connect the Bluetooth device to the primary SONAR Xi and the primary SONAR Xi to the secondary SONAR Xi to control two SONAR Xi units remotely. You also have to set App Control and Streaming to 'On' for the primary SONAR Xi and App Control to 'Secondary' for the secondary SONAR Xi.
Resetting the App's Fader Volume and Mute Functions on the Device
Sometimes SONAR and a Bluetooth-enabled device may be disconnected because that device is no longer available. Perhaps its battery has run low or it has been moved out of range. In any event, you can manually cancel all of the app's mutes and volume off sets - as indicated by the little triangles being somewhere other than at 0 dB: All you have to do is adjust the corresponding Volume control on SONAR Xi.
3.3 More on Bluetooth
Streaming Audio while Using the REMOTE CONTROL App
SONAR Xi can handle both Bluetooth signals simultaneously, even from different Bluetooth devices. This lets you do things like use a smartphone to stream audio while controlling the speaker via a tablet running the SONAR REMOTE app.
Bluetooth Range
SONAR Xi supports Bluetooth 5. Its signal strength depends on the Bluetooth player's transmission power. Bluetooth 5-enabled devices' range can extend out to 40 meters. The range of devices that do not support Bluetooth 5 usually runs up to 10 meters, but that depends on factors such as the device's quality, transmission power and the given environment. Objects such as walls obstructing the transmission path, a protective cover or a holder for the Bluetooth device can interfere with the signal.
Out of Range – Bluetooth Interruptus
The app switches over to Demo mode when the device is out of Bluetooth range. A broken connection also interrupts the audio stream. The app automatically reconnects to SONAR Xi as soon as the device is back within range. The SONAR REMOTE app also automatically connects to SONAR Xi after the power is switched off and back on again.
If you are streaming audio via Bluetooth when the signal drops out, you'll have to reconnect the two devices manually. You don't have to do anything on the SONAR Xi, but you do have to select the SONAR Xi in the Bluetooth-enabled device's list of discovered devices. The same applies if you switch the SONAR Xi off and back on again: You have to select it manually in the device's Bluetooth list.
Bluetooth Audio Stream Stutters or Drops Out
The app sends individual data packets at short intervals, so it is a lot less susceptible to interference than an audio stream, which requires a constant flow of data. To get a good signal without glitches, it is best to align SONAR Xi and the source device in line of sight of one another.
Good to know: Your source device may be set up to issue ringtones, notifications and system sounds. The speakers will render these sounds along with the audio stream if they arrive via Bluetooth, so be sure to disable these functions on your Bluetooth device.
Learn more about Bluetooth at www.bluetooth.org.
4 The SONAR REMOTE App

You can run the SONAR REMOTE app on a smartphone or tablet to control up to two SONAR Xi units remotely via Bluetooth.
text_image
SONAR 3. Shelby's birthday... EDIT 1 MUTE EDIT 2 MUTE EDIT 3 MUTE SETUP Master MUTEThe SONAR REMOTE app provides a Volume fader and a Mute button for each channel. In Edit mode, the left and right arrows let you quickly step through the individual channels and adjust their EQ settings. The Scenes button serves to store and load mixer settings. The fi ve-segment Bluetooth display indicates the strength of the signal connecting SONAR Xi and the Bluetooth device.
The SONAR Xi display shows all settings as they are adjusted in the SONAR REMOTE app, and vice versa. The Bluetooth link enables the two displays to sync up in real time.
You'll see a blue horizontal bar, faders and position arrows in the app when a single SONAR Xi is connected. The primary SONAR Xi's controls are also blue with two SONAR Xi connected, but the secondary SONAR Xi's are green. Controls that address both SONAR Xi units are orange.
text_image
SONAR SONAR (12x) Edit EDIT EDIT EDIT SETUP 1 2 3 Master MUTE MUTE MUTE MUTEThe app's mixer for a single SONAR Xi
text_image
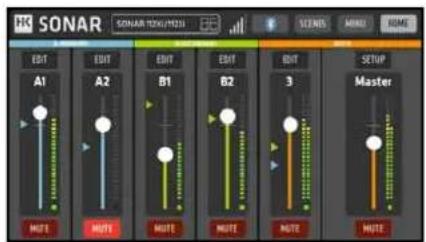
SONAR SONAR TOXU/H23 Edit Edit Edit Edit Edit 3 SETUP A1 A2 B1 B2 Master MUTE MUTE MUTE MUTE MUTEJoint Channel 3 and Master Volume controls for two SONAR Xi units in stereo mode
text_image
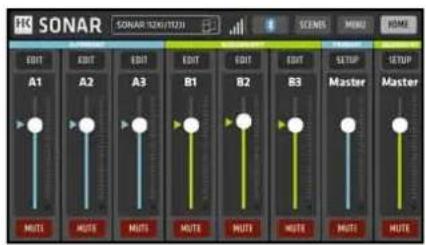
SONAR SONAR 1200/1033 EDIT EDIT EDIT EDIT EDIT EDIT EDIT EDIT A1 A2 A3 B1 B2 B3 SETUP SETUP MUTE MUTE MUTE MUTE MUTE MUTE MUTE MUTE MUTETwo SONAR Xi units in Zone mode: Dedicated Channel 3 and Master Volume faders for each
text_image
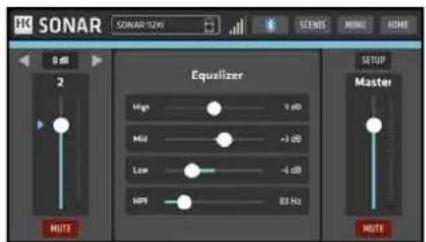
SONAR SONAR/12W 8 dB 2 Equalizer High 0 dB Mid -3 dB Low -6 dB MPS 83 Hz MUTE STOP Master MUTEChannel 2 in Edit mode
text_image
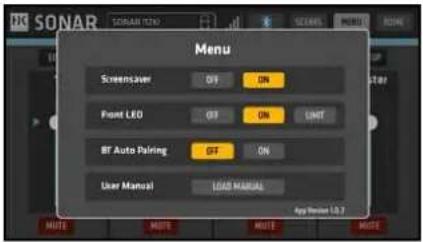
SONAR SORAR 1200 Menu Screen saver OFF ON Front LED OFF ON UNIT ST Auto Pairing OFF ON User Manual LOAD MANUAL App Version 1.0.7 MUTE MUTE MUTE MUTEMenu options

text_image
SONAR SONAR 12.0 Setup Mode LUG DI MONITOR Ext.Sub Ext. Sub can only be activated on SONAR Bluetooth will be disabled then. Delay 0.0m/Off Output PDS MASTER POST MASTER Master 0 dB NOTESetup options
Heads up: The SONAR REMOTE app does not process audio signals. It merely controls the DSP functions of SONAR Xi's 24-bit audio controller.
The SONAR REMOTE app is available for free in the Apple App Store and the Google Play Store. You'll find a direct link to these app stores on the product pages at hkaudio.com.
Please check from time to time to make sure you are running the latest version of the SONAR REMOTE app.
5 Example Applications
Examples with SONAR Xi Fullrange Cabinets
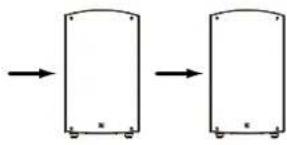
- Two standalone SONAR Xi units
natural_image
Two identical rectangular frames with rounded corners and small base dots, connected by arrows (no text or symbols)Connections:
Connect microphone, line, aux and Bluetooth sources to the first SONAR Xi and use XLR cables to route these signals to the second SONAR Xi.
Signal path:
SONAR Xi #1 Mix Out → SONAR | Xi #2 Line Input (Channel 1 or 2)
Settings:
| Ext. Sub: Off | |
| Other settings as the situation requires. | |
Set the channel EQ faders of the Line input on the second SONAR Xi receiving the signal from the first SONAR Xi to a neutral position to ensure the two speakers sound the same.
Heads up: Signal sources connected to one SONAR Xi will only be rendered by this cabinet. They can't be transmitted to the other SONAR Xi via Bluetooth, the one exception being audio streamed via Bluetooth TWS. See section 3.1 for more on this. For example, if you want the second SONAR Xi to render the signal of a microphone connected to the first SONAR Xi, you will have to connect the two speakers with an XLR cable.
Caution: Do not connect two SONAR Xi in both directions (SONAR Xi #1 Mix Out -> SONAR Xi #2 Line input and SONAR Xi #2 Mix Out -> SONAR Xi #1 Line input). This would create a feedback loop that could destroy electronic components and speakers.
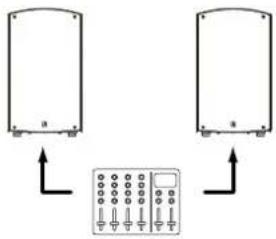
- Two SONAR Xi units with an outboard mixer
text_image
Diagram showing two identical rectangular devices with labeled 'a' and directional arrows pointing to a control panel with multiple buttons.Connect microphone, line, aux and Bluetooth sources to the first SONAR Xi and use XLR cables to route these signals to the second SONAR Xi.
Signal path:
| External mixer Out L/R → 2x SONAR | Xi Line Input(Channel 1 or 2 respectively) |
Settings:
| Ext. Sub: Off | |
| Other settings as the situation requires | |
Heads up: Be sure to configure the two SONAR Xi unit's Setup options the same way when operating a stereo system, for example, with Mode set to Live and Delay to 0. Two SONAR Xi units covering different zones can have completely different settings.
Heads up: If you are using the Line inputs, set their channel EQs on both SONAR Xi units to a neutral position or to the same values to ensure the two speakers sound the same.
Heads up: You can combine two different SONAR Xi models in a stereo system and even stream audio via Bluetooth and use the REMOTE app, but two different speakers will sound a bit different by design.
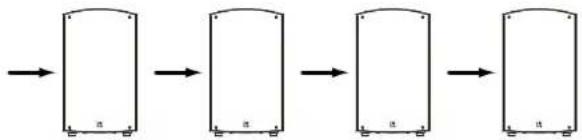
- Two (or more) daisy-chained SONAR Xi units without an outboard mixer
You can plug XLR cables into the Mix Outs and Line Ins to daisy-chain several SONAR Xi cabinets. Simply route the first SONAR Xi's signal on to the downstream SONAR Xi unit(s). This works for front sound reinforcement, monitoring and for zone coverage.
flowchart
graph LR
    A[" "] --> B[" "]
    B --> C[" "]
    C --> D[" "]
Connections:
Connect microphone, line, aux and Bluetooth sources to the first SONAR Xi as desired.
Signal path:
| SONAR Xi #1 Mix Out → SONAR | Xi #2 Line Input (Channel 1 or 2) |
| SONAR Xi #2 Mix Out → SONAR | Xi #3 Line Input (Channel 1 or 2) |
| SONAR Xi #3 Mix Out → SONAR | Xi #4 Line Input (Channel 1 or 2) |
Settings:
| Ext. Sub: Off (#1 / #2 | #3 / #4) |
| SONAR Xi #1 and #2 Mode: Live or DJ |
| SONAR Xi #3 and #4 Mode: Monitor |
Connect signal sources such as a microphone, Bluetooth audio stream and so on to the first SONAR Xi. If you connect other signal sources to a downstream speaker such as SONAR Xi #2, they will be rendered by SONAR Xi #2, SONAR Xi #3 and #4, but not by the upstream SONAR Xi #1.
Use the Setup/Output menu option to determine if a volume adjustment made on an upstream SONAR Xi will also affect the downstream SONAR Xi unit(s). See section 2.4 for more on this.
Make sure all SONAR Xi units have the same settings. Also, set the channel EQs of input channels on downstream SONAR Xi units to a neutral position, unless you wish to configure these otherwise.
Examples of SONAR Xi Fullrange Cabinets Combined with Active SONAR SUB Series Subwoofers
The following examples feature SONAR Xi fullrange cabinets combined with SONAR SUB series subwoofers. The SONAR Xi fullrange cabinets offer a preset for SONAR subwoofers, and SONAR subwoofers a preset for use with SONAR Xi fullrange cabinets. A touch of a button is all takes to match these components.
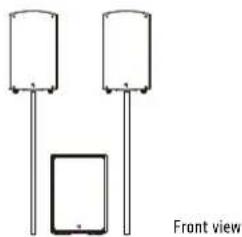
• 2.1 Stereo system (single subwoofer)
natural_image
Simple line drawing of two cylindrical objects with vertical rods and a separate square component, labeled 'Front view' (no text or symbols on the objects themselves)Signal flow:
| External mixer Out L/R | → | SONAR Sub In L/R |
| SONAR Sub Thru L/R | → | 2x SONAR Xi Line Input(Channel 1 or 2 respectively) |
Settings:
| Xi: Ext. Sub | On |
| Sub: MODE | Normal |
| Sub: X-OVER | SONAR (or set the frequency to match other speakers) |
| Further settings as required | |
For a balanced image, center the subwoofer between the two mid/high units.
• Half-stack system (one subwoofer per side)

natural_image
Simple line drawing of two identical rectangular objects with vertical connectors, labeled 'Front view' at the bottom (no text or symbols on objects)Signal flow:
| External mixer Out L/R | → | 2x SONAR Sub In (L or R each) |
| 2x SONAR Sub Thru (L or R each) | → | 2x SONAR Xi Line Input(Channel 1 or 2 respectively) |
Settings:
| Xi: Ext. Sub | On |
| Sub: MODE | Normal |
| Sub: X-OVER | SONAR (or set the frequency to match other speakers) |
| Further settings as required | |
• Full-stack system (two subwoofers per side)
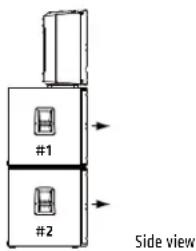
text_image
#1 #2 Side viewSignal flow:
| External mixer Out L/R → 2x SONAR | Sub #2 In (L or R each) | |
| 2x SONAR Sub #2 Thru (L or R each) → | 2x | SONAR Sub #1 In (L or R each) |
| 2x SONAR Sub #1 Thru (L or R each) → | 2x | SONAR Xi Line Input(Channel 1 or 2 respectively) |
Settings:
| Xi: Ext. Sub On | |
| Sub: MODE Normal | |
| Sub: X-OVER SONAR (or set the frequency to match other speakers) | |
| Further settings as required. | |
6 Optional HK Audio Accessories
The availability of accessories may vary across regions and from time to time. Please visit the SONAR product page at www.hkaudio.com to learn more.
FCC STATEMENT
Changes or modifications not expressly approved by the party responsible for compliance could void the user's authority to operate the equipment.
NOTE: This equipment has been tested and found to comply with the limits for a Class B digital device, pursuant to Part 15 of the FCC Rules. These limits are designed to provide reasonable protection against harmful interference in a residential installation.
This equipment generates uses and can radiate radio frequency energy and, if not installed and used in accordance with the instructions, may cause harmful interference to radio communications. However, there is no guarantee that interference will not occur in a particular installation. If this equipment does cause harmful interference to radio or television reception, which can be determined by turning the equipment off and on, the user is encouraged to try to correct the interference by one or more of the following measures:
- Reorient or relocate the receiving antenna.
- Increase the separation between the equipment and receiver.
- Connect the equipment into an outlet on a circuit different from that to which the receiver is connected.
- Consult the dealer or an experienced radio/TV technician for help.
FCC Radiation Exposure Statement
This equipment complies with FCC radiation exposure limits set forth for an uncontrolled environment. This equipment should be installed and operated with minimum distance 20cm between the radiator & your body.
IC WARNING
This device contains licence-exempt transmitter(s)/receiver(s) that comply with Innovation, Science and Economic Development Canada's licence-exempt RSS(s). Operation is subject to the following two conditions:
(1) This device may not cause interference.
(2) This device must accept any interference, including interference that may cause undesired operation of the device.
7 Technical Specifications
| Model SONAR 110 Xi SONAR 112 Xi SONAR 115 Xi SONAR 115 Sub D | ||||
| Max. SPL peak @ 10 % THD 123 dB | half space 127 dB half space 130 | dB half space 125 dB half space | ||
| Max. SPL calculated 126 dB half space 130 dB half space 133 dB half space 128 dB half space | ||||
| Frequency response +/- 3 dB | 64 Hz - 18 kHz | 58 Hz - 18 kHz | 56 Hz - 18 kHz | 40 Hz - X-Over |
| Frequency response -10 dB | 59 Hz - 20 kHz | 54 Hz - 20 kHz | 50 Hz - 20 kHz | 36 Hz - X-Over |
| Power amp output (peak power) | 800 W | 1200 W | 1200 W | 1500 W |
| Amp type | Class AB + D | Class AB + D | Class AB + D | Class D |
| Active protective circuits Thermal & Overload protection, Subsonic filter, peak + RMS limiter | Thermal & Overload protection, Subsonic filter, peak + RMS limiter | Thermal & Overload protection, Subsonic filter, peak + RMS limiter | Thermal protection, Overload protection, Subsonic filter, peak + RMS limiter | |
| LF driver | - | - | - | 1x 15", 3" voice coil |
| Low-/mid speaker | 1x 10", 2" voice coil | 1x 12", 2.5" voice coil | 1x 15", 2.5" voice coil | - |
| HF driver | 1", 1" voice coil | 1", 1.35" voice coil | 1", 1.35" voice coil | - |
| Horn directivity | 90° x 60° CD horn | 90° x 60° CD horn | 90° x 60° CD horn | - |
| Active crossover frequency | - | - | - | 60 - 150 Hz, adjustable |
| Display | 1.83" color display | 1.83" color display | 1.83" color display | 2.2" LCD |
| Analog inputs | 2x XLR combo balanced, 1x 3.5 mm stereo jack | 2x XLR combo balanced, 1x 3.5 mm stereo jack | 2x XLR combo balanced, 1x 3.5 mm stereo jack | 2x XLR combo balanced |
| Analog outputs | 1x Mix Out XLR balanced | 1x Mix Out XLR balanced | 1x Mix Out XLR balanced | 2x Thru XLR balanced |
| Sensitivity switch | 2x Mic/Line | 2x Mic/Line | 2x Mic/Line | - |
| Sound modes | Live/DJ/Monitor | Live/DJ/Monitor | Live/DJ/Monitor | - |
| Setup modes | Ext. Sub | Ext. Sub | Ext. Sub | Cardioid Front, Cardioid Rear, SONAR |
| DSP functions | Master Volume, Level Metering, 3-band EQ, Low-Cut Filter, Front LED, Screen-saver, BT Auto Pairing, Delay, Output Pre/Post Master | Master Volume, Level Metering, 3-band EQ, Low-Cut Filter, Front LED, Screen-saver, BT Auto Pairing, Delay, Output Pre/Post Master | Master Volume, Level Metering, 3-band EQ, Low-Cut Filter, Front LED, Screensaver, BT Auto Pairing, Delay, Output Pre/Post Master | Bass Boost, Polarity, X-Over, Delay, Front LED, Display Dim, Reset |
| Bluetooth version | 5.0 | 5.0 | 5.0 | - |
| Bluetooth features | Audio streaming, TWS | Audio streaming, TWS | Audio streaming, TWS | - |
| Remote app | iOS + Android | iOS + Android | iOS + Android | - |
| Delay | 0-10 m | 0-10 m | 0-10 m | 0-10 m |
| Power consumption (nominal according to EN 62368-1) | 0.4 A / 220-240 V AC0.8 A / 100-120 V AC | 0.6 A / 220-240 V AC1.2 A / 100-120 V AC | 0.6 A / 220-240 V AC1.2 A / 100-120 V AC | 0.8 A / 220-240 V AC1.6 A / 100-120 V AC |
| Angles up (monitor angle) | 35° | 35° | 35° | - |
| Pole mount | 35 mm, tiltable (0°/-7.5°) | 35 mm, tiltable (0°/-7.5°) | 35 mm, tiltable (0°/-7.5°) | 1x M20 |
| Rigging points | 3x M10 | 3x M10 | 3x M10 | - |
| Carrying handles | 1x SingleGrip | 2x SingleGrip | 2x SingleGrip | 2x MultiGrip |
| Casters | - | - | - | Optional |
| Housing | Plastic | Plastic | Plastic | Wood |
| Finish | Black | Black | Black | Black acrylic enamel |
| Front grille | Metal grille backed with black acoustic foam | Metal grille backed with black acoustic foam | Metal grille backed with black acoustic foam | Metal grille backed with black acoustic foam |
| Dimensions (WxHxD) | 31 x 53.5 x 30 cm | 36.5 x 62.9 x 35.5 cm | 42.5 x 72.9 x 41.5 cm | 43 x 61.2 x 61.6 cm |
| Weight | 11.5 kg / 25.4 lbs | 15.9 kg / 35.1 lbs | 19.5 kg / 43.0 lbs | 28.4 kg / 62.6 lbs |
Bluetooth®
The Bluetooth ^® word mark and logos are registered trademarks owned by Bluetooth SIG, Inc. and any use of such marks by Stamer Musikanlagen GmbH is under license.
Apple, the Apple logo and iPad are trademarks of Apple Inc., registered in the U.S. and other countries. App Store is a service mark of Apple Inc.
All mentioned trademarks and copyrights belong to their respective owners.
natural_image
Technical line drawing of three views of a speaker chamber with no visible text or symbols② Volume (CH 1/CH 2)
3 Mic/Line (CH 1/CH 2)
5 Master (Push to edit)
flowchart
graph LR
    A["Mobile Device"] --> B["Primary"]
    B --> C["Secondary"]
text_image
Serial No. Mains 100-120 V~ + 50-60 Hz 1.2 A @ 1/8 output power Power 10 On Off11 Mains
text_image
App 1st Mic 2 High 0dB Mid 3dB Low -6dB HPF 80Hztext_image
1 App 2nd Streaming Secondary App Control Secondary 3 4 Zone Stereo Unlink 5 6text_image
App 1st Line Mute Setup Menu 1 2 BT/Aux -5dB MasterMaster
text_image
App 1st Menu Screensaver On Front LED Off BT Auto Pairing On ResetScreensaver
text_image
App 1st Setup Mode Monitor Ext. Sub Off Delay 5,2m/17ft Output Pre MasterMode
text_image
Setup Activating "Ext. Sub" will disable/lock some settings. Are you sure? Cancel Continuetext_image
App Streaming On App Control OffStreaming
text_image
App Streaming On App Control Off Link App 1st Streaming On App Control Off Zone Stereo Unlink App 2nd Streaming Secondary App Control Secondary Zone Stereo UnlinkOptionen: Link, Stereo, Zone, Unlink
Link
text_image
SONAR 3: Shelby's birthday... EDIT 1 MUTE EDIT 2 MUTE EDIT 3 MUTE SETUP Master MUTEtext_image
SONAR SONAR 1200 $ SCENS MENU HOME EDIT 1 EDIT 2 EDIT 3 SETUP Masters MUTE MUTE MUTE MUTEtext_image
SONAR SONAR/12/01/2021 ESCRES MENU VARS EDIT A1 EDIT A2 EDIT B1 EDIT B2 EDIT 3 SETUP Master MUTE MUTE MUTE MUTE MUTEtext_image
SONAR SONAR (12/01/2023) EDIT EDIT EDIT EDIT EDIT EDIT EDIT EDIT A1 A2 A3 B1 B2 B3 SETUP SETUP MUTE MUTE MUTE MUTE MUTE MUTE MUTE MUTE MUTEtext_image
SONAR SONAR 12.0K SIZE MENU HOME Equalizer High 3 dB Mid +3 dB Low -6 dB Mute 8.5 Hz MUTE SETUP Masternatural_image
Two identical rectangular diagrams with arrows indicating transformation or scaling, no text or symbols present.text_image
Diagram showing two identical rectangular devices connected to a control panel with labeled buttons and indicators.flowchart
graph LR
    A["Rectangular container with internal components"] --> B["Rectangular container with internal components"]
    B --> C["Rectangular container with internal components"]
    C --> D["Rectangular container with internal components"]
Anschlüsse:
natural_image
Simple line drawing of three cylindrical objects with vertical rods, one containing a rectangular block, labeled 'Vorderansicht' at the bottom (no other text or symbols)Signalweg:
| Ext. Mischpult Out L/R → SONAR Sub In L/R | |
| SONAR Sub Thru L/R → 2x SONAR Xi Line Input(jeweils Kanal 1 oder 2) |
Einstellungen:
natural_image
Two identical cylindrical objects with vertical rods, labeled 'Vorderansicht' at the bottom (no other text or symbols)Signalweg:
natural_image
Technical line drawing of three views of a speaker chamber with no visible text or symbols24bit Digital Signal Processor

HK AUDIO
SONAR
Master

Push to edit

1

Mlc◀▶Line


2

Mlc◀▶Line


3

BTh
Mix Out
1 Display
2 Volume (CH 1/CH 2)
3 Mic/Line (CH 1/CH 2)
5 Master (Push to edit)
flowchart
graph LR
    A["Mobile Device"] --> B["Primary"]
    B --> C["Secondary"]
text_image
Serial No. Mains 100-120 V× 50-60 Hz 1.2 A @ 1/8 output power Power 10 On Off11 Mains
text_image
App 1st Mic 2 High 0dB Mid 3dB Low -6dB HPF 80Hztext_image
1 App 2nd Streaming Secondary App Control Secondary 3 4 Zone Stereo Unlink 5 6text_image
App 1st Setup Menu Line Mute BT/Aux -5dB 1 2 3 MasterMaster
text_image
App 1st Menu Screensaver On Front LED Off BT Auto Pairing On Resettext_image
App 1st Setup Mode Monitor Ext. Sub Off Delay 5,2m/17ft Output Pre MasterMode
text_image
Setup Activating "Ext. Sub" will disable/lock some settings. Are you sure? Cancel ContinueTourner 1x, Appuyer 1x ...
text_image
Ext. Sub: On Setup Mode Live Ext. Sub On Delay 0,0m/0ft Output Pre MasterOptions: 0 - 10 m/33 ft
Options: Pre Master, Post Master
text_image
App Streaming On App Control OffStreaming
Options: Off, On, Secondary
Options: Off, On, Secondary
text_image
App Streaming On App Control Off Link App 1st Streaming On App Control Off Zone Stereo Unlink App 2nd Streaming Secondary App Control Secondary Zone Stereo UnlinkOptions : Link, Stereo, Zone, Unlink
Link
text_image
SONAR 3. Shelly's birthday... EDIT 1 MUTE EDIT 2 MUTE EDIT 3 MUTE SETUP Master MUTE SCENES MENU HOMEtext_image
SONAR SONAR (12x) EDIT EDIT EDIT EDIT 1 2 3 SETUP MUTE MUTE MUTE MUTE MUTE MUTEtext_image
SONAR SONAR 1220/R223 EDIT EDIT EDIT EDIT A1 A2 B1 B2 MUTE MUTE MUTE MUTE MUTE SETUP Mastertext_image
SONAR SONAR(1200/1023) EDIT EDIT EDIT EDIT EDIT EDIT EDIT EDIT A1 A2 A3 B1 B2 B3 SETUP SETUP MUTE MUTE MUTE MUTE MUTE MUTE MUTE MUTE MUTEtext_image
SONAR SONAR 1520 Setup Mode LUG G HOMITOR Ext.Sub Ext. Sub can only be activated on SONAR, bluetooth will be disabled then. Delay 0.0ms/IPS Output FBS MASTER POST MASTER Master MUTEnatural_image
Two identical rectangular diagrams with arrows indicating transformation or scaling, no text or symbols present.text_image
Diagram showing two identical rectangular devices connected to a control panel with labeled buttons and indicators.flowchart
graph LR
    A[" "] --> B[" "]
    B --> C[" "]
    C --> D[" "]
Connexions :
natural_image
Simple line drawing of two cylindrical objects with vertical rods and a separate rectangular object, labeled 'Vue de face' at the bottom (no other text or symbols)Trajet du signal :
| Pupitre de mixage externe Out L/R → | SONAR Sub In L/R | |
| SONAR Sub Thru L/R | → | 2x SONAR Xi Line Input(respectivement canal 1 ou 2) |
Paramètres :
natural_image
Two identical rectangular objects with vertical lines and base, labeled 'Vue de face' below (no other text or symbols)Trajet du signal :
| Pupitre de mixage externe Out L/R → | 2x SONAR Sub In (resp. L ou R) | |
| 2x SONAR Sub Thru (resp. L ou R) | → | 2x SONAR Xi Line Input(respectivement canal 1 ou 2) |
Paramètres :
This device contains licence-exempt transmitter(s)/receiver(s) that comply with Innovation, Science and Economic Development Canada's licence-exempt RSS(s). Operation is subject to the following two conditions:
(1) This device may not cause interference.
(2) This device must accept any interference, including interference that may cause undesired operation of the device.
natural_image
Technical line drawing of three views of a speaker chamber with visible sound dividers and mounting brackets (no text or symbols)② Volume (CH 1/CH 2)
3 Mic/Line (CH 1/CH 2)
5 Master (Push to edit)
flowchart
graph LR
    A["Smartphone"] --> B["Primary"]
    B --> C["Secondary"]
text_image
App 1st Setup Menu Line Mic BT/Aux OrdB 1 2 3 Mastertext_image
App 1st Mic 2 High 0dB Mid 3dB Low -6dB HPF 80Hztext_image
1 App 2nd Streaming Secondary App Control Secondary 3 4 Zone Stereo Unlink 5 6text_image
App 1st Setup Menu Line Mute BT/Aux -5dB 1 2 3 MasterMaster
text_image
App 1st Menu Screensaver On Front LED Off BT Auto Pairing On ResetScreensaver
text_image
App 1st Setup Mode Monitor Ext. Sub Off Delay 5,2m/17ft Output Pre Mastertext_image
App Streaming On App Control OffStreaming
text_image
App Streaming On App Control Off Link App 1st Streaming On App Control Off Zone Stereo Unlink App 2nd Streaming Secondary App Control Secondary Zone Stereo Unlinktext_image
SONAR SORAR 1200 Menu Screen saver OFF ON Front LED OFF ON UNIT ST Auto Pairing OFF ON User Manual LOAD MANUAL App Version 1.0.7 MUTE MUTE MUTE MUTEImpostazioni Menu

text_image
SONAR SONAR 12.0 Setup Mode LPG D MONITOR Ext.Sub Ext. Sub can only be activated on SONAR Bluetooth will be disabled then. Delay 0.0m/0Hz Output POST MASTER POST MASTER Master 0 dB MUTEImpostazioni Setup
natural_image
Two identical rectangular diagrams with rounded corners and base supports, connected by arrows (no text or symbols)Connessioni:
SONAR Xi #1 Mix Out → SONAR | Xi #2 Line Input (Canale 1 o 2)
Impostazioni:
text_image
Diagram showing two identical rectangular devices with labeled 'a' and directional arrows pointing to a control panel with multiple buttons.flowchart
graph LR
    A["Rectangular Object with label 'a'"] --> B["Rectangular Object with label 'a'"]
    B --> C["Rectangular Object with label 'a'"]
    C --> D["Rectangular Object with label 'a'"]
Connessioni:
| Ext. Sub: Off (#1, #2, #3, #4) |
| SONAR Xi #1 e #2 Mode: Live o DJ |
| SONAR Xi #3 e #4 Mode: Monitor |
natural_image
Technical line drawing of three views of a speaker chamber with circular components (no text or symbols)24bit Digital Signal Processor

HK AUDIO
SONAR
Master

Push to edit

1

Mlc◄►Line


2

Mlc◀▶Line


3
BTh


Mix Out
1 Display
2 Volume (CH 1/CH 2)
3 Mic/Line (CH 1/CH 2)
5 Master (Push to edit)
flowchart
graph LR
    A["Mobile Device"] --> B["Primary"]
    B --> C["Secondary"]
text_image
Signal No. Mains 100-120 V~ + 50-60 Hz 1.2 A @ 1/8 output power Power 10 On Off11 Mains
text_image
App 1st Line Mic Setup Menu 1 2 BT/Aux OctB 3 Mastertext_image
App 1st Mic 2 High 0dB Mid 3dB Low -6dB HPF 80Hztext_image
App 1st Setup Menu Line Mute BT/Aux -5dB 1 2 3 MasterMaster
text_image
App 1st Menu Screensaver On Front LED Off BT Auto Pairing On ResetScreensaver
text_image
App 1st Setup Mode Monitor Ext. Sub Off Delay 5,2m/17ft Output Pre Mastertext_image
App Streaming On App Control OffStreaming
text_image
App Streaming On App Control Off Link App 1st Streaming On App Control Off Zone Stereo Unlink App 2nd Streaming Secondary App Control Secondary Zone Stereo Unlinktext_image
SONAR 3: Shelly's birthday... EDIT 1 MUTE EDIT 2 MUTE EDIT 3 MUTE SETUP Master MUTEtext_image
SONAR SONAR 1246 8 SCEN5 MENU HOME EDIT 1 MUTE EDIT 2 MUTE EDIT 3 MUTE MUTE SETUP Mastertext_image
SONAR SONAR 1520 Setup Mode LUG G HOMITOR Ext. Sub Ext. Sub can only be activated on SONAR bluetooth will be disabled then. Delay 0.0ms/IPS Output POST MASTER POST MASTER Master 0 dB MUTEAjustes de Setup
natural_image
Two identical rectangular panels with rounded corners and base supports, connected by arrows (no text or symbols)text_image
Diagram showing two identical devices with labeled ports and an analog control panel below, likely illustrating a system or device configuration.natural_image
Simple line drawing of two cylindrical tanks and a rectangular device, labeled 'Vista frontal' (no text or symbols on the devices themselves)Vía de señal:
natural_image
Two identical cylindrical objects with vertical rods, labeled 'Vista frontal' below (no other text or symbols)Vía de señal:
text_image
#1 #2 Vista lateralVía de señal: