HD 17190 - Pressure washer ROTHENBERGER - Free user manual and instructions
Find the device manual for free HD 17190 ROTHENBERGER in PDF.
| Product type | High pressure cleaner for pipes and surfaces |
| Brand | Rothenberger |
| Model | HD 17/190 (ref. 76070) |
| Maximum working pressure | 19 MPa (190 bar) |
| Flow rate | 17 L/min |
| Maximum working length | 40 m (pipe diameter 40-250 mm) |
| Power supply | 400 V / 50 Hz, three-phase |
| Motor power | 5.0 kW |
| Rotational speed | 2800 rpm |
| Current consumption | 10.9 A |
| Dimensions (L x W x H) | 65 x 50 x 70 cm |
| Weight | 50 kg |
| Pump type | Oil bath pump with 3 ceramic plungers, brass body, stainless steel valves |
| Dry run protection | Yes |
| Maximum suction height | 2 m |
| Maximum water temperature | 60 °C |
| Included high pressure hose | NW8 x 40 m |
| Integrated detergent injector | Yes, external suction |
| Pressure regulation | Continuous via regulating valve |
| Built-in pressure gauge | Yes, bar/PSI scale |
| Protection class | I |
| Protection type | IP54 |
| Sound pressure level | 79 dB(A) (K=3 dB(A)) |
| Hand-arm vibration value | 2.2 m/s² |
| Recommended oil type | Castrol Formula RS |
| Maintenance | Oil change every 1000 h (first at 500 h) |
| Included accessories | High pressure hose, injector, pressure gauge, regulating valve |
| Intended use | Cleaning of pipes, vehicles, buildings, surfaces |
Frequently Asked Questions - HD 17190 ROTHENBERGER
User questions about HD 17190 ROTHENBERGER
0 question about this device. Answer the ones you know or ask your own.
Ask a new question about this device
Download the instructions for your Pressure washer in PDF format for free! Find your manual HD 17190 - ROTHENBERGER and take your electronic device back in hand. On this page are published all the documents necessary for the use of your device. HD 17190 by ROTHENBERGER.
USER MANUAL HD 17190 ROTHENBERGER
natural_image
Four different industrial pressure irrigation machines shown from different angles (no visible text or labels)Bedienungsanleitung
Instructions for use
text_image
Warning symbol and icon depicting a person reading a document, with an exclamation mark in a triangle.A Overview
B Operating
text_image
1 A B
text_image
2 A B CIntro
| DEUTSCH - Originalbetriebsanleitung! | Seite 2 |
| Bedienungsanleitung bitte lesen und aufbewahren! Nicht wegwerfen!Bei Schäden durch Bedienungsfehler erlischt die Garantie! Technische Änderungen vorbehalten! | |
| ENGLISH | page 10 |
| Please read and retain these directions for use. Do not throw them away! The warranty does not cover damage caused by incorrect use of the equipment! Subject to technical modifi cations! | |
| FRANÇAIS | page 18 |
| Lire attentivement le mode d'emploi et le ranger à un endroit sûr! Ne pas le jeter ! La garantie est annulée lors de dommages dûs à une manipulation erronée ! Sous réserve de modifi cations techniques! | |
| ESPAÑOL | página 26 |
| ¡Por favor, lea y conserve el manual de instrucciones! ¡No lo tire! ¡En caso de daños por errores de manejo, la garantía queda sin validez! Modifi caciones técnicas reservadas! | |
| ITALIANO | Pagina 34 |
| Per favore leggere e conservare le istruzioni per l'uso! Non gettarle via! In caso di danni dovuti ad errori nell'uso, la garanzia si estingue! Ci si riservano modifi che tecniche! | |
| PORTUGUES | pagina 42 |
| Queiram ler e guardar o manual de instruções! Não deitar fora! Em caso de avarias por utilização incorrecta, extingue-se a garantia! Reservado o direito de alterações técnicas! | |
| POLSKI | strony 50 |
| Instrukcjê obsługi prosze przeczytac i przechowac! Nie wyrzucac!Przy uszkodzeniach wynikajacych z blédów obsługi wygasa gwarancja! Zmiany techniczne zastrzezone! | |
| TÜRKÇE | sayfa 58 |
| Kullanim açıklamalarini lütfen dikkatlice okuyunuz ve bir yerde muhafaza ediniz! Çöpe atmayiniz!Kullaniminda yapılan hatalar, garantinin silinmesine neden olur! Teknik deđipiklikler yapma hakkimiz saklidir! | |
| РУССКИЙ | Страница 66 |
| Прочтите инструкцию по эксплуатации и сохраняйте её для дальнейшего использования! В случае поломки инструмента из-за несоблюдения инструкции клиент теряет право на обслуживание по гарантии! Возможны технические изменения! | |
EU-DECLARATION OF CONFORMITY
We declare on our sole accountability that this product conforms to the standards and guidelines stated.
DECLARATION EU DE CONFORMITÉ
Director Corporate Technology
D-65779 Kelkheim/Germany
Inhalt
Seite
natural_image
Mechanical assembly diagram showing gears and shafts with a black arrow pointing to one gear (no text or symbols)Email: service@rothenberger.com
www.rothenberger.com
7 Entsorgung
1.1 Intended use....11
1.2 General safety instructions 11
1.3 Special safety instructions....12
2 Technical Data 13
3 Function of the Unit....13
3.1 Overview (A)....13
3.2 Functional description....14
3.3 Start of operation (B) 14
3.4 Shutdown 15
4 Care and Maintenance....15
5 Accessories....16
6 Customer service....16
7 Disposal....17
Markings in this document:

Danger!
This sign warns against the danger of personal injuries.
Caution!

This sign warns against the danger of property damage and damage to the environment.

Call for action
1.1 Intended use
The high-pressure pipe cleaning devices must only be used to clean pipes, drains, downpipes, house service connections and rain downpipes as well as for cleaning work in ducts with a diameter of 40 – 150 mm and up to 30 m in length or with a diameter of 40 – 250 mm and up to 40 m in length and for cleaning the surfaces of motor vehicles, machines, buildings and floor plates.
The HD 19/180B high-pressure cleaner must only be used outdoors!
1.2 General safety instructions

ATTENTION! When using electric tools, the following fundamental safety measures must be taken to prevent electric shock, injury or fire.
Read all of these instructions before you use the electric tool, and store the safety instructions properly.
Service and maintenance:
1 Regular cleaning, maintenance and lubrication. Always pull the electrical plug before any adjustment, maintenance or repair.
2 Have your device repaired only by qualified experts and only with original replacement parts. This ensures the continued safety of the device.
Working safely:
1 Keep your work area orderly. A messy work area can cause accidents.
2 Consider environmental influences. Do not expose electric tools to rain. Do not use electric tools in damp or wet environments. Keep the work area well lit. Do not use electric tools where there is a risk of fire or explosion.
3 Protect yourself from electric shock. Avoid physical contact with earthed parts (such as pipes, radiators, electric stoves or cooling devices).
4 Keep other people away. Do not let other people — especially children — touch the electric tool or its cable. Keep them away from the work area.
5 Store electric tools safely when they are not in use. Unused electric tools should be kept in a dry, high or closed area, out of reach of children.
6 Do not overload your electric tool. Work is better and safer within the performance range indicated.
7 Use the right electric tool. Don't use low-performance machines for heavy-duty jobs. Do not use the electric tool for purposes for which it was not intended. For example, do not use a portable circular saw for cutting tree branches or logs.
8 Wear proper clothing. Do not wear loose clothing or jewellery, as they can get caught in moving parts. When working outdoors, wear slip-resistant shoes. Wear a hairnet over long hair.
9 Use protective gear. Wear safety glasses. Wear a breathing mask during work that creates dust.
10 Connect the dust extraction equipment. If there are connections to dust extraction and collection equipment, make sure that they are connected and properly used.
11 Do not use the cable for purposes for which it was not intended. Never use the cable to pull the plug from the socket. Protect the cable from heat, oil and sharp edges.
12 Secure the work piece. Use clamps or a vice to hold the work piece firmly. They will hold it more securely than your hand can.
13 Avoid abnormal postures. Make sure to stand securely and always keep your balance.
14 Maintain your tools with care. For better and safer work, keep cutting tools sharp and clean. Follow the instructions for lubrication and changing tools. Regularly inspect the electric tool's connection cable, and if it is damaged, have it replaced by an authorized expert. Regularly check extension cords and replace them if they are damaged. Keep the handles dry, clean and free of oil and grease.
15 Pull the plug from the socket. When not using the electric tool, before maintenance or when changing tools, such as saw blades, drills and cutting bits.
16 Do not leave any tool keys inserted. Before switching on, check to see that keys and adjustment tools have been removed.
17 Avoid unintentional activation. When plugging the tool in, make sure that the switch is turned off.
18 Use outdoor extension cords. When outdoors, use only extension cords that are approved and appropriately marked.
19 Be alert. Pay attention to what you do. Approach your work sensibly. Do not use the electric tool when you are distracted.
20 Check the electric tool for damage. Before using the electric tool, you must inspect safety equipment or slightly damaged parts carefully to ensure that they work properly and as intended. Check to see that the moving parts operate freely and don't stick, and to make sure no parts are damaged. All parts must be mounted properly and meet all the conditions for ensuring trouble-free operation of the electric tool.
Damaged safety equipment and parts must be properly repaired or replaced by a professional facility, unless otherwise indicated in the user manual. Damaged switches must be replaced by a customer service facility.
Never use an electric tool whose switch cannot be turned on and off.
21 Caution. Using other insertion tools and accessories may cause injury.
22 Have your tool repaired by an electrical expert. This electric tool meets applicable safety requirements. Repairs must be made only by an electrical expert using original replacement parts. Otherwise accidents many occur.
1.3 Special safety instructions
In accordance with DIN 1988-1 the devices must not be connected directly to the public drinking water supply. According to the DVGW (German Technical and Scientific Association for Gas and Water) short-term connection is, however, permissible if a return flow inhibitor with an aerator is fitted in the inlet pipe.
Hose lines are to be guided in such a way that they are not pinched or damaged by bodies with sharp edges. Extended tensile and bending stress to the hose lines is to be avoided.
The operator must ensure that the proper condition of the important parts and safety devices is checked every time before the fluid spray gun is put into operation. Any faults are to be remedied before start-up.
For pipe cleaning work do not switch on until the nozzle and the hose are inserted into the pipe until the mark on the pipe. Please also observe the "Guidelines for fluid spray guns" and "Safety of electric devices for domestic use and similar purposes".
Never take in solvent-containing fluids such as paint thinner, petrol, oil or similar fluids. Observe the information provided by the manufacturers of the additives. The seals in the device are not solvent resistant. The atomised spray of solvents is highly inflammable, able to explode and toxic.
This appliance was designed to be used with detergents which are supplied or recommended by the manufacturer. The use of other detergents or chemicals may compromise the safety of the appliance.
The high pressure jet may not be directed at persons, animals, live electrical equipment or at the appliance itself.
Do not use the appliance when there are other persons around unless they are also wearing protective clothing.
The high-pressure jet must not be directed at other persons or the user him/herself to clean clothing or footwear.
Do not spray flammable liquids.
The appliance must not be operated by children or persons who have not been instructed accordingly.
High-pressure hoses, fixtures and couplings are important for the safety of the appliance. Only use high-pressure hoses, fixtures and couplings recommended by the manufacturer.

Please note! Be sure to read before use. Please observe the attached instruction manual with safety information on the petrol motor!
2 Technical Data
| Part Number: | HD 11/9076008 | HD 13/10076020 | HD 17/19076070 | HD 19/180B76090 |
| Flow rate (l/min) | 11 | 13 | 17 | 19 |
| Max. working length (m) | 10 | 20 | 40 | 40 |
| Max. operating pressure (MPa) | 9 | 10 | 19 | 18 |
| Motor | 230V / 50Hz | 230V / 50Hz | 400V / 50Hz | petrol |
| Speed (1/min) | 1400 | 1400 | 2800 | 1800 |
| Motor capacity (kW) | 1,5 | 2,3 | 5,0 | 8,1 |
| Current consumption | 9,5 A | 13 A | 10,9A | --- |
| Consumption/Tank contents | --- | --- | --- | 3,2l/h / 6,5l |
| Dimensions (cm) | 48 x 24 x 35 | 65 x 50 x 70 | 65 x 50 x 70 | 65 x 50 x70 |
| Weight (kg) | 29,5 | 45 | 50 | 78,5 |
| High-pressure hose | NW6 x 10m | NW6 x 20m | NW8 x 40m | NW8 x 40m |
| Protection class | I | I | I | --- |
| Protection type | IP54 | IP54 | IP54 | --- |
| Noise pressure level dB (A) | ||||
| L_pA | K_pA | 68 | 3 | 76 | 3 | 79 | 3 | 81 | 3 |
| Sound power level dB (A) | ||||
| L_WA | K_WA | 84 | 3 | 91 | 3 | 89 | 3 | 103 | 3 |
| Washing lance: | ||||
| Recoil force (Nm) | ca. 18 | ca. 20 | ca. 22 | ca. 38 |
| Hand-arm vibration value | 1,9 m/s2 | 2,1 m/s2 | 2,2 m/s2 | 2,2 m/s2 |
| The noise level during operation can exceed 85 dB (A). Wear hearing protection! | ||||
| Measured values determined in accordance with EN 60335-2-79. | ||||
3 Function of the Unit
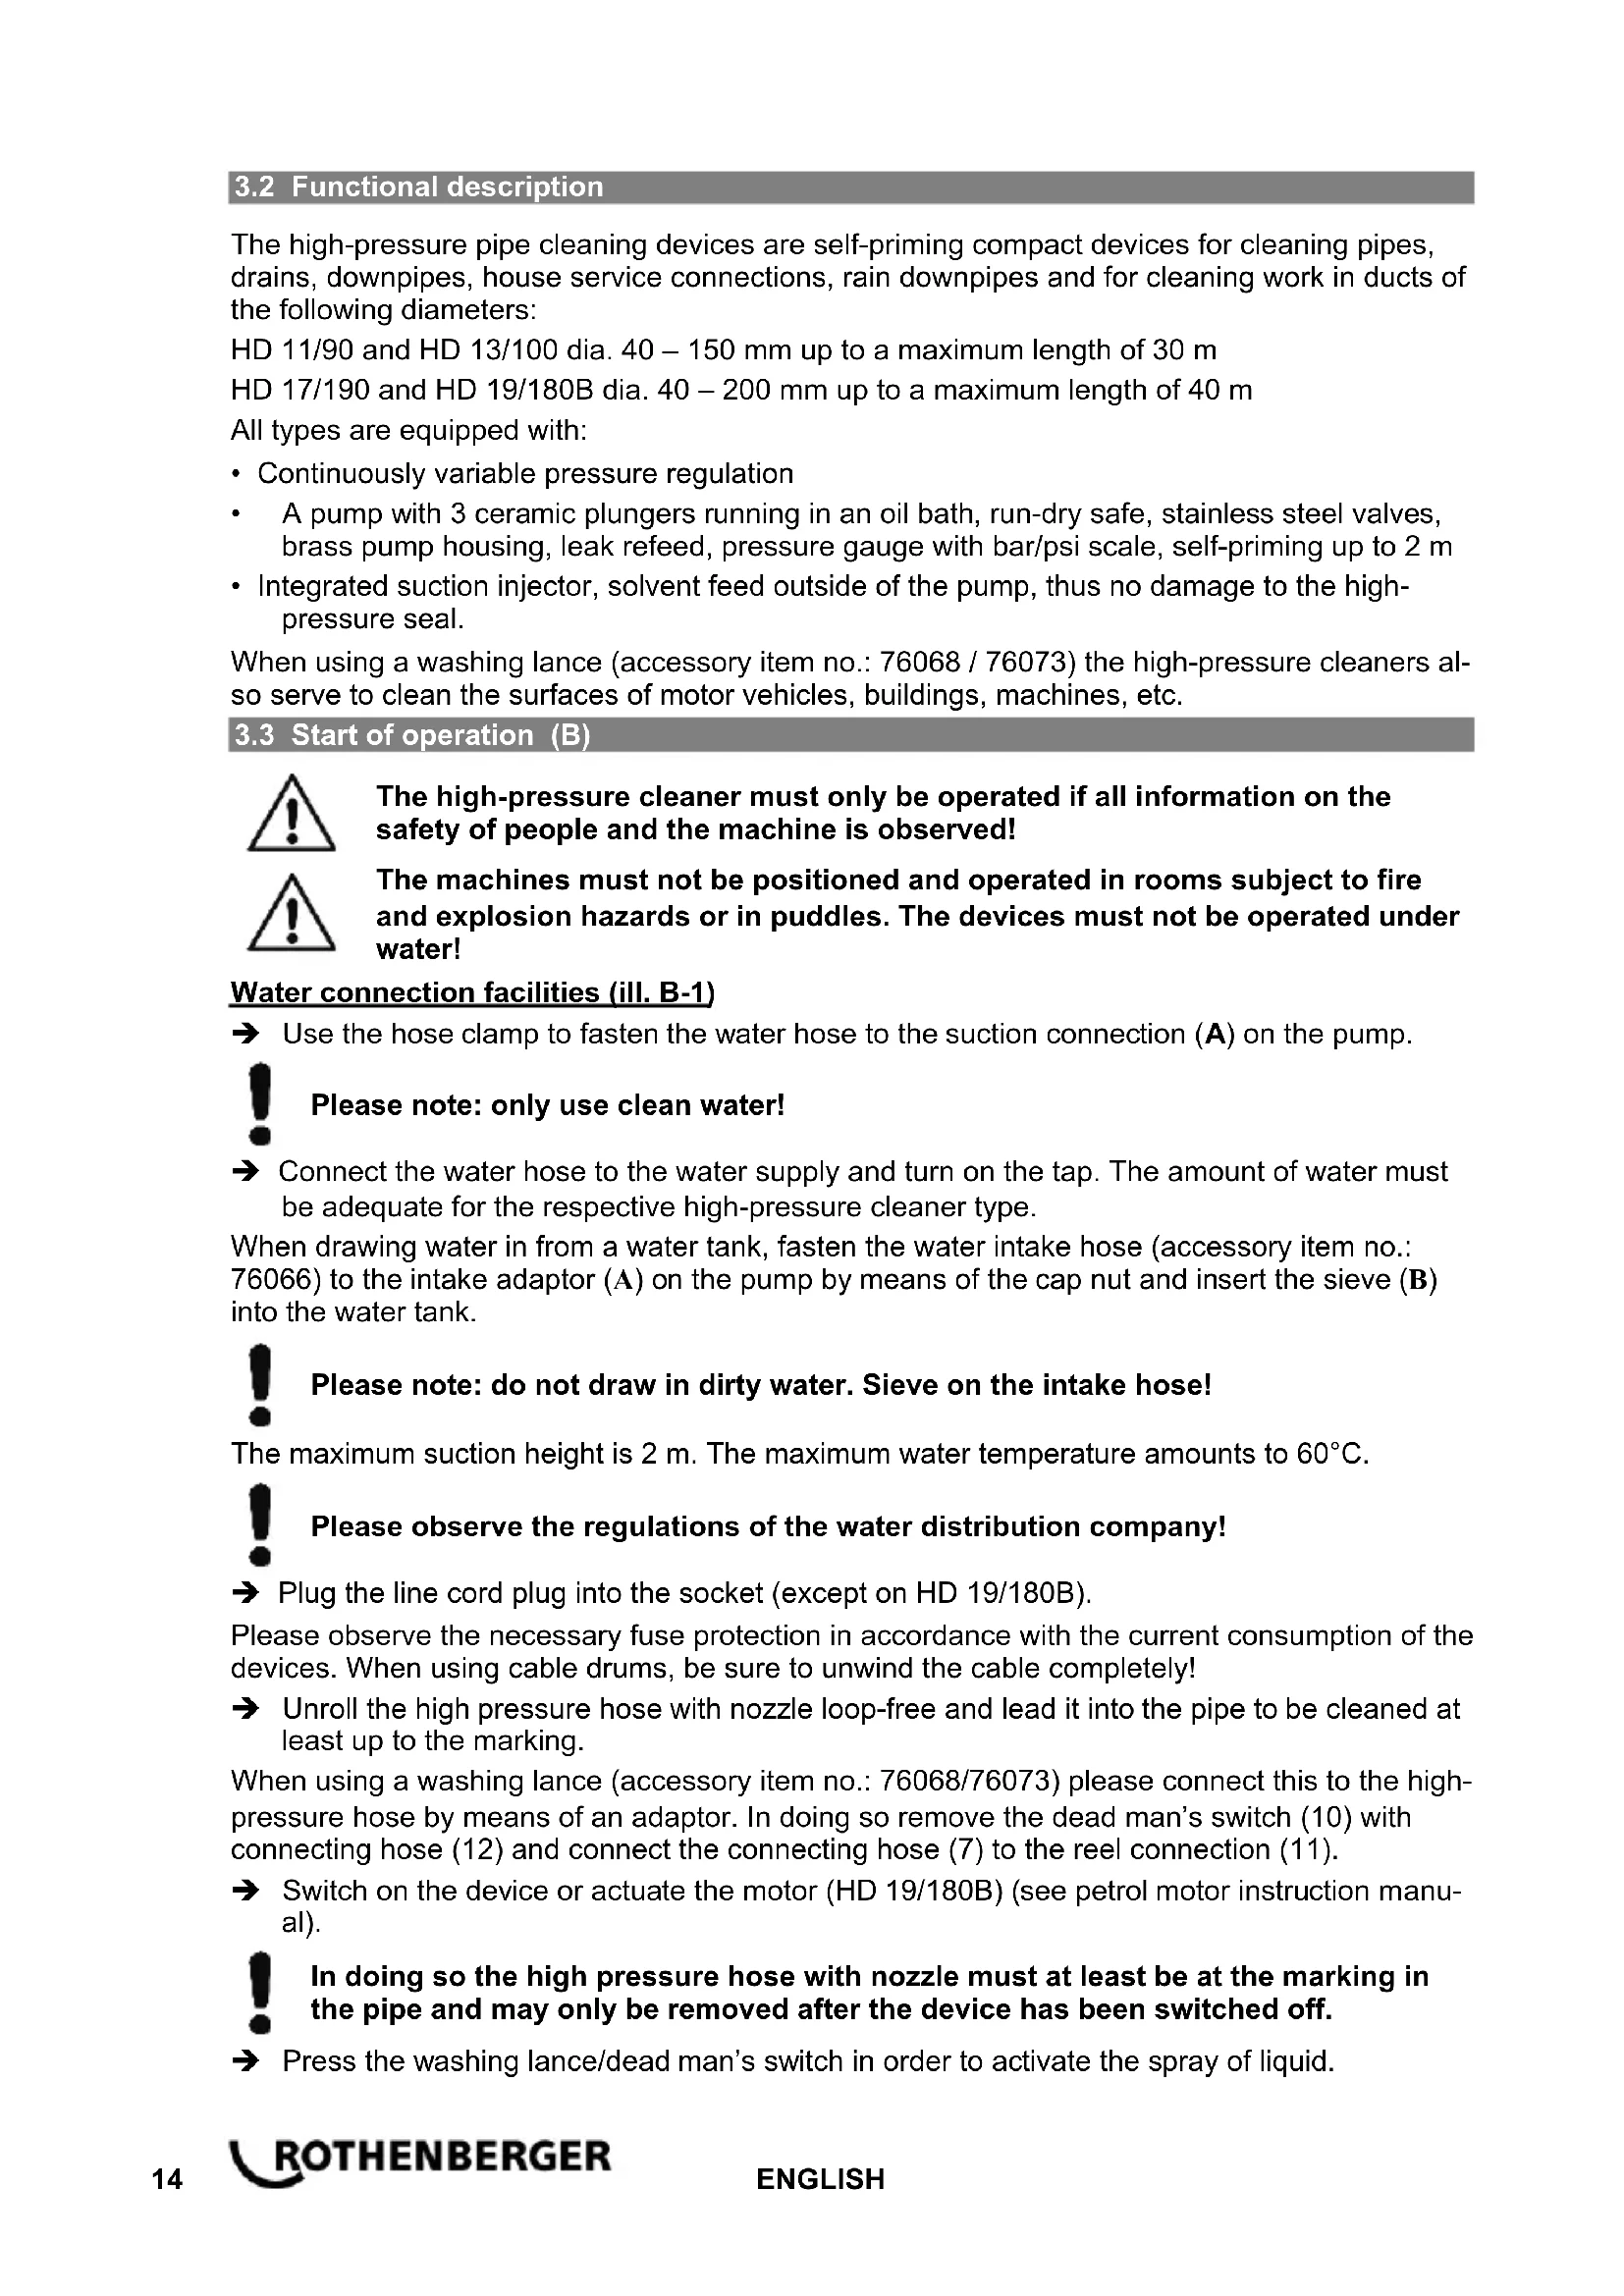
3.1 Overview (A)
| 1 | Adaptor for high-pressure hose | 7 | Connecting hose pump - reel |
| 2 | Water inflow | 8 | Mounting for washing lance / Dead man's switch |
| 3 | Injector adaptor | 9 | Petrol motor (HD19/180B) |
| 4 | Pressure control valve | 10 | Dead man's switch |
| 5 | Pressure gauge | 11 | Reel connection |
| 6 | Valves | 12 | Connecting hose for the dead man's switch |
3.2 Functional description
The high-pressure pipe cleaning devices are self-priming compact devices for cleaning pipes, drains, downpipes, house service connections, rain downpipes and for cleaning work in ducts of the following diameters:
HD 11/90 and HD 13/100 dia. 40 – 150 mm up to a maximum length of 30 m
HD 17/190 and HD 19/180B dia. 40 – 200 mm up to a maximum length of 40 m
All types are equipped with:
• Continuously variable pressure regulation
- A pump with 3 ceramic plungers running in an oil bath, run-dry safe, stainless steel valves, brass pump housing, leak refeed, pressure gauge with bar/psi scale, self-priming up to 2 m
- Integrated suction injector, solvent feed outside of the pump, thus no damage to the high-pressure seal.
When using a washing lance (accessory item no.: 76068 / 76073) the high-pressure cleaners also serve to clean the surfaces of motor vehicles, buildings, machines, etc.
3.3 Start of operation (B)

The high-pressure cleaner must only be operated if all information on the safety of people and the machine is observed!

The machines must not be positioned and operated in rooms subject to fire and explosion hazards or in puddles. The devices must not be operated under water!
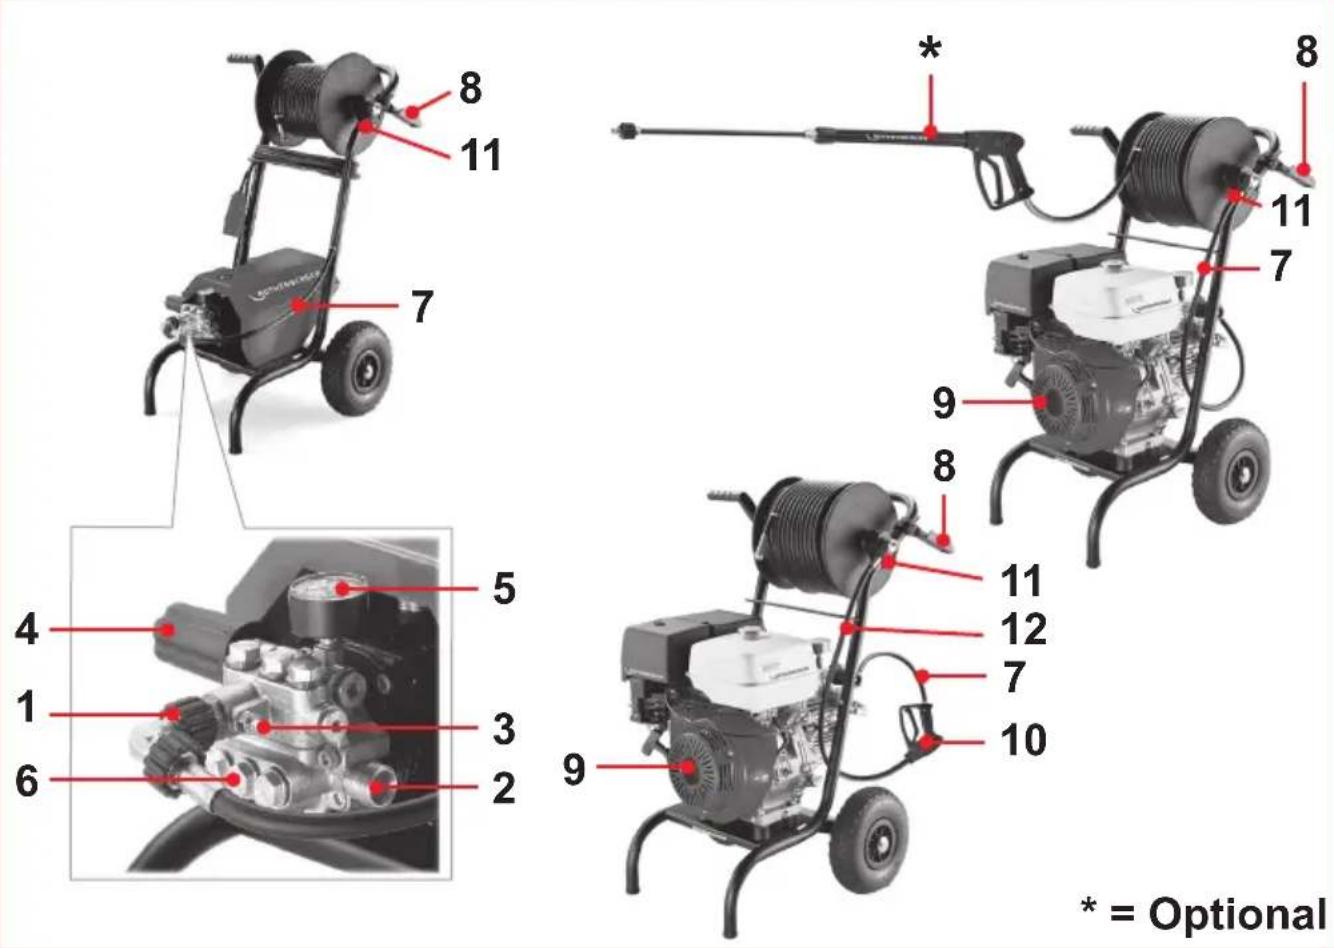
Water connection facilities (ill. B-1)
→ Use the hose clamp to fasten the water hose to the suction connection (A) on the pump.

Please note: only use clean water!
→ Connect the water hose to the water supply and turn on the tap. The amount of water must be adequate for the respective high-pressure cleaner type.
When drawing water in from a water tank, fasten the water intake hose (accessory item no.: 76066) to the intake adaptor (A) on the pump by means of the cap nut and insert the sieve (B) into the water tank.

Please note: do not draw in dirty water. Sieve on the intake hose!
The maximum suction height is 2 m. The maximum water temperature amounts to 60^ C.

Please observe the regulations of the water distribution company!
→ Plug the line cord plug into the socket (except on HD 19/180B).
Please observe the necessary fuse protection in accordance with the current consumption of the devices. When using cable drums, be sure to unwind the cable completely!
→ Unroll the high pressure hose with nozzle loop-free and lead it into the pipe to be cleaned at least up to the marking.
When using a washing lance (accessory item no.: 76068/76073) please connect this to the high-pressure hose by means of an adaptor. In doing so remove the dead man's switch (10) with connecting hose (12) and connect the connecting hose (7) to the reel connection (11).
→ Switch on the device or actuate the motor (HD 19/180B) (see petrol motor instruction manual).

In doing so the high pressure hose with nozzle must at least be at the marking in the pipe and may only be removed after the device has been switched off.
Press the washing lance/dead man's switch in order to activate the spray of liquid.
The on/off switch serves simultaneously as the motor-circuit switch and shuts down if the set value (ampere) is exceeded.
Pipe cleaning nozzles are to be used depending on the type of contamination.
Use of chemical cleaning agents (ill. B-2)
Area of application: Heavily contaminated surfaces of houses, motor vehicles, paving tiles, etc.
Necessary for this application: Injector intake hose (accessory item no. 76067), washing lance with control nozzle (accessory item no. 76068 / 76073) and chemical cleaning agent.
Remove the dead man's switch (10) with connecting hose (12) and connect the connecting hose (7) to the reel connection (11).
→ Slide the adaptor (A) of the injector intake hose onto the hose connection (3) and insert the chemical sieve (B) into the reservoir with the chemical agent.
→ Connect the washing lance by means of an adaptor to the high-pressure hose and turn on the control nozzle (C). The injector will now draw in the cleaning agent.
The chemical agent supply is shut down automatically when the control nozzle is closed.
→ Allow the cleaning agent to act and rinse off subsequently at high pressure.
Chemical agent supply only up to a maximum hose length of 20 m! In this connection please see accessory high-pressure hose 10 m (item no.: 72810) and 20 m (item no.: 72812).

Please observe the regulations of the manufacture of the additive (e.g. protective equipment) as well as the waste water regulations!
3.4 Shutdown
→ Release the dead man's switch, the spray jet stops.
→ Switch off the device or deactivate the motor (HD 19/180B) (see petrol motor instruction manual).
→ Stop the supply of water (turn off tap).
→ Venting: Press the dead man's switch shortly to relieve the pressure.
→ After using the washing lance: unscrew the washing lance from the high pressure hose and store in an orderly fashion.
→ Emptying the pump: press the dead man's switch and switch on the motor for about 20 seconds.
→ Remove the power plug (HD 11/90, HD 13/100, HD 17/190).
→ Wind the high pressure hose in an orderly fashion onto the reel.
→ Winter: Store the pump in frost-free places.
→ Clean the water filter.
4 Care and Maintenance
Use the gauge glass to check the oil level every time before start-up (please observe horizontal position). The oil level should be half way up the gauge glass.
Check that the sieve is clean every time before start-up! Please ensure that the water is clean when taking in at outside locations The hose cross-section must be at least 12 " =12.7 mm (free passageway)!
text_image
seThe first oil change should take place after 500 operating hours. Further oil changes after 1000 operating hours in each case. Type of oil: Castrol Formula RS.
Warranty of any kind shall expire if the pump is operated without a universal safety valve or if the limiting values for temperature and speed are exceeded ("Guidelines for fluid spray guns").
The safety valve must be set in such a way that the maximum operating pressure cannot be exceeded by more than 10%.
For HD 19/180B only:

Please note: Be sure to observe the information in the attached petrol motor instruction manual!
The petrol motor should be serviced and cared for in accordance with the manufacturer's instructions.
The high-pressure cleaning devices must only be disassembled and repaired by trained specialised staff.
The ROTHENBERGER service stations or the manufacturer's service department are available to you. We are naturally able to provide you with spare parts without delay. Please contact your dealer or the manufacturer.
5 Accessories
| Accessory Name | ROTHENBERGER Part Number |
| Flexible, high-pressure hose with R 1/4" coupling, NW6 x 10 m | 72810 |
| NW6 x 20 m | 72812 |
| NW8 x 40 m | 72820 |
| Cleaning lance with wide-angle nozzle | 76068 |
| Cleaning lance with wide-angle nozzle (HD 11/90) | 76073 |
| Spare wide-angle nozzle | 76088 |
| Spare wide-angle nozzle (HD 11/90) | 76082 |
| Pipe cleaning nozzles R1/4", stainless steel incl. forward jet spray | 76065 |
| incl. forward jet spray (HD 11/90) | 76063 |
| excl. forward jet spray | 76089 |
| excl. forward jet spray (HD 11/90) | 76053 |
| Rotary nozzle 45° | 77506 |
| Rotary nozzle 45° (HD 11/90) | 77503 |
| Injector suction pipe for cleaning agent | 76067 |
| Water suction hose, length 3 m | 76066 |
6 Customer service
The ROTHENBERGER service locations are available to help you (see listing in catalog or online) and replacement parts and service are also available through these same service locations. Order your accessories and spare parts from your specialist retailer or using our service-after-sales hotline:
Phone: +49 (0) 61 95 / 800 - 8200
Fax: +49 (0) 61 95 / 800 - 7491
Email: service@rothenberger.com
www.rothenberger.com
7 Disposal
Components of the unit are recyclable material and should be put to recycling. For this purpose registered and certified recycling companies are available. For an environmental friendly disposal of the non-recyclable parts (e.g. electronic waste) please contact your local waste disposal authority.
Oils and lubricants: Only specialist companies are authorized to dispose of old oils. Old oils and contaminated oils must be stored and disposed of in sealed, oil-resistant containers (metal drums). Defective electrical appliances and machines that cannot be repaired must be opened and cleaned to remove the remaining oil. Oil troughs must be cleaned so that there are no traces of oil. No oils (even very small amounts) may be allowed to enter the ground!
Waste from maintenance work: Regulations issued by the responsible national and regional authorities for disposing of refuse must be observed. These are available from the local environmental authority. If in doubt, waste from maintenance work such as cleaning and rinsing agents, cloths etc. must be disposed of as special category waste by communal collecting points. Waste that can be recycled must be separated on the basis of material groups and sent for suitable recycling!
For EU countries only:
Do not dispose of electric tools with domestic waste. In accordance with European Directive 2012/19/EC on waste electrical and electronic equipment and its implementation as national law, electric tools that are no longer serviceable must be collected separately and utilised for environmentally compatible recycling.
natural_image
Mechanical assembly diagram showing gears and shafts with a pointer indicating direction (no text or labels)Email: service@rothenberger.com
www.rothenberger.com
natural_image
Mechanical assembly diagram showing a gear-like component being inserted into a cylindrical housing (no text or symbols visible)Email: service@rothenberger.com
www.rothenberger.com
7 Eliminación
natural_image
Mechanical assembly diagram showing gears and shafts with a pointer indicating direction (no text or labels)Email: service@rothenberger.com
www.rothenberger.com
7 Smaltimento
natural_image
Mechanical assembly diagram showing gears and shafts with a connecting rod (no text or labels)Email: service@rothenberger.com
www.rothenberger.com
7 Eliminação
natural_image
Mechanical assembly showing multiple gears and shafts with a black arrow pointing to one gear (no text or symbols visible)Email: service@rothenberger.com
www.rothenberger.com
7 Utylizacja
natural_image
Mechanical assembly diagram showing gears and shafts with a pointer indicating direction (no text or labels)Email: service@rothenberger.com
www.rothenberger.com
7 Atıklar İçin
natural_image
Mechanical assembly diagram showing a shaft and gear assembly with a directional arrow (no text or labels)natural_image
Blank grid paper with uniform gray squares on white background (no text or symbols)NOTES
ROTHENBERGER Worldwide
| Australia | ROTHENBERGER Australia Pty. Ltd.Unit 6 · 13 Hoyle Avenue · Castle Hill · N.S.W. 2154Tel + 61 2 / 98 99 75 77 · Fax + 61 2 / 98 99 76 77rothenberger@rothenberger.com.auwww.rothenberger.com.au | Italy | ROTHENBERGER Italiana s.r.l.Via G. Reiss Romol 17-19 · I-20019 Settimo MilaneseTel + 39 02 / 32 50 601 · Fax + 39 02 / 38 50 0151Info@rothenberger.it · www.rothenberger.it |
| Austria | ROTHENBERGER Werkzeuge- und Maschinen Handelsgesellschaft m.b.H.Gewerbeparkstraße 9 · A-5081 AntifTel + 43 62 46 / 7 20 91-45 · Fax + 43 62 46 / 7 20 91-15office@rothenberger.at · www.rothenberger.at | Netherlands | ROTHENBERGER Nederland by Postbus 45 · NL-5120 AA RijenTel + 31 1 61 / 29 55 79 · Fax + 31 1 61 / 29 39 08Info@rothenberger.nl · www.rothenberger.nl |
| Belgium | ROTHENBERGER Benelux bvbaAntwerpsesteenweg 59 · B-2630 AartselaarTel + 32 3 / 8 77 22 77 · Fax + 32 3 / 8 77 03 94Info@rothenberger.be · www.rothenberger.be | Poland | ROTHENBERGER Polska Sp.z.o.o,Ul. Anopol 4A · Budymek C · FL-03-256 WanszawaTel + 48 22 / 2 13 59 00 · Fax + 48 22 / 2 13 59 01bluro@rothenberger.pl · www.rothenberger.pl |
| Brazil | ROTHENBERGER do Brasil LTDAAv. Fagundes de Oliveira, 598 · Galpão A409950-300 · Diadema / SP · BrazilTel + 55 111 / 40 44-4748 · Fax + 55 111 / 40 44-50851spacente@rothenberger.com.br · www.rothenberger.com.br | Russia | ROTHENBERGER RussiaAvtosavodskaya str. 25115280 Moscow, RussiaTel + 7 485 / 782 59 44 · Fax + 7 485 / 782 58 46Info@rothenberger.cz · www.rothenberger.cu |
| Bulgaria | ROTHENBERGER Bulgaria GmbHBoul. Sltnjakovo 79 · BG-11111 SofiaTel + 35 9 / 2 9 46 14 59 · Fax + 35 9 / 2 9 46 12 05Info@rothenberger.bg · www.rothenberger.bg | South Africa | ROTHENBERGER-TOOLS SA (PTY) Ltd.P.O. Box 4360 · Edenvalle 1610165 Vanderbilt Street, Meadowdale Gemiston Gauteng (Johannesburg), South AfricaTel + 27 111 / 3 72 986 31 · Fax + 27 111 / 37 72 986 32Info@rothenberger.co.za · www.rothenberger.co.za |
| China | ROTHENBERGER Pipe Tool (Shanghai) Co.,Ltd.D-4, No.195 Qianpu Road.East New Area of SongliangIndustrial Zone, Shanghai 201611, ChinaTel + 86 21 / 67 60 20 61 · + 86 21 / 67 60 20 67Fax + 86 21 / 67 60 20 63 · office@rothenberger.cn | Spain | ROTHENBERGER S.A.Ctra. Durango-Borino, Km 2 · E-48220 Absdano (Vizcaya)(P.O. Box) 1117 · E-48200 Durango (Vizcaya)Tel + 34 94 / 6 21 01 00 · Fax + 34 94 / 6 21 01 31export@rothenberger.es · www.rothenberger.es |
| Czech Republic | ROTHENBERGER CZPrumyslova 1306/7 · 102 00 Praha 10Tel +420 271 730 183 · Fax +420 267 310 187prodej@rothenberger.cz · www.rothenberger.cz | Sweden | ROTHENBERGER Sweden ABHemvärnsgatan 22 · S- 171 54 Sohs, SvergeTel + 46 8 / 54 60 23 00 · Fax + 46 8 / 54 60 23 01roswe@rothenberger.se · www.rothenberger.se |
| Denmark | ROTHENBERGER Scandinavia A/SSmedevænget 8 · DK-9560 HadsundTel + 45 98 / 15 75 66 · Fax + 45 98 / 15 68 23roscan@rothenberger.dk | Switzerland | ROTHENBERGER (Schwetz) AGHerostr. 9 · CH-8048 ZürichTel + 41 (0)44 435 30 30 · Fax + 41 (0)44 401 06 08Info@rothenberger-werkzeuge.ch |
| France | ROTHENBERGER France S.A.24, rue des Draplers, BP 45033 · F-57071 Metz Cedex 3Tel + 33 3 / 87 74 92 92 · Fax + 33 3 / 87 74 94 03Info-fr@rothenberger.com · www.rothenberger.fr | Turkey | ROTHENBERGER Tes. Aletwe Mak. San. Tic Ltd. StiPoyraz Sok. No 20/3 - Detay Is MerkeziTR-34722 Kadiköy-IstanbulTel + 90//216 449 24 85 · Fax + 90//216 449 24 87rothenberger@rothenberger.com.trwww.rothenberger.it |
| Germany | ROTHENBERGER Deutschland GmbHIndustriestraße 7 · D-65779 Kelkhelm/GermanyTel + 49 61 95 / 800 61 00 · Fax + 49 61 95 / 800 37 38verkauf-deutschland@rothenberger.comwww.rothenberger.com | UAE | ROTHENBERGER Middle East FZCOPO Box 261190 · Jebel All Free ZoneDubal, United Arab EmiratesTel + 971 / 48 83 97 77 · Fax + 971 / 48 83 97 57office@rothenberger.se |
| Greece | ROTHENBERGER Werkzeuge Produktion GmbHLilenthalstraße 71- 87 · D-37235 Hessch-LichtenauTel + 49 56 02 / 93 94-0 · Fax + 49 56 02 / 93 94 36 | UK | ROTHENBERGER EQUIPMENT TRADING & SERVICES LLCPO Box 91208 · Mussafah Industrial AreaAbu Dhabi, United Arab EmiratesTel + 971 / 25 50 01 54 · + 971 / 25 50 01 53uaesales@rothenberger.se |
| Hungary | ROTHENBERGER Hungary Kft.Gubacst út 26 · H-1097 BudapestTel + 36 1 / 3 47- 50 40 · Fax + 36 1 / 3 47 - 50 59Info@rothenberger.hu · www.rothenberger.hu | USA | ROTHENBERGER USA LLC7130 Clinton Road · Loves Park, IL 611111 USATel. +1 / 60 05 45 76 96 · Fax + 1 // 81 56 33 08 79plpetools@rothenberger-usa.comwww.rothenberger-usa.com |
| India | ROTHENBERGER India Pvt. Ltd.Plot No 17, Sector - 37, Pace city-IGurgaon, Haryana - 122 001, IndiaTel. 91124- 4618800 · Fax:91124-4018471contactus@rothenberger.indla.comwww.rothenberger.com | ROTHENBERGER Werkzeuge GmbHIndustriestraße 7D- 65779 Kelkheim / GermanyTelefon + 49 (0) 61 95 / 800 - 0Fax + 49 (0) 6195 / 800 - 3500 |
info@rothenberger.com