PCCR701B - Speaker Porter-Cable - Free user manual and instructions
Find the device manual for free PCCR701B Porter-Cable in PDF.
User questions about PCCR701B Porter-Cable
0 question about this device. Answer the ones you know or ask your own.
Ask a new question about this device
Download the instructions for your Speaker in PDF format for free! Find your manual PCCR701B - Porter-Cable and take your electronic device back in hand. On this page are published all the documents necessary for the use of your device. PCCR701B by Porter-Cable.
USER MANUAL PCCR701B Porter-Cable
Thank you for choosing PORTER-CABLE! To register your new product, go to:
www.portercable.com/ServiceAndSupport/ProductRegistration.aspx
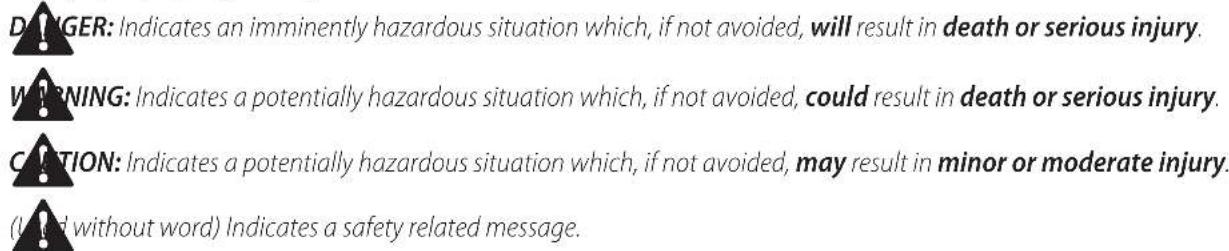
Definitions: Safety Alert Symbols and Words
This instruction manual uses the following safety alert symbols and words to alert you to hazardous situations and your risk of personal injury or property damage.
text_image
DANGER: Indicates an imminently hazardous situation which, if not avoided, will result in death or serious injury. WARNING: Indicates a potentially hazardous situation which, if not avoided, could result in death or serious injury. CAUTION: Indicates a potentially hazardous situation which, if not avoided, may result in minor or moderate injury. (Used without word) Indicates a safety related message.NOTICE: Indicates a practice not related to personal injury which, if not avoided, may result in property damage.
text_image
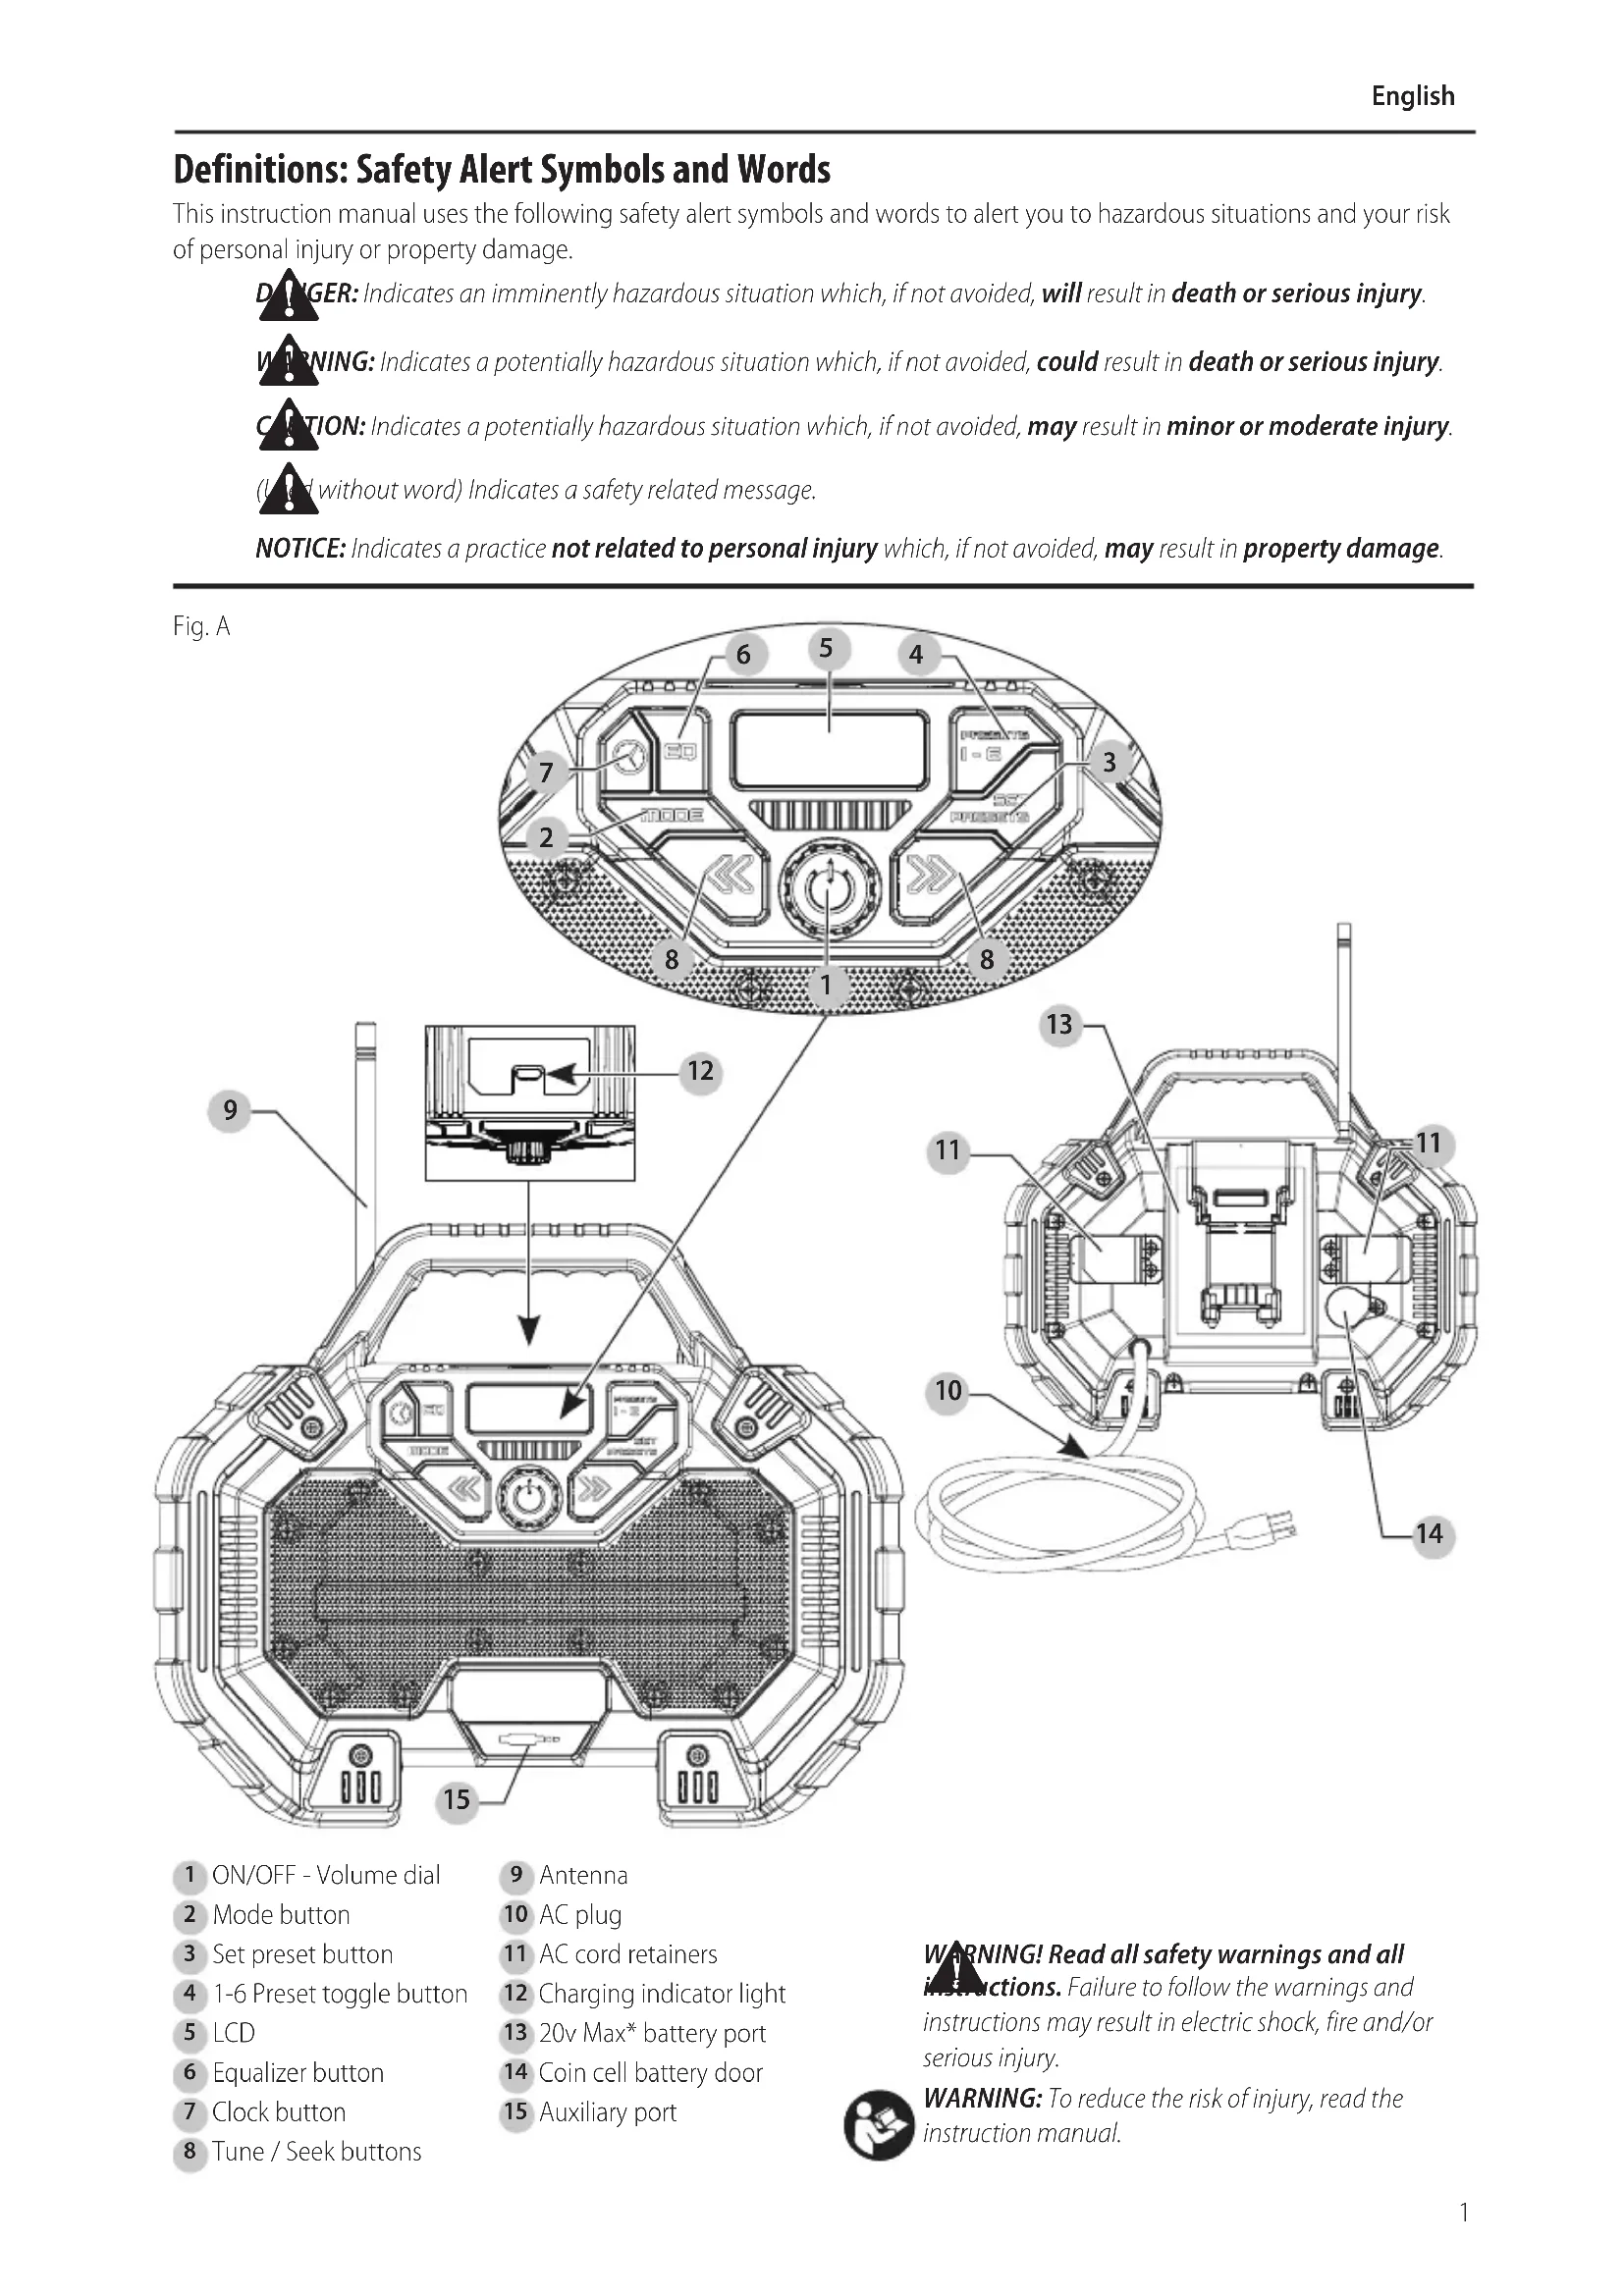
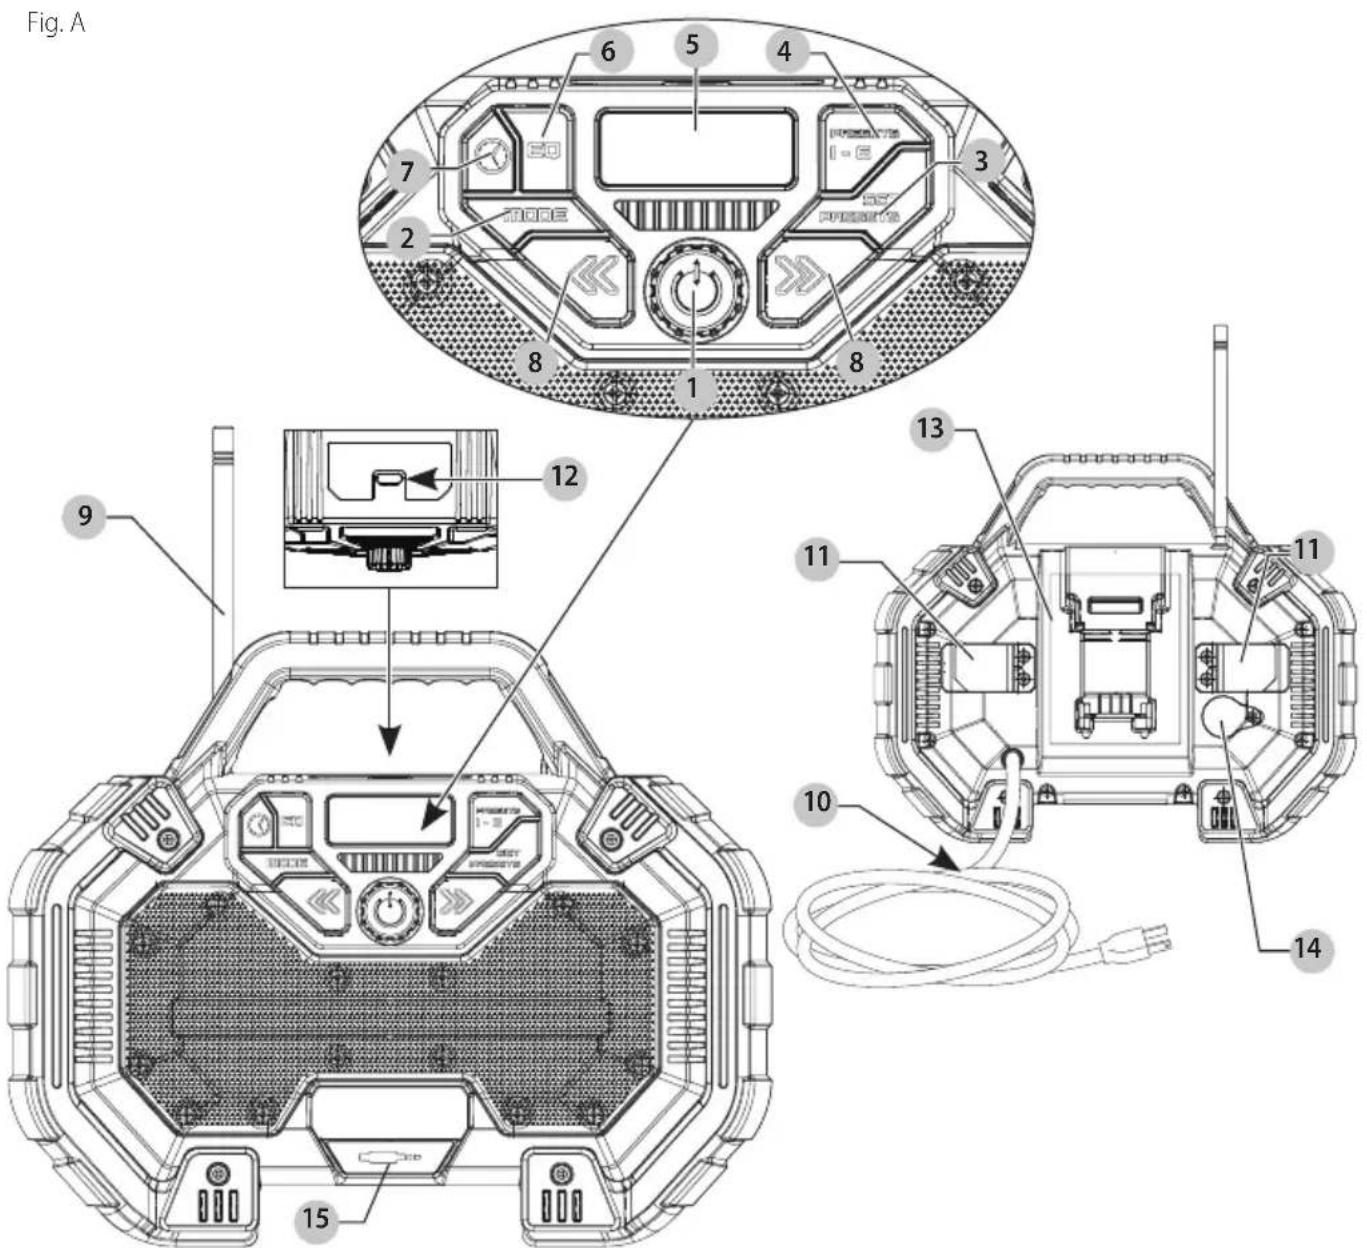
Fig. A 6 5 4 7 2 8 1 3 8 12 9 13 11 10 14 151 ON/OFF - Volume dial
2 Mode button
3 Set preset button
4 1-6 Preset toggle button
5 LCD
6 Equalizer button
7 Clock button
8 Tune / Seek buttons
9 Antenna
10 AC plug
11 AC cord retainers
12 Charging indicator light
13 20v Max* battery port
14 Coin cell battery door
15 Auxiliary port
WARNING! Read all safety warnings and all instructions. Failure to follow the warnings and instructions may result in electric shock, fire and/or serious injury.

WARNING: To reduce the risk of injury, read the instruction manual.
ENGLISH
Important Safety Instructions
WARNING:
- Read these instructions.
- Keep these instructions.
- Heed all warnings.
- Follow all instructions.
- Do not use this apparatus near water.
- Clean only with dry cloth.
- Do not block any ventilation openings. Install in accordance with the manufacturer's instructions.
- Do not install near any heat sources such as radiators, heat registers, stoves or other apparatus (including amplifiers) that produce heat.
- Do not defeat the safety purpose of the polarized or grounding-type plug. A polarized plug has two blades with one wider than the other. A grounding type plug has two blades and a third grounding prong. The wide blade or the third prong are provided for your safety. If the provided plug does not fit into your outlet, consult an electrician for replacement of the obsolete outlet.
- Protect the power cord from being walked on or pinched particularly at plugs, convenience receptacles, and the point where they exit from the apparatus.
- Only use attachments/accessories specified by the manufacturer.
- Unplug this apparatus during lightning storms or when unused for long periods of time.
- Refer all servicing to qualified service personnel. Servicing is required when the apparatus has been damaged in any way; such as power-supply cord or plug is damaged; liquid has been spilled or objects have fallen into the apparatus; the apparatus has been exposed to rain or moisture; does not operate normally or has been dropped.
- Apparatus shall not be exposed to dripping or splashing and no objects filled with liquids, such as vases, shall be placed on the apparatus.
WARNING: To reduce the risk of fire or electric shock, do not expose this apparatus to rain or moisture. Use only in dry locations. USE ONLY WITH PORTER CABLE BATTERY PACKS. OTHERS MAY BURST CAUSING PERSONAL INJURY AND DAMAGE. WHEN USING THE AC RECEPTACLE, FULLY INSERT ATTACHMENT PLUGS. DO NOT USE THE RECEPTACLE IF THE ATTACHMENT PLUG CANNOT BE FULLY INSERTED.
DANGER: DO NOT INGEST BATTERY; CHEMICAL HAZARD. This product contains a coin/
button cell battery. If the coin/button cell battery is swallowed, it can cause severe internal burns in just 2 hours and can lead to death.
Keep new and used batteries away from children. If the battery compartment does not close securely stop using the product and keep it away from children
If you think batteries might have been swallowed or placed inside any part of the body, seek immediate medical attention.
WARNING: To prevent electric shock, match wide blocks of plug to wide slot fully insert.
WARNING: Danger of explosion if battery is incorrectly replaced.
WARNING: Replace only with the same or equivalent type.
- Do not disassemble radio. Take it to an authorized service center when service or repair is required. Incorrect reassembly may result in a risk of electric shock, electrocution or fire.
- Disconnect the radio from the outlet before attempting any cleaning. This will reduce the risk of electric shock. Removing the battery pack will not reduce this risk.
WARNING: When radio is attached to the AC mains, it is to the AC power cord must always be maintained so that the radio can be disconnected if needed.
SAVE THESE INSTRUCTIONS
Specific Safety Rules for Charger / Radio
- Use only a proper extension cord when necessary to operate
- Do not submerge Charger / Radio in any liquid.
- The Charger / Radio is intended for commercial and household use.
- Before using battery and Charger / Radio, read all instructions and cautionary markings on Charger / Radio, charger and battery pack.
- Store the Charger / Radio indoors when not in use. Keep out of reach of children.
- DO NOT attempt to charge the battery pack with any chargers other than the ones in this manual. The built in charger and battery pack are specifically designed to work together.
- Make sure extension cord is located so that it will not be stepped on, tripped over, or otherwise subjected to damage or stress.
- Use only a proper extension cord that is necessary to operate the PCCR701 Charger / Radio on AC power (refer to Use of Extension Cords with Charger / Radio). Use of an improper extension cord could result in risk of fire, electric shock, or electrocution.
- A proper extension cord will be marked with the suffix letter "W" and with a tag stating "Suitable for Use with Outdoor Appliances."
- Place the Charger / Radio away from any heat source.
- Do not disassemble Charger / Radio. Take it to an authorized service center when service or repair is required. Incorrect reassembly may result in a risk of electric shock, electrocution or fire.
- Disconnect the Charger / Radio from the outlet before attempting any cleaning. This will reduce the risk of
electric shock. Removing the battery pack will not reduce this risk.
- The PCCR701 Charger / Radio is designed to operate on 120 Volts, 60 Hz AC or on direct current (DC) through fully charged PORTER-CABLE 20V Max* lithium-ion battery packs. Do not use any other voltage.
- Use type SJW, SJOW, SJTW, SJTOW, SW, SOW, STW and STOW cord when operating the Charger / Radio on AC power.
- Secure the Charger / Radio in upright position while transporting.
CANTION: Only use Charger / Radio on stable surface.
Beet raise above work space/personnel via lifting, hoisting, mounting, or suspension.
The label on your tool may include the following symbols. The symbols and their definitions are as follows:
V....volts
Hz......hertz
min......minutes
or DC.....direct current
Class I Construction (grounded)
.../min.....per minute
BPM.....beats per minute
IPM....impacts per minute
RPM......revolutionsper minute
sfpm .... surface feet per minute
SPM ...... strokes per minute
A.....amperes
W.....watts
\~ or AC......alternating current
or AC/DC....alternatingor direct current
ClassII Construction (double insulated)
n_0 .....no load speed n .....rated speed
earthing terminal
⚠️......safety alert symbol
△......visible radiation
......wearrespiratory protection
weareye protection
O....wearhearing protection
readall documentation
Use of Extension Cords with Charger / Radio
When a long extension cord is used to connect a Charger / Radio or tool, a voltage drop occurs. The longer the cord, the greater the voltage drop. This results in less voltage being supplied to the Charger / Radio or tool and increases the amount of current (amp) draw or reduces performance. A heavier cord with a larger wire size will reduce the voltage drop. Be sure to choose a cord that will supply enough voltage to operate your tool and/or Charger / Radio.
WARNING: Risk of electric shock. Keep extension cord connection dry and off the ground.
WARNING: Keep electrical cords in good condition. Do not use worn, bare, or frayed cords because they can cause electrical shock.
WARNING: Operating equipment at low voltage can cause it to overheat. Using an excessively long extension cord can cause the cord to overheat.
For more information about extension cord size requirements, refer to the Minimum Gauge for Cord Sets chart found under Important Safety Instructions for the Battery Charger.
BATTERIES AND CHARGERS
The battery pack is not fully charged out of the carton. Before using the battery pack and charger, read the safety instructions below and then follow charging procedures outlined. When ordering replacement battery packs, be sure to include the catalog number and voltage. Your tool uses a PORTER-CABLE charger. Be sure to read all safety instructions before using your charger. Consult the chart at the end of this manual for compatibility of chargers and battery packs.
READ ALL INSTRUCTIONS
Important Safety Instructions for All Battery Packs
WARNING: Read all safety warnings and all instructions for the battery pack, charger and power tool. Failure to follow the warnings and instructions may result in electric shock, fire and/or serious injury.
- Do not charge or use the battery pack in explosive atmospheres, such as in the presence of flammable liquids, gases or dust. Inserting or removing the battery pack from the charger may ignite the dust or fumes.
- NEVER force the battery pack into the charger. DO NOT modify the battery pack in any way to fit into a non-compatible charger as battery pack may rupture causing serious personal injury. Consult the chart at the end of this manual for compatibility of batteries and chargers.
- Charge the battery packs only in designated PORTER-CABLE chargers.
- DO NOT splash or immerse in water or other liquids.
- Do not store or use the tool and battery pack in locations where the temperature may reach or exceed 104 °F (40 °C) (such as outside sheds or metal buildings in summer). For best life store battery packs in a cool, dry location.
NOTE: Do not store the battery packs in a tool with the trigger switch locked on. Never tape the trigger switch in the ON position.
- Do not incinerate the battery pack even if it is severely damaged or is completely worn out. The battery pack can explode in a fire. Toxic fumes and materials are created when lithium ion battery packs are burned.
- If battery contents come into contact with the skin, immediately wash area with mild soap and water. If battery liquid gets into the eye, rinse water over the open eye for 15 minutes or until irritation ceases. If medical attention is needed, the battery electrolyte is composed of a mixture of liquid organic carbonates and lithium salts.
- Contents of opened battery cells may cause respiratory irritation. Provide fresh air. If symptoms persist, seek medical attention.
WARNING: Burn hazard. Battery liquid may be flammable if exposed to spark or flame.
English
WARNING: Fire hazard. Never attempt to open the battery pack for any reason. If the battery pack case is cracked or damaged, do not insert into the charger. Do not crush, drop or damage the battery pack. Do not use a battery pack or charger that has received a sharp blow, been dropped, run over or damaged in any way (e.g., pierced with a nail, hit with a hammer, stepped on). Damaged battery packs should be returned to the service center for recycling.
Transportation
WARNING: Fire hazard. Do not store or carry the battery pack so that metal objects can contact exposed battery terminals. For example, do not place the battery pack in aprons, pockets, tool boxes, product kit boxes, drawers, etc., with loose nails, screws, keys, etc. Transporting batteries can possibly cause fires if the battery terminals inadvertently come in contact with conductive materials such as keys, coins, hand tools and the like. The US Department of Transportation Hazardous Material Regulations (HMR) actually prohibit transporting batteries in commerce or on airplanes in carry-on baggage UNLESS they are properly protected from short circuits. So when transporting individual battery packs, make sure that the battery terminals are protected and well insulated from materials that could contact them and cause a short circuit.
The RBRC® Seal
The RBRC® (Rechargeable Battery Recycling Corporation) Seal on the nickel cadmium, nickel metal hydride or lithium-ion batteries (or battery packs) indicates that the costs to recycle these batteries

(or battery packs) at the end of their useful life have already been paid by PORTER-CABLE. In some areas, it is illegal to place spent nickel cadmium, nickel metal hydride or lithium-ion batteries in the trash or municipal solid waste stream and the Call 2 Recycle® program provides an environmentally conscious alternative.
Call 2 Recycle, Inc., in cooperation with PORTER-CABLE and other battery users, has established the program in the United States and Canada to facilitate the collection of spent nickel cadmium, nickel metal hydride or lithium-ion batteries. Help protect our environment and conserve natural resources by returning the spent nickel cadmium, nickel metal hydride or lithium-ion batteries to an authorized PORTER-CABLE service center or to your local retailer for recycling. You may also contact your local recycling center for information on where to drop off the spent battery. RBRC® is a registered trademark of Call 2 Recycle, Inc.
Wireless Certifications and Safety Information
• This device is CAN ICES-3(B)/NMB-3(B) compliant.
- This device complies with Part 15 of the FCC rules and Industry Canada License-exempt RSS standard(s). Operation is subject to the following two conditions:
- This device may not cause harmful interference, and - This device must accept any interference received, including interference that may cause undesired operation.
This equipment has been tested and found to comply with the limits for a Class B digital device, pursuant to Part 15 of the FCC Rules. These limits are designed to provide reasonable protection against harmful interference in a residential installation. This equipment generates, uses and can radiate radio frequency energy and, if not installed and used in accordance with the instructions, may cause harmful interference to radio communications. However, there is no guarantee that interference will not occur in a particular installation. If this equipment does cause harmful interference to radio or television reception, which can be determined by turning the equipment off and on, the user is encouraged to try to correct the interference by one or more of the following measures:
- Reorient or relocate the receiving antenna.
- Increase the separation between the equipment and adaptor.
- Connect the equipment into an outlet on a circuit different from that to which the adaptor is connected.
-
Consult the dealer or an experienced radio/TV technician for help.
-
Changes or modifications to this equipment not expressly approved by the manufacturer could void the user's authority to operate the device. This Class B digital apparatus complies with Canadian ICES-003.
- Under Industry Canada regulations, this radio transmitter may only operate using an antenna of a type and maximum (or lesser) gain approved for the transmitter by Industry Canada. To reduce potential radio interference to other users, the antenna type and its gain should be so chosen that the equivalent isotropically radiated power (e.i.r.p.) is not more than that necessary for successful communication.
- To comply with FCC and Industry Canada RF radiation exposure limits for general population, the antenna used for this device must not be co-located or operating in conjunction with any other antenna or transmitter.
Important Safety Instructions for All Battery Chargers
WARNING: Read all safety warnings and all instructions for the battery pack, charger and power tool. Failure to follow the warnings and instructions may result in electric shock, fire and/or serious injury.
-
DO NOT attempt to charge the battery pack with any chargers other than the ones in this manual. The charger and battery pack are specifically designed to work together.
• These chargers are not intended for any uses other than charging PORTER-CABLE rechargeable batteries. Any other uses may result in risk of fire, electric shock or electrocution. -
Do not expose the charger to rain or snow.
- Pull by the plug rather than the cord when disconnecting the charger. This will reduce the risk of damage to the electric plug and cord.
- Make sure that the cord is located so that it will not be stepped on, tripped over or otherwise subjected to damage or stress.
- Do not use an extension cord unless it is absolutely necessary. Use of improper extension cord could result in risk of fire, electric shock or electrocution.
- When operating a charger outdoors, always provide a dry location and use an extension cord suitable for outdoor use. Use of a cord suitable for outdoor use reduces the risk of electric shock.
- An extension cord must have adequate wire size (AWG or American Wire Gauge) for safety. The smaller the gauge number of the wire, the greater the capacity of the cable, that is, 16 gauge has more capacity than 18 gauge. An undersized cord will cause a drop in line voltage resulting in loss of power and overheating. When using more than one extension to make up the total length, be sure each individual extension contains at least the minimum wire size. The following table shows the correct size to use depending on cord length and nameplate ampere rating. If in doubt, use the next heavier gauge. The lower the gauge number, the heavier the cord.
Minimum Gauge for Cord Sets
| Volts | Total Length of Cord in Feet (meters) | ||||
| 120 V 25 (7.6) | 50 (15.2) | 100 (30.5) | 150 (45.7) | ||
| 240 V 50 (15.2) | 100 (30.5) | 200 (61.0) | 300 (91.4) | ||
| Ampere Rating | American Wire Gauge | ||||
| More Than | Not More Than | ||||
| 0 6 18 | 16 16 14 | ||||
| 6 10 | 18 16 14 12 | ||||
| 10 12 | 16 16 14 12 | ||||
| 12 16 | 14 12 Not Recommended | ||||
- Do not place any object on top of the charger or place the charger on a soft surface that might block the ventilation slots and result in excessive internal heat. Place the charger in a position away from any heat source. The charger is ventilated through slots in the top and the bottom of the housing.
- Do not operate the charger with a damaged cord or plug.
- Do not operate the charger if it has received a sharp blow, been dropped or otherwise damaged in any way. Take it to an authorized service center.
- Do not disassemble the charger; take it to an authorized service center when service or repair is required. Incorrect reassembly may result in a risk of electric shock, electrocution or fire.
-
Disconnect the charger from the outlet before attempting any cleaning. This will reduce the risk of electric shock. Removing the battery pack will not reduce this risk.
-
NEVER attempt to connect 2 chargers together.
- The charger is designed to operate on standard 120V household electrical power. Do not attempt to use it on any other voltage. This does not apply to the vehicular charger.
WARNING: Shock hazard. Do not allow any liquid to go inside the charger. Electric shock may result.
WARNING: Burn hazard. Do not submerge the battery pack in any liquid or allow any liquid to enter the battery pack. Never attempt to open the battery pack for any reason. If the plastic housing of the battery pack breaks or cracks, return to a service center for recycling.
WARNING: Burn hazard. To reduce the risk of injury, charge only PORTER-CABLE rechargeable battery packs. Other types of batteries may overheat and burst resulting in personal injury and property damage.
NOTICE: Under certain conditions, with the charger plugged into the power supply, the charger can be shorted by foreign material. Foreign materials of a conductive nature, such as, but not limited to, grinding dust, metal chips, steel wool, aluminum foil or any buildup of metallic particles should be kept away from the charger cavities. Always unplug the charger from the power supply when there is no battery pack in the cavity. Unplug the charger before attempting to clean.
Charging a Battery
PORTER-CABLE chargers are designed to charge PORTER-CABLE battery packs. When the radio is plugged in it will charge the installed battery.
- Plug the charger radio into an appropriate outlet before inserting a battery pack.
- Insert the battery pack 17 into the charger radio, making sure the battery pack is fully seated in the battery slots (Fig. C.).
- The LED will flash indicating that the battery is being charged.
- The completion of charge is indicated by the LED remaining on continuously. The pack is fully charged and may be used at this time or left on the charger.
- Recharge discharged batteries as soon as possible after use or battery life may be greatly diminished. For longest battery life, do not discharge batteries fully. It is recommended that the batteries be recharged after each use.
Charger Diagnostics
This charger is designed to detect certain problems that can arise with the battery packs or the power source. Problems are indicated by one LED flashing in different patterns.
Bad Battery

The charger can detect a weak or damaged battery. The LED flashes in the pattern indicated on the label. If you see this bad battery blink pattern, do not continue to charge
English
the battery. Return it to a service center or a collection site for recycling.
Hot/Cold Pack Delay
When the charger detects a battery that is excessively hot or excessively cold, it automatically starts a Hot/Cold Pack Delay, suspending charging until the battery has normalized. After this happens, the charger automatically switches to the Pack Charging mode. This feature ensures maximum battery life. The light flashes in the pattern indicated on the label.
Leaving the Battery in the Charger
The charger and battery pack can be left connected with the LED glowing indefinitely. The charger will keep the battery pack fresh and fully charged. This charger features an automatic tune-up mode which equals or balances the individual cells in the battery pack to allow it to function at peak capacity. Battery packs should be tuned up weekly or whenever the battery no longer delivers the same amount of work. To use the automatic tune-up mode, place the battery pack in the charger and leave it for at least 8 hours.
Charger Cleaning Instructions
WARNING: Shock hazard. Disconnect the radio from the outlet before cleaning. Dirt and grease may be removed from the exterior of the radio using a cloth or soft non-metallic brush. Do not use water or any cleaning solutions.
Important Charging Notes
- Longest life and best performance can be obtained if the battery pack is charged when the air temperature is between 65 °F and 75 °F (18 ° – 24 °C). DO NOT charge the battery pack in an air temperature below +40 °F (+4.5 °C), or above +104 °F (+40 °C). This is important and will prevent serious damage to the battery pack.
- The charger and battery pack may become warm to the touch while charging. This is a normal condition, and does not indicate a problem. To facilitate the cooling of the battery pack after use, avoid placing the charger or battery pack in a warm environment such as in a metal shed or an uninsulated trailer.
- If the battery pack does not charge properly:
a. Check operation of receptacle by plugging in a lamp or other appliance;
b. Check to see if receptacle is connected to a light switch which turns power off when you turn out the lights;
c. Move the charger and battery pack to a location where the surrounding air temperature is approximately 65^ F – 75^ F ( 18^ – 24^ C);
d. If charging problems persist, take the tool, battery pack and charger to your local service center.
- The battery pack should be recharged when it fails to produce sufficient power on jobs which were easily done previously. DO NOT CONTINUE to use under these conditions. Follow the charging procedure. You may
also charge a partially used pack whenever you desire with no adverse effect on the battery pack.
- Foreign materials of a conductive nature such as, but not limited to, grinding dust, metal chips, steel wool, aluminum foil, or any buildup of metallic particles should be kept away from charger cavities. Unplug the charger before attempting to clean.
- Do not freeze or immerse the charger in water or any other liquid.
Storage Recommendations
- The best storage place is one that is cool and dry, away from direct sunlight and excess heat or cold.
- For long storage, it is recommended to store a fully charged battery pack in a cool dry place out of the charger for optimal results.
nOTE: Battery packs should not be stored completely depleted of charge. The battery pack will need to be recharged before use.
SAVE THESE INSTRUCTIONS FOR FUTURE USE
COMPONENTS (FIG. A)
WARNING: Never modify the charger, radio or any part of it. Damage or personal injury could result.
Refer to Fig. A at the beginning of this manual for a complete list of components.
INTENDED USE
This charger / radio is designed for broadcast radio reception, to play/stream audio through a wired connection to a mobile phone or other audio device, and to charge PORTER-CABLE batteries.
DO nOT use under wet conditions or in presence of flammable liquids or gases.
DO nOT let children come into contact with the tool. Supervision is required when inexperienced operators use this tool.
OPERATION
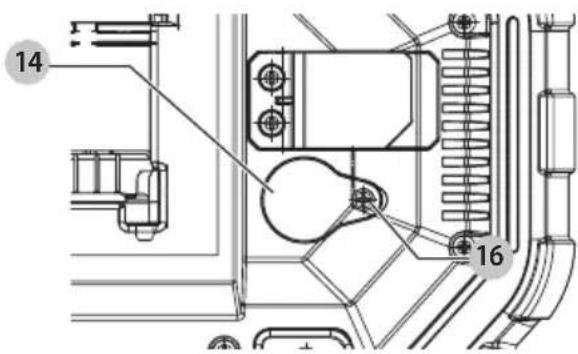
To Install Coin Cell Battery (Fig. B)
Your radio is equipped with memory capacity in order to store the preset time. When the radio is in the OFF position, this memory capacity is powered by one coin cell battery that is included with the radio.
nOTE: For first time use, remove the protective tab under the battery door to activate the coin cell battery.
WARNING: Danger of explosion if battery is incorrectly replaced. When replacing battery, replace it with the same or equivalent type CR2032. Observe correct polarity (+ and -) when replacing batteries. Do not store or carry batteries so that metal objects can contact exposed battery terminals.
- On the battery door 14 on the back of the unit, turn the screw 16 counterclockwise to remove. Screw will remain captive in the door.
Fig. B
text_image
14 16- Pull the battery door open.
- Install the coin cell battery according to the diagram inside the coin cell battery area.
- Replace the battery door, insert the screw and tighten.
NOTE: To reset the LCD display clock remove the coin cell battery for a few minutes and then re-install. Follow this procedure if the screen seems to locked in place and tighten securely.
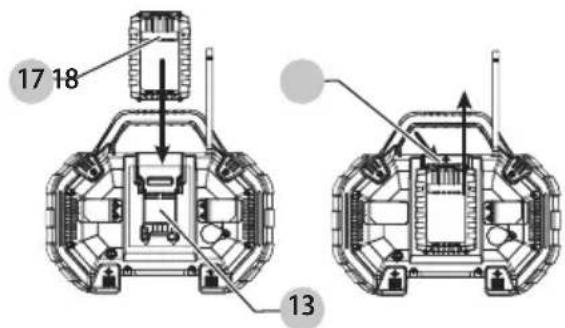
Installing and Removing
the Battery Pack (Fig. C)
nOTE: For best results, make sure your battery pack is fully charged.
To install the battery pack 17 into the radio, align the battery pack with the rails on the battery port 13 and slide it into the radio until the battery pack is latched and firmly seated and you have ensured that it does not disengage.
To remove the battery pack from the radio, press the release button 18 and firmly pull the battery pack out.
Fig. C
text_image
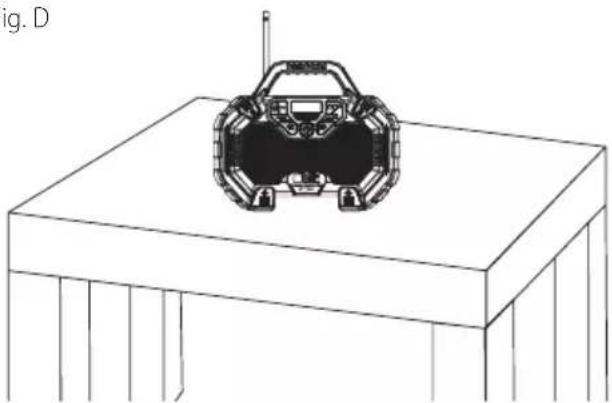
17 18 13Tool Placement (Fig. D)
Place the charger / radio on a smooth, level surface as shown in Fig. D.
Fig. D
natural_image
Line drawing of a small wheeled vehicle on a rectangular platform (no text or symbols)On/Off - Volume Dial
• To operate as a corded product, insert the AC plug into an appropriate AC power outlet or generator.
- To operate as a cordless product, insert a fully charged 20v Max* PORTER-CABLE battery (not included) into the battery port 13. Be sure battery is fully seated.
1. To turn the radio ON, press the ON/OFF - be sure battery is latched and fully seated.
2. Press the ON/OFF - Volume dial again to turn the radio OFF.
Volume Adjustment
- Rotate the ON/OFF - Volume dial 1 clockwise to increase the volume.
- To decrease the volume, rotate the ON/OFF - Volume dial 1 counter clockwise.
NOTE: If the battery is attached to the radio and the AC plug is plugged in at the same time, the radio will run off of the AC power and not drain the battery. Having both attached simultaneously will prompt the unit to charge the battery.
Mode Function
To choose one of the mode functions (FM, AM, or AUX) push the mode button 2 until the desired function is displayed on the LCD. For example, if the radio is on FM, push the mode button two times to change to AUX.
NOTE: The first press on any buttons when the back light is off, will wake the unit up. Press the desired button again to activate the function.
Tune or Seek Function
To Tune:
- Press the right tune / seek button 8 to quickly move the tuner up the frequency band. To move the tuner down the frequency band, press the left tune / seek button.
To Seek:
- Press and hold the right tune / seek button 8, then release to quickly scan up the frequency band to the next available station. Press and hold the left tune / seek button 8, the release to quickly seek down the frequency band.
To Program The Clock
The clock can be programmed with the power ON.
- Press and hold the clock button 7 until the hour numbers of the digital time flash on the LCD 5, then release the clock button.
- Rotate the ON/OFF-Volume dial 1 left or right to tune / seek buttons 8 to set hour.
- When the correct hour is set, press the clock button once so the minute numbers flash.
English
- Rotate the ON/OFF-Volume dial 1 left or right to tune / seek buttons 8 to set minutes.
- If you do not press a button within 5 seconds, the clock programming feature will automatically return to the previous mode. The clock is set once the clock button is re-pressed or if the numbers stop flashing.
To Program The Presets
6 FM and 6 AM radio stations may be independently set. After programming the buttons, pressing the "1-6" preset toggle button 4 will instantly change the frequency to the preset station.
To program the channels:
- Turn power ON.
- Press the mode button 2 until the desired mode is selected (AM or FM).
- Tune the radio to the desired station (read Tune or Seek Function).
- Press the set preset button 3. The "Mem" icon will flash in the LCD 5.
- Press the "1-6" preset toggle button 4 to scroll through the 6 presets.
- Once it displays the desired preset number, press the set preset button.
- Repeat steps 3 through 6 to set the other memory buttons.
Equalizer Button
To Set the Bass and Treble:
- Press the equalizer button 6 once. The bass equalizer will appear on the LCD 5.
- Rotate the ON/OFF - Volume dial 1 to set the desired bass level.
- Press the equalizer button a second time to get to the treble equalizer.
- Rotate the ON/OFF - Volume dial 1 to set the desired treble level.
- Press the equalizer button a third time to exit.
NOTE: If you do not press a button within 5 seconds, the equalizer programming feature will automatically be set to the new setting.
Important Radio Notes
- Reception will vary depending on location and strength of radio signal.
- Certain generators may cause background noise.
- AM reception will most likely be clearer when powered by a battery pack.
Auxiliary Port
NOTE: For proper performance, ensure that the auxiliary cord ends are firmly inserted into the auxiliary port and your device.
To use the auxiliary port 15, plug the output jack from a phone, CD or MP3 player into the auxiliary port. (cord sold separately) The sound from the external source plays
through the speakers. The radio will not automatically switch to AUX Mode when an input source is detected. The mode button 2 needs to be set to the "AU" function.
Maintenance
Cleaning
WARNING: Blow dirt and dust out of all air vents with dry air at least once a week. To minimize the risk of eye injury, always wear ANSI Z87.1 approved eye protection when performing this.
WARNING: Never use solvents or other harsh chemicals for cleaning the non-metallic parts of the tool. These chemicals may weaken the plastic materials used in these parts. Use a cloth dampened only with water and mild soap. Never let any liquid get inside the tool; never immerse any part of the tool into a liquid.
Repairs
The charger and battery pack are not serviceable.
WARNING: To assure product SAFETY and RESPONSIBILITY, repairs, maintenance and adjustment (including brush inspection and replacement, when applicable) should be performed by a PORTER-CABLE factory service center or a PORTER-CABLE authorized service center. Always use identical replacement parts.
Register Online
Thank you for your purchase. Register your product now for:
- WARRANTY sERViCE: Registering your product will help you obtain more efficient warranty service in case there is a problem with your product.
- COnFiRMATiOn OF OWnERshiP: In case of an insurance loss, such as fire, flood or theft, your registration of ownership will serve as your proof of purchase.
- FOR YOUR SAFETY: Registering your product will allow us to contact you in the unlikely event a safety notification is required under the Federal Consumer Safety Act.
Register online at www.portercable.com/register.
THREE YEAR LIMITED WARRANTY
PORTER-CABIE will repair or replace, without charge, any defects due to faulty materials or workmanship for three years from the date of purchase for tools (two years for batteries). This warranty does not cover part failure due to normal wear or tool abuse. For further detail of warranty coverage and warranty repair information, visit www.portercable.com or call (888) 848-5175. This warranty does not apply to accessories or damage caused where repairs have been made or attempted by others. This warranty gives you specific legal rights and you may have other rights which vary from state to state or province to province.
In addition to the warranty, PORTER-CABIE tools are covered by our:
1 YEAR FREE sERViCE: PORTER-CABIE will maintain the tool and replace worn parts caused by normal use, for free, any time during the first year after purchase.
90 DAY MOnEY BACK gUARAnTEE: If you are not completely satisfied with the performance of your PORTERCABLE Power Tool for any reason, you can return it within 90 days from the date of purchase with a receipt for a full refund – no questions asked.
IATin AMERiCA: This warranty does not apply to products sold in Latin America. For products sold in Latin America, see country specific warranty information contained in the packaging, call the local company or see website for warranty information.
To register your tool for warranty service visit our website at www.portercable.com.
WARning IABEI REPIACEMENT
If your warning labels become illegible or are missing, call (888) 848-5175 for a free replacement.
PORTER CABLE.
4825 Highway 45 North, Jackson, Tennessee 38305
(888) 848-5175 • www.portercable.com
Troubleshooting Guide
BE sURE TO FOLLOW SAFETY RULEs AnD insTRUCTiOns
For assistance with your product, visit our website at www.portercable.com for a list of service centers, or call the PORTER-CABLE Customer Care Center at (888) 848-5175.
| PROBLEM POSSIBLE CAUSE POSSIBLE SOLUTION | ||
| - Unit will not turn ON | - Battery pack not installed properly- Battery pack not charged.- Internal components too hot.- Cord not plugged in.- Circuit breaker is tripped.- Cord or switch is damaged. | - Check battery pack installation- Check battery pack charging requirements.- Allow tool to cool down.- Plug tool into a working outlet.- Reset circuit breaker. (If the product repeatedly causes the circuit breaker to trip, discontinue use immediately and have it serviced at an authorized PORTER-CABLE service center.- Have cord or switch replaced at an authorized PORTER-CABLE service center |
| - Battery pack will not charge. | - Battery pack not inserted into charger.- Charger not plugged in.- Surrounding air temperature too hot or too cold. | - Insert battery pack into charger until LED illuminates.- Plug charger into a working outlet. Refer to "Important charging notes" for more details.- Move charger and battery pack to a surrounding air temperature of above 40 degrees F (4,5°C) or below 105 degrees F (+40,5°C). |
| - Unit shuts off abruptly. | - Battery pack has reached its maximum thermal limit.- Out of charge. (To maximize the life of the battery pack it is designed to shut off abruptly when the charge is depleted.) | - Allow battery pack to cool down.- Place on charger and allow to charge. |
natural_image
Line drawing of a small robotic vehicle on a rectangular platform (no text or symbols)4825 Highway 45 North
Jackson, Tennessee 38305
(888) 848-5175
www.portercable.com