Vidar - Exercise bike Skandika - Free user manual and instructions
Find the device manual for free Vidar Skandika in PDF.
| Product type | Exercise bike |
| Brand | Skandika |
| Model | Vidar |
| Usage | Home |
| User weight capacity | 120 kg |
| Power supply | 2 AAA 1.5V batteries |
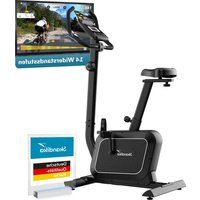
| Display | LCD screen with Scan, Time, Speed, Distance, Calories, Odometer, Pulse functions |
| Resistance system | Manually adjustable |
| Pulse sensors | Handlebars with hand pulse sensors |
| Connectivity | Bluetooth for Kinomap and Zwift apps |
| Pedals | Left and right pedals |
| Transport wheels | Yes (on front foot) |
| Adjustable feet | Yes (rear foot) |
| Frame material | Steel |
| Warranty | 24 months |
| Spare parts | Detailed list included in the manual |
| Maintenance | Clean with a slightly damp cloth, dry after use |
| Safety | Requires a free space of 2 meters around the device, use on a flat floor |
| Use | One person at a time |
| Device class | HC (home) |
Frequently Asked Questions - Vidar Skandika
User questions about Vidar Skandika
0 question about this device. Answer the ones you know or ask your own.
Ask a new question about this device
Download the instructions for your Exercise bike in PDF format for free! Find your manual Vidar - Skandika and take your electronic device back in hand. On this page are published all the documents necessary for the use of your device. Vidar by Skandika.
USER MANUAL Vidar Skandika
natural_image
Exterior view of a Skandika stationary exercise bike (no signage or text on the device itself)Inhalt

skandika.com/service
SCHRITT 5: HANDGRIFFMONTAGE
text_image
Technical diagram of a mechanical device with numbered components and labeled parts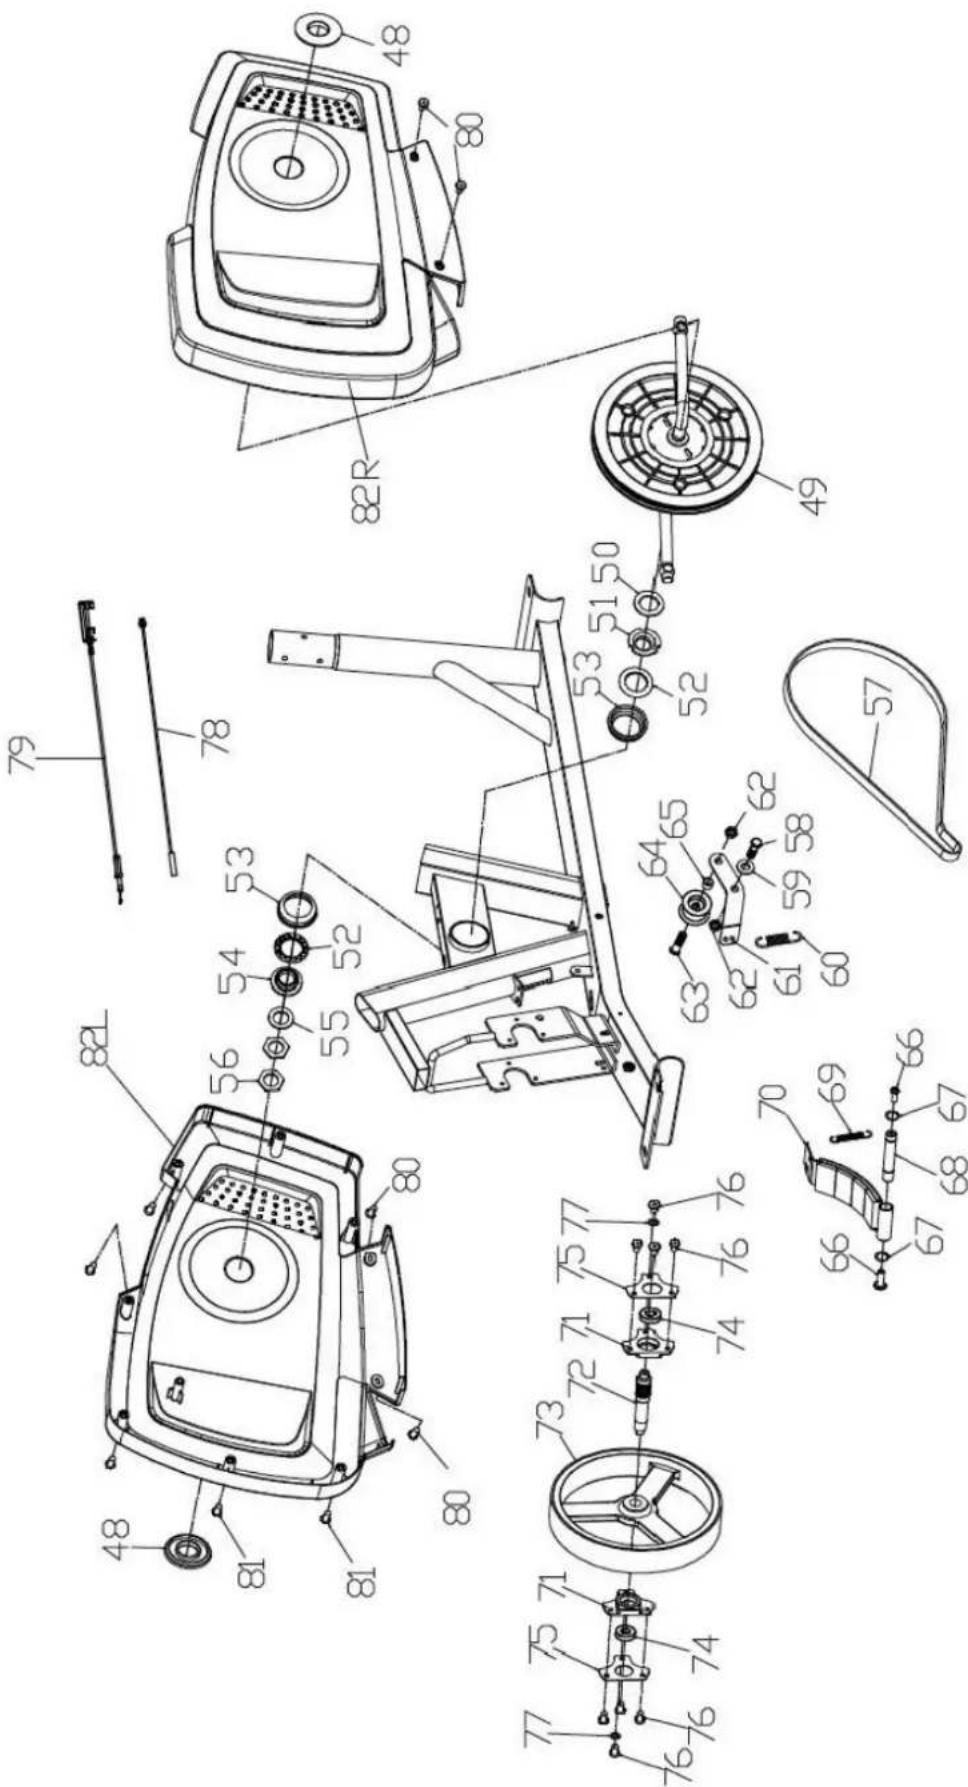
text_image
Technical diagram of a mechanical assembly with numbered components and exploded viewstext_image
Sochen Kinomap Kinomap SAS ACTUALISEREN 4,3 ★★★★☆ #53 4+ New Funktionen Thanks for training on Kinomap. Our daily concern is offering you the best experience there is. Vorschau
text_image
Kinomap FOLGT SIE Kinomap Gesponsert STAVANGER, LIMBURG & HONG KONG RACES JOIN THE CHALLENGE HAMMER SOBIEK on Kinomap IN ASSOCIATION WITH wahoo Mehr erfahren >
text_image
1. Zurück Kinomap KETTLER MARATHON PAFERS Peak Fitness PAFERS PEAK FITNESS POWERLAND Skandika POWERLAND SKANDIKA sportplus SPORTSTECH SPORTPLUS SPORTSTECHMAC: http://www.zwift.com/download/mac
GooglePlay: https://play.google.com/store/apps/details?id=com.zwift.zwiftgame
Appstore: https://itunes.apple.com/us/app/id1134655040?mt=8

20 Safety precautions
21 Set-up instructions
27 Explosion drawing
29 Parts list
30 Computer operation
31 Use of apps
33 Cleaning & care
34 Warm-up and cool-down
35 Guarantee conditions

skandika.com/service
Please visit the Skandika Service portal on our website for setup & help videos, FAQs and downloadable instructions. For more information about Skandika, simply visit our main page www.skandika.com

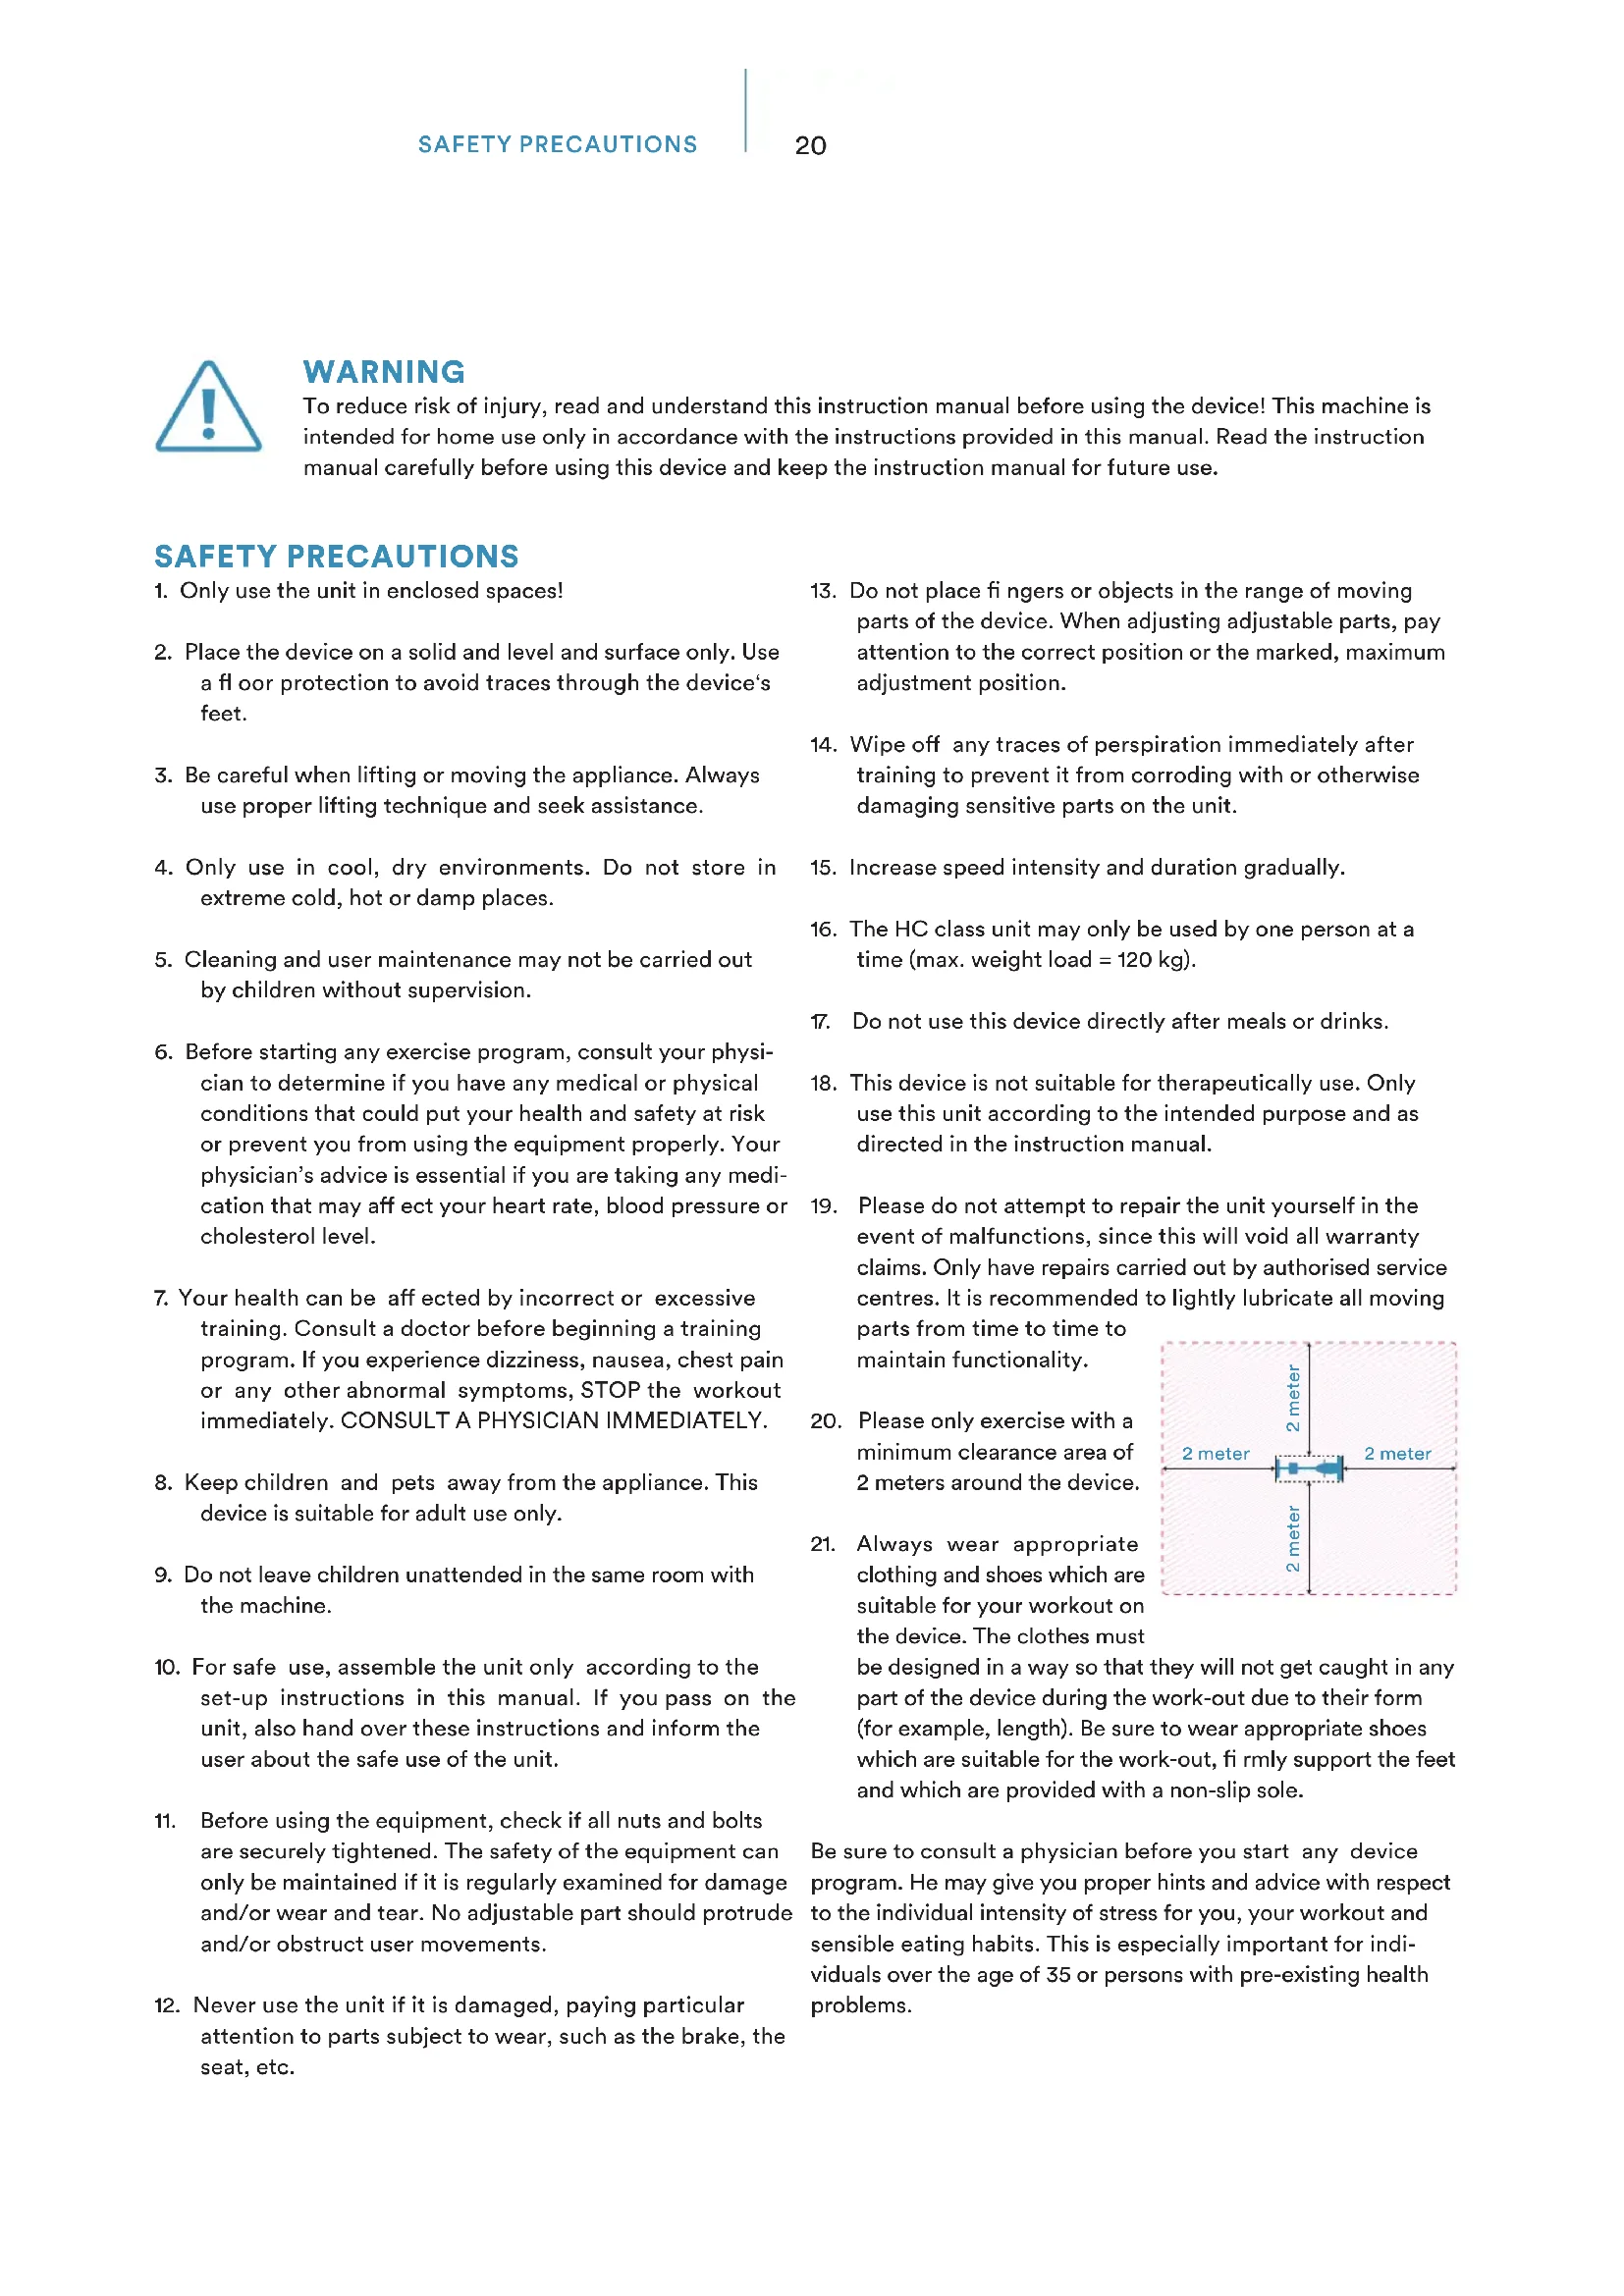
WARNING
To reduce risk of injury, read and understand this instruction manual before using the device! This machine is intended for home use only in accordance with the instructions provided in this manual. Read the instruction manual carefully before using this device and keep the instruction manual for future use.
SAFETY PRECAUTIONS
-
Only use the unit in enclosed spaces!
-
Place the device on a solid and level and surface only. Use a floor protection to avoid traces through the device's feet.
-
Be careful when lifting or moving the appliance. Always use proper lifting technique and seek assistance.
-
Only use in cool, dry environments. Do not store in extreme cold, hot or damp places.
-
Cleaning and user maintenance may not be carried out by children without supervision.
-
Before starting any exercise program, consult your physician to determine if you have any medical or physical conditions that could put your health and safety at risk or prevent you from using the equipment properly. Your physician's advice is essential if you are taking any medication that may affect your heart rate, blood pressure or cholesterol level.
-
Your health can be affected by incorrect or excessive training. Consult a doctor before beginning a training program. If you experience dizziness, nausea, chest pain or any other abnormal symptoms, STOP the workout immediately. CONSULT A PHYSICIAN IMMEDIATELY.
-
Keep children and pets away from the appliance. This device is suitable for adult use only.
-
Do not leave children unattended in the same room with the machine.
-
For safe use, assemble the unit only according to the set-up instructions in this manual. If you pass on the unit, also hand over these instructions and inform the user about the safe use of the unit.
-
Before using the equipment, check if all nuts and bolts are securely tightened. The safety of the equipment can only be maintained if it is regularly examined for damage and/or wear and tear. No adjustable part should protrude and/or obstruct user movements.
-
Never use the unit if it is damaged, paying particular attention to parts subject to wear, such as the brake, the seat, etc.
-
Do not place fingers or objects in the range of moving parts of the device. When adjusting adjustable parts, pay attention to the correct position or the marked, maximum adjustment position.
-
Wipe off any traces of perspiration immediately after training to prevent it from corroding with or otherwise damaging sensitive parts on the unit.
-
Increase speed intensity and duration gradually.
-
The HC class unit may only be used by one person at a time (max. weight load = 120 kg).
-
Do not use this device directly after meals or drinks.
-
This device is not suitable for therapeutically use. Only use this unit according to the intended purpose and as directed in the instruction manual.
-
Please do not attempt to repair the unit yourself in the event of malfunctions, since this will void all warranty claims. Only have repairs carried out by authorised service centres. It is recommended to lightly lubricate all moving
parts from time to time to maintain functionality.
-
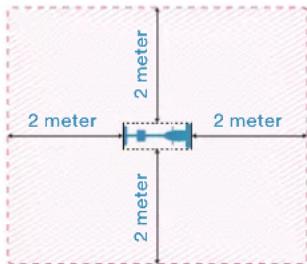
Please only exercise with a minimum clearance area of 2 meters around the device.
-
Always wear appropriate clothing and shoes which are suitable for your workout on the device. The clothes must
text_image
2 meter 2 meter 2 meter 2 meterbe designed in a way so that they will not get caught in any part of the device during the work-out due to their form (for example, length). Be sure to wear appropriate shoes which are suitable for the work-out, firmly support the feet and which are provided with a non-slip sole.
Be sure to consult a physician before you start any device program. He may give you proper hints and advice with respect to the individual intensity of stress for you, your workout and sensible eating habits. This is especially important for individuals over the age of 35 or persons with pre-existing health problems.
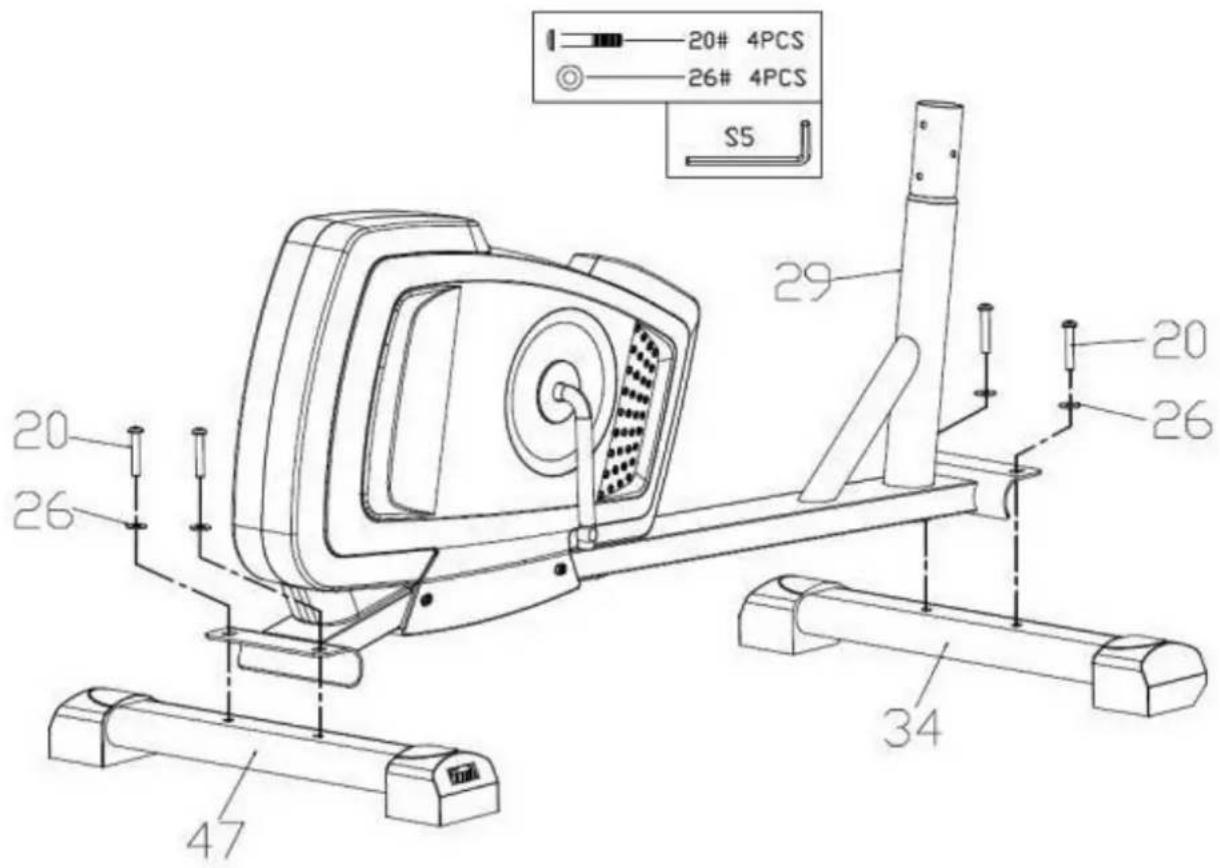
STEP 1: ATTACHING THE STABILIZERS
First attach the front and rear stabilizer (34=front and 47=rear) to the main frame (29). This requires 2 screws (20) and 2 washers (26) each, which you must first remove from the respective stabilizer. Tighten the connections well. The height adjusters on the rear stabilizer (47) must be used to compensate for any unevenness of the floor. To do this, turn the adjusters until the unit stands firmly and without wobbling on the floor. The front stabilizer (34) is equipped with castors to make it easier to move the unit from place to place (Attention: To protect the floor, place a pad underneath!).
text_image
20# 4PCS 26# 4PCS S5 29 20 26 34 47STEP 2: MOUNTING THE HANDLE SUPPORT
Loosen the screws (35) and corrugated washers (11) from the main frame (29). Turn the resistance adjuster (16) to the lightest setting and connect the resistance cable upper part (16) to the resistance cable lower part (79), as well as the computer cable upper part (17) to the computer cable lower part (78).
Now carefully (without pinching a cable) insert the handle support (18) into the main frame (29) and fix it with the screws (35) and corrugated washers (11).
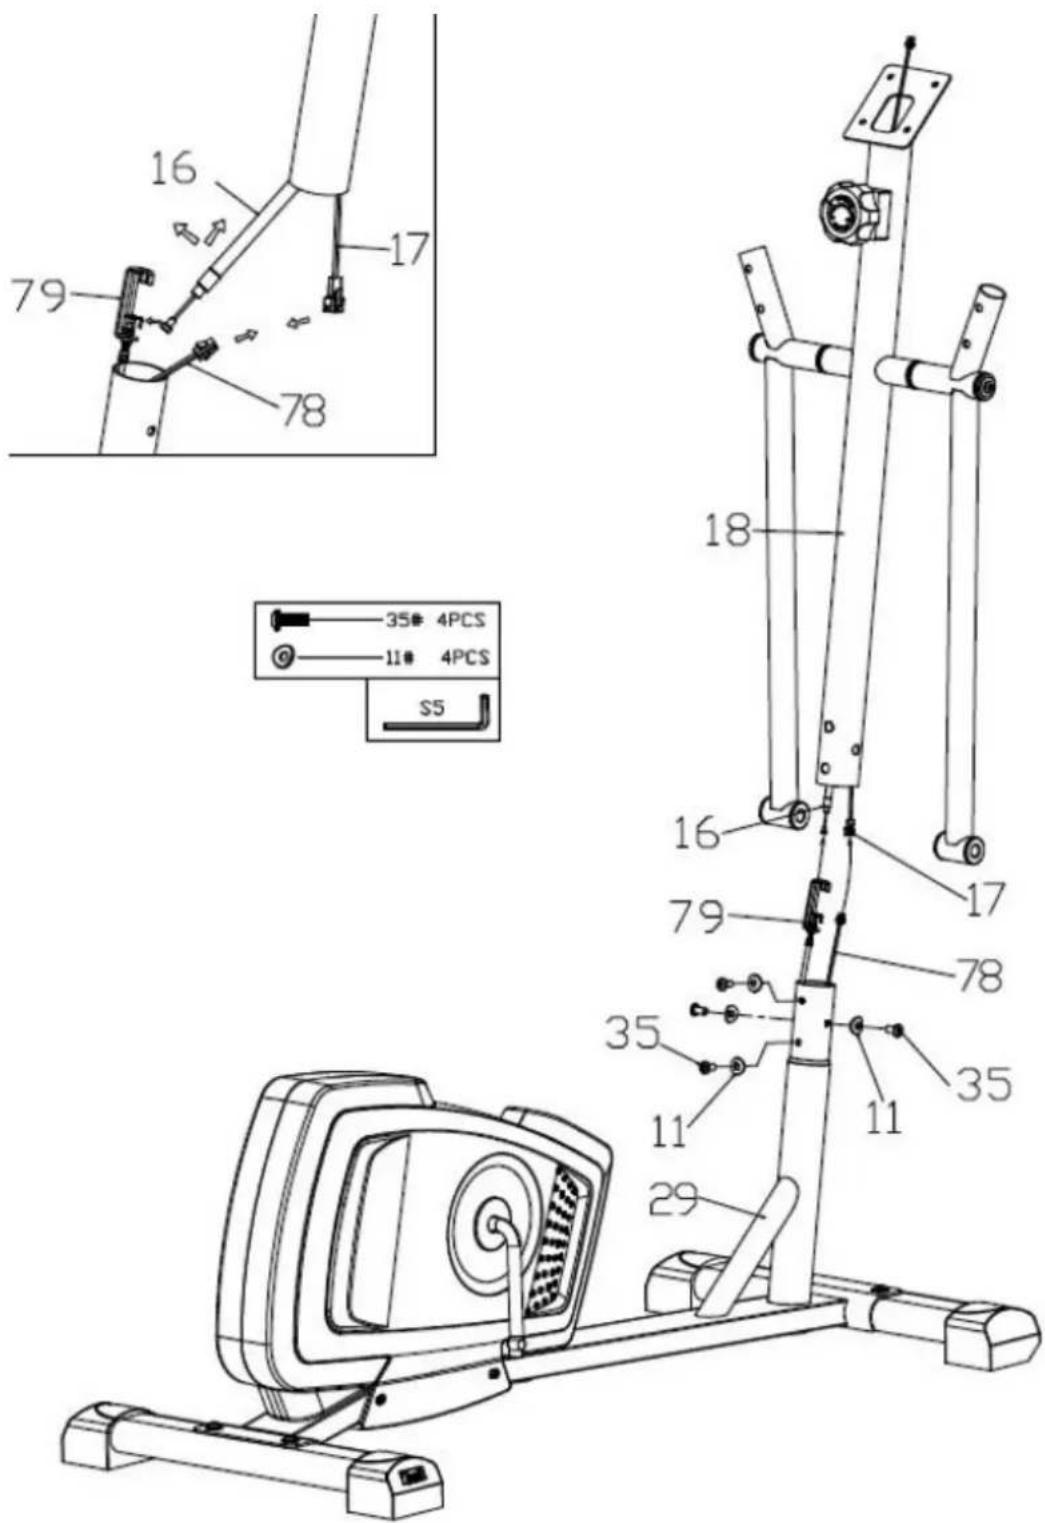
text_image
16 79 17 78 35 4PCS 11 4PCS S5 18 16 79 78 35 11 29 35STEP 3: TREAD ASSEMBLY
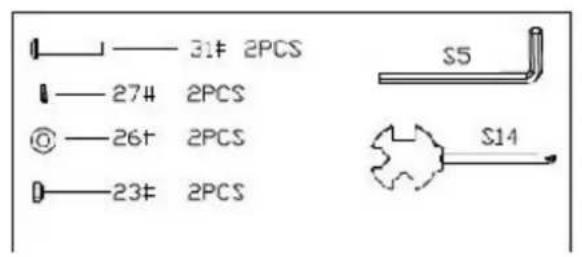
Attach the left and right treads (30L/R) to the tread struts (32 and 33) with the bolts (31), spring washers (27), washers (26) and nuts (23) as shown.
text_image
31# 2PCS 274 2PCS @ 26+ 2PCS 23# 2PCS S5 S14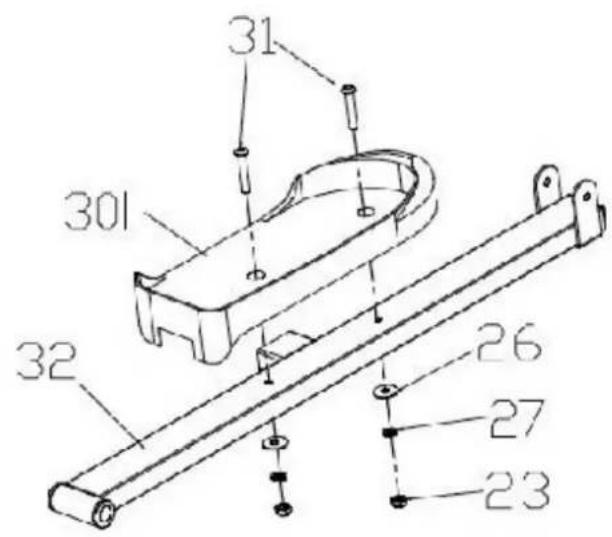
text_image
31 301 32 26 27 23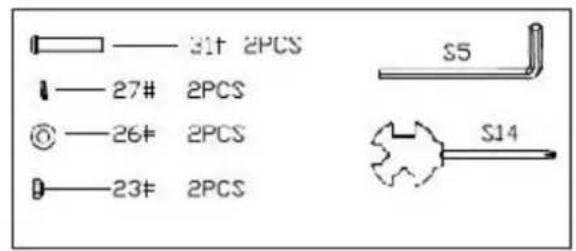
text_image
31# 2PCS 27# 2PCS 26# 2PCS 23# 2PCS S5 S14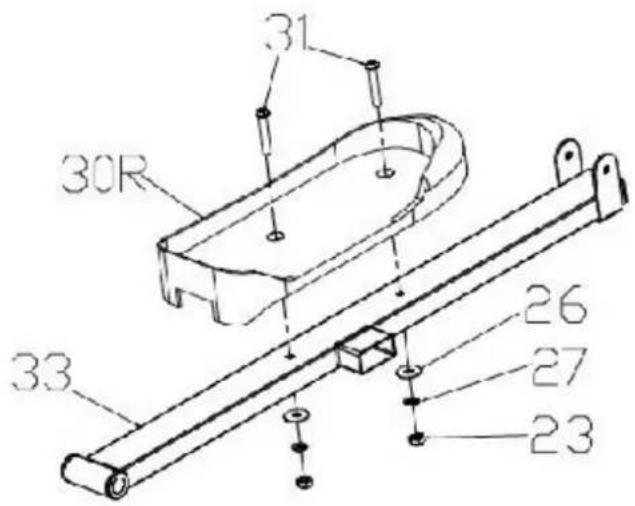
text_image
30R 31 33 26 27 23STEP 4: SWING BAR ASSEMBLY (LOWER PART)
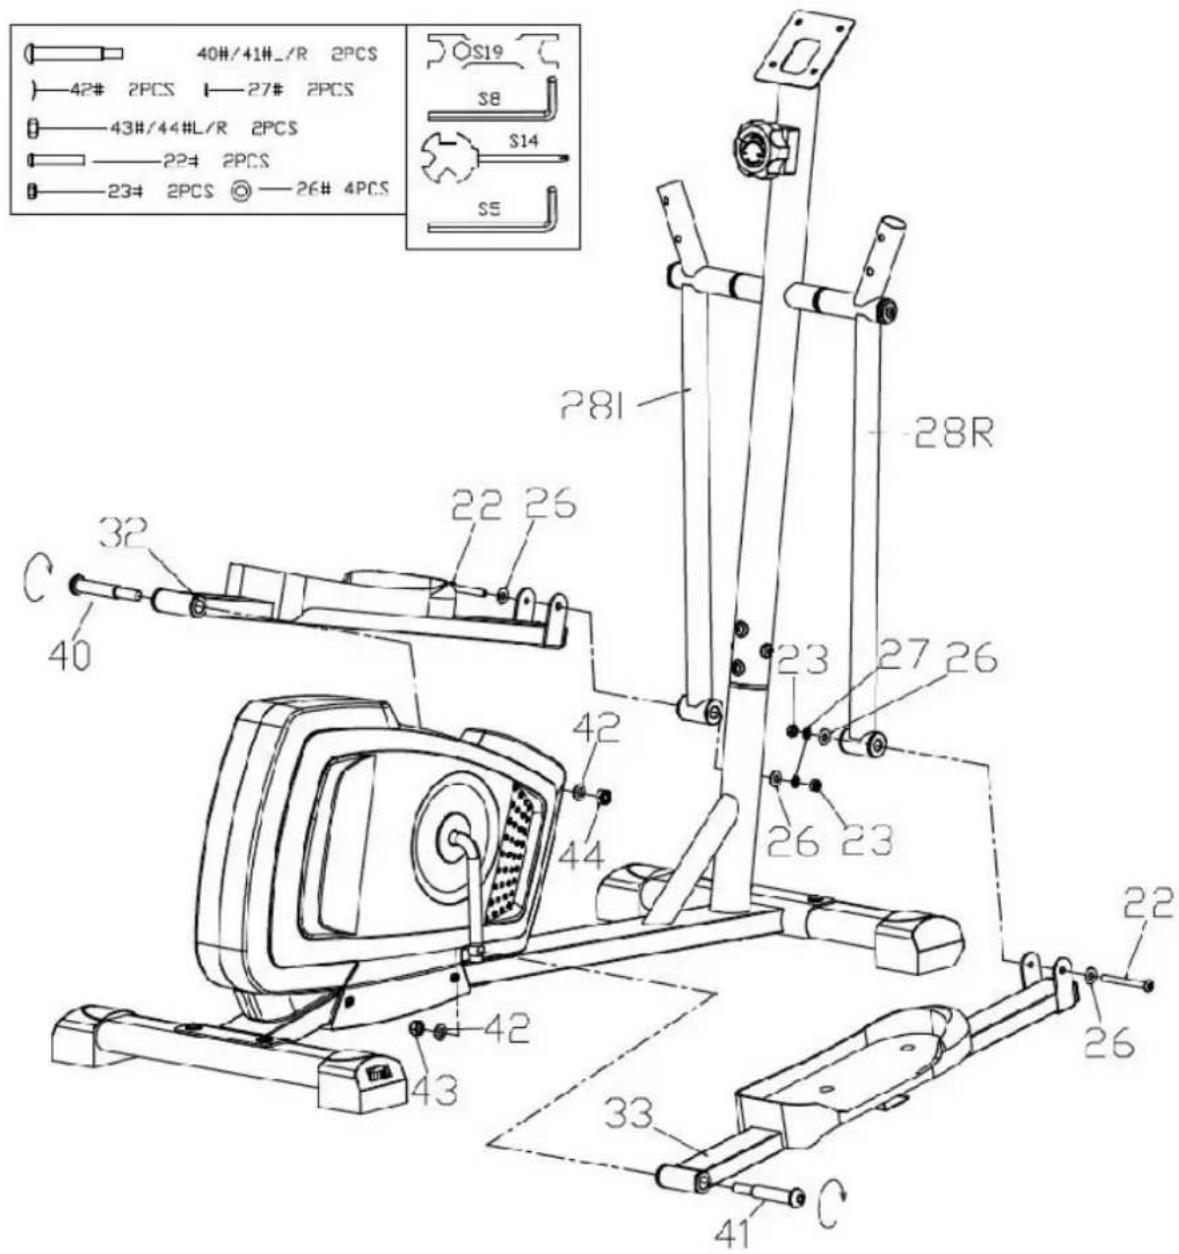
Remove the bolts (40 & 41), spring washers (42), nuts (43 & 44), as well as the bolts (22), nuts (23), washers (26) and corrugated washers (27) from the tread struts (32 or 33).
Fit the right (32) and left (33) tread struts to main frame (29) with the bolts (40 & 41), spring washers (42) and nuts (43 & 44) as shown. Then connect the front of the tread struts (32 or 33) to the two lower swing bar ends (28L & 28R). For this you need the bolts (22), nuts (23), washers (26) and corrugated washers (27).
text_image
40#/41#/R 2PCS 42# 2PCS — 27# 2PCS 43#/44#/L/R 2PCS 22# 2PCS 23# 2PCS © — 26# 4PCS S8 S14 SE P81 28R 22 26 32 40 23 27 26 42 44 26 23 22 26 43 42 33 41STEP 5: HANDLE ASSEMBLY
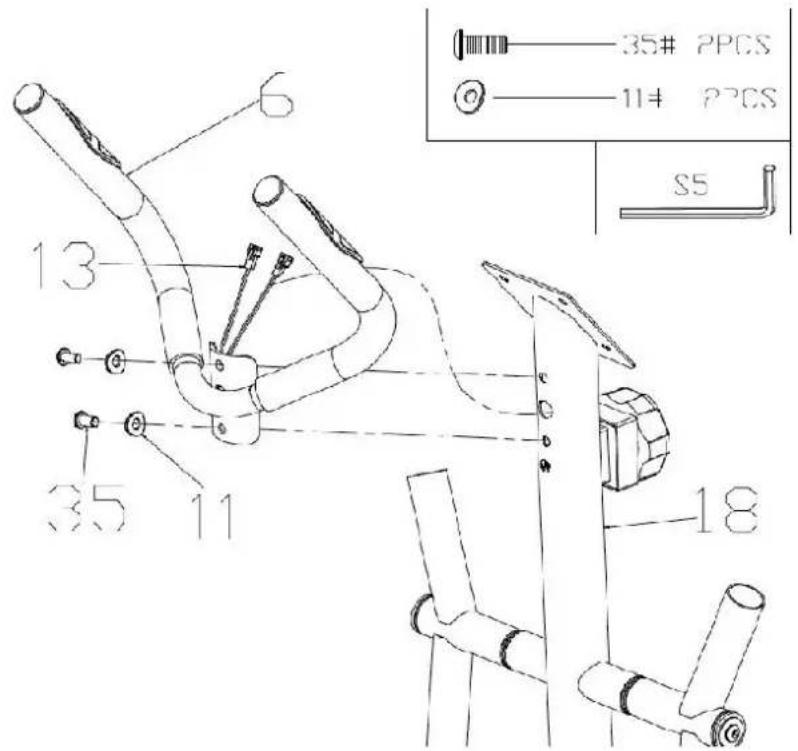
First remove the screws (35) and corrugated washers (11) from the handle support (18). Guide the pulse cables (13) through the large hole in the handle support (18) and upwards through the opening. Then fix the handle (6) to the handle support (18) with the screws (35) and corrugated washers (11). Be careful not to pinch any cable!
text_image
35# PPCS 11# PPCS S5 6 13 35 11 18STEP 6: COMPUTER ASSEMBLY
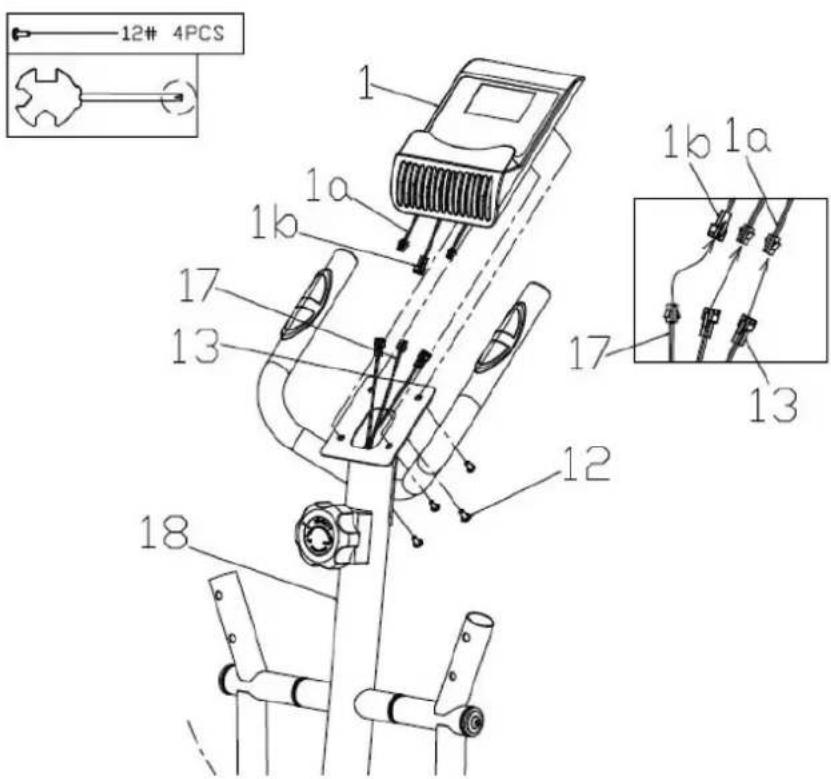
Connect the sensor cable (17) and the pulse cables (13) to the corresponding connectors (1a/1b) on the computer (1). Then mount the computer (1) with 4 screws (12) on top of the handle support bracket (18).
text_image
12# 4PCS 1 1a 1b 17 13 12 18 1b 1a 13STEP 7: SWING BAR ASSEMBLY (UPPER PART)
Remove the screws (35) and corrugated washers (11) from the upper swing bars (2L & 2R).
Then insert the two upper swing bars (2L & 2R) into the two lower swing bar ends (28L & 28R) and fix them with the screws (35) and corrugated washers (11).
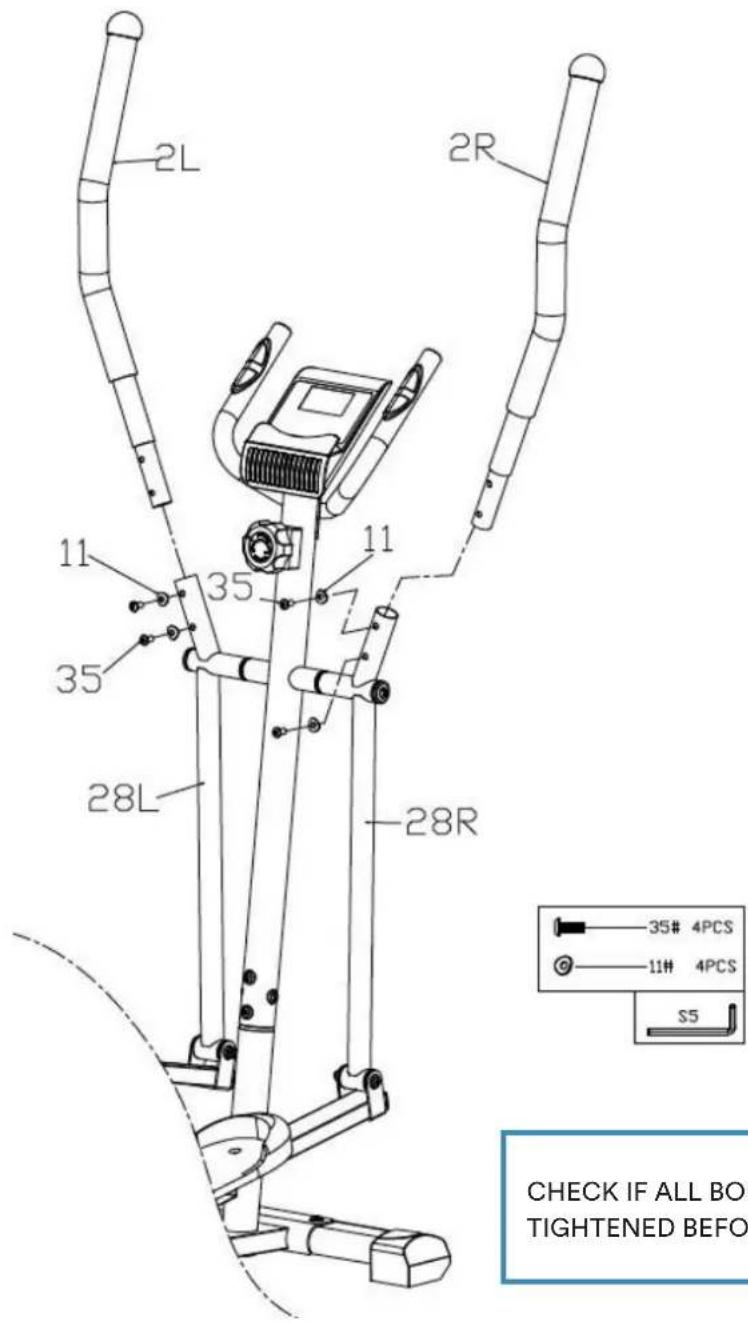
text_image
2L 2R 11 35 11 35 28L 28R 35# 4PCS 11# 4PCS S5 CHECK IF ALL BOI TIGHTENED BEFORECHECK IF ALL BOLTS AND NUTS ARE TIGHTENED BEFORE USING THE DEVICE!
text_image
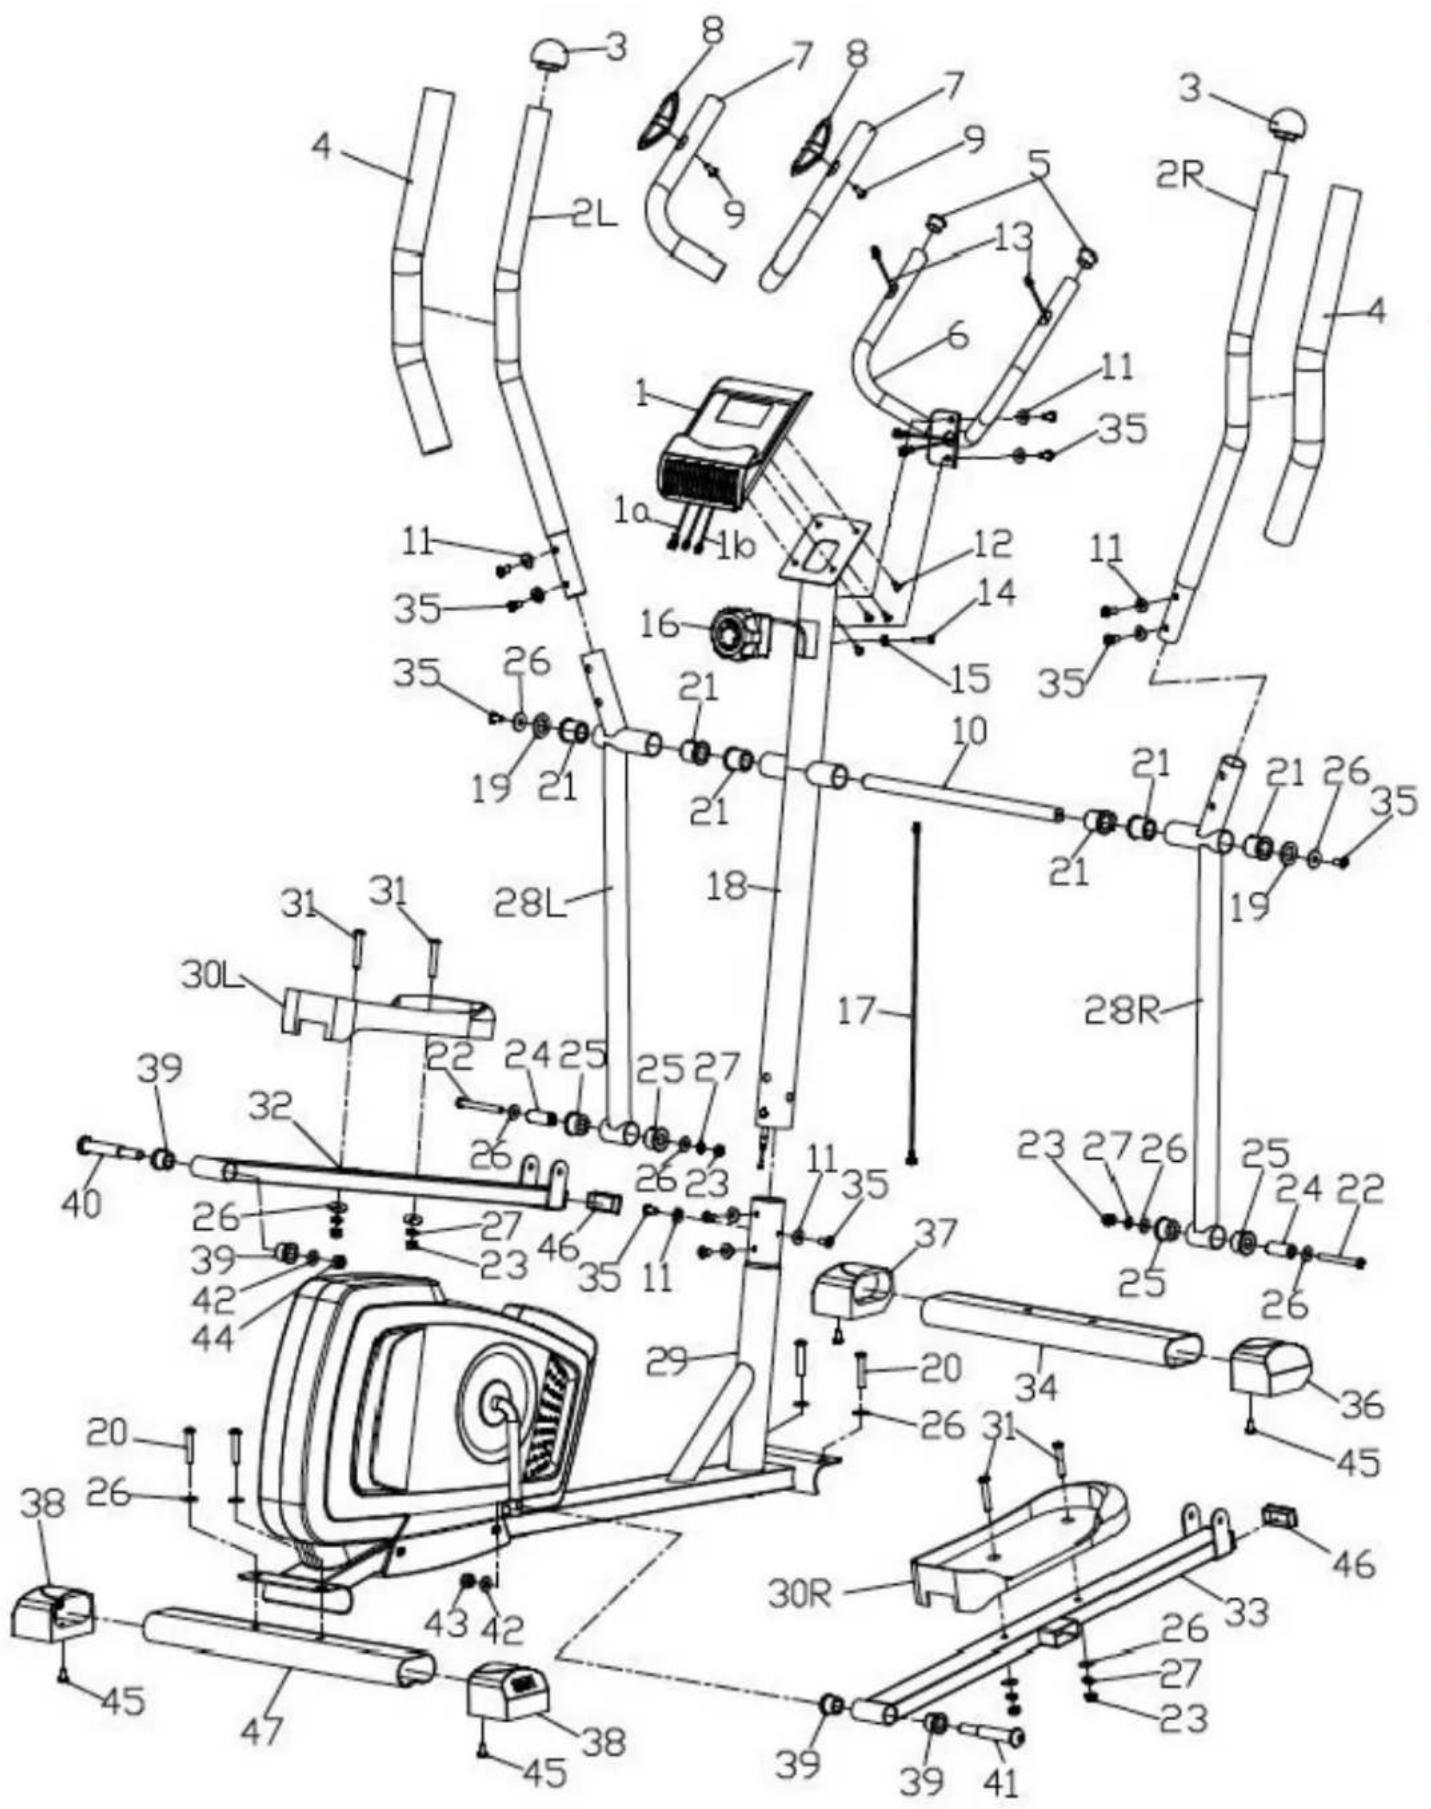
Technical diagram of a stationary exercise machine with numbered components and labeled parts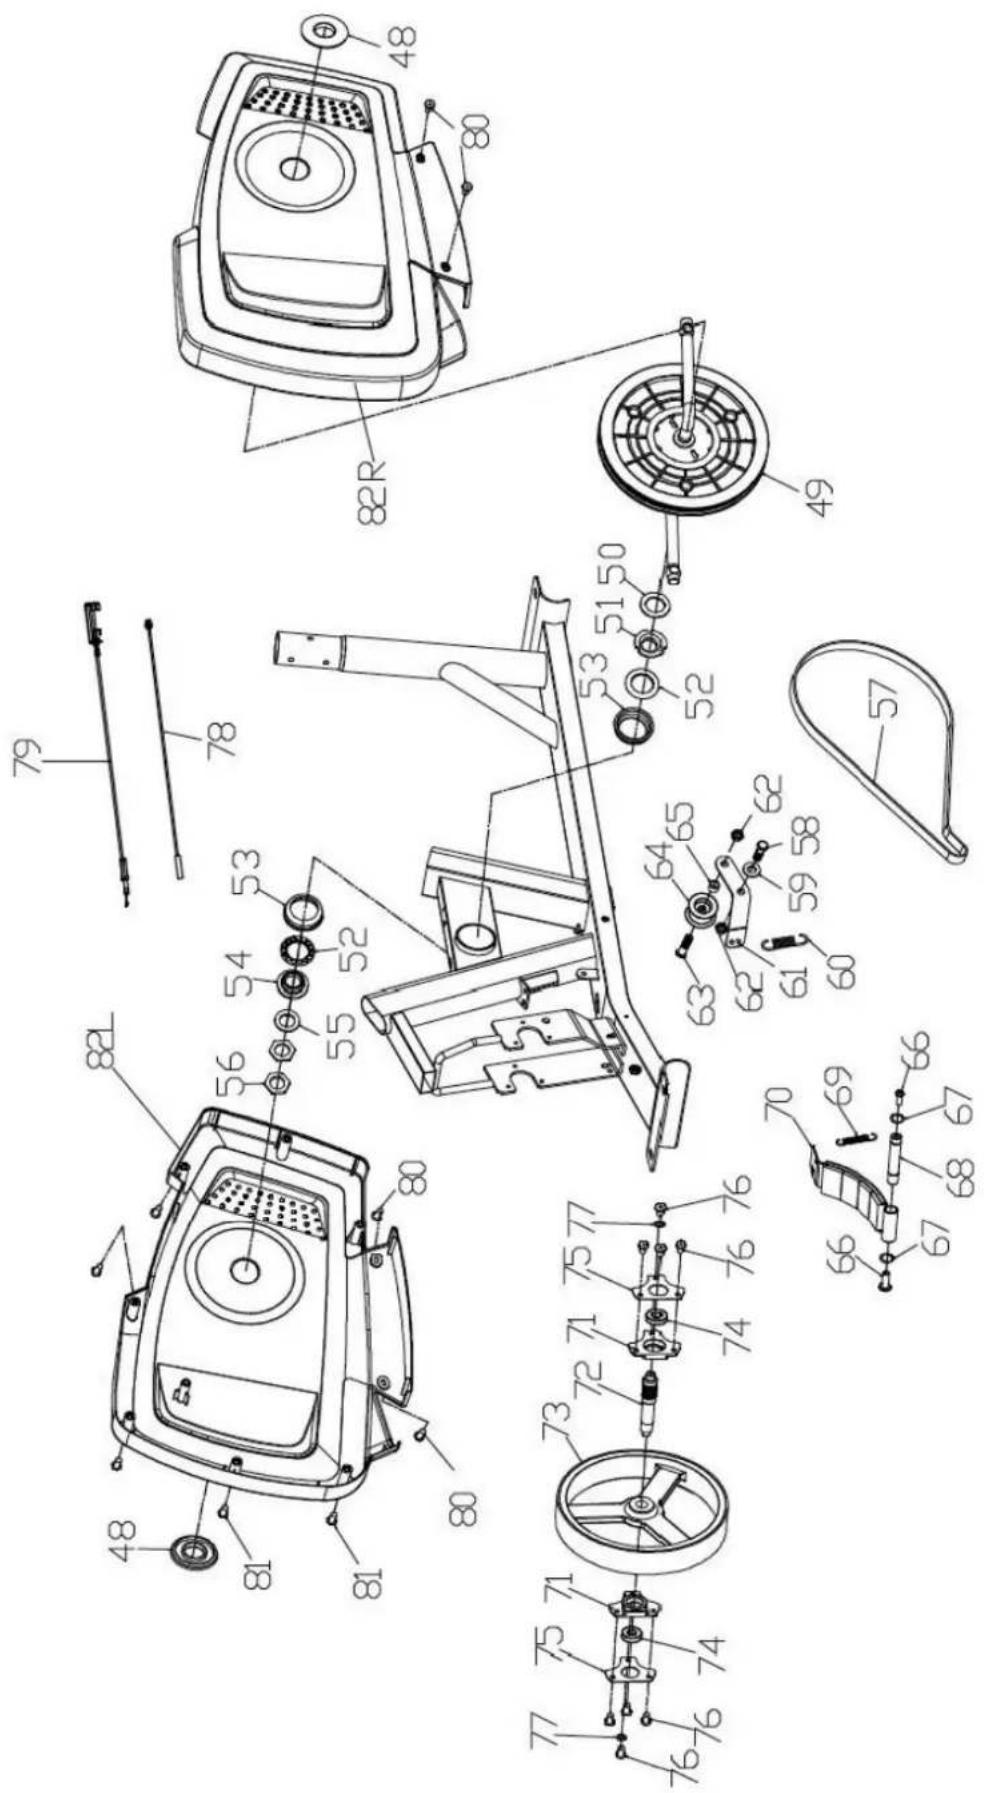
text_image
Technical diagram of a mechanical assembly with numbered components and exploded views| Part no. | Description Q'ty | |
| 1 Computer 1 | ||
| 2 L/R Upper swing arm (L/R) each 1 | ||
| 3 Round head tube plug 2 | ||
| 4 Foam handle 2 | ||
| 5 Plug ø25 2 | ||
| 6 Handle 1 | ||
| 7 Foam handle for handgrip | 2 | |
| 8 Pulse sensor | 2 | |
| 9 Screw ST4.2×20 | 2 | |
| 10 | Axle | 1 |
| 11 | Shaft washer D8 | 10 |
| 12 | Screw M5×10 | 4 |
| 13 | Pulse cable | 2 |
| 14 | Screw M5×40 | 1 |
| 15 | Shaft washer D5 | 1 |
| 16 | Resistance adjuster incl. cable | 1 |
| 17 | Sensor cable (upper part) | 1 |
| 18 | Handle support | 1 |
| 19 | D-shaped seal | 2 |
| 20 | Screw M8×50 | 4 |
| 21 | Bushing ø32×ø30×28 | 6 |
| 22 | Screw M8×65 | 2 |
| 23 | Nut M8 | 6 |
| 24 | Shaft ø14×ø8.5×60 | 2 |
| 25 | Bush ø32×ø14×20 | 4 |
| 26 | Washer D8×ø24×1.5 | 14 |
| 27 | Spring washer D8 | 6 |
| 28 L/R | Lower swing arm (L/R) | each 1 |
| 29 | Main frame | 1 |
| 30 L/R | Tread (L/R) | each 1 |
| 31 | M8×45 bolt | 4 |
| 32 | Tread strut, left | 1 |
| 33 | Tread strut, right | 1 |
| 34 | Front stabilizer | 1 |
| 35 | Screw M8×16 | 1 |
| 36 | Front end cap, right | 1 |
| 37 | Front end cap, left | 1 |
| 38 | Rear end cap | 2 |
| 39 | Bushing ø24×ø16,1×20 | 4 |
| 40 | Crankshaft bolt 1/2" L | 1 |
| 41 | Crankshaft bolt 1/2" R | 1 |
| 42 | Spring washer 1/2" | 2 |
| 43 | Crankshaft lock nut 1/2" R | 1 |
| 44 | Crankshaft lock nut 1/2" L | 1 |
| 45 | Screw ST4.2×16 | 4 |
| 46 | Plug J50×25×1.5 | 2 |
| 47 | Rear stabilizer | 1 |
| 48 | Cover | 2 |
| 49 | Crank + pulley | 1 |
| 50 | Washer | 1 |
| 51 | Right flange nut | 1 |
| Part no. | Description Q'ty | |
| 52 | Ball bearing | 2 |
| 53 | Ball bearing holder | 2 |
| 54 | Left flange nut | 1 |
| 55 | Locking piece | 1 |
| 56 | Nut | 2 |
| 57 | V-belt | 1 |
| 58 | Screw M10×1,25 | 1 |
| 59 | Washer D10 | 1 |
| 60 | Spring | 1 |
| 61 | Idler pulley mounting plate | 1 |
| 62 | Nut M10×1,25 | 2 |
| 63 | Screw M10×1,25 | 1 |
| 64 | Guide roller | 1 |
| 65 | Spacer sleeve | 1 |
| 66 | Screw M6×20 | 2 |
| 67 | Spring D12 | 2 |
| 68 | Magnetic axis | 1 |
| 69 | Spring | 1 |
| 70 | Magnet plate | 1 |
| 71 | Bearing block | 2 |
| 72 | Flywheel axle | 1 |
| 73 | Flywheel 1 | |
| 74 | Bearing | 2 |
| 75 | End cap | 2 |
| 76 | M6×10 bolt | 8 |
| 77 | Washer D10 | 2 |
| 78 | Sensor cable (lower part) | 1 |
| 79 | Resistor cable lower part | 1 |
| 80 | Screw ST4.2×16 | 4 |
| 81 | Screw ST4.2×16 | 7 |
| 82 L/R | Protective cover (L/R) | each 1 |
COMPUTER FUNCTIONS
- Scan: Automatic display change of all function values
• Time: Display of the training time (0:00 - 99:59 min.)
• Speed: Speed display (0.0 - 999.9 km/h)
• Distance: Distance (0.0 - 9999 km)
• Calories: Approx. calorie consumption (0.0 - 9999 kcal)
• Odo: Total distance (0.0 - 9999 km)
• Pulse: Pulse rate (40 - 240 beats/minute)
For a correct reading, please make sure that you are correctly the two sensors correctly with your palms. It may take up to 2 minutes before the pulse rate is measured correctly.
BATTERIES
The computer requires 2 AAA 1.5V batteries.
BUTTONS AND OPERATION

text_image
SCAN TIME SPEED RESET MODE SET DIST CAL ODO PULSE SkandikaThe computer will switch on when you press the button or start exercising. After about 4 minutes of no activity, the computer will automatically switch off.
RESET: All values will be reset when you press and hold this button for approx. 3 seconds or when the batteries are removed.
MODE: With this key you can select the desired function to be displayed (or preset). If „Scan“ is selected, all function values are displayed one after the other in an automatic cycle. A small arrow is displayed additionally, which always points to the currently active function.
SET: With this button you can set target values for time, distance or calories. After setting, these values will then count down to 0.
Notes:
- If the computer display does not show any values, please carefully check all cable connections for proper contact!
- The calorie consumption values registered and displayed with this computer merely serve as indicative values for a person of medium stature with medium resistance setting, and can deviate considerably from the actual medically precise calorie consumption.
- The pulse values registered and displayed with this computer are merely indicative in nature and can deviate considerably from the actual pulse.
- This computer has been tested according to the appropriate applicable EMC standards. Nevertheless, it is possible that the display may be disturbed, especially by electrostatic discharges. This may result in an unwanted reset or a faulty display. In such a case, you only need to restart the computer (switch it off and on again).
KINOMAP
The free KinoMap app turns your device into a powerful and fun fitness product! Choose from the geotagged video on Kinomap and go! Your position is shown in the video and as icon on the map. Download the Kinomap Fitness app in the app or play store by searching for 'Kinomap Fitness' or follow one of the links below.
Install and open the app and register resp. log in. Activate Bluetooth®. Now add the training device as follows:

text_image
Apple Store Kinomap Kinomap SAS AKTUALISEMEN 4,3 ★★★★☆ $53 4+ Neue Funktionen Thanks for training or Kinomap. Our daily concerns is offering you the best experience there is. Vorschau

text_image
Kinomap FOLGT SIE Kinomap Gesponsert STAVANGER, LIMBURG & HONG KONG RACES JOIN THE CHALLENGE HAMMER SERIES in ASSOCIATION WITH wahoo Mehr erfahren >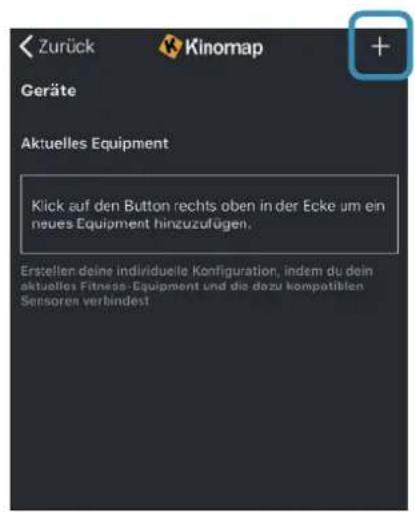
Now tap on OK and return to main menu. You can now choose a course for your exercise (depending on your type of KinoMap account maybe only some free courses). Press Start and begin to exercise!

text_image
Kimmap Free videos Suzhou Home BEST TRAVINGSLESTONE HOME BEST TRAVINGSLESTONE HOME BEST TRAVINGSLESTONE Options Starter Pre-Off Eggeorohama HKSk #1-Hong Kong Harbour HKSk HOME BEST TRAVINGSLESTONE HOME BEST TRAVINGSLESTONE- Select Skandika → 5. Tap on the device
FITSHOW
Turn on Bluetooth® on your mobile device, download the app and install it on your iOS or Android device. You can find the app through your device's app search feature. After successful installation, you can launch the app on your mobile device.
To record training data, you need to register in the app. However, a simple training without permanent data recording is also possible without registration.

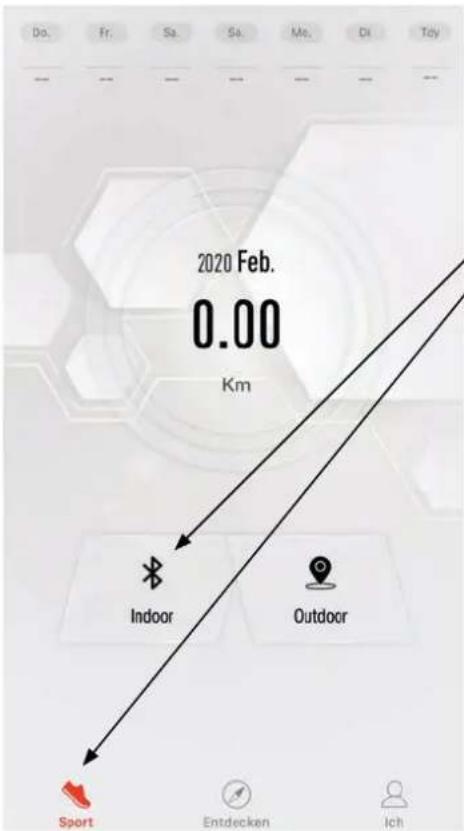
If you are not registered, a corresponding message may appear:

Confir rm by tapping „Continue“. Now you can start training and the corresponding data will be displayed in the app, while the device computer only displays the Bluetooth® icon. If your device's training computer is not found, please check if Bluetooth® is enabled on your training device and on your mobile device.
If you want to fi nish the workout, tap and hold the red STOP button in the app.
ZWIFT
Your device computer is equipped with Bluetooth® and is compatible to the „ZWIFT“ app. Please note the following information. Download ZWIFT from the following sources and install the app on your device (e.g. PC, notebook or mobile phone):
Windows: http://www.zwift.com/download/pc
MAC: http://www.zwift.com/download/mac
GooglePlay: https://play.google.com/store/apps/details?id=com.zwift.zwiftgame
Appstore: https://itunes.apple.com/us/app/id1134655040?mt=8

ZWIFT
After the installation, please follow the instructions of the app. To connect to the computer of the training device, select the device and confirm with „OK“.
ZWIFT is a third party supplier. We offer you this connectivity to make your training even more interesting. However, due to possible changes or updates, we cannot guarantee permanent compatibility. You may need to register with ZWIFT to use the app. The app contains partly chargeable content.
CLEANING & CARE
- Before cleaning the appliance, make sure that the appliance is switched off. Allow the unit to cool down.
- Clean the device with a slightly damp cloth only. Never use brushes, aggressive cleaning agents, petrol, thinners or alcohol. Rub the device dry with a clean dry cloth.
- Never immerse the appliance in water to clean it and ensure water cannot get into the appliance.
- Wait until the device is completely dry before using it again.
WARM-UP and COOL-DOWN
A successful exercise program consists of a warm-up, aerobic exercise and a cool-down. Exercise for at least two or preferably three times a week, resting for a day between workouts. After several months, you may increase the frequency to four or five times per week.
WARM-UP
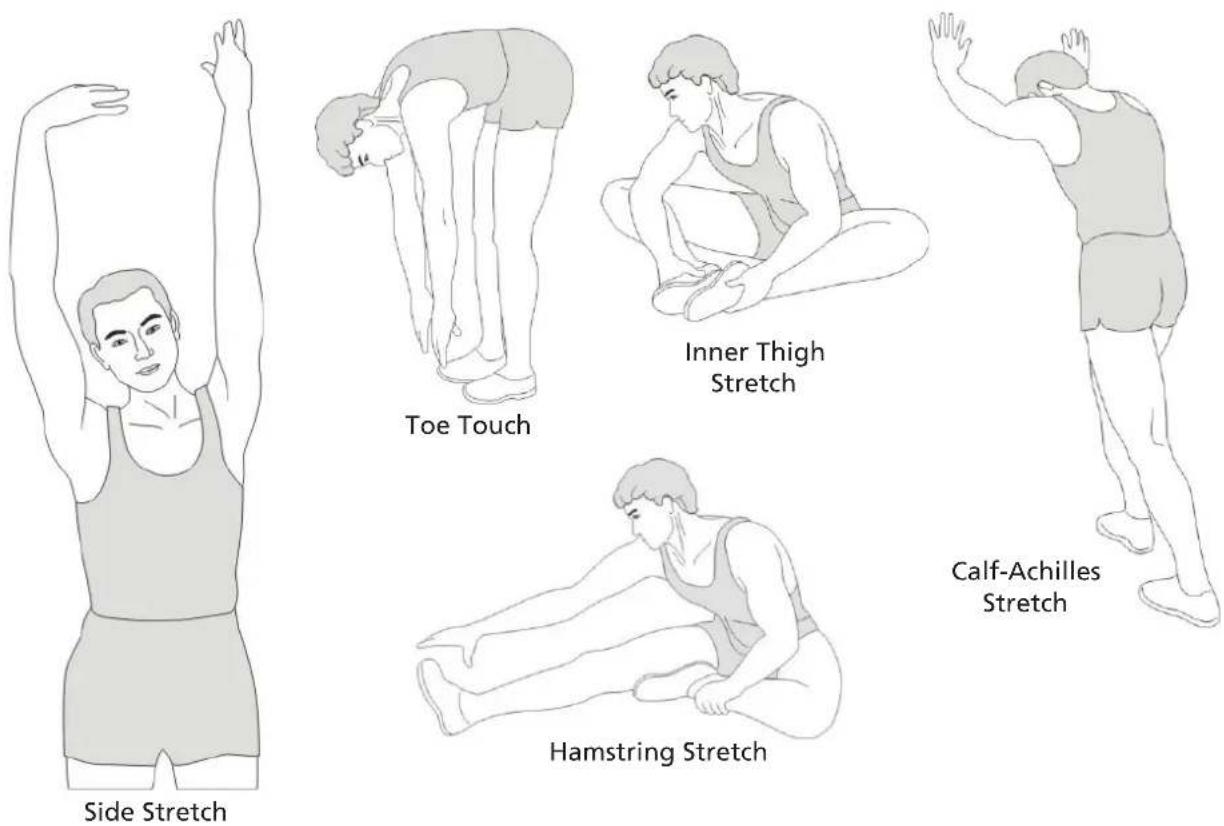
This stage helps to improve the blood circulation and prepares the muscles for your workout. It additionally helps to reduce the risk of injury or cramps. It is recommended to do some stretching exercises as shown here below. Hold each stretching position for approximately 30 seconds. Never force or jerk yourself into a stretching position – if you feel pain, STOP immediately. Warm-up exercises may also include brisk walking, jogging, jumping jacks, jump rope exercises or running in place.
STRETCHING
Muscles can be stretched more easily when these are warm. This reduces the risk of injury. DO NOT BOUNCE.
COOL-DOWN
This stage helps to soothe your muscles and your cardiovascular system after your workout. At the end of your workout, reduce the speed and exercise for approximately 5 minutes at this lower speed level. Afterwards, repeat the warm-up exercises as described above.
GUARANTEE CONDITIONS
For our devices we provide a warranty as defined below.
- In accordance with the following conditions (numbers 2-5) we repair defect or damage to the device free of charge, if the cause is a manufacturing defect. Therefore, these defects / damages need to be reported to us without delay after appearance and within the warranty period of 24 months after delivery to the end user. The warranty does not cover parts, which easily break (e.g. glass or plastic). The warranty does not cover slight deviations of the product, which are insignificant for usability and value of the device and damage caused by chemical or electrochemical effects and damages caused by penetration of water or generally force majeure damage.
- The warranty achievement is the replacement or repair of defective parts, depending on our decision. The cost of material and labor will be borne by us. Repairs at customer site cannot be demanded. The proof of purchase along with the date of purchase and / or delivery is required. Replaced parts become our property.
- The warranty is void if repairs or adjustments are made,
which are not authorized by us or if our devices are equipped with additional parts or accessories that are not adapted to our devices. Furthermore, the warranty is void if the device is damaged or destroyed by force majeure or due to environmental influences and in case of improper handling / maintenance (e.g. due to non-observance of the instruction manual) or mechanical damages. The customer service may authorize you to replace or repair defective parts after telephone consultation. In this case, the warranty is not void.
- Warranty services do not extend the warranty period nor do they initiate a new warranty period.
- Further demands, especially claims for damages which occurred outside the device, are excluded as long as a liability is not obligatory legal.
- Our warranty terms - which cover the requirements and scope of our warranty conditions - do not affect the contractual warranty obligations of the seller.
- Parts of wear and tear are not included in the warranty.
- The warranty is void if not used properly or if used in gyms, rehabilitation centers and hotels. Even if most of our units are suitable for a professional use, this requires a separate agreement.

ENVIRONMENTAL PROTECTION
The symbol of the crossed-out dustbin on batteries or accumulators indicates that they must not be disposed of in household waste at the end of their life. If batteries or accumulators contain mercury (Hg), cadmium (Cd) or lead (Pb), you will find the respective chemical symbol below the symbol of the crossed-out dustbin. You are legally obliged to return old batteries and accumulators after use. You can do this free of charge at a retail outlet or at another collection point near you. You can obtain addresses of suitable collection points from your city or local government. Batteries may contain substances that are harmful to the environment and human health. Particular care should be taken when handling batteries containing lithium because of the special risks involved. The separate collection and recycling of old batteries and accumulators is intended to avoid negative impacts on the environment and human health. Please avoid the generation of waste from old batteries as far as possible, e.g. by giving preference to batteries with a longer life or rechargeable batteries. Please avoid littering public spaces by not carelessly leaving batteries or electrical and electronic equipment containing batteries. Please consider ways to reuse a battery instead of disposing of it, for example by reconditioning or repairing the battery.
In accordance with our policy of continual product improvement, we reserve the right to make technical and visual changes without notice.
For spare parts please contact: service@skandika.de Service centre: MAX Trader GmbH, Wilhelm-Beckmann-Straße 19, 45307 Essen, Germany
Contenu

skandika.com/service
text_image
Technical diagram of a mechanical device with numbered components and labeled parts
text_image
Technical diagram of a mechanical assembly with numbered components and exploded viewstext_image
Sochen Kinomap Kinomap SAS ACTUALISEREN 4,3 ★★★★☆ #53 4+ New Funktionen Thanks for training on Kinomap. Our daily concern is offering you the best experience there is. Vorschau
text_image
Kinomap FOLGT SIE Kinomap Gesponsert STAVANGER, LIMBURG & HONG KONG RACES JOIN THE CHALLENGE HAMMER SOBIEK on Kinomap IN ASSOCIATION WITH wahoo Mehr erfahren >
text_image
1. Zurück Kinomap KETTLER MARATHON PAFERS Peak Fitness PAFERS PEAK FITNESS POWERLAND Skandika POWERLAND SKANDIKA sportplus SPORTTECH SPORTPLUS SPORTSTECHtext_image
Kinsmap Free videos Suplam SICUM 67.3 10.8 SICUM Opticeon HNSA #1-Hong Kang Harbour SICUM 02:47 02:23 SICUM SICUM SICUM SICUM SICUM SICUM SICUM SICUM SICUM SICUM SICUM SICUM SICUM SICUM SICUM SICUM SICUM SICUM SICUM SICUM SICUM SICUM SICUM SICUM SICUM SICUFITSHOW
MAC: http://www.zwift.com/download/mac
GooglePlay: https://play.google.com/store/apps/details?id=com.zwift.zwiftgame
Appstore: https://itunes.apple.com/us/app/id1134655040?mt=8