VPP16 - Vacuum packaging machines Vollrath - Free user manual and instructions
Find the device manual for free VPP16 Vollrath in PDF.

| Product type | Professional vacuum packaging machine |
| Brand | Vollrath |
| Model | VPP16 |
| Sealing bars | Two 16-inch (40.6 cm) sealing bars |
| Power supply | 120 V, 60 Hz (check nameplate) |
| Power | Not specified |
| Weight | Not specified |
| Dimensions (L x W x H) | Not specified |
| Chamber capacity | Suitable for bags up to 16 inches wide |
| Programs | 20 default programs, customizable via control panel or ACS Configurator software |
| Main functions | Vacuum, sealing, LiquidControl, Soft-Air, Tenderize (marination), label printing, HACCP data logging |
| User access | Password-controlled access (owner and user) |
| Display | LCD screen with navigation keys |
| Programming interface | Integrated control panel or ACS Configurator software via USB key |
| Label printing | Compatible with label printer (not included) via USB port |
| HACCP data logging | Yes, data log exportable to USB key, up to 100 entries |
| Daily maintenance | Run the pump conditioning program and clean with a non-lint microfiber cloth |
| Weekly maintenance | Check oil level, inspect sealing bar, protector and lid gasket |
| Semiannual maintenance | Replace pump oil, sealing wires, Teflon tape, sealing bar protector and lid gasket |
| Quadrennial maintenance | Replace lid, gas springs and sealing cylinder membranes |
| Safety | Unplug before cleaning, avoid water infiltration, do not tilt the unit, use on a flat surface with feet, 15 cm clearance on sides and 39.4 cm above |
| Spare parts | Available at Vollrath.com (sealing wires, Teflon tape, protector, gasket, oil, fuses) |
| Repairability | Contact Vollrath technical support for any repairs; do not attempt self-repair |
| Warranty | Vollrath warranty for defects in materials and workmanship (commercial use) |
Frequently Asked Questions - VPP16 Vollrath
User questions about VPP16 Vollrath
0 question about this device. Answer the ones you know or ask your own.
Ask a new question about this device
Download the instructions for your Vacuum packaging machines in PDF format for free! Find your manual VPP16 - Vollrath and take your electronic device back in hand. On this page are published all the documents necessary for the use of your device. VPP16 by Vollrath.
USER MANUAL VPP16 Vollrath
VacuumPackingMachinewithDual16"SealingBarsandAdvancedControlSystem(ACS)
ThankyouforpurchasingthisVollrathequipment.Beforeoperatingthe equipment,readandfamiliarizeyourselfwiththefollowingoperating andsafetyinstructions.SAVETHESEINSTRUCTIONSFORFUTURE REFERENCE.Savetheoriginalboxandpackaging.Usethispackaging toshiptheequipmentifrepairsareneeded.
SAFETYPRECAUTIONS
Toensuresafeoperation,readthefollowingstatementsandunderstand theirmeaning.Thismanualcontainssafetyprecautionswhichare explainedbelow.Pleasereadcarefully.

WARNING
Warningisusedtoindicatethepresenceofahazardthatwillorcan causeseverepersonalinjuryordeath.

CAUTION
Cautionisusedtoindicatethepresenceofahazardthatwillorcan causeminorormajorpersonalinjuryifthecautionisignored.
NOTICE: Notice is used to note information that is important but not hazard-related.
Toreduceriskofinjuryordamagetotheequipment:
- Unplugwhennotinuse.
- Keepunitandpowercordawayfromopenflames,electricburners orexcessiveheat.
•Donotoperateunattended. - Donotoperateifunithasbeendamagedorismalfunctioningin anyway.
FUNCTIONANDPURPOSE
Thisunitisintendedtovacuumsealfoodproductsinacommercial kitchenenvironment.Itisnotintendedforhousehold,industrialor laboratoryuse.
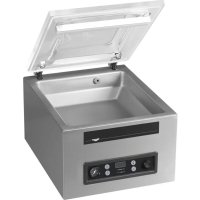
natural_image
Exterior view of a stainless steel laboratory instrument with open lid and control panel (no visible text or symbols)| ItemNo. | Model | Description |
| 40834 | VPP16 | VacuumPackingMachinewithDual16"SealingBars andAdvancedControlSystem(ACS) |
TableofContents
FeaturesandControls......page2
Password-ControlledAccess......page2
Installation......page2
Operation......page3
CreateCustomProgramsandLabels......page4
HACCPDataLog......page7
Cleaning......page7
text_image
Labeled diagram of a laboratory filtration or separation device with numbered components A through F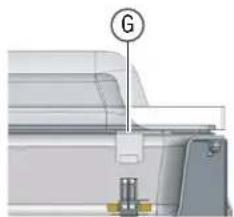
natural_image
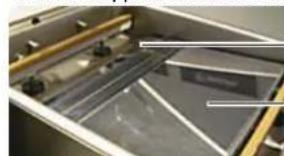
Technical diagram of a mechanical assembly with labeled component G (no text or symbols beyond label)ALidEOilInspectionWindow
BSealBarsFChamber
CControlPanelGSeaiPad
DLidRetainer (notpictured)
text_image
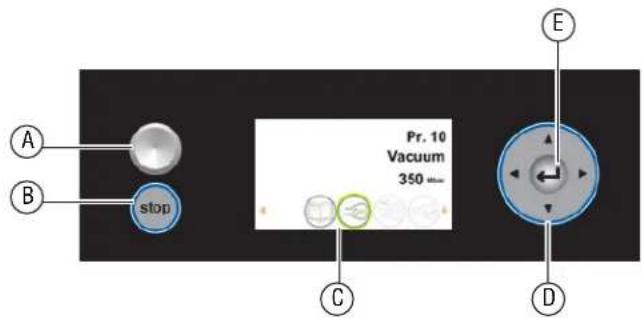
Pr. 10 Vacuum 350 mm stop A B C D EAOn/OffButtonDNavigationButtons
BStopButtonEEnterButton
CDisplay
PASSWORD-CONTROLLEDACCESS
NOTICE: Themachineremembersthelastpasswordused. To preventunauthorizedchanges, loginasUserafteryou changesettings.
Themachinehastwolevelsofpassword-controlledaccess-owner modeandusermode. Themachinearrivesinownermode. Thisallows full-accesstoallsettingsandprograms.Usermodelocksthesettings andprogramsssotheycannotbechanged.Toswitchtousermode, logintothemachineusingtheusercode.
| LoginAs | AccessTo | Password |
| User | Runprogramsandadjustprintersettings0000 | |
| Owner | Changesettingsandeditprograms | 1324 |
INSTALLATION
NOTICE: Do NOT til the machine. Tilting could allow oil to flow out of the pump and caused damage to the machine.
NOTICE: Usingavoltageotherthanthenameplateratedvoltagewill causedamagetotheunit. Incorrect voltage, modification to the power cordorelectrical componentscandamage unit and will void the warranty.
NOTICE: Runningthemachinewithoutoilorinsufficientoilwill damagethemachineandvoidthewarranty.
- Remove all packing material and tape, as well as any protective plastic from the equipment.
- Cleananyglueresidueleftbytheplasticortape.
- Placethevacuumpackmachineonaflat, levelsurface.
- Install the included 4"(10.2cm) legs. ETLSanitation requires machinetobe used within included legs.
- Check the oil gaugewindow at the back of the machine. Verify the oil level is between the minimum and maximum fill lines.
6.Plugthepowercordintoagroundedelectricaloutletthatmatches thenameplateratedvoltage. - RunthePumpConditioningprogram.SeeDailyCleaningon page7.
SettheTimeandDate
Thedefaulttimeonthemachinemaynotmatchyourlocaltime.Ifyou plantouseHACCPIlogging,itisimportanttosetthecorrecttime.There arealsoseveraldateformatsfromwhichtochoose.Bothofthesecan bechangedintheSettingsmenu.
- Turnonthemachine. PressandreleasetheOn/Offbutton.Allowapproximately7-10 secondsforthedisplaytoload.Thestart-upscreenwilldisplay informationaboutthesoftware, timeanddate. Forexample:

- Press ◀ untilishhighlighted. Press ← .
3.Entertheownerpassword1324.Press←. (Press▲ toselectanumber.Press▶ toentertothenextnumber.)
-
Press ← toentertheSettingsmenu.
-
Press ▼ to1.3DateandTime.Press← .
OPERATION
Themachineincludes20defaultprograms.Theseprogramscanbe namedandthesettingscustomizedforspecificneeds.SeeCreate CustomProgramsandLabelsonpage4forinstructions.
NOTICE: Neverpackproduct that can be damaged by vacuum packaging.
NOTICE: Toreducecondensation and corrosion risk for the pump, cool products before packing.
NOTICE: When packing food, always select a program that includes Liquid Sensor Control.
NOTICE: Special instructions apply for packing liquid products. See Packing Liquid Productson page 3.
NOTICE: Themachine is designed for a maximum use of five hours per day.
NOTICE: This machine is not designed for continuous use. Allow 15 seconds between packing cycles.
NOTICE: If the machine has been in use for one hour, stop the machine and allow it to cool to ambient temperature.
NOTICE: Do NOT til the machine. Tilting could enable oil to flow out of the pump and caused damage to the machine.
TurnOntheMachine
-
Rotatethelidretainersoitisnotcoveringthelid. Thelidretaineris usedonlyforsecuringthelidwhenthemachineisnotinuse.
-
PressandreleasetheOn/Offbuttonandallowapproximately7-10 secondsforthedisplaytoload.
-
If the machine has not been used for awhile, run the Pump Conditioning Program. Seepage7.
SelectaProgram
PackingaFoodProduct:SelectaprogramthatincludesLiquidSensor Control.
PackingaLiquidProduct: SeeimportantinformationunderPacking LiquidProductsonpage3.
- Press ▲ or ▼ toselectaprogram. Press ◀ or ▶ toviewthefunctionsintheprogram.
- Press ← toviewthesettingsofafunction.Fordescriptionsofthe functions,pleaseseepage4
PlacetheProductintheChamber

CAUTION
BurnHazard
Sealingbarmaybeomehotafterrepeateduse.Donottouch thesealingbarwhenplacingvacuumbagsinthechamber.
-
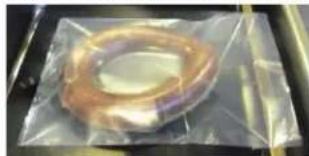
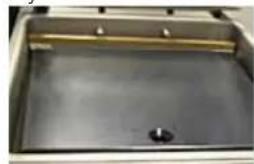
Placethefoodproductinavacuumsealingbagthatfitscompletely withinthechamber.
-
Placethebaginthechamberwiththeopenendoverthesealing bar.Makesurethebagissmooth,withoutwrinklesorfolds.
natural_image
Close-up of a copper ring wrapped in plastic film, placed on a metal tray (no text or symbols visible)- Forsmallproducts, placeoneormoreinsertplates under the product. This fillsemptyspace in the chamber, which reduces the cycle time.
natural_image
Interior view of a stainless steel appliance with a central sink and metal frame (no visible text or symbols)- Multiplevacuumbagscanbeplacedoverthesealingbars.DoNOT overlapvacuumbags.
RuntheProgram
-
Closethelid.DoNOTusethelidretainer. Usingthelidretainer duringapackingcyclewillinterferewiththecycle.
-
The program automatically starts.
-
Thelidopenswhenthelastfunctioniscomplete.
-
Removethepackedproduct.
-
Wait15secondsbeforepackinganotherproduct.
StopaCycle
- Stop the vacuum function and continuetothenext function, press ▶.
- StopandcanceltheentirecyclePress

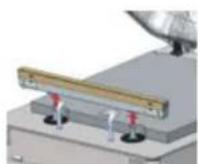
PackingLiquidProducts
Specialcareneedstobetakenwhenvacuumpackingliquidormoist products.
•Coolfoodsbeforepacking.Hotfoodquicklyreachestheboiling point,whichcanleadtoaninsufficientseal. NOTICE:Hotproductscreatecondensation,whichcandamage thepump.
- Use the included incline plate and magnetic positioning barsto position the bag soth liquid is below these sealing bar. Magnetic bars are shipped attached to the underside of the incline plate.
natural_image
Close-up of a metallic mechanical component with internal compartments and mounting holes (no visible text or symbols)Magneticbar
Inclineplate
- Useaprogram that include the Liquid Sensor Control function. This will prevent the product from boiling.
NOTICE: Boilingwillincreasetheamountofmoisturethatenters thepump, whichcanleadtocorrosion.
3.RunthePumpConditioningProgramattheendoftheworkday.Seepage7.
CREATECUSTOMPROGRAMSANDLABELS
Thedefaultprogramscanbecustomizedtofityourspecificneeds.
- If you have access to a computer, use the online ACS Configurator Tool to create your custom programs and labels.
- If you donothave access to a computer, use the control panel on the machinet create programs. See Create Programs Using the Control Panel on page 5.
CreateProgramsandLabelswithACSConfigurator
•AUSBstick(notincluded)isrequired.
TheACSConfiguratorprovidesaneasy-to-useinterfaceforcreating customprogramsandlabels.DownloadandsavetheprogramsandlabelstoaUSBstickfortransferringtothemachine.
CreatePrograms
Youcancreatenewprogramsoreditthedefaultprogramsonthe machine.Toeditthedefaultprograms,youmustfirstdownloadthe programsfromthemachine.SeeEditProgramsorLabelDataUsing theACSConfiguratoronpage5.Tocreatenewprograms,continue below.
1.StartawebbrowsersuchasInternetExplorerorChrome.
2.Gotohttp://www.acs-configurator.com
3. SelectProgramandProgram1.ClickGo.

text_image
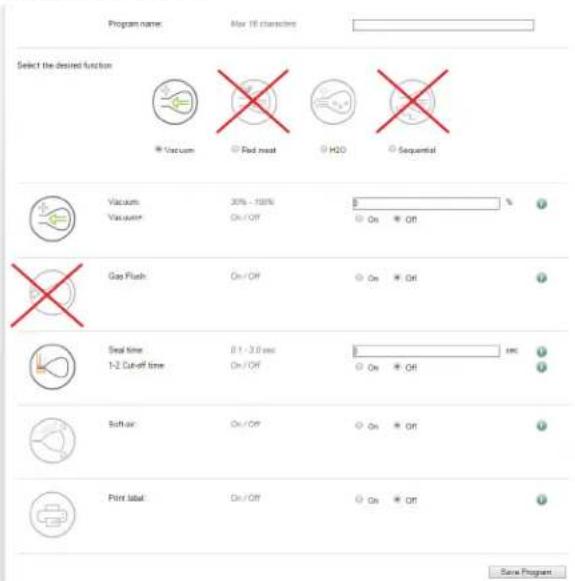
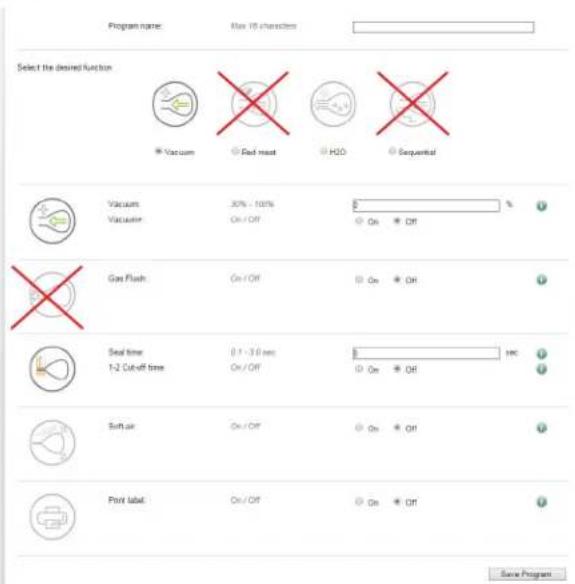
ACS Configurator This software allows you to set the values of the programs and labels of your vacuum packaging machine. Please note that your machine has to be updated with at least software version 82 to be able to upload the files from the USB key. If this is not the case please contact your supplier to update your machine. Instructions • Before you setup the next program or label, please make sure you have saved the previous one. • Every program or label that is changed, requires separate saving. • When finished, download the settings on your computer or USB key by selecting the program installed file. Then click an export. • For transmission on your machine, please make sure that you use an empty USB key. • To import the settings into the machine, plug in the USB key, go to the import/export sector in the main menu and choose export. Your machine must be equipped with the chosen options, since not all options are standard on our machines? Select a file to import or export Choose file: No file chosen Go Export Select a program or label Program Program 1 Go Label Go- EditfunctionsinProgram1.
text_image
Program name: Max 10 characters Select the desired function Vacuum Red mesh H2O Sequential Vacuum Vacuum 30% - 100% On/Off On Off Gas Flush On/Off On Off Seal time 8.1 - 3.0 sec On/Off On Off Soft air On/Off On Off Print label On/Off On Off Save ProgramNOTICE:TheRedMeat, GasFlush, SequentialVacuumandCutofffunctionsarenotavailableonthisVacuumPacking Machine. Settingsforthesefunctionsarenotusedwhen theprogramisloadedintothemachine.
- ClickSave.Anasteriskinfrontoftheprogramindicatesithasbeen saved.
- TocreateanotherprogramselectProgram2. PressGo.
text_image
Vacuum Packaging Machine Configuration Wizard This software allows you to set the values of the programs and labels of the vacuum pack machine. Please make sure that you are using Internet Explorer 8 on a Windows XP system or higher. Select a file to import Choose File No file chosen Out Export Select a program or label you want to change Program Label Label 2 Label 1 Label 3 Label 4 Label 5 Label 6 Label 7 Label 8 Label 9 Label 10 Label 11 Label 12 Label 13 Label 14 Label 15 Label 16 Label 17 Label 18 Label 19 Label 20 Label 21 Label 22 characters Label 23 characters Label 24 characters Label 25 characters Label 26 characters Label 27 characters Label 28 characters Label 29 characters Label 30 characters Label 31 characters Label 32 characters Label 33 characters Label 34 characters Label 35 characters Label 36 characters Label 37 characters Label 38 characters Label 39 characters Label 40 characters Label 41 characters Label 42 characters Label 43 characters Label 44 characters Label 45 characters Label 46 characters Label 47 characters Label 48 characters Label 49 characters Label 50 characters Label 51 characters Label 52 characters Label 53 characters Label 54 characters Label 55 characters Label 56 characters Label 57 characters Label 58 characters Label 59 characters Label 60 characters Label 61 characters Label 62 characters Label 63 characters Label 64 characters Label 65 characters Label 66 characters Label 67 characters Label 68 characters Label 69 characters Label 70 characters Label 71 characters Label 72 characters Label 73 characters Label 74 characters Label 75 characters Label 76 characters Label 77 characters Label 78 characters Label 79 characters Label 80 characters Label 81 characters Label 82 characters Label 83 characters Label 84 characters Label 85 characters Label 86 characters Label 87 characters Label 88 characters Label 89 characters Label 90 characters Label 91 characters Label 92 characters Label 93 characters Label 94 characters Label 95 characters Label 96 characters Label 97 characters Label 98 characters Label 99 characters Label 100 characters- Enterandsavedataforeachprogram.
- ClickExporttosavetheprogramstoyourcomputer.

text_image
Select a file to import Choose File Labels dir Go Export- Thefile "programs.txt" will besaved to the downloads folder on your computer.

text_image
Kathy Downloads Organize Include in library Share with Slide show Burn New folder Favorites Downloads Hightail Name Date modified Type labels.txt 2/19/2015 10:30 AM Test Document programs.txt 2/19/2015 11:51 AM Test Document10.Copythefile"programs.txt"toaUSBstick.
NOTICE: Donotrename "programs.txt." Programswillnotload intothemachineifthenamehasbeenchanged.
| FunctionDescriptions | |
| FinalVacuumPressure%-Setsvacuumtoreachaset pressure. ·Recommendedminimumis50%. Vacuum+-Extendsthevacuumcycletoenableair trappedintheproducttoescapethebag. ·Tousethisfunction,FinalVacuumPressuremustbe setto99.8%. | |
| LiquidControl-Usewhenpackingfood.Detectstheboiling point,stopsthevacuumandadvancestothenextstepto produceabetterqualityproductandpreventsdamagetothe pumpfrommoistureintheproduct. LiquidControl+-SimilartoVacuum+. Extendsthevacuumcycletoenableairtrappedinthe producttoescapethevacuumbag. | |
| SealingTime-Setthesealtime. ·2.0to2.5secondsrecommendedformostbags. | |
| Soft-Air-Gentlyformsthebagtoprotectdelicateproductsor preventdamagetothebagfromsharpedgesonproduct. | |
| Tenderize-Usesvacuumpressuretoquicklymarinatefood. Setpressureandmarinatetime.Canonlybeprogrammed throughthecontrolpanel.NotavailableintheACS Configurator. | |
| Print-Selectalabeltoprintwithaprogram. | |
CREATECUSTOMPROGRAMSANDLABELS(CONTINUED)
CreateLabelData
- Labelprinter, USBcableandlabelsarerequiredtoprintlabels, but arenotincluded.
Usetheonlineconfiguratortooltoenterdataforlabels.Downloadand savelabeldatatoaUSBstickforloadingintothemachine.Labeldata caninclude:productname,description,storagetemperature,expiration date,vacuumpressureandthenameofpersonwhopackedthe product.
- StartawebbrowsersuchasInternetExplorerorChrome.
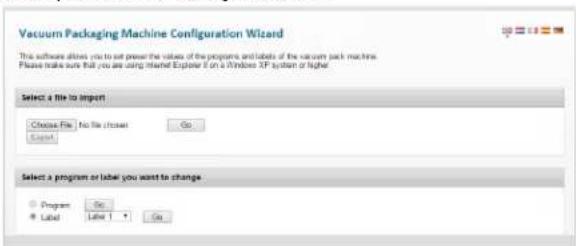
2.Gotohttp://www.acs-configurator.com
text_image
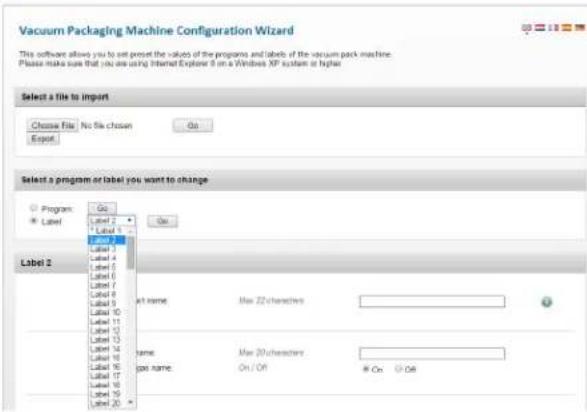
Vacuum Packaging Machine Configuration Wizard This software allows you to set power the value of the programs and labels of the vacuum pack machine. Please make sure that you are using Internet Explorer if on a Windows XP system or higher. Select a file to import Choose File No file chosen Go Export Select a program or label you want to change Program Go Label Label Go- SelectLabelandLabel1.ClickGo.
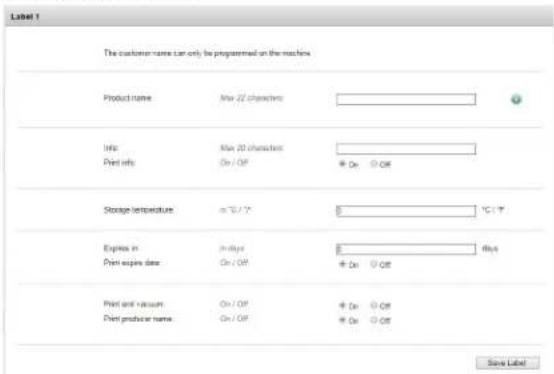
4.EnterthedataforLabel1.
text_image
Label 1 The customer name can only be programmed on the machines Product name May 22 characters Info: May 20 characters Print info: On / Off + On Off Storage temperature in °C / °F 5 1°C / °F Express in: In Bits 8 Print expires date: On / Off + On Off Print and vacuum: On / Off + On Off Print producer name: On / Off + On Off Save Label- ClickSave.Anasteriskinfrontofthelabelindicatesthedatahas been saved.
6.Toenterdataforanotherlabel,select Label2.PressGo.

text_image
Vacuum Packaging Machine Configuration Wizard This software allows you to set the value of the programs and labels of the vacuum pack machine. Please make sure that you are using Internet Explorer if on a Windows AP system or higher. Select a file to import Choose File: No file chosen Export Select a program or label you want to change Program Label Label 1 Label 2 Label 3 Label 4 Label 5 Label 6 Label 7 Label 8 Label 9 Label 10 Label 11 Label 12 Label 13 Label 14 Label 15 Label 16 Label 17 Label 18 Label 19 Label 20 On On act name: Max 22 characters name: Max 22 characters job name: On/Off On Off7.Enterandsavedataforeachlabel.
8.ClickExporttosavethelabelstoyourcomputer.
This software allows you to set preset the values of the programs and labels of the vacuum pack machine. Please make sure that you are using Internet Explorer II on a Windows XP system or higher.

- Thefile "labels.txt" will besaved to your computer.
10.Save"labels.txt"toaUSBstick.
NOTICE: Donotrename "labels.txt." The label will not load into the machine if the file has adifferent name.
LoadProgramandLabelDataintotheMachine
-
Insert the USB stick into the USB port at the back of the machine.
-
Press ◀ untilishhighlighted. Press ←
3.Entertheownerpassword1324.Press▲ toselectanumber. Press▶ toentertothenextnumber.Press←.
-
SelectImport/Export.Press←
-
SelectImportDatafromUSBtocopytheprogramsandlabelsinto themachine.Press←.
EditProgramsorLabelDataUsingtheACSConfigurator
- YoucanusetheACSConfiguratortoeditexistingprogramsor labels. If the programsor labels are in them machine, export the information to a USB stick. Reversethe procedure for Loading Programs and Label Data into the Machine.
1.StartawebbrowsersuchasInternetExplorerorChrome.
2.Gotohttp://www.acs-configurator.com
3.ClickChooseFile.

text_image
Select a file to import Choose File: No file chosen Export- Navigatetothelocationofthe"programs.txt" or "labels.txt" file containingthelabeldata.ClickOpen.

text_image
Select a file to import or export Choose File programs.txt Go Export- Click Gotoloadyourlabeldataintotheconfigurator.
CreateProgramsUsingtheControlPanel
1.Enterprogrammingmode.
Press◀ untilishhighlighted.Press← .
Entertheownerpassword1324.
(Press▲ toselectanumber.Press▶ toentertothenextnumber.)
Press◀.
- Selectaprogramtoedit.
Press▲ or▼ toscrollthrough programs.
Press← toselecttheprogram.
Confirmtheownerpassword.
- Selectafunctiontoedit.
Press▲ or▼ toviewfunctions.
Press← toselectthefunction.
- Edit the settings in a function.
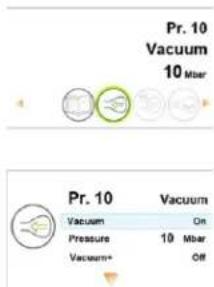
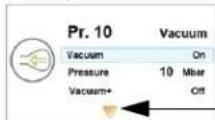
text_image
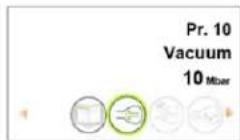
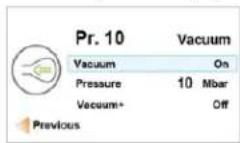
Pr. 10 Vacuum 10 Mbar Pr. 10 Vacuum Vacuum On Pressure 10 Mbar Vacuum+ Off| Selectasetting▲ or▼ | |
| Edittheselectedsetting | ← |
| Changethesetting | |
| Increase | ▲ |
| Decrease | ▼ |
| Gotopreviousornnextcharacter | ▲ or▼ |
| Confirmthechange | ← |
| Goback◀ | |
Adownwardpointingarrowatthebottomofascreenindicates moreoptions.Press▼ toseetheoptions.
Moreoptions
CREATECUSTOMPROGRAMSANDLABELS(CONTINUED)

VacuumPressure
- Setthevacuumpressure.
•Recommendedminimumis50%.
•TouseVacuum+,vacuumpressuremustbesetto99.8%.
- ToedittheVacuum+function, continuebelow.

Vacuum+
-
TurnonVacuumPlus.
-
Setthetime.
WhenVacuum+isselectedtheplussignintheprogramICONis highlightedblue.

LiquidControl
SettingsinLiquidControloverrideanysettingsinVacuum function.
-
TurnLiquidControlOn.
-
Setthevacuumpressure.
-
ToedittheLiquidControl+function, continuebelow.

LiquidControl+
-
TurnonLiquidControl+.
-
SettheLiquidControl+Time.
WhenLiquidControl+isselectedtheplussignintheprogram ICONishhighlightedblue.

Tenderize(Marinate)
NOTICE: When using the Tenderize function you must also turn on Liquid Control.
TenderizewillvacuumtothepressuresetintheTenderizefunction oruntilLiquidControldetectsboiling.
-
TurnTenderizeOn.
-
Setavacuumpressure.
-
Setthetime.

SealingTime
- Setthenumberofseconds.
•2.0-2.5secondsrecommendedformostbags

SoftAir
-
TurnSoftAirOnorOFF.
-
Setthetime.

-
TurnlabelprintOnorOff.
-
Selectwhichlabeltoprint.
-
Setthenumberoflabelstoprintpercycle.
-
Editanotherfunctioninthecurrentprogram.
Press◀.
6.Exitownermodeandreturntousermode.
Thiswillpreventunauthorizedchangestosettingsandprograms.
Press◀ untilishhighlighted.Press← .
Entertheuserpassword0000andpress←.
NamethePrograms
ThedefaultprogramsarenamedPr.1throughPr.20.Youcanchange theprogramnamestobemoredescriptive. Forexample, Fish, Soup, Steak, Cheese, Vacuum85%, etc. Thenewprogramnamesdisplayat theprogramselectlevel. But thedefaultnameddisplayswhenviewing thedetailsofthefunctionsintheprogram.
- Press ◀ untilishhighlighted. Press ← .
2.Entertheownerpassword1324.
(Press▲ toselectanumber.Press▶ toentertothenextnumber.)
- Press← toentertheSettingsmenu.
4.Pressto1.7ProgramNames.Press←
-
Press▼ toSelectaProgram.Press←
-
Press ▲ or ▼ to select a program number. Press ←.
-
Press▼ toName.Press← .
8.Usearrowbuttonstoenteraname.
- Press←
10.Tonameanotherprogram,press
- Loginusingtheuserpassword0000topreventunauthorized changestothemachine.
CreateLabels
Enterthedatayouwishtoprintonlabels.
- Press ◀ untilishhighlighted. Press ← .
2.Entertheownerpassword1324.
(Press▲ toselectanumber.Press▶ toentertothenextnumber.)
-
PressEntertoentertheSettingsmenu.
-
Press▼ to1.1Printer.Press←
-
Press▼ toSetLabels.
6.Enterthelabeldata.
-
Tocreateanotherlabel, press
-
Loginusingtheuserpassword0000topreventunauthorized changestothemachine.
Tip:
Toenter:Press
Lowercaseletter▼
Uppercaseletter▲
HACCPDATALOG
ThemachinecanlogHACCPinformation.Eachentryinthelog contains:date,time,user,selectedprogramsandsettings,selectedlabelandnumberofcycles.
•HACCPcanonlybeturnedOnorOffbytheowner.Onceitisturned on, datacanbeloggedbyloggingintothemachineusing the followingcodes:owner:1324,user2:3821,user3:5718,user4:6982,user5:9217.Thegenericusercode0000cannotbeused.
- Anewentryisstartedeachtimeadifferentuserlogsinorwhen programsandprogramsettingsarechanged.
•TheHACCPlogcanholdupto100entries.
- Logdataissavedasa.txtfileandcanbeexportedtoaUSBstick.
- Afterexportingthedata, the log will automatically be cleared.
flowchart
graph TD
    B["User:hm"] --> Program["Program 2="]
    Program --> UserA["User:he started 28-3-2013 16:43"]
    Program --> CB["CB"]
    Program --> D["D"]
    Program --> F["F"]
    Program --> G["G"]
    Program --> Amount["Amount of cycles:2"]
    Program --> LabelInr::1["LabelInr.:1"]
    Program --> LabelInr::1::1[" "]
Program 1=, Vac:99.8% Seal:0.4 sec, Labelnr.:1, Amount of cycles:1 User:hm started 28-3-2013 16:44
Program 3=, Vac:90%, Seal:2.5 sec, Labelnr.:1, Amount of cycles:2 User: started 28-3-2013 16:45
Program 3=, Vac:95% Seal:2.5 sec, Labelnr.:1, Amount of cycles:1
ATheprogramnumberused.
BTheinitialsofthepersonwhohasloggedin. Ifnoinitialsareenteredinthesettings,nothingisdisplayedhere (seethelastentryofthesamplelog).
CStarttimeanddateoftheproduction.
DThemaximumvacuumreachedforthepackage.
EThesealtimeused.
FThelabelprintedwiththispackage.
GThetotalnumberofoperatingcycles.
TurnOnHACCPLogging
Usethecontrol panel to turn non HACCP. Before logging HACCP data, set your machineto your local time and preferred date format.
- Press ◀ untilishhighlighted. Press ←
2.Entertheownerpassword1324.
(Press▲ toselectanumber.Press▶ toentertothenextnumber.)
- Press ← toentertheSettingsmenu.
4.TurnonHACCP.
5.AssignuserinitialstoeachUser(PinCode)(optional).
SelectaUser(PinCode).
Press▼ toNametoenteruserinitials.
6.LogintothemachineasownerorwithoneoftheHACCPPINs.
ExportHACCPData
- InsertaUSBstickintotheUSBportonthebackofthemachine.
- Press ◀ untilishhighlighted. Press ←
3.Entertheownerpassword1324.
(Press▲ toselectanumber.Press▶ toentertothenextnumber.) - Press ← toentertheSettingsmenu.
- SelectImport/Exportmenu.Press←
6.SelectExportdata.
CLEANING
Daily
RunthePumpConditioningProgram
The Pump Conditioning Program removes anymoisture that may have accumulated in the pump. During the program, the pump and oil reach operating temperature, which evaporates anymoisture in the pump.
- Press.

- Thedisplayshows.
3.Closethelid.
4. The program starts. Moving dots appear on the display.
5. The program runs for approximately 15 minutes. Donot interrupt the program. If the program is interrupted, it must be unagain to ensure completion.
Cleantheexteriorandinterior


WARNING
ElectricalShockHazard
Keepwaterandotherliquidsfromenteringtheinsideofthe equipment. Liquidinsidetheequipmentcouldcausean electricalshock. Donotspraywaterorcleaningproducts. Liquidcouldcontacttheelectricalcomponentsandcausea shortcircuitoranelectricalshock.


CAUTION
BurnHazard
Allowequipmenttocoolbeforemovingorcleaning.
NOTICE: Donotusecleaners containing ammonia, alcohol, acetone or dry cleaning products. Cleaners with these chemicals will damage Plexiglas ^® , acrylic and other plastics. These will damage the finish.
NOTICE: Donotusepapertowels, abrasivematerials, scratching cleansers, razorblades, brushes, steelwoolorscouring pads, suchasScotchBrite™ pads. These will damage the finish.
NOTICE: DonotuseWD-40 ^® orpetroleum, industrialorcommercial cleaning products. These will damage the finish.
- Unplugthemachine. Allowittocool.
- Wipethevacuumchamber, lid, sealingbar, siliconeholder and exterior with asoft, lintfreeormicrofiberclothandwarmwater, or amixture of warmwater and asmall amount of mild dish detergent.
- Thoroughly wipe off anymild soap or chemical cleaners. Residue could corrode the surface of the unit.
MAINTENANCE


WARNING
ElectricalShockHazard
Unplugunitbeforeservicing.
NOTICE: Themachinemustbemovedortransportedinanupright position.
NOTICE: Do NOT tilt the machine. Tilting could enable oil to flow out of the pump and caused damage to the machine.
The followingmaintenancescheduleisonlyaguideline.Actual maintenanceneedswillvarydependingonmachineuse.Inspectyour machineregularly.
| IntervalProcedure | |
| WeeklyCheck | theoilbyviewingtheOilInspectionWindow. |
| Inspectthesealbarforwear. | |
| Inspectthesealpadunderthelidforwear. | |
| Inspectthelidgasketandlid. | |
| Eversix months | Replacetheoilinthevacuumpump.ContactVollrath TechnicalServices. |
| ReplacethesealingwiresandTeflon ^® tape. | |
| Replacethesealpadunderthelid. | |
| Replacethelidgasket. | |
| YearlyInspect | theoilexhaustfilter.ContactVollrathTechnical Services. |
| Everyfour years | Replacethelid,gasspringsandsealcylinder membranes.ContactVollrathTechnicalServices. |
ReplacetheSealingWiresandTeflon ^® Tape
Checkthesealingbarfordamage.Replace the Teflontapeorsealing wiresifthesealqualityisnolongersufficientoriftheTeflontapeor sealwiresareworn.
ToolsNeeded:
•Phillipsscrewdriver
•Tensioningtoolorpliers
•Scissors
•Lint-freecleaningcloth
- ReplacementTeflontape
•Replacementsealingwire
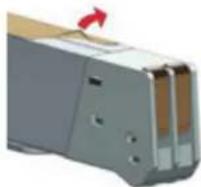
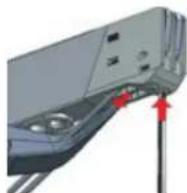
- Pulluponthesealingbartoremoveitfromthemachine.
- RemovetheTeflontapethatprotectsthesealingwires.
- Removethescrewsonthebottomsideofthesealbar.
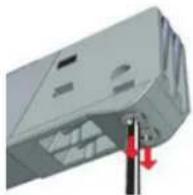
- Removethesealingwires.
- RemovetheTeflontapefromthesealingbar.
- Cleanthesealingbarwithalint-freecloth.
MAINTENANCE(CONTINUED)
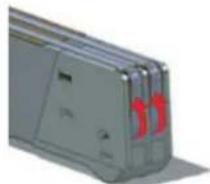
- CutapieceofreplacementTeflontapetothesamelengthasthe sealingbar.
- Applythereplacementtapetothesealingbar.
- Cut new sealing wire to the length of these sealing bar, plus about 6" (15cm).
- Attachonewiretoonesideofthesealbarbytighteningthescrew.
- Pullthewireacrossthesalingbarstraightandtight.
- Attachitbytighteningthescrew.
- Repeatsteps10 through 12 for these second wire.
14.Trimthewires. - Cutapiece of Teflontapethesamelength of thesealing bar, plus about 2"(5cm).
- Apply the tapes smoothly over these sealing wires on these sealing bars.
17.Trimthetape. - Placethesealingbarbackinthemachine. Verify that thesealing barisproperly snapped into the holder.
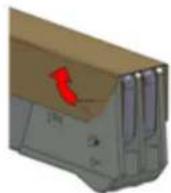
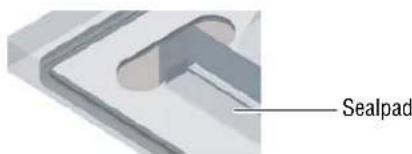
ReplacetheSealPad
Inspectthepadforroughness.Replaceifareasofthepadarerough.
ToolsNeeded:
-
Replacementsealpad
•Scissors -
Removethewornpadfromtheholder.
text_image
Sealpad- Cutanewpieceofsealpadthesamelengthastheoldone. Apad thatistooshortortoolongwillcausessealingproblems.
- Placethenewpadintheholder. Ensure that the padis completely and evenly placed in the groove.
- Placethenewpieceinthesiliconeholder. Ensure that the silicone rubber is completely and evenly placed in the groove.
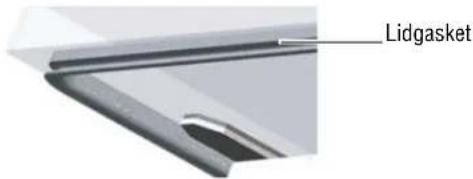
ReplacetheLidGasket
Thelidgasketensuresthevacuumchamberiscompletelysealed duringthepackingcycle. This is essential to achieve maximum vacuum. Thelidgasket wears dueto the extreme pressure differences and must be replaced regularly.
ToolsNeeded:
-
Replacementgasket
•Scissors -
Removetheworngasket.
text_image
Lidgasket- Cutanewpieceofgasketslightlylongerthantheoldone. Position thenewgasketsothelipfacesdownwardandoutward.
- Pressthegasketintotheslotevenly.
- Trimthegasketsotheendscometightlytogethertoprevent leakage. Theendsmustbecutoffstraight. If the lidgasketistoo shortortoolong, itcancauseproblems when closing the lidor leakagemayoccur.
TROUBLESHOOTING
| ProblemMightbeCausedByCourseofAction | |||
| Thecontrolpaneldoesnotilluminate. | Themachineisnotconnectedtoanelectricaloutlet.Connect | themachinetothepowersupply. | |
| Themainfuseisburnedout. | ContactVollrathTechnicalServices. | ||
| Thecircuitboardfuseisburnedout. | |||
| Thecontrolpanelisonbutthereisnoactivityafterclosingthelid. | Thelidmicroswitchmayneedtobeadjusted. | ||
| Thecontroltransformerfuseisburnedout. | |||
| Theliddoesnotopenautomatically.Thegasspringisdamaged. | |||
| F1indisplayThelidmicroswitchmayneedadjusting. | |||
| F2indisplayTheprintedcircuitboardorliquidcontrolsensorhasmalfunctioned. | |||
 | Thepumpconditioningprogramneedstoberun. | Runthepumpconditioningprogram.See“PumpConditioningProgram”onpage7. | |
 | Theoilinthepumpneedstobecheckedandorneeds tobechanged. | ContactVollrathTechnicalServices. | |
| Machineusagehasreachedascheduledmaintenance point. | |||
| Finalvacuumisnotsufficient.Thesetvacuumtimeistooshort.Extendthevacuumtime. | |||
| Thereistoolittleoilinthevacuumpump.ContactVollrathTechnicalServices. | |||
| Theextractionholeatthebackofthevacuum chamberispartiallycoveredbythevacuumbag duringextraction. | Placethevacuumbagclosertothesealingbar. | ||
| Thelidgasketisworn.Replacethelidgasket. | |||
| Theoiliscontaminated. | ContactVollrathTechnicalServices. | ||
| Theoilexhaustfilterissaturated. | |||
| Themachineextractsairtooslowly.Thepilexhaustfilterissaturated. | |||
| Thepump'sextractionfilterisblocked. | |||
| Vacuumbagisnotsealedcorrectly. | Thevacuumbagisbeingplacedincorrectlyonthe sealingbar. | Placethevacuumbagneatlyandsmoothlyonthsealingbar.Ensurethattheopeningofthebagis alwayswithinthevacuumchamber. | |
| Thesealingtimeistoolongortooshort.Adjustthesealingtimelongerorshorter. | |||
| Thesealpadunderthelidisdamagedorworn.Replacethesealpad. | |||
| TheTeflontapeisdamaged.ReplacetheTeflontape. | |||
| Thevacuumbagopeningisnotclean.Cleanthevacuumbag'sopening. | |||
MAINTENANCELOG
| DateCompanyMaintenancePerformedComments | |||
SERVICEANDREPAIR
ServiceablepartsareavailableonVollrath.com.
To avoid serious injury or damage, never attempt to repair the unit or replace a damaged power cord yourself. Do not send units directly to TheVollrathCompanyLLC.PleasecontactVollrathTechnicalServicesforinstructions.
When contacting Vollrath Technical Services, please be ready with the item number, model number (if applicable), serial number, and proof of purchaseshowingthedatetheunitwaspurchased.
WARRANTYSTATEMENTFORTHEVOLLRATHCO.L.L.C.
This warranty does not apply to products purchased for personal, family or household use, and The Vollrath Company LLC does not offer a written warranty top purchasers for such uses.
The Vollrath Company LLC warrants the products it manufactures or distributes against defects in materials and workmanship as specifically described in our full warranty statement. In all cases, the warranty runs from the date of the end user's original purchase date found on the receipt. Any damages from improper use, abuse, modification or damage resulting from improper packaging during return shipment for warranty repair will not be recovered under warranty.
Forcomplete warranty information, product registration and new product announcement, visit www.vollrath.com.

www.vollrath.com
The VollrathCompany, L.L.C.
1236North18thStreet
Sheboygan, WI53081-3201U.S.A.
MainTel:800.624.2051or920.457.4851
MainFax:800.752.5620or920.459.6573
CustomerService:800.628.0830
CanadaCustomerService:800.695.8560
TechnicalServices
techservicereps@vollrathco.com
InductionProducts:800.825.6036
CountertopWarmingProducts:800.354.1970
Toasters:800-309-2250
AllOtherProducts:800.628.0832
natural_image
Exterior view of a stainless steel laboratory instrument with open lid and control panel (no visible text or symbols)FONCTIONSETCOMMANDES

text_image
Technical diagram of a device with labeled parts (A–G) and an inset view showing internal components.natural_image
A wrapped food item on a metal tray, showing a ring with a white center and purple rim (no text or symbols visible)natural_image
Interior view of a stainless steel oven with a central sink and golden handle (no text or symbols visible)natural_image
Close-up of a mechanical device with metallic components and a transparent screen (no visible text or symbols)text_image
ACS Configurator This software allows you to set the values of the programs and labels of your vacuum packaging machine. Please note that your machine has to be updated with at least software version 82 to be able to upload the files from the USB key. If this is not the case please contact your supplier to update your machine. Instructions • Before you setup the next program or label, please make sure you have saved the previous one. • Every program or label that is changed requires separate saving. • After finished, download the settings on your computer or USB key by selecting the program or label file. Then click an export. • For translation in your machine, please make sure that you use an empty USB key. • To export the settings into the machine, plug in the USB key, go to the import/export section in the main menu and choose export. Your machine must be equipped with the chosen options, since not all options are standard on our machine? Select a file to import or export Choose file: No file chosen Go Export Select a program or label Program: Go Label: Gotext_image
Program name: Max 15 characters Select the desired function Vacuum Gas Flux: Seal time 1-2 Cut-off time Software: Print label 30% - 10% On/Off On On On On On On On On On On On On On On On On On On On On On On On On On On On On On On On On On On On On On On On On On On On On On On On On On On ONtext_image
Vacuum Packaging Machine Configuration Wizard This software allows you to set preset the values of the programs and labels of the vacuum pack machine. Please make sure that you are using Internet Explorer 8 on a Windows XP system or higher Select a file to import Choose File: No file chosen Go Export Select a program or label you want to change Program Label Label 1 Label 2 Label 3 Label 4 Label 5 Label 6 Label 7 Label 8 Label 9 Label 10 Label 11 Label 12 Label 13 Label 14 Label 15 Label 16 Label 17 Label 18 Label 19 Label 20 Label 2 xt name: Max 22 characters Name: Max 20 characters Gas name: On / Off On / Offtext_image
Select a file to import Choose File Labels list Go Exporttext_image
Organize Include in library Share with Slide show Burn New folder Favorites Downloads Highted Name: labels.txt programs.txt Date modified Type 2/19/2013 10:30 AM Text Document 2/19/2015 11:51 AM Text Document- Copiezlefichier «programs.txt» suruneclé USB.
text_image
Vacuum Packaging Machine Configuration Wizard This software allows you to set power the values of the program and labels of the vacuum pack machine. Please make sure that you are using Internet Explorer if on a Windows XP system or higher Select a file to import Choose File: No file closer Go Export Select a program or label you want to change Program Go Label Label 1 Gotext_image
Label 1 The customer name can only be programmed on the machines Product name: Max 22 characters Info: Max 20 characters Print info: On / Off Storage temperature: in °C / °F Express in: in dB/s Print expires date: On / Off Print and vacuum: On / Off Print product name: On / Off Save Labeltext_image
Vacuum Packaging Machine Configuration Wizard This software allows you to set proved the values of the programs and labels of the vacuum pack machine. Please make sure that you are using Internet Explorer 8 on a Windows XP system or higher. Select a file to import Choose File: No file chicken Export Select a program or label you want to change Program Label Label 2 Label 1 Label 3 Label 4 Label 5 Label 6 Label 7 Label 8 Label 9 Label 10 Label 11 Label 12 Label 13 Label 14 Label 15 Label 16 Label 17 Label 18 Label 19 Label 20 Label 2 Label 2 Label 2 Label 2 Label 2 Label 2 Label 2 Label 2 Label 2 Label 2 Label 2 Label 2 Label 2 Label 2 Label 2 Label 2 Label 2 Label 2 Label 2 Label 2 Label 2 Label 2 Label 2 Label 2 Label 2 Label 10 Label 11 Label 12 Label 13 Label 14 Label 15 Label 16 Label 17 Label 18 Label 19 Label 20 Label name: Max. XX characters: Name: Max. XX characters: Gas name: Gas/Off: On: Off:The software allows you to set preset the values of the programs and labels of the vacuum pack machine. Please make sure that you are using Internet Explorer II on a Windows XP system or higher.

text_image
Select a file to import Choose File No file chosen Do Exporttext_image
Select a file to import Choose file: No file chosen Exporttext_image
Pr. 10 Vacuum 10 Mbar Pr. 10 Vacuum Vacuum On Pressure 10 Mbar Vacuum+ OffCRÉATIONDEPROGRAMMESETD'ÉTIQUETTESPERSONNALISÉS(SUITE)
JOURNALDEDONNÉESHACCP
flowchart
graph TD
    B["User:hm"] --> Program["Program 2=, Vac:98%, Seal:0.3 sec"]
    A["User:he"] --> Program
    Program --> Label["Labelnr.:1, Amount of cycles:2"]
    Program --> CBF["D"]
    Program --> D["CBFG"]
    Program --> D
    Program --> O["O"]
    Program --> O
Program 1=, Vac:99.8% Seal:0.4 sec, Labelnr.:1, Amount of cycles:1
User:hm started 28-3-2013 16:44
Program 3=, Vac:90%, Seal:2.5 sec, Labelnr.:1, Amount of cycles:2
User: started 28-3-2013 16:45
Program 3=, Vac:95% Seal:2.5 sec, Labelnr.:1, Amount of cycles:1
natural_image
Close-up of a gray electronic device casing with red circular highlights (no visible text or symbols)5.EnlevezlerubanenTeflondelabarredesoudage.
natural_image
Close-up of a mechanical component with no visible text or symbolsProtectiondebarredesoudage
natural_image
Close-up of a sleek, flat electronic device with a metallic clip and screen (no visible text or symbols)Jointducouvercle
natural_image
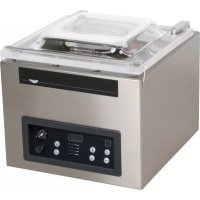
Exterior view of a stainless steel laboratory instrument with open lid and control panel (no visible text or symbols)text_image
Technical diagram of a device with labeled parts (A–G) and internal components, including a close-up view of the internal structure.ATapaEMirilladeaceite
BBarrasdeselladoFCámara
CPaneldecontrolGAlmohadilladesellado
DReténdelatapa (noseilustra)

text_image
Pr. 10 Vacuum 350 stop A B C D Enatural_image
Close-up of a wrapped food item on a metal tray, no visible text or symbolsnatural_image
Interior view of a stainless steel appliance with a central sink and golden handle (no visible text or symbols)natural_image
Close-up of a mechanical or electronic component with metallic parts and mounting holes (no visible text or symbols).Barramagnética
Placadeinclinación
text_image
ACS Configurator This software allows you to set the values of the programs and labels of your vacuum packaging machine. Please note that your machine has to be updated with at least software version 82 to be able to upload the files from the USB key. If this is not the case please contact your supplier to update your machine. Instructions • Before you setup the next program or label, please make sure you have saved the previous one • Every program or label that is changed requires separate saving • After finished, download the settings on your computer or USB key by selecting the program or label file. Then click an export. • For transmission on your machine please make sure that you use an empty USB key • To export the settings into the machine plug in the USB key, go to the import/export section in the main menu and choose export. Your machine must be equipped with the chosen options, unless not all options are standard on our machine? Select a file to import or export Choose File: No file chosen Go Export Select a program or label • Program - Program 1 - Go • Label - Go- EditelasfuncionesenelPrograma1.
text_image
Program name: Max 10 characters Select the desired function Vacuum Vacuum Gas Flush Seal time 1-2 Cut-off time Soft pad Print label Vaccum Red meat HDD Sequential 30% - 100% On / Off On On On On On On On On On On On On On On On On On On On On On On On On On On On On On On On On On On On On On On On On On On On On On On On On On On NRC NRC NRC NRC NRC NRC NRC NRC NRC NRCtext_image
Vacuum Packaging Machine Configuration Wizard This software allows you to set the values of the programs and labels of the vacuum pack machine. Please make sure that you are using Internet Explorer 8 on a Windows XP system or higher Select a file to import Choose File: No file chosen Export Select a program or label you want to change Program Label Label 1 Label 2 Label 3 Label 4 Label 5 Label 6 Label 7 Label 8 Label 9 Label 10 Label 11 Label 12 Label 13 Label 14 Label 15 Label 16 Label 17 Label 18 Label 19 Label 20 Label 2 Label 3 Label 4 Label 5 Label 6 Label 7 Label 8 Label 9 Label 10 Label 11 Label 12 Label 13 Label 14 Label 15 Label 16 Label 17 Label 18 Label 19 Label 20 at name: Max 22 characters name: Max 20 characters gas name: On / Off On Off- Introduzcayguardelosdatosparacadaprograma.
8.HagaclicenExportparaguardarlosprogramasensu computadora.

text_image
Select a file to import Choose File Labels list Go Exporttext_image
Kathy Downloads Organize Include in library Share with Slide show Burn New folder Favorites Downloads Highmail Name labels.txt programs.txt Date modified Type 2/19/2015 10:31 AM Text Document 2/19/2015 11:51 AM Text Documenttext_image
Vacuum Packaging Machine Configuration Wizard This software allows you to set please the values of the programs and labels of the vacuum pack machine. Please make sure that you are using Internet Explorer 5 on a Windows XP system or higher. Select a file to import Choose File No file chosen Go Export Select a program or label you want to change Program Go Label Label 1 Gotext_image
Label 1 The customer name can only be programmed on the machine Product name: New 20 characters Info: New 20 characters Print info: On/OFF On/OFF Storage temperature: (°C) / V 0 °C / V Expires in: In days Print expiry date: On/OFF On/OFF Print and vacant: On/OFF On/OFF Print producer name: On/OFF On/OFF On/OFF Save Label:5.HagaclicenSave.Unasteriscodelantedelaetiquetaindicaquelos datossehanguardado.
text_image
Vacuum Packaging Machine Configuration Wizard This software allows you to set prevent the values of the programs and labels of the vacuum pack machines. Please make sure that you are using Internet Explorer 8 on a Windows XP system or higher. Select a file to import Choose File No file chosen Go Export Select a program or label you want to change Program Go Label 2 Do Label 1 Label 3 Label 4 Label 5 Label 6 Label 7 Label 8 Label 9 Label 10 Label 11 Label 12 Label 13 Label 14 Label 15 Label 16 Label 17 Label 18 Label 19 Label 20 Label 2 label name: Mar 32 characters user: Mar 36 characters job name: On/Off On Off- Introduzcayguardelosdatosdecadaetiqueta.
This software allows you to set preset the values of the programs and labels of the vacuum pack machine. Please make sure that you are using Internet Explorer if on a Windows XP system or higher.

text_image
Select a file to import Choose File No No chosen Go Exportflowchart
graph TD
    B["User:hm"] --> Program["Program 2=, Vac:98%, Seal:0.3 sec"]
    A["User:he"] --> Program
    Program --> Label["Labelnr.:1, Amount of cycles:2"]
    Program --> D["CBFGD"]
    Program --> D
    Program --> D
    Program --> D
    Program --> D
    Program --> D
    Program --> D
    Program --> D
    Program --> D
    Program --> D
    Program --> D
    Program --> D
    Program --> D
    Program --> D
    Program --> D
    Program --> D
    Program --> D
    Program --> D
    Program --> D
    Program --> D
    Program --> D
    Program --> D
Program 1=, Vac:99.8% Seal:0.4 sec, Labelnr.:1, Amount of cycles:1
User:hm started 28-3-2013 16:44
Program 3=, Vac:90%, Seal:2.5 sec, Labelnr.:1, Amount of cycles:2
User: started 28-3-2013 16:45
Program 3=, Vac:95% Seal:2.5 sec, Labelnr.:1, Amount of cycles:1