
GAC 250 Professional - Saw BOSCH - Free user manual and instructions
Find the device manual for free GAC 250 Professional BOSCH in PDF.

| Brand | Bosch |
| Model | GAC 250 Professional |
| Product type | AAC block chainsaw |
| Rated power input | 1200 W |
| Chain speed at no load | 12 m/s |
| Guide bar length | 33.5 cm |
| Chain type | 3/8" - 50 |
| Drive link thickness | 1.3 mm |
| Number of drive links | 44 |
| Tool-free chain tensioning (SDS) | Yes |
| Idler sprocket | Yes |
| Front brake | Yes |
| Instant stop brake | Yes |
| Stop | Yes |
| Weight (according to EPTA) | 4.7 kg |
| Supply voltage | 230 V, 50 Hz |
| Dust extraction | Dust extraction hose for vacuum cleaner |
| Safety devices | Front brake, instant stop brake, chain guard, switch-on lock |
| Maintenance and cleaning | Regular cleaning, chain and sprocket replacement |
| Spare parts | Chain, guide bar, sprocket, cover |
| Intended use | Cutting AAC/lightweight concrete blocks |
Frequently Asked Questions - GAC 250 Professional BOSCH
User questions about GAC 250 Professional BOSCH
0 question about this device. Answer the ones you know or ask your own.
Ask a new question about this device
Download the instructions for your Saw in PDF format for free! Find your manual GAC 250 Professional - BOSCH and take your electronic device back in hand. On this page are published all the documents necessary for the use of your device. GAC 250 Professional by BOSCH.
USER MANUAL GAC 250 Professional BOSCH
GAC 250 Professional
Robert Bosch Power Tools GmbH
70538 Sollgart
GERMANY
www.bosch-pt.com
160992A8GA(2023.03)0/87

1609 92A 8GA
en Original instructions
fr Notice originale
pt Manual original
zh 正本使用说明书
zh原始使用说明
thnnaa
General Power Tool SafetyWarnings
WARNING
Read all safety warnings, instructions, illustrations and specifica
tions provided with this power tool. Failure to follow all instructions listed below may result in electric shock, fire and/ or serious injury.
Save all warnings and instructions for future reference.
The term "power tool" in the warnings refers to your mains-operated (corded) power tool or battery-operated (cordless) power tool.
Work area safety
- Keep work area clean and well lit. Cluttered or dark areas invite accidents.
- Do not operate power tools in explosive atmospheres, such as in the presence of flammable liquids, gases or dust. Power tools create sparks which may ignite the dust or fumes.
- Keep children and bystanders away while operating a power tool. Distractions can cause you to lose control.
Electrical safety
Power tool plugs must match the outlet. Never modify the plug in any way. Do not use any adapter plugs with earthed (grounded) power tools. Unmodified plugs and matching outlets will reduce risk of electric shock.
- Avoid body contact with earthed or grounded surfaces, such as pipes, radiators, ranges and refrigerators. There is an increased risk of electric shock if your body is earthed or grounded.
Do not expose power tools to rain or wet conditions. Water entering a power tool will increase the risk of electric shock.
Do not abuse the cord. Never use the cord for carrying, pulling or unplugging the power tool. Keep cord away from heat, oil, sharp edges or moving parts. Damaged or entangled cords increase the risk of electric shock.
When operating a power tool outdoors, use an extension cord suitable for outdoor use. Use of a cord suitable for outdoor use reduces the risk of electric shock.
If operating a power tool in a damp location is unavoidable, use a residual current device (RCD) protected supply. Use of an RCD reduces the risk of electric shock.
Personal safety
Stay alert, watch what you are doing and use common sense when operating a power tool. Do not use a power tool while you are tired or under the influence of drugs, alcohol or medication. A moment of inatten
tion while operating power tools may result in serious personal injury.
Use personal protective equipment. Always wear eye protection. Protective equipment such as a dust mask, non-skid safety shoes, hard hat or hearing protection used for appropriate conditions will reduce personal injuries.
Prevent unintentional starting. Ensure the switch is in the off-position before connecting to power source and/or battery pack, picking up or carrying the tool. Carrying power tools with your finger on the switch or energising power tools that have the switch on invites accidents.
- Remove any adjusting key or wrench before turning the power tool on. A wrench or a key left attached to a rotating part of the power tool may result in personal injury.
- Do not overreach. Keep proper footing and balance at all times. This enables better control of the power tool in unexpected situations.
Dress properly. Do not wear loose clothing or jewellery. Keep your hair and clothing away from moving parts. Loose clothes, jewellery or long hair can be caught in moving parts.
If devices are provided for the connection of dust extraction and collection facilities, ensure these are connected and properly used. Use of dust collection can reduce dust-related hazards.
Do not let familiarity gained from frequent use of tools allow you to become complacent and ignore tool safety principles. A careless action can cause severe injury within a fraction of a second.
Power tool use and care
Do not force the power tool. Use the correct power tool for your application. The correct power tool will do the job better and safer at the rate for which it was designed.
Do not use the power tool if the switch does not turn it on and off. Any power tool that cannot be controlled with the switch is dangerous and must be repaired.
- Disconnect the plug from the power source and/or remove the battery pack, if detachable, from the power tool before making any adjustments, changing accessories, or storing power tools. Such preventive safety measures reduce the risk of starting the power tool accidentally.
- Store idle power tools out of the reach of children and do not allow persons unfamiliar with the power tool or these instructions to operate the power tool. Power tools are dangerous in the hands of untrained users.
- Maintain power tools and accessories. Check for misalignment or binding of moving parts, breakage of parts and any other condition that may affect the power tool's operation. If damaged, have the power tool repaired before use. Many accidents are caused by poorly maintained power tools.
10|English
- Keep cutting tools sharp and clean. Properly maintained cutting tools with sharp cutting edges are less likely to bind and are easier to control.
Use the power tool, accessories and tool bits etc. in accordance with these instructions, taking into account the working conditions and the work to be performed. Use of the power tool for operations different from those intended could result in a hazardous situation. - Keep handles and grasping surfaces dry, clean and free from oil and grease. Slippery handles and grasping surfaces do not allow for safe handling and control of the tool in unexpected situations.
Service
Have your power tool serviced by a qualified repair person using only identical replacement parts. This will ensure that the safety of the power tool is maintained.
Special Safety Instructions for AAC Block Cutter
- Keep all parts of the body away from the saw chain when the saw is running. Before starting up the saw, ensure that the saw chain is not touching anything. When working with a power tool, a moment of inattention could lead to clothing or parts of the body being caught by the saw chain.
Always hold the power tool with your right hand on the rear grip and your left hand on the front grip. Holding the power tool with the reversed hand configuration increases the risk of injuries and must not be used.
Only hold the power tool by the insulated gripping surfaces because the saw chain may come into contact with hidden electrical cables or its own power cable. If the saw chain comes into contact with a live wire, this may make metal parts of the tool live as well, posing a risk of electric shock.
Wear protective eyewear and a dust mask. Additional protective equipment for ears, head, hands, legs and feet is recommended. Appropriate protective clothing reduces the risk of injury from flying chip material and anything accidentally coming into contact with the saw chain.
Do not work with the power tool on a ladder, from a roof or on an unstable support. Operating a power tool in this way may lead to serious injuries.
Always ensure that you have a secure footing and only use the power tool if you are standing on solid, secure and level ground. Slippery or unstable surfaces can cause you to lose your balance or lose control over the power tool. - With the power tool switched off, carry it by the front grip with the saw chain facing forwards. Always put on the protective cover when transporting or storing the power tool. Handling the power tool carefully reduces the likelihood of the running saw chain accidentally coming into contact with an object.
Follow the instructions for the chain tension and for changing the saw blade body and the chain. A chain
that is not tensioned correctly may break or may increase the risk of kickback.
- Only saw autoclaved aerated concrete. The power tool must not be used for work that it is not intended for. Example: Do not use the power tool to saw metal, plastic, masonry, soil, ice or wood. Using the power tool for work that is not intended for may lead to dangerous situations.
If you are removing accumulated material, storing the power tool or performing maintenance, follow all of the instructions. Ensure that the on/off switch is switched off and the mains plug is not plugged in. Un-intentionally activating the power tool when removing accumulated material or during maintenance may lead to serious injuries.
Causes of kickbacks and prevention:
- Kickbacks may occur if the tip of the guide rail comes into contact with an object.
- If an object comes into contact with the tip of the guide rail, it may cause the power tool to react unexpectedly in a backwards direction, during which the guide rail is knocked upwards and in the direction of the operator.
- If the saw chain jams on the top edge of the guide rail, the rail may quickly kick back in the direction of the operator.
- Any of these reactions may lead to you losing control of the power tool or seriously injuring yourself. Do not solely rely on the safety devices built into the power tool. As the user of a power tool, you should take a number of measures so that you can work without accidents or injuries. Kickback is the result of misuse or incorrect use of the power tool. It can be avoided by taking proper precautions as given below.
Hold the power tool firmly with both hands, with the handles of the power tool grasped with your thumb and finger. Move your body and arms into a position from which you can withstand the kickback forces. If suitable measures are taken, the operator can control the kickback forces. Never let go of the power tool.
Avoid adopting an abnormal posture and do not saw above shoulder height. This prevents the tip of the guide rail accidentally coming into contact with an object and gives you better control of the power tool if unexpected situations occur.
Always use replacement rails, saw chains and sprocket wheels specified by the manufacturer. Using incorrect replacement rails, saw chains and sprocket wheels may cause the chain to break or lead to kickbacks.
Always follow the manufacturer's instructions for maintaining the saw chain. Setting depth gauges too low increases the likelihood of kickbacks.
Products sold in GB only:
Your product is fitted with an BS 1363/A approved electric plug with internal fuse (ASTA approved to BS 1362).
If the plug is not suitable for your socket outlets, it should be cut off and an appropriate plug fitted in its place by an au
thorised customer service agent. The replacement plug should have the same fuse rating as the original plug. The severed plug must be disposed of to avoid a possible shock hazard and should never be inserted into a mains socket elsewhere.
Explanation of symbols

Read instruction manual.

Do not expose to rain.
Before starting adjustment and maintenance work or if the power cable is damaged or severed, immediately unplug the mains plug.

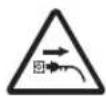
WARNING: Keep bystanders away.

Always hold the power tool with both hands.

Pay attention to kickbacks from the power tool and avoid contact with the tip of the chain bar.

Wear eye and head protection.

Wear hearing protection.

Wear a dust mask.

Wear slip-resistant footwear.

Wear hand protection.
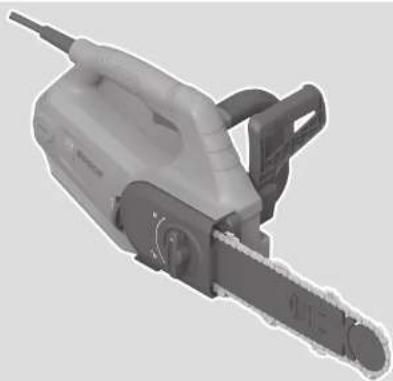
Product Description and Specifications

Read all the safety and general instructions. Failure to observe the safety and general instructions may result in electric shock, fire and/or serious injury.
Please observe the illustrations at the beginning of this operating manual.
Intended Use
The power tool is exclusively intended for sawing autoclaved aerated concrete.
Product Features
The numbering of the product features refers to the diagram of the power tool on the graphics page.
(1) Rear handle
(2) On/off switch
(3) Front handle
(4) Handguard/lever for activating the front brake
(5) Serial number
(6) Nose sprocket
(7) Chain guard
(8) TCT saw chain
(9) Chain bar
(10) Stop
(11) Rotary knob for cover
(12) Cover
(13) Tension wheel
(14) Lock-off function for On/Off switch
(15) Extraction outlet
(16) Running direction and cutting direction symbol
(17) Sprocket wheel
(18) Fastening bolt
(19) Guide bar for chain bar
(20) Extraction hose
(21) Bolt
a) Not all of the accessories listed are included with the power tool. Please refer to the product packaging to see which items are included.
Technical Data
| AAC Block cutter GAC 250 | |
| Article number | 3601BB60.. |
| Rated power input W 1200 | |
| Chain speed at no load m/s 12 | |
| Chain bar length cm 33.5 | |
| Saw chain type 3/8"-50 | |
| Drive link thickness mm 1.3 (0.050") | |
| Number of drive links 44 | |
| Tool-free chain tensioning (SDS) | ● |
| Nose sprocket | ● |
| Front brake | ● |
| Run-out brake | ● |
12 | English
| AAC Block cutter GAC 250 | |
| Stop ● | |
| Weight according to EPTA-Procedure 01:2014 | kg 4.7 |
| Protection class | ☐/II |
The specifications apply to a rated voltage [U] of 230V . These specifications may vary at different voltages and in country-specific models.
Starting cycles generate brief voltage drops. Interference with other equipment/machines may occur in case of unfavourable mains system conditions. Malfunctions are not to be expected for system impedances below 0.25 ohm.
Values can vary depending upon the product and are subject to application and environmental conditions. For further information www.bosch-professional.com/wac.
Assembly
For Your Safety
Warning! Switch off, remove plug from mains before adjusting or cleaning. The same applies when the mains cable is damaged, cut or entangled.
Caution! Do not touch the rotating chain.
Never operate the power tool in the vicinity of persons, children or animals or after consuming alcohol, drugs or taking numbing medication.
Mounting and Tensioning the Saw Chain
Only connect the power tool to the mains supply once it has been fully assembled.
Always wear protective gloves when handling the chain.
Assembling the Chain Bar and Saw Chain (see figures A-C)
- Carefully unpack all of the parts.
- Set down the power tool on a level surface.
- Insert the saw chain (8) into the circumferential groove of the chain bar (9). Ensure that the running direction is correct. To do this, compare the saw chain against the running direction symbol (16).
- Make sure that the tension wheel (13) is in the - position.
Put the chain links around the sprocket wheel (17) and position the chain bar (9) on the fastening bolt (18). Note: During initial assembly, the bolt (21) must engage in the mounting hole on the chain bar (9) that is furthest away from the sprocket wheel (17) (see figure A). -
Check whether all of the parts are positioned correctly and hold the chain bar with the saw chain in this position. Then turn the tension wheel (13) in the + direction until the saw chain is partially tensioned and remains mounted on the chain bar.
-Replace the cover (12)
Tighten the cover (12) slightly with the knob (11). -
The saw chain is not yet fully tensioned. The saw chain is tensioned as described in the "Tensioning the Saw Chain" section.
Tensioning the Saw Chain (see figure D)
Check the chain tension regularly every ten minutes, including before starting work, after the initial steps and during sawing. Particularly when using new saw chains, increased extension should be expected initially.
The service life of the saw chain relies heavily on it being tensioned correctly.
Do not tension the saw chain if it is strongly heated because it will tighten once it has cooled down and it will fit too tightly on the chain bar.
- Set down the power tool on a level surface.
- Turn the knob (11) in the direction in order to release the fixed chain bar.
- Check whether the chain links are correctly positioned in the guide slot of the chain bar (9) and on the sprocket wheel (17).
Turn the tension wheel (13) in the + direction until the correct chain tension has been reached. The latching mechanism stops the chain tension from being released. If the tension wheel (13) is hard to turn, you must continue to loosen the knob (11) in the direction. The knob (11) can also rotate if the tension wheel (13) is set. Two hands may be required to hold the knob (11) in position while setting the tension wheel (13). - The saw chain (8) is tensioned correctly if it can be lifted in the middle by approx. 3 - 4mm . This should be done with one hand by pulling up the saw chain against the power tool's own weight.
- If the saw chain (8) is tensioned excessively, turn the tension wheel (13) in the - direction.
- When the saw chain (8) is tensioned, secure the chain bar (9) by turning the knob (11) in the direction. Do not use a tool to do this.
Dust/chip extraction
Dust from materials can be harmful to health. Touching or breathing in this dust can trigger allergic reactions and/or cause respiratory illnesses in the user or in people in the near vicinity.
Certain dusts are classified as carcinogenic.
- Use a dust extraction system that is suitable for the material wherever possible.
- Provide good ventilation at the workplace.
- It is advisable to wear a P2 filter class breathing mask.
- Avoid dust accumulation at the workplace. Dust can easily ignite.
External Dust Extraction (see figure 1)
Insert the extraction hose (20) with adapter into the extraction outlet (15). Connect the dust extraction hose to a dust extractor (accessory). You will find an overview of how to connect to various dust extractors at the end of these operating instructions.
The power tool can be directly connected to the socket of a Bosch all-purpose dust extractor with remote starter. This dust extractor is started up automatically when the power tool is switched on.
The dust extractor must be suitable for the material being worked.
When extracting dry dust or dust that is especially detrimental to health or carcinogenic, use a special dust extractor.
Operation
Starting Operation
Pay attention to the mains voltage! The voltage of the power source must match the voltage specified on the rating plate of the power tool. Power tools marked with 230V can also be operated with 220V .
▶ Products that are only sold in AUS and NZ: Use a residual current device (RCD) with a nominal residual current of 30 mA or less.
Switching On and Off
Pull the hand guard/lever for activating the front brake (4) from position to position in the direction of the front handle (3) (see figure E). If you have not operated the hand guard/lever for activating the front brake (4), the front brake has not been deactivated before use and the power tool will not start up.
Remove the chain guard (7).
Hold the power tool as described in the "Working with the Power Tool" section.
To start the power tool, first press the lock-off button (14), then press and hold the on/off switch (2).
If the power tool is running, you can release the lock-off function.
To switch off the power tool, release the on/off switch (2).
Note: For safety reasons, the on/off switch (2) cannot be locked; it must remain pressed throughout operation.
Note: Do not slow down the power tool by activating the front brake (4).
Run-Out Brake/Front Brake (see figure E)
The power tool is fitted with two protective devices: The run-out brake slows down the saw chain after the on/off switch (2) is released.
The front brake is a protective mechanism that is triggered via the lever for activating the front brake (4) if the power tool kicks back or the on/off switch fails. The saw chain stops immediately.
Perform a function test from time to time. Push the lever for activating the front brake (4) forwards (position and briefly switch on the power tool. The saw chain must not start up. To unlock the front brake again, pull the lever for activating the front brake (4) back again (position
Do not carry the power tool by the lever for activating the front brake.
Working with the Power Tool
Before Cutting
The following checks must be performed before starting operation and regularly during sawing:
-
Is the power tool in a safe state?
-
Is the saw chain tensioned and sharpened correctly? During sawing, check the chain tension regularly every ten minutes. Particularly when using new saw chains, increased extension should be expected initially. The state of the saw chain greatly influences the sawing performance. Only sharp saw chains protect against overload.
- Is the front brake released and its function ensured?
- Are you wearing the required protective equipment? Use safety goggles, a dust mask and hearing protection. It is recommended that you wear additional protective equipment for your head, hands, legs and feet. Wearing suitable protective clothing reduces the risk of injury from flying cut material and the saw chain accidentally coming into contact with an object.
Saw Kickback (see figure E)
A saw kickback is the sudden uncontrolled movement and kickback of the running power tool, which can occur if the tip of the chain bar comes into contact with the material to be sawn or if the chain jams.
If a kickback occurs, the power tool may respond unpredictably and cause severe injuries to the operator or bystanders in the cutting area.
Particular care must be taken for lateral, bevel and rip cuts because the stop (10) cannot be applied.
To prevent saw kickbacks:
- Position the power tool so that it is as flat as possible.
- Never work with a loose, extended or heavily worn saw chain.
- Never saw above shoulder height.
- Never saw using the tip of the chain bar.
- Always hold the power tool firmly with both hands.
- Always use a Bosch saw chain for autoclaved aerated concrete (accessory).
- Use the stop (10) as a lever.
- Make sure that the chain tension is correct.
General Behaviour (see figures E-H)
Always hold the power tool firmly with both hands, with your left hand on the front handle and your right hand on the rear handle. Always grasp the handles with your thumb and finger. Always guide the mains cable to the rear and keep it outside the area of the saw chain and material to be sawn.
Ensure you always have a secure footing when operating the power tool.Hold the power tool slightly to the right of your body.
14 | English
The saw chain must be running at full speed before coming into contact with the autoclaved aerated concrete. To do this, use the stop (10) to support the power tool on the autoclaved aerated concrete. During sawing, use the stop as a lever.
When sawing heavier autoclaved aerated concrete blocks, reposition the stop at a lower point. To do this, pull the power tool back to release the stop and reposition it at a lower point. Do not remove the power tool from the cut.
Do not press on the saw chain with force, let it run by using the stop (10) to create a slight leverage pressure.
Never operate the power tool with extended arms. Do not attempt to operate the saw in hard-to-reach places or when standing on a ladder. Never saw above shoulder height.
The best sawing results are achieved when the chain speed is not reduced due to overload.
Be careful at the end of the saw cut. As soon as the power tool has cut through, the weight force will change unexpectedly. There is a risk of injury to legs and feet.
Only remove the power tool from the cut with the saw chain running.
Sawing Autoclaved Aerated Concrete (see figures G-H)
When sawing autoclaved aerated concrete, refer to the following safety regulations:
Set down the autoclaved aerated concrete as shown in the figure and support it such that the cut does not close and the saw chain jams.
Before sawing, set up shorter autoclaved aerated concrete structures and secure them in place.
Only saw objects made of autoclaved aerated concrete.
Avoid coming into contact with stones and nails because they may be hurled upwards and damage the saw chain or cause serious injuries to the user or bystanders.
Do not bring the running power tool into contact with wire fencing or the ground.
Exercise particular caution when making rip cuts because the stop (10) cannot be used. Guide the power tool at a shallow angle in order to avoid saw kickbacks.
Troubleshooting
The following table shows fault symptoms and how you can remedy the problem if your power tool does not work properly. If this does not enable you to locate and rectify the problem, contact your service workshop.
Important: Before troubleshooting, switch off the power tool and pull out the mains plug.
Problem Possible Cause Corrective measure
| Power tool not running | Front brake has been triggered | Pull the lever for activating the front brake (4) back to the position. |
| Plug not connected Connect the plug | ||
| Plug socket defective Use another plug socket | ||
| Fuse has been triggered Change the fuse | ||
| Extension cable damaged Do not attempt without an extension cable | ||
| Power tool works inter-mittently | Mains cable defective Operate the front brake lever to stop the saw chain; check the mains cable and replace it if ne-cessary | |
| External or internal loose connection Operate the front brake lever to stop the saw chain; contact your Bosch after-sales service | ||
| On/off switch (2) defective | Operate the front brake lever to stop the saw chain; contact your Bosch after-sales service | |
| Saw chain does not slow down | Front brake/run-out brake defective Contact your Bosch after-sales service. | |
| Saw chain/guide rail hot | Chain tension too high Adjust the chain tension | |
| Blunt saw chain Replace the saw chain | ||
| Power tool judders, vi-brates or does not saw correctly | Chain tension too low Adjust the chain tension | |
| Blunt saw chain Replace the saw chain | ||
| Saw chain worn Replace the saw chain | ||
| Saw teeth pointing in the wrong direction | Install the saw chain correctly | |
Maintenance and Service
Maintenance and Cleaning
Pull the plug out of the socket before carrying out any work on the power tool.
To ensure safe and efficient operation, always keep the power tool and the ventilation slots clean.
In extreme conditions, always use a dust extractor if possible. Blow out ventilation slots frequently and install a residual current device (RCD) upstream.
In order to avoid safety hazards, if the power supply cord needs to be replaced, this must be done by Bosch or by an after-sales service centre that is authorised to repair Bosch power tools.
Note: Perform the following maintenance work regularly to ensure long and reliable use.
Check whether the covers and protective devices are undamaged and fitted correctly. Before use, carry out any required maintenance or repair work.
Regularly inspect the power tool for obvious defects, such as a loose, dislodged or damaged saw chain, a loose fixing and worn or damaged components.
Replacing the Saw Chain and Sprocket Wheel
Replace the saw chain and sprocket wheel with original Bosch spare parts or have these parts replaced at your authorised after-sales service centre for Bosch power tools.
After Use/Storage
Place the chain guard (7) on the chain bar (9) in order to prevent injuries.
The saw chain (8) may become blunt from unintentional impacts or scratches.
Clean the moulded plastic housing of the power tool using a soft brush and a clean cloth. Do not use water or any solvents or polishes. Remove all of the dirt, particularly any dirt in the motor's ventilation slots.
After an application time of 1-3 hours, remove the cover (12), the chain bar (9) and the saw chain (8) and clean them using a brush.
If the power tool is to be stored for a prolonged period of time, clean the saw chain (8) and the chain bar (9).
Store the power tool in a safe, dry place out of the reach of children.
Do not place any other objects on the power tool.
Do not make any alterations to the power tool. Unreliable alterations may compromise the safety of your power tool and lead to increased noise and vibrations.
After-Sales Service and Application Service
Our after-sales service responds to your questions concerning maintenance and repair of your product as well as spare parts. You can find explosion drawings and information on spare parts at: www.bosch-pt.com
The Bosch product use advice team will be happy to help you
with any questions about our products and their accessories.
In all correspondence and spare parts orders, please always include the 10-digit article number given on the nameplate of the product.
Malaysia
Robert Bosch Sdn. Bhd.(220975-V) PT/SMY
No.8A,Jalan 13/6
46200 Petaling Jaya
Selangor
Tel.: (03) 79663194
Toll-Free: 1800 880188
Fax: (03) 79583838
E-Mail: kiathoe.chong@my.bosch.com
www.bosch-pt.com.my
You can find further service addresses at:
www.bosch-pt.com/serviceaddresses
Disposal
The power tool, accessories and packaging should be recycled in an environmentally friendly manner.
Do not dispose of power tools along with household waste.
Français
www.bosch-pt.com/serviceaddresses
www.bosch-pt.com/serviceaddresses
Eliminação
www.bosch-pt.com/serviceaddresses
处理废弃物
www.bosch-pt.com/serviceaddresses
廢棄物處理
nauuunnuuauuauuuuuuuuuuuuuuuuuuuuuuuuuuuuuuuuuuuuuuuuuuuuuuuuuuuuuuuuuuuuuuuuuuuuuuuuuuuuuuuuuuuuuuuuuuuuuuuuuuuuuuuuuuuuuuuuuuuuuuuuuuuuuuuuuuuuuuuuuuuuuuuuuuuuuuuuuuuuuuuuuuuuuuuuuuuuuuuuuuuuuuuuuuuuuuuuuuuuuuuuuUU
1 1
1 1 1 1 1 1 1 1 1 1 1 1 1 1 1 1 1 1 1 1 1 1 1 1 1 1 1 1 1 1 1 1 1 1 1 1 1
nnaananaananaananaananaananaananaananaananaananaananaananaananaananaananaananaananaananaananaananaananaananaananaananaananaananaananaananaananaananaananaananaananaananaananaananaananaananaananaananaananaananaananaananaananaananaananaananaananaananaananaanaraannnnnnnnnnnnnnnnnnnnnnnnnnnnnnnnnnnnnnnnnnnnnnnnnnnnnnnnnnnnnnnnnnnnnnnnnnnnnnnnnnnnnnnnnnnnnnnnnnnnnnnnnnnn
aannnnnnae annnne nnnnne aannnne
Aaannnnnnaanennnnnnnnnnnnnnnnnnnnnnnnnnnnnnnnnnnnnnnnnnnnnnnnnnnnnnnnnnnnnnnnnnnnnnnnnnnnnnnnnnnnnnnnnnnnnnnnnnnnnnnnnnnnnnnnnnnnnnnnnnnnnn
17
2017-01-01 15:00:00 15:00:00 15:00:00 15:00:00 15:00:00 15:00:00 15:00:00 15:00:00 15:00:00
y
a
aannnnnne
aannnnnna
yua:10nannnnnaa yaa
#

nunnnnnnnnnnnnnnnnnnnnnnnnnnnnnnnnnnnnnnnnnnnnnnnnnnnnnnnnnnnnnnnnnnnnnnnnnnnnnnnnnnnnnnnnnnnnnnnnnnnnnnnnnnnnnnnnnnnnnnnnnnnnnnnnnnnnnnnnnnnnnnnnnnnnnnnnn
(8) TCT
(9)
(10)
(11)
(12)
(13)
(14)
(15)
(16)
(17)
(18)
(19)
(20)
(21)
a) 100000000000000000000000000000000000000000000000000000000000
yantunna
| THAILANDA SECURITIES CO.,LTD. HONG KONG SECURITIES CO.,LTD. THAILAN SECURITIES CO.,LTD. THAILAN SECURITIES CO.,LTD. THAILAN SECURITIES CO.,LTD. THAILAN SECURITIES CO.,LTD. THAILAN SECURITIES CO.,LTD. THAILAN SECURITIES CO.,LTD. THAILAN SECURITIES CO.,LTD. THAILAN SECURITIES CO.,LTD. THAILAN SECURITIES CO.,LTD. THAILAN SECCURITIES CO.,LTD. THAILAN SECURITIES CO.,LTD. THAILAN SECURITIES CO.,LTD. THAILAN SECURITIES CO.,LTD. THAILAN SECURITIES CO.,LTD. THAILAN SECURITIES CO.,LTD. THAILAN SECURITIES CO.,LTD. THAILAN SECURITIES CO.,LTD. THAILAN SECURITIES CO.,LTD. THAILAN SEC URITIES CO.,LTD. THAILAN SECURITIES CO.,LTD. THAILAN SECURITIES CO.,LTD. THAILAN SECURITIES CO.,LTD. THAILAN SECURITIES CO.,LTD. THAILAN SECURITIES CO.,LTD. THAILAN SECURITIES CO.,LTD. THAILAN SECURITIES CO.,LTD. THAILAN SECURITIES CO.,LTD. THAILAN SECURS CO.,LTD. THAILAN SECURS CO.,LTD. THAILAN SECURS CO.,LTD. THAILAN SECURS CO.,LTD. THAILAN SECURS CO.,LTD. THAILAN SECURS CO.,LTD. THAILAN SECURS CO.,LTD. THAILAN SECURS CO.,LTD. THAILAN SECURS CO.,LTD. THAILAN SECURSCO.,LTD. THAILAN SECURS CO.,LTD. THAILAN SECURS CO.,LTD. THAILAN SECURS CO.,LTD. THAILAN SECURS CO.,LTD. THAILAN SECURS CO.,LTD. THAILAN SECURS CO.,LTD. THAILAN SECURS CO.,LTD. THAILAN SECURS CO.,LTD. THAILAN SECURS CO, LTD. THAILAN SECURS CO, LTD. THAILAN SECURS CO, LTD. THAILAN SECURS CO, LTD. THAILAN SECURS CO, LTD. THAILAN SECURS CO, LTD. THAILAN SECURS CO, LTD. THAILAN SECURS CO, LTD. THAILAN SECURS CO, LTD. THAILAN SECURS CO, LTPA 01:2014 | 3601 BB6 0.. |
| THAILAN SECURITIES CO.,LTD. THAILAN SECURITIES CO.,LTD. THAILAN SECURITIES CO.,LTD. THAILAN SECURITIES CO.,LTD. THAILAN SECURITIES CO.,LTD. THAILAN SECURITIES CO.,LTD. THAILAN SECURITIES CO.,LTD. THAILAN SECURITIES CO.,LTD. THAILAN SECURITIES CO.,LTD. thailand thailand thailand thailand thailand thailand thailand thailand thailand thailand thailand thailand thailand thailand thailand thailand thailand thailand thailand thailand thailand thailand thailand thailand thailand thailand thailand thailand thailand thailand thailand thailand thailand thailand THAILAN SECURITIES CO.,LTD. THAILAN SECURITIES CO.,LTD. THAILAN SECURITIES CO.,LTD. THAILAN SECURITIES CO.,LTD. THAILAN SECURITIES CO.,LTD. THAILAN SECURITIES CO.,LTD. THAILAN SECURITIES CO.,LTD. THAILAN SECURITIES CO.,LTD. THAILAN SECURITIES CO.,LTD. THE SECURITIES CO.,LTD. THAILAN SECURITIES CO.,LTD. THAILAN SECURITIES CO.,LTD. THAILAN SECURITIES CO.,LTD. THAILAN SECURITIES CO.,LTD. THAILAN SECURITIES CO.,LTD. THAILAN SECURITIES CO.,LTD. THAILAN SECURITIES CO.,LTD. THAILAN SECURITIES CO.,LTD. THAILANSECURITIES CO.,LTD. THAILAN SECURITIES CO.,LTD. THAILAN SECURITIES CO.,LTD. THAILAN SECURITIES CO.,LTD. THAILAN SECURITIES CO.,LTD. THAILAN SECURITIES CO.,LTD. THAILAN SECURITIES CO.,LTD. THAILAN SECURITIES CO.,LTD. THAILAN SECURITIES CO.,LTD. THAILAN SECURLS CO.,LTD. THAILAN SECURITIES CO.,LTD. THAILAN SECURITIES CO.,LTD. THAILAN SECURITIES CO.,LTD. THAILAN SECURITIES CO.,LTD. THAILAN SECURITIES CO.,LTD. THAILAN SECURITIES CO.,LTD. THAILAN SECURITIES CO.,LTD. THAILAN SECURITIES CO.,LTD. THAILAN SECURITIESCO.,LTD. THAILAN SECURITIES CO.,LTD. THAILAN SECURITIES CO.,LTD. THAILAN SECURITIES CO.,LTD. THAILAN SECURITIES CO.,LTD. THAILAN SECURITIES CO.,LTD. THAILAN SECURITIES CO.,LTD. THAILAN SECURITIES CO.,LTD. THAILAN SECURITIES CO.,LTD. THAILAN SECURITIES CO, LTD. THAILAN SECURITIES CO, LTD. THAILAN SECURITIES CO, LTD. THAILAN SECURITIES CO, LTD. THAILAN SECURITIES CO, LTD. THAILAN SECURITIES CO, LTD. THAILAN SECURITIES CO, LTD. THAILAN SECURITIES CO, LTD. THAILAN SECURITIES CO, LTD. THAILAN SECURITIES CO, LTPA 01:2014 | 12 12 3/8"-50 1.3 (0.050) 44 ● ● ● ● ● ● ● ● ● ● ● ● ● ● ● ● ● ● ● ● ● ● ● ● ● ● ● ● ● ● ● ● ● ● ● ● ● ● ● ● ● ● ● ● ● ● ● ● ● ● — — — — — — — — — — — — — — — — — — — — — — — — — — — — — — — — — — — — — — — — — — — — — — — — — — - |
46|m
1
GAC 250

nuiuunnuusuWnuua [U]230 Tanaa nnae aenauan uwnuusuWnuuaannuu uae annan anu annan
nssnnnsnnnsnnnsnnnsnnnsnnnsnnnsnnnsnnns
nH: 10000000000000000000000000000000000000000000000000000000000000000
nunnnn (4)
wnnnnunnuu/wnnnn (wnw Jssnau E)
Wauuuaa uauuuuauuuuuuuuuuuuuuuuuuuuuuuuuuuuuuuuuuuuuuuuuuuuuuuuuuuuuuuuuuuuuuuuuuuuuuuuuuuuuuuuuuuuuuuuuuuuuuuuuuuuuuuuuuuuuuuuuuuuuuuuuuuuuuuuuuuuuuuuuuuuuuuuuuuuuuuuuuuuuuuuuuuuuuuuuuuuuuuuuUU
nannnnn/naan
www.bosch-pt.com/serviceaddresses
#
wovolwn gnuuwsnyua
山
ywnnnaaunnnn nnannnnnnnnnnnnnnnnnnnnnnnnnnnnnnnnnnnnnnnnnnnnnnnnnnnnnnnnnnnnnnnnnnnnnnnnnnnnnnnnnnnnnnnnnnnnnnnnnnnnnnnnnnnnnnnnnn
Bahasa Indonesia
Petunjuk keselamatan
Keselamatan personnel
GunakanSEPATAntiselip.

Kenakan sarung tangan pengaman.
Arkadia Green Park Tower G-7th floor
Ji. Let. Jend. TB. Simatupang Kav.88
Jakarta 12520
Tel.: (021) 3005 5800
Fax: (021) 3005 5801
E-Mail: boschpowertools@id.bosch.com
www.bosch-pt.co.id
www.bosch-pt.com/serviceaddresses
Caramembuang
Cac canh bao an toan
www.bosch-pt.com/serviceaddresses
Su thai bo
J 1 J 1 J 1 J 1 J 1 J 1 J 1 J 1 J 1 J 1 J 1 J 1 J 1 J 1 J 1 J 1 J 1 J 1 J 1 J 1 J 1 J 1 J 1 J 1 J 1 J 1 J 1 J 1 J 1 J 1 J 1 J 1 J 1 J 1 J
Lgolsswaiagagogogl jos
a a a a a a a a a a a a a a a a a a a a a a a a a a a a a a a a a a a a a a a a a a a a a
aui jSJI sssj plaiwgl aloloos
a aai aai aai j 0sll uai oal al abwugol jg Jauu Jsu Jui JgJai Jauo aai Jauu Jauu Jauu Jauu Jauu Jauu Jauu Jauu
40 1
J 1000
1 11111111111111111111111111111111111
Lg 1 g a j 11 11 11 11 11 11 11 11 11 11 11 11 11 11 11 11 11 11 11 11 11 11 11 11 11 11 11 11 11 11 1
Joo 1
Jlalbig Jkso gagall.
SduLglls
U
g g u 1sloj jao jao jao jao jao jao jao jao jao jao jao jao jao jao jao jao jao jao jao jao jao jao jao jao jao jao jao jao jao jao jao jao jao jao jao jao jao jao jao jao jao jao jao jao jao jao jao jao jao jao jae JooJoo
1oIy coa. aaiiiaiaiaiaiaiaiaiaiaiaiaiaiaiaiaiaiaiaiaiaiaiaiaiaiaiaiaiaiaiaiaiaiaiaiaiaiaiaiaiaiaiaiaiaiaiaiaiaiaiaiaiaiaiaiaiaiaiaiaiaiaiaiaiaiaia
uui 1
40 auiuJl o
JU 10000000000000000000000000000000000000000000000000000000000000000000000
aogallabwU
ggl golgl 1s jgs 10jS Lg aLg 11 11 11 11 11 11 11 11 11 11 11 11 11 11 11 11
4gJUboJc aJ.
JUySsI UoLd Jy. aUgUJU
山LJI pssu
auiuuiuuiuuiuuiuuiuuiuuiuuiuuiuuiuuiuuiuuiuuiuuiuuiuuiuuiuuiuuiuuiuuiuuiuuiuuiuuiuuiuuiuuiuuiuuiuuiuuiuuiuuiuuiuuiuuiuuiuuiuuiuuiuuiuuiuuiuuiuuiuuiuuiuui uuuuuuuuuuuuuuuuuuuuuuuuuuuuuuuuuuuuuuuuuuuuuuuuuuuuuuuuuuuuuuuuuuuuuuuuuuuuuuuuuuuuuuuuuuuuuuuuuuuuuuuuuuuuuuuuuuuuuuuuuuuuuuuuuuuuuuuuuuuuuuuuuuuuuuuuuuuuuuu uu u u u u u u u u u u u u u u u u u u u u u u u u u u u u u u u u u u u u u u u u u u u u u u u u u u u u u u u u u u u u u u u u u u uu uu uu uu uu uu uu uu uu uu uu uu uu uu uu uu uu uu uu uu uu uu uu uu uu uu uu uu uu uu uu uu uu uu uu uu uu uu uu uu uu uu uu uu uu uu uu uu uu uu uu uu uu uu uu uu uu uu uu uu uu uu uu uu uu uu uu uu uu uu uu uu uu uu uu uu uu uu uu uu uu uu uu uu uu uu uu uu uu uu uu uu uu uu uu uu uu uu uu uuUUUUUUUUUUUUUUUUUUUUUUUUUUUUUUUUUUUUUUUUUUUUUUUUUUUUUUUUUUUUUUUUUUUUUUUUUUUUUUUUUUUUUUUUUUUUUUUUUUUUUUUUUUUUUUUUUUUUUUUUUUUUUUUUUUUUUUUUUUUUUUUUUUUUUUUUUUUUUUUUUUUUUUUUUUUUUUUUUUUUUUUUUUUUUUUUUUUUUUUU
ao sao uolai lo sic 1s jk kj kj - .lo liu lll uoall
g uolal ao sao aouo la g jn jk s - Uc al all ll dgo g jr jlll all
lll ylll uolall sicg g g o jg
. paaall oaj g jg
aaggll agl jluiaill aulw jauil - acw yaaall g jI g jn jk sJ Ll
. paaall oaj g jg
Jlill glioo jIg llo sall Jsall .glol!uulug oabuabuabla blg
jglb jg jll lla 13! pJl Jn jg gI caiolll Jd wI Jg
4aLgglgag aiaaagatg Hb bcey jlg
.0000jc Ls uaiu kS
p8 gll auiu kSJJ sse I y
. JIabJI gIIIO jc |s yqal dwi
oJ2 nJ auiu kSJJ oSJI pdswU gow
. SSS .Iaiaill UJy jol gI q
4Uc gglgglgblg ksh Pliuieauu kSJI
. Omu ng D
aJydoasjai jglal jzI JSSU.
aJxJcJusuaa uag pLw Ls
aagg aegnlae hlls! lo aag
ooJI 1o aoLg jg aLL
aJlI JzI Od oJg! gnn .aJy
aJGJ no JgJ IJgJ WsO sIe!
Jsuqu quiu poiui ayuqu
J 1 J 1 J 1 J 1 J 1 J 1 J 1 J 1 J 1 J 1 J 1 J 1 J 1 J 1 J 1 J 1 J 1 J 1 J 1 J 1 J 1 J 1 J 1 J 1 J 1 J 1 J 1 J 1 J 1 J 1 J 1 J 1 J 1 J 1 J
.0g 10000000000000000000000000
. giuuaabwIc auiuSJI oaii g
j8)Jaiai aulw J
oJlLjLilUaWlg.9)
alwuw jjg jg.
(16) jIg JI oJI jO jUaJI
-2gJ1 0ggo (13) aI alc uS -
aJLKS JSWJuaioJIaIawwSsPQ
ggo gjgmo loJuaaiaaaw
"jaiolaluluw
(DjgJJI jbl) JuaJIaUuW
Jg Jaa 1a aalwll w no gaa
Jbuaa aaiuuiuuiuuiuuiuuiuuiuui
dgg 10
Gdssdalljuljuiicg dai jy
.
S J S J J J J J J J J J J J J J J J J J J
aannn ann n
aaiw w 1jiaai aaww
auiy jaii jui jai yaiu lijbi
auiu suiu uui
. giuwabwUcuiuJSSIooJIg
Cuuu 111
.
aagogaoaullull lalla 131 lao gao -
agall jjjgai aaoa aiwajll jis guii sic. Luwai aaoia abai lc aoai buo xlaow
yai aai ayj yj jy 100000000000000000000000000000000000000000000000000000000000000000000000000000
laig jiaiill alwuw ic ogj pail sic bsui X
caas bao yuol qo jno jooq lijl (10) aai jip u cgl
JUaJIgai JIJIaIgblg aIJIgglgblggoJollluy
.(10)
juiiai juiui
a 2aunu 5ginnu
.1K
-ooaoglaSgNo,
.5suy alSlo gI
-aiJglaijIgim
J 1
.aaJldoa
-01sL
-aaaaiwajulg
.(g|g)jgJ
-ε|jss (10) ssall
- alwlull aolll sui
(E-H jgJJI jbi) aolJI-1sJI Jau
. 1 J 1 J 1 J 1 J 1 J 1 J 1 J 1 J 1 J 1 J 1 J 1 J 1 J 1 J 1 J 1 J 1 J 1 J 1 J 1 J 1 J 1 J 1 J 1 J 1 J 1 J 1 J 1 J 1 J 1 J 1 J 1 J 1 J 1 J
auiJgSJI aSμwU
Lc1
aJyjai 1bawosagol.
aJLkA Jd aawlll jgj 1gllnq ggl n cagggll t aaii i 1aagll lao yog g o 6c 1gss (PRCD)
Robert Bosch Morocco SARL
gjoo oo ojjol gJJ.53
LJ1J120300
+212529314327:
sav.outillage@ma.bosch.com: 日 _ 1 ^ 日
:aa aal jglic no jall
www.bosch-pt.com/serviceaddresses
aJySJI oSJI no JauJI
Jgglgglgglg Js
aiull lcl abalso aayjuyuaill allo jSjo
yulai jao ayjssll 8
.
J73
000s1giojgs jbsjbuoo 5u
JU 1 JU 1 JU 1 JU 1 JU 1 JU 1 JU 1 JU 1 JU 1 JU 1 JU 1 JU 1 JU 1 JU 1 JU 1 JU 1 JU 1 JU 1 JU 1 JU 1 JU 1 JU 1 JU 1 JU 1 JU 1 JU 1
JgI y JgS g g Sg Sg Cg Sg Sg Sg Sg Sg Sg Sg Sg Sg Sg Sg Sg Sg Sg Sg Sg Sg Sg Sg Sg Sg Sg Sg Sg Sg Sg Sg Sg Sg Sg Sg Sg Sg Sg Sg Sg Sg Sg Sg Sg Sg Sg Sg Sg Sg Sg Sg Sg Sg Sg
. 1ai oiai iiai Sic jolgaw g s wlo siio jai l jj joiiaai g iaol k jai iiai glaos juc jil jls egj u wuio aao Lwq
aalwgsn jglgjl jll gddjnl 1s yjdu n llaill jy jryds oksws
cysdyolkwslglgnl wls
dssyowgola jyjldasis
daoslgawoosolpwos jao pimds
wogcljolkwslgwuylogggb
.
0s s gj jI Jgai g ss 100 100 100 100 100 100 100
y jy yj yj yj yj yj yj yj yj yj yj yj yj yj yj yj yj yj yj yj yj yj yj yj yj yj yj yj yj yj yj yj yj yj yj yj yj yj yj yj yj yj yj yj yj yj yj yj yj yj yj y
sis sssggs kj g slss Jla jslgssj l j gssu g Lgo sllw .a s j g oikws Jglawg CwJ Soo cij g si 590 .si solsw
sS oiiS gao dlw g jue g jj sso
ds yg w jiao sbu cwi oow ai jue g
o laaiw g cai w jilw g i
jue g jj so jilw g jol olaaiw .djw
.6i0o jui jue g jy jy l low ciigao
jg Ssli g loj jgl Jg w cly sui 1u ooo .g w joi jg 0. g uji j 1gus ojc j jalaj g
Jg 100000000000000000000000000000000000000000000000000000000000000000000000000000000000000000
74|
ds gl ds 59g Cw g aoc dws
Ggo Gscky jj1j1 jnssd s. J
Jl ju w g ss G y u j j u w J S
gBbLaJn j CwI Jy J
Wai .sIs Lwai ggs y wu L
gU uL aS Lg g Ww U
SjL sU uu uu uu uu uu uu uu uu uu uu uu uuu uuu uuu uuu uuu uuu uuu uuu uuu uuu uuu uuu uuu uuu uuu uuu uuu uuu uuu uuu uuu uuu uuu uuu uuu uuu uuu uuu uuu uuu uuu uuu uuu uuu uuu uuu uuu uuu uuu uuu uuu uuu uuu uuu uuu uuu uuu uuu uuu uuu uu
Jw jolalai. jia s Jaiu Jue g 10 w s Jg i yj 10 jy j u yu .g w y d oogg Lg g n j Uy j l uu c a Jy, uau bua uu uu uu uuuu uuuu uuuu uuuu uuuu uuuu uuuu uuuu uuuu uuuu uuuu uuuu uuuu uuuu uuuu uuuu uuuu uuuu uuuu uuuu uuuu uuuu uuuu uuuu uuuu uuuu uuuu uuuu uuuu uuuu uuuu uuuu uuuu uuu uuuu uuuu uuuu uuuu uuuu uuuu uuuu uuuu uuuu uuuu uuuu uuuu uuuu uuuu uuuu uuuu uuuu uuuu uuuu uuuu uuuu uuuu uuuu uuuu uuuu uuuu uuuu uuuu uuuu uuuu uuuu uuuu uuuu
jui ool. sisi slw jui jai uul aui uu uu uu uu
ds 0laaiu jj1 jilaoj bag g .ol o liuul jgaw g joi soo joj (59) jI cly siuglo Jyduu agbw u o sijgabw .siigw gj yj1 uuiu u uauu
aui j, cui gl a gj oji j aS Jla
sJgSi Li jai g Jao pKim .yj kJgl
JogI jkaiu uugu uuuu uji
waiiia, gj jj jg oJ oJauW.
uis
uis
abg jgssj g aai j g aai o sui s uus s uus as a s uus i S9u J uJ uJ uJ uJ uJ uJ uJ uJ uJ uJ uJ uJ uJ uJ uJ uJ uJ uJ uJ uJ uJ uJ uJ uJ uJ uJ uJ uJ uJ uJ uJ uJ uJ uJ uJ uJ uJ uJ uJ uJ uJ uJ uJ uJ uJ uJ uJ uJ uJ uJ u
plai jj j j j. sis oos
ooui d j bi j l qil sl y ds uolks
jll j: lio nlgic a. sisi oosaiw, cwi
jlaow, kssu, jlqnrs o jy rj
sokoi oslaw g g g sla ooj j
slyds oiai plai syl y jj j 0saiw
du cwl ocao, cwlo o w agj j 1gai
g w jao sli jaa sccgo
jui osw awlal slgo nns sly poim
jl u j sldj g wggw l gj y jj
dik sglgdo gdo jgdo gdo pao
g wogda/ wgda n gogda jl
g w niabogd a dowgda n gdo
nj s i pim jj j j gglk d e gwh
sld g wggw pdo ly o w aiw al slgo
sdd jia dy w da y cww
JL JU JU JU JU JU JU JU JU JU JU JU JU JU JU JU JU JU JU JU JU JU JU JU JU JU JU JU JU JU JU JU JU JU JU JU JU JU JU JU JU JU JU JU JU JU JU JU JU JU JU JUUUUUUUUUUUUUUUUUUUUUUUUUUUUUUUUUUUUUUUUUUUUUUUUUUUUUUUUUUUUUUUUUUUUUUUUUUUUUUUUUUUUUUUUUUUUUUUUUUUUUUUUUUUUUUUUUUUUUUUUUUUUUUUUUUUUUUUUUUUUUUUUUUUUUUUUUUUUUUUUUUUUUUUUuuuuuuuuuuuuuuuuuuuuuuuuuuuuuuuuuuuuuuuuuuuuuuuuuuuuuuuuuuuuuuuuuuuuuuuuuuuuuuuuuuuuuuuuuuuuuuuuuuuuuuuuuuuuuuuuuuuuuuuuuuuuuuuuuuuuuuuuuuuuuuuuuuuuuuuuuuuuuuuuuuuuuuuuuuuuuuuuuuuuuuuuuuuuuuuuuuuuuuuu uu
AgoIgjJ
.
#
| ### | ### |
| ### | ### |
| ### | ### |
| ### | ### |
| ### | ### |
| ### | ### |
| ### | ### |
| ### | ### |
| ### | ### |
| ### | ### |
| ### | ### |
| ### | ### |
| ### | ### |
| ### | ### |
| ### | ### |
| ### | ### |
| ### | ### |
| ### | ### ### |
| ### | ### |
| ### | ### |
| ### | ### |
| ### | ### |
| ### | ### |
| ### | ### |
| ### | ### |
| ### | ### |
| ### | ### |
| ### | ### |
| ### | ### |
| ### | ### |
| ### | ### |
| ### | ### |
| ### | ### |
| ### | ### |
Jusgglj 1 jg jI sds
1j j (s) ds a g u w g w d b g y s l k:dis
g o 0 g 0 slaiw U s plil j y g bd
. g w n aoi o i i w u j iabl U Lg
siu w gla o j g y d s ii S w y
o laiwl j u d .siu o w zu w j d g
1j ci a j (s) ds a g u w g w U lac dg
. s pail
1 1111111111111111111111111111111
uugw9 CJr
olw s jjg josj
jJ jI Jl lalwgs kssll
JjI s9J JsLd
JSSJSSL JSSLAWGALI
10i jai iji aeg
UJSoUjgOJJ.
s0laaiol sio paaa 1j oJgam
nds u jy g a Jggi sljus
(jPRCD) nLkss g g jai
.
www.bosch-pt.com/serviceaddresses
olwJgJgJj
gduy,ul syu g alao,
g jL oJ juuj bao Jjao
.
022mm: 022mm:
2608000572(3m) 2608000571(3m)
2608000568(5m) 2608000567(5m)
035mm: 035mm:
2608000570(3m) 2608000569(3m)
2608000566(5m) 2608000565(5m)