Codix 560 - Measuring equipment Kübler - Free user manual and instructions
Find the device manual for free Codix 560 Kübler in PDF.
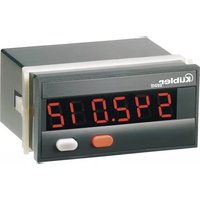
| Product type | Electronic preselection counter with two presets |
| Dimensions | 96 x 48 x 102 mm (front panel), panel cutout 92+0.8 x 45+0.6 mm |
| Weight | Approximately 180 g |
| Power supply | 100...240 V AC ±10% (max. 11 VA) or 10...30 V DC (max. 5.5 W) |
| Main functions | Impulse counter (up to 60 kHz), tachometer/frequency meter (0.01 Hz to 65 kHz), hour meter; 2 relay outputs (changeover); 6-digit 14 mm LED display; key programming; presetting, totalizer, batch counter, reset, teach-in functions |
| Maintenance and cleaning | Clean the front panel only with a soft damp cloth. No special maintenance required during normal operation; in case of failure, return to the manufacturer. |
| Safety | Use according to intended purpose; flush mounting away from heat sources; electrical installation by a specialist; external fuses mandatory; observe technical specifications and warnings. |
| Spare parts and repairability | The device can only be repaired by the manufacturer. Spare parts are available upon request from Kübler. |
| General information | Brand: Kübler, model: Codix 560, category: measuring equipment. Manual available in several languages (FR, DE, EN, ES, IT, etc.). Warranty and after-sales service provided by Kübler. |
Frequently Asked Questions - Codix 560 Kübler
User questions about Codix 560 Kübler
0 question about this device. Answer the ones you know or ask your own.
Ask a new question about this device
Download the instructions for your Measuring equipment in PDF format for free! Find your manual Codix 560 - Kübler and take your electronic device back in hand. On this page are published all the documents necessary for the use of your device. Codix 560 by Kübler.
USER MANUAL Codix 560 Kübler
Electronic Preset Counter
With two presets
Impulszähler: cnt.dir, up.dn, up.up, quad, quad2, quad4, A/B, (A-B)/Ax100%
Frequenzzähler: A, A - B, A + B, quad, A/B, (A-B)/Ax100%
Zeitzähler: FrErun, Auto, InpA.InpB, InpB.InpB
Add, Sub, AddAr, SubAr, AddBat, SubBat, AddTot, SubTot, Trail, TrailAr
4-stufiger RESET-Mode
3-stufige Tastaturverriegelung (Lock)
Vorwahl 1 relativ zu Vorwahl 2
TRAR
Vorwahl 1 relativ zu Vorwahl2
SELV, CLASS II (Limited
Power Source)
text_image
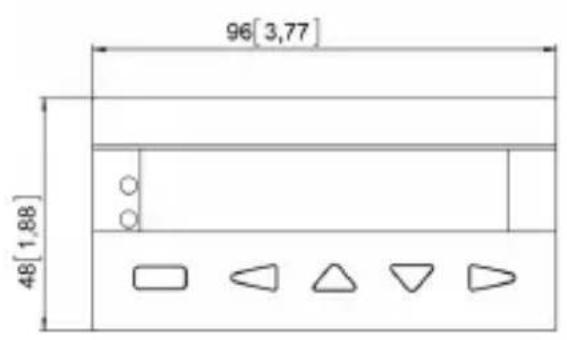
96[3,77] 48[1,88]
text_image
max.35[1,38] 43[1,69] 7,35[0,29] 11,2[0,44] 90,5[3,56]Rückansicht:

text_image
90 [3,54]Electronic Preset Counter
With two presets
Table of Contents (German is the original version.)
1 Preface 4
2 Safety instructions and Warnings 4
2.1 Use according to the intended purpose 4
2.2 Mounting in a control panel 4
2.3 Electrical Installation 5
2.4 Cleaning and maintenance 5
3 Description 5
4 Display/Operating elements 6
5 Inputs 6
5.1 INP A, INP B 6
5.2 RESET 6
5.3 GATE 6
5.4 LOC.INP 6
5.5 MPI 1 / MPI 2 6
6 Outputs
6.1 Output 1 / Output 2 6
6.2 Active Outputs 6
7 Programming
7.1 Entering the programming 6
7.2 Selecting the main menus 7
7.3 Entering a sub-menu 7
7.4 Selecting the parameters 7
7.5 Changing parameter values 7
7.6 Setting count values 7
7.7 Ending the programming 7
7.8 Programming menu 7
7.8.1 Select language 7
7.8.2 Setting the Basic Function 8
7.8.3 Pulse Counter 8
7.8.4 Tacho/Frequency meter 10
7.8.5 Timer 11
8 Operation
8.1 Switching the display during operation 15
8.2 Setting the presets 15
8.2.1 Setting via front keys 15
8.2.2 Teach Function 16
8.2.3 Teach-In with tracking presets 16
8.3 Set Function 16
8.4 Default Parameters 16
8.4.1 Entry into the default setting 16
8.4.2 Selecting the parameter sets 16
8.4.3 Accepting the setting 16
8.4.4 Parameter Set Table 17
9 Error Message
10 Connections
10.1 Signal and Control Inputs 17
10.2 Supply Voltage and Outputs 17
11 Technical Data
11.1 General Data 17
11.2 Pulse Counter 17
11.3 Tacho/Frequency Meter 18
11.4 Timer 18
11.5 Signal and Control Inputs 18
11.6 Outputs 18
11.7 Supply Voltage 18
11.8 Sensor Supply Voltage 18
11.9 Climatic Conditions 18
11.10 EMC 18
11.11 Device Safety 18
11.12 Mechanical Data 18
11.13Connections 19
12 Scope of Delivery 19
13 Ordering Codes 19
14 Frequencies (typical) 19
14.1 Pulse Counter 19
14.2 Frequency Meter 19
15 Input modes: Pulse counting 20
16 Input modes: Timing 22
17 Input modes: Frequency meter 23
18 Output operations 24
19 Help Texts 26
20 Dimensional Drawings 28
1 Preface

Please read this instruction manual entirely and carefully before installation and start-up. Please observe all warnings and advice, both for your own safety and for general plant safety. If the device is not used in accordance with this instruction manual, then the intended protection can be impaired.
2 Safety instructions and Warnings

Please use the device only if its technical condition is perfect. It should be used only for its intended purpose. Please bear in mind safety aspects and potential dangers and adhere to the operating instructions at all times. Defective or damaged devices should be disconnected from the mains immediately and taken out of operation.
The device shall not be opened. Use the repair service of the manufacturer.
Only connect the device to the electricity networks provided to that purpose.
The safety of the system in which the device is integrated is the responsibility of the installer.
Disconnect all electricity networks prior to any installation or maintenance work.
Use exclusively cables approved in your country and designed for your temperature and power ranges.
Installation and service work shall be carried out exclusively by qualified personnel.
The device must compulsorily be protected with approved external fuses. The value of these fuses can be found in the technical information.

This symbol is used on the device to remind of the existence of dangers, which are referred to in this manual.
2.1 Use according to the intended purpose
The preset counter 560 detects and measures pulses, times and frequencies up to max. 60 kHz and offers a wide variety of different operating modes. At the same time, the preset counter processes programmed presets. Use for any purpose over and beyond this will be deemed as not in accordance with its intended purpose and thus not complying with the requirements.
The application area for this device lies in industrial processes and controls, in the fields of manufacturing lines for the metal, wood, plastics, paper, glass, textile and other like industries. Over-voltages at the terminals of the device must be kept within the limits of Over-voltage Category II. The device must only be operated when mounted in a panel in the correct way and in accordance with the section "Technical Data".
The device is not suitable for use in hazardous areas and for areas excluded in EN 61010 Part 1. If the device is used to monitor machines or processes in which, in the event of a failure of the device or an error made by the operator, there might be the risk of damaging the machine or causing an accident to the operators, it is your responsibility to take the appropriate safety measures.
The device has been designed for indoor operation. It may nevertheless be used outdoors, provided the technical data is adhered to. In this case, take care to provide suitable UV protection.
2.2 Mounting in a control panel

Mount the device away from heat sources and avoid direct contact with corrosive liquids, hot steam or similar.
Provide a free space of 10mm all around the device for its ventilation.
The device should be mounted so that the terminals are out of the reach of the operator and cannot be touched by him. When mounting the device, consider the fact that only the front side is classified as accessible for the operator.
Mounting instructions
- Remove the mounting clip from the device.
- Insert the device from the front into the panel cut-out, ensuring the front-panel gasket is correctly seated.
- Slide the fixing clip from the rear onto the housing, until the spring clamps are under tension and the upper and lower latching lugs have snapped into place.
Note: In case of proper installation, IP65 can be reached on the front side.
2 . 3 E I e c t r

DANGER
The device must be disconnected from any power supply prior to any installation or maintenance work. Make sure that no more voltages LIABLE TO CAUSE AN ELECTROCUTION are present.
AC-powered devices must only be connected to the low-voltage network via a switch or circuit breaker installed close to the device and marked as their disconnecting device.
Installation or maintenance work must only be carried out by qualified personnel and in compliance with the applicable national and international standards.
Take care to separate all extra-low voltages entering or exiting the device from hazardous electrical conductors by means of a double or reinforced insulation (SELV circuits).

DANGER
The device must be protected externally for its proper operation. Information about the prescribed fuses can be found in the technical information.
The relay outputs are not protected internally in the device. Without suitable protection of the relay outputs, undesired heat development or even fire may occur. The relay outputs must be protected externally by the manufacturer of the plant. It must also be made sure that, even in case of a malfunction, the values stated in the technical data are under no circumstances exceeded.
- During installation, make sure that the supply voltage and the wiring of the output contacts are both fed from the same mains phase, in order not to exceed the maximum permitted voltage of 250V.
- The cables and their insulation must be designed for the planned temperature and voltage ranges. Regarding the type of the cables, adhere to the applicable standards of the country and of the plant. The cross sections allowed for the screw terminals can be found in the technical data.
- Before starting the device, check the cables for proper wiring and tightening. The screws of
i unused screw terminals installed to the stop, so that they cannot loosen and get lost.
- The device has been designed for overvoltage category II. If higher transient voltages cannot be excluded, additional protection measures must be taken in order to limit the overvoltage to the values of CAT II.
Advice on noise immunity
All connections are protected against external sources of interference. The installation location should be chosen so that inductive or capacitive interference does not affect the device or its connecting lines! Interference (e.g. from switch-mode power supplies, motors, clocked controllers or contactors) can be reduced by means of appropriate cable routing and wiring.
Measures to be taken:
Use only shielded cable and control lines. Connect shield at both ends. The conductor cross-section of the cables should be a minimum of 0.14 mm ^2 .
The shield connection to the equipotential bonding should be as short as possible and with a contact area as large as possible (low-impedance).
Only connect the shields to the control panel, if the latter is also earthed.
Install the device as far away as possible from noise-containing cables.
Avoid routing signal or control cables parallel to power lines.
2.4 Cleaning and maintenance
The front side of the unit should only be cleaned using a soft damp (water!) cloth. Cleaning of the embedded rear side is not planned and is the responsibility of the service personnel or of the installer.
In normal operation, this device is maintenance-free. Should the device nevertheless not operate properly, it must be sent back to the manufacturer or to the supplier. Opening and repairing the device by the user is not allowed and can adversely affect the original protection level.
3 Description
6-digit 14-segment LED display, 14 mm Help Text display
Preset counter with two relay outputs Preset entry via the front keys or via the Teach-In function
Step or tracking preset Pulse counter, Frequency meter, Timer or Hour meter
Preset-, Batch- or Total counter Set function for pulse counter and timer
Multiplication and division factor
Averaging and Start Delay for frequency meter Input modes:
Pulse counter: cnt.dir, up.dn, up.up, quad, quad2, quad4, A/B, (A-B)/Ax100%
Frequency meter: A, A - B, A + B, quad, A/B, (A-B)/Ax100%
Timer: FrErun, Auto, InpA.InpB, InpB.InpB
Output operations:
Add, Sub, AddAr, SubAr, AddBat, SubBat, AddTot, SubTot, Trail, TrailAr
4-stage RESET mode
3-stage keypad locking (Lock)
MPI input for Display Latch, Teach-In or Set function
Supply voltage 100 ... 240 V AC ± 10% or 10 .. 30 VDC
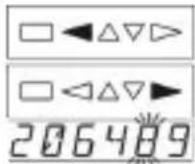
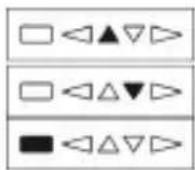
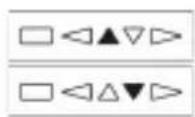
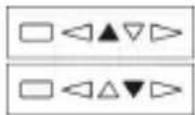
4 Display / Op
text_image
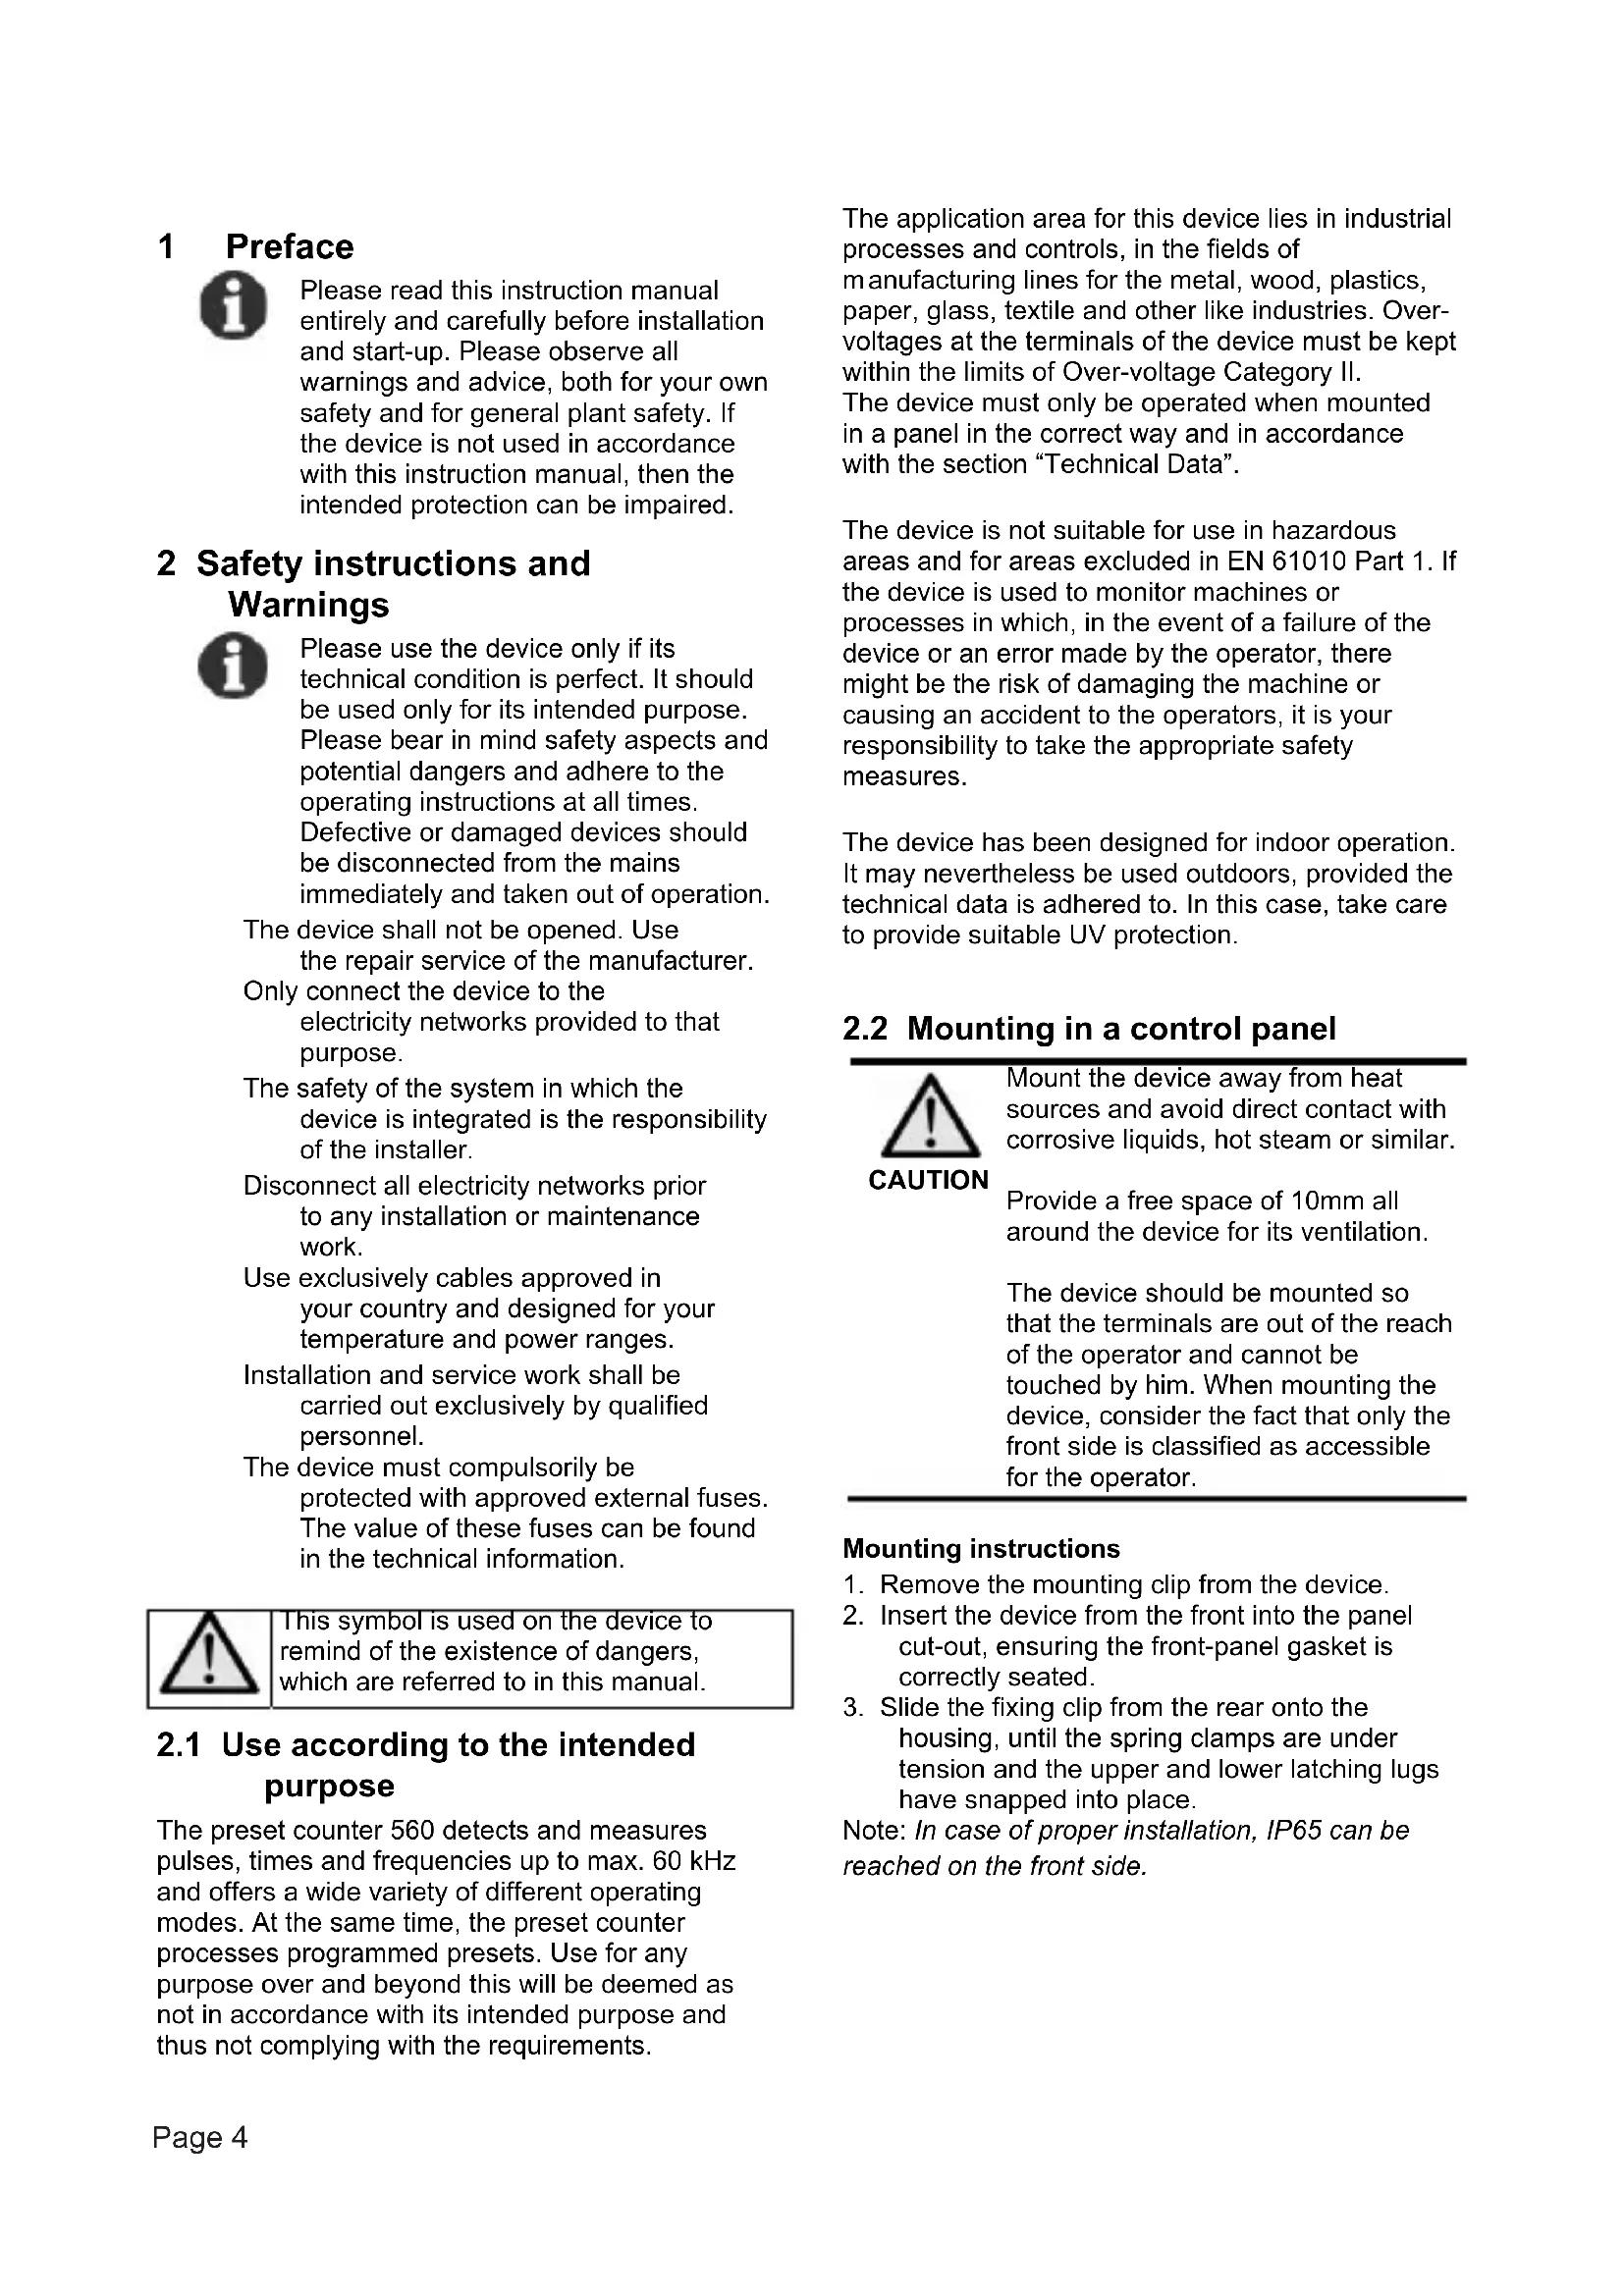
2 1 3 4 5 6 71 6-digit LED display
2 Status display LED1 / LED2
3 RESET key / ENTER key
4 Key LEFT
5 Key UP
6 Key DOWN
7 Key RIGHT
5 Inputs
5.1 INP A, INP B
Signal inputs: function acc to operating mode.
Max. frequency 60 kHz, can be damped in the programming menu to 30 Hz.
Pulse counter: Count inputs
Frequency meter: Frequency inputs
Timer: Start input or
Start/Stop inputs
5.2 RESET
Dynamic reset input: resets the pulse counter or timer to zero ('Add' output operations) or to preset value 2 ('Sub' output operations). The reset input can be inhibited in the programming menu.
Pulse counter: RESET input
Frequency meter: no function
T i m e r :
F
5.3 GATE
Static gate input: function dependent on operating mode.
Pulse counter: no counting while active
Frequency meter: no counting while active
Timer: no time measurement while active
5.4LOC.INP
Static keypad lock input for preset or programming. Lock-out level can be set in the programming menu.
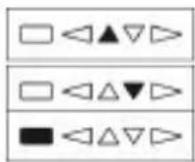
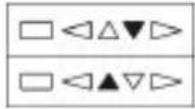
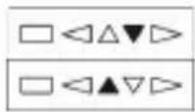
5.5 MPI 1 / MPI 2
User Input. Programmable as Display Latch, Set or Teach-In input.
6 Outputs
6.1 Output 1 / Output 2
Relays with potential-free changeover contacts.
6.2 A c t i v e
LED1 and LED2 indicate an active output.
For safety switching the relays can be inverted, i.e. the relays will be de-energized when the presets are reached. To do this, the parameters Pr.OUT1 and Pr. OUT2 must be set to (for permanent signal) and to or (for timed signal).
7 Programming
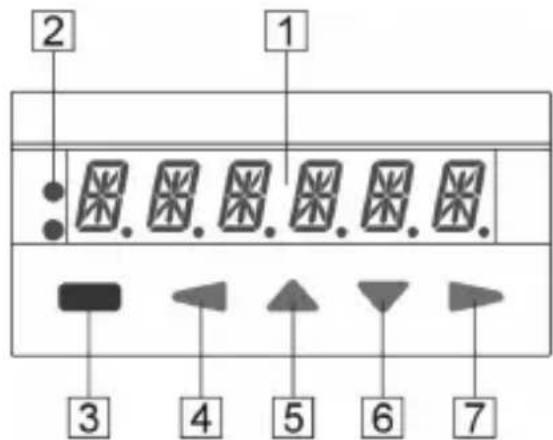
7.1 Enter in
Simultaneously press the UP key and the DOWN key for 3 sec.
The security prompt appears alternately in the display
Programming can be exited again using the ENTER key.
Press the UP key or DOWN key to continue with the programming.

The security prompt YES appears in the display

Enter the main menu by pressing the ENTER key

The first menu item in the main menu appears in the display

When ending the programming via PROG. NO the counter contents are not reset.
7.2 Selecting the main menus
The main menus are selected using the UP and DOWN keys

Indicated by LED1

E n t e r i

Press the ENTER key. The first parameter is displayed with the current setting flashing.

Indicated by LED1 and LED2
7.4 Selecting the parameters
The parameters are selected using either the RIGHT key or the LEFT key.
7.5 Changing parameter values

Press the ENTER key.
Change the parameter value using the UP or DOWN keys.

Press the ENTER key. The new setting is again displayed flashing.
7.6 Setting count values

Press the ENTER key.
Select the decade using the RIGHT key or the LEFT key.

→ the corresponding decade flashes
Change the count value using the UP key or the DOWN key.
Press the ENTER key. The new setting is again displayed flashing.
7.7 Ending the programming

Select the menu item

Pressing the ENTER key acknowledges this prompt and allows the programming to be repeated. The previously-programmed values are preserved. These can now be checked or changed once again.

Pressing the UP key or the DOWN key selects the at-sub-ment he programming.

The security prompt YES appears in the display

Pressing the ENTER key acknowledges this prompt and terminates the programming; the modified settings are saved in the EEPROM.

The text SAVE is shown in the display for 2 sec.

When ending the programme via END.PRG. YES the counter contents are reset.
No count pulses, frequencies or times are detected or measured whilst programming is taking place.
7 . 8 P r o g r a m

Factory settings are highlighted in grey
7.8.1 Select language

Submenu: Select language

Help Text
Help Text ON
Help Text OFF

Select language for Help Text
English
German (Deutsch)

When 'Help Text ON' is selected, a running text in English or German automatically appears after 3 sec. in the display. This provides an explanation of the menu item. Once a running text has started, it can be cancelled by pressing any key.
7.8.2 Setting the Basic Function

Submenu: Basic function

Basic Function
Pulse counter (7.8.3)
Timer/Hour meter (7.8.5)

Tacho/Frequency meter (7.8.4)

Changing the basic function causes all parameters to be reset to factory settings.
7.8.3 Pulse Counter
7.8.3.1 Submenu for the Signal and Control inputs

Submenu for programming the signal and control inputs

Input polarity

PNP: switching to Plus for all inputs in common

NPN: switching to 0 V for all inputs in common

Filter for signal inputs INP A and INP B

Maximum count frequency
Damped to approx. 30 Hz (for control with mechanical contacts)

Count Input mode
(See also under 15.)

Count/Direction control
INP A: count input INP B: count direction input

Differential counting [A - B]
INP A: count input add
INP B: count input sub
![Kübler Codix 560 - Differential counting [A - B] - 1](/content/2026/04/621246/images/19a99fd51b7b46e99bbc67daf5a7d0e63973091f6cdb3e92411c891db09fc464.jpg)
Totalising [A + B]
INP A: count input add INP B: count input add
![Kübler Codix 560 - Totalising [A + B] - 1](/content/2026/04/621246/images/0b89e1c51eba0d3eb359a2047436cb3fe527f682fda4ee78f7a50e88c3b52594.jpg)
Quadrature input
INP A: count input 0° INP B: count input 90°

Quadrature with pulse doubling (x2)
INP A: count input 0° INP B: count input 90° Each pulse edge of INP A will be counted

Quadrature x4
INP A: count input 0° INP B: count input 90° Each pulse edge of INP A and INP B will be counted.

Ratio measurement [A / B]
INP A: count input A INP B: count input B
![Kübler Codix 560 - Ratio measurement [A / B] - 1](/content/2026/04/621246/images/66765962f3d427f3bd0a5b7c7adac3c5aa89082123851b8f9e1606b141a84eb6.jpg)
Percentage differential counting
[(A - B) / A in %] INP A: count input A INP B: count input B
User input 1
User input 2

When the MPI input is activated the display is "frozen" and remains "frozen" until the MPI input is deactivated. Internally the preset counter continues counting.

When the MPI input is activated the current count value for the preset that has just been selected will be adopted as the new preset value. (See also 8.2.2)

When the MPI input is activated the preset counter will be set to the value specified in the parameter SETPT. (See also 8.3)

Lock input

When the Lock input is activated, the programming is inhibited.

When the Lock input is activated, the setting of the preset values is inhibited.
PRGPRE
When the Lock input is activated, the setting of the preset values and the programming are both inhibited.
7.8.3.2 Submenu for Output operations
MODE
Submenu for determining the operation of the outputs
MODE
Output operation
(See also under 18.)
A D D
Count mode ADDING
Outputs active when count status ≥ preset value Reset to zero
SUB
Count mode SUBTRACTING
Output 1 active when count status ≤ preset value 1 Output 2 active when count status ≤ 0 Reset to preset 2
ADAR
Count mode ADDING with automatic reset
Output 1 active when count status ≥ preset value 1 Output 2 (timed signal) active when count status = preset value 2 Automatic reset to zero when count status = preset value 2 Reset to zero
SUBAR
Count mode SUBTRACTING with automatic reset
Output 1 active when count status < preset value 1 Output 2 (timed signal) active when count status = 0 Automatic reset to preset 2 when count status = 0 Reset to preset 2
ADIBRT
Count mode ADDING with automatic reset and Batch counter
Output 2 (timed signal) active when main counter = preset value 2 Automatic reset to zero when main counter = preset 2 Batch counter counts the number of automatic repetitions of preset 2 Output 1 active when Batch counter > preset 1 Manual reset sets both counters to zero.
SUBBAT
Electrical reset sets only the main counter to zero.
Count mode SUBTRACTING with automatic reset and Batch counter
Output 2 (timed signal) active when main counter = zero Automatic reset to preset 2 when main counter = zero Batch counter counts the number of automatic repetitions of preset 2 Output 1 active when Batch counter ≥ preset 1 Manual reset sets main counter to preset value 2, batch counter to zero Electrical reset only sets the main counter to preset value 2
ADITOT
Count mode ADDING with automatic reset and Total counter
Output 2 (timed signal) active when main counter = preset value 2 Automatic reset to zero when main counter = preset value 2 Total counter counts all the count pulses from the main counter Output 1 active when total counter > preset value 1 Manual Reset sets both counters to zero Electrical reset sets only the main counter to zero
SUBTOT
Count mode SUBTRACTING with automatic reset and Total counter
Output 2 (timed signal) active when main counter = zero Automatic reset to preset value 2 when main counter = zero Total counter counts (sub from preset value 1) all count pulses from main counter Output 1 active when Total counter ≤ zero Manual reset sets both counters to the preset values Electrical reset sets only main counter to preset value 2
TRAIL
Tracking Preset mode
When preset 2 is changed then preset 1 automatically tracks it. Reset to zero Preset 1 relative to Preset 2
TRAR
Tracking Preset mode with automatic reset
When preset 2 is changed then preset 1 automatically tracks it. Reset to zero.
Automatic reset to zero when main counter = preset value 2. Preset 1 relative to Preset 2
7.8.3.3 Submenu for configuration
| CONFIG. | Submenu for matching the input pulses to the display. |
| FACTOR010000 | Multiplication factorcan be programmed from 00.0001 to 99.9999 The setting 00.0000 will not be accepted. |
| DIVISO010000 | Division factorcan be programmed from 01.0000 to 99.9999A setting < 01.0000 will not be accepted. |
| DP0 | Decimal point setting(only optical function)0 no decimal place0.0 1 decimal place0.00 2 decimal places0.000 3 decimal places0.0000 4 decimal places0.00000 5 decimal places |
| SETPT000000 | Set valueSet value can be programmed from -999999 to 999999A previously programmed decimal point will be displayed |
7.8.3.4 Submenu for reset mode
| RES.MOD. | Submenu for setting the reset mode |
| RES.MOD.MANEL. | Reset modeManual reset (reset key) and electrical reset (reset input) |
| NORES. | No reset possible(reset key and reset input inhibited) |
| EL.PRES. | Only electrical reset possible(reset input) |
| MAN.PRES. | Only manual reset possible(reset key) |

Electrical Reset:
Always resets only the main counter.
Manual Reset:
Resets the main counter (ACTUAL) and auxiliary counters (BATCH or TOTAL), if the value of the main counter or the value of an auxiliary counters is shown on the display.
7.8.3.5 Preset 1
see below 7.9.5.5
7.8.3.6 Preset 2
see below 7.9.5.6
7.8.4.1 Submenu for the Signal and
| C | o | n | t | r | o |
| INPUT | Submenu for programming the signal and control inputs | ||||
| INPPOL | Input polarity | ||||
| PNP | PNP: switching to Plus for all inputs in common | ||||
| NPN | NPN: switching to 0 V for all inputs in common | ||||
| FILTER | Filter for signal inputs INP A and INP B | ||||
| OFF | maximum count frequency | ||||
| ON | Damped to approx. 30 Hz (for control with mechanical contacts) | ||||
| TAC.INP | Input mode Frequency measurement (see also under 17.) | ||||
| A | Simple frequency measurement | ||||
| INP A: Frequency input | |||||
| INP B: no function | |||||
| A-B | Differential measurement [A-B] | ||||
| INP A: Frequency input A | |||||
| INP B: Frequency input B | |||||
| A+B | Total measurement [A+B] | ||||
| INP A: Frequency input A | |||||
| INP B: Frequency input B | |||||
| QUAD | Frequency measurement with direction detection [Quad] | ||||
| INP A: Frequency input 0° | |||||
| INP B: Frequency input 90° | |||||
| A/B | Ratio measurement [A/B] | ||||
| INP A: Frequency input AINP B: Frequency input B | |
| A0/0B | Percentage differential measurement [(A-B) / A in %]INP A: Frequency input AINP B: Frequency input B |
| MP.INP.1 | User input 1 |
| MP.INP.2 | User input 2 |
| LATCH | When the MPI input is activated the display is “frozen” and remains “frozen” until the MPI input is deactivated.Internally the frequency meter continues running(Display store). |
| TEACH | When the MPI input is activated the current frequency for the preset that has just been selected will be adopted as the new preset value.(See also 8.2.2) |
| LOC.INP. | Lock input |
| PROG. | When the Lock input is activated the programming is inhibited |
| PRESET | When the Lock input is activated the setting of the preset values inhibited. |
| PRG.PRE. | When the Lock input is activated the setting of the preset values and the programming are both inhibited |
7.8.4.2 Submenu for configuration
| CONFIG. | Submenu for matching the input pulses to the display. |
| FACTOR010000 | Multiplication factorcan be programmed from 00.0001 to 99.9999 .The setting 00.0000 will not be accepted |
| DIVISO010000 | Division factorcan be programmed from 01.0000 to 99.9999A setting < 01.0000 will not be accepted. |
| T.MODESEC-1 | Display modeCalculation and display of the frequency / speed in 1/sec |
| MIN-1 | Calculation and display of the frequency / speed in 1/min |
| DP | |
| B | |
| Decimal point setting(determines the resolution) | |
| 0 | no decimal place |
| 0.0 | 1 decimal place |
| 0.00 | 2 decimal places |
| 0.000 | 3 decimal places |
| RVG | Moving average |
| OFF | Moving average calculatedAVG 2 over 2 measurementsAVG 5 over 5 measurementsAVG 10 over 10 measurementsAVG 20 over 20 measurements |
| START | Start delay |
| 00.0 | Programmable from 00.0 up to 99.9 sec.At the start of a measurement the measurement results within this time-period are ignored. |
| WAIT 00.1 | Waiting timeProgrammable from 00.1 up to 99.9 sec.This value specifies how much time should elapse, after the last valid edge, before zero is to be displayed. |
| 7.8.4.3 Preset 1 |
| See below 7.9.5.5 |
| 7.8.4.4 Preset 2 |
| See below 7.9.5.6 |
7.8.5 Timer
7.8.5.1 Submenu for the Signal and Control inputs
| INPUT | Submenu for programming the signal and control inputs |
| INPPOL | Input polarity |
| PNP | PNP: switching to Plus for all inputs in common |
| NPN | NPN: switching to 0 V for all inputs in common |
| FILTER | Filter for signal inputs INP A and INP B |
| OFF | for electronic control of the signal inputs |
| ON | for mechanical control of the signal inputs (for control with mechanical contacts) |
START
INRINB
INBING
FRE.PUN
AUTO
Input mode Time measurement (see also under 16.)
Start: Edge to INP A Stop: Edge to INP B
Start: 1. Edge to INP B
Stop: 2. Edge to INP B
Timing can only be controlled via the Gate input. INP A and INP B have no function.
The timer is reset by means of a RESET (to zero when adding, to preset 2 when subtracting) and then starts timing again. Timing is stopped with adding operations when preset 2 is reached. Timing is stopped with subtracting operations when zero is reached. A RESET during the timing process also causes this to stop. INP A and INP B: no function.

With AUTO: no output operations with automatic repeat.
MP.INP.1 MP.INP.2
LATCH
TEACH
SET
LOC.INP
PROG.
PRESET
PRG.PRE.
User input 1
User input 2
When the MPI input is activated the display is "frozen" and remains "frozen" until the MPI input is deactivated. Internally the preset timer continues counting.
When the MPI input is activated the current count value for the preset that has just been selected will be adopted as the new preset value. (See also under 8.2.2)
When the MPI input is activated the preset counter will be set to the value specified in the parameter SETPT. (See also under 8.3)
Lock input
When the Lock input is activated the programming is inhibited
When the Lock input is activated the setting of the preset values is inhibited.
When the Lock input is activated the setting of the preset values and the programming is both inhibited.
7.8.5.2 Submenu for output operations
MODE
Submenu for determining the operation of the outputs
MODE
Output operation (See also under 18.)
A D D
Count mode ADDING
Outputs active when count status
preset value Reset to zero
SUB
Count mode SUBTRACTING
Output 1 active when count status ≤ preset value 1 Output 2 active when count status ≤ 0 Reset to preset 2
ADJAR
Count mode ADDING with automatic reset
Output 1 active when count status > preset value 1 Output 2 (timed signal) active when count status = preset value 2
Automatic reset to zero when count status = preset value 2 Reset to zero
SUBAR
Count mode SUBTRACTING with automatic reset
Output 1 active when count status ≤ preset value 1 Output 2 (timed signal) active when count status = 0 Automatic reset to preset 2 when count status = 0 Reset to preset 2
ADUBAT
Count mode ADDING with automatic reset and Batch counter
Output 2 (timed signal) active when main counter = preset value 2 Automatic reset to zero when main counter = preset 2 Batch counter counts the number of automatic repetitions of preset 2 Output 1 active when Batch counter >_preset 1 Manual reset sets both counters to zero. Electrical reset sets only the main counter to zero.
SUBBAT
Count mode SUBTRACTING with automatic reset and Batch counter
Output 2 (timed signal) active when main counter = zero Automatic reset to preset 2 when
main counter = zero
Batch counter counts the number of automatic repetitions of preset 2
Output 1 active when batch counter ≥ Preset 1
Manual reset sets main counter to preset value 2 and batch counter to zero
Electronic reset only sets the main counter to preset value 2

Count mode ADDING with automatic reset and Total counter
Output 2 (timed signal) active when main counter = preset value 2
Automatic reset to zero when main counter = preset value 2
Total counter counts all the count pulses from the main counter Output 1 active when total counter > preset value 1
Manual Reset sets both counters to zero
Electrical reset sets only the main counter to zero

Count mode SUBTRACTING with automatic reset and Total counter
Output 2 (timed signal) active when main counter = zero
Automatic reset to preset value 2 when main counter = zero
Total counter counts (sub from preset value 1) all count pulses from main counter
Output 1 active when Total counter < zero
Manual reset sets both counters to the preset values
Electrical reset sets only main counter to preset value 2

Tracking Preset mode
When preset 2 is changed then preset 1 automatically tracks it.
Reset to zero
Preset 1 relative to Preset 2

Tracking Preset mode with automatic reset
When preset 2 is changed then preset 1 automatically tracks it.
Reset to zero.
Automatic reset to zero when
main counter = preset value 2.
Preset 1 relative to Preset 2
7.8.5.3 Submenu for configuration

Submenu for matching the input pulses to the display.

Unit of time
Seconds
Decimal point setting determines the resolution

Minutes
Decimal point setting determines the resolution

Hours
Decimal point setting determines the resolution

Hrs. Min. Sec.

Decimal point setting
(determines the resolution)
0 no decimal place
0.0 1 decimal place
0.00 2 decimal places
0.000 3 decimal places

Set value
Set value can be programmed from 000000 to 999999
A previously programmed
decimal point will be displayed
7.8.5.4 Submenu for reset mode

Submenu for setting the reset mode

Reset mode
Manual reset (reset key) and electrical reset (reset input)

No reset possible (reset key and reset input inhibited)

Only manual reset possible (reset key)

Only manual reset possible (reset key)

Electrical Reset:
Always resets only the main counter.
Manual Reset:
Resets the main counter (ACTUAL) and auxiliary counters (BATCH or TOTAL), if the value of the main counter or the value of an auxiliary counters is shown on the display.
7.8.5.5 Submenu for Preset 1

Submenu Preset 1

Preset 1 ON/OFF
Preset 1 ON
Preset 1 OFF and no function

Output signal
ADD mode output operations: permanent signal at Output 1, becomes active when count ≥ Preset 1
SUB mode output operations: permanent signal at Output 1, becomes active when count ≤ Preset 1

ADD mode output operations: permanent signal at Output 1, becomes passive when count ≥ Preset 1
SUB mode output operations: permanent signal at Output 1, becomes passive when count ≤ Preset 1

ADD mode output operations: timed signal at Output 1, becomes active when count ≥ Preset 1. (Activation only in positive direction)
SUB mode output operations: timed output at Output 1, becomes active when count ≤ Preset 1 (Activation only in negative direction)

ADD mode output operations: timed signal at Output 1, becomes passive when count > Preset 1. (Deactivation only in positive direction)
SUB mode output operations: timed output at Output 1, becomes passive when count < Preset 1. (Deactivation only in negative direction)

ADD mode output operations: timed signal at Output1, becomes active with positive direction and when count > Preset 1 and subsequently active with negative direction and when count < Preset 1
SUB mode output operations: timed signal at Output 1, becomes active with negative direction and when count < Preset 1 and subsequently active

with positive direction and when count >_Preset 1
ADD mode output operations: timed signal at Output1, becomes passive with positive direction and when count > Preset 1 and subsequently passive with negative direction and when count < Preset 1 SUB mode output operations: timed output at Output 1, becomes passive with negative direction and when count < Preset 1 and subsequently passive with positive direction and when count > Preset 1

Duration of timed signal of Output 1
programmable from 00.01 to 99.99 sec. Timed signal is post-triggered

7.8.5.6 Submenu for Preset 2

Output signal
ADD mode output operations: permanent signal at Output 2, becomes active when count >_ Preset 2
SUB mode output operations: permanent signal at Output 2, becomes active when count < zero

ADD mode output operations: permanent signal at Output 2, becomes passive when count > Preset 2
SUB mode output operations: permanent signal at Output 2, becomes passive when count ≤ zero

ADD mode output operations: timed signal at Output 2, becomes active when count > Preset 2 (Activation only in positive direction).
SUB mode output operations: timed signal at Output 2, becomes active when count < zero (Activation only in negative direction)

ADD mode output operations: timed signal at Output 2, becomes passive when count > Preset 2 (Deactivation only in positive direction)
SUB mode output operations: timed signal at Output 2,

becomes passive when count ≤ zero (Deactivation only in negative direction).
ADD mode output operations: timed signal at Output 2, becomes active with positive direction and when count ≥ Preset 2 and subsequently with negative direction and when count < Preset 2
SUB mode output operations: timed signal at Output 2, becomes active with negative direction and when count ≤ zero and subsequently with positive direction and when count ≥ zero

ADD mode output operations: timed signal at Output 2, becomes passive with positive direction and when count ≥ Preset 2 and subsequently with negative direction and when count ≤ Preset 2
SUB mode output operations: timed signal at Output 2, becomes passive with negative direction and when count < zero and subsequently with positive direction and when count > zero

Duration of timed signal of Output 2

programmable from 00.01 to 99.99 sec.
Timed signal is post-triggered

Active:
Relays are activated when the preset value is reached.
Passive:
Relays becomes de-energized when the preset value is reached.
Timed outputs that have started are not aborted by a RESET.
8 Operation
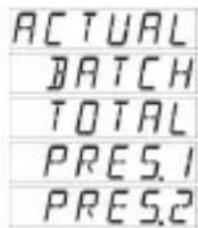
8.1 Switching the display during operation
t = 2 sec
Pressing the DOWN key or the UP key once causes the name of the currently selected display function to be displayed for 2 sec. If within this time the DOWN key or the UP key is pressed a second time, then the display switches to the next or previous display function. This is confirmed by displaying the new name for a period of 2 sec. After 2 sec the count value that corresponds to the selected display function is displayed.
Main counter
Batch counter
Total counter
Preset 1
Preset 2
text_image
ACTUAL BATCH TOTAL PRES.1 PRES.28.2 Setting the presets
8.2.1 Setting via front keys
Using the UP key or the DOWN key, select the preset to be changed, either PRES1 or PRES2 (see 8.1).
Select the decade using the RIGHT key or the LEFT key.
→ the corresponding decade flashes
Set the count value using the UP key or the DOWN key.
The new setting is accepted either by pressing the ENTER key or after a period of 2 sec.

Preset setting is inhibited if the lock function for the presets is active (Parameter LOC.INP set to PRESET or PRG.PRE and keypad lock input LOCK active).
8.2.2 Teach Function
- In the programming menu, programme MPI input 1 or MPI input 2 (MP.INP.1 / MP.INP.2) to TEACH
- In operating mode, select the preset to be changed: PRES1 or PRES2
- In operating mode, briefly activate MPI input 1 or MPI input 2 (NPN or PNP input logic)
⇒ the current count value will be adopted as the new preset value

See also 9. Error messages.
The preset value can subsequently be further modified via the keypad. If preset entry is inhibited (see note 8.2.1), then the Teach Function is also locked out.
8.2.3 Teach-In with tracking presets
If a tracking (trailing) preset (TRAIL or TR.AR) has been programmed, the value for Preset 2 can be set either via the keypad or via the Teach-In function.
However the value for Preset 1 must be entered via the keypad. In this instance, it is not possible to use the Teach-In function.

With output operations ADD.BAT, SUB.BAT, ADD.TOT, SUB.TOT, TRAIL and TR.AR, the Teach-In function is not available for Preset 1.
8.3 Set Function
The pulse counter and the timer can be set to a value by means of the Set function.
- In the programming menu, programme MPI Input 1 or MPI Input 2 (MP.INP1 / MP.INP2) to SET
- In the programming menu, set the parameter SETPT to the desired value
- In operating mode, briefly activate MPI input 1 or MPI input 2 (NPN or PNP input logic)
⇒ For add. output operations the pulse counter or timer will be set to the SETPT value
⇒ For sub. output operations the pulse counter or timer will be set to the difference between the value of Preset 2 and the value of SETPT

See also 9. Error messages
8.4 Default Parameters

Note: Three default parameter sets have been permanently stored; these can be adapted as required. With each acknowledgment of the parameter sets, all parameters will be reset to the values listed in the table.
8.4.1 Entry into the default setting

Simultaneously press the UP key and the DOWN key for 3 sec.

The security prompt appears in the display

Programming can be exited again using the ENTER key.
Press the UP key or the DOWN key to continue with the programming.

The security prompt YES appears in the display

Enter the default menu by pressing the ENTER key

The parameter set last programmed appears in the display
8.4.2 Selecting the parameter sets
The parameter sets are selected using the UP key and the DOWN key.
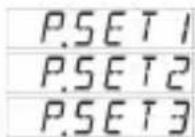
Default parameter set 1
Default parameter set 2
Default parameter set 3
8.4.3 Accepting the setting

Pressing the ENTER key accepts the current setting and returns to the operating mode.

The text SAVE is shown in the display for 2 sec.
8.4.4 Parameter Set Table
| P . | S E T | 1 | P . S |
| HLP.TXT. ON | ON | ON | |
| SL.LANG. | E | N | E |
| FUNCT C O | U N | T C | O U N |
| INP.POL. P | N | P | P N |
| FILTER ON | OFF | OFF | |
| COUNT C N | T . D I | R U P | . D N |
| MP.INP.1 L | A T C H | L ATC | |
| MP.INP.2 | TEACH | SET | TEACH |
| LOC.INP. | PROG | PROG | PROG |
| MODE | ADD | SUB | TRAIL |
| FACTOR | 01.0000 | 01.0000 | 01.0000 |
| DIVISO. | 01.0000 | 01.0000 | 01.0000 |
| DP | 0 | 0 | 0.00 |
| SETPT. | 000000 | 000000 | 0000.00 |
| RES.MOD. | MAN.EL | MAN.EL | MAN.EL |
| PRES.1 | ON | ON | ON |
| PR.OUT1 |  |  |  |
| T.OUT1 | 00.10 | ||
| PR.OUT2 | |||
| T.OUT2 | 00.10 | 00.10 | |
9 Error Message
| Err 1 Set value ≤ 0 not allowed | |
| Err 2 | Set value ≥ Preset 2 not allowed |
| Err 3 | negative Teach-In value for Preset 1 not permitted |
| Err 4 Zero or negative Teach-In value for Preset 2 not permitted | |
| Err 45 | EEPROM error |
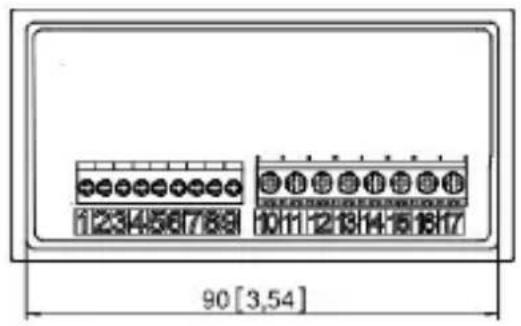
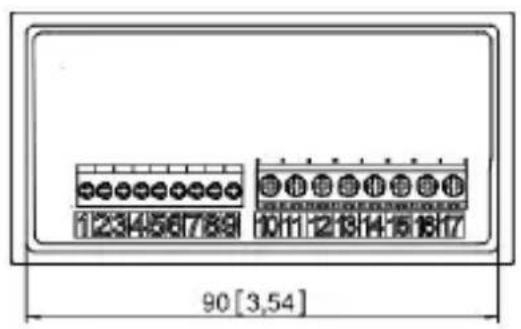
10 Connections
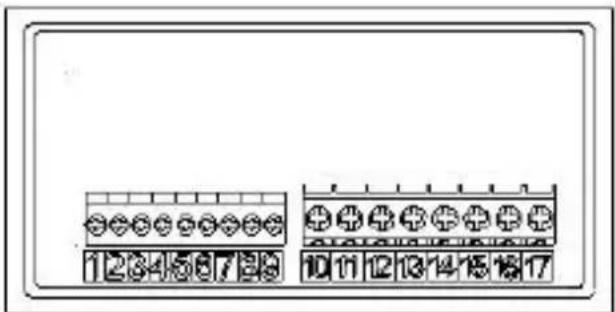
text_image
123456789 10 11 12 13 14 15 16 1710.1 Signal and Control Inputs
| E | N° | Designation | S | E | Function |
| 1 | INP A | Signal input A | |||
| 2 | INP B | E | N | Signal input B | |
| 3 | RESET | U | N | T | |
| 4 | LOCK | P | N | Keypad lock | |
| 5 | GATE | Gate input | |||
| 6 U | MPI D | User input 1 | |||
| 7 | MPI 2 E | T | User input 2 | ||
| 8 | AC: 24 VDC/80 mA | Sensor supply voltage | |||
| DC: UB connected through | |||||
| 9 | GND (0 VDC) | Common connection Signal and Control inputs | |||
| N° | Designation. S E | Function |
| 1 | INP A | Signal input A |
| 2 | INP B E N | Signal input B |
| 3 | RESET U N T | Reset input |
| # | LOCK P N | Keypad lock |
| 5 | GATE | Gate input |
| 6U | MPI D | User input 1 |
| 7 | MPI 2 E T | User input 2 |
| 8 | AC: 24 VDC/80 mA DC: UB connected through | Sensor supply voltage |
| 9 | GND (0 VDC) | Common connection Signal and Control inputs |
10.2 Supply Voltage and Outputs
| N° | Designation | Function |
| 10 | Relay contact C.2 | Output 2 |
| 11 | Relay contact N.O.2 | |
| 12 | Relay contact N.C.2 | |
| 13 | Relay contact C.1 | Output 1 |
| 14 | Relay contact N.O.1 | |
| 15 | Relay contact N.C.1 | |
| 16 | AC: 100...240 V AC ± 10% N~DC: 10..30 VDC | Supply voltage |
| 17 | AC: 100...240 V AC ± 10% L~DC: GND (0 VDC) | Supply voltage |
11 Technical Data
11.1 General Data
| Display | 6-digit, 14-segment LED |
| Digit height | 14 mm |
| Overload/ | Blinking, 1 sec., counter loses |
| Underload | no pulses up to 1 decade |
| Data retention | >10 years, EEPROM |
| Operation | 5 keys |
11.2 Pulse Counter
Count frequency max. 55 kHz (see under 14. Frequencies - typical)
| Response time of the outputs: | |
| Add;Sub;Trail | < 13 ms |
| With automatic repeat | < 13 ms |
| A/B ; (A-B)/A | < 34 ms |
1 1 . 3 T a c h o / F r e1 q1 u. e7 n 6 y p M p d y e Voltage
Frequency range 0.01 Hz to 65 kHz (see under 14. Frequencies typ.
Measuring principle ≤ 76.3 Hz Time interval
(Period measurement)
76.3 Hz Gate time
Gate time approx. 13.1 ms
Measuring error < 0.1% per channel
Response time of the outputs:
1-channel operation < 100 ms @ 40 kHz < 350 ms @ 65 kHz
2-channel operation < 150 ms @ 40 kHz < 600 ms @ 65 kHz
1 1 . 4 Timer
Seconds 0.001 sec ... 999 999 sec
Minutes 0.001 min ... 999 999 min
Min. time measurable 500μs
Measuring error < 100 ppm
Output response time: < 13 ms
11.5 Signal and Control Inputs
SELV circuits, reinforced / double insulation
Polarity: programmable NPN/PNP for all inputs in common
Input resistance 5 kΩ
Pulse shape any
Switching level with AC supply:
HTL level Low: 0 ... 4 VDC High: 12 ... 30 VDC
4...30 V DC level Low: 0 ... 2VDC High: 3.5 ... 30 VDC
Switching level with DC supply:
HTL level Low: 0 ... 0,2 x UB High: 0.6 x UB ... 30 VDC
4...30 V DC level Low: 0 ... 2 VDC High: 3.5 ... 30 VDC
Minimum pulse length of the Reset input: 1 ms
Minimum pulse length of the Control inputs:10 ms
1 1 . 6 Outputs
Output 1 / Output 2
Relays with changeover contacts
Prescribed fuse: 3A
Switching voltage max. 250 VAC/150 VDC
Switching current max. 3 A AC/ DC min. 30 mA DC
Switching capacity max. 750 VA/ 90 W

The maximum values shall in no case be exceeded!
Mechanical service life (switching cycles) 20 × 10^6
N° of switching cycles at 3 A/250 V AC 5x10 ^4
N° of switching cycles at 3 A/ 30 V DC 5x10 ^4
AC supply: 100 ... 240 V AC / max. 11 VA
50/60 Hz, Tolerance ± 10%
ext. fuse protection: T 0.1 A
DC supply: 10 ... 30 V DC/ max. 5.5 W
reverse polarity protection, SELV, CLASS II (Limited Power Source)
ext. fuse protection T 0.25 A
11.8 Sensor Supply Voltage
(Voltage output for external sensors)
SELV circuits, reinforced / double insulation
for AC supply: 24 V DC ±15%, 80 mA
for DC supply: max. 80 mA, ext. voltage supply is connected through
1 1 . 9 C l i m a t i c C Operating temperature: -20°C. +63°C ^1 s e c ...
Storage temperature: -25^ . +75^
Relative humidity: R.H. 93% at +40°C,
N o n - c
Altitude: up to 2000 m
11.10 EMC
Noise immunity: EN 61000-6-2
with shielded signal and control cables
Noise emission: EN 55011 Class B
11.11 Device Safety
Design to: EN 61010 Part 1
Protection Class: Protection Class 2 (front side)

Only the front side is classified as accessible for the operator.
Application area: Pollution level 2
over-voltage Category II
Insulation: Front: double insulation,
Rear side: basic insulation,
Signal inputs and und sensor power supply: SELV
11.12 Mechanical Data
Housing: Panel-mount housing to DIN 43 700, RAL 7021
Dimensions: 96 x 48 x 102 mm
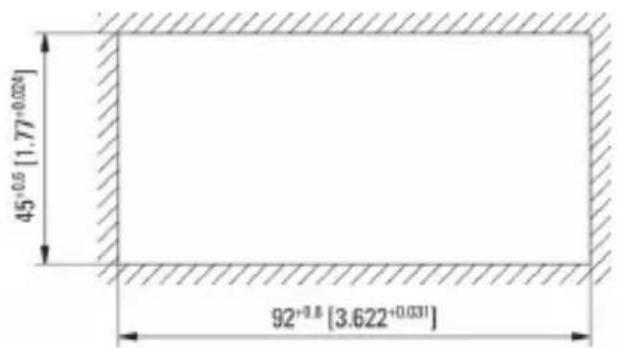
Panel cut-out: 92 +0,8 x 45 +0,6 mm
Installation depth: ca. 92 mm incl. terminals
Weight: ca. 180 g
Protection: IP 65 (front, device only)
Housing material: Polycarbonate UL94 V-2
Vibration resistance: 10 - 55 Hz / 1 mm / XYZ
EN 60068-2-6 30 min. in each direction
Shock resistance:
EN 60068-2-27 100G / XYZ
3 times in each direction
EN 60068-2-29 10G / 6 ms/ XYZ
2000 times in each direction
11.13 Connections
Supply voltage and outputs:
Plug-in screw terminal, 8-pin, RM5.00
Core cross - section, max. 2.5 mm ^4
Signal and control inputs:
Plug-in screw terminal, 9-pin, RM 3.50
Core cross - section, max. 1.5 mm ^4
12 Scope of Delivery
Preset counter
Mounting clip
Instruction manual
13 Ordering Codes
6.560.X1X.XX0
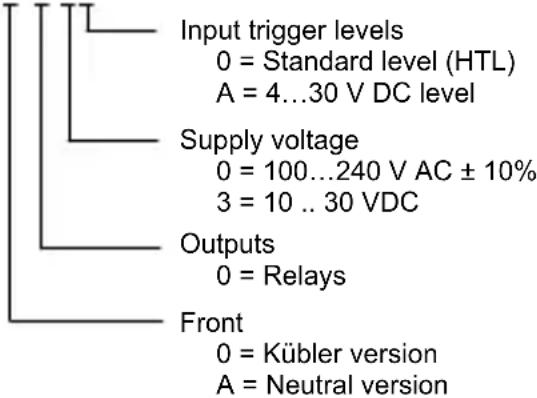
text_image
Input trigger levels 0 = Standard level (HTL) A = 4...30 V DC level Supply voltage 0 = 100...240 V AC ± 10% 3 = 10 .. 30 VDC Outputs 0 = Relays Front 0 = Kübler version A = Neutral version14 Frequencies (typical)
NOTE: Switching levels of the inputs
Switching levels with AC supply:
HTL level Low: 0 .. 4 VDC
High: 12.30 VDC
4...30 V DC level Low: 0 .. 2VDC
H i g h :
Switching levels with DC supply:
HTL level Low: 0 .. 0.2 x UB
High: 0.6 x UB .. 30 VDC
4...30 V DC level Low: 0 .. 2 VDC
High: 3.5 .. 30 VDC
14.1 Pulse Counter
HTL level, signal shape square wave 1:1
AC supply typ. Low 2.5 V
t y p .
DC supply 12V typ. Low 2 V
t y p .
DC supply 24V typ. Low 2.5 V
t y p .
| Add Sub Trail | AddAr SubAr AddBat SubBat TrailAr | AddTot SubTot | |
| Cnt.Dir | 55 kHz | 2.6 kHz | 2.5 kHz |
| Up.Dn ; Up.Up | 29 kHz | 2.6 kHz | 2.5 kHz |
| Quad ; Quad 2 | 28 kHz | 1.2 kHz | 1.1 kHz |
| Quad 4 | 18 kHz | 1.1 kHz | 0.8 kHz |
| A/B ; (A-B)/A | 29 kHz | ||
4...30 V DC level, signal shape square wave 1:1
typ. Low 1.0 V
typ. High 4.0 V
| Add Sub Trail | AddAr SubAr AddBat SubBat TrailAr | AddTot SubTot | |
| Cnt.Dir | 9 kHz | 2.5 kHz | 2.2 kHz |
| Up.Dn ; Up.Up | 9 kHz | 2.5 kHz | 2.2 kHz |
| Quad ; Quad 2 | 9 kHz | 1.1 kHz | 1.1 kHz |
| Quad 4 | 9 kHz | 1.1 kHz | 0.9 kHz |
| A/B ; (A-B)/A | 9 kHz | ||
1 4 . 2 F r e q u e n c y
HTL level, signal shape square wave 1:1
AC supply typ. Low 2.5 V
DC supply 12V t y p . typ. Low 2 V
DC sapply 24V 5 typ. Low t y p . 235 V 0 VDC t y p .
4...30 V DC level, signal shape square wave 1:1
| HTL | 5V | |
| A | 65 kHz | 9 kHz |
| A - B; A + B | g 65 kHz | 2 9 kHz 2 |
| A / B; (A-B)/A | ||
| Quad i | g 30 kHz | 1 9 kHz 0 |
H i g h 2 2
15 Input modes: Pulse counting
| Function DiagramNote: No counting when GATE input is activeP = Preset | PNP: Count on rising edgeNPN: Count on falling edge | |
CNT.DIR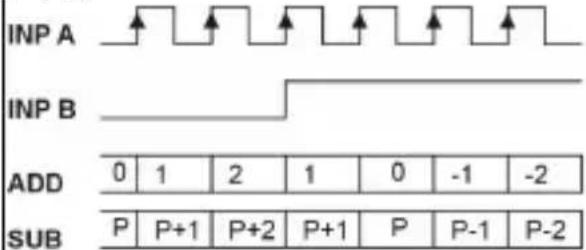 | Inp A: Count inputInp B: Count directionAdd: Display 0 --> PresetSub: Display Preset -> 0 | |
UP.DN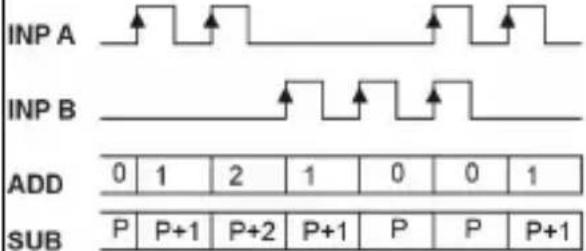 | Inp A: Count input addInp B: Count input subAdd: Display 0 --> PresetSub: Display Preset -> 0 | |
UP.UP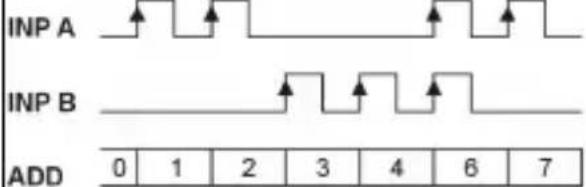 | Inp A: Count input 1 addInp B: Count input 2 addAdd: Display 0 --> Preset | |
QUAD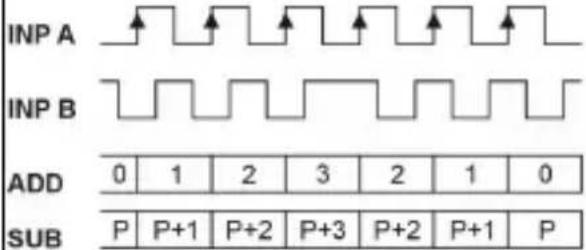 | A 90° BInp A: Count inputCount on one edgeInp B: Reverse directionAdd: Display 0 --> PresetSub: Display Preset -> 0 | |
QUAD2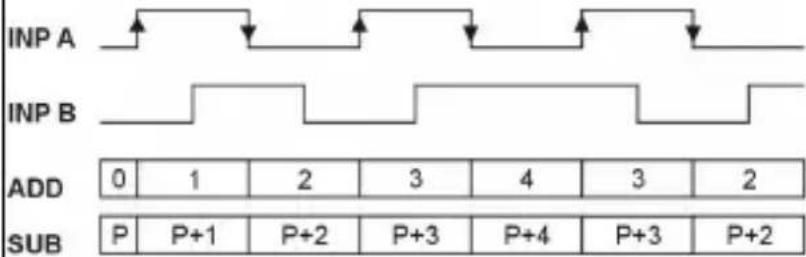 | A 90° BInp A: Count inputCount on rising and on falling edgesInp B: Reverse directionAdd: Display 0 --> PresetSub: Display Preset -> 0 | |
| Function | DiagramNote: No counting when GATE input is active | PNP: Count on rising edgeNPN: Count on falling edge | |||||||
| QUAD4 |  | A 90° Bnp A: Count inputCount on rising and onfalling edgesnp B: Count inputCount on rising and onfalling edges, ReversedirectionAdd: Display 0 --> PresetSub: Display Preset -> 0 | |||||||
| ADD |  | ||||||||
| SUB | |||||||||
| A / B | INP A |  | np A: Count input 1np B: Count input 2Formula:A / B | ||||||
| Counts A | 0 | 1 | 1 | 1 | 2 | 3 | 4 | ||
| INP B |  | ||||||||
| Counts B | 0 | 1 | 2 | 3 | 3 | 4 | 4 | ||
| Display |  | ||||||||
| A % B | INP A |  | np A: Count input 1np B: Count input 2Formula:(A-B)/A x100 | ||||||
| Counts A | 0 | 1 | 1 | 1 | 2 | 3 | 4 | ||
| INP B |  | ||||||||
| Counts B | 0 | 1 | 2 | 3 | 3 | 4 | 4 | ||
| Display |  | ||||||||
16 Input modes: Timing
| Function Diagram | PNP: Count on rising edgeNPN: Count on falling edge | |
| INA.INB | INPA 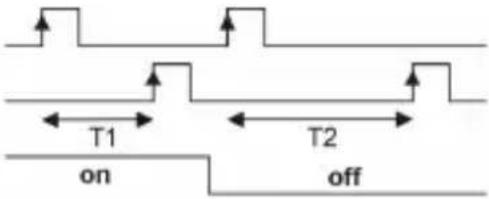 INPB GATE INPB GATE  | Inp A: StartInp B: StopAdd: Display 0 --> PresetSub: Display Preset -> 0 |
| INB.INB | INPB 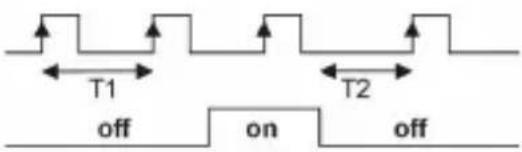 GATE GATE 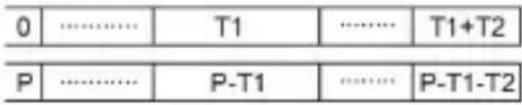 | Inp A: no functionInp B: Start/StopAdd: Display 0 --> PresetSub: Display Preset -> 0 |
| FREE.RN | GATE 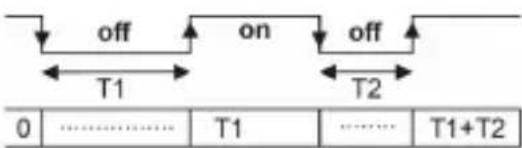 ADD ADD  | Inp A: no functionInp B: no functionControl of the timing only via the GATE inputAdd: Display 0 --> PresetSub: Display Preset -> 0 |
| AUTO | GATERESET  PRESE PRESE 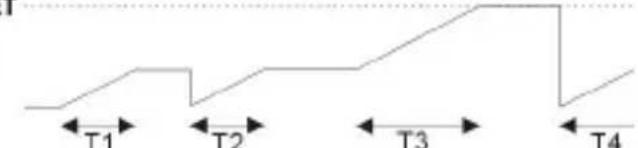 ADD 0 0 ... T1 0 ... T2 ... T2+T3 0 ...SUB P P ... P-T1 P ... P-T2 ... P-T2-T3 P ... ADD 0 0 ... T1 0 ... T2 ... T2+T3 0 ...SUB P P ... P-T1 P ... P-T2 ... P-T2-T3 P ... | Inp A: no functionInp B: no functionControl of the timing via RESET (manual or electrical)Add: Display 0 --> PresetSub: Display Preset -> 0 |
17 Input modes: Frequency meter
| Function Diagram | PNP: Count on rising edgeNPN: Count on falling edge | |||||||
| A | INPA | 0 | F_A0 | F_A1 | F_A2 | 0 | x | Inp A: Frequency inputInp B: no function |
| Display | 0 | 0 | F_A0 | F_A1 | F_A2 | 0 | ||
| A-B | INPA | 0 | F_A0 | F_A1 | F_A2 | 0 | x | Inp A: Frequency input 1Inp B: Frequency input 2Formula:A - B |
| INPB | 0 | 0 | F_B0 | F_B1 | F_B2 | x | ||
| Display | 0 | 0 | F_A0 | F_A0-F_B0 | F_A1-F_B1 | - F_B2 | ||
| A+B | INPA | 0 | F_A0 | F_A1 | F_A2 | 0 | x | Inp A: Frequency input 1Inp B: Frequency input 2Formula:A + B |
| INPB | 0 | 0 | F_B0 | F_B1 | F_B2 | x | ||
| Display | 0 | 0 | F_A0 | F_A0+F_B0 | F_A1+F_B1 | F_B2 | ||
| QUAD | Inp A | 0 | 0 | F_A0 | F_A1 | F_A2 | 0 | A 90° BInp A: Frequency input 1Inp B: Reverse direction |
| Inp B | 0 | 0 | f_A0 | f_A1 | f_A2 | f_A3 | ||
| Display | 0 | 0 | F_A0 | F_A1 | F_A2 | - F_A3 | ||
| A/B | INPA | 0 | F_A0 | F_A1 | 0 | 0 | x | Inp A: Frequency input 1Inp B: Frequency input 2Formula:A / B |
| INPB | 0 | 0 | F_B0 | F_B1 | F_B2 | x | ||
| Display | 0 | 0 | 0 | F_A0/F_B0 | F_A1/F_B1 | 0 | ||
| A% B | INPA | 0 | F_A0 | F_A1 | 0 | 0 | x | Inp A: Frequency input 1Inp B: Frequency input 2Formula:(A-B)/A x100 |
| INPB | 0 | 0 | F_B0 | F_B1 | F_B2 | x | ||
| Display | 0 | 0 | 100% | F_A0 % F_B0 | F_A1 % F_B1 | 0 | ||
18 Output operations
| Mode | e Di a g r a | m | Mode D i |
 |  | ||
| ADD | 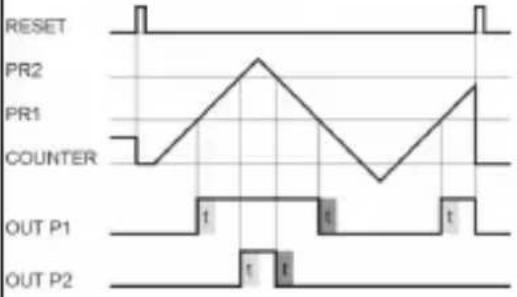 | SUB | 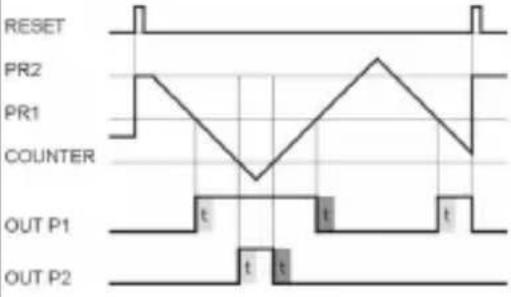 |
| ADD.AR | 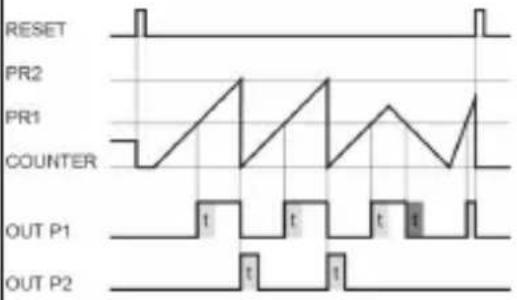 | SUB.AR | 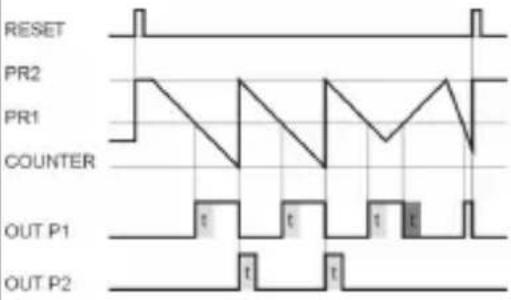 |
| ADD.BAT | 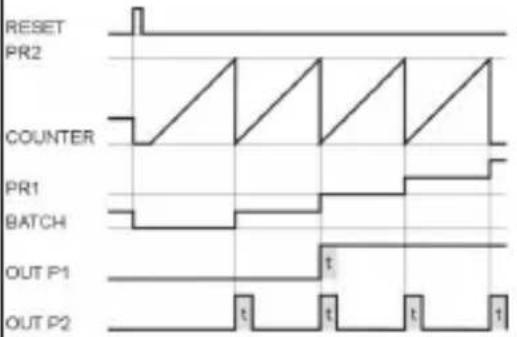 | SUB.BAT | 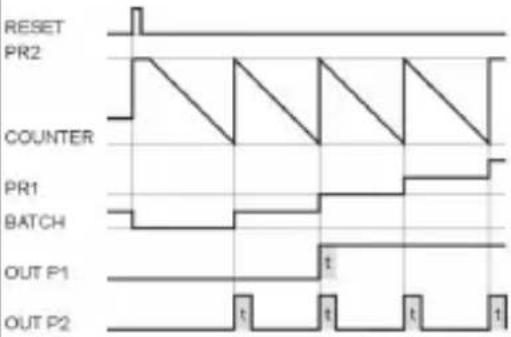 |
| ADD.TOT | 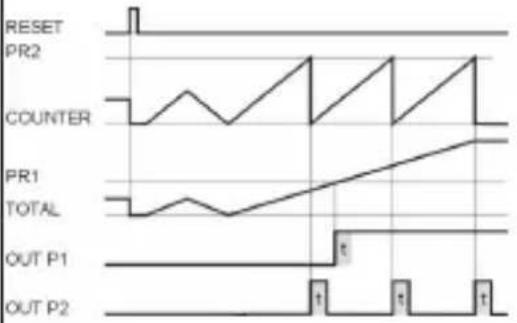 | SUB.TOT | 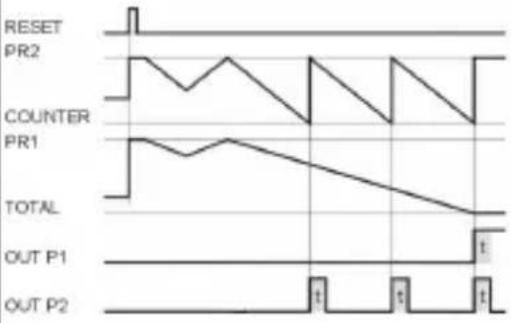 |
| Mode | Diagram |
| TRAIL | RESETPR1PR2PR1COUNTER 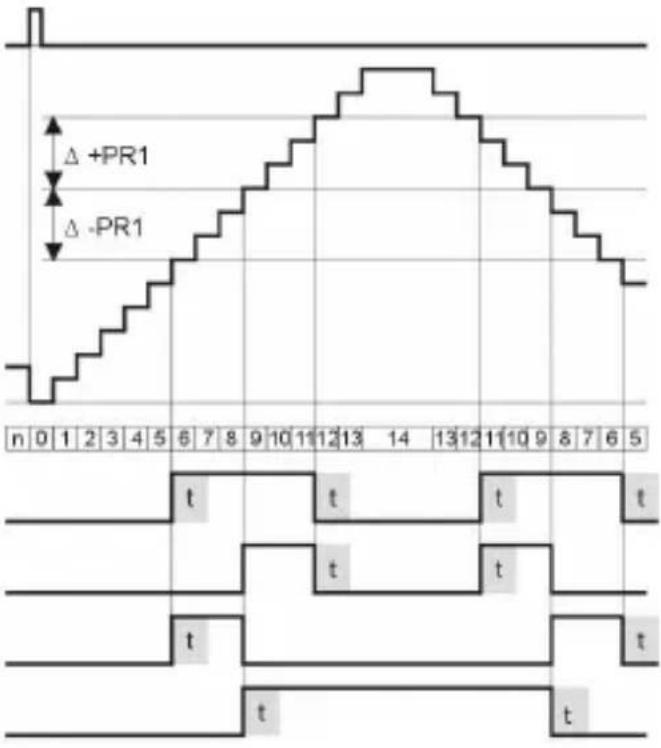 OUT P1Δ +/-PR1OUT P1Δ +PR1OUT P1Δ -PR1OUT P2 OUT P1Δ +/-PR1OUT P1Δ +PR1OUT P1Δ -PR1OUT P2 |
| TR.AR | RESETPR1PR2PR1COUNTER 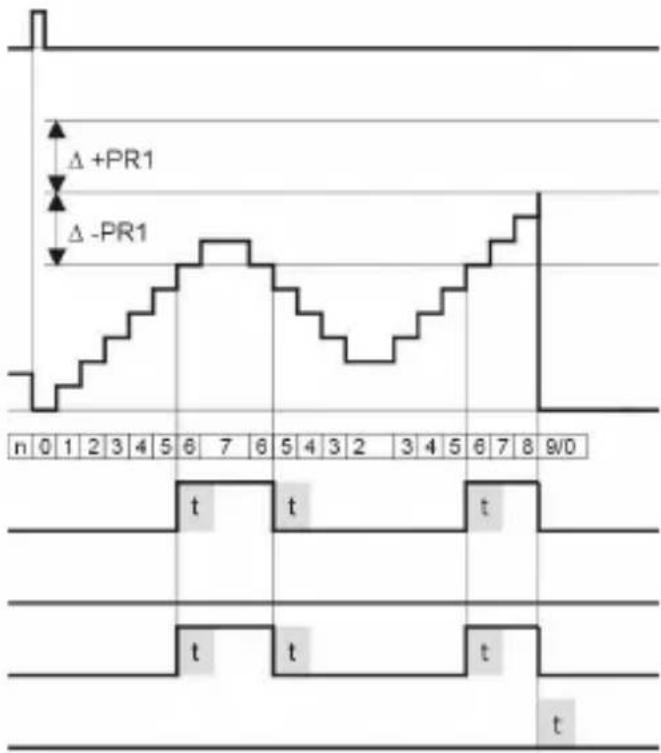 OUT P1Δ +/-PR1OUT P1Δ +PR1OUT P1Δ -PR1OUT P2 OUT P1Δ +/-PR1OUT P1Δ +PR1OUT P1Δ -PR1OUT P2 |
19 Help Texts
| P R | O G | . N O N O PROGRAMMING |
| P R | O G | . Y E S S T A R T PROGRAM |
| LANGU. MAIN MENU SELECT LANGUAGE | ||
| HL P. T X T. | Y E S H E L P T E X T ON | |
| S L. L A N G. | D E D E U T S C H | |
| S L. L A N G. | E N E N G L I S H | |
| FUNCT. MAIN MENU BASIC FUNCTION | ||
| FUNCT. COUNT BASIC FUNCTION COUNTER | ||
| FUNCT. TIMER BASIC FUNCTION TIMER | ||
| FUNCT. TACHO BASIC FUNCTION TACHOMETER/FREQUENCY METER | ||
| I N P U T M A I N MENU INPUTS | ||
| INP.POL. PNP INPUT POLARITY PNP | ||
| INP.POL. NPN INPUT POLARITY NPN | ||
| FILTER OFF | INPUT 30HZ FILTER OFF | |
| FILTER ON | INPUT 30HZ FILTER ON | |
| CNT.INP. CNT.DIR | INPUT MODE COUNT DIRECTION | |
| CNT.INP. UP.DN INPUT MODE UP-DOWN | ||
| CNT.INP. UP.UP INPUT MODE UP-UP | ||
| CNT.INP. QUAD | INPUT MODE QUADRATURE | |
| CNT.INP. QUAD2 | INPUT MODE QUADRATURE x 2 | |
| CNT.INP. QUAD4 | INPUT MODE QUADRATURE x 4 | |
| CNT.INP. A/B | INPUT MODE A/B | |
| CNT.INP. A%B | INPUT MODE (A-B)/A IN % | |
| START INA.INB | START INPUT A / STOP INPUT B | |
| START INB.INB | START INPUT B / STOP INPUT B | |
| START FRE.RUN | TIMER IN FREE RUN MODE | |
| START AUTO | TIMER IN AUTO STOP MODE | |
| TAC.INP. A ONLY INPUT A | ||
| TAC.INP. A-B INPUT MODE A-B | ||
| TAC.INP. A+B INPUT MODE A+B | ||
| TAC.INP. QUAD | INPUT MODE QUADRATURE | |
| TAC.INP. A/B INPUT MODE A/B | ||
| TAC.INP. A%B INPUT MODE (A-B)/A IN % | ||
| MP.INP._ LATCH | FUNCTION MP-INPUT_LATCH | |
| MP.INP._ TEACH | FUNCTION MP-INPUT_TEACH | |
| MP.INP._ SET | FUNCTION MP-INPUT_SET | |
| LOC.INP. PROG. | LOCK PROGRAMMING | |
| LOC.INP. PRESET | LOCK EDITING OF PRESETS | |
| LOC.INP. PRG.PRE. | LOCK PROGRAMMING AND EDITING OF PRESETS | |
| MODE MA N MENU OPERATION MODE | ||
| M O D E | A D D M O D E ADDING | |
| MODE ADD.AR | MODE ADDING WITH AUTOMATIC RESET | |
| MODE ADD.BAT MODE ADDING WITH AUTOMATIC RESET + BATCH COUNTER | ||
| MODE ADD.TOT MODE ADDING WITH AUTOMATIC RESET + TOTAL COUNTER | ||
| MODE TRAL MODE ADDING OUTPUT 1 TRACKING PRESET OF OUTPUT 2 | ||
| MODE TR.AR MODE ADDING OUTPUT 1 TRACKING PRESET OF OUTPUT 2 WITH AUTOMATIC RESET | ||
| M O D E | S U B M O D E SUBTRACTING | |
MMING
| MODE | SUB.AR | MODE SUBTRACTING WITH AUTOMATIC RESET |
| MODE SUB | BAT MODE | SUBTRACTING WITH AUTOMATIC RESET + BATCH COUNTER |
| MODE SUB | TOT MODE | SUBTRACTING WITH AUTOMATIC RESET + TOTAL COUNTER |
| C O N | F I G | M A I N M E N U C O N F I G U R A |
| F A C | T O R | M U L T I P L I C A T I O N FACTOR |
| D I V | I S | O . D I V I S I O N FACTOR |
| T.MODE SEC | TIME RANGE SECONDS | |
| T.MODE MIN | TIME RANGE MINUTES | |
| T.MODE HOUR | TIME RANGE HOURS | |
| T.MODE HH | MM.SS TIME RANGE HH.MM.SS | |
| T.MODE SEC-1 | TACHO RANGE SEC-1 | |
| T.MODE MIN-1 | TA CHO RANGE MIN-1 | |
| DP | DECIMAL POINT | |
| SETPT. | SET VALUE | |
| AVG | OFF | NO AVERAGE |
| AVG | AVG 2 AVERAGE OF 2 MEASUREMENTS | |
| AVG | AVG 5 AVERAGE OF 5 MEASUREMENTS | |
| AVG | AVG10 | AVERAGE OF 10 MEASUREMENTS |
| AVG | AVG20 | AVERAGE OF 20 MEASUREMENTS |
| START | START DELAY TIME [SEC] | |
| WAIT 0 | WAIT TIME UNTIL DISPLAY ZERO [SEC] | |
| RES.MOD | MAIN MENU RESET MODE | |
| RES.MOD. | NO.RES. | NO RESET FUNCTION |
| RES.MOD. | MAN.RES. | RESET VIA FRONT BUTTON |
| RES.MOD. | EL.RES. | RESET VIA RESET INPUT |
| RES.MOD. | MAN.EL. | RESET VIA FRONT BUTTON OR RESET INPUT |
| PRES. 1 | MAIN MENU PRESET 1 | |
| PRES. 1 | ON | PRESET 1 ON |
| PRES. 1 | OFF | PRESET 1 OFF |
| PR.OUT1 | ---- PERMANENT SIGNAL FORM AT OUTPUT 1 | |
| PR.OUT1 | ---- PERMANENT SIGNAL FORM AT OUTPUT 1 | |
| PR.OUT1 | ---- TIMED SIGNAL FORM IN MAIN DIRECTION AT OUTPUT 1 | |
| PR.OUT1 | ---- TIMED SIGNAL FORM IN MAIN DIRECTION AT OUTPUT 1 | |
| PR.OUT1 | ---- TIMED SIGNAL FORM IN BOTH DIRECTION AT OUTPUT 1 | |
| PR.OUT1 | ---- TIMED SIGNAL FORM IN BOTH DIRECTION AT OUTPUT 1 | |
| T.OUT 1 | ACTIVE TIME FOR OUTPUT 1 | |
| PRES. 2 | MAIN MENU PRESET 2 | |
| PR.OUT2 | ---- PERMANENT SIGNAL FORM AT OUTPUT 2 | |
| PR.OUT2 | ---- PERMANENT SIGNAL FORM AT OUTPUT 2 | |
| PR.OUT2 | ---- TIMED SIGNAL FORM IN MAIN DIRECTION AT OUTPUT 2 | |
| PR.OUT2 | ---- TIMED SIGNAL FORM IN MAIN DIRECTION AT OUTPUT 2 | |
| PR.OUT2 | ---- TIMED SIGNAL FORM IN BOTH DIRECTION AT OUTPUT 2 | |
| PR.OUT2 | ---- TIMED SIGNAL FORM IN BOTH DIRECTION AT OUTPUT 2 | |
| T.OUT 2 | ACTIVE TIME FOR OUTPUT 2 | |
| END.PRG. | NO | REPEAT PROGRAMMING |
| END.PRG. | YES | EXIT PROGRAMMING AND STORE DATAS |
20 Dimensional Drawings
Dimensions in mm [inch]
text_image
96[3,77] 48[1,88]
text_image
max.35[1,38] 43[1,69] 7,35[0,29] 11,2[0,44] 90,5[3,56]Rear view:

text_image
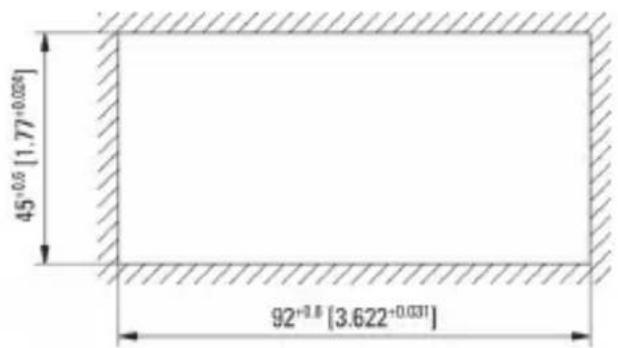
90 [3,54]Panel cut-out:
text_image
45⁺⁰·⁵ [1.77⁺⁰.⁰²⁴] 92⁺⁰·⁸ [3.622⁺⁰.⁰³¹]CODIX 560

text_image
Kublon200 1 Cod i x + 2Electronic Preset Counter
with two presets
Add, Sub, AddAr, SubAr, AddBat, SubBat, AddTot, SubTot, Trail, TrailAr
text_image
DEFAULT NOMode monocanal < 100 ms @ 40 kHz < 350 ms @ 65 kHz
Mode bicanal < 150 ms @ 40 kHz < 600 ms @ 65 kHz
1 1 . 4 C o m p t e u r h
Secondes 0.001 s ... 999 999 s
Minutes 0.001 min ... 999 999 min
Heures 0.001 h .. 999 999 h
h. m i n . s 99h.59min.59s
Temps mini. mesurable 500μs
| B | a | s | 1,0 | V | ||
| H | a | u | t | 4,0 | V |
text_image
96[3,77] 48[1,88]
text_image
max.35[1,38] 43[1,69] 7,35[0,29] 11,2[0,44] 90,5[3,56]Vue de l'arrière
text_image
90 [3,54]Electronic Preset Counter
With two presets
Contatore di impulsi: cnt.dir, up.dn, up.up, quad, quad2, quad4, A/B, (A-B)/Ax100%
Frequenzimetro: A, A - B, A + B, quad, A/B, (A-B)/Ax100%
Overflow/ lampeggio, 1 sec.
SELV, CLASS II (Limited
Power Source)
text_image
96[3,77] 48[1,88]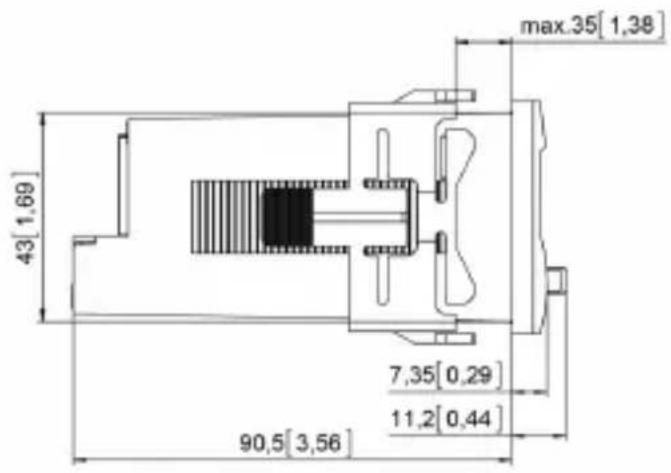
text_image
max.35[1,38] 43[1,69] 7,35[0,29] 11,2[0,44] 90,5[3,56]Vista posteriore:
text_image
90 [3,54]Apertura d'incastro:
text_image
45⁺⁰·⁵ [1.77⁺⁰.⁰²⁶] 92⁺⁰·⁸ [3.622⁺⁰.⁰³¹]CODIX 560
text_image
Kublon2001 1 Codix+ 2Electronic Preset Counter
With two presets
Frecuencimetro: A, A - B, A + B, quad, A/B, (A-B)/Ax100%
Add, Sub, AddAr, SubAr, AddBat, SubBat, AddTot, SubTot, Trail, TrailAr
text_image
96[3,77] 48[1,88]
text_image
max.35[1,38] 43[1,69] 7,35[0,29] 11,2[0,44] 90,5[3,56]Vista posterior:

text_image
90 [3,54]text_image
45+0.5 [1.77+0.034] 92+0.8 [3.622+0.031]Kübler Group
Fritz Kübler GmbH
Schubertstrasse 47
D-78054 Villingen-Schwenningen
Germany
Phone: +49 7720 3903 - 0
Fax: +49 7720 21564
info@kuebler.com
www.kuebler.com