Eclipse HBH755 - Blender HAMILTON BEACH - Free user manual and instructions
Find the device manual for free Eclipse HBH755 HAMILTON BEACH in PDF.

User questions about Eclipse HBH755 HAMILTON BEACH
0 question about this device. Answer the ones you know or ask your own.
Ask a new question about this device
Download the instructions for your Blender in PDF format for free! Find your manual Eclipse HBH755 - HAMILTON BEACH and take your electronic device back in hand. On this page are published all the documents necessary for the use of your device. Eclipse HBH755 by HAMILTON BEACH.
USER MANUAL Eclipse HBH755 HAMILTON BEACH
Operation Manual – Page 2
HBH750/HBH755 SÉRIE MÉLANGEUR DE BAR
natural_image
Line drawing of a Hamilton Beach digital balance counter with control panel (no text or symbols on device)840227001
9/15
IMPORTANT: This operation manual should be reviewed with all equipment operators as part of your operator training program.
IMPORTANT SAFETY INSTRUCTIONS
WARNING – When using electrical appliances, basic safety precautions should always be followed to reduce the risk of fire, electric shock, and/or injury to persons, including the following:
- Read the Operation Manual before using blender. Keep Operation Manual handy.
- Before first use, wash container assembly in hot, soapy water. Do NOT place in dishwasher.
- Plug into a grounded outlet.
- Do not remove ground.
- Do not use an adapter.
- Do not use an extension cord.
- Disconnect power before cleaning or servicing.
- To reduce risk of personal injury, unplug cord from outlet when not in use and before putting on or taking off parts.
- Unplug the blender and inspect the power cord insulation for cracks on a weekly basis. Refer to "Technical Services" for repair or replacement.
- To protect against electrical shock, do not immerse cord, plug, or blender base in water or any other liquid.
- Do not spray the base with a high-pressure spray gun.
- Extreme caution must be used when moving an appliance containing hot oil or other hot liquids.
- Do not use appliance for other than intended use.
- Not intended for use by or near children. Children should be supervised to ensure that they do not play with the appliance.
-
The appliance is not intended for use by persons (including children) with reduced physical, sensory, or mental capabilities, or lack of experience and knowledge, unless they have been given supervision or instruction concerning use of the appliance by a person responsible for their safety.
-
The use of accessory attachments not recommended by the appliance manufacturer may cause injuries.
- To reduce risk of personal injury and to prevent damage to blender or container and cutter assembly, DO NOT insert utensils into blender container while operating blender.
- Do not store any kitchen utensils in the container because the blender would be damaged if inadvertently turned on.
- To prevent possibility of serious personal injury, keep hands out of blender container while operating blender.
- Avoid contacting moving parts. Switch OFF (O) the appliance and disconnect from power supply before changing accessories or approaching parts that move in use.
- Blades are sharp. Handle carefully.
- If cutter assembly blades are loose, discontinue use immediately and replace cutter assembly. Do not attempt to repair or tighten blades.
- Inspect container and cutter assembly daily. Do not use broken, chipped, or cracked container. Check cutter for wear, nicks, or broken blades. Do not use broken or cracked cutting blades.
- Do not use outdoors.
- This appliance is intended for short periods of operation, with a rated operating time of 2 minutes.
- Do not leave blender unattended while it is operating.
-
To prevent damage to blender, container, or cutter assembly, DO NOT move or shake blender while in operation. If blending action stops during operation, turn blender OFF (O), remove container from base, remove container cover, and use a thin rubber spatula to push mixture towards cutters.
-
When blending hot liquids, remove center piece of two-piece lid. Hot liquids may push lid off jar during blending. To prevent possible burns: Do not fill blender jar beyond the 1 quart (946 ml) level. With the protection of an oven mitt or thick towel, place one hand on top of lid. Keep exposed skin away from lid. Start blending at lowest speed.
-
Always operate blender with container lid in place.
-
Do not operate any appliance with a damaged supply cord or plug, or after the appliance malfunctions or has been dropped or damaged in any manner. Supply cord replacement and repairs must be conducted by the manufacturer, its service agent, or similarly qualified persons in order to avoid a hazard. Call the provided customer service number for information on examination, repair, or adjustment.
- SAVE THESE IN STRUC TIONS -

WARNING


Electrical Shock Hazard
Disconnect power before
cleaning blender base.
Failure to follow these instructions can result in death or electrical shock.

Electrical Shock Hazard
Plug into a grounded outlet.
Do not remove ground.
Do not use an adapter.
Do not use an extension cord.
Failure to follow these instructions can result in death, fire, or electrical shock.

WARNING

Cut Hazard
The blending blade is sharp.
Always place lid on container when blending.
Do not put hands, spoons, or other utensils in container when blending.
Failure to follow these instructions can result in broken bones, cuts, or other injuries.
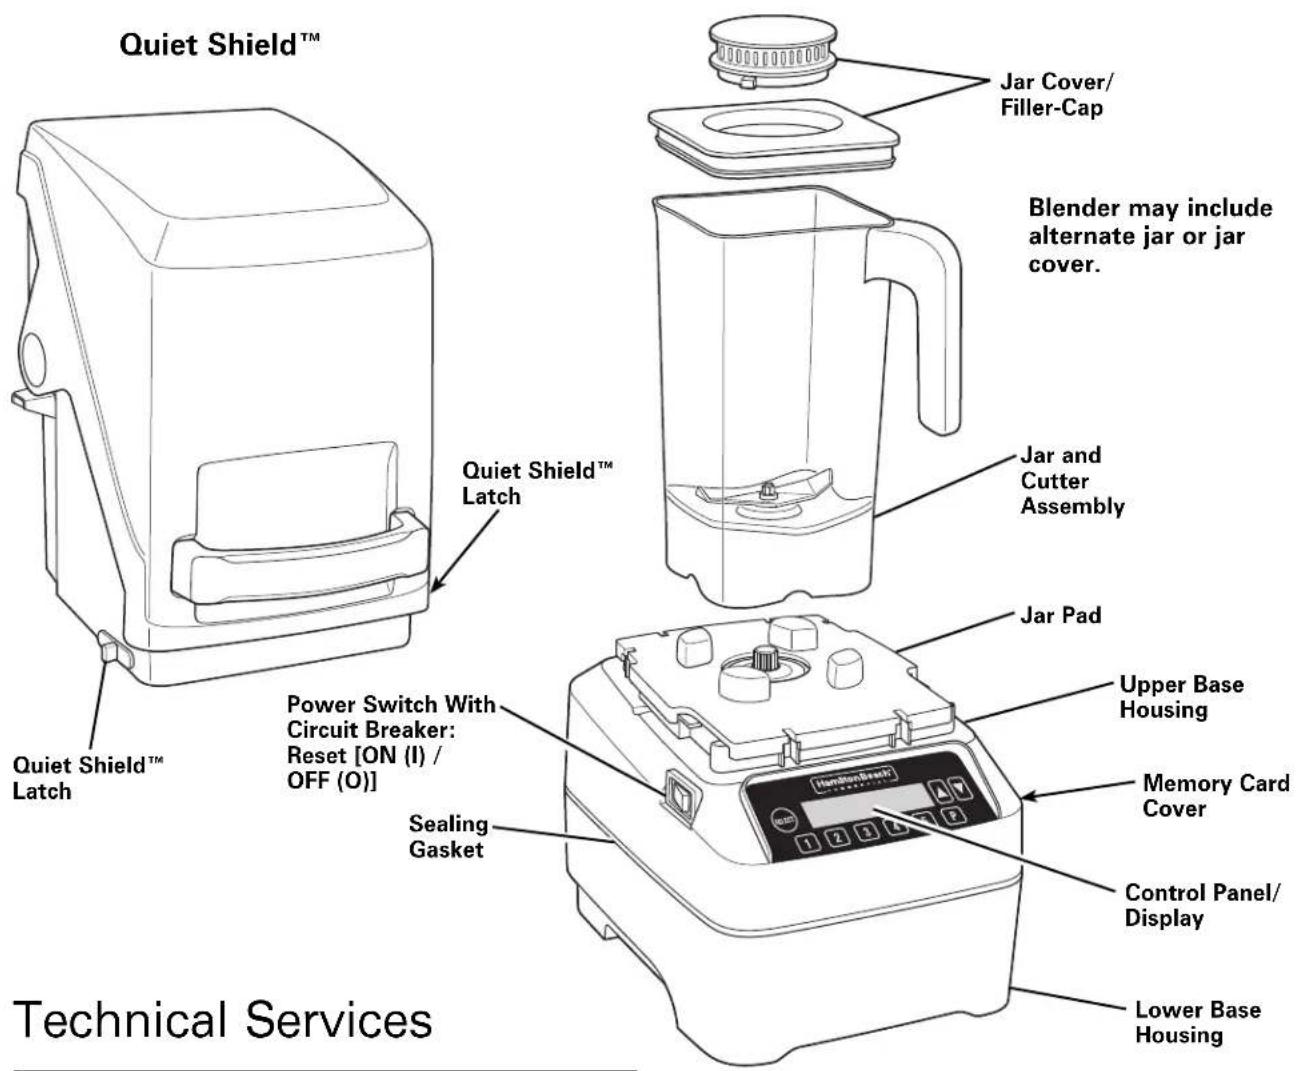
Parts and Features
The parts and features for the blender are shown on this page. Your blender is designed for blending and mixing beverages.
text_image
Quiet Shield™ Quiet Shield™ Latch Power Switch With Circuit Breaker: Reset [ON (I) / OFF (O)] Sealing Gasket Quiet Shield™ Latch Quiet Shield™ Latch Jar Cover/ Filler-Cap Blender may include alternate jar or jar cover. Jar and Cutter Assembly Jar Pad Upper Base Housing Memory Card Cover Control Panel/Display Lower Base Housing Technical Services(above-counter model)
For assistance or replacement parts, call our Technical Services number: 866-285-1087 or 910-693-4277
8 a.m. – 5 p.m. EST Monday – Friday www.hamiltonbeachcommercial.com
Replacement Parts
The following components are subject to wear and should be replaced at least yearly. We recommend keeping a replacement container on hand.
| Part Description | Part Number |
| Container, 48 oz./1.4 L | 6126-750 |
| Container, 64 oz./2.0 L | 6126-755 |
| Cutter Assembly | 98650 |
Optional
To Load Custom Programs with the Memory Card:
- Turn OFF (O) and unplug unit.
- Remove the memory card cover.
- Insert memory card.
- Plug in unit and turn ON (Reset) (I).
- Display will show a confirmation message.
- Turn OFF (O) and unplug unit.
- Remove memory card and reinstall the memory card cover.
Control Panel
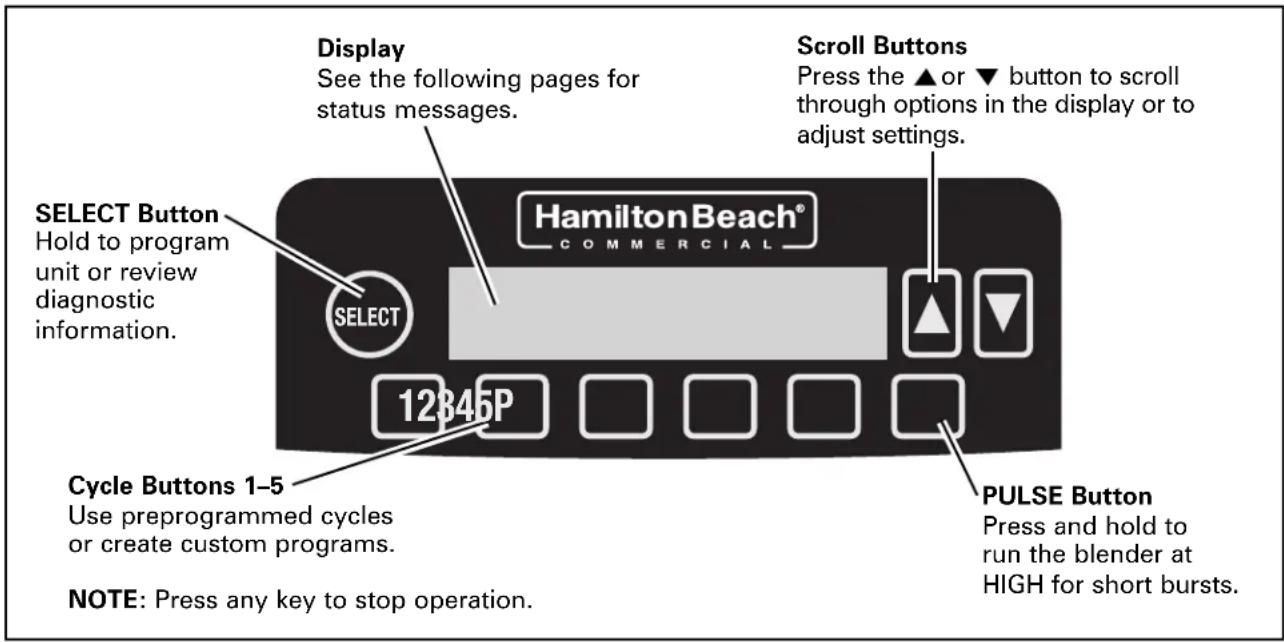
text_image
Display See the following pages for status messages. Scroll Buttons Press the ▲ or ▼ button to scroll through options in the display or to adjust settings. SELECT Button Hold to program unit or review diagnostic information. 12345P Cycle Buttons 1-5 Use preprogrammed cycles or create custom programs. NOTE: Press any key to stop operation. PULSE Button Press and hold to run the blender at HIGH for short bursts.Blender Operation – Quick Start Guide
- Read Important Safety Instructions and Warning Symbol Explanations before use.
- Place the blender on a dry, level surface.
- Make sure the power switch is OFF (O). Plug the blender into a grounded 3-prong electrical outlet.
-
Place the container on the base with ingredients and container lid in place.
-
Turn the blender on by pressing the Power Switch marked Reset [ON (I)] / OFF (O). The red LED switch indicates that power is ON (I).
- Select the desired function.
- Use any button to stop operation.
Sanitizing
Sanitize using 1 tablespoon (15 ml) of household bleach per 1 gallon (3.8 liter) of clean, cool water (60°F/16°C), mixed according to the instructions on the bleach.
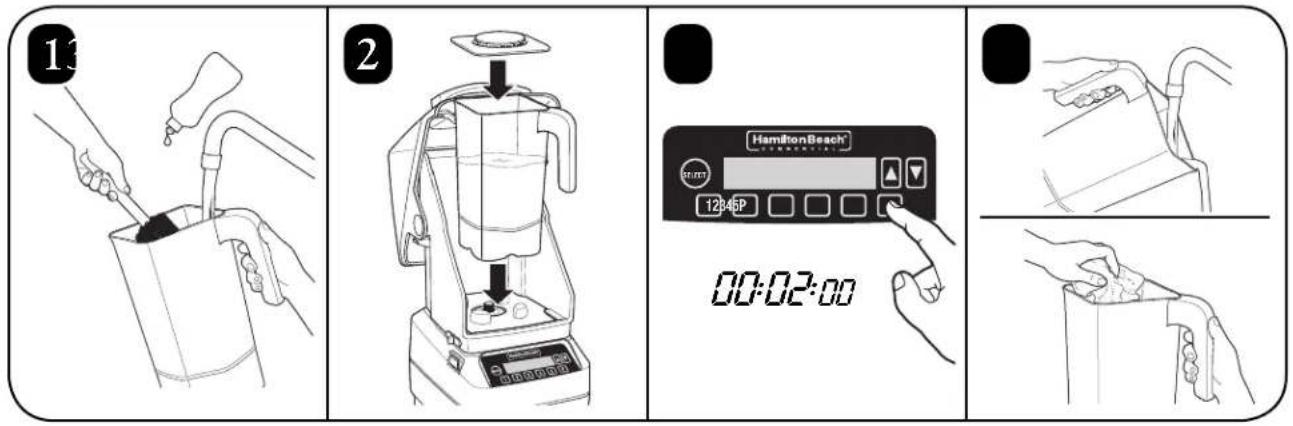
- Fill container with sanitizing solution, replace lid and filler cap and run on LOW speed for 2 minutes. Empty container.
-
Wipe exterior with soft cloth dampened with sanitizing solution.
-
Immerse lid and filler cap in sanitizing solution for 2 minutes.
- Place empty container on base and run on HIGH speed for 2 seconds to remove any moisture from the cutter assembly.
- When ready to use, rinse with clean water.
12845P
These preset program buttons each have a blending cycle designed for commonly made drinks (see separate drop-in). Each button can be changed to a different preprogrammed cycle using the directions below.
Changing Programs

Hold SELECTs to program unit. Press ● to continue.

There are 8 preset programs. Scroll up ▲ to view the program. Hold button 1–5 to assign a program or continue to scroll up ▲ for the following additional programs.


Press 🐘 and scroll up ▲ to select cycle time. Hold button 1–5 to assign a program. NOTE: Saving a new cycle to a location will overwrite any existing cycle in that location.
Hold P button to run blender at high speed. Release to stop blender.
Information and Settings

Hold SELECT to enter the menu and scroll up ▲ to INFORMATION option.

Press SELECT to enter INFORMATION menu and scroll up ▲ to view below options.
For all options below, press 🐘 to view information or scroll for next option. Press ⚪ a second time during any option to exit program menu.

Display shows CYCLES INTO WARRANTY.

Display shows CUSTOM CYCLE COUNTER. This cycle counter can be reset by the operator.

Display shows CLEAR CYCLE COUNTER. This option will only clear custom cycle counter, not cycles into warranty.

Display shows CUSTOMER SERVICE.

Display shows DISPLAY BACKLIGHT. Scroll to enable or disable option for constant display of backlight.

Display shows QUIET SHIELD SENSOR. This can only be disabled for 120V.

Display shows RUN COOL DOWN CYCLE. If the blender motor overheats, this message will be displayed to prompt you to run a cool-down cycle. Remove the container from the blender and press 📄. (For 230V, the Quiet Shield™ must be closed.)

Display shows FACTORY DEFAULTS. This option will restore all programs to factory defaults.

Display shows SOFTWARE VERSION.

Display shows EEPROM VERSION.
Troubleshooting Guide
| Problem . . . Solution | ... |
| Blender fails to start or stops while it is running and display is blank. | Make sure that the Power Switch is in the ON (Reset) position and is illuminated red.Check to see if unit is securely plugged into an electrical outlet of the proper voltage and frequency.Check to see if the fuse for the electrical outlet has blown or if the Power Switch has tripped.This blender is equipped with motor overload protection. If the motor stops during operation due to overheating, unplug and allow the blender to cool down for 15 minutes. Plug blender back in after 15 minutes to resume normal operation. |
| Blender fails to start or stops while it is running; message appears in display. | Make sure that the jar is seated properly on the blender base.Blender will not operate unless jar is properly seated.Make sure Quiet ShieldTM is down and in correct position. |
| Blender fails to start or stops while it is running. | Thermal overload protection has been tripped. Attempt to run “cool down cycle.” Follow instructions in display.This blender is equipped with motor overload protection. If the motor stops during operation due to overheating, unplug and allow the blender to cool down for 15 minutes. Plug blender back in after 15 minutes to resume normal operation. |
| Unit does not respond to button commands or error message appears in display. | Turn the power off and back on using the power switch to reset the controls.Turn the power off and back on using the power switch. If the error message still appears, the unit will need to be serviced. |
| Ingredients will not mix properly. | Check to see if enough liquid has been added to the ingredients. Mixture should be fluid and free-running at all times.Solid pieces are too large.Container is too full. Do not fill past highest graduation marking.Cutter assembly blades are not sharp or are damaged. Inspect container and cutter assembly daily. Replace cutter assembly at least yearly or sooner if cutter assembly appears worn or damaged.Check to see if cutter assembly is installed properly.Select speed to create a fluid blend. |
Maintenance
Inspect the blender and its various parts and replace as follows:
| Daily | Unplug the blender, remove the container from the base, and then inspect the container and cutter assembly for wear, nicks, and broken or loose blades. If the blades are nicked, broken, or loose, discontinue use immediately and replace the container or cutter assembly. See “Replacement Parts.” |
| Weekly | Unplug the blender, and then inspect the power cord insulation and power plug for cracks. Refer to “Technical Services” for repair or replacement. Remove jar from blender base. Inspect the cutter by rotating the drive end of the cutter by hand. It should turn smoothly. If it does not, replace the container or cutter assembly. |
8 a.m. – 5 p.m. EST Lunes – Viernes
www.hamiltonbeachcommercial.com
Partes de Repuesto
text_image
1 22" MIN (56 cm) 5" (12.7 cm) 4" MAX (130 cm)
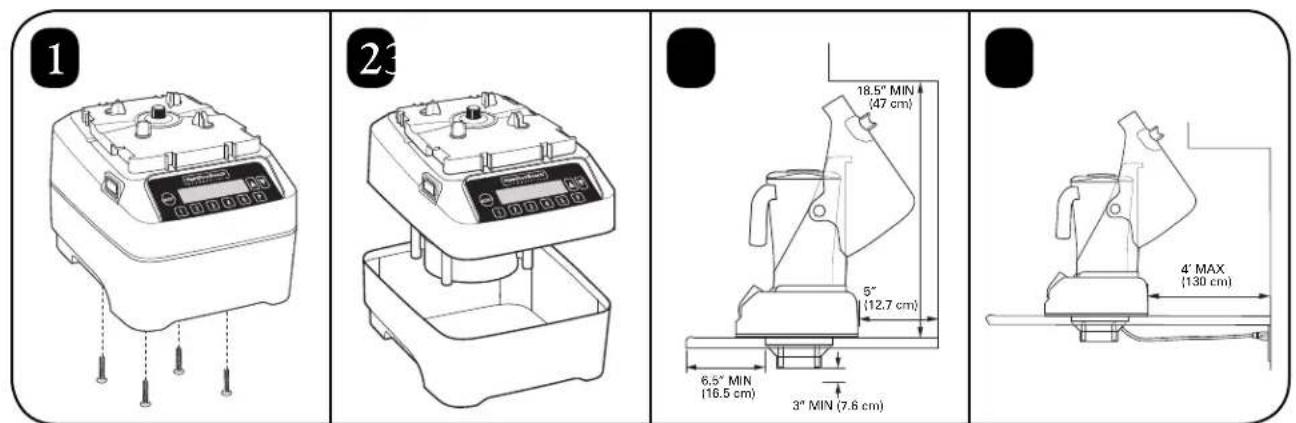
text_image
1 2 3 4' MAX (130 cm) 6.5" MIN (16.5 cm) 5" (12.7 cm) 3" MIN (7.6 cm) 18.5" MIN (47 cm)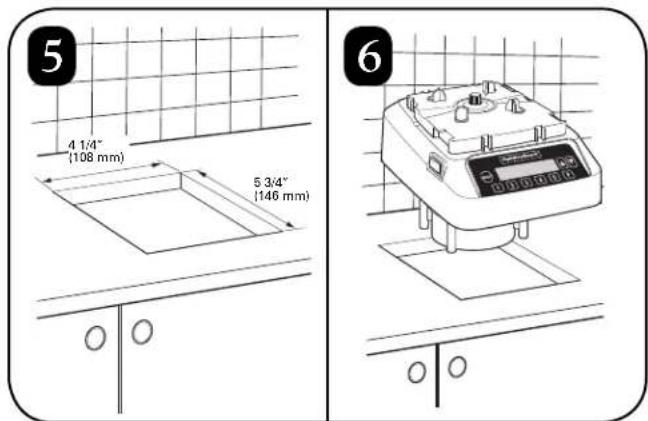
text_image
5 4 1/4" (108 mm) 5 3/4" (146 mm) 6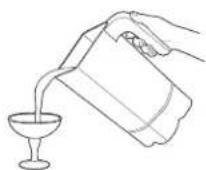

text_image
Two triangular warning signs: one indicating a hazard symbol with a lightning bolt, the other showing a lightning bolt.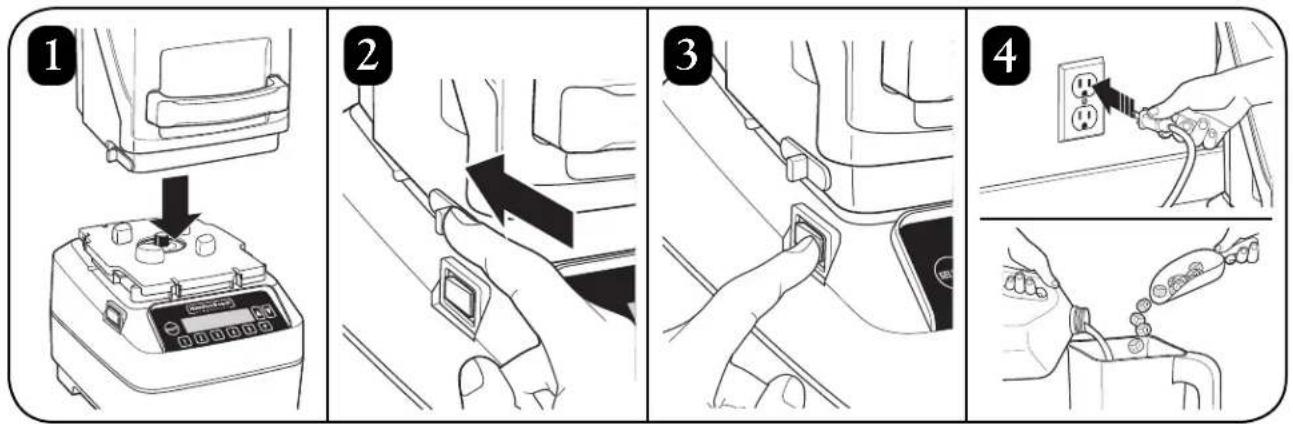
text_image
Step-by-step instructions for car seatbelt switch, showing device insertion and power installation steps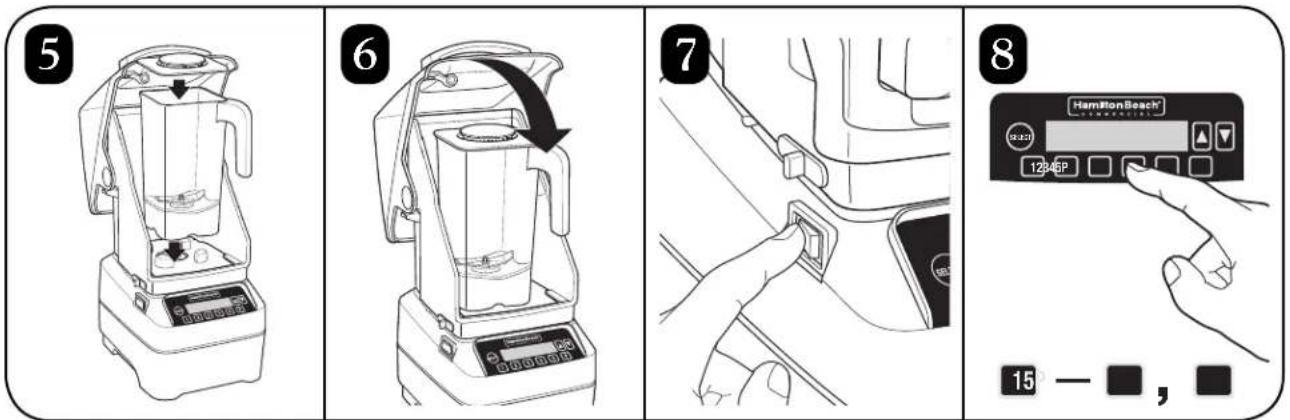
text_image
5 6 7 8 HamiltonBeach 124EP 15 — ■ , ■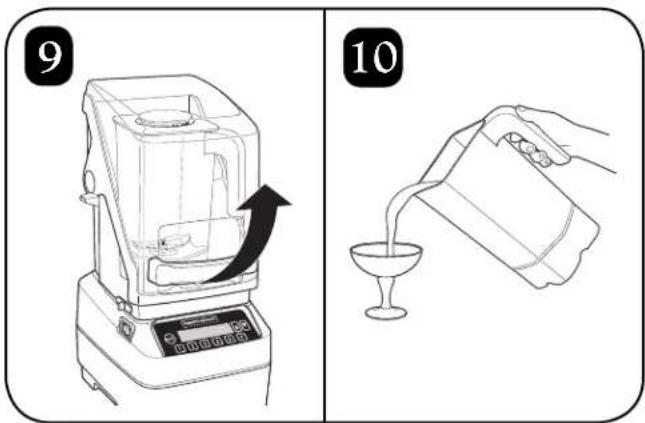
text_image
9 10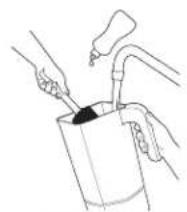
natural_image
Line drawing of hands pouring liquid into a container with a pipe (no text or symbols)
text_image
Illustrated sequence showing a hand washing a blender with control panel and time setting, including step 1 and 2.
text_image
Step-by-step instructions for installing a car interior, showing hand positioning and valve assembly steps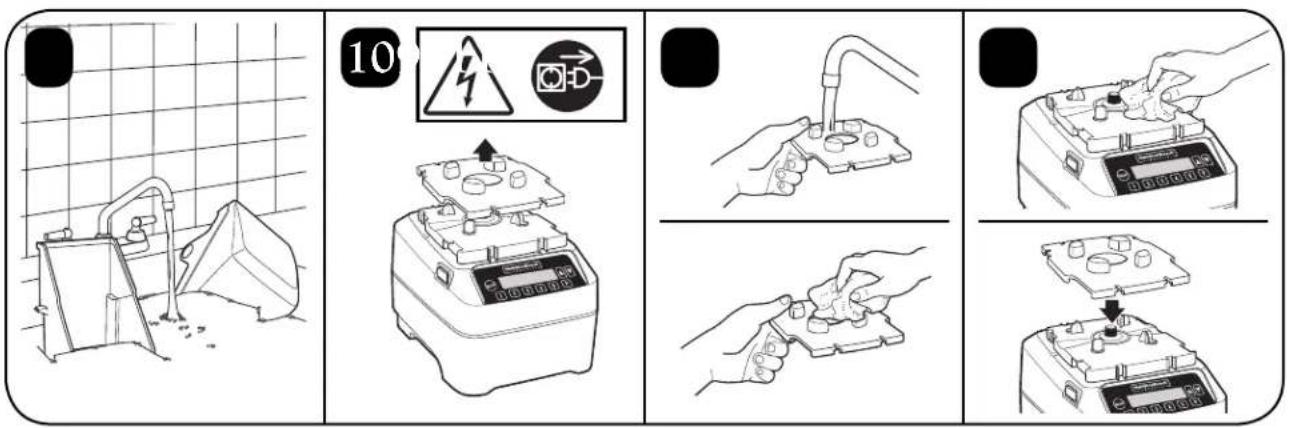
text_image
Diagram illustrating battery charging process with labeled steps and warning symbolsModelos:
HBH750, HBH755
Tipo:
GB34
Southern Pines, NC 28387