
53524 - Blender HAMILTON BEACH - Free user manual and instructions
Find the device manual for free 53524 HAMILTON BEACH in PDF.

| Feature | Detail |
|---|---|
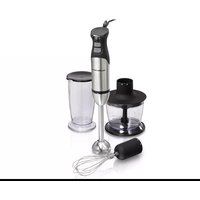
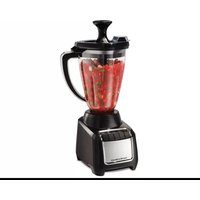
| Product type | Multi-purpose blender with citrus juicer attachment |
| Power | 700 W |
| Jar capacity | 48 oz (approx. 1.4 L), recommended max fill 1,250 mL |
| Jar material | Glass |
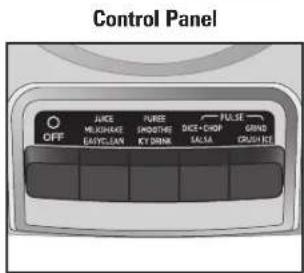
| Blending programs | 3 dedicated modes: PUREE/SMOOTHIE/ICY DRINK, JUICE/MILKSHAKE/EASYCLEAN, PULSE (Dice/Chop/Salsa) |
| PULSE function | Burst mode for fine chopping, dicing, and making chunky salsas or chutneys with precise texture control |
| EasyClean function | Self-clean the jar in 20-30 seconds with warm water and a drop of dish soap - no disassembly needed |
| Mess-Free Spout | Hinged-cap pour spout for drip-free serving without removing the lid |
| Stir Spoon | Reaches ingredients through the lid opening without stopping the blender or removing the lid |
| Travel Jars | 2 personal 20-oz (590 mL) travel jars with drinking lids for on-the-go smoothies (on select models) |
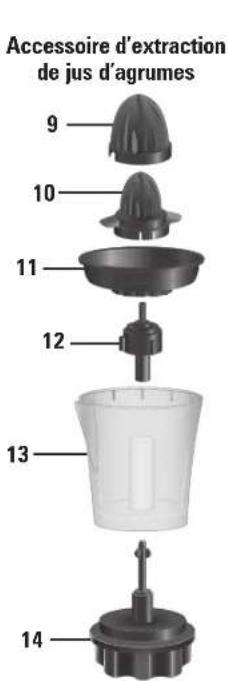
| Citrus Juicer attachment | Complete set with large and small reamers (for oranges/grapefruits or lemons/limes), pulp control basket, and juice cup |
| Dishwasher-safe parts | Jar, blade assembly, lid, travel jars, juicer parts (no Sanitize cycle - temperatures may damage parts) |
| Recommended uses | Smoothies, frozen drinks, milkshakes, salsas, citrus juices, vinaigrettes, purees, marinades |
| Warranty | 3 years (USA) - 5 years (Canada) |
Frequently Asked Questions - 53524 HAMILTON BEACH
User questions about 53524 HAMILTON BEACH
0 question about this device. Answer the ones you know or ask your own.
Ask a new question about this device
Download the instructions for your Blender in PDF format for free! Find your manual 53524 - HAMILTON BEACH and take your electronic device back in hand. On this page are published all the documents necessary for the use of your device. 53524 by HAMILTON BEACH.
USER MANUAL 53524 HAMILTON BEACH
Visit hamiltonbeach.com for our complete line of products and Use and Care Guides – as well as delicious recipes, tips, and to register your product online.
LIRE AVANT UTILISATION
Français.... 16
natural_image
Black and white photo of a Hamilton Beach blender with various kitchen ingredients including a mixer, blisters, and clear bottles (no text or symbols visible on main objects)IMPORTANT SAFEGUARDS
When using electrical appliances, basic safety precautions should always be followed to reduce the risk of fire, electric shock, and/or injury to persons, including the following:
- Read all instructions.
- This appliance is not intended for use by persons with reduced physical, sensory, or mental capabilities, or lack of experience and knowledge, unless they are closely supervised and instructed concerning use of the appliance by a person responsible for their safety.
- This appliance shall not be used by children. Keep the appliance and its cord out of reach of children.
- Close supervision is necessary when any appliance is used near children. Children should be supervised to ensure that they do not play with the appliance.
- To protect against risk of electrical shock, do not put cord, plug, base, or motor in water or other liquid.
- Turn the appliance OFF ( ) Then unplug from outlet when not in use, before assembling or disassembling parts, and before cleaning. To unplug, grasp the plug and pull from the outlet. Never pull from the power cord.
- Avoid contact with moving parts. Do not attempt to defeat any safety interlock mechanisms.
- Do not operate any appliance with a damaged supply cord or plug, or after the appliance malfunctions or has been dropped or damaged in any manner. Supply cord replacement and repairs must be conducted by the manufacturer, its service agent, or similarly qualified persons in order to avoid a hazard. Contact Customer Service for information on examination, repair, or adjustment as set forth in the Limited Warranty.
- The use of attachments, including canning jars, not recommended or sold by the appliance manufacturer may cause fire, electric shock, or personal injury.
- Do not use outdoors.
-
Do not let cord hang over edge of table or counter or touch hot surfaces, including stove.
-
Do not place on or near a hot gas or electric burner, or in a heated oven.
- Keep hands and utensils, other than the stir spoon provided, out of container while blending to reduce the risk of severe injury to persons or damage to the blender. The cover must remain in place when using the stir spoon through the cover opening. A scraper may be used but must be used only when the blender is not running.
- Blades are sharp; handle carefully—especially when assembling, disassembling, emptying or cleaning blender jar.
- Do not use a broken, chipped, or cracked blender jar.
- Do not use broken, cracked, or loose cutting blade assembly.
- Always operate blender with lid and filler-cap in place. Remove filler-cap only for adding ingredients or to insert the stir spoon.
- Do not use appliance for other than intended purpose.
- Do not leave blender unattended while it is operating.
- Check that the appliance is OFF ( ) before plugging cord into wall outlet. To disconnect, turn the control to OFF ( ); then remove plug from wall outlet. To unplug, grasp the plug and pull from the outlet. Never pull from the power cord.
- CAUTION! In order to avoid a hazard due to inadvertent resetting of the thermal cut-out, this appliance must not be supplied through an external switching device, such as a timer, or connected to a circuit that is regularly switched on and off by the utility.
- If the jar should twist or rotate when the motor is switched ON, switch OFF (O) immediately and tighten jar in collar or on blender base.
- Ensure cutting blade assembly is tight and secure to jar. Injury can result if moving blades accidentally become exposed.
-
Risk of thermal burn injury due to excessive pressure in the travel jar. Do not blend hot liquids in the travel jar.
-
When blending hot liquids, remove filler-cap of two-piece lid or open vent opening of lid with mess-free spout, and close any lid openings along the edge intended for pouring. Hot liquids may push lid off jar during blending. To prevent possible burns: Do not fill blender jar beyond the 3-cup (710-mL) level. With the protection of an oven mitt or thick towel, place one hand on top of lid. Keep
exposed skin away from lid. Start blending at lowest speed.
-
Be careful if hot liquid is poured into the blender jar as it can be ejected out of the appliance due to a sudden steaming.
-
To reduce the risk of injury, never place cutting blade assembly on base without jar properly attached.
SAVE THESE INSTRUCTIONS
Other Consumer Safety Information
This appliance is intended for household use only. Use for food or liquids only.
⚠ WARNING Electrical Shock Hazard: This product is provided with either a polarized (one wide blade) or grounded (3-prong) plug to reduce the risk of electric shock. The plug fits only one way into a polarized or grounded outlet. Do not defeat the safety purpose of the plug by modifying the plug in any way or by using an adapter. If the plug does not fit fully into the outlet, reverse the plug. If it still does not fit, have an electrician replace the outlet.
The length of the cord used on this appliance was selected to reduce the hazards of becoming tangled in or tripping over a longer cord. If a longer cord is necessary, an approved extension cord may be used. The electrical rating of the extension cord
must be equal to or greater than the rating of the appliance. If the appliance is of the grounding type, the extension cord should be a grounding-type, 3-wire cord. Care must be taken to arrange the extension cord so that it will not drape over the countertop or tabletop where it can be pulled on by children or accidentally tripped over.
If the cutting blade assembly locks and will not move, it will damage the motor. Do not use. Contact Customer Service for information.
Do not place blender jar in the freezer filled with food or liquid. This can result in damage to the cutting blade assembly, jar, blender, and possibly result in personal injury.
Wattage/Peak Power Information
The wattage/ampere rating of the blender is determined by an Underwriters Laboratory test and is based on available cutting blade assembly, jar combinations, and attachments that may not be provided with your unit, but are available as replacement parts. This is a measure of input wattage/amperes after 30 seconds of operation. The blender as provided may draw significantly less power.
Peak power is the measure of the motor wattage during the first seconds of operation. This is when a blender requires the most power to crush ice, frozen fruit, etc. This is a better measure of what a blender motor can consume when power is needed most.
Before first use: After unpacking blender, wash everything except blender base in hot, soapy water. Dry thoroughly. Wipe blender base with a damp cloth or sponge. DO NOT IMMERSE BASE IN WATER. Care should be taken when handling cutting blade assembly as it is very sharp.
Parts and Features
| 1 | Mess-Free Spout With Hinged Cap |
| 2 | Blender Jar |
| 3 | Cutting Blade AssemblyNOTE: Gasket is permanently affixed to Cutting Blades. Do not try to remove it. |
| 4 | Base |
| 5 | Filler-Cap |
| 6 | Lid |
| 7 | Collar |
| 8 | Control Panel |
| 9 | Large Reamer |
| 10 | Small Reamer |
| 11 | Pulp Control Basket |
| 12 | Shaft Adapter |
| 13 | Juice Cup |
| 14 | Juice Cup Base |
| 15 | $tir Spoon* |
| 16 | Drinking Lid (2)* |
| 17 | 20-oz. Travel Jar (2)* |
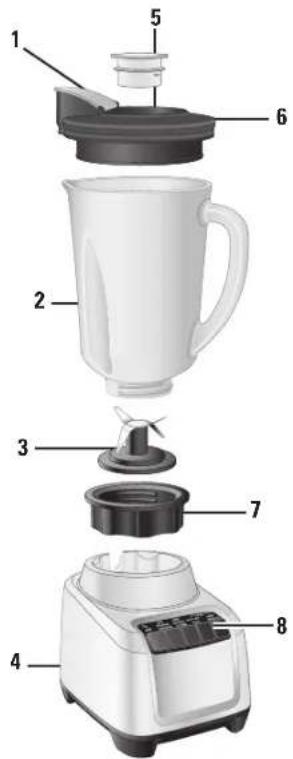
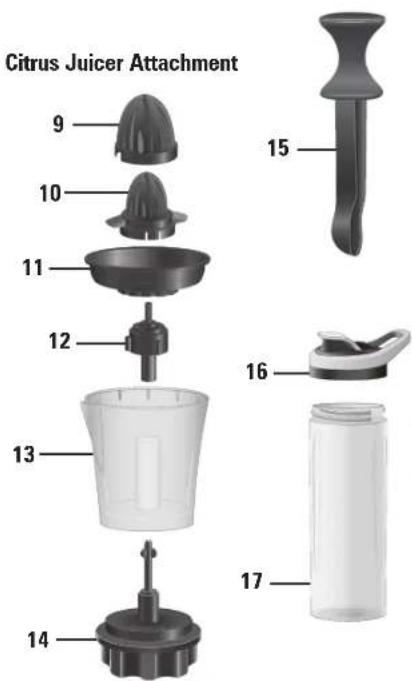
* Optional Accessory on Select Models To order parts, visit: hamiltonbeach.com/parts

Using Your Blender
IMPORTANT: Your Blender Jar and Cutting Blade Assembly are subject to wear during normal use. Always inspect Jar for nicks, chips, or cracks. Always inspect Cutting Blade Assembly for broken, cracked, or loose blades. If Jar or Cutting Blade Assembly is damaged, do not use. Contact Customer Service to obtain replacement parts.
natural_image
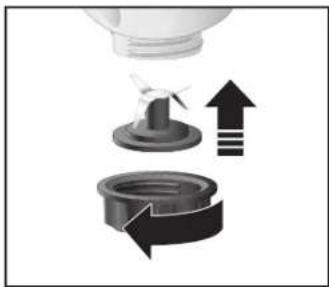
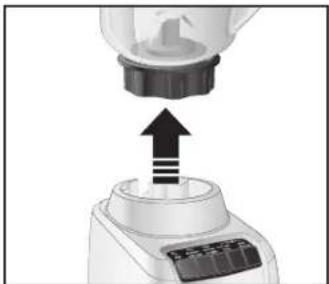
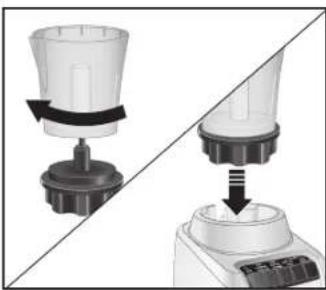
Diagram showing a kitchen utensil with a fan and directional arrows indicating rotation or movement (no text or symbols)- Rotate Collar clockwise until tight.
natural_image
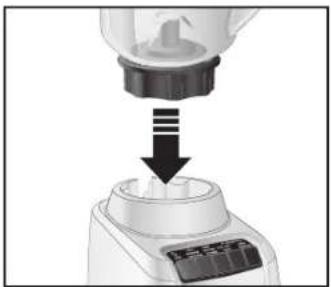
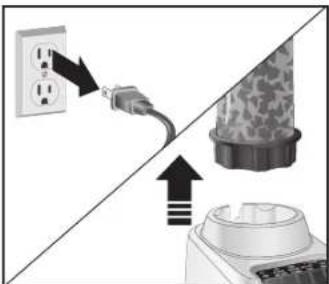
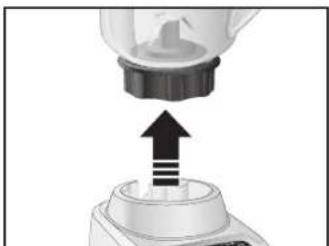
Close-up of a kitchen blender being inserted into a plastic cup (no text or symbols visible)- Place Jar on Base.
Before first use: After unpacking Blender, follow instructions in "Care and Cleaning."

natural_image
Illustration of hands pouring liquid from a container into a mixing bowl (no text or symbols)uid ingredients first (at least 8 oz. its to Jar. Do NOT fill ingredients
natural_image
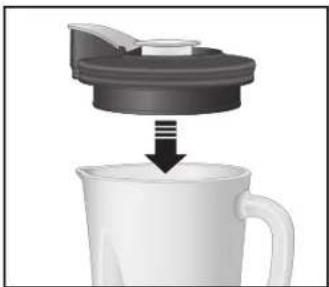
Close-up of a white mug with a lid and arrow indicating compression or lifting process (no text or symbols visible)- Place Lid on Jar. Ensure Filler-Cap is in place.
natural_image
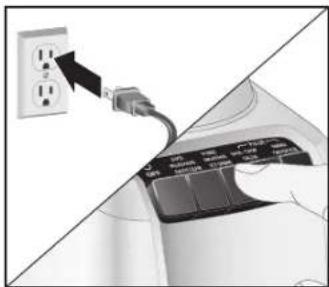
Close-up of a hand inserting a power outlet into a device (no visible text or symbols)- Plug into outlet. Push desired speed button. When using PULSE buttons, Blender will only run when button is held down.
natural_image
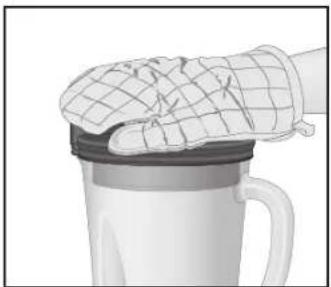
Illustration of a hand cleaning a cup with a mesh covering (no text or symbols)WARNING Burn Hazard. When blending hot liquids, remove filler-cap and close the edge cover opening intended for pouring. To prevent possible burns: Do not exceed the 3-cup (710-mL) level. Hot liquids may push off lid during blending; therefore, with the protection of an oven mitt or thick towel, place one hand on top of the lid, keep exposed skin away from the lid, and start blending at lowest speed.
Using Your Blender (cont.)
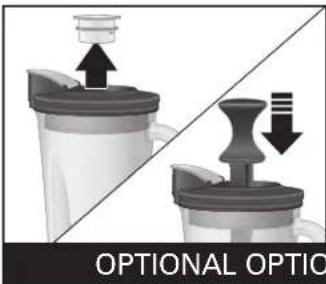
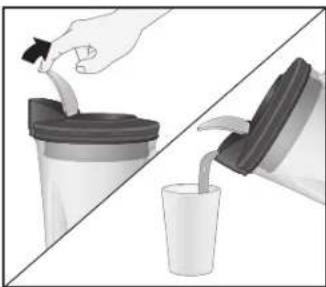
- Remove Filler-Cap and insert Stir Spoon into hole in Lid. Place one hand on top of Lid and use Stir Spoon to add ingredients or to move thick mixtures around in Blender Jar. NOTE: Turn Blender OFF (☐) before removing Filler-Cap and when adding Stir Spoon.
natural_image
Illustration of a hand pouring liquid into a container, with another hand holding a clamp (no text or symbols)Sir Spoon into hole in Lid. Place Stir Spoon to add ingredients and in Blender Jar. NOTE: Turn Filler-Cap and when adding
natural_image
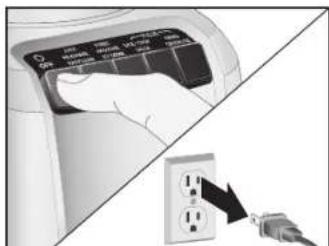
Diagram showing a hand inserting a card into an electrical outlet, with no visible text or symbols.- Turn Blender OFF (Q) Unplug.
natural_image
Close-up of a kitchen blender with an upward arrow indicating compression or lifting (no text or symbols visible)- Remove Jar from Base.
natural_image
Illustration showing a hand pouring liquid from a straw into a cup, separated by a diagonal line (no text or symbols)- Open Spout. Pour mixture into container or Travel Jar. 6 Serve.
Blender Tips
• To add foods when Blender is operating, remove Filler-Cap and add ingredients through the opening.
- For best performance, minimum amount of liquid needed per recipe is one cup (8 ounces/237 mL). Add more liquid if food is not blending properly.
- If blending action stops during blending or ingredients stick to sides of Jar, insert Stir Spoon to help move mixture around or add more liquid to Blender Jar.
- Do not try to mash potatoes, mix stiff dough, whip egg whites, grind raw meat, or extract juices from fruits and vegetables.
- Do not store food or liquids in Blender Jar.
- Avoid bumping or dropping Blender when in operation or at any time.
Using Travel Jar
WARNING Burn Hazard.
Do not blend hot ingredients. Pressure may build, causing jar to pop off and hot ingredients to erupt.
WARNING Laceration
Hazard. Handle blade carefully; it is very sharp.
-
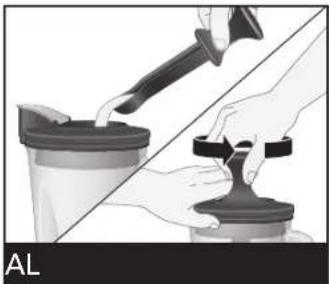
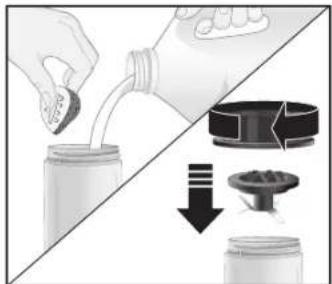
Make sure unit is turned OFF (○) and is unplugged. Add ingredients to Travel Jar. Carefully place Cutting Blade Assembly and Collar onto Travel Jar.
-
Turn Travel Jar upside down, shake to mix ingredients, and place onto Base.

natural_image
Diagram showing a hand pouring liquid into a container with arrows indicating flow direction (no text or symbols)
natural_image
Illustration of a hand inserting a power outlet into a blender with a cloth (no text or symbols)- Plug into outlet. Hold Jar in place while blending. Press ON (I) or PULSE to blend 15 to 30 seconds or until smooth. Always operate on a countertop or other supporting surface.
natural_image
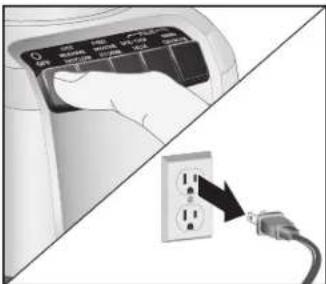
Diagram showing a power outlet connected to a wall-mounted device with an arrow indicating the process (no text or symbols present)-
Unplug. Remove Jar from Base.
-
Turn bottom up; remove Collar and Cutting Blade Assembly from Jar. Hand-tighten Drinking Lid onto Travel Jar.

natural_image
Diagram showing two mechanical components with arrows indicating assembly or transformation (no text or symbols)Blending Tips for 20-oz. Travel Jar
- If blending action does not start, stops during blending, or ingredients stick to sides of Jar, turn Blender OFF (O). Remove Jar, shake contents, and return to blending.
- For best performance in 20-oz. Travel Jar minimum amount of liquid needed per recipe is 3/4 cup (6 ounces/177 mL).
- When filling Jar, place frozen ingredients or ice into Jar first. When turned upside down to blend, frozen items will be on top.
- Do not chop or process hard foods such as cheese, crackers, or meat.
- Avoid bumping or dropping Blender.
- Do not blend hot liquids in Travel Jar.
- Do not fill Travel Jar above MAX fill line.
Blending Drinks With Blender Jar
TYPE OF DRINK INGREDIENTS NUMBER OF SERVINGS BLENDER SETTING/TIME
| Fruit Smoothie 1 cup (237 mL) milk1 1/2 cups (355 mL) yogurt2 cups (473 mL) frozen berries or other fruitSweetener to taste (optional) | 3 to 4(makes 4 cups [946 mL]) | PUREE/SMOOTHIE/ICY DRINK setting for 45 seconds or until blended. |
| Milkshake 1 1/2 cups (355 mL) milk2 large scoops ice cream2 to 3 tablespoons (15 to 44 mL) flavored syrup | 2 to 3(makes 3 cups [710 mL]) | JUICE/MILKSHAKE/EASYCLEAN setting for 5 to 10 seconds or until blended. |
| Frozen Drink 1 cup (237 mL) drink mix, such as Piña Colada mix10 ice cubes | 2(makes 2 cups [473 mL]) | PUREE/SMOOTHIE/ICY DRINK setting for 45 seconds or PULSE 5 times and blend on PUREE/SMOOTHIE/ICY DRINK for 45 seconds or until blended. |
TIPS FOR BEST RESULTS:
• Always place liquid in Blender Jar first, then remaining ingredients.
- If frozen fruit or ice are not blending, stop Blender and pulse a few times.
- For best performance, minimum amount of liquid needed per recipe is one cup (8 ounces/237 mL). Add more liquid if food is not blending properly.
- If blending action stops during blending or ingredients stick to sides of Jar, insert Stir Spoon to help move mixture around or add more liquid to Blender Jar.
Blending Drinks With Travel Jar
TYPE OF DRINK INGREDIENTS NUMBER OF SERVINGS BLENDER SETTING/TIME
| Whole Juice 1/2 cup (118 mL) frozen mango or pineapple1 handful baby spinach leaves1 cup (237 mL) green seedless grapes | 2 to 3(makes 2–2 1/2 cups[473 to 591 mL]) | Blend on PUREE/SMOOTHIE/ICY DRINK for 30 seconds. Remove Jar from Blender. Shake ingredients in Jar and return to blend on PUREE/SMOOTHIE/ICY DRINK for 15 to 20 seconds longer. Remove Collar and Cutting Blade Assembly and screw on Drinking Lid. |
| Fruit Smoothie 1 cup (237 mL) frozen strawberries1 large banana1/4 cup (59 mL) Greek vanilla yogurt3/4 cup (177 mL) pineapple juice | 2 to 3(makes 2–2 1/2 cups[473 to 591 mL]) | Blend on PUREE/SMOOTHIE/ICY DRINK for 25 to 30 seconds. Remove Collar and Cutting Blade Assembly and screw on Drinking Lid. |
| Milkshake 3 scoops any flavor ice cream(#16 scoop)3/4 cup (177 mL) milk or plant milk | 2 to 3(makes 2–2 1/2 cups[473 to 591 mL]) | Blend on JUICE/MILKSHAKE/EASYCLEAN for 20 seconds. Remove Collar and Cutting Blade Assembly and screw on Drinking Lid. |
TIPS FOR BEST RESULTS:
- When filling Jar, place frozen ingredients or ice into Jar first. When turned upside down to blend, frozen items will be on top.
- If frozen fruit or ice are not blending, stop Blender and pulse a few times.
Using Juicer Attachment
NOTE: Always select size of reamer based on size of fruit to be juiced.
natural_image
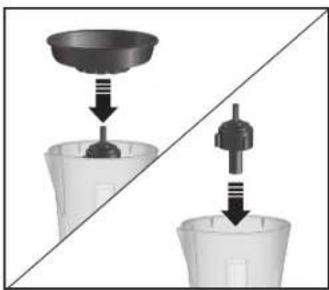
Diagram showing a computer mouse with a keyboard and scroll, no text or symbols present- Place Juice Cup on Juice Cup Base and rotate clockwise to lock. Place on Blender Base.
natural_image
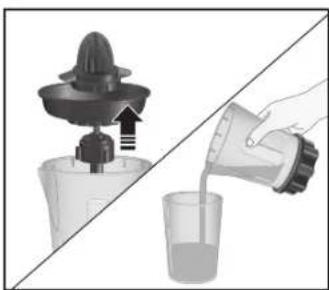
Diagram showing a mechanical assembly process with two views of a device (no text or symbols present)- Place Shaft Adapter into Juice Cup. Then place Pulp Control Basket on top of Shaft Adapter.
natural_image
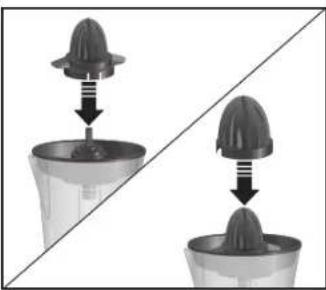
Two identical diagrams showing a coffee cup with a lid and its side view, each with arrows indicating the process (no text or symbols present)- Snap Small Reamer onto Pulp Control Basket.
- If juicing large fruit (oranges, grapefruit), fit Large Reamer directly on top of Small Reamer.
natural_image
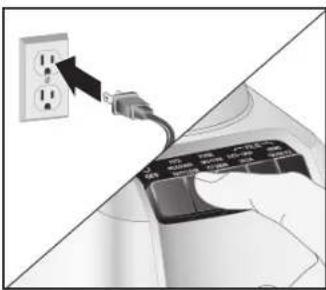
Close-up of a hand inserting a power outlet into a car (no visible text or symbols)- Ensure unit is in OFF (O) position. Plug into outlet.
- Push JUICE button to juice. Reamer will rotate continuously. Press halved citrus fruit on Reamer until all juice is extracted. Press OFF to stop juicing action.
natural_image
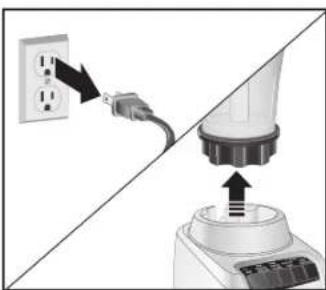
Diagram showing a power outlet connected to a plug, with an arrow indicating the plug's direction (no text or symbols present)- Unplug. Remove Jar from Base.

natural_image
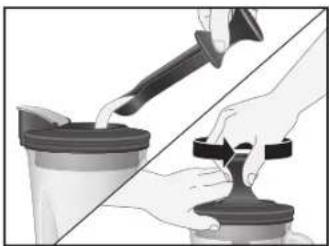
Illustration of a blender being poured into a glass with liquid, showing mechanical components and a hand pouring liquid (no text or symbols)- Pour mixture into container or Travel Jar.
Tips for Best Results
- This Juicer is designed to juice citrus fruits such as oranges, lemons, limes and grapefruit.
- For maximum juice, fruit should be at room temperature.
- Before juicing, roll fruit between countertop and palm of your hand. Slice fruit in half, cutting across sections.
Care and Cleaning
- Unplug.
- Wipe Blender Base, Control Panel, and cord with a damp cloth or sponge. If Juicer Attachment is included, wipe Juice Cup Base and Shaft Adapter with a damp cloth or sponge. To remove stubborn spots, use a mild, nonabrasive cleanser.
- Carefully wash Travel Jar, Drinking Lid, Blender Jar, Cutting Blade Assembly, Filler-Cap, Collar, and Lid in hot, soapy water. Care should be taken when handling Cutting Blade Assembly, as it is very sharp. If Juicer Attachment is included, carefully wash Juice Cup, Pulp Control Basket, and Reamers in hot, soapy water. Rinse
⚠ WARNING Electrical Shock Hazard. Disconnect power before cleaning. Do not immerse cord, plug, base, or motor in water or other liquid.
and dry thoroughly. Do not soak. These parts may also be washed in a dishwasher. DO NOT use "SANITIZE" setting when washing in dishwasher. SANITIZE cycle temperatures could damage your product.
- Store Blender with Lid ajar to prevent container odor.
DISHWASHER SAFE PARTS

natural_image
Exploded view of a blender with various kitchen utensils and accessories (no text or labels visible)EASYCLEAN for Blender Jar and Travel Jar
For Blender Jar: Pour 2 cups (473 mL) warm water in Jar and add 1 drop liquid dishwashing detergent. Press JUICE/MILKSHAKE/EASYCLEAN button and run for 20 to 30 seconds. Discard soapy water. Rinse with clean water.
This cleaning function is not a substitute for regular cleaning as instructed above. This function should never be used when blending any mixture containing eggs, milk, or any other dairy products, meats, or seafood.
This cleaning function should only be used to rinse Blender between batches of processing same food. When processing of a single type of food is finished, Blender should be disassembled and thoroughly cleaned as instructed above.
For Travel Jar: Pour 1 cup (237 mL) warm water in Jar and add 1 drop liquid dishwashing detergent. Press JUICE/MILKSHAKE/EASYCLEAN button and run for 10 seconds. Discard soapy water. Rinse with clean water.
Recipes
Triple Berry Smoothie
1 cup (237 mL) cranberry-raspberry juice
8 ounces (1 1/2 cups [355 mL]) fresh strawberries, hulled and quartered
6 ounces (1 1/4 cups [296 mL]) fresh raspberries
4 ounces (3/4 cup [177 mL]) fresh blueberries
1 medium ripe banana, cut into large chunks
1 cup (237 mL) vanilla yogurt
12 ice cubes
Directions:
- Place ingredients in Blender Jar in order listed.
- Cover and blend on PUREE/SMOOTHIE/ICY DRINK until smooth.
Test Kitchen Tip: Try different combinations of fresh berries and juice to make new flavors of smoothies.
Serves: 4
Green Apple Smoothie (For Travel Jar)
1/2 cup (118 mL) ice cubes (about 6 crescent-shape)
1/2 medium Granny Smith apple, cut in slices
1/2 medium banana, broken into chunks
1/2 cup (118 mL) kale, torn into pieces
1/2 cup (118 mL) apple juice
Directions:
- Place ingredients in Travel Jar in order listed.
- Blend until smooth.
Serves: 1–2
Vanilla Milkshake With Mix-Ins
3/4 cup (177 mL) milk
3 large scoops vanilla ice cream
1/4 cup (59 mL) crushed candy or cookies, optional
Directions:
- Place ingredients in Blender Jar in order listed.
- Cover and blend on JUICE/MILKSHAKE/EASYCLEAN until smooth.
Test Kitchen Tips:
• Always place liquid ingredients in Blender first.
- For best results, crush candy or cookies before adding to milkshake. When milkshake is blended, pour crushed candy or cookies on top and PULSE (Dice/Chop/Salsa) 3 to 4 times to mix.
Serves: 2–3
Fresh and Spicy Salsa
1 onion, peeled and quartered
1 clove garlic
1 jalapeno pepper, stem removed
4 small tomatoes, quartered
1/4 cup (59 mL) cilantro
1 tablespoon (15 mL) lime juice
1/2 teaspoon (2.5 mL) cumin
Salt and pepper to taste
Directions:
- Place onion, garlic, and pepper in Blender Jar. Cover and PULSE (Dice/Chop/Salsa) until finely minced. Stir as needed. Stop Blender.
- Add tomatoes, cilantro, lime juice, cumin, salt, and pepper. Cover and PULSE until desired texture is reached, stirring as needed.
Serves: 6–8
Recipes (cont.)
Blueberry Smoothie Bowl
Smoothie Bowl:
1/2 cup (118 mL) almond or coconut milk
5.3 oz. (140 mL) Greek yogurt
1 cup (237 mL) fresh blueberries
2 to 3 tablespoons (15 to 44 mL) chia seeds
Topping suggestions: blueberries, raspberries, chia seeds, chopped nuts, and/or granola.
Directions:
- Place almond milk, yogurt, blueberries and chia seeds in Blender Jar in order listed.
- Cover and blend on PUREE/SMOOTHIE/ICY DRINK until smooth.
- Insert Stir Spoon to help move mixture around and scrape down sides of Blender Jar.
- Pour in serving bowl and top as desired.
Serves: 1
Lemon Honey Vinaigrette (for Citrus Juicer and Travel Jar)
3 fresh lemons
1 cup (237 mL) olive oil
1/4 cup (59 mL) chopped shallot
3 tablespoons (45 mL) honey
2 teaspoons salt
1 teaspoon coarse black pepper
Directions:
- Using Citrus Juicer, juice lemons.
- Add juice and remaining ingredients to Travel Jar. Cover and blend on JUICE/MILKSHAKE/EASYCLEAN until smooth.
Easy Blender Hollandaise
1/2 cup (125 mL) melted butter
2 large egg yolks
1 tablespoon (15 mL) lemon juice
Salt and cayenne pepper, to taste
Directions:
- Place egg yolks and lemon juice in Blender Jar.
- Cover and blend on PULSE (Dice/Chop/Salsa) a few times, then blend on PUREE for 2 minutes, slowly drizzling in melted butter until mixture is thickened and smooth.
- Season with salt and a pinch of cayenne pepper.
Test Kitchen Tip: For information regarding the use of raw eggs in recipes, visit foodsafety.gov.
Serves: 2
Strawberry Lemonade (for Citrus Juicer)
4 large lemons
4 cups (946 mL) water, divided
2 cups (473 mL) frozen strawberries
3/4 cup ( 177 mL) sugar
Directions:
- Using Citrus Juicer, juice 4 lemons.
- In a large pitcher, combine 3 cups water and lemon juice.
- In Blender Jar, place 1 cup water, frozen strawberries and sugar. Blend on PUREE/SMOOTHIE/ICY DRINK setting for 30 to 45 seconds or until blended and icy.
- Add strawberry mixture to lemon juice mixture and stir.
- Serve over ice if desired.
Serves: 8–10
Recipes (cont.)
Acai Power Smoothie Bowl
3 oz. (89 mL) frozen acai puree, thawed
1 cup (237 mL) frozen blueberries
1/2 cup (118 mL) spinach
1/2 medium frozen banana
1 tablespoon (15 mL) almond butter
1 tablespoon (15 mL) ground flaxseed, optional
Topping suggestions: Granola, blueberries, sliced almonds and sliced bananas
Directions:
- Place acai puree, frozen blueberries, and spinach in Blender Jar. Blend on PUREE/SMOOTHIE/ICY DRINK until combined. Add frozen banana, almond butter, and ground flaxseed, if using. Blend on PUREE/SMOOTHIE/ICY DRINK until smooth.
- Pour into a bowl and top with granola, blueberries, chopped almonds and sliced bananas.
- Insert Stir Spoon to help move mixture around and scrape down sides of Blender Jar.
Serves: 1
Ginger Lime Marinade (For Citrus Juicer and Travel Jar)
1 lime
1/3 cup (79 mL) soy sauce
2 tablespoons (30 mL) packed brown sugar
1 tablespoon (15 mL) grated ginger
1 teaspoon dried crushed red pepper
Directions:
- Use Citrus Juicer to juice lime.
- Add juice and remaining ingredients to Travel Jar. Cover and blend on JUICE/MILKSHAKE/MIX until smooth.
- Use marinade for beef, chicken or seafood.
14
Blueberry Lemon Prosecco Sorbet
1/2 cup (18 mL) cold water minus 1 tablespoon (15 mL)
2 tablespoons (30 mL) Prosecco
1 pound frozen blueberries
1 teaspoon fresh lemon zest
3 tablespoons (44 mL) fresh lemon juice
1/2 cup (118 mL) sugar
2 tablespoons (30 mL) blueberry preserves or jam
Directions:
- Place ingredients in Blender in order listed.
- Blend on PUREE/SMOOTHIE/ICY DRINK for 60 to 90 seconds, or until smooth, stopping and stirring every 15 seconds.
- Transfer mixture to an airtight container and freeze for 4 to 6 hours, or until firm.
Serves: 6–8
Crushed Cookie Frappé
3/4 cup (177 mL) brewed espresso or other dark roast coffee
1/4 cup (59 mL) whole milk
2 tablespoons (30 mL) sugar
1 tablespoon (15 mL) chocolate syrup
2 chocolate sandwich cookies, broken into pieces
2 1/2 cups (474 mL) crescent-shaped ice cubes (about 24 ice cubes)
Whipped cream
Directions:
- Place brewed coffee, milk, sugar, and chocolate syrup in Blender Jar. Add ice to mixture in Blender.
- Press PULSE (Dice/Chop/Salsa) 4 or 5 times to chop ice. Then, blend on PUREE/SMOOTHIE/ICY DRINK until mixture is thoroughly blended.
- Add cookies to mixture in Blender. PULSE (Dice/Chop/Salsa) until cookies are blended into mixture.
- Top with whipped cream and additional cookie pieces, if desired.
Serves: 2–3
Limited Warranty
This warranty applies to products purchased and used in the U.S. and Canada. This is the only express warranty for this product and is in lieu of any other warranty or condition.
This product is warranted to be free from defects in material and workmanship for a period of five (5) years from the date of original purchase in Canada and three (3) years from the date of original purchase in the U.S. During this period, your exclusive remedy is replacement of this product or any component found to be defective, at our option; however, you are responsible for all costs associated with our returning a product or component under this warranty to you. If the product or component is unavailable, we will replace with a similar one of equal or greater value.
This warranty does not cover glass, filters, wear from normal use, use not in conformity with the printed directions, or damage to the product resulting from accident, alteration, abuse, or misuse. This warranty extends only to the original consumer purchaser or gift recipient. Keep the original sales receipt, as proof of purchase is required to make a warranty claim. This warranty is void if the product is used for other than single-family household use or subjected to any voltage and waveform other than as specified on the rating label (e.g., 120V \~ 60 Hz).
We exclude all claims for special, incidental, and consequential damages caused by breach of express or implied warranty. All liability is limited to the amount of the purchase price. Every implied warranty, including any statutory warranty or condition of merchantability or fitness for a particular purpose, is disclaimed except to the extent prohibited by law, in which case such warranty or condition is limited to the duration of this written warranty. This warranty gives you specific legal rights. You may have other legal rights that vary depending on where you live. Some states or provinces do not allow limitations on implied warranties or special, incidental, or consequential damages, so the foregoing limitations may not apply to you.
To make warranty claim, do not return this appliance to the store. Please write Hamilton Beach Brands, Inc., Attn: Consumer Affairs, 261 Yadkin Road, Southern Pines, NC 28387, or visit hamiltonbeach.com/customer-service in the U.S. or hamiltonbeach.ca/customer-service in Canada. For faster service, include the model, type, and series numbers on your appliance.
PRÉCAUTIONS IMPORTANTES
natural_image
Three labeled items: a pushpin, a lid, and a clear glass bottle (no text or symbols on the objects themselves)natural_image
Diagram showing a kitchen appliance with a fan, blade, and circular component (no text or symbols)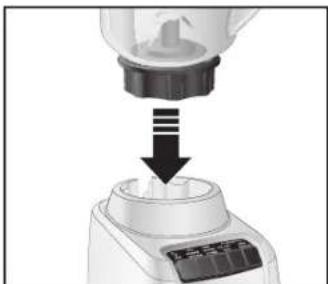
natural_image
Close-up of a kitchen blender being processed with a black arrow indicating downward motion (no text or symbols visible)
natural_image
Illustration of hands pouring liquid into a trash bin (no text or symbols)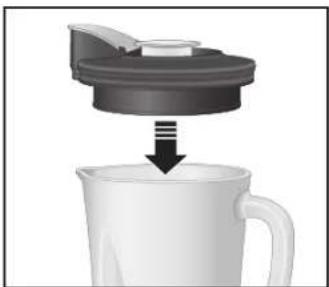
natural_image
Close-up of a white mug with a lid and arrow indicating compression or lifting (no text or symbols visible)natural_image
Close-up of hands inserting a power outlet into a wall-mounted device (no visible text or symbols)natural_image
Illustration of a hand holding a mesh-wrapped object over a mug (no text or symbols visible)AVERTISSEMENT
Risque de brûlure.
natural_image
Diagram showing two views of a food container with arrows indicating movement or change (no text or symbols present)OPTIONNEL OPTIC
natural_image
Illustration of hands using a tool to lift or remove a cup (no text or symbols present)NNEL
natural_image
Close-up of a hand inserting a power socket into an air conditioner unit (no text or symbols visible)m = 311
natural_image
Close-up of a kitchen blender with an upward arrow indicating compression or lifting (no text or symbols visible)The quick brown fox jumps over the lazy dog.
natural_image
Illustration showing a hand pouring liquid from a container into a glass, separated by a diagonal line (no text or symbols)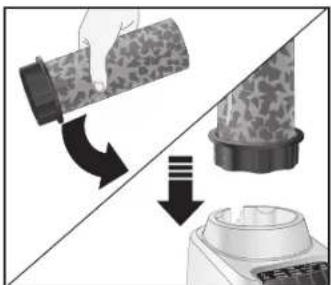
natural_image
Diagram showing a hand holding a textured object being processed, with arrows indicating process flow (no text or symbols)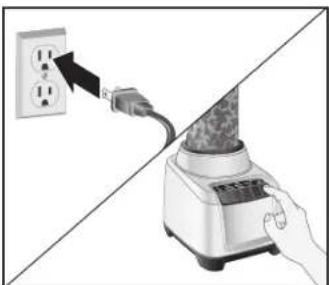
natural_image
Illustration of a power adapter with a plug inserted into an outlet, connected to a blender (no text or symbols visible)natural_image
Diagram showing a power outlet connected to a wall-mounted device with an arrow indicating upward movement (no text or symbols present)natural_image
Diagram showing two containers with arrows indicating movement or transformation, no text or symbols presentnatural_image
Diagram showing a blender being inserted into a digital device, with no visible text or symbols.natural_image
Diagram showing a mechanical assembly with a top component and a side view of a base component (no text or symbols)natural_image
Two identical diagrams showing a coffee cup with a lid and its side view, connected by arrows (no text or symbols)natural_image
Close-up of a hand inserting a power outlet into a wall-mounted device (no text or symbols visible)natural_image
Diagram showing a power outlet connected to a plug, with an arrow indicating the plug's direction (no text or symbols present)natural_image
Illustration of a blender being poured into a glass, showing mechanical components and liquid level (no text or symbols)natural_image
Exploded view of kitchen cleaning items including blender, blender, and blender cup (no text or labels visible)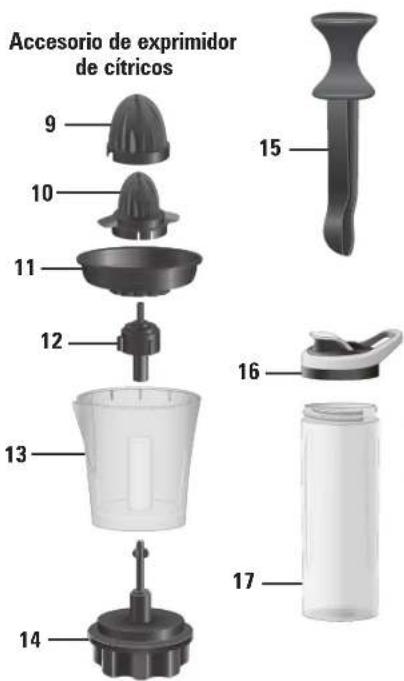
natural_image
Diagram showing a kitchen appliance with a fan, blade, and circular component (no text or symbols)
natural_image
Close-up of a kitchen blender being processed with a black arrow indicating downward motion (no text or symbols visible)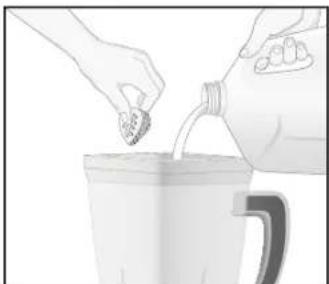
natural_image
Illustration of hands pouring liquid into a trash bin with a bottle (no text or symbols)natural_image
Close-up of a white mug with a lid and arrow indicating compression or lifting process (no text or symbols visible)natural_image
Close-up of a hand inserting a power outlet into a device (no visible text or symbols)natural_image
Illustration of a hand holding a mesh-wrapped object over a mug (no text or symbols visible)ADVERTENCIA
natural_image
Illustration of hands pouring liquid from a container into a spray bottle (no text or symbols)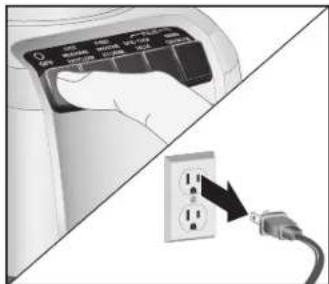
natural_image
Diagram showing a hand inserting a wall-mounted power socket into a socket connected to a cable (no text or symbols visible)
natural_image
Close-up of a kitchen blender with an upward arrow indicating compression or lifting (no text or symbols visible)natural_image
Illustration showing a hand pouring liquid from a straw into a cup, separated by a diagonal line (no text or symbols)natural_image
Illustration showing a hand pouring liquid into a jar with a filter, and a downward arrow indicating process (no text or symbols)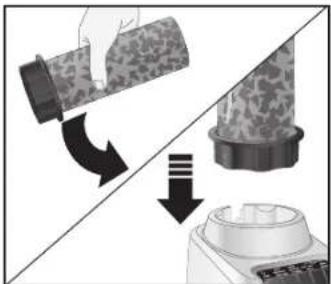
natural_image
Diagram showing a hand pouring liquid into a container with arrows indicating flow direction (no text or symbols)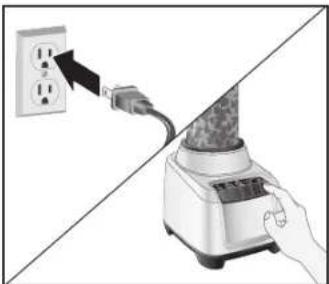
natural_image
Illustration of a blender with a power plug connecting to a digital display (no text or symbols visible)natural_image
Diagram showing a power outlet connected to a wall-mounted device with an arrow indicating assembly or connection (no text or symbols present)natural_image
Diagram showing a mechanical assembly with arrows indicating direction of movement or transformation (no text or symbols present)natural_image
Diagram showing a device being processed into a motor, with no visible text or symbols.natural_image
Diagram showing a mechanical assembly with a top component and a side view of a cylindrical component (no text or symbols)natural_image
Two identical diagrams showing a coffee cup with a lid and its side view, connected by arrows (no text or symbols)natural_image
Close-up of a hand inserting a power outlet into a car (no text or symbols visible)natural_image
Diagram showing a power outlet connected to a device with an upward arrow indicating the process (no text or symbols present)- Desenchufe. Retire la jarra de la base.
natural_image
Illustration of a blender being poured into a glass, showing the process (no text or symbols)natural_image
Exploded view of kitchen appliance components including blender, blender, and blender cup (no text or labels visible)Mixcoac, Benito Juárez
- LIRE AVANT UTILISATION
- IMPORTANT SAFEGUARDS
- SAVE THESE INSTRUCTIONS
- Other Consumer Safety Information
- Wattage/Peak Power Information
- Parts and Features
- Using Your Blender
- Using Your Blender (cont.)
- Blender Tips
- Using Travel Jar
- WARNING Burn Hazard.
- WARNING Laceration
- Blending Tips for 20-oz. Travel Jar
- Blending Drinks With Blender Jar
- TIPS FOR BEST RESULTS:
- Blending Drinks With Travel Jar
- Using Juicer Attachment
- Tips for Best Results
- Care and Cleaning
- EASYCLEAN for Blender Jar and Travel Jar
- Recipes
- Triple Berry Smoothie
- Directions:
- Serves: 4
- Green Apple Smoothie (For Travel Jar)
- Serves: 1–2
- Vanilla Milkshake With Mix-Ins
- Test Kitchen Tips:
- Serves: 2–3
- Fresh and Spicy Salsa
- Serves: 6–8
- Recipes (cont.)
- Blueberry Smoothie Bowl
- Serves: 1
- Lemon Honey Vinaigrette (for Citrus Juicer and Travel Jar)
- Easy Blender Hollandaise
- Strawberry Lemonade (for Citrus Juicer)
- Acai Power Smoothie Bowl
- Ginger Lime Marinade (For Citrus Juicer and Travel Jar)
- Blueberry Lemon Prosecco Sorbet
- Crushed Cookie Frappé
- Limited Warranty
- PRÉCAUTIONS IMPORTANTES
- AVERTISSEMENT
- Risque de brûlure.
- ADVERTENCIA
Brand : HAMILTON BEACH
Model : 53524
Category : Blender