USER MANUAL LT-24HD7WU JVC
Operating Instructions
Mode d'emploi
Handleiding
- Auto Power Off
- PVR (Personal Video Recorder)
Time Shift
- New Thin-frame design*
DVD Player
Battery notice (valid in EU only)
Look after our environment - contact your local authorities for advice on how to safely dispose of exhausted batteries. The crossed out wheelie bin symbol indicates that used batteries should not be disposed of with your normal household waste! A separate collection system for used batteries is in place to allow the correct treatment and recycling in accordance with current legislation. Please contact your local authority for details on collection and recycling schemes in your area.
DVB-C notice
- Encoded programmes require a Smartcard and a CA module (CAM) for deciphering. You get the smartcard from your cable supplier (CAMs are customary). Insert the smartcard into the CAM, and then insert the CAM into the CI slot of your TV set. The Smartcard you insert into the CAM.
- Currently approx. 650 cable-providers offer their service in Germany. The built-in tuner cannot automatically store all available channels of all cable networks. This performance cannot be expected, with so many individual providers on the market. Please use your provider's channel-table for manual tuning.
- This TV's CI slot cannot support all CI+ modules of all 650 providers. If your provider's module is not supported, please ask your dealer for another CA module or use your provider's settop-box for scrambling.
- Any function relative to the digital television (with the DVB logo) is available only within the country or area where such signals are transmitted. Verify with the salesman if it is possible to receive a DVB-T signal in the zone where you live.
- Remove the CAM for DVB-T reception, if it has been inserted.
- A DVB-T antenna must be connected for DVB-T reception.
- Even if the television conforms to the DVB-T specifications, the compatibility to future digital DVB-T transmissions is not guaranteed.
- Some digital television functions may not be available in some countries.
- The DVB-T system present in this device is FTA (Free to air).
Equipment connected to the protective earthing of the building installation through the mains connection or through other equipment with a connection to protective earthing – and to a cable distribution system using coaxial cable, may in some circumstances create a fire hazard. Connection to a cable distribution system has therefore to be provided through a device providing electrical isolation below a certain frequency range.
Dear Customer,
[European Union]
This apparatus is in conformance with the valid European directives and standards regarding electromagnetic compatibility and electrical safety.
- The extra-slim frame allows more than a full view to the TV's screen. Even the superblack screen's rim (3mm approx.) is now visible.
This unit has been produced according to all current safety regulations. The following safety tips should safeguard users against careless use and the dangers connected with such use.
Although this appliance has been carefully manufactured and rigorously checked prior to leaving the factory, as with all electrical appliances it is possible for problems to develop. If you notice smoke, an excessive build-up of heat or any other unexpected phenomena, you should disconnect the plug from the mains power socket immediately.
-
Ensure that the unit is sufficiently ventilated! Never place next to or underneath curtains!
-
This set should be only be connected to an AC 100-240V~50/60Hz mains power supply - do not attempt to connect it to any other type of supply.
-
The socket-outlet must be installed near the equipment and easily accessible.
-
Any repairs must be carried out by qualified service personnel only.
-
Do not open this unit. A non-expert attempting to repair the unit could be dangerous and potentially cause a fire hazard.
-
Keep away from rodents. Rodents (and also cockatiels) enjoy biting into electric flexes.
-
The animal can cause a short cut (fire hazard!) and receive a fatal electric shock.
-
Always hold plug when pulling out plug from power mains supply system. Do not pull on flex. The flex can become overloaded and cause a short cut.
-
Never wet clean. Only use a damp cloth, the same as when cleaning furniture.
-
Do not submerge in or under water!
-
Set up unit so that no one is able to trip over the flex.
-
This unit is recommended to be installed on shock-free benches in order to avoid any danger from falling.
Take note that toddlers can pull the unit down from the table or cupboard by means of its flex. Children can hurt themselves when doing this.
-
Do not use the unit near heat sources. The casing and flex could be damaged by the impact of heat.
-
Watch out for kiddies copying what adults do! Do not stick any objects through the vents!
-
The vents must remain open! No newspapers or covers should be put on the unit!
-
The remote control is not a toy! Toddlers could swallow the batteries. If a battery has been swallowed, please seek out a doctor immediately.
-
The screen is made of glass and can break if it is damaged. Be careful when collecting sharp-edged broken glass. You could be hurt or the unit could become damaged.
-
If the unit is mounted on the wall, contact the shop where you purchased the unit for advice, and leave the installation work to experts. Incomplete installation work can cause you injuries.
-
Taking fall-prevention measures
-
If these measures are not taken, the unit can fall and you could be injured.
-
Contact the shop where you purchased the unit to obtain full details of the measures.
-
When a TV stand is used,
-
Ensure the unit is fully on the stand and placed in the centre.
-
Do not leave the stand doors open.
-
You could be hurt as a result of the unit falling or breaking, or your fingers being caught or jammed. Take extra precautions if you have children.
-
Avoid placing the unit on any surfaces that may be subject to vibrations or shocks.
-
To protect the unit during a thunder storm unplug the AC power cord and disconnect the antenna. Caution: Do not touch the antenna connector.
-
When you leave your home for a long period of time, unplug the AC power cord for safety reasons.
-
The unit becomes warm when in operation. Do not place any covers or blankets on the unit in order to prevent overheating. The ventilation holes are not to be blocked. Do not set up near radiators. Do not place in direct sunshine. When placing on a shelf leave 10cm free space around the whole unit to allow for air circulation.
-
Liquids spilled into the unit can cause serious damage. Switch the set OFF and discon supply, then consult a qualified service person before attempting to use the unit again.
Please pay attention to the following instructions in order to avoid receiving a life-threatening electric shock:
- Protect against moisture. Never use in the bath or sauna.
- Never use near a bath, shower or swimming pool.
- Never use the unit if it has got wet. This can also mean condensation moisture, which occurs in the winter when the cold unit is brought into a heated flat. Wait before operating the unit especially after it has been transported in the winter, until the cold unit has adjusted to the room temperature.
- Do not place any heavy objects on the flex. Electrical isolation could be damaged.
- Never wrap insulating tape around damaged flexes or on damaged plugs. These should be repaired or replaced by qualified service personnel.
- Never use this unit if the cabinet is defective. Do not make provisional repairs if the cabinet is damaged - this should be replaced by a new cabinet if necessary.
- Unplug the unit from the mains power supply prior to the cleaning of the unit.
- Never try to repair a damaged AC power cord with isolation-tape - this should be repaired by a specialist or replaced. Do not let your pet loose near the cable. Animals biting into the cable could receive a fatal electric shock, and could cause a hazard to others.
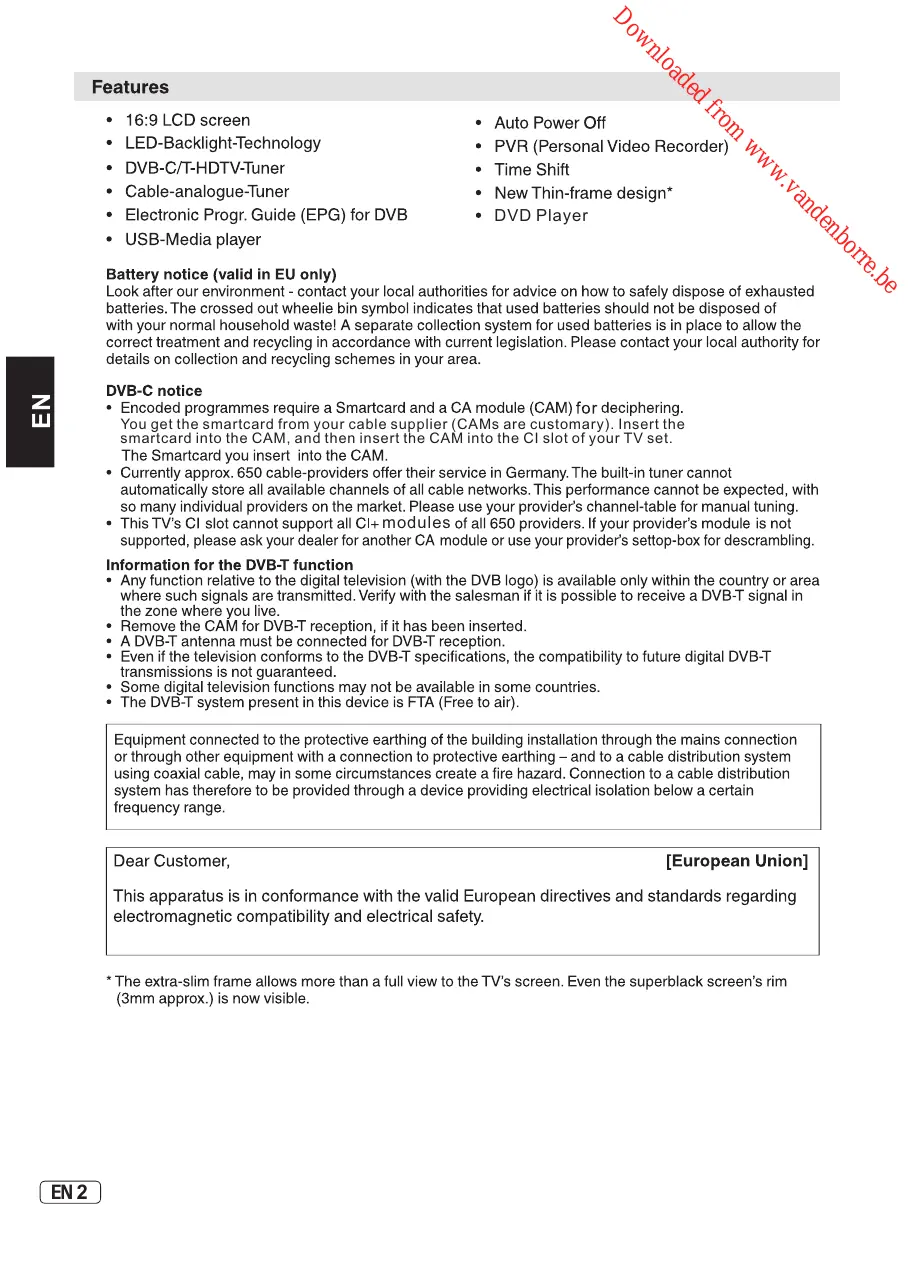
How to attach the stand
NOTE:
- Unplug the AC cord.
- Before performing work spread cushioning over the base area to lay the TV on.
- Do not support the TV by the screen as sharp objects and too much pressure may cause damage.
- Be sure to follow the instructions. Incorrect installation of the stand may result in the TV falling over.
1) Place the TV on its front onto a table.
2) Align the stand's base-plate (supplied) as seen here.
It will fit in only one direction. Make sure the locating pegs fit in the locating holes.
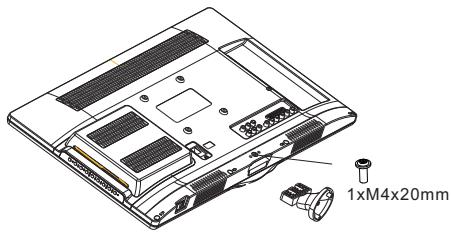
3) Carefully hold the base plate in position and secure it with screws.
-
Place the TV with the display side down on a flat surface. Use a cloth to protect the display. Position the stand base pillar onto the bottom of the TV.
-
Attach the stand base plate and washer to the stand pole by firmly tightening the supplied screws.
NOTE:
- To detach the stand, perform these steps in reverse order.
Dismantling the stand
For wall mounting, the stand must be dismantled. To do this, remove screws (above drawing) from the back. Fit a VESA (100 x 100) wall mounting kit. The screw thread length must not exceed 5mm.
Notes when mounting the TV on a wall
Remove the stand as one piece by reversing the fixing procedure described above.
You can refit the screws to the stand for safe keeping, but tighten them only slightly.
VESA screw size 4xM4x5mm
Protect the screen and lay the TV flat on its face, on a stable table, with the stand foot clear of the table edge.
To ensure a safe installation, please observe the following when hanging the television on a wall:
Warning: This operation requires two people.
Check that the wall can support the weight of the television set and a VESA-standard wall mount assembly (not supplied).
Be sure to use only screws suitable for the material of the wall.
In case of any doubt please contact a qualified installer.
Beware of electrical cables, gas and water pipes in the wall.
Follow the instructions provided with the wall mount.
The set must be installed on a vertical wall.
Make sure that cables are placed so that there is no danger of tripping over them or damaging them.
WARNING To prevent fire, never place any type of candle or open flame on the top or near the TV set.
Headphone Warning
To prevent possible hearing damage, do not listen at high volume levels for long periods.
Moving the unit or carrying by hand
When the unit is moved a long way, unplug the power cord and disconnect the antenna, connecting cables and any fall-prevention apparatus.
- Moving without doing so could result in damage to the power cord, a fire, electric shocks or injuries from dropping the unit.
Ensure that unpacking and transfer of the unit is carried out by two or more people and that the unit stays upright when doing this.
- Ensure that you support the unit when the stand is pushed, as this can cause the unit to fall and you could be injured.
- The appliance could leave indentations in wooden tables with extremely soft wooden surfaces due to its heavy weight.
- Furniture polish could corrode and dissolve rubber feet. Black imprints could be visible on the table.
You should therefore only use TV benches, which have been constructed for this specific purpose.
The distance between eyes and the screen should be about 3 ~ 4 times as long as height of the screen.
Viewing from too close a distance can cause strain for your eyes.
When installing the Monitor on a table, be careful not to place it on the edge.
- This may cause the Monitor to fall, causing serious injury to a child or adult, and serious damage to the Monitor.
Possible Adverse Effects on LED Screen: If a fixed (non-moving) pattern remains on the LED screen for long periods of time, the image can become permanently engrained in the LEDTV panel and cause subtle but permanent ghost images. This type of damage is NOT COVERED BY YOUR WARRANTY. Never leave your TV on for long periods of time while it is displaying the following formats or images:
- Fixed Images, such as stock tickers, video game patterns, TV station logos, and websites.
- Special Formats that do not use the entire screen. For example, viewing letterbox style (16:9) media on a normal (4:3) display (Black bars at top and bottom of screen); or viewing normal style (4:3) media on a wide-screen (16:9) display (Black bars on left and right sides of screen).
Attention!
Cleaning instructions for your LEDTV.
Safety note:
Before you start to clean, switch the set's power off completely and disconnect the plug from the mains power supply.
Be careful not to scratch the plastic coated front panel - it is highly vulnerable to accidental scratching (e.g. by fingernails or other sharp items). While cleaning, do not wear jewelry that could cause surface scratching (such as rings, wrist-watch, etc.). Use a lint-free cloth and pure water to clean with, but make sure the cloth is thoroughly wrung out so that it is just damp and not soaking wet - also make sure that the cloth is free from any dirt that could cause scratching to the surface.
Wipe the set clean using minimal pressure.
Do not use standard window cleaning fluid. Its alcohol / ammonia will dissolve the front window's coating. Never use solvent or thinner. Never use special cleaners which are designed for cleaning PC Monitors or CRT TVs. Finally carefully rub dry with a clean dry lint-free cloth.
Do not use paper towels or tissues to clean the set - paper can disintegrate when wet or may leave a trail of dust behind. Some paper can also be abrasive and scratch your screen.
Safe use and care of your television We have designed and made this television to meet European Safety Standards, but as with any electronic equipment you must take care, to stay safe and get the best results. Here is some good advice to help you do this.
Read these instructions carefully before you try to use the television.
Protect the mains lead. You must ensure the mains lead cannot be walked on, crushed, chafed, cut or trapped.
Switch off the mains power or pull out the mains plug when you leave the television unattended, unless the function of the television requires a continuous power supply.
Do not continue to use your television if you have spilt liquids in it, if it is damaged in any way or if it does not work normally. Immediately unplug the television and get expert advice.
Avoid harsh conditions such as wet or damp places, high humidity, strong vibration, extremely high or low temperatures, strong sunlight and places that are very dusty.
Never fit makeshift stands or legs to the television. Never push objects into holes and ventilation slots. To prevent electric shock do not remove any cover. Do not touch the LED display as it gets warm when in use, this is normal and is not a fault.
If anything goes wrong do not try to fix it yourself, get a qualified service agent to look at it. Pull out the mains plug and disconnect the aerial lead during thunder storms.
Cleaning
Disconnect the mains supply and use only a lightly dampened soft cloth. Do not use chemical solvents or strong detergents as these may damage the cabinet or screen.
Never allow water droplets to remain on the screen as moisture can cause permanent discoloration.
Greasy marks must only be removed with a commercial cleaner specifically recommended for LED screens.
Mains Supply
This television is designed to operate from a 100-240 Volts 50/60Hz AC mains supply. Other power sources may damage it. Check that the rating plate (on the back cover of the television) states 100-240V AC before you plug it in for the first time.
The manufacturer accepts NO liability for damage or injury caused by using the product with the wrong mains voltage.

Dangerous voltage constituting a risk of electric shock is present inside this equipment.

This equipment is double insulated and an earth connection is not required.

This mark is applied to show the equipment conforms to European safety and electro-magnetic compatibility standards.
Eye Fatigue
When using this product as a computer monitor, health and safety experts recommend short frequent breaks rather than occasional longer breaks. For example a 5-10 minute break after an hour of continuous screen work is considered to be better than a 15 min break every 2 hours. Do not use the monitor against a bright background or where sunlight or other bright light sources will shine directly onto the screen.
Battery handling and usage
Only adults should handle batteries. Do not allow a child to use this remote control unless the battery cover is securely attached to the remote control.
The battery type used in the remote control is 2 × 1.5V AAA size batteries (not included) which are accessible and can be replaced.
Remove the battery cover located at the bottom of the remote control to remove the batteries.
DISPOSAL
As a responsible retailer we care about the environment.
As such we urge you to follow the correct disposal procedure for the product, packaging materials and if applicable, accessories and batteries.

This will help conserve natural resources and ensure that the material that protects health and the environment.
You must follow laws and regulations about disposal. Waste electrical products and batteries must be disposed of separately from household waste when the product reaches the end of its life.
Contact the store where you bought the product and your local authority to learn about disposal and recycling.
The batteries must be disposed of at your local recycling point.
WARNING:
This appliance is intended for domestic household use only and should not be used for any other purpose or on any other application, such as for non-domestic use or use in a commercial environment.
If the supply cord is damaged it must be replaced by the manufacturer, its service agent or similarly qualified persons in order to avoid a hazard.
This apparatus shall not be exposed to dripping or splashing.
No objects filled with liquids, such as vases, shall be placed on the apparatus.
No naked flame sources, such as lighted candles should be placed on the apparatus.
The ventilation should not be impeded by covering the ventilation openings, with items such as newspapers, tablecloths, curtains etc.
WARNING: To prevent injury, this apparatus must be securely attached to the floor/wall in accordance with the installation instructions.
This apparatus is not suitable for use in a tropical climate.
Ventilation
Allow at least a 10 cm gap all around the product.
To protect the environment, use local recycling facilities for battery disposal.
Where the MAINS plug or an appliance coupler is used as the disconnect device, the disconnect device shall remain readily operable.
Contents
Features. 2
Important Safety Information. 3-7
Contents. 8
Installation 9-12
Remote Control. 13-14
Operation 15-24
DVD Operation 25-29
Troubleshooting table. 30-34
Specification 35
License Information 36
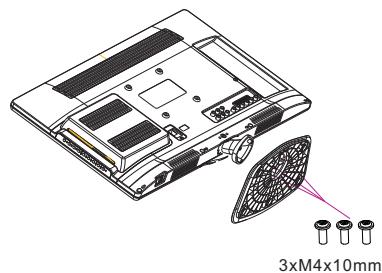
Front panel
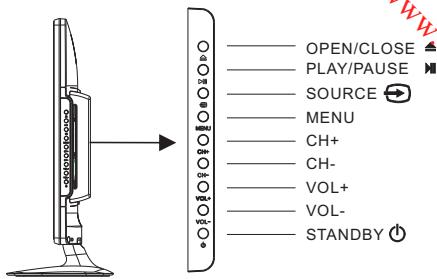
KEYBOARD
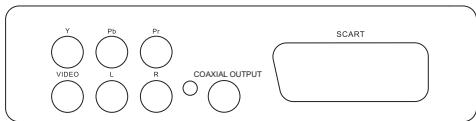
REAR AV Connections
- OPEN/CLOSE: Open or close DVD slot.
- PLAY/PAUSE: Play or pause playback.
- SOURCE: Displays the input source, press "CH+" or "CH-" to select required source, then press "VOL-" or "VOL+" to change source.
- MENU: Display main MENU.
- CH + / CH - : In TV mode, press "CH+" or "CH-" to change the channel up and down. In MENU mode, press "CH+" or "CH-" to select items.
- VOL+/VOL-: Adjust sound level. In MENU mode, press "VOL+ " or "VOL- " to adjust the item that you selected.
- STANDBY: Press this button to turn the unit ON from STANDBY mode. Press it again to turn the set back to STANDBY.
All the terminals are (from left to right): YPbPr INPUT,VIDEO, AUDIO INPUT,COAXIAL OUTPUT, SCART.
Note:VIDEO and YPbPr share one audio channel.
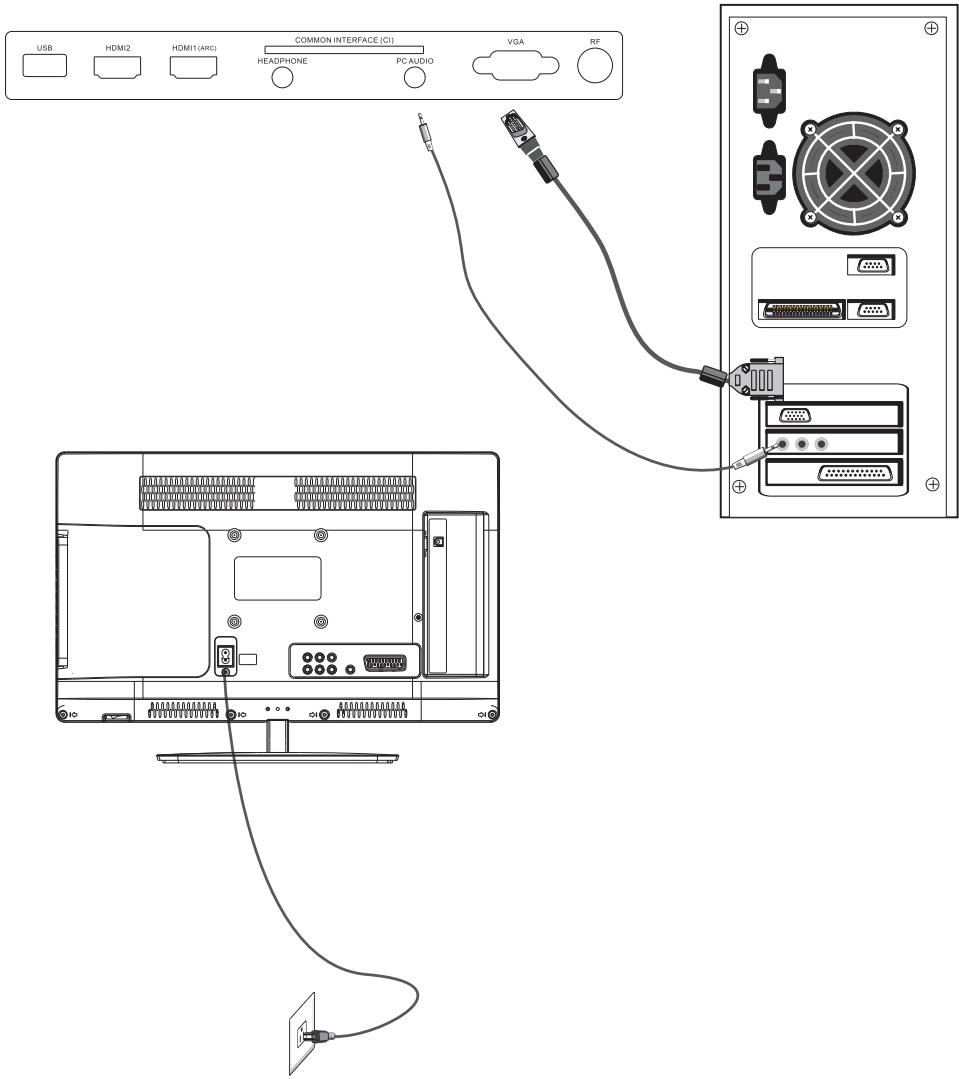
REAR AV Connections(SIDE)

All the terminals are(from left to right):
USB, HDMI2(ARC), HDMI1, HEADPHONE, CI, PC AUDIO, VGA, RF.
Note: 1.When HDMI port gets DVI signal ,the audio signal is received from the PC Audio channel.
2.Insert the plug of the earphone into the headphone jack on the unit.
The speakers are then muted.
HDMI ARC (Audio Return Channel)
The ARC function allows you to send audio signal from your ARC-compliant TV to ARC-compliant audio devices (e.g. home theatre) without the need to connect any audio cable (e.g. coaxial, optical digital audio cable, or analog audio cable).
To enjoy the ARC function:
-
Make sure your ARC- compliant audio devices are connected by an HDMI 1.4 cable to the HDMI 2 (ARC) port of your ARC- compliant TV. And open the ARC function of ARC-compliant audio devices.
-
Adjust TV setting : press MENU button, choose SETUP, then set HDMI CEC Control on.
-
Then, just use your TV remote control to adjust the volume output (VOL + / - and MUTE) of the connected audio device.
Note: If the ARC-compliant audio devices do not support sound that TV outputs, such as Dolby Digital , or Dolby Digital Plus, then ARC function will not work and there may be no sound from ARC-compliant audio devices. In this case, please set coaxial to PCM.
PC
STEPS:
Be sure both the TV and computer are set to
Power off.
- Connect VGA and audio cable.
- Connect the power cord.
3.Power on the TV, switch to PC mode.
4.Power on the PC.
This sequence is very important.
PC
PRESET MODE
| RESOLUTION | V.Freq.(Hz) | H.Freq.(kHz) |
| 1 | 800*600 | 60 | 37.88 |
| 2 | 640*480 | 60 | 31.47 |
| 3 | 1024*768 | 60 | 48.36 |
| 4 | 1280*960 | 60 | 60 |
| 5 | 1280*720 | 60 | 45 |
| 6 | 1366*768 | 60 | 47.7 |
NOTE:
PC V.Freq.(Hz) not more than 60Hz
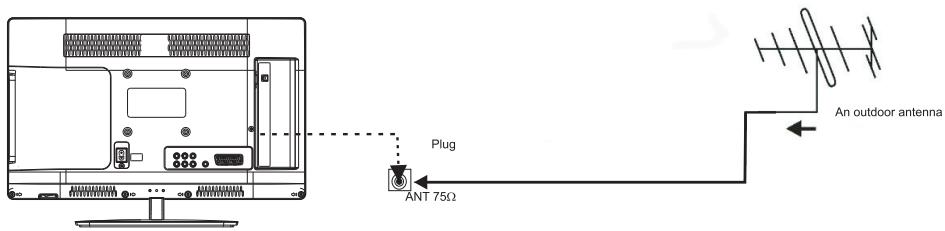
ANTENNA
Note:
Aerial connections: IEC(female).
Input impedance: 75 unbalanced.
AV EQUIPMENT
This TV provides one group of AV, one group of YPbPr and one SCART for convenient connection to VCR, DVD or other video equipment. Please refer to the owners manual of the equipment to be connected.
REAR AND SIDE CONNECTIONS
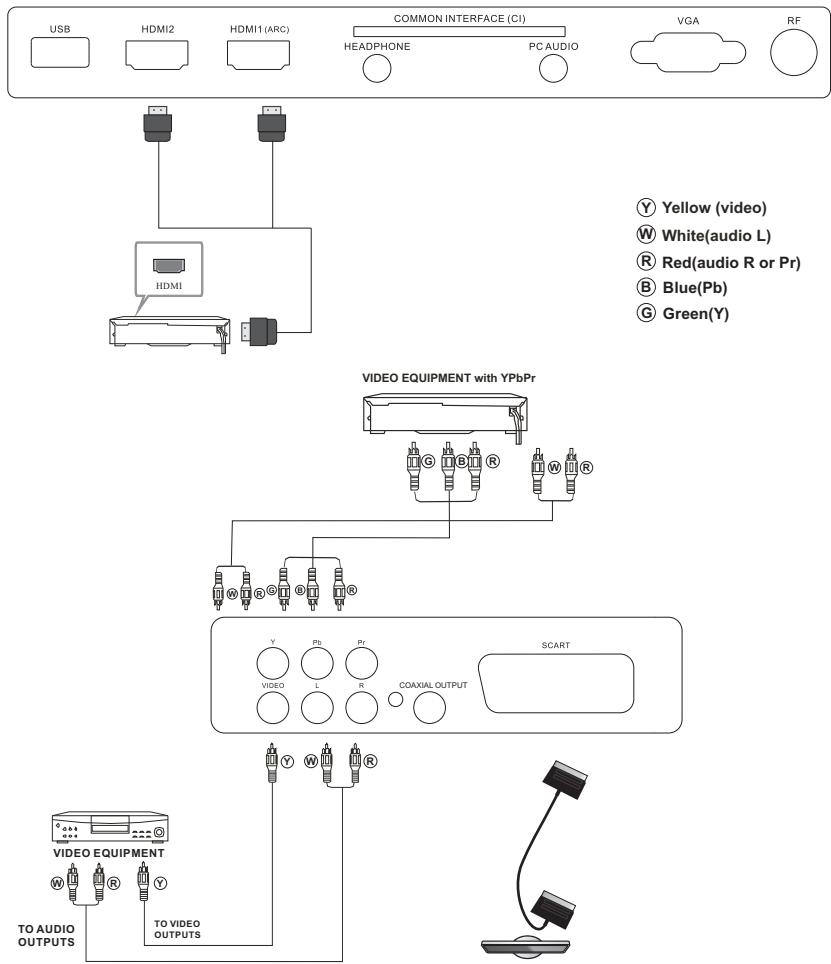
It can be connected to the following appliances: VCR, multi disc player, DVD, camcorder, video game or stereo system, etc....
YPbPr can support these video formats: 480i,576i,480p,576p,720p,1080i,1080p.
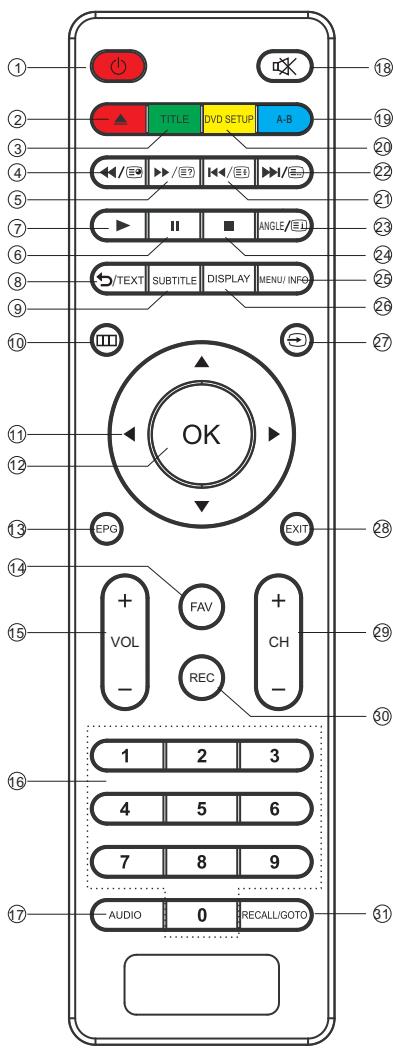
1: 口 :To set the TV to standby or power on.
2: : In DVD mode, used to eject the CD/DVD. Red button (see footnote).
3:TITLE:In DVD mode, used to access the Title menu. Green button (see footnote).
4: /图:In DVD mode or in USB mode, used as reverse key; in teletext mode, used as subpage key.
5: /[2]: In DVD mode or in USB mode, used as forward key; in teletext mode, used as reveal key.
6:II: In DTV mode, used to start timeshift. In DVD/USB mode, press this button to pause playback.
7:▶: In DVD mode, used to resume playback during timeshift. In DVD/USB mode, press this button to begin or resume playback.
8:TEXT:To enter or exit teletext.
9:SUBTITLE:To turn subtitles on or off.
10:To display the main on-screen menu.
11:NAVIGATION BUTTONS: To move within the menu.
12: OK: To confirm selection.
13: EPG: In DTV mode, used to display information about the programme being viewed and what's on next.
14: FAV: In TV or DTV mode, used to access your favourite channels list.
15: VOL +/-: To adjust sound level.
16: NUMERIC BUTTONS: For direct access to channels.
17: AUDIO: To select the available audio language of TV programmes.
18: : To disable or enable the sound output.
19: A-B: In DVD mode, used to repeat a segment of the disc you are watching between point A and point B in a loop. Blue button (see footnote).
20: DVD SETUP: In DVD mode, used to access the DVD setup menu. Yellow button (see footnote).
21: In DVD mode or in USB mode, used as previous key; in teletext mode, used as hold key.
22: I/:In DVD mode or in USB mode, used as next key; in teletext mode used as list key. In TV/DTV mode, used as channel list key except when in teletext mode.
23: [ ] : In teletext mode used as index. In DTV, used to access the Recorded list menu.
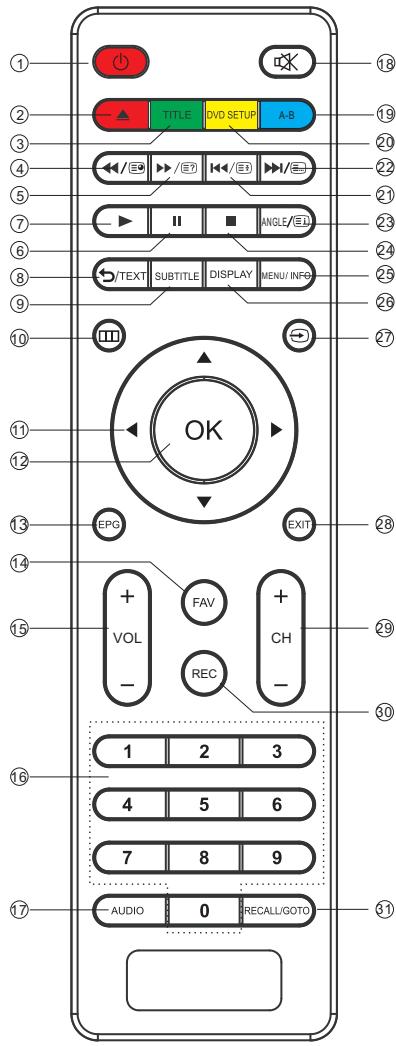
24: ■ : In DTV mode, used to stop timeshift or recording. In DVD/USB mode, used to stop Playback.
25: MENU/INFO: During DVD playback, press MENU to display the disc menu of the current title. During VCD/SVCD playback, press MENU to set playback control on or off. In DTV mode, used as info.
26: DISPLAY: In DVD mode, used to display info.
27: Press this button to display and select the available video input sources.
28: EXIT: To return to the previous menu or exit menu.
29: CH + / CH - : To access the next or previous channels.
30: REC: in DTV Mode, press this button to start recording the TV programme you are watching. In DVD mode, used to repeat chapter or title.
31: RECALL/GOTO: In DTV Mode, RECALL jumps to the last channel viewed. In DVD Mode, GOTO allows direct chapter/ title/track/time input.
Footnote:
Red, green, yellow and blue buttons are multi-function; please follow on-screen prompts and section instructions.
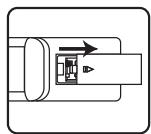
Remote Control Battery Installation
The remote control requires two AAA batteries (not supplied). Below are steps to assist you with replacing the batteries.
- Open the back cover of the battery compartment.
2.Install the batteries into the battery tray. There are + / - polarity markings in the battery compartment. Please ensure the battery polarity is correct.
3.Close the battery cover.
TELETEXT
Teletext is an information system broadcast by certain channels which can be read like a newspaper. It also offers access to subtitles for viewers with hearing problems or who are not familiar with the transmission language (cable networks, satellite channels, etc.)
| Press : | You will obtain : |
| TEXT
(BUTION 6) | This is used to enter or exit teletext mode. The summary appears with a list of items that can be accessed. Each item has a corresponding 3 digit page number. |
| SELECTING A PAGE
▲ ○ ○
▼ ○ ○
○ ○ ○
○ ○ ○ | Enter the number of the page required using the numeric buttons and up and down arrow buttons. Example: page 120, enter 120. The number is displayed top left, the counter turns and then the page is displayed.
Repeat this operation to view another page. If the counter continues to search, this means that the page is not transmitted. Select another number. |
| DIRECT ACCESS
TO THE ITEMS
● ○ ○
○ ○ ○ | Coloured areas are displayed at the bottom of the screen. The 4 coloured keys are used to access the items or corresponding pages. The coloured areas flash when the item or the page is not yet available. |
| INDEX
(BUTION 19) | This returns to the contents page (usually page 100). |
| SUB PAGE
(BUTION 2) | Certain pages contain sub-pages which are automatically displayed successively. This key is used to stop or resume sub-page acquisition. The number appears top left. |
| HOLD
(BUTION 18) | To freeze the page. |
| REVEAL
(BUTION 3) | To display or hide the concealed information (games solutions). |
| LIST
(BUTION 17) | The user can set four favourite pages to be directly linked to the four colour keys. The favourite page numbers should be stored and restored to/from nonvolatile memory for each channel by the system software. |
OPERATION
Installation Guide
| Please select an OSD language |
| Français | | | |
| English | Nederlandis | | | |
| Spanish | | | | |
1). Press the buttons to navigate the menu and change the settings. Press the OK button to confirm.
Select your desired language to be displayed on the menu.
NOTE : Once option highlighted 3 second on the Source choices, it automatically confirmed without pressing OK button.
| Mode Select |
| Home Mode | | | | |
| < Shop Mode | | | | |
| | | | |
| OK |
2).Press the buttons to select Home Mode or shop Mode, press the OK button to confirm.
HOME or SHOP modes
- Home Mode is an energy-saving Mode. Home Mode is recommended for normal viewing setting and is set as default by the manufacturer.
- Shop Mode is an option for retailers for Advertising or product presentation. Shop Mode has a brighter image than Home Mode.
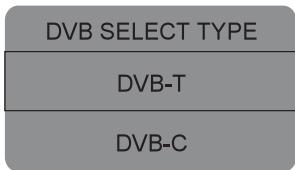
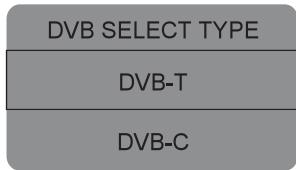
3). Press the buttons to select DVB-T/DVB-C and then press the OK button to confirm.
| DVB SELECT TYPE |
| DVB-T |
| DVB-C |
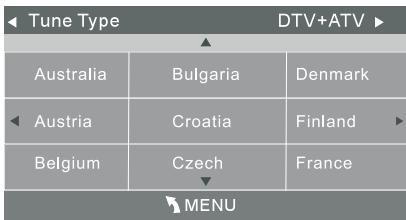
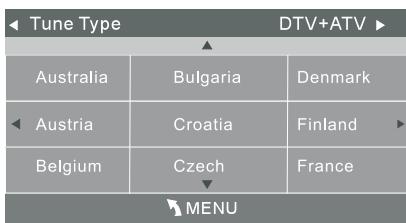
a.If you select DVB-T, the next step is to select the Tune Type and country,then press the OK button to start tuning.
| Tune Type DTV+ATV |
| Australia | Bulgaria | Denmark |
| Austria | Croatia | Finland |
| Belgium | Czech | France |
| MENU |
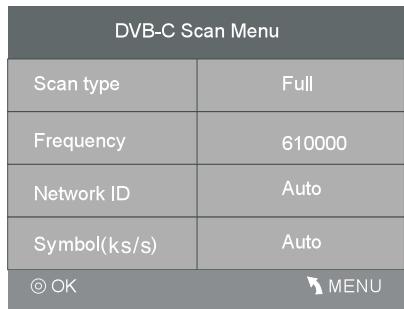
b. If you select DVB-C, the next step is to configure the DVB-C system (scan type /Frequency/Network ID/Symbol (ks / s) then press OK button to get into the tune type and country select menu. This step is the same as DVB-T, select the tune type (DTV/ATV). Choose the right country, press OK button to start tu
| DVB-C Scan Menu |
| Scan type | Full |
| Frequency | 610000 |
| Network ID | Auto |
| Symbol(ks/s) | Auto |
| © OK | MENU |
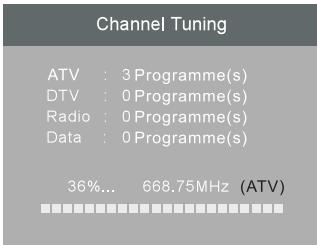
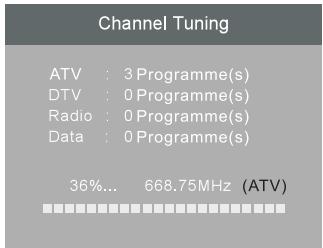
4). Channel tuning will commence. This operation may take up to several minutes. The display will show the progress of the tuning and the number of channels found.
5). If you want to skip the ATV tuning, press the MENU button to interrupt the tuning half way. A pop-up screen will be displayed, press the button to select YES to confirm. You will then go straight to DTV tuning. You may repeat the above step if you also want to skip the DTV tuning.
6). After tuning is complete, the channels are arranged in a preset order. If you wish to skip channels, modify the preset order or delete channels, select Programme Edit under the Channel menu.
| Channel Tuning |
| ATV:3 Programme(s) |
| DTV:0 Programme(s) |
| Radio:0 Programme(s) |
| Data:0 Programme(s) |
| 36%... 668.75MHz (ATV) |
1.1 Auto Tuning (DVB-T)
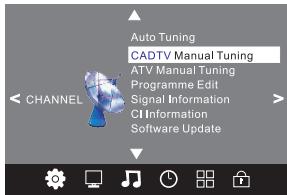
1). Press the MENU button and then press the buttons to select the CHANNEL menu.
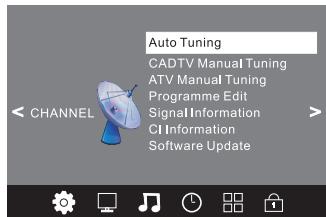
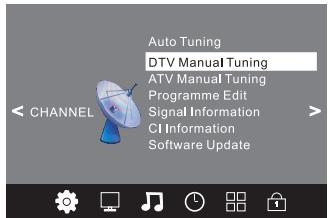
2). Press the buttons to select Auto Tuning and then press the OK button.
| CHANNEL | Auto Tuning |
| DTV Manual Tuning |
| ATV Manual Tuning |
| Programme Edit |
| Signal Information |
| CI Information |
| Software Update |
OPERATION
3). Press the buttons to select DVB-T/DVB-C. Select DVB-T and then press the OK button to confirm.
4). In the Tune Type menu, press the buttons to select ATV / DTV / DTV + ATV. Press the button and then press the buttons to select the country where you will operate the TV. Press the OK button to confirm.
5). Channel tuning will commence. This operation may take up to several minutes. The display will show the progress of the tuning and the number of channels found.
6). If you want to skip the ATV tuning, press the MENU button to interrupt the tuning half way. A pop-up screen will be displayed, press the button to select YES to confirm. You will then go straight to DTV tuning. You may repeat the above step if you also want to skip the DTV tuning.
7). After tuning is complete, the channels are arranged in a preset order. If you wish to skip channels, modify the preset order or delete channels, select Programme Edit under the Channel menu.
1.2 Auto Tuning (DVB-C)
1). Press the MENU button and then press the buttons to select the CHANNEL menu.
2). Press the buttons to select Auto Tuning and then press the OK button.
3). Press the buttons to select DVB-T/DVB-C. Select DVB-C and then press the OK button to confirm.
4). Press buttons to select Scan type/Symbol(Ks/S) press the OK button to confirm.
5). In the Tune Type menu, press the buttons to select ATV / DTV / DTV + ATV. Press the button and then press the buttons to select the country where you will operate the TV. Press the OK button to confirm.
OPERATION
6). Channel tuning will commence. This operation may take up to several minutes. The display will show the progress of the tuning and the number of channels found.
7). If you want to skip the ATV tuning, press the MENU button to interrupt the tuning half way. A pop-up screen will be displayed, press the button to select YES to confirm. You will then go straight to DTV tuning. You may repeat the above step if you also want to skip the DTV tuning.
8). After tuning is complete, the channels are arranged in a preset order. If you wish to skip channels, modify the preset order, rename or delete channels, select Programme Edit under the Channel menu.
NOTE:
All the channels including ATV, DTV and Radio can be tuned in one go, if the Tune Type is DTV+ATV.
All the stored channels will disappear after auto tuning.
2.1 DTV Manual Tuning (DVB-T)
1). Press the MENU button and then press the buttons to select the CHANNEL menu.
2). Press the▼▲ buttons to select DTV Manual Tuning and then press the OK button.
3). The DTV Manual Tuning screen will pop up. Press the buttons to select the desired VHF or UHF channel and then press the OK button to commence the search of that channel. When the signal has been tuned, the picture and signal strength will be displayed on the screen.
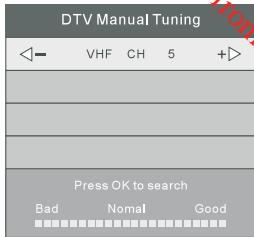
Note: if you don't press any button, the DTV Manual Tuning menu will disappear.
4). Press the MENU button to return back to the main menu.
5). Press the EXIT button to exit the menu.
2.2 DTV Manual Tuning (DVB-C)
1). Press the MENU button and then press the buttons to select the CHANNEL menu.
2). Press the buttons to select DVB-C Manual Tuning and then press the OK button.
Note: If DVB-C Manual Tuning is not listed in the Channel menu, you should first select Auto Tuning, and then DVB-C.
3). The DVB-C Manual Tuning screen will pop up. Press the buttons to select Frequency, Symbol (ks/s), QAM Type, enter the appropriate setting and then press the OK button to commence the search of that channel. When the signal has been tuned, the picture and signal strength will be displayed on the screen.
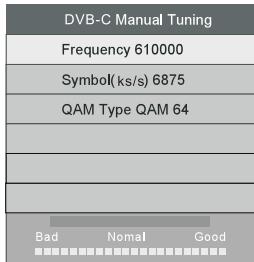
Note: if you don't press any button, the DVB-C Manual Tuning menu will disappear.
4). Press the MENU button to return back to the main menu.
5). Press the EXIT button to exit the menu.
OPERATION
3.1 ATV Manual tuning :
Press Source button on the remote control and select ATV to search the analog TV channels and fine tune the channels, then store the channels you selected.

NOTE:
Press red button to store the channels after manual tuning.
4.1 Programme edit:
You can Delete, Rename, Move, Skip, programmes or set them as favourite.

Delete
Press red button, to delete the highlighted programme.

Rename:
Only ATV programmes can be renamed.
Move the cursor to the desired programme, press green button to rename the programme.
Press▼▲ to choose the character. Press ▲▶ to move the cursor.
Press MENU button to exit edit, Press EXIT to exit the menu.
Note: ATV programmes name only can be 5 characters long.

Move
Use the Arrow Buttons to select the channel you wish to move. Then press the Yellow Button to select Move function. Once active, use the Arrow Buttons to move and then press OK to confirm.

Skip
Press to choose the programme, press blue button to skip this programme. The will show on the right side of the programme. To cancel the skip, choose the skipped programme and press blue button again. The will disappear.

Favourite
Press to choose the programme, press FAV button, it will show on the right side of the programme. To cancel the FAV setting, choose the favourite programme and press FAV button again. will disappear.
Once your favourite group is created, you can press the FAV key to quickly access your favourite channel.
This menu includes information on channels, networks, modulation, quality and strength.
This menu can display the Cl card's information
5.3 Software update
This menu enables you to upgrade your software via USB, only if the manufacturer asks you to and provides you the appropriate file. Follow the on-screen prompts.
The second item of the MENU is PICTURE MENU. You can adjust picture effect here, such as contrast, brightness, etc.
Press to move, press OK to adjust.

NOTE:
1).Tint is available in NTSC system only.
2).There are four colour temperature modes that can be selected:Medium,Warm,Cool,User.
3).Screen is available in PC mode only.You can adjust Horizontal position, vertical position, size and phase.
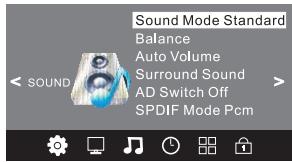
The third item of the MENU is the SOUND MENU. You can adjust the sound effect here such as treble, bass, balance etc.
Press to move, press OK to adjust.
OPERATION
Note:
Auto volume: only available when the input signal volume is too large or distortion.
Surround sound can be set on or off.
AD switch is audiodescription functionality.
SPDIF mode is the digital output sound feature.
The fourth item of the menu is the TIME MENU. You can adjust the clock, power on/off time, sleep time etc Press to move, press OK to adjust.
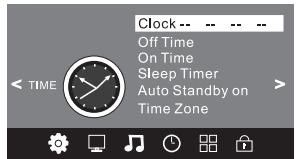
NOTE:
- When auto standby is on, if without signal and without action for 18 minutes, TV automatically turns to standby mode, if with signal but without action for 4 hours, TV automatically turns to standby mode. When auto standby is off, TV will always be on.
2.In DTV mode, the current time depends on the broadcast station. Hence, to avoid the confusion of EPG and PVR settings, the clock function cannot be set manually.
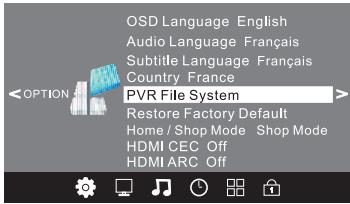
The fifth item of the MENU is the OPTION MENU. You can adjust the Menu language, Audio language, Subtitle language etc.

PVR Setup
Personal Video Recording (PVR) settings (In DTV Mode only)
The PVR function allows this unit to record live digital TV (DTV) programmes, allowing for viewing on demand at any time. This function supports DTV programme recording, Time shift and playback as described below. PVR will only record when there is an external USB drive connected to the unit with sufficient memory space available. Recording can be done both manually on demand and also using Scheduled Recording.
IMPORTANT!
All USB media must be formatted in FAT32 file system or Hi Speed FS. If media, including portable HDD, are formatted in NTFS, no recording can be done on this media. All USB media must comply with USB 2.0 specifications. Maximum USB media size that can be accepted is up to 1 terabyte (1TB)
WARNING:
Ensure that no valuable information is currently stored on the disk, as the formatting process means that ALL DATA will be ERASED from the memory drive connected to the USB port.
- Insert MEDIA into the USB connection on the rear panel of the TV.
- Press MENU button on the front panel to display the main menu.
- Press / buttons to select the OPTION menu, then press OK buttons for the submenu.
- Press / buttons to select PVR File System and press OK to enter.
NOTE: NOT all USB devices, such as phones, MP3 players, cameras, and the like, are compatible with recording files.
- On the remote control press button to select Check PVR File System and press OK to start check.
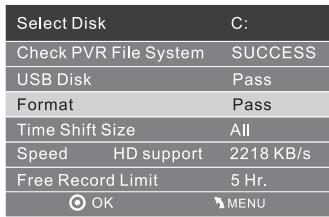
NOTE:If a compatible USB drive is attached, 'SUCCEED' will be displayed & no further action is required. Press MENU repeatedly to EXIT.
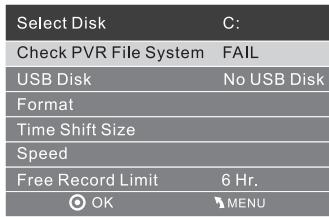
- If the USB device is found to be incompatible with your television, an additional screen will be displayed informing you that you must format your device.
Use the / to select file system. Choose the file system type: "FAT32" is best for High Speed USB storage devices.
"High Speed FS" is best for Low Speed USB storage devices.
| File System Size |
| PVR File System Type | FAT32 |
| PVR File System Size | All |
| SD 208 Mins | |
| HD 59 Mins | |
| OK | MENU |
| File System Size |
| PVR File System Type | Hi Speed FS |
| PVR File System Size | 4GB |
| SD 112 Mins |
| HD 32 Mins |
| |
| OK | MENU |
NOTE:
1 After formatting into "FAT32" file system, you will still be able to store and share other media files on the same USB storage device.
2 Storage devices formatted in "High Speed FS"system can only be used to record video on this TV and cannot store other media files.
PVR File System Size (only if Hi Speed FS is selected) Press the / buttons on the remote control to select PVR File System Size. Press / buttons on the remote control to select recording time from 1GB to Maximum size of USB Disk.
Note:
- This applies only to manual (instant) recording.
- Recording will stop once it reaches the maximum set time.
NOTE: Formatting will erase all data on the USB Drive.
Time Shift Size
After the USB storage device is formatted into FAT32 or Hi Speed FS file system, Time Shift size cannot be altered. During 'Check PVR File System' the display will show that the whole storage device space will be used for Time Shift recording, but scheduled & Manual Recording will still take priority on disk. NOTE:
To change Time Shift Size disk must be formatted again.
- If disk requires formatting press OK on the remote control to start. Formatting will change the file system to FAT32 or Hi Speed FS depending on selection. This may take some time depending on the size of the USB Media connected.
NOTE:
Formatting will erase all data on the USB Drive.
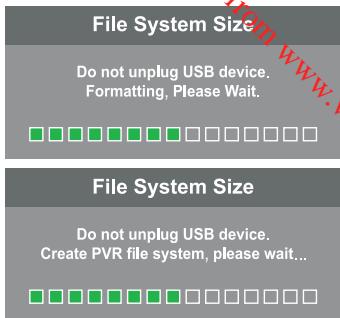
- When formatting is complete.
Press MENU button repeatedly to EXIT.
| Select Disk | C; |
| Check PVR File System Start |
| USB Disk |
| Format |
| Time Shift Size |
| Speed |
| Free Record Limit 6 Hr. |
| OK | MENU |
NOTE:
Restore factory default will clear all the programmes and password.
Recorded file will be saved with the TS file extension e.g. DateSHOWName.ts.
TS file extension stands for Transport Stream. It is a communications protocol for audio, video, and data which is specified in MPEG2 Part 1, Systems (ISO/IECstandard 13818-1). It is also known as ITU-T Rec.H.222.0.
Please refer to your instruction manual for recording details.
The sixth item of the menu is the LOCK MENU. You can lock system, set password, block programmes and set parental guidance. Once you set the lock system on, you can not search the channels.
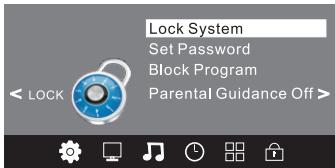
NOTE:
The default password is 6666.
If you change the password, be sure to remember the new password! If you forget the new password, enter the master password "9527".
Block program: Press to choose the programme, press green button to block the programme. If you want to unblock the programme, enter the main menu, input the password, then press green button again. Parental guidance: Press to choose rating.
OPERATION
7. USB
Press the source button and then select USB item to enter the USB menu.
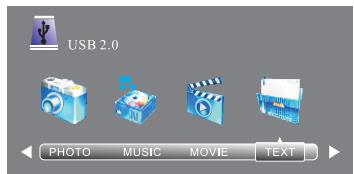
Please make sure that the USB device is plugged in the slot. You can select between four media types: Photo, Music, Movie or Text.
Select the media type by pressing , press OK button to enter the disk selection menu.
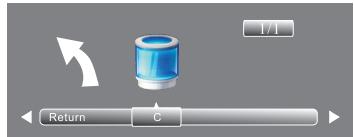
Press the to select the right disk and press OK to display media files and folder list or choose Return to go back to the media type selection menu.
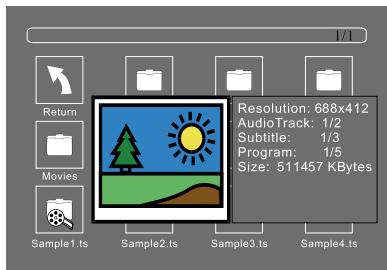
Select the media file by pressing or , then the preview frame will pop up. Press the button to play the media file in full screen. You can also select several files and add them to your playlist: press OK to tick or untick the related box, and then press the button to play the files. When the media file (photo, movie, music or text type) is playing, press the OK or Info button to display the control bar, as below:
Photo1.

Photo2.
The control bar also contains the other below hidden info icon. Use the navigation keys Right / Left to access other icons :
Music1.

Music2.
OPERATION

Movie1

Movie3
Movie2.
Press to select the function icon, press OK button to confirm your selection.
Press or EXIT button to exit the control bar.
Info icons of the Control bar :
PHOTO
| Play/Pause | Play or pause the playback, press OK key again to resume playback when in PAUSE. |
| Prev. | Skip to Previous photo. |
| Next | Skip to Next photo. |
| Stop | Stop photo. |
| RepeatAll | Repeat all files,tracks etc.. |
| Music | In Photo and TEXT mode, play music. |
| Playlist | Display the multimedia files which will be played and marked on previous main page showing all available files on the USB key. Each file has red mark when you select and confirm with OK key. |
| Info | Select this icon and press OK key to display the INFO menu. |
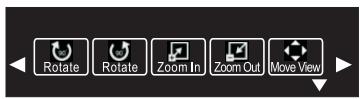
| Rotate | Turn left 90°. |
| Rotate | Turn right 90°. |
| Zoom In | To zoom in the picture. Press OK key after selecting Zoom in to adjust as you wish. |
| Zoom Out | To zoom out of the picture. Press OK key after selecting Zoom out to adjust as you wish. |
| Move View | To move the picture view UP, DOWN, LEFT, RIGHT. To be able to move the picture view, you first have to zoom in the picture. |
Movie
| Play/Pause | Play or pause the playback, press OK key again to resume playback when in PAUSE. |
| FB | Fast Backward. |
| FF | Fast Forward. |
| Prev. | Skip to Previous track. |
| Next | Skip to Next track. |
| Stop | To stop movie. |
| RepeatAll | To Repeat all files, tracks etc.. |
| SetA | To set repeat from A to B. During playback, select A-B and press OK to repeat a certain content from start point A to ending point B. |
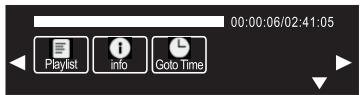
| Playback | Display the multimedia files which will be played and marked on previous main page showing all available files on the USB key. Each file has red mark when you select and confirm with OK key. |
| Info | Select this icon and press OK key to display the INFO menu. |
MUSIC
| Play/Pass | Play or pause the playback, press OK key again to resume playback when in PAUSE. |
| FB | Fast Backward. |
| FF | Fast Forward. |
| Prev. | Skip to Previous music. |
| Next | Skip to Next music. |
| Stop | To stop music. |
| Repeat All | To Repeat all files, tracks etc.. |
| Mute | Mute the sound. |
| Player | Display the multimedia files which will be played and marked on previous main page showing all available files on the USB key. Each file has red mark when you select and confirm with OK key. |
| Info | Select this icon and press OK key to display the INFO menu. |
| Go Time | Select this icon and press OK to confirm. This function allows you to input the go to time to reach precise time play in the file. |
Movie
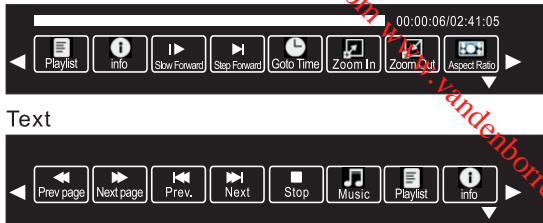
| Slow Forward | When playing select this icon and press OK key to select slow speed playing. Each press on OK key will skip successively to slow speed play x 2 , x 4 , x 8 x 16 and resume normal speed play. |
| Step Forward | During playback select this icon and press OK key to step forward, frame by frame. Each press on OK key you will skip forward to the next frame. To resume normal play, press Play key. |
| Goto Time | Select this icon and press OK to confirm. This function allows you to input the go to time to reach precise time play in the file. |
| Zoom In | To zoom in the picture. Press OK key after selecting Zoom in to adjust as you wish. |
| Zoom Out | To zoom out the picture. Press OK key after selecting Zoom out to adjust as you wish. |
| Aspect Ratio | Display the available ratio screen per each press on OK key: following aspect ratio will be displayed successfully : 4 : 3 , AUTO , 16 : 9 . |
| Movie View | To move the movie view UP, DOWN, LEFT, RIGHT. To be able to move the movie view, you first have to zoom in the picture. |
OPERATION
Text
| Prev page | Skip to previous page . |
| Next page | Skip to next page . |
| Prev. | Skip to Previous text file. |
| Next | Skip to Next text file. |
| Stop | Stop text. |
| Music | In Photo and TEXT mode, play music. |
| Playlist | Display the multimedia files which will be played and marked on previous main page showing all available files on the USB key. Each file has red mark when you select and confirm with OK key. |
| info | Select this icon and press OK key to display the INFO menu. |
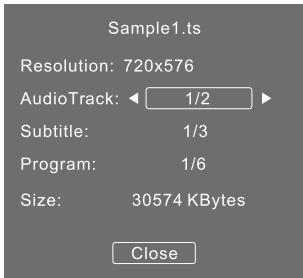
NOTE:
You can adjust the audio track, subtitle, or programme in the Info menu while playing the video file.
Choose the Info icon and press OK to display the Info menu (as follows).
USB playback is supported for the following photo file formats:
-JPEG (files with the extension". jpg")
-BMP (files with the extension".bmp")
-PNG (files with the extension".png")
USB playback is supported for the following music file formats:
-MP3 (files with the extension".mp3")
USB playback is supported for the following text file formats:
-TXT (files with the extension".txt")
USB playback is supported for the following movie file formats:
-TS(MPEG2&H.264)
OPERATION
The EPG menu is used to look at what is being broadcasted on DTV or Radio channel in the day. To access the EPG menu, press the EPG button, the following menu will be displayed:
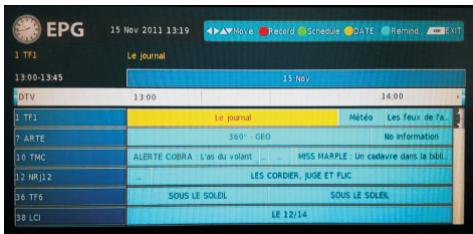
1. INFO
Use to choose the programmes, Press INFO key, you can display the highlighted programme's information.
2. Record
Press the red key, it can set the programme to be recorded.
3.Green
Press the green key, it can list all the scheduled reminders press to choose there reminder, press red key to delete the line.
4. Date
Press the yellow key to choose date item, then use left/right key to change date.
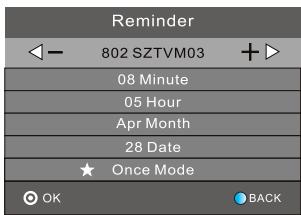
5. Remind
Press the blue key to choose one programme and set up one reminder time, the TV screen will skip to the chosen programme in the reminder time automatically.
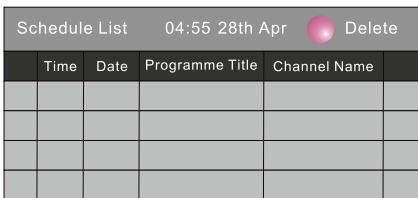
9. Recording a programme
Record the programme:
To record the programme you are currently watching, press the REC button: a red recording icon will appear on the top left corner of the screen. To get more information, press the REC button again.
To stop recording, press the button.
Play the recording:
The programme recorded will be saved on the USB device. You can play it in USB mode.
10. Time shift recording
Press button while watching a broadcast to activate time shift mode. In time shift mode, the programme is paused and simultaneously recorded to the connected USB disk.
Press button again to resume the paused programme from where you stopped. Press the button to stop time shift recording and return to the live broadcast.
Press button to play the recording. If you press button again, point A will be determined; if you press once more, point B will be determined and the recording will repeatedly play between A and B until you press button to deactivate this setting.
Notes:
During time shift, the following icon will be displayed on the top left corner of the screen: When the time shift size is full, the playback begins automatically.
DVD REAR PANEL

DOLBY
DIGITAL PLUS

Multi-angle
Dolby Digital
Kodak
PICTURE CD
COMPATIBLE
KODAK picture CD

Subtitle choices

MP3 files on
CD-R/CD-RW

Audio choices

VIDEO
DVD video

TV Aspect
Ratio modes

DVD VIDEO players and DVD VIDEO discs havetheir own region code numbers .This system canplay back a DVD VIDEO whose region numberincludes the system's region code ,which isindicated on the rear panel .
Playable kind of Disc
DVDVIDEO/VCD/SVCD/CD/CD-R/
CD-RW/DVD+R/DVD-R/DVD+RW/DVD-RW

Caution
This DVD Player has a Class 1 laser which may be harmful to your eyes. Do not attempt to disassemble the cabinet or make any adjustments.
Refer all servicing to a qualified professional.
Features
Disc formats supported by this player:
DVD-Video,DVD-ROM,DVD-R/RW
Protect your DVD discs
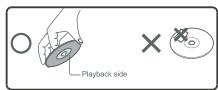
HANDLE DISCS PROPERLY
Do not touch the playback side of the disc.
Do not attach paper or tape to the disc.
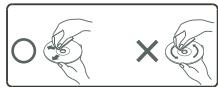
HOW TO CLEAN A DISC
Fingerprints and dust on the disc can cause poor picture and sound quality and may prevent the disc from playing altogether.
Always wipe the disc with a soft, dust free cloth from the centre outwards. Never use any paper tissues as these will scratch the disc.
If you cannot wipe off the dust with a dust free soft cloth, wipe the disc lightly with a slightly moistened soft dust free cloth.
Do not use any type of solvent such as thinners, any oil based cleaners, antistatic spray for vinyl LP's or commercially available cleaners unless specifically made for cleaning CD and DVD discs.
The wrong type of cleaning may damage the disc.
Title: DVD Video disc are usually divided into several numbered sections called titles
Chapter: A title comprises smaller numbered sections called chapters.
1. Playing the DVD Player
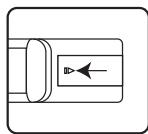
A. Press the "→" button to select "DVD" mode, if no disc is inserted yet, the display shows "No Disc".
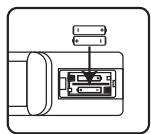
B. Insert a DVD with the label side facing towards the front of the TV/DVD Player(see below)
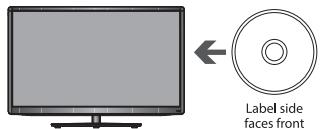
Unable to play disc!
Check label faces front of TV Check disc for marks or damage Check disc is compatible type.
Note:The picture of the product may vary depending on the model.
C. The TV will first display "Loading", then change to "DVD-video". Most DVDs will show some preliminary information then stop at a main menu screen.
D. Press PLAY to play it directly. Or press the MENU button to access the disc menu during playback.
E. Use the direction button on the remote control to select the desired option. Press OK to select the option or press the button. Playback will now commence.
F. After playback,press the button on remote control or button on TV/DVD to remote the disc.
Note: Sometimes a message "No function" or image may appear on the screen. That indicates the function you just operated is not supported or unavailable now.
Getting Started
Carefully remove the TV / DVD and all other items from the box. You may wish to store the packaging for future use.
Please read these instructions thoroughly before use.
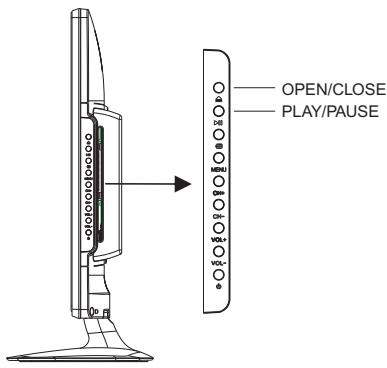
2:OPEN/CLOSE ▲
To open the disc tray, press the OPEN/CLOSE button on the side of the TV (above the DVD slot load entrance). DVD loading and unloading can only be performed when the TV's main Input source Menu is set to "DVD".
To close the disc tray, press OPEN/CLOSE again.
3:TITLE: In DVD mode, shows the TITLE menu (where available).
4:REV
During DVD, CD MP3 or VCD playback, press REV to scan in reverse.
The player will review the disc at different times speed. Press PLAY to resume normal playback.
5:FWD
During DVD, CD, MP3, or VCD playback, press FWD to scan forward. The player will cue the disc at different speeds. Press PLAY to resume normal playback.
6:Pause II
In play state, press the Pause button and the player will be in pause state.
7:Play
In pause state or stop state, press this button and the player will be in playing state.
8:RETURN
When DVD/SVCD/VCD displaying, press RETURN button to the menu (PBC ON only).
9:SUBTITLE
Press the button to choose different captions (Requires support from the playing disc).
12:OK
Press the button to confirm your choice on screen.
16:0-9 keys
These keys are used to input the time, as well as title, chapter and track numbers. When a numeric item is displayed on the screen, press the 0-9 keys to select the desired entry, and press ENTER/OK to confirm. When a VCD is playing, press the 0-9 keys to select a track directly.
17:AUDIO
Changes the audio language or audio channel (requires support from the playing disc).
19:A-B:Press to repeat a segment of the disc you are watching between A and B.(DVD mode)
20:DVD SETUP
Press the button to enter the system setting menu. Press the button again to exit the menu.
21:PREV
During DVD, CD, MP3, or VCD playback, press PREV to play the previous chapter, title or track.
22:NEXT
During DVD,CD,MP3, or VCD playback, press NEXT to play the next chapter, title or track.
23:ANGLE
Press the button to view scenes shot from different viewing angles. (Disc support is required).
24:STOP
Press the button once and the player will be in memory stop state. Press this button twice and the player will be in complete stop state.
During DVD playback, press MENU to display the disc menu of the current title, during VCD/SVCD playback, press MENU to control PBC ON/OFF.
26:DISPLAY
Press the button to show the information of the current playing disc.
30:REPEAT
Press to select between different repeat modes.
Note: Some discs do not support the repeat function, different disc shows different information.
31:GOTO
For DVD discs, press the button to choose the desired title and chapter and search the desired title time and chapter time. For Super VCD,VCD,CD discs,press this button to search the desired disc time and track time and choose the desired track.
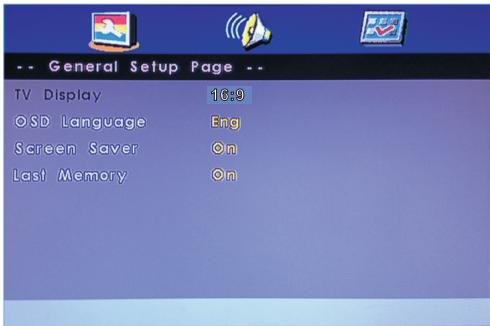
General Setup Page
A. Press DVD SETUP button on remote control during playing DVD, it will show following menu
B. Press "▼/▲" to choose the items, then enter the desired item with OK button. It has been set already when the desired item becomes red.
Note: Press Left button to get back the previous menu.
C. Pres DVD SETUP to exit the menu.
D. The items of the menu as below.
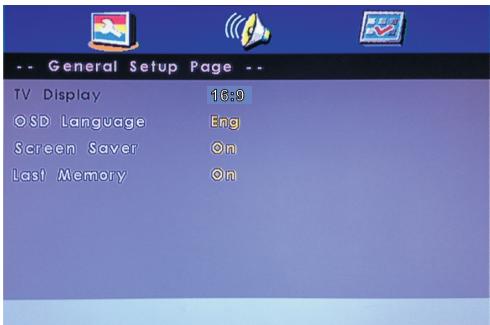
TV Display: Set the Picture Display.
The image display ratio is related to the recorded disc format. Some disc cannot display images in the aspect ratio you choose. If you play a disc recorded in 4:3 format on a wide screen TV, black bars will appear on the left and right side of the screen. You must adjust the screen setting depending on the type of the television you have.
OSD Lang.: Set the language of OSD menu. Default setting is English.
Screen Saver.: Set the saver on or off.
Last Memory: Set it on to memorize the last stop point. During playing the DVD, you change to other mode. When you come back to DVD mode, it can play automatically from the last stop point.
Note: We suggest you turn off the last memory function unless you really need it. To turn on this function may influence the lifetime of flash memory of DVD module.
Audio Setup Page
A. Press DVD SETUP butoon on remote control during playing DVD,Press“</▶”until it will show following.
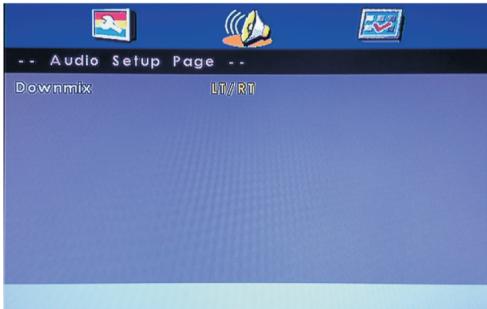
B. Press “ / ” to choose the items, then enter the desired item with OK button. It been set already when the desired item becomes red.
Note: Press Left button to get back the previous menu.
C. Press DVD SETUP to exit the menu.
D. The items of the menu as below.
Downmix: choose the downmix mode. There is only item--stereo.
Preference Page
A. Press DVD SETUP button on remote control after ejecting DVD disc, Press “ ” until Preference wil show following menu.
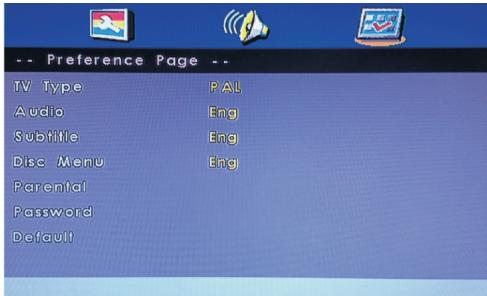
B. Press “ / ” to choose the items, then enter the desired item with OK button. It has been set already when the desired item becomes red.
Note: Press Left button to get back the previous menu.
C. Press DVD SETUP to exit the menu.
D. The items of the menu as below.
TV Type: You can select from either PAL, NTSC or Auto. The DVD player setting should be matched to your TV set.
Audio: Set the audio language to your language of choice. Not all DVD disc support multiple Audio Languages.
Subtitle: Select the subtitle language Note: not all DVD disc are recorded or offer subtitles in multiple language.
Disc Menu: Set the default language of Disc menu.
Parental: Movies rated higher than the level set will not be played by selecting a certain access level. The parental lock can only be changed after input the correct password.
DVD OPERATION
Note: This function is available only when the disc have rating encoded on.it wil ask a password when you select a level except for Adult. The factory setting of the password is 6666. Press Down button to the OK after finishing input of the password, then press OK button to confirm and go back to the previous menu.
Password:Reset the password.The password should be 4-digit,and the initial password is 6666. Note:Press Down button to the OK after finishing input of the password, then press OK button to confirm and go back to the previous menu. If you forget the old password, you can always use the factory setting password 6666.
Default: Default the factory's settings EXCEPT the password.
If you have any questions, please consult the troubleshooting guide below:
NO PICTURE OR SOUND
- Ensure the TV is switched on (ie. not in Stand-by mode).
- Ensure the power outlet is operational.
- Ensure the power cord is not damaged.
- Ensure the power plug is connected firmly to the mains outlet.
PICTURE BUT NO SOUND
- Ensure the audio is not set to mute.
- Ensure you have set the player's AUDIO settings correctly.
POOR PICTURE OR SOUND
- Ensure you have set the player's AUDIO and PICTURE settings correctly
- Ensure the disc is not scratched or stained.
"BAD DISC"DISPLAYED
- Ensure the disc is not warped, damaged or deformed.
- Ensure the disc is not badly stained or damaged.
- Ensure the disc format is compatible with the player.
- Please check whether you have tried to play a software CD. If so, please restart the player using a music CD or DVD.
Make sure that the disc is not upside down (the label side should be facing you when viewed from the front of the TV).
REMOTE NOT WORKING
Make sure the Main unit's POWER button is on
- Ensure the remote batteries are working.
- Point the remote control directly at the player's IR sensor.
- Remove any obstacles between the remote and the IR sensor.
UNIT NOT WORKING
- Turn off the power, and then turn it on again.
"NO DISC" DISPLAYED
- Ensure you have put the disc in the slot.
- Ensure the disc is not distorted, stained or scratched.
Troubleshooting table
TV Troubleshooter
A check through the guide below could save you the trouble of returning your purchase or waiting for a service engineer. If you require assistance with operating this product you can phone our help line!
| Analogue TV & general Sound |
| Symptoms | Possible causes | What to do |
| No sound | The volume is set to minimum. The mute is switched on. | Turn the volume up. Press the mute button to release 'mute'. |
| Crackling noises or distorted sound. | Interference from cars, fluorescent lights, video recorder, a radio broadcast, personal computer or other equipment. | Turn off one piece of equipment at a time to see if the interference clears. See also what to do for picture interference. |
| Stereo switching to mono. | Aweak signal or a mono broadcast. | Check the signal and your aerial system. |
| No stereo sound from equipment connected to the scart (AV) socket. | A mono scart lead is being used to connect the television. The signal being viewed is connected through the aerial socket. | Check that the scart lead is stereo. Check the video recorder is connected to the television through an AV (scart) lead, then switch the television to AV mode. |
| Analogue TV & general Picture |
| Symptoms | Possible causes | What to do |
| Grainy (snowy) picture | CI disconnected. Your video recorder could be faulty. Transmitter trouble. The outside aerial has moved, or is damaged. | If you have a video recorder try plugging the aerial directly into the television. If the fault clears, the video recorder is probably faulty. Have your aerial system checked. |
| Extra outlines on objects in the picture (ghosts). | The aerial is receiving reflected signals from hills or buildings. Faulty aerial system. | Try to tune in a better signal from the same television station. Get your aerial system checked. |
| Picture interference like spots or streaks. | Weak aerial signal. Interference from electrical equipment such as power tools and motors. Settings for the digital video equipment output do not match the monitors VGA or DVI input specifications. | Try to tune in a better signal from the same television station. Get your aerial system checked. Move the interfering equipment further away or if possible, turn it off. Change the refresh rate or resolution settings on the digital equipment, if possible. |
| Picture is the wrong size or the source device (computer, DVD player, set top box and so on) will not let you set up the pixel resolution the display can reproduce. | Source device has not read the set-up data from the display. Connecting cable does not have all the necessary connections. | Avoid old cables and adapter devices. Use only modern cables. Re-start the source device after connecting and powering up the display. Change the graphics adapter in your computer. Check compatible video resolutions given in these instructions. |
| Picture looks squashed or stretched even though the aspect ratio controls are set correctly (for example 4:3 or 16:9). | Equipment feeding the display is set to the wrong aspect ratio. | On the equipment feeding the TV choose the correct output aspect ratio such as 4:3 or 16:9 to match the TV. On digital equipment you might choose 1280 x 960 pixels to match 4:3 screens or 1280 x 768 pixels to match 16:9 screens. |
| Picture interference like wavy lines or patterns. Sound or colour interference may also be present. | Some other equipment is using the same frequency. Poor quality cable in the path between the TV and the TV aerial. Your aerial system is receiving an unwanted signal on the same frequency. | Put other equipment on stand-by to see if the interference stops: change the output frequency of the equipment that is causing interference (see its instructions). Get higher quality cable. Get your aerial system checked. |
| No picture. | Brightness and contrast levels are set to minimum. | Increase the brightness and contrast settings. |
| Jumbled teletext characters | Poor quality signal | As for 'Snowy picture' and 'Ghosts' |
| When RGB input is used there is a distorted picture or no picture. | Synchronisation signal is missing. | Press the AV button to select the AV input which receives the synchronisation signal. |
| Analogue TV & general Sound |
| Symptoms | Possible causes | What to do |
| Television seems 'dead' - no lights come on and nothing works. | Mains supply missing. Main power switch is off. | Make sure it is not a general power cut. |
| The stand-by light is on but the buttons don't seem to work. | Blown fuse or circuit breaker. Try the front panel STANDBY/ON button: if TV comes on then check "The remote does not function". | Check the power switches on the television and at the power outlet. Check the fuse or circuit breaker at your main fuse box. Look for a possible cause of failure before you replace or re-set it. Disconnect power supply, wait five minutes and try front panel STANDBY/ON. If still no good, disconnect power supply and assume the unit is faulty. |
| Local function buttons do not work. Stuck on stand-by. | Micro-controller confused by electrical disturbance. | Switch off mains power and wait 10 minutes before trying again. (Leave the TV unplugged and call a service engineer if this does not work.) |
| Analogue TV & general Remote |
| Wrong functions or short range. | Batteries run down. Obstacle in the way. | Insert new batteries Remove any objects and aim from straight in front of the remote sensor with a clear line of sight. |
Digital Terrestrial TV Troubleshooter
| Symptoms | Possible causes | What to do |
| Picture blocking or freezing. Sound breaking up. | Weak signal or wrong type of aerial. | Try re-tuning.
Aerial may not be suitable for digital TV broadcasts.
You may be in a place which does not get a good digital TV signal.
Get an aerial rigger to check the aerial system. |
| Some channels are missing. | Not receiving one or more digital multiplex frequencies. |
| Any or all of the above faults. | Interference or other problem caused by passing aerial signal through other equipment. | Try connecting the aerial directly to the digital TV receiver and then re-tuning.
If some equipment has a radio frequency modulator, switch it off or change the frequency of it and re-tune the analogue TV. (Please see other equipments instructions for how to do this.) |
Multiplex
DVB-T (Digital Video Broadcasting - Terrestrial) is broadcast in groups of channels on one common frequency. This arrangement is known as a Multiplex.
There are several multiplexes in the DVB-T system, each carrying a group of channels.
If the signal level on a particular multiplex frequency is poor you may lose the whole group of channels on that multiplex.
Computer Monitor TV and HDMI Troubleshooter
| Sound | | |
| Symptoms | Possible causes | Possible solutions |
| No sound | HDMI input is being fed through a conversion connector from equipment with a DVI output. | Connect sound output from the DVI equipment to an external amplifier. |
| Picture |
| Symptoms
No picture.
On-screen message indicates video input is not compatible. | Possible causes
Settings for the digital video equipment feeding the TV do not match the TV input requirements. | Possible solutions
Change the refresh rate or resolution settings of the computer graphics adaptor or other digital equipment. |
| Computer feeding the TV does not offer you suitable settings to match the TV requirements. | Computer has not exchanged information with the television. In older computers, the graphics adaptor might be obsolete. | Re-start the computer while the television is still connected to the power supply, then try again.
In exceptional cases, you may need to go into the computer graphics adaptor settings and clear the check box for Show only settings this monitor can support. For Microsoft Windows this can be found by right-clicking on the Desktop and following Properties - Display Properties - Settings - advanced tab Monitor tab. The availability of this function and the method of adjustment varies with computer operating system.
Upgrade your graphics adaptor. |
| Picture is not clear.
Picture is in the wrong position. | Television needs to be set up for the computer analogue RGB input (also known as VGA - or - sub).
Some input resolutions produce a clearer picture than others. | For computer analogue RGB input (also known as VGA-or D-sub-, activate the automatic set-up function. The phase, frequency, vertical and horizontal position controls might also need slight adjustment.
Check information in the computer monitor section of these instructions and try a different resolution setting. |
| Picture looks squashed or stretched. | the wrong aspect ratio.
Equipment feeding the TV is set to | For a TV with a computer monitor function fed from the computer analogue RGB connector (also known as VGA or D-sub, set up the computer graphics adaptor resolution to have the same aspect ratio as the TV screen. (Aspect ratio means the ratio of width to height, which in this case is measured in pixels.) |
We have made every effort to ensure these instructions are as accurate as possible, however we apologize for any inconvenience caused by minor inconsistencies which may occur as a result of product improvement and development.
Troubleshooting table
Please check the following list before requesting service.
| Symptom | Possible solution |
| No picture, no sound | Switch on the set.
Check that the mains power outlet is properly connected.
Select appropriate input mode.
Unplug unit for 1 minute, then plug it back in. |
| No reception | Have you tuned in the TV stations?
Press 1 on the remote control.
Connect the antenna.
Make sure the set is ON and not in Standby mode |
| The TV switches off with missing antenna input signal | This is normal.
15 minutes after the antenna signal has disappeared, the set will change to standby mode. |
| The Channel option cannot be selected. | The unit is set to AV mode. Press 23 on the remote control. |
| Wrong Colours | Colour and Brightness errors can occur when the viewing angle/ambient air temperature (see technical specifications) are exceeded. |
| While viewing a DVB (digital) channel, there is sound but no picture. | Some channel offers audio content only. It is normal. |
| Blocky image or image stops intermittently. | Check all antenna connections.
Move the antenna away from areas of possible interference.
Try using an antenna booster. |
| Some digital channels cannot be viewed. | Contact the service provider to subscribe. |
| A cracking sound is sometimes heard from the unit. | If there is nothing wrong with the picture or sound, this is the sound of the cabinet undergoing very slight contractions in response to changes in the room temperature.
There are no adverse effects on the performance or other aspects. |
- The LCD panel is a very high technology product, giving you fine picture details. Occasionally, a few nonactive pixels may appear on the screen as a fixed point of blue, green or red. Please note that this does not affect the performance of your product.
| JVC / LT-24HD7WU |
| System: | Analogue: PAL (B/G, D/K, I), SECAM (B/G, D/K)
· This product is not compatible with analogue SECAM L broadcasting. Digital: DVB-T, DVB-T HD (H.264), DVB-C, DVB-C HD (H.264) PAL/SECAM/NTSC 3.58/NTSC 4.43/PAL 60Hz |
| Video Colour System: |
| Preset channels: | 1100 Service in total of Analog and Digital |
| Frequency Range: | Analogue: 45.75~858MHz |
| LCD: | Digital: E2~E69 |
| HDMI input: | TFT low-glass Active Matrix Colour LCD HDMI compliant (type A connector), HDCP compliant Suggested scan rates: 50Hz: 576i/576p/720p/1080i/1080p 60Hz: 480i/480p/720p/1080i/1080p |
| Audio Output Power: | HDMI Audio: 2-channel PCM, 32/44.1/48 kHz sampling frequency 16/20/24 bits per sample; 6-channel AC-3, 32/44/48KHz, sampling frequency, maximum bitrate is 640kbps. |
| approx. 3W(MAX) x 2 |
| GENERAL | |
| Power Source: | 100-240V ~50/60Hz |
| Energy efficiency class: | A |
| Visible screen size (diagonal): | 60cm / 23.6inch |
| Power Consumption (Rating): | 35W |
| Power Consumption in on mode: | 25W |
| Energy consumption per year*1: | 36kWh |
| Power Consumption in standby mode: | ≤0.30W |
| Power Consumption in recording mode*2: | 5W |
| Screen resolution: | 1,366 pixel (horizontal) x 768 pixel (vertical) |
| Weight: | 3.8kg |
| Dimensions: | 55.7(W) x 38.5(H) x 16(D)cm |
| Surrounding temperature: | Operation: 5°C ~ 40°C/Storage: -20°C ~ 60°C |
| Operating Humidity: | Less than 80%RH |
Accessories
User's Manual. 1
Brown safety sheet. 1
Energy label. 1
Remote control. 1
Screw 4
Stand Base Plate. 1
Stand Base Pillar. 1
1 Energy consumption per year, based on the power consumption of the television operating 4 hours per day for 365 days. The actual energy consumption will depend on how the television is used.
2 Based on the power consumption of the television unit only (when TV does not output picture and sound signal). Not include any other USB devices.
Weight and Dimensions are approximate. Because we continuously strive to improve our products we may change specifications and designs without prior notice.
- DVB and the DVB logos are trademarks of the DVB project.
- Manufactured under license from Dolby Laboratories. Dolby and the double-D symbol are trademarks of Dolby Laboratories.
- This product is protected by certain intellectual property rights of Microsoft. Use or distribution of such technology outside of this product is prohibited without a license from Microsoft.
- THIS PRODUCT IS LICENSED UNDER THE MPEG-4 VISUAL PATENT PORTFOLIO LICENSE FOR THE PERSONAL AND NON-COMMERCIAL USE OF A CONSUMER FOR (i) ENCODING VIDEO IN COMPLIANCE WITH THE MPEG-4 VISUAL STANDARD ("MPEG-4 VIDEO") AND/OR (ii) DECODING MPEG-4 VIDEO THAT WAS ENCODED BY A CONSUMER ENGAGED IN A PERSONAL AND NON-COMMERCIAL ACTIVITY AND/OR WAS OBTAINED FROM A VIDEO PROVIDER LICENSED BY MPEG LA TO PROVIDE MPEG-4 VIDEO. NO LICENSE IS GRANTED OR SHALL BE IMplied FOR ANY OTHER USE. ADDITIONAL INFORMATION INCLUDING THAT RELATING TO PROMOTIONAL, INTERNAL AND COMMERCIAL USES AND LICENSING MAY BE OBTAINED FROM MPEG LA, LLC. SEE HTTP://WWW.MPEGLA.COM.
- THIS PRODUCT IS LICENSED UNDER THE AVC PATENT PORTFOLIO LICENSE FOR THE PERSONAL USE OF A CONSUMER OR OTHER USES IN WHICH IT DOES NOT RECEIVE REMUNERATION TO (i) ENCODE VIDEO IN COMPLIANCE WITH THE AVC STANDARD ("AVC VIDEO") AND/OR (ii) DECODE AVC VIDEO THAT WAS ENCODED BY A CONSUMER ENGAGED IN A PERSONAL ACTIVITY AND/OR WAS OBTAINED FROM A VIDEO PROVIDER LICENSED TO PROVIDE AVC VIDEO. NO LICENSE IS GRANTED OR SHALL BE IMplied FOR ANY OTHER USE. ADDITIONAL INFORMATION MAY BE OBTAINED FROM MPEG LA, L.L.C. SEE HTTP://WWW.MPEGLA.COM.
- The terms HDMI and HDMI High-Definition Multimedia Interface, and the HDMI Logo are trademarks or registered trademarks of HDMI Licensing LLC in the United States and other countries.
- All other trademarks are property of their respective owners.
This product incorporates copyright protection technology that is protected by method claims of certain U.S.patents and other intellectual property rights owned by Macro vision Corporation and other rights owners. Use of this copyright protection technology must be authorized by Macro vision Corporation, and is intended for home and other limited viewing uses only. Unless otherwise authorized by Macro vision Corporation. Reverse engineering or disassembly is prohibited.
The product complies with the KODAK Picture CD format and will display KODAK Picture CDs. The "KODAK Picture CD Compatible" logo is a trademark of Eastman Kodak Company and is used with permission.
\section*{Caracteristiques}
| Tune Type DTV+ATV |
| Australia | Bulgaria | Denmark |
| Austria | Croatia | Finland |
| Belgium | Czech | France |
| MENU |
| Tune Type DTV+ATV |
| Australia | Bulgaria | Denmark |
| Austria | Croatia | Finland |
| Belgium | Czech | France |
| MENU |
FONCTIONNEMENT
| File System Size |
| PVR File System Type | Hi Speed FS |
| PVR File System Size | 4GB |
| SD 112 Mins |
| HD 32 Mins |
|
|
| OK | MENU |
REMARQUE :
2:OPEN/CLOSE (OUVRIR/FERMER) ▲
30:REPEAT (REPÉTITION)
PAS D'IMAGE OU DE SON
IL Y A DES IMAGES, MAIS PAS DE SON
USB, HDMI2(ARC), HDMI1, KOPTELEFOON, CI, PC AUDIO, VGA, RF
Opmerking:
| Tune Type DTV+ATV |
| Australia | Bulgaria | Denmark |
| Austria | Croatia | Finland |
| Belgium | Czech | France |
| MENU |
| File System Size |
| PVR File System Type | Hi Speed FS |
| PVR File System Size | 4GB |
| SD 112 Mins |
| HD 32 Mins |
| |
| OK | MENU |
OPMERKING:
"BAD DISC" WORDT WEERGEGEVEN
"NO DISC" WORDT WEERGEGEVEN
| File System Size |
| PVR File System Type | FAT32 |
| PVR File System Size | All |
| SD 208 Mins | |
| HD 59 Mins | |
| |
| |
| OK | MENU |
| File System Size |
| PVR File System Type | Hi Speed FS |
| PVR File System Size | 4GB |
| SD 112 Mins | |
| HD 32 Mins | |
| |
| |
| OK | MENU |
NOTA:
Pulse: Pulse: Pulse: Pulse: Pulse: Pulse: Pulse: Pulse: Pulse: Pulse: Pulse: Pulse: Pulse: Pulse: Pulse: Pulse: Pulse: Pulse: Pulse: Pulse: Pulse:
Pulse: Pulse: Pulse: Pulse: Pulse: Pulse: P pulse: P pulse: P pulse: P pulse: P pulse: P pulse: P pulse: P pulse: P pulse: P pulse: P pulse: P pulse: P pulse: P pulse: P pulse: P pulse: P pulse: P pulse: P pulse: P pulse: P pulses: Spirito y airey.
Spirito y airey.
Spirito y airey.
Spirito y airey.
Spirito y airey.
Spirito y airey.
Spirito y airey.
Spirito y airey.
Spirito y airey.
Spirito y airey.
Spirito y airey.
Spirito y airey.
Spirito y airey.</HR
Spirito y airey.</HR
Spirito y airey.</HR
Spirito y airey.</HR
Spirito y airey.</HR
Spirito y airey.</HR
Spirito y airey.</HR
Spirito y airey.</HR
Spirito y airey.</HR
Spirito y airey.</HR
Spirito y airey.</HR
Spirito y airey.</HR
spirito y airey.</HR
spirito y airey.</HR
spirito y airey.</HR
spirito y airey.</HR
spirito y airey.</HR
spirito y airey.</HR
spirito y airey.</HR
spirito y airey.</HR
spirito y airey.</HR
spirito y airey.</HR
spirito y airey.</HR
s Piratae 100% Pulsa 100% Pulsa 100% Pulsa 100% Pulsa 100% Pulsa 100% Pulsa 100% Pulsa 100% Pulsa 100% Pulsa 100% Pulsa 100% Pulsa 100% Pulsa 100% Pulsa 101%
Pulse 100% Pulsa 100% Pulsa 100% Pulsa 100% Pulsa 100% Pulsa 100% Pulsa 100% Pulsa 100% Pulsa 100% Pulsa 100% Pulsa 100% Pulsa 100% Pulsa 102%
Pulse 100% Pulsa 100% Pulsa 100% Pulsa 100% Pulsa 100% Pulsa 100% Pulsa 102%
Pulse 100% Pulsa 100% Pulsa 100% Pulsa 100% Pulsa 102%
Pulse 100% Pulsa 100% Pulsa 100% Pulsa 102%
Pulse 100% Pulsa 100% Pulsa 100% Pulsa 102%
Pulse 100% Pulsa 100% Pulsa 102%
Pulse 100% Pulsa 100% Pulsa 102%
Pulse 100% Pulsa 100% Pulsa 102%
Pulse 100% Pulsa 100% Pulsa 102%
Pulse 100% Pulsas 102%
Pulse 100% Pulsas 102%
Pulse 100% Pulsas 102%
Pulse 100% Pulsas 102%
Pulse 100% Pulsas 102%
Pulse 100% Pulsas 102%
Pulse 100% Pulsas 102%
Pulse 1.5 mm Hg.
Pulse 2.5 mm Hg.
Pulse 3.5 mm Hg.
Pulse 4.5 mm Hg.
Pulse 5.5 mm Hg.
Pulse 6.5 mm Hg.
Pulse 7.5 mm Hg.
Pulse 8.5 mm Hg.
Pulse 9.5 mm Hg.
Pulse 10.5 mm Hg.
Pulse 12.5 mm Hg.
Pulse 14.5 mm Hg.
Pulse 16.5 mm Hg.
Pulse 2.5 mm Hg.
Pulse 3.5 mm Hg.
Pulse 4.5 mm Hg.
Pulse 5.5 mm Hg.
Pulse 6.5 mm Hg.
Pulse 7.5 mm Hg.
Pulse 8.5 mm Hg.
Pulse 9.5 mm Hg.
Pulse 12.5 mm Hg.
Pulse 14.5 mm Hg.
Pulse 16.5 mm Hg.
Pulse 18.5 mm Hg.
Pulse 2.5 mm Hg.
Pulse 3.5 mm Hg.
Pulse 4.5 mm Hg.
Pulse 5.5 mm Hg.
Pulse 6.5 mm Hg.
Pulse 7.5 mm Hg.
Pulse 8.5 mm Hg.
Pulse 9.5 mm Hg.
Pulse 12.5 mm Hg.
Pulse ^4 mm Hg.
Pulse ^5 mm Hg.
Pulse ^6 mm Hg.
Pulse ^7 mm Hg.
Pulse ^8 mm Hg.
Pulse ^9 mm Hg.
Pulse ^ ^ * ^ * ^ * ^ * ^ * ^ * ^ * ^ * ^ * ^ * ^ * ^ * ^ * ^ * ^ * ^ * ^ * ^ * ^ * ^ * ^ * Pulse ^ ^ ^ ^ ^ ^ ^ ^ ^ ^ ^ ^ ^ ^ ^ ^ ^ ^ ^ ^ ^ Pulse ^ ^ ^ ^ ^ ^ ^ ^ ^ ^ ^ ^ ^ ^ ^ ^ ^ Pulse ^ ^* ^ . Sigrado (pulau): Sigrado (pulau): Sigrado (pulau): Sigrado (pulau): Sigrado (pulau): Sigrado (pulau): Sigrado (pulau): Sigrado (pulau): Sigrado (pulau): Sigrado (pulau): Sigrado (pulau): Sigrado (pulau): Sigrado (pulau): Sigrado( pula): Sigrado (pulau): Sigrado (pulau): Sigrado (pulau): Sigrado (pulau): Sigrado (pulau): Sigrado (pulau): Sigrado (pulau): Sigrado (pulau): Sigrado (pulau): Sigrado (pulau): Sigrado (pulau): Sigrado (pulau): Sigrados (pulau): Sigrados (pulau): Sigrados (pulau): Sigrados (pulau): Sigrados (pulau): Sigrados (pulau): Sigrados (pulau): Sigrados (pulau): Sigrados (pulau): Sigrados (pulau): Sigrados (pulau): Sigrados (pulau): Sigrados (pulAU)
Notas:
Downloaded from www.vandenborre.be