T 81 Classic - Vacuum Cleaner Kärcher - Free user manual and instructions
Find the device manual for free T 81 Classic Kärcher in PDF.
User questions about T 81 Classic Kärcher
0 question about this device. Answer the ones you know or ask your own.
Ask a new question about this device
Download the instructions for your Vacuum Cleaner in PDF format for free! Find your manual T 81 Classic - Kärcher and take your electronic device back in hand. On this page are published all the documents necessary for the use of your device. T 81 Classic by Kärcher.
USER MANUAL T 81 Classic Kärcher
natural_image
Line drawing of three different vacuum cleaner units with coiled tubing (no text or symbols)Deutsch 4
English 8
Français 12
Italiano 16
Español 20
Norsk 24
Türkçe 28
Русский 32
Srpski 37
Українська 41
中文 45
Indonesia 49
한국어 53
natural_image
Technical line drawing of a vacuum cleaner with labeled component '17' (no text or symbols beyond label)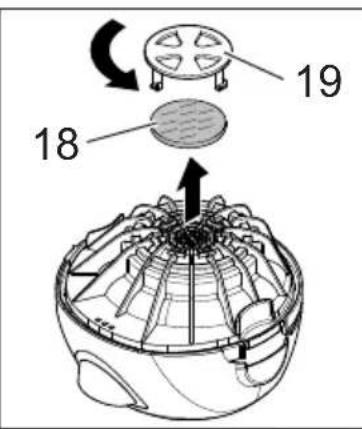
natural_image
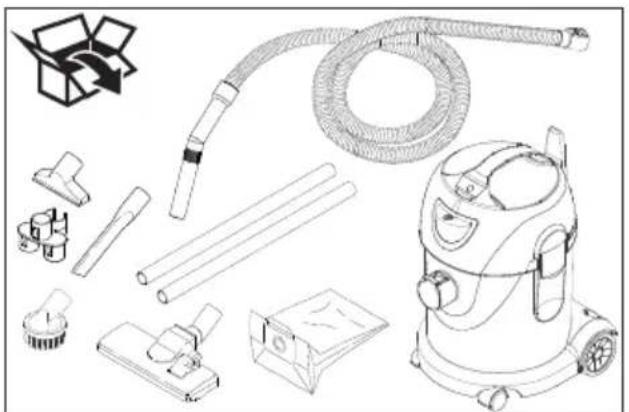
Line drawing of various cleaning and installation tools including a vacuum cleaner, hose, and mechanical components (no text or labels)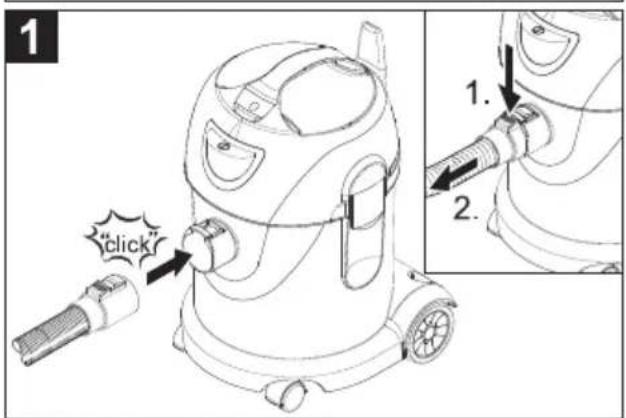
natural_image
Line drawing of a vacuum cleaner with hose and control panel (no text or symbols)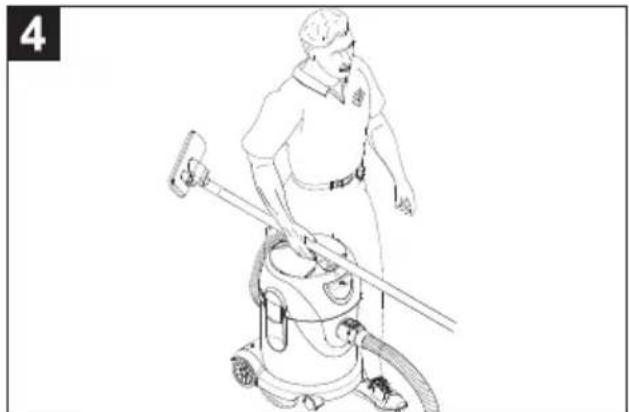
natural_image
Line drawing of a person using a vacuum cleaner (no text or symbols present)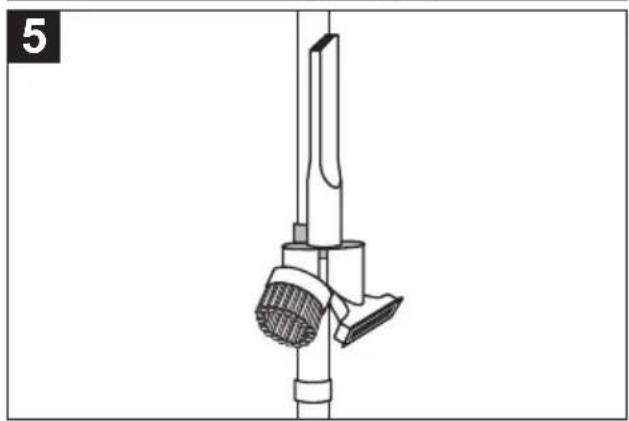
natural_image
Technical line drawing of a mechanical device with a lever and handle (no text or symbols)
Please read and comply with these original instructions prior
to the initial operation of your appliance and store them for later use or subsequent owners.
- Before first start-up it is definitely necessary to read the safety indications Nr. 5.956-249.0!
- The non-compliance of the operating and safety instructions may lead to damages of the appliance and to dangers for the operator and other persons.
– In case of transport damage inform vendor immediately.
Contents
Environmental protection .... EN 1
Danger or hazard levels ..... EN 1
Proper use ...... EN 1
Device elements ..... EN 2
Start up.... EN 2
Operation ...... EN 2
Transport..... EN 2
Storage ..... EN 2
Care and maintenance ..... EN 2
Troubleshooting ..... EN 3
Warranty ..... EN 3
Accessories and Spare Parts. EN 3
Technical specifications ..... EN 4
Environmental protection

The packaging material can be recycled. Please do not throw the packaging material into household waste; please send it for recycling.
Old appliances contain valuable materials that can be recycled; these should be sent for recycling. Batteries, oil, and similar substances must not enter the environment. Please dispose of your old appliances using appropriate collection systems.
Notes about the ingredients (REACH)
You will find current information about the ingredients at:
www.kaercher.com/REACH
Danger or hazard levels
⚠️DANGER
Pointer to immediate danger, which leads to severe injuries or death.
⚠ WARNING
Pointer to a possibly dangerous situation, which can lead to severe injuries or death.
△CAUTION
Pointer to a possibly dangerous situation, which can lead to minor injuries.
ATTENTION
Pointer to a possibly dangerous situation, which can lead to property damage.
Proper use
⚠ WARNING
The appliance is not suitable for vacuuming dust which endangers health.
ATTENTION
This unit is only to be used indoors.
- This vacuum cleaner is meant for dry cleaning of floors and walls.
- This appliance is suited for the commercial use, e.g. to clean buildings (offices, hotels, etc.), for handymen on construction sites, for carpenters and for interior remodeling.
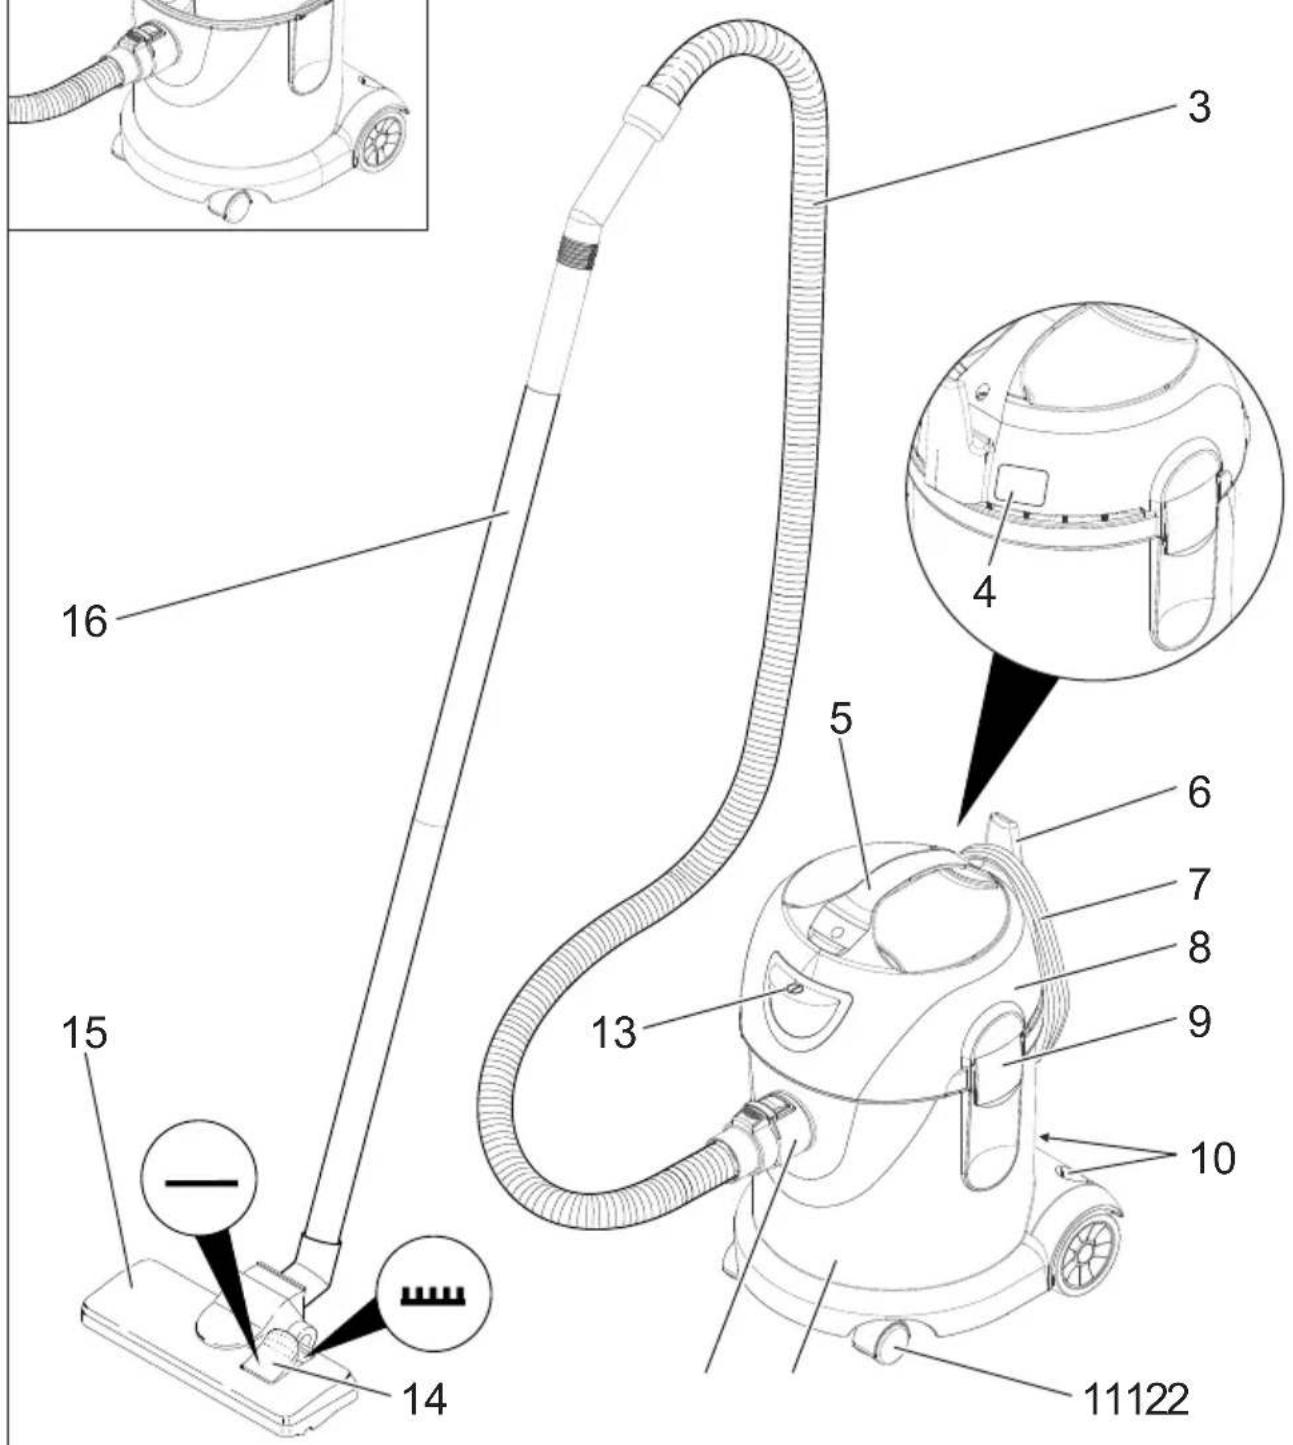
Device elements
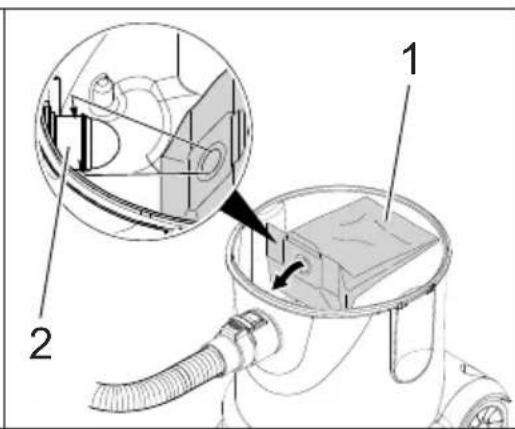
1 Paper filter bag
2 Suction support
3 Suction hose with manifold
4 Nameplate
5 Carrying handle
6 Cable hook
7 Power cord
8 Suction head
9 Suction head lock
10 Storage for accessories
11 Steering roller
12 Dirt receptacle
13 Main switch
14 Switch between hard surface/carpet
15 Floor nozzle
16 Suction tube
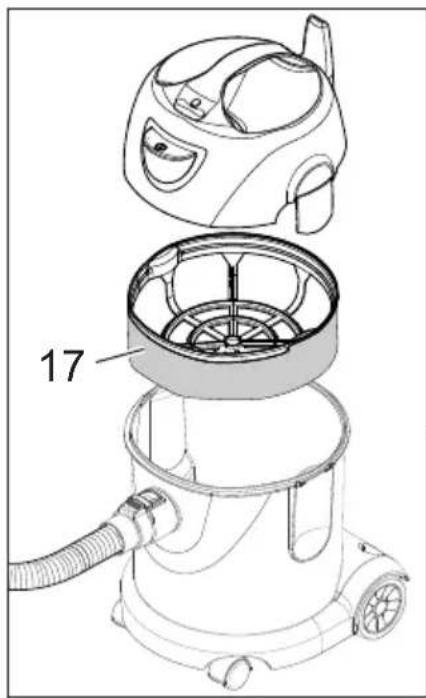
17 Main filter basket
18 Motor protection filter
19 Grid of the motor protection filter
Start up
→ Check whether main filter basket has been inserted into the appliance.
Operating modes
1 Operation with paper filter bag
2 Operation without filter bag
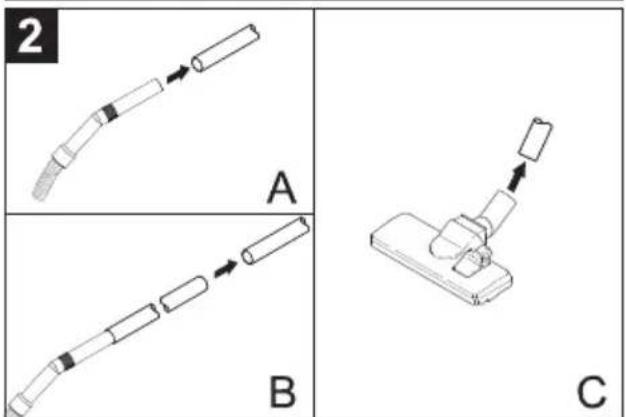
Installation of the filter bag
→ Release and remove the suction head.
→ Remove the main filter basket.
→ Insert the paper filter bag.
→ Insert main filter basket.
→ Insert and lock the suction head.
Operation
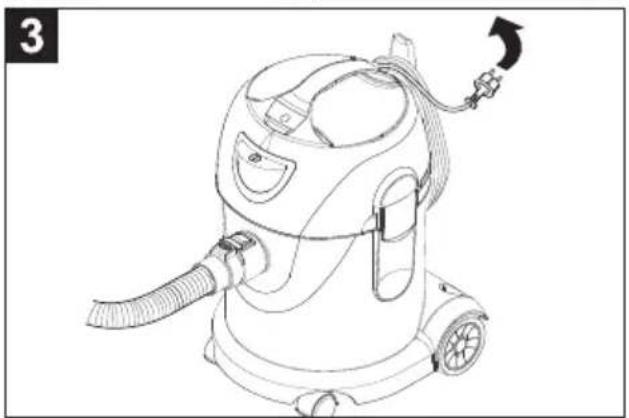
Turning on the Appliance
→ Plug in the mains plug.
→ Switch on the appliance at the main switch.
Cleaning operations
→ Set the selection switch of the floor nozzle to hard surface or carpet.
→ Perform the cleaning operation.
Turn off the appliance
→ Switch off the appliance at the main switch.
→ Pull out the mains plug.
After each operation
→ Empty the container.
Transport
△CAUTION
Risk of injury and damage! Observe the weight of the appliance when you transport it.
→ When transporting in vehicles, secure the appliance according to the guidelines from slipping and tipping over.
Storage
△CAUTION
Risk of injury and damage! Note the weight of the appliance in case of storage.
This appliance must only be stored in interior rooms.
Care and maintenance
⚠️DANGER
First pull out the plug from the mains before carrying out any tasks on the machine.
Clean main filter basket
→ Main filter basket (washable), clean it under running water if necessary.
ATTENTION
Risk of damage! Never insert the main filter basket while wet.
Replace motor protection filter
→ Release and remove the suction head.
→ Push the grids of the motor protection filter down, turn and remove.
→ Remove the motor protection filter.
→ Insert the new motor protection filter.
→ Insert the grid of the motor protection filter and lock it into place.
→ Insert and lock the suction head.
Troubleshooting
⚠️DANGER
First pull out the plug from the mains before carrying out any tasks on the machine.
The appliance shuts off during the operation
- Motor thermal protector has responded.
→ Exchange the paper filter bag.
→ Replace motor protection filter.
→ Check all parts for plugging.
Switching back on after the motor turbine has cooled off, after approx. 30 to 40 minutes.
Suction turbine does not run
→ Check the receptacle and the fuse of the power supply.
→ Check the power cable and the power plug of the device.
→ Turn on the appliance.
Suction capacity decreases
→ Remove choking of suction nozzle, suction tube or suction hose.
→ Exchange the paper filter bag.
→ Clean the main filter basket under running water.
→ Insert/lock the suction head correctly.
→ Replace defective suction hose.
→ Replace motor protection filter.
Dust comes out while vacuuming
→ Exchange the paper filter bag.
→ Check the paper filter bag.
→ Insert/lock the suction head correctly.
→ Insert undamaged main filter basket.
→ Reinsert motor protection filter correctly.
Customer Service
If malfunction can not be fixed, the device must be checked by customer service.
Warranty
The warranty terms published by the relevant sales company are applicable in each country. We will repair potential failures of your appliance within the warranty period free of charge, provided that such failure is caused by faulty material or defects in manufacturing. In the event of a warranty claim please contact your dealer or the nearest authorized Customer Service centre. Please submit the proof of purchase.
Accessories and Spare Parts
Only use original accessories and spare parts, they ensure the safe and trouble-free operation of the device.
For information about accessories and spare parts, please visit www.kaercher.com.
Technical specifications
| T 8/1 Classic T 1 | 4/1 Classic | ||
| Mains voltage V 220-240 220-240 | |||
| Frequency Hz 1~50-60 1~50-60 | |||
| Max. performance W 1600 1600 | |||
| Container capacity I 8 14 | |||
| Air volume (max.) I/s 47 47 | |||
| Negative pressure (max.) | kPa (mbar) | 28,5 (285) | 28,5 (285) |
| Protective class | II II | ||
| Suction hose connection (C-DN/C-ID) | mm | 35 35 | |
| Length x width x height | mm | 360 x 315 x 350 | 360 x 315 x 465 |
| Typical operating weight | kg | 5,0 | 5,3 |
| Max. ambient temperature | °C | +40 | +40 |
| Values determined to EN 60335-2-69 | |||
| Sound pressure level L_pA | dB(A) | 69 69 | |
| Uncertainty K_pA | dB(A) | 2 2 | |
| Hand-arm vibration value | m/s^2 | <2,5 | <2,5 |
| Uncertainty K | m/s^2 | 0,2 | 0,2 |
| Power cord | H05VV-F 2x1,0 mm ^2 | |
| Part no.: | Cable length | |
| EU | 9.770-650.0 | 7,5 m |
www.kaercher.com/REACH
Niveaux de danger
⚠️DANGER
www.kaercher.com/REACH
Livelli di pericolo
⚠PERICOLO
www.kaercher.com/REACH
Niveles de peligro
⚠️ PELIGRO
www.kaercher.com/REACH
Risikotrinn
⚠️FARE
Anvisning om en umiddelbar truende fare som kan føre til store personskader eller til død.
ADVARSEL
www.kaercher.com/REACH
Tehlike kademeleri
TEHLIKE
www.kaercher.com/REACH
Степень опасности
⚠️ ОПАСНОСТЬ
www.kaercher.com/REACH
Stepeni opasnosti
⚠ OPASNOST
Napomena koja ukazuje na neposredno preteću opasnost koja dovodi do teških telesnih povreda ili smrti.
⚠UPOZORENJE
Napomena koja ukazuje na eventualno opasnu situaciju koja može dovesti do teških telesnih povreda ili smrti.
△OPREZ
Napomena koja ukazuje na eventualno opasnu situaciju, koja može izazvati lakše telesne povrede.
PAŽNJA
Napomena koja ukazuje na eventualno opasnu situaciju koja može izazvati materijalne štete.
Namensko korišćenje
⚠UPOZORENJE
www.kaercher.com/REACH
Ступінь небезпеки
⚠️НЕБЕЗПЕКА
www.kaercher.com/REACH
危险等级
危险
www.kaercher.com/REACH
Tingkat bahaya
⚠BAHAYA
www.kaercher.com/REACH
위험 수준
⚠️ 위험
natural_image
Icon showing a gear and wrench inside a square frame (no text or symbols)http://www.kaercher.com/dealersearch