
DC 2 - Cooker AEG - Free user manual and instructions
Find the device manual for free DC 2 AEG in PDF.
| Brand | AEG |
| Model | DC 2 |
| Product type | Dashcam (dashboard camera) |
| Reference | 11232 |
| Screen | IPS WDR 4.0 inch screen (10.16 cm) |
| Lens | 140° A+ ultra wide angle high resolution |
| Maximum video resolution | Up to 1296P |
| Photo resolution | 2 MP |
| Video format | MOV (H.264) |
| Photo format | JPEG |
| Internal memory | TF/Micro-SD card, class 10, up to 128 GB (not included) |
| Battery | Lithium-ion polymer, 3.7 V, 200 mAh, 0.74 Wh |
| Power supply | 12 V DC cigarette lighter plug / USB 5 V DC |
| Fuse | F3A250V |
| Dimensions (H x W x D) | 116 x 63.5 x 31 mm |
| Weight | 120.4 g |
| Menu language | Multilingual (French available) |
| Main functions | Loop recording, G-sensor, night vision (LED), motion detection, parking mode, rear camera (included), ADAS systems (LDWS, FCWS) |
| Package contents | Front camera, rear camera with USB cable, suction cup mount, USB cable with 12 V cigarette lighter plug, user manual |
| Cleaning and maintenance | Clean with a soft cloth; store in a clean, dry place; roll the cable properly |
| Safety | Do not expose to rain/humidity; do not cover while in operation; keep away from airbags; comply with privacy legislation |
| Repairability | Fuse replacement possible (F3A250V); contact dealer for other repairs |
Frequently Asked Questions - DC 2 AEG
User questions about DC 2 AEG
0 question about this device. Answer the ones you know or ask your own.
Ask a new question about this device
Download the instructions for your Cooker in PDF format for free! Find your manual DC 2 - AEG and take your electronic device back in hand. On this page are published all the documents necessary for the use of your device. DC 2 by AEG.
USER MANUAL DC 2 AEG
GB Instructions for use Dashcam DC 2
natural_image
Line drawing of a camera with concentric circular components and a separate mechanical bracket (no text or symbols)AEG
DE - Seite 3
Read these instructions before using the charger. Follow all instructions and recommendations.
FR - Page 43
22 www.aeg-automotive.com
24 www.aeg-automotive.com
TABLE OF CONTENTS
Introduction 26
Normal use 27
Contents 27
Technical data 27
Safety 28
Product Overview....33
Functions.... 34
Installation 35
Inserting the memory card....35
Installing the rear facing camera....35
Installing the front facing camera 36
Operation 36
Information about use.... 36
Switching the camera on and off 37
Formatting the memory card ....37
Recording video (video mode)....37
Taking pictures (photo mode) 37
Viewing recordings ( playback mode)....37
Protecting/unprotecting recordings.... 38
Deleting recordings.... 38
Changing the camera view.... 38
Settings 38
Calibrating the lane departure warning system 40
Troubleshooting 41
Cleaning, Care and Maintenance 42
Changing the fuse 42
Service 42
Disposal 42
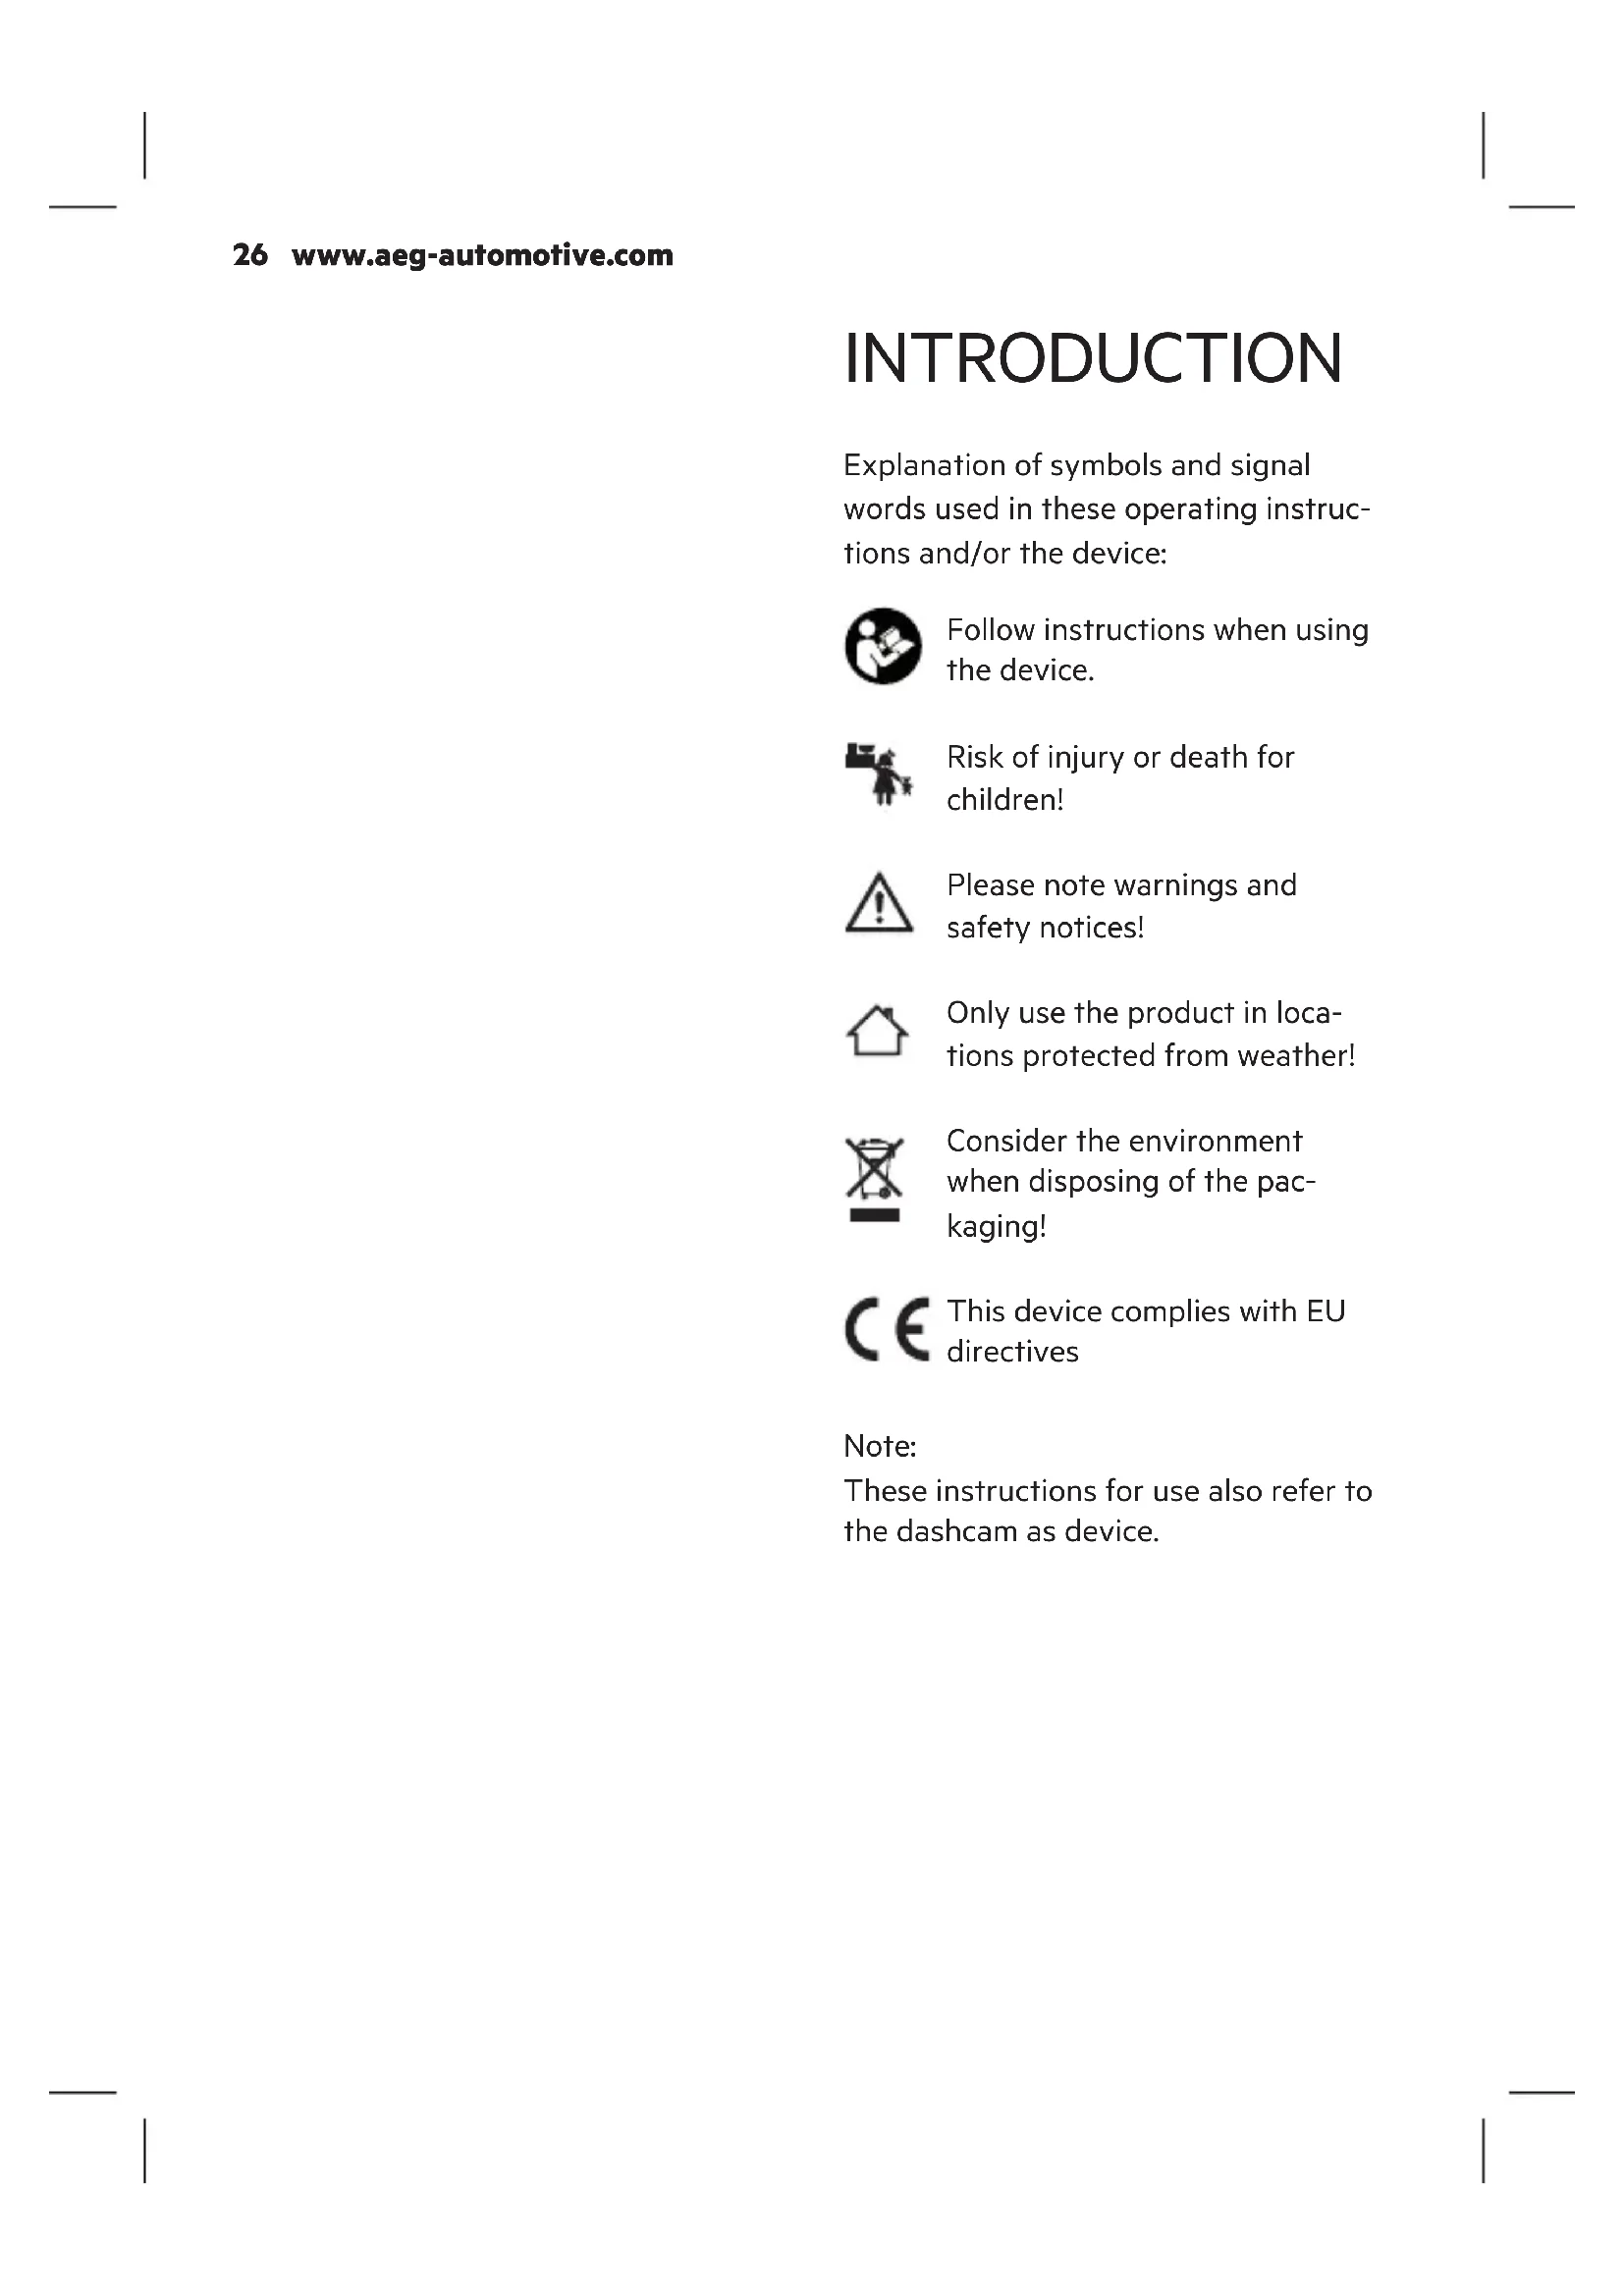
INTRODUCTION
Explanation of symbols and signal words used in these operating instructions and/or the device:

Follow instructions when using the device.

Risk of injury or death for children!

Please note warnings and safety notices!

Only use the product in loca- tions protected from weather!

Consider the environment when disposing of the packaging!

This device complies with EU directives
Note:
These instructions for use also refer to the dashcam as device.
Normal use
The DashCam is used to record events (e.g. traffic) from the driver's perspective. Depending on the mode being used it will either record film sequences or take pictures.
It is powered via USB cable.
Note:
The privacy of others is protected by law. Recording third parties can be a criminal offence. You are responsible for your actions. Please obtain information about the laws.
Using the device in traffic may be subject to special local regulations in the respective country.
This device is not intended to be used by children or persons with reduced physical, sensory or mental capabilities or lack of experience and knowledge, as they do not understand the resulting dangers.
This device is not intended for commercial use.
Any other use or modification of the device is considered improper and involves significant risks. The manufacturer assumes no liability for damages due to improper use.
Contents
Be sure to verify contents immediately upon opening the product. Check the product and all parts for damage. Do not use a defective product or parts.
Front facing camera
Rear facing camera with connecting cable
Suction cup mount
USB cable with 12 V car plug
Instructions For Use
Please include all relevant documentation to other users!
The operating instructions are also available at the following Internet address:
| Model Dashcam DC 2 | |
| Item number 11232 | |
| Display 4.0 inch (10.16 cm) | IPS WDR display |
| lens 140° A+ | high-resolution ultra-wide angle lens |
| Language multilingual | |
| Video format MOV (H.264) | |
| Video resolution up to 1296P | |
| record mode loop cycle recording | |
| recording length adjustable | |
| Picture format JPEG | |
| picture resolution 2 MP | |
| memory TF/Micro-SD | Class 10max. 128 GB |
| advanced driver assistance systems (ADAS) | integrated |
| parked mode integrated | |
| Microphone integrated | |
| Speaker integrated | |
| Sensor Acceleration sensor | |
| Power supply Car plug: 12 V DCUSB: 5 V DC | |
| Rechargeable battery | Li-ion polymer3.7 V, 200 mA,0.74 Wh |
| Dimensions(h x w x d) | 116 x 63.5 x 31 mm |
| Weight 120.4 g | |
| Fuse F3A250V | |
SAFETY
General Safety Guidelines
Read all safety notes and instructions. Failure to observe the safety notes and instructions may result in electric shock, fire and/or serious injuries. Please keep all safety notes and instructions for future reference.
Include all documentation when passing this product on to other users or subsequent owners!
The manufacturer is not responsible for damages caused by:
Improper connection and/or operation.
External forces, damage to the device and/or damage to parts of the device due to mechanical impacts or overload.
Any type of modifications to the device.
Using the device for purposes not described in this operating manual.
Subsequent damages from improper and/or incorrect use.
Moisture and/or inadequate ventilation.
Unauthorised opening of the device.
This will void the warranty.

Warning!

Risk of bodily or fatal injury to children! Risk of suffocation or strangulation! Keep the machine out of the reach of children.
Children are unable to assess the risks associated with use of this product!
Do not allow children to play with the components or fasteners, as they could be swallowed and result in suffocation.

Danger!
Damaged leads may cause fatal electric shock. Discontinue use if leads are damaged.


Explosion and fire hazard!
Verify the on-board voltage matches the input voltage specified on the device to prevent damage to the device.
Never expose the device to direct sunlight.
The equipment will heat up during use. Always place the backup camera system in a safe, well ventilated location.
Do not cover the device during operation, as it may be damaged from extreme heating.
Immediately stop using the device if you notice smoke or an unusual odour.
The device has a built-in rechargeable battery, therefore do not throw the device or the rechargeable battery into fire and do not expose the device/rechargeable battery to extreme heat. The rechargeable battery may otherwise burst or explode.

Risk of electric shock!
Do not expose the monitor to rain or wet conditions. Avoid spilling or dripping water or other liquids on it. Water entering electrical devices will increase the risk of electric shock.
Do not allow the device to come into contact with water or other liquids. Water entering the electric device increases the risk of electric shock. If the device comes into contact with water, immediately unplug the car plug. Discontinue use of the device and consult a speciality shop.
Do not modify the plug in any way.
Always unplug the cable from the 12 V car outlet by the plug. The cable may otherwise be damaged.
Do not use device if damaged. Damage to the device or the charging cable increases the risk of electrical shock.
Never use the cable to carry or pull the device.
Never operate the device if it has been dropped or damaged in any other way. For inspection and repair, take it to a qualified electrician.
Do not use other cables or accessories. Do not extend the cables.
Always unplug the device from the power source to disconnect it when not in use. Never pull on the connecting cable!

Risk of injury!
Before installing the backup camera system and before each functionality test of the backup camera system, secure the vehicle to prevent it from rolling away. Attention – risk of injury and property damage! Always engage the hand brake and shift into gear! Automatic transmissions must be put into Park and the hand brake engaged!
Do not run or start the vehicle while installing the backup camera system!
Always follow safety instructions if the vehicle is on jacks or a car lift or the like!
Follow the automaker's safety instructions and manual!
Only install the backup camera system in a safe environment! Keep clothing, hair, limbs and the backup camera system away from moving and hot engine- and car parts!
When installing the device, always be sure the safety and functionality of other systems and devices inside the vehicle will not be affected! Please note the information inside the automaker's manual.
If operation system mal- functions and damage to the backup camera system occurs during operation, immediately disconnect the equipment from the 12 V vehicle power supply!
Be sure the ignition and all vehicle loads are powered off before starting with installation of the backup camera system!

Risk of damage!
Improper installation of the backup camera system may damage the vehicle's electrical equipment.

Accident hazard!
Using a mobile device whilst driving may distract from traffic. Maintain your focus on driving and traffic.
Do not solely rely on the assist systems of the device. The assist systems do not affect your vehicle, do not prevent collisions and do not reduce damages or injuries.
Using the assist systems does not release you of your obligation to watch for other traffic!
Reckless driving and/or a inattentiveness operating the vehicle may result in fatal accidents or serious injuries.
The airbag being released can project devices mounted near the airbag at high speeds, resulting in serious injuries. Never mount the mobile device near airbags.
Special notes
After using a car wash, the camera's detection range may change due to mechanical effects. Be sure to check for this and readjust the camera if necessary.
When removing dirt or ice and snow from the camera lens be extremely careful so as not to scratch it.
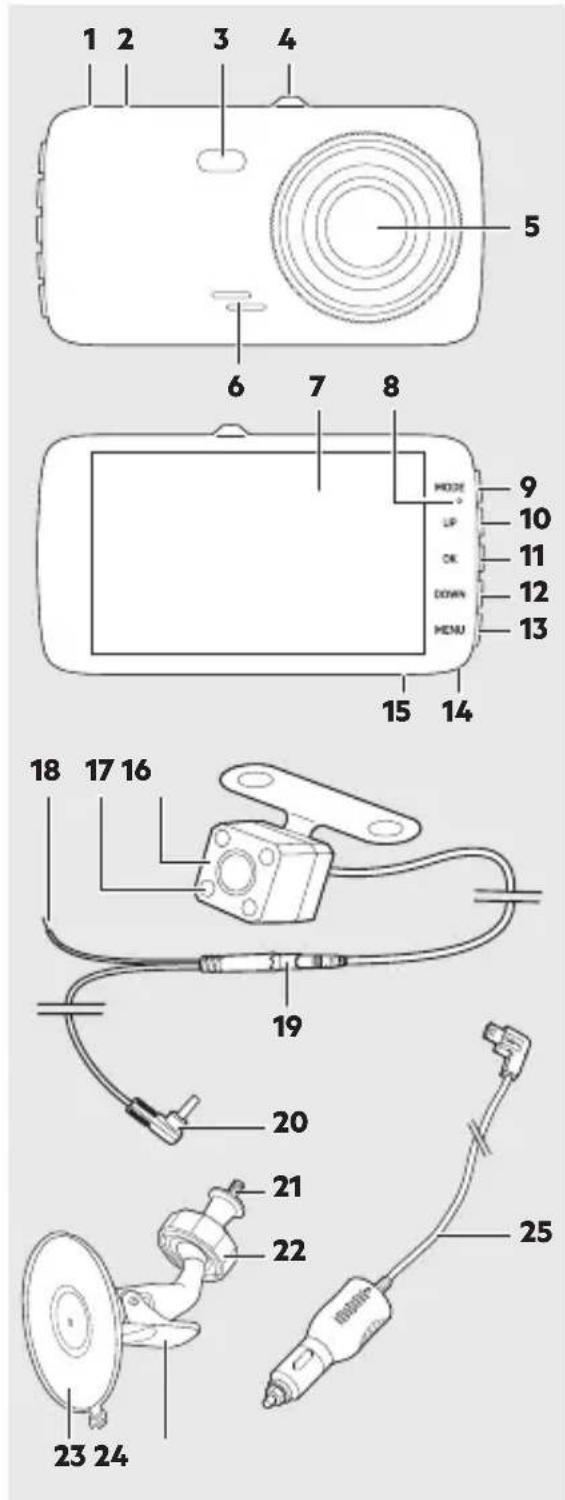
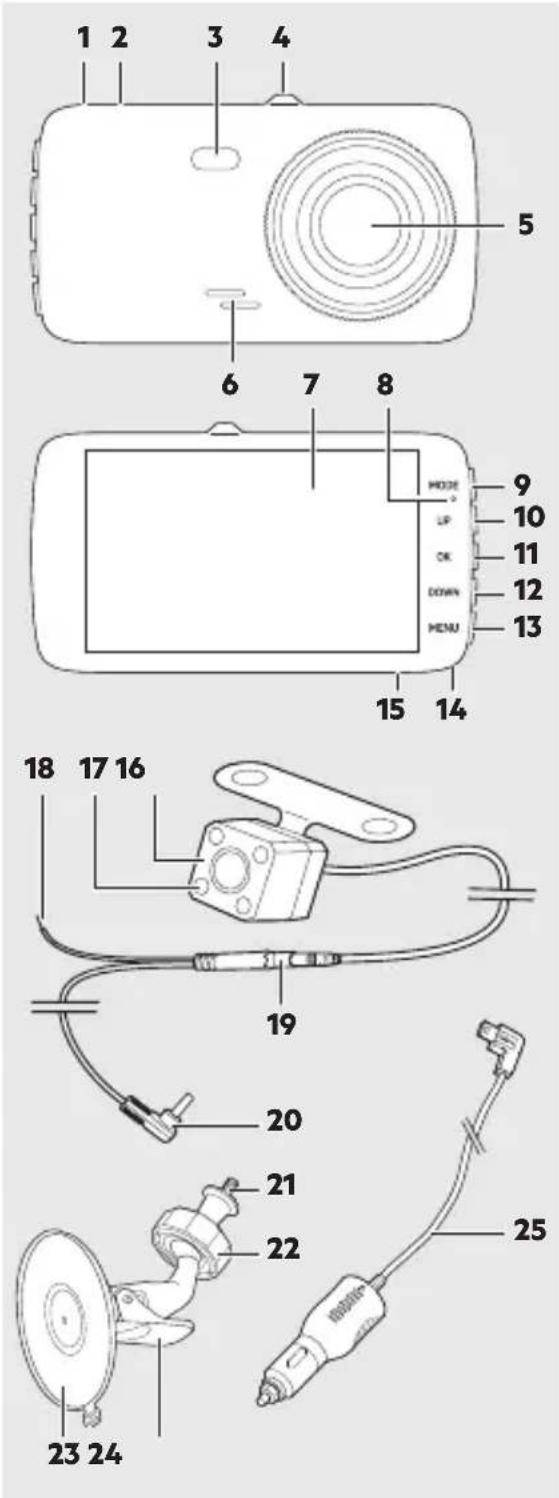
PRODUCT OVERVIEW
-
Socket for rear facing camera
-
USB connecting socket
-
LED light
-
Intake for suction cup mount
-
Lens
-
Speaker
-
Display
-
Status LED
-
MODE button
-
UP button
-
OK button
-
DOWN button
-
MENU button
-
Microphone
-
TF/microSD card slot
-
Rear facing camera
-
LED light
-
Socket for 12 V cable
-
Plug connection rear facing camera connecting cable
-
Rear facing camera connector plug
-
Thread with knurled screw
-
Lock nut
-
Suction cup
-
Locking lever
-
USB connecting cable with car plug
34 www.aeg-automotive.com
FUNCTIONS
Automatic loop cycle recording
The device records in an endless loop. When the memory card is full, the oldest recordings which are not write protected are erased. This ensures there is always room and an adequate recording history.
Acceleration sensor (G-Sensor)
The acceleration sensor detects rapid acceleration and slowing (e.g. in an accident). The camera protects the active recording so the recording will not be overwritten later.
Night vision
Hold the MENU button whilst recording to switch on the LED light.
Motion detection
When motion detection is active, the camera automatically starts recording if motion is detected with in the camera's viewing angle.
Parking monitor
When the camera is not being powered (e.g. whilst parked), the camera draws power from the integrated battery and switches to standby mode. If the acceleration sensor detects a collision, the camera automatically starts recording.
Reversing camera
By switching the camera image on the display you can use the rear facing camera as a reversing camera, e.g. picture-in-picture (see “Changing the camera image”).
ADAS assist systems
The camera features ADAS (Advanced Driver Assistance Systems) smart assistance systems. The systems assist the drive and can help prevent accidents due to inattentiveness.
LDWS lane departure warning system
The LDWS system (Lane Departure Warning System) continuously monitors the lane separator and warns the driver when departing the lane.
Note:
The system must be calibrated prior to first use to work correctly (see "Calibrating the lane departure warning system").
FCWS front collision warning system
The FCWS (Front Collision Warning System) continuously monitors the safety distance between your vehicle and the vehicle in front of you. If the distance is less than the calculated safety distance, the system warns the driver.
INSTALLATION
Inserting the memory card
A memory card is required to save device recordings.
Insert a TF/microSD card (not included) in the TF/microSD card slot (15).
We recommend formatting the TF/microSD card directly in the camera prior to first use (see “Format memory card”).
Installing the rear facing camera Attention!
Due to differences in technical and design-related vehicle types, these instructions for use do not apply to all vehicle models.
- Remove the number plate from its bracket.
- Unscrew and remove the number plate holder.
- Now locate an opening / hole to the interior of the vehicle near the number plate to feed the plug of the connecting cable for the camera into the vehicle's interior. Remove the interior trim around the number plate for easier visibility and installation. If there is no opening on the vehicle, drill a hole with a 10 mm (diameter) drill bit in the trim area around the number plate.
Attention!
be sure there are no electrical wires or other automotive parts in the area where you will be drilling which could be damaged!
- To protect the borehole in the metal panel from corrosion the metal edges should be coated with a suitable paint coating (e.g. automaker's touchup pen) and allow to dry adequately.
Attention!
The location of the rear facing camera must not affect the functionality of the number plate lamp! If it will affect the number plate lamp, install the rear facing camera in a different suitable location.
- Feed the plug of the camera cable (19) into the interior of the vehicle or the boot lid.
- Mount the rear facing camera to the vehicle with suitable fasteners (not included).
Be sure the cable output at the back of the camera is always up to maintain the maximum swivel range.
If desired, you may also use caulk to seal the opening for the camera cable from both sides to prevent water from entering.
- Attach the mounting plate and the number plate holder to the vehicle.
- Attach the number plate.
Attention!
Disconnect the negative cable from the vehicle's battery before working on the vehicle's electric circuit! Stored information, codes and programming may be lost! To prevent possible damage, please first consult the vehicle manufacturer.
- Now connect the red supply cable of the camera cable to a 12 V + (positive) supply of the vehicle.

Warning!
Do not route the cable near where the airbag deploys.
- Route the camera cable (19) to connect to the front facing camera in the interior/void of the vehicle. Ensure the cables will not be pinched or tied.
- Plug the connector (20) of the camera cable into the connecting socket (1) on the front facing camera.
The rear facing camera can be swivelled in one direction. Swivel the camera into the desired position.
Installing the front facing camera Attention!
When installing the device, ensure it will not obstruct your view. The connecting cable must not interfere with your ability to drive and the monitor must be firmly secured in place. Observe the applicable laws and safety rules for automobiles!
- Screw the thread (21) of the suction cup mount into the intake (4) of the camera. Turn the knurled screw toward the camera to secure the screw joint.
- Clean the area of the windscreen where you wish to attach the suction cup (23).
- Press the suction cup against the windscreen and push the locking lever (24) toward the suction cup.
- Open the lock nut (22) and adjust the camera to the desired viewing angle. Then tighten the lock nut again to fix the camera.
- Plug the USB connecting cable (25) into the connecting socket (2).
- Route the USB connecting cable so as not to impair or jeopardise the safety of the vehicle and occupants.
- Plus the car plug (25) into a 12 V car socket.
OPERATION

Warning!
Do not operate the monitor whilst driving, as this distracts from traffic. Maintain your focus on driving and traffic.
Information about use
You may have to turn the ignition to activate the vehicle's 12 V car outlet. Please refer to the owner's manual for your vehicle. Contact a specialised shop if you are unsure.
Do not cover the device during use and ensure proper ventilation.
Switching the camera on and off
The camera automatically switches on and starts recording when starting the engine.
When the engine is shut off, the camera saves the current recording and automatically switches off.
The recordings of the front and rear facing camera are saved separately.
-
To manually switch on the camera, briefly press the OK button.
-
Hold the OK button to switch the camera off.
Note:
Without power supply, the camera automatically switches off when the battery is low.
Formatting the memory card
- Press the MENU button.
- Use the UP/DOWN button to select "Form. SD card".
- Press OK to confirm.
- Use the UP/DOWN button to select "Yes".
- Press OK to confirm.
- The memory card will now be formatted.
Wait for the process to complete.
Recording video (video mode)
After switching on, the camera automatically switches to video mode and starts recording.
- To start recording manually, briefly press the OK button.
The red camera symbol will appear and the blue LED will flash. - To stop recording, press the OK button again.
Taking pictures (photo mode)
To take a picture, briefly press the DOWN button.
The picture will automatically be saved and can later be viewed in playback mode.
Viewing recordings (playback mode)
- Use the MODE button to select playback mode (if necessary).
- Use the UP/DOWN button to select the desired category:
normal recordings
protected recordings
parked mode recordings
photos
Note:
Recordings from the front and rear facing camera are saved under separate categories.
- Press the OK button to confirm your selection.
- Use the UP/DOWN button to select the desired recording.
- Press the OK button. The video will play or the picture will be shown.
- To stop playback or close the picture, press the OK button again.
38 www.aeg-automotive.com
- Press the MODE button to go back of the categories.
- Press the MODE button again to go to the home screen.
Protecting/unprotecting recordings
- Use the MODE button to select playback mode (if necessary).
- Select the desired recording. To protect or unlock all recordings, select any recording.
- Press the MENU button.
- Select "Protect".
- Press OK to confirm.
- Option 1: Select "Protect one" or "Unprotect 1".
- Möglichkeit 2: Select "Protect all" or "Unprotect all".
- Press OK to confirm.
Deleting recordings
- Use the MODE button to select playback mode (if necessary).
- Select the desired recording. To delete all recordings, select any recording.
- Press the MENU button.
- Select "Delete".
- Press OK to confirm.
- Option 1: Select "Delete one".
- Option 2: Select "Delete all".
- Press OK to confirm.
Changing the camera view
Press the UP button to select the view of camera images:
front facing camera only
near facing camera only
front facing camera large, rear facing camera PiP*
near facing camera large, front facing camera PiP*
*PiP = Picture in Picture
SETTINGS
- Press the MENU button.
- Use the UP/DOWN button to select a setting.
- Press the OK button to confirm a selection or open the respective submenu.
- Press the MENU button to go back or exit the menu.
| Setting Description / values | |
| Film end time Recording duration | on when switching off the camera or after disconnecting from power.0 minutes, 5 seconds, 10 seconds, 30 seconds |
| Film clip length Set the video length. | Off, 1 minute, 3 minutes, 5 minutes |
| Film mode Set video resolution. | 2304x1296 30fps, 1080P, 720P |
| Audio recording Record audio | whilst recording video.On, Off |
| Language English, Deutsch, Italiano, Polski, Slovenčina, Français, Čeština, Nederlands | |
| Signal Signal and key tones. | On, Off |
| Volume 1 - 10 | |
| LCD energy saver Display automatically switches off to safe energy.Off, 30 seconds, 1 minute, 3 minutes | |
| Flicker Set refresh rate. | 50 Hz, 60 Hz |
| LED light LED light (3) on or off. | On, Off |
| Safety setting Sets the sensitivity of the acceleration sensor.Off, High, Medium, Low | |
| Parking monitor Set sensitivity for recording in parked mode.Off, High, Medium, Low | |
| Motion Detection Set motion detection sensitivity.Off, High, Medium, Low | |
| Reset Restores the factory settings. | |
| Format SD card Formats the SD card. | |
| Clock | Set the date/time. |
| LDWS Enable or disable lane de | departure warning system.On, Off |
| FCWS Enable or disable front collision warning system.On, Off | |
| Calibrate LDWS see “Calibrating the lane departure warning system” | |
| Lighting Set exposure correction. | -2, -1.7, -1.3, -1, -0.7, -0.3, 0, 0.3, 0.7, 1, 1.3, 1.7, 2 |
| FW version Shows the firmware version | |
Calibrating the lane departure warning system

Warning!
Only calibrate the device in a safe environment. Never calibrate the device on public roads or in moving traffic.
- Press the MENU button to open the "Settings" menu.
- Use the UP/DOWN button to select "Calibrate LDWS" and press the OK button.
- Press the OK button again to start the calibration.
To cancel the calibration process, press the MENU button.
The active setting will be displayed with a red line. The current calibration is shown with a green triangle which changes with the new setting.
-
Press the UP/DOWN button to move the active setting vertically or horizontally.
-
Press the OK button to confirm the desired position of the red line.
Upper intersection point:
Align the vertical line with the middle of the road.
Align the horizontal line with the horizon.
Left intersection point:
Align the vertical line with the left roadside.
Align the horizontal line with the end of the bonnet.
Right intersection point:
Align the vertical line with the right roadside.
Align the horizontal line with the end of the bonnet.
- Press the OK button to confirm the calibration.
TROUBLESHOOTING
| Problem Possible cause Solution | ||
| The camera doesn’t switch on. | The car plug is not connected to the cigarette lighter socket or a 12 V socket in the vehicle. | Plug the car plug into the cigarette lighter socket or a 12 V socket in the vehicle. |
| The fuse in the car plug is burnt out and needs to be replaced. | Replace the defective fuse in the car plug with a new fuse (see “Replacing the fuse”). | |
| The camera keeps switching off. | The car plug is not correctly seated in the cigarette lighter socket or the 12 V socket in the vehicle. | Verify the car plug is seated correctly. The LED on the car plug must be on. |
| The memory card is not detected. | The memory card is not formatted. | Format the memory card (see “Formatting the memory card”). |
| Memory card defective. Check the memory card and replace if necessary. | ||
| The camera does not start recording after switching on. | Memory card full (too many protected recordings). | Check the memory card and if necessary delete recordings which are no longer required. |
| Video has no sound. Audio recording is switched off. | Enable audio recording (see “Settings”). | |
42 www.aeg-automotive.com
CLEANING, CARE AND MAINTEN- NANCE
Minimal care will ensure your device remains functional for years.
●Carefully wind the cable when storing the device. This will help prevent accidental damage to the cable and the device.
●clean the product with a soft, dry cloth.
Store the machine in a clean, dry place.
Changing the fuse
The car plug of this device has a fuse. It is triggered by short-circuits or voltage peaks and will then require replacement.
Attention!
Do not insert higher rated fuses. This may otherwise damage the electronics.

- Unscrew the retaining ring (1) with the safety cover (2) from the car plug (4).
- Insert a new microfuse (3) of the same rating (see Technical Data).
- Screw the retaining ring (1) with the safety cover (2) back onto the car plug (4).
Service
Please contact your speciality retailer if you have any questions about using or operating the device after reading these instructions or if for any problems with your device.
Disposal
The packaging consists of non-contaminating materials that you can dispose of at your local recycling point.

Do not throw electrical appliances in withdomestic waste!
In accordance with European Directive 2012/19/EC for waste electrical and electronic equipment (WEEE) and conversion to national law, used electrical appliances must be collected separately and taken to a recycling point. For ways to dispose of old electrical appliances please contact your community or city administration.

Do not dispose of waste batteries with household rubbish. Discharge used battery packs and return the battery packs to a public waste management or collection site. Properly dispose of damaged or defective battery packs in compliance with local regulations.
Illustrations may vary slightly from the product itself. We reserve the right to modify the product in accordance with technical advances. Decoration not included.
SOMMAIRE
Introduction 44
52 www.aeg-automotive.com
APERÇU DU PRODUIT
54 www.aeg-automotive.com
Assistant de respect des distances FCWS
56 www.aeg-automotive.com
58 www.aeg-automotive.com
- Possibilité 1:
62 www.aeg-automotive.com
NETTOYAGE, ENTRETIEN ET MAINTENANCE
64 www.aeg-automotive.com
INDICE
Introduzione....66
Uso conforme....67
Fornitura 67
Dati tecnici 67
Sicurezza....68
72 www.aeg-automotive.com
74 www.aeg-automotive.com
80 www.aeg-automotive.com
82 www.aeg-automotive.com
84 www.aeg-automotive.com
86 www.aeg-automotive.com
OBSAH
Úvod 88
100 www.aeg-automotive.com
Pokyny k použití
102 www.aeg-automotive.com
106 www.aeg-automotive.com
114 www.aeg-automotive.com
120 www.aeg-automotive.com
122 www.aeg-automotive.com
124 www.aeg-automotive.com
128 www.aeg-automotive.com
OBSAH
Úvod....130
132 www.aeg-automotive.com
140 www.aeg-automotive.com
MONTÁŽ
142 www.aeg-automotive.com
OVLÁDANIE

Varovanie!
144 www.aeg-automotive.com
NASTAVENIA
146 www.aeg-automotive.com
148 www.aeg-automotive.com
ČISTENIE, STA- ROSTLIVOST A ÚDRŽBA
150 www.aeg-automotive.com
Made in China
MTS MarkenTechnikService GmbH & CO. KG
Carl-Benz-Str. 2 • 76761 Rülzheim - Germany
www.mts-gruppe.com
Intertec Polska Sp. z o.o.
Stara Wies, ul. Grodziska 22 • 05-830 Nadarzyn - Poland
www.intertec-polska.pl
Tegro AG
Ringstr. 3 • 8603 Schwerzenbach - Switzerland
www.tegro.ch
www.aeg-automotive.com
AEG is a registered trademark used under license from AB Electrolux (publ).
EAN: 4038373070555

- DE - Seite 3
- FR - Page 43
- www.aeg-automotive.com
- TABLE OF CONTENTS
- INTRODUCTION
- Normal use
- Contents
- SAFETY
- General Safety Guidelines
- Warning!
- Danger!
- Explosion and fire hazard!
- Risk of electric shock!
- Risk of injury!
- Risk of damage!
- Accident hazard!
- Special notes
- PRODUCT OVERVIEW
- www.aeg-automotive.com
- FUNCTIONS
- Automatic loop cycle recording
- Acceleration sensor (G-Sensor)
- Night vision
- Motion detection
- Parking monitor
- Reversing camera
- ADAS assist systems
- LDWS lane departure warning system
- FCWS front collision warning system
- INSTALLATION
- Inserting the memory card
- Installing the rear facing camera Attention!
- Attention!
- Installing the front facing camera Attention!
- OPERATION
- Information about use
- Switching the camera on and off
- Formatting the memory card
- Recording video (video mode)
- Taking pictures (photo mode)
- Viewing recordings (playback mode)
- www.aeg-automotive.com
- Protecting/unprotecting recordings
- Deleting recordings
- Changing the camera view
- SETTINGS
- Calibrating the lane departure warning system
- TROUBLESHOOTING
- www.aeg-automotive.com
- CLEANING, CARE AND MAINTEN- NANCE
- Changing the fuse
- Service
- Disposal
- SOMMAIRE
- www.aeg-automotive.com
- APERÇU DU PRODUIT
- www.aeg-automotive.com
- Assistant de respect des distances FCWS
- www.aeg-automotive.com
- www.aeg-automotive.com
- www.aeg-automotive.com
- NETTOYAGE, ENTRETIEN ET MAINTENANCE
- INDICE
- www.aeg-automotive.com
- www.aeg-automotive.com
- www.aeg-automotive.com
- www.aeg-automotive.com
- www.aeg-automotive.com
- OBSAH
- www.aeg-automotive.com
- Pokyny k použití
- www.aeg-automotive.com
- www.aeg-automotive.com
- www.aeg-automotive.com
- www.aeg-automotive.com
- www.aeg-automotive.com
- www.aeg-automotive.com
- www.aeg-automotive.com
- www.aeg-automotive.com
- MONTÁŽ
- www.aeg-automotive.com
- OVLÁDANIE
- Varovanie!
- www.aeg-automotive.com
- NASTAVENIA
- www.aeg-automotive.com
- www.aeg-automotive.com
- ČISTENIE, STA- ROSTLIVOST A ÚDRŽBA
Brand : AEG
Model : DC 2
Category : Cooker