Look V Therm Perfection - Coffee machine MELITTA - Free user manual and instructions
Find the device manual for free Look V Therm Perfection MELITTA in PDF.


| Product type | Drip coffee maker |
| Brand | Melitta |
| Model | Look V Therm Perfection |
| Water tank capacity | Up to 15 cups (approx. 1.25 L) |
| Maximum number of cups | 15 cups (85 ml/cup) or 10 cups (125 ml/cup) |
| Anti-drip system | Yes |
| Thermal carafe | Yes (thermal) |
| AromaSelector | Yes (adjustable aroma strength) |
| Timer function | Yes (on certain variants) |
| Filter type | Melitta 1x4® filter (size 4) |
| Removable water tank | Yes |
| Descaling program | Yes (with CALC button) |
| Water hardness indicator | Yes (adjustable) |
| Dishwasher safe parts | Carafe, filter holder, water tank lid |
| Cord length | Approx. 1 m |
| Power supply | 220-240 V, 50/60 Hz |
| Power | Approx. 900 W |
Frequently Asked Questions - Look V Therm Perfection MELITTA
User questions about Look V Therm Perfection MELITTA
0 question about this device. Answer the ones you know or ask your own.
Ask a new question about this device
Download the instructions for your Coffee machine in PDF format for free! Find your manual Look V Therm Perfection - MELITTA and take your electronic device back in hand. On this page are published all the documents necessary for the use of your device. Look V Therm Perfection by MELITTA.
USER MANUAL Look V Therm Perfection MELITTA
natural_image
Line drawing of a coffee maker with digital display and control buttons (no text or symbols)1100232-00
Inhaltsverzeichnis
natural_image
Technical line drawing of a car interior showing structural components and parts (no text or labels)natural_image
Technical line drawing of a blender with a conical lid and fan blade (no text or symbols)natural_image
Illustration of a toaster oven with a kettle and control panel, showing no text or symbols on the device itself.Electrical and Electronic Equipment).
I For your safety......13
I.1 Proper use....13
1.2 Danger from electric current.... 13
1.3 Risk of burns and scalds....14
1.4 General safety 14
1.5 Insulated jug....14
1.6 Children.... 14
2 Appliance at a glance......15
3 First steps....16
3.1 Unpacking the appliance .... 16
3.2 Setting up the appliance....16
3.3 Connecting the appliance 16
3.4 Setting the time (only on variant with timer function)....16
3.5 Removing the filter insert....16
3.6 Removing jug....16
3.7 Remove the jug lid....17
3.8 Filling water tank 17
3.9 Rinsing the appliance.... 17
4 Operating the appliance......18
4.1 “AromaSelector” and dosing recommendation .... 18
4.2 Preparing coffee....18
5 Changing settings......18
5.1 Setting the water hardness.....18
5.2 Using the timer (only on variant with timer function)....19
6 Cleaning the appliance ....19
7 Descaling the appliance......20
8 Disposal....20
9 Technical data....20
Dear Customer,
Thank you for purchasing our Melitta Look® filter coffee machine. We hope you enjoy using it. If you require further information or have any questions, contact Melitta® or visit our website at: www.international.melitta.de.
I For your safety
The appliance complies with the valid European directives. The appliance was inspected by independent test institutes and certified. Please read the safety instructions and the operating instructions through completely. You must observe the safety and operating instructions to avoid dangers. Melitta® accepts no liability for damage caused by failure to observe the instructions.
I.1 Proper use
The appliance is intended for use in private households or comparable environments to prepare coffee.
Any other use is regarded as improper and may lead to personal injury and material damage.
I.2 Danger from electric current
Only use the appliance if it is in a technically flawless condition.
Only connect the appliance to a correctly installed earthed mains socket.
If the appliance or the power cable is damaged, there is a risk of fatal electric shock. You may not use the appliance in this case, but instead you need to have it repaired by the manufacturer, the customer services or a service partner.
You must not immerse the appliance in water or let the power cable come into contact with water.
Disconnect the appliance from the power supply when left unsupervised for a long time.
I.3 Risk of burns and scalds
The coffee and steam produced are very hot. Avoid direct contact with the flowing coffee and the steam. Do not open the hinged filter holder during preparation.
I.4 General safety
Do not operate the appliance in a cabinet.
Do not reach into the interior of the appliance during operation.
You may not open the housing or manipulate the appliance in any other way.
Do not use abrasive cleaning agents or scouring milk to clean parts that come into contact with food. Remove the remains of the cleaning agents with clear water.
1.5 Insulated jug
You may not use the jug in a microwave.
Do not place the jug on a hot stove.
Do not use the jug to store dairy products or baby food. There is a risk of bacterial growth.
Do not lay the filled jug on its side as liquid could leak out.
1.6 Children
Children must not be allowed to play with the appliance.
You must keep children who are younger than 8 years away from the appliance.
This appliance may be used by children over 8 years of age and by persons with reduced physical, sensory or mental capabilities or a lack of experience and knowledge, but only if they are supervised or have been instructed in using the appliance safely and understand the resulting risks.
Cleaning and maintenance must not be undertaken by children younger than 8 years of age.
Children older than 8 years of age must be supervised during cleaning and maintenance.
2 Appliance at a glance
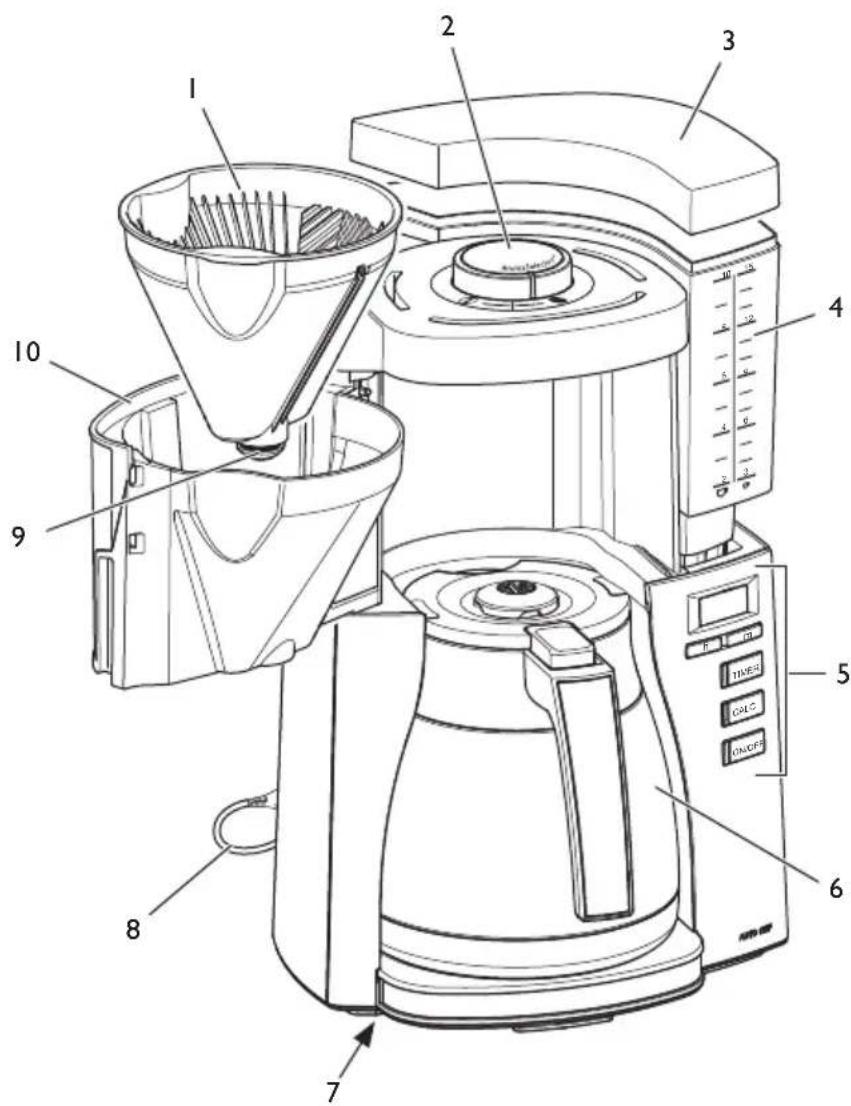
I Filter insert
2 AromaSelector
3 Water tank lid
4 Water tank
5 Control panel
6 Jug with jug lid
7 Cable-winding facility
8 Power cable
9 Drip stop
10 Hinged filter holder
Variant with timer function
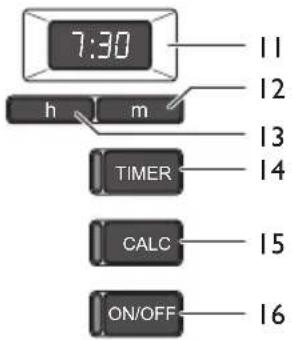
11 Display
12 "Minutes" button
13 "Hours" button
14 "TIMER" button with white lamp
15 "CALC" button with red lamp
16 "ON/OFF" button with green lamp
Variant without timer function
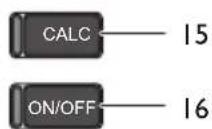
15 "CALC" button with red lamp
16 "ON/OFF" button with green lamp
3 First steps
3.1 Unpacking the appliance
Remove the packaging material and the adhesive strips from the appliance. Please keep the original packaging.
3.2 Setting up the appliance
■ Set up the appliance in a dry room.
- Set up the appliance on a stable, flat and dry surface. The surface may not be hot. The appliance may not be placed in the vicinity of sinks or the like.
- Route the power cable so it does not lie over edges or cannot be damaged by hot surfaces.
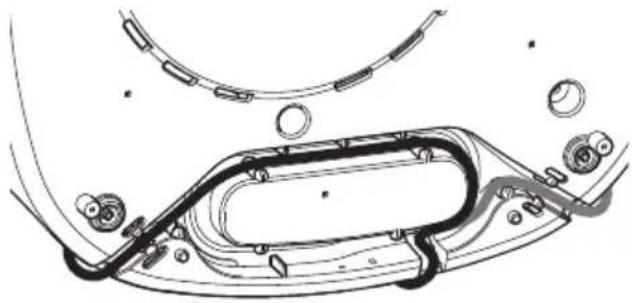
■ Store the length of cable that you do not need in the cable-winding facility in the base of the appliance.
natural_image
Technical line drawing of a mechanical assembly with no visible text or symbols3.3 Connecting the appliance
Only connect the appliance to an easily accessible, properly installed earthed mains socket. After connecting, all lamps will illuminate briefly one after the other.
Full isolation from the mains is achieved by disconnecting the mains plug.
3.4 Setting the time (only on variant with timer function)
After connecting, the time will flash on the display and ask you to set the time. The appliance will not be ready for use until you set the time.
h m Press the "Hours" and "Minutes" buttons to set the
time. Hold down the buttons to run through the hours or minutes faster.
When you disconnect the appliance from the mains and connect it again, you need to set the time again.
You can switch the display lighting on and off with the "Hours" and "Minutes" buttons. Simultaneously press the two buttons for longer than 2 seconds.
3.5 Removing the filter insert
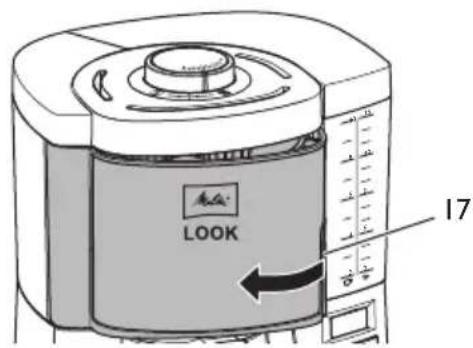
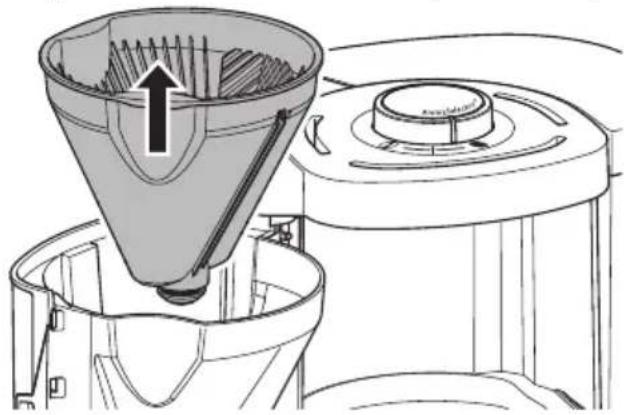
To open the hinged filter holder, reach into the recessed handle (17) and swing out the hinged filter holder to the left up to the stop.
natural_image
Technical line drawing of a blender with a funnel and lid, showing internal blades and a control knob (no text or symbols)Remove the filter insert.
Fit the filter insert before closing and swing the hinged filter holder to the right until you hear it click into place.
Do not use the appliance without the filter insert.
3.6 Removing jug
Always hold the jug by the jug handle when removing and inserting it.
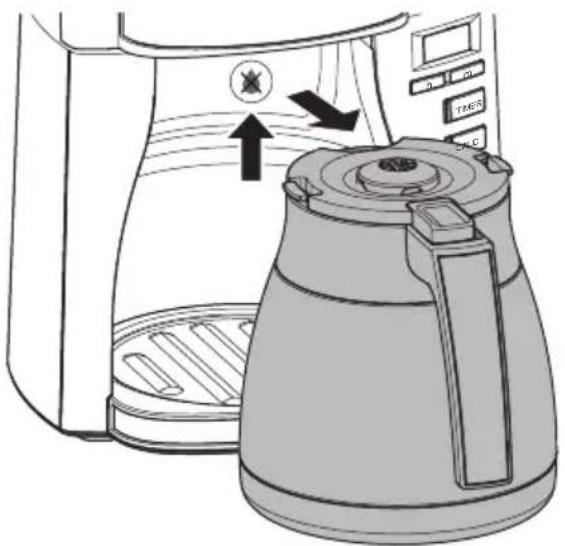
Place the jug with closed jug lid under the hinged filter holder so that the jug lid pushes the drip stop up slightly. This opens the drip stop and the coffee can flow into the jug. The drip stop stops coffee dripping when you remove the jug.
natural_image
Illustration of a kettle being opened by a toaster, showing the lid and control panel (no text or symbols)3.7 Remove the jug lid
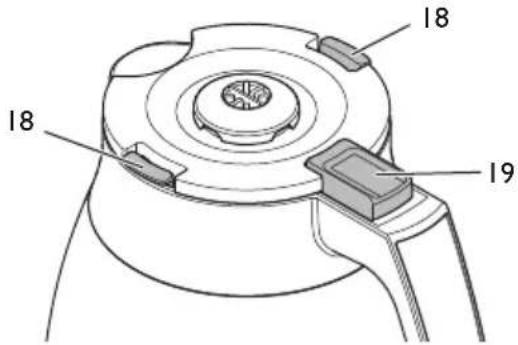
To remove the lid, press and hold the side catches (18) and lift the lid. Also press and hold the side catches when you fit the lid again.
To pour, press the lever (19) on the jug handle.
3.8 Filling water tank
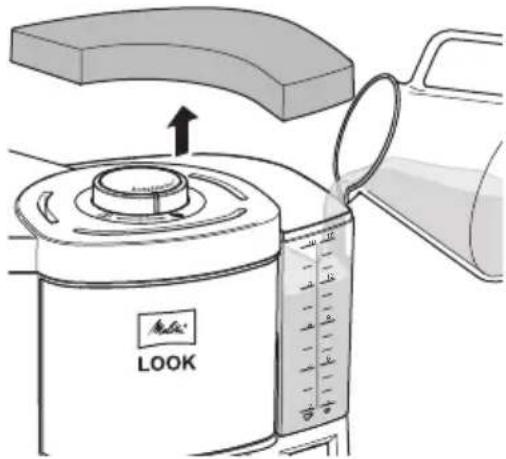
The markings on the water tank correspond with the number of cups that you prepare during a brewing process.

Approx. 85 ml coffee per cup

Approx. 125 ml coffee per cup
The brewing process will always use up all of the water in the water tank. Therefore, fill only the quantity of water that you require for the subsequent brewing process. The filled quantity of water may not exceed the 10/15 cup marking as the jug will otherwise overflow.
Fill fresh, clean tap or drinking water into the water tank. Do not use carbonated water or any other liquids.
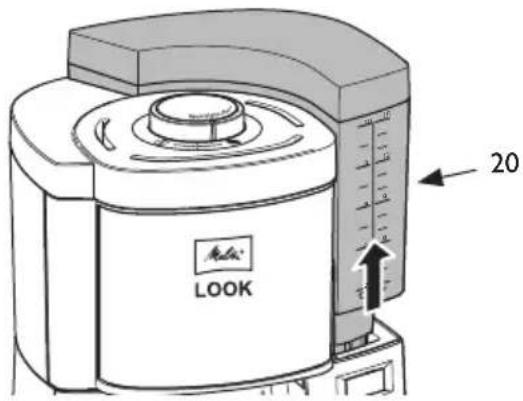
I. Take hold of the recessed handle (20) and pull the water tank vertically upwards out of the appliance.
2 Remove the water tank lid.
3. Fill the water tank with the required quantity of water.
4. Close the water tank with the water tank lid.
5. Insert the water tank vertically from above into the appliance.
Alternatively, you can fill water directly into the water tank while it is still in the appliance by using a suitable vessel.
3.9 Rinsing the appliance
Before using for the first time and after descaling, you need to rinse the appliance twice. You should also rinse the appliance if you do not use the appliance for a longer period.
Rinsing is done without a filter and without coffee powder.
I. Fill the water tank with fresh, clear tap water up to the 10/15-cup marking.
2 Make sure that the filter insert is in the hinged filter holder and that the hinged filter holder is closed.
3. Place the jug with closed jug lid under the hinged filter holder.
4. ON/OFF Start the rinsing process with the "ON/OFF" button.
» The "ON/OFF" lamp lights up.
» The rinsing process ends once the water has completely run through.
- ON/OFF Switch off the hotplate with the "ON/OFF" button.
» The "ON/OFF" lamp goes out.
- Empty the jug.
Always allow the water to flow through completely and empty the jug.
4 Operating the appliance
Observe the following instructions during preparation:
- Use Melitta® filters in the size 1x4®.
– After preparation, dispose of the used filter. - You can end preparation at any time by pressing the "ON/OFF" button again. Some water will continue to flow after you press the button.
4.1 "AromaSelector" and dosing recommendation
The “AromaSelector” allows you to change the taste with the same quantity of coffee.
① Turn the “AromaSelector” clockwise for a milder coffee.
Turn the “AromaSelector” anticlockwise for a stronger coffee.
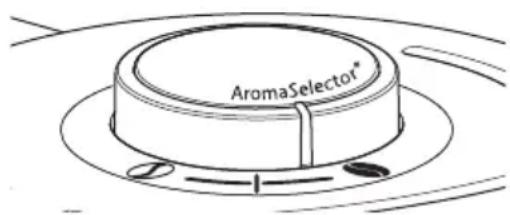
Use approx. 6 to 8 g of ground coffee per large cup according to your taste. This figure corresponds with the middle position of the "AromaSelector".
4.2 Preparing coffee
I. Fill the water tank with the required quantity of water.
2 Swing the hinged filter holder to the left up to the stop.
3. Fold a filter along the stamped seam.
4. Fit the filter in the filter insert. Press it down lightly and into the edges of the filter insert.
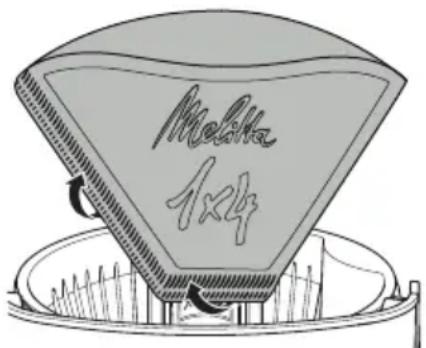
- Fill the filter paper with coffee powder according to the filled quantity of water and your taste.
- Close the hinged filter holder.
- Place the jug with closed jug lid under the hinged filter holder.
- ON/OFF Start the brewing process with the "ON/OFF" button.
» The “ON/OFF” lamp lights up.
» The brewing process ends once the water has completely run through.
5 Changing settings
5.1 Setting the water hardness
The hardness of the tap water influences how often you have to descale the appliance. The harder the tap water, the more frequently you have to descale the appliance.
Contact your local water provider to find out the water hardness.
Or check the water hardness with a water hardness test strip available from retailers.
Follow the instructions on the water hardness test strip and the information in the table Water hardness.
| Water hardness | |||
| Water hardness | °dH Display(with timer) | “CALC” lamp flashing rhythm (without timer) | |
| I <7 | .... | ■....■.... | ||
| II 7 to I | 4 2 .... | ■■....■■.... | |
| III 14 to | 2 | 3 .... | ■■■....■■■.... | |
| IV* >2 | | 4 .... | ■■■■....■■■■.... | |
* Factory setting
Variant without timer function
To set the water hardness, press the "CALC" button for longer than 2 seconds. The "CALC" lamp starts to flash. The flashing rhythm indicates the set water hardness.
I. CALC Press the "CALC" button for longer than 2 seconds.
» The "CALC" lamp flashes.
2. CALC Press the "CALC" button repeatedly until the required water hardness is set. The flashing rhythm indicates the set water hardness, see table Water hardness.
3. CALC Press the "CALC" button for longer than 2 seconds to save the setting.
The setting is retained even when you disconnect the appliance from the electricity mains.
Variant with timer function
I. CALC Press and hold the "CALC" button.
2. m Also press the "Minutes" button until the required water hardness is shown on the display, see table Water hardness.
After you release the "CALC" button, the setting is saved and retained even when you disconnect the appliance from the electricity mains.
5.2 Using the timer (only on variant with timer function)
The appliance is equipped with a timer function. This allows preparation to start automatically at a time you set.
Setting the timer
I. TIMER Press and hold the "TIMER" button.
» The display flashes.
h m Also press the "Hours" and "Minutes" buttons to
set the starting time. Hold down the buttons to run through the hours or minutes faster.
2 Release the "TIMER" button.
» The current time appears on the display.
When you disconnect the appliance from the mains and connect it again, you need to set the timer again.
Activating the timer
I. Prepare the appliance for a brewing process, see chapter 4 Operating the appliance on page 18.
2. TIMER Press the "TIMER" button to activate the timer for the next brewing process.
» The “TIMER” lamp lights up.
» The starting time appears briefly on the display.
» The brewing process starts at the set starting time.
Press the "TIMER" button again to deactivate the timer.
6 Cleaning the appliance
Regular cleaning and maintenance of the appliance guarantee the consistent high quality of your coffee.
Attention! Unsuitable cleaning agents can damage the appliance. Only use the recommended cleaning agents.
Always allow the appliance to cool down before cleaning it.
Do not immerse the appliance or the mains plug in water.
- Clean the surfaces of the housing with a soft, moist cloth.
- Clean the jug and the filter insert after every use.
- Rinse the jug, the filter insert, the water tank and the water tank lid with clear, warm water and a small quantity of washing up liquid.
- You can also clean the filter insert and water tank lid in the dishwasher.
7 Descaling the appliance
After you have used the appliance for a while, limescale deposits will build up inside it. To ensure that your appliance works perfectly and has a long life, you need to descale it on a regular basis. Descaling takes approximately 25 minutes and should not be interrupted.
The illuminated "CALC" lamp asks you to descale the appliance soon.
Use Melitta® Anti Calc liquid descaling agent for filter coffee machines.
Caution! Descaling agent causes eye irritation. If it accidentally comes into contact with your eyes, you should rinse them with clear water for several minutes. Consult a doctor if symptoms persist.
I. Remove the filter from the filter holder.
2 Close the hinged filter holder.
3. Fill at least 500 ml of descaling fluid into the water tank. Follow the instructions on the packaging of the descaling agent.
4. Place the jug with closed jug lid under the hinged filter holder.
- CALC Start descaling with the "CALC" button.
» The “CALC” lamp flashes.
» The display shows the remaining time (only on the variant with timer function).
» Descaling ends automatically.
» The “CALC” lamp goes out.
- After descaling, you must rinse the appliance to remove all remains of the descaling agent, see chapter 3.9 Rinsing the appliance on page 17.
8 Disposal
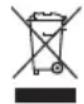
Appliances marked with this symbol are subject to the European Directive for WEEE (Waste Electrical and Electronic
Equipment).
Electrical appliances do not belong in domestic waste. Dispose of the appliance in an environmentally friendly way via suitable collection systems.
The packaging materials are raw materials and recyclable. Please return them to the raw materials cycle.
9 Technical data
You find detailed technical data via the following link.

Sommaire
I Sécurité......21
I.1 Utilisation conforme....21
natural_image
Technical line drawing of a car interior showing structural components and parts (no text or labels)natural_image
Technical line drawing of a blender with a funnel and lid, showing internal structure (no text or symbols)Retirer le support-filtre.
natural_image
Illustration of a toaster oven with a kettle and control panel, showing no text or symbols on the main device.Inhoudsopgave
natural_image
Technical line drawing of a car interior showing structural components and parts (no text or labels)natural_image
Technical line drawing of a blender with a conical lid and fan blade (no text or symbols)natural_image
Illustration of a toaster oven with a kettle and control panel, showing no text or symbols on the device itself.Waste Electrical and Electronic Equipment).
Sommario
natural_image
Technical line drawing of a mechanical assembly with no visible text or symbolsnatural_image
Technical line drawing of a blender with a conical lid and fan blade (no text or symbols)Estrarre l'inserto filtro.
natural_image
Illustration of a toaster oven with a kettle and control panel, showing heat transfer arrows (no text or symbols)natural_image
Technical line drawing of a mechanical assembly with no visible text or symbols3.3 Conectar la cafetera
natural_image
Technical line drawing of a blender with a conical funnel and lid, showing internal blades and a handle (no text or symbols)natural_image
Illustration of a toaster oven with a kettle and digital display (no text or symbols)Indholdsfortegnelse
I For din sikkerhed...... I
I.1 Formålsbestemt brug...... I
1.2 Fare som følge af elektrisk strøm......I
1.3 Risiko for forbrændinger og skoldninger 2
1.4 Generel sikkerhed....2
1.5 Termokande....2
1.6 Børn....2
2 Oversigt over maskinen......2
3 Første trin....4
I Filterindsats
2 AromaSelector
3 Vandtankslag
4 Vandtank
5 Betjeningsfelt
6 Kande med kandelåg
7 Kabeloprulning
8 Netkabel
9 Drypstop
10 Drejefilter
natural_image
Technical line drawing of a car interior showing structural components and wiring (no text or labels)natural_image
Technical line drawing of a blender with a conical lid and fan blade (no text or symbols)natural_image
Illustration of a toaster oven with a kettle and control panel, showing no text or symbols on the main device.Electronic Equipment).
I Filterinsats
2 AromaSelector
3 Vattentankslock
4 Vattentank
5 Kontrollpanel
6 Kanna med kannlock
7 Kabelvinda
8 Strömkabel
9 Droppstopp
10 Vridbart filter
natural_image
Technical line drawing of a mechanical assembly with no visible text or symbols3.3 Anslutning
natural_image
Technical line drawing of a blender with a conical lid and fan blade (no text or symbols)Ta ut filterinsatsen.
natural_image
Illustration of a kettle being opened by a toaster, showing the lid and control panel (no text or symbols)Innhold
I For din sikkerhet....71
I Filterinnsats
2 AromaSelector
3 Vanntanklokk
4 Vanntank
5 Kontrollpanel
6 Kanne med lokk
7 Kabeloppvikling
8 Strømkabel
9 Dryppstopp
10 Svingfilter
natural_image
Technical line drawing of a car body panel with attached sensors and components (no text or labels)natural_image
Technical line drawing of a blender with a conical lid and handle, showing internal blades and a control knob (no text or symbols)natural_image
Illustration of a toaster oven with a kettle and control panel, showing no text or symbols on the device itself.Sisällysluettelo
natural_image
Technical diagram of a car interior showing structural components and parts (no text or labels)natural_image
Technical line drawing of a blender with a funnel and lid, showing internal blades and a control knob (no text or symbols)natural_image
Illustration of a toaster oven with a kettle and a digital timer, showing no text or symbols on the main objects.(WEEE / Waste Electrical and Electronic Equipment).
Spis treści
natural_image
Technical line drawing of a car interior frame with mechanical components and mounting holes (no text or symbols)natural_image
Technical line drawing of a blender with a conical lid and handle, showing internal blades and a control knob (no text or symbols)natural_image
Illustration of a toaster oven with a kettle and digital display (no text or symbols)
Melitta Europa GmbH & Co. KG
Division Household Products
Ringstr. 99
D-32427 Minden
Germany
www.melitta.de
Editorial department:
ZINDEL AG
www.zindel.de

- Inhaltsverzeichnis
- Dear Customer,
- I For your safety
- I.1 Proper use
- I.2 Danger from electric current
- I.3 Risk of burns and scalds
- I.4 General safety
- Insulated jug
- Children
- Appliance at a glance
- Variant with timer function
- Variant without timer function
- First steps
- Unpacking the appliance
- Setting up the appliance
- Connecting the appliance
- Setting the time (only on variant with timer function)
- Removing the filter insert
- Removing jug
- Remove the jug lid
- Filling water tank
- Rinsing the appliance
- Operating the appliance
- "AromaSelector" and dosing recommendation
- Preparing coffee
- Changing settings
- Setting the water hardness
- Using the timer (only on variant with timer function)
- Setting the timer
- Activating the timer
- Cleaning the appliance
- Descaling the appliance
- Disposal
- Technical data
- Sommaire
- Inhoudsopgave
- Sommario
- Conectar la cafetera
- Indholdsfortegnelse
- Anslutning
- Innhold
- Sisällysluettelo
- Spis treści
Brand : MELITTA
Model : Look V Therm Perfection
Category : Coffee machine