R3 - Radio Ruark Audio - Free user manual and instructions
Find the device manual for free R3 Ruark Audio in PDF.

| Product type | Compact Hi-Fi radio with CD player, DAB/DAB+/FM radio, Bluetooth and Wi-Fi streaming |
| Dimensions | 167 x 420 x 220 mm |
| Weight | 5.3 kg |
| Power supply | Mains adapter 100-240 V AC, 50/60 Hz, 1 A; output 14 V DC, 2.85 A |
| Power consumption in standby | 1.6 W |
| Amplifier | Class AB, 30 W |
| Transducers | 2 x Ruark NS+ 75 mm |
| Tuner | DAB/DAB+ and FM with RDS |
| CD player | CD, CD-ROM, CD-R/RW, MP3, WMA, AAC up to 320 kbps |
| Digital audio | Wi-Fi 802.11b/g/n, Bluetooth 4.0 (aptX, SBC, AAC), DLNA, Spotify Connect |
| Sockets | TOSLINK optical digital, Line in, Line out, Headphone (3.5 mm), USB (5 V, 1 A), Ethernet, DAB/FM antenna |
| Main functions | Alarm, timer, auto standby, equalizer (bass, treble, loudness), 3D sound, 10 presets per source, control via UNDOK app |
| Maintenance and cleaning | Use a slightly damp, lint-free cloth; do not use abrasive products or solvents |
| Safety | Do not open the casing; avoid exposure to rain, humidity and heat sources; disconnect in case of thunderstorm or prolonged non-use |
| Spare parts and repairability | Remote control, AAA batteries, telescopic antenna, mains adapter with interchangeable plugs; repair by qualified personnel only |
| Warranty | 2 years (3 years after registration at www.ruarkaudio.com) |
Frequently Asked Questions - R3 Ruark Audio
User questions about R3 Ruark Audio
0 question about this device. Answer the ones you know or ask your own.
Ask a new question about this device
Download the instructions for your Radio in PDF format for free! Find your manual R3 - Ruark Audio and take your electronic device back in hand. On this page are published all the documents necessary for the use of your device. R3 by Ruark Audio.
USER MANUAL R3 Ruark Audio
Important information about the AC power adapter
Model DYS836-140285W-K
Input 100-240V\~50/60Hz 1.0A MAX
Output 14.0V = 2.85A
Class II, Efficiency Level VI
- This AC adapter is for audio & video equipment use only and complies with IEC 62368 safety standard.
- The supplied 3-pin plug adapter complies with BS 1363-1 and the supplied 2-pin plug adapter complies with EN 50075.
- Before using the AC adapter, ensure the mains voltage is within the rated supply voltage range.
- The output power taken from this AC adapter must not exceed its rated output power.
- DO NOT disassemble or modify the AC adapter.
- DO NOT drop or throw the AC adapter.
- The external flexible cable cannot be replaced and if the cord is damaged, the AC adapter must be replaced.
- DO NOT expose the AC adapter to dripping or splashing water, and do not place objects filled with liquids, such as vases, on or near the device.
-
DO NOT leave the AC adapter in a hot location, such as near fire or under strong sunlight.
-
Unplug the AC adapter during lightning storms or when unused for long periods of time to prevent damage.
EN - Ensure that the AC adapter is readily accessible when plugged into the mains. If an abnormal condition occurs while using it, immediately turn off the connected device and disconnect the mains adapter from the mains.
- DO NOT dispose this AC adapter as general household waste or unsorted municipal waste. Dispose of it according to local regulations.never cover ventilation openings on the device.
Safety & regulatory info
- Read this user guide and follow all instructions, it will help you set up and operate your product properly.
- Heed all warnings and keep this user guide for future reference.
- Do not attempt to use a damaged device as this could result in a dangerous electric shock.
- Do not open the unit or remove any panels to expose the electronics. No user serviceable parts inside.
- Refer all servicing to qualified service personnel. Servicing is required when the device has been damaged in any way, such as when any power cord, or power plug is damaged, liquid has been spilled or objects have fallen into the device, the device has been exposed to rain or moisture, does not operate normally, or has been dropped.
- This device is intended to be operated ONLY from the AC voltages listed on the back panel or included AC mains adapter. Operation from voltages other than those indicated may cause irreversible damage to the device and void the product warranty.
- Ensure that the mains plug or mains connector into the unit is readily accessible in case disconnection from the mains is required.
- The AC mains adapter, mains plug, or mains connector must be removed from the socket to completely disconnect the system from AC mains power.
- Do not place any naked flame sources, such as lighted candles, on or near the device. Do not install near any heat sources such as radiators, stoves, or other devices that produce heat.
- Avoid exposure to extreme heat or cold.
- Only use attachments/accessories specified for this device. Make no modifications to the system or accessories. Unauthorised alterations may compromise safety, regulatory compliance, and system performance.
- Only use the supplied aerial or an approved replacement.
- To reduce the risk of fire or electrical shock, do not expose the device to rain or moisture. Do not expose this device to dripping or splashing, and do not place objects filled with liquids, such as vases, on or near the device. As with any electronic products, use care not to spill liquids into any part of the system. Liquids can cause a failure and/or a fire hazard.
- Disconnect this device from AC mains power during lightning storms or when unused for long periods of time to prevent damage to this device.
- To prevent risk of fire or electric shock, avoid overloading AC mains power outlets or extension cords.
- Long-term exposure to loud music may cause hearing damage. It is best to avoid extreme volume when using headphones, especially for extended periods.
- Do not install this device in a confined space. Always leave a space of at least 10cm around the device for ventilation and ensure that curtains or other objects never cover ventilation openings on the device.

This device is labelled in accordance with European Directive 2012/19/EU concerning waste electrical and electronic equipment. This symbol indicates that the product or associated batteries should not be disposed of as general household waste. As with any electrical equipment, please dispose of it according to local regulations.

CE COMPLIANCE INFORMATION
This product conforms to all EU Directive requirements as applicable by law. Hereby, Ruark Audio, declares that this device complies with the essential requirements and other relevant provisions of the European Radio Equipment Directive 2014/53/EU.
You can download the full CE Declaration of Conformity at www.ruarkaudio.com/doc/R3doc.pdf

UK CONFORMITY ASSESSMENT INFORMATION
This product conforms to all UK Conformity Assessment regulations as applicable by law. You can download the full UKCA Declaration of Conformity at www.ruarkaudio.com/doc/R3UKCA.pdf
Specifications
Amplifiers and drivers
2 × 75mm Ruark NS+ drivers
30W Class AB power amplifier
Enhanced digital 3D audio processor
Tuner
DAB, DAB+ and FM Tuner with RDS
75 Ohm F-type DAB/FM aerial connector
CD player
CD, CD-ROM, CD-R/RW
MP3, WMA, AAC 320kbps
Digital audio
Internet radio, Spotify Connect, Amazon Music, Deezer, TIDAL, UPnP™ DLNA
Wi-Fi 802.11b/g/n supports WEP, WPA & WPA2 security
MP3 48kHz 320kbps, AAC 96kHz 320kbps,
FLAC 24-bit 48kHz, WAV 16-bit 48kHz / 24 bit 44.1kHz,
WMA 44.1kHz 320kbps
Bluetooth: V4.0 SBC, AAC, A2DP, aptX
Inputs and outputs
Digital optical input (TOSLINK) 24-bit 192kHz
Line input (RCA) 2.3Vrms
Line out (RCA) 2.0Vrms
Ethernet (RJ45)
USB 2.0, 5W (5V 1A)
3.5mm headphone jack, 25mW into 16-32 Ohm
Power
AC mains adapter input: 100-240V AC 50/60Hz 1A
AC mains adapter output: 14V DC 2.85A
Nominal consumption: 5W
Standby consumption: 1.6W
Remote batteries: 2 x 1.5V AAA
Physical
H167 x W420 x D220mm (H6.6 x W16.5 x D8.7in)
5.3kg (11.7lbs)
Specification and design subject to modification without notice.
Ruark Audio assumes no responsibility for any errors that may appear in this manual and the information contained in it may change without notice.
Troubleshooting
For help with your product, please refer to the FAQ
(Frequently Asked Questions) page in the support area of our website.
For more information visit www.ruarkaudio.com/support
What's in the box
Ensure that all parts listed below are in the box.
If any part is missing, do not use the R3 and contact us directly if purchased in the UK, or your Ruark Audio dealer if purchased outside the UK.
- R3
- Remote control
- Remote batteries (2x 1.5V AAA)
- Antenna spanner
- Telescopic antenna
- AC power adapter
- Plug(s) for AC power adapter*
- Quick start guide
If possible, please retain the carton and all packaging materials.
* The number and type of plug adapters supplied will vary according to region.

natural_image
Line drawing of a rectangular electronic device with a front panel and mounting feet (no text or symbols)
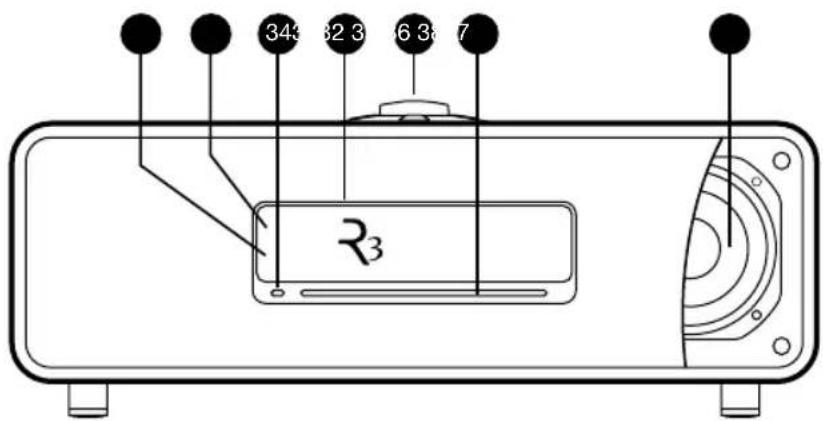
Controls
9. STANDBY
10. CONTROL KNOB / SELECT
Rotate to adjust volume from a Now Playing screen Rotate to browse menus, tracks or station lists ^* . Press to SELECT
-
▶▶I – press to skip to next station or track, press and hold to fast forward. In standby, press to increase display brightness.
-
I◄◄─ press to skip to previous station or track, press and hold to rewind. In standby, press to decrease display brightness.
-
PRESET – press to recall a saved station or playlist, press and hold for two seconds to save a station or playlist.
-
SOURCE – press to change audio source
-
▶II – press to play/pause a track or mute audio inputs and radio
-
MENU – press to view the menu
-
BACK – press to return to the previous menu or list screen
18. INDICATOR LIGHT
Indicates your music system is on and flashes when Bluetooth is ready to pair or when using the remote
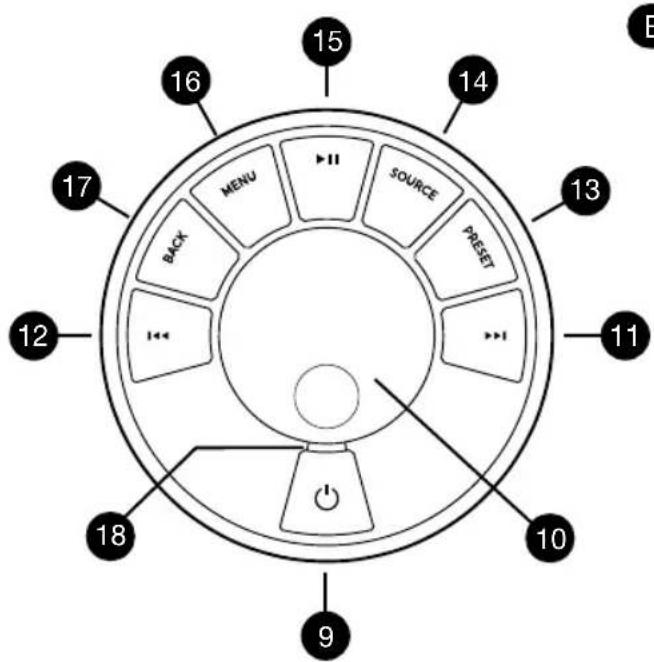
*You can also press▶▶ or ▶ browse menus, tracks, sources or station lists.
How long you press a key is important Press = tap or press and immediately release Press and hold = press and release after two seconds
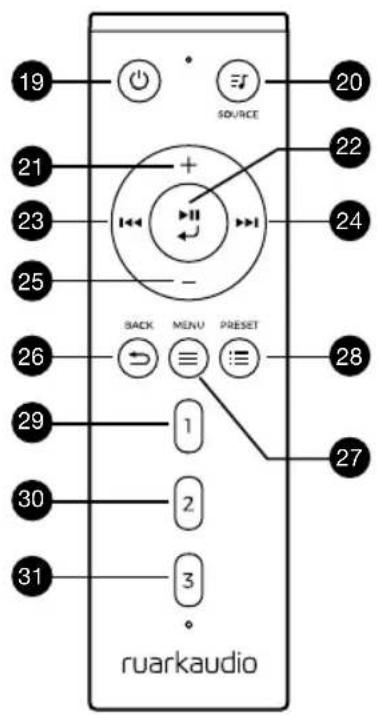
Remote
- ⏻STANDBY
- ✉ SOURCE – press to change audio source.
- INCREASE VOLUME
- ▶II / SELECT – press to play/pause a track, mute/unmute radio or to select a menu item.
- I◄◄— press to skip to previous station or track, press and hold to rewind. In standby, press to decrease display brightness.
- ▶▶▶- press to skip to next station or track, press and hold to fast forward. In standby, press to increase display brightness.
- DECREASE VOLUME
- BACK – press to return to the previous menu or list screen.
- ≡MENU - press to view the menu.
- :≡ PRESET – press to recall a saved station or playlist, press and hold for two seconds to save a station or playlist.
- PRESET 1
- PRESET 2
- PRESET 3
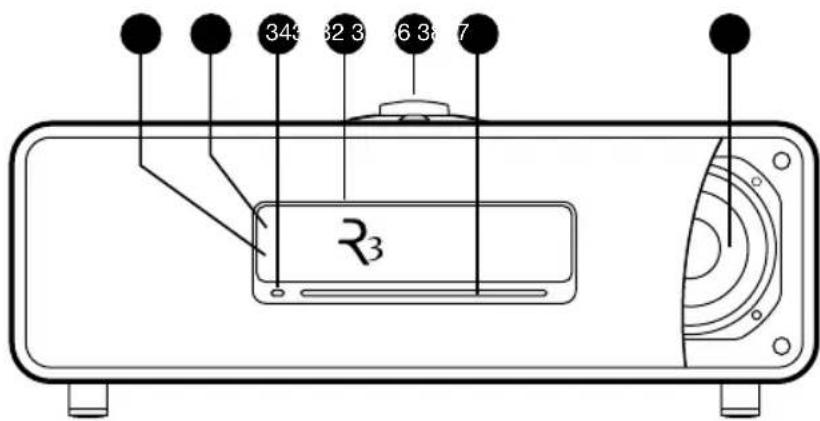
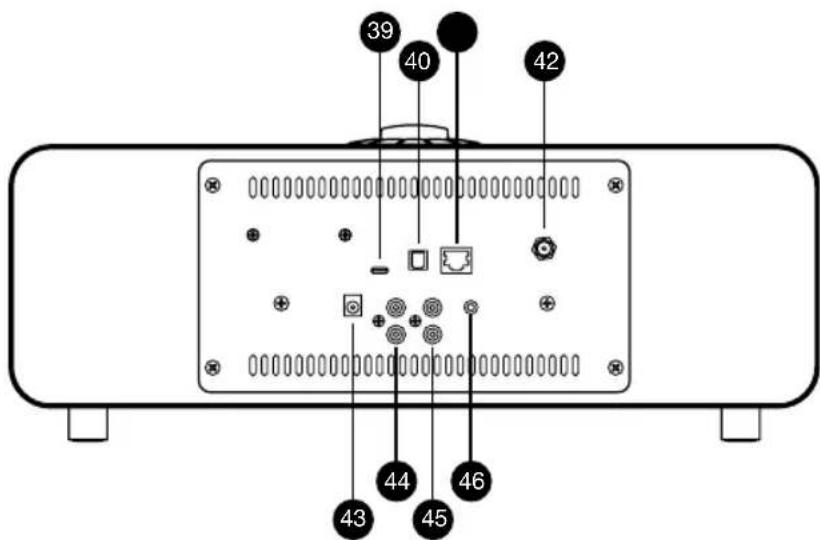
Overview
- Remote receiver
- Ambient light sensor
- CD eject button
- OLED display
- Controls
- CD loading slot
- 75mm Ruark NS+ drivers
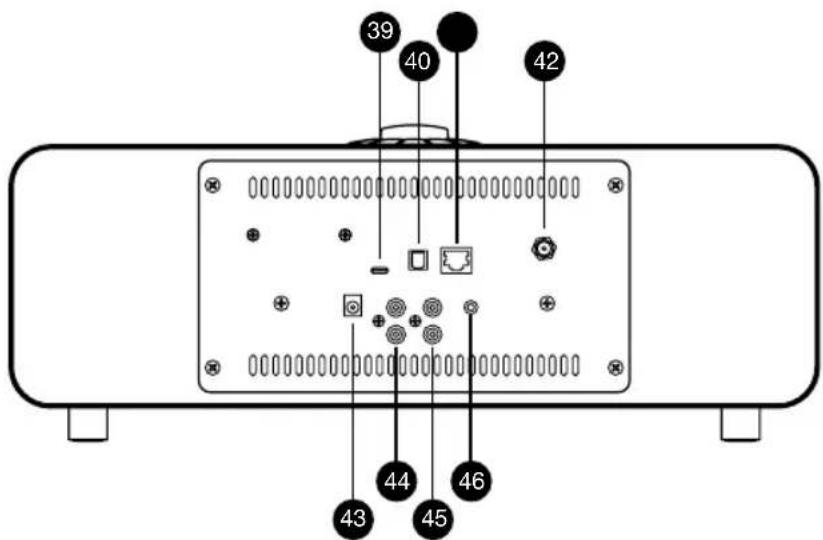
- USB C (5V 1A)
- Optical input
- Ethernet
- DAB-FM antenna
- DC power input (14V 2.85A)
- Line in (phono)
- Line out (phono)
- Headphone out (3.5mm jack)
Getting started
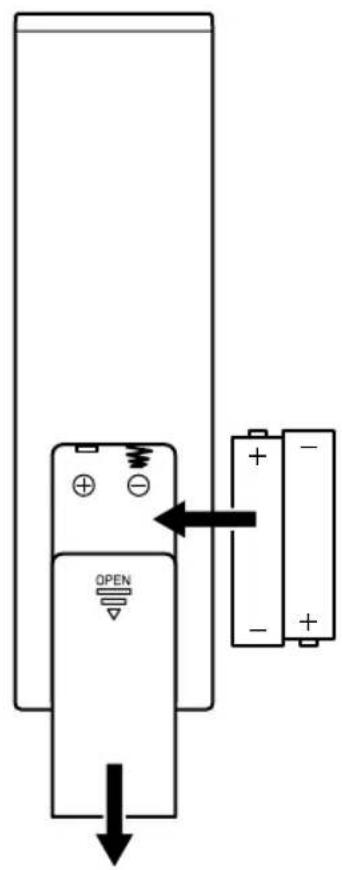
1 Insert batteries into remote control
2 Connect the aerial
Fit the telescopic aerial to the DAB/FM antenna socket on the back of your R3 and gently tighten it using the supplied spanner.
3 Connect to AC mains power
Fit the correct plug for your region to the mains adapter; it will "click" into place. Connect the mains adapter to the DC power socket on the back of your R3, then connect it to the mains socket.
4 Switch on
Press ⚫ to turn the R3 on.
5 Select language
Rotate the CONTROL KNOB until your preferred choice is highlighted, then press SELECT.
6 Setup wizard
Follow the setup wizard to configure the clock and connect to your network.
To start the setup wizard, rotate the CONTROL KNOB to highlight YES and then press the knob to SELECT.
If you choose NO, your R3 will start without configuring the time/date and network settings.
7 Select a source
When your setup is complete, your R3 will display a menu with a list of the available sources. Use the CONTROL KNOB to choose a source and press SELECT.
8 Enjoy your music!
App control
You can also control your R3 using UNDOK. Find it on the Apple/Android app store.
For more information visit www.ruarkaudio.com/app

Common functions
Switch on and to standby
Press STANDBY to turn your music system on. Press again to switch to standby.
Now Playing screens
Unless you're adjusting a setting, the screen will look similar to the example below with the clock above and station/track/album/artist information below.
12:30
BBC Radio 3 Enigma Variations
The on-screen icons below are shown when their respective functions are active.
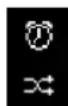
Alarm Sleep time
Shuffle Repeat


Menu screens
EN
The menus enable you to set the various options such as adjusting the bass and treble. To change a setting, press MENU to display the list of available options, rotate the CONTROL KNOB to highlight the one you wish to change, then press the knob to confirm your selection.
System
Audio
Network
Date and time
Brightness
Language

Browsing menus, track and station lists
To change settings – press MENU
To scroll through options – rotate CONTROL KNOB
To select option – press CONTROL KNOB
To exit menu – press MENU or wait for a few seconds
To return to the previous menu/list – press BACK
How long you press a key is important
Press = tap or press and immediately release
Press and hold = press and release after two seconds
Adjust volume
Rotate the CONTROL KNOB from any Now Playing screen.
Speaker volume and headphone volume are adjusted separately, so when headphones are plugged in the volume is shown as Volume (HP).
NOTE: rotating the CONTROL KNOB when a menu or track/station list is displayed will scroll through the menu and not change the volume.
Change audio source
Press SOURCE to view the current source, rotate the CONTROL KNOB to cycle through the list of sources, then press the knob to select one currently displayed. (You can also press SOURCE repeatedly to cycle through the list of sources instead of rotating the knob.)
Pause track or mute audio
Press ▶ and then press again to resume listening.
Play next/previous track
Press ▶skip to the next track in the folder or album, press ▶skip to the start of the current track, press again to skip to the previous track.
Fast forward or rewind track
Press and hold ▶ (may not work with Bluetooth).
Change FM radio station
Press ▶ to seek the next or previous station.
Change DAB radio station
Press ▶ to tune to the next or previous station.
You can also view the multiline station list by selecting MENU > Station list.
Change station or track information
Change the station/track information displayed by selecting one of the options from MENU > Info.
Save radio station preset
Press and hold PRESET until 'Save preset' is shown then rotate the CONTROL KNOB to choose the preset number and press the knob to save the current station. Presets are either marked with the station name, frequency or as '[Not set]'.
If you save a station over an existing preset, the new station will replace it.
Recall radio station preset
Press PRESET, rotate the CONTROL KNOB to scroll through the preset station list, then press the knob to select a station.
To return to the previous menu level or station list, press BACK
Connect a Bluetooth device
When you change the source to Bluetooth, your R3 will attempt to automatically connect to the last connected device. If you have not yet paired your device or the previous device is not available, your R3 will enter into pairing mode.
To disconnect the current device and connect a new one, select MENU > Connect device.
Headphones
Connect your headphones to the 3.5mm stereo jack socket on your R3.
Headphone volume is adjusted independently from speaker volume, so when headphones are plugged in the volume is shown as Volume (HP).
USB charging
The USB socket on your R3 is rated at 5W (5V 1A) and will power most smart devices and USB powered accessories.
Please note that: MENU > System > Audio means press MENU, select System and finally select Audio
Music streaming services
EN
Spotify Connect
Use your phone, tablet or computer as a remote control for Spotify. Go to spotify.com/connect to learn how.
Amazon Music
For more details, visit www.amazon.com
Deezer
For more details, visit dzr.fm/airable
TIDAL
For more details, visit tidal.com/try-now
The range of supported music services may change without notice.


deezer TIDAL
System settings
Bass and treble
MENU > System > Audio > Bass or Treble level
Loudness
Loudness automatically boosts the treble and bass frequencies at lower volumes.
MENU > System > Audio > Loudness
3D sound
3D widens the stereo sound stage and creates a more immersive and involving sound.
MENU > System > Audio > 3D
Date and time
MENU > System > Date and time
The time and date are automatically synchronised with national time signals broadcast over DAB, network and FM (FM time synchronisation may not always be available).
You can also set the time manually by turning auto update off and change the time and date format.
Display brightness
MENU > System > Brightness
Adjust the display brightness when your R3 is on and in standby.
In standby, press ◀◀◀ to decrease display brightness, or ▶▶◀I to increase it.
Please note that the brightness also automatically adjusts according to ambient light conditions.
Language
MENU > System > Language
Change the menu language.
Software update
MENU > System > Software update
Your R3 is set to automatically check for software updates. If one is available, you will be asked whether you want to download and install it.
CAUTION: Disconnecting the power during a software update could permanently damage your R3.
Factory reset
MENU > System > Factory reset
Resets all settings and clears presets.
Setup wizard
MENU > System > Setup wizard
Runs the setup wizard to guide you through setting up the clock and network.
Inactive standby
Your R3 is set to automatically switch itself to standby if there is no audio for more than 20 minutes. To change this select MENU > System > Inactive standby.
Network wizard
For a guided process to help you connect to a wired or Wi-Fi network, select MENU > System > Network > Network wizard.
Network profiles
Your R3 will automatically attempt to connect to any network it has previously connected to.
To see the list of saved networks, select MENU > System > Network > Network profile. To delete an unwanted network, highlight it, press the CONTROL KNOB and select YES.
Keep network connected
MENU > System > Network > Keep connected
Choose whether your R3 always remains connected to your network, even in standby (default). We recommend you set it to keep connected as it will ensure your R3 is always accessible using Spotify or DLNA music streaming. We also recommend this if you have set your clock to update from Network.
System information
Shows details of your R3 including the software version, and unique radio ID code.
Advanced network settings
There are other advanced network settings for experienced users for manual configuration or diagnosing and fixing network problems.
For more information visit
www.ruarkaudio.com/support.
Currently saved settings are marked with an asterisk (*)
FM radio
When listening to FM, your R3 displays the station name and other RDS/RBDS* programme information when available.
*Radio Data System/Radio Broadcast Data System
14:08 BBC Radio 4 The Archers
Change station
Press ▶▶ td ⬆ automatically tune to the next available FM station. If RDS/RBDS is unavailable the frequency is displayed instead.
14:08 93.90 MHz [No RadioText]
To further reduce hiss on weaker FM stations, we recommend turning 3D sound OFF
Scan setting
You can change the scan setting to only stop at stations with a strong signal by selecting Menu > Scan setting > Strong stations only.
Programme information
Choose from radio text, programme type, frequency, signal strength and date by selecting MENU > Info.
Manual tune
Select MENU > Manual tune then either rotate the CONTROL KNOB or press ▶ to change the frequency.
Save preset
You can store 10 FM stations in your preset list. The station name will be stored only when RDS/RBDS is available. See ‘Common functions’ section.
Recall preset
See 'Common functions' section.
Mono
As an FM signal becomes weaker, the level of hiss will increase. To reduce this, select Menu > Mono.
DAB radio
When listening to DAB/DAB+, your R3 displays the station name and other DLS* programme information when available.
The first time you use your R3, or if the station list is empty, it will automatically perform a full scan to identify available stations.
*Dynamic Label Segment
Change station
Press ▶ or to tune to the next/previous station.
Station list
To view a list of available DAB stations select MENU > Station list or press ▶. Highlight the station you wish to listen to and press SELECT.

Programme information
EN
Choose from radio text, programme type, signal strength, signal format and date by selecting MENU > Info.
Save preset
You can store 10 DAB stations in your preset list. See 'Common functions' section.
Recall preset
See 'Common functions' section.
Station order
The DAB station list can be ordered by Alphanumeric, Ensemble or Valid. Alphanumeric puts the stations in alphabetical order, Ensemble groups stations from the same broadcaster together, Valid shows available stations first and places invalid stations (marked with ‘?’) last.
To change station order, select Menu > Station order and select Alphanumeric (default), Ensemble or Valid.
Invalid stations have '?' in front of the station name
Station scan
If the station list is empty the radio will automatically perform a full scan as soon as you switch to DAB.
In any case, we recommend you do a full scan from time to time to update the station list because:
- New stations sometimes become available
• Stations close or may no longer be received - Reception was poor during the original scan (for example the aerial wasn't properly fitted)
- You move the radio to a different region
To do a full scan, select MENU > Scan.
Remove weak or invalid stations
Weak (burbling) or invalid stations have ‘?’ in front of the station name and can be removed by selecting MENU > Prune invalid.
Internet radio
Your R3 can play thousands of internet radio stations and podcasts from all over the world (internet connection required).
Main menu
The first time you listen to internet radio you will see the main menu for this mode.
If you have listened to internet radio stations on your R3 before, it will automatically play the last listened station.
Last listened
To access a list of recently listened to stations select MENU > Last listened.
When you use your R3 for the first time, the list will be empty.
Station list
You can browse or search the extensive list of stations by selecting MENU > Station list and selecting from the various options, including genre, location and popularity.
Now playing information
The station name is shown along with additional information like artist and track name. To change what is displayed select MENU > Info and choose from radio text, genre, signal quality, track name, location, and date.
Search for a station
Search for a station by selecting MENU > Station list > Stations > Search stations and then entering the name of the station you're looking for.
Podcasts
Many stations will have associated podcasts which you can browse and search for just like internet radio stations.
Mute
Press ▶ mute and press again to resume listening.
Save a preset
You can store 10 Internet radio stations in your preset list. See 'Common functions' section.
Recall a preset
See 'Common functions' section.
DLNA media streaming
You can also stream audio to your R3 from a Digital Living Network Alliance (DLNA) compatible media server. This is where you browse for music on the server itself and play it through your R3. There are many apps available for Mac, iOS, Linux, Android, Windows phone, etc that will turn your smartphone, tablet or laptop into a DLNA media server.
With DLNA media streaming, your R3 functions as a Digital Media Renderer (DMR) so you browse for music on your smartphone or laptop and then stream it to your R3 over your network.
Your R3 will automatically change to DMR mode when you select your R3 as your chosen player – DMR is not a mode that can be selected using the SOURCE key.
Similarly, all the Now playing information will be controlled by the server so there are no settings you can change.
For more details refer to the documentation for your device or app or visit www.ruarkaudio.com/support.
DLNA media streaming requires that your R3 is connected to your network so we recommend that you set it to keep network connected. See system settings section.
Bluetooth
Your R3 supports aptX for CD quality streaming. It will automatically connect to your bluetooth device using the highest quality connection supported by your device.
Pairing your Bluetooth device
When you have changed the source to Bluetooth, wait until Awaiting connection... is shown and the indicator light on top flashes.
Use the Bluetooth setup on your smart device to pair and connect it to your R3. It will appear in the list of paired devices as Ruark R3. When connected, BT Connected + your device name (eg Ozzie's phone) is displayed.
If you do not connect within a few minutes, your R3 will stop attempting to connect and show No connection. To connect, select MENU > Connect device.
Connecting your Bluetooth device
As soon as you switch to Bluetooth, your R3 will display Connecting as it attempts to connect to the last device it was paired with.
If that device isn't available, it displays Awaiting connection... To connect to your R3, ensure the Bluetooth function on your device is on and select Ruark R3 from the paired devices list on your Bluetooth device.
Play audio
Once connected, audio from your Bluetooth device will play through your R3. For more information on playing audio from your Bluetooth device, refer to your device's documentation.
NOTE: you may need to select your Ruark R3 or Bluetooth as your audio output on your device.
Pause track
Press▶and then press again to play.
Skip track
Press▶▶ to skip to the next or previous track.
Adjust volume
We recommend that you adjust the volume on your Bluetooth device so that the playback volume is about the same as other sources. You can then use the volume control on your R3 to adjust overall playback volume.
Now Playing information
Artist, album and track name will show if your Bluetooth device and app support Bluetooth metadata. You can also show the name of the connected device. Select what is shown from MENU > Info.
Operating range
This is typically up to 10 metres (30 feet) from your R3, although obstructions such as walls will reduce this.
Connect device
To disconnect the current device and connect a new one, select MENU > Connect device.
Pairing additional devices
You can pair up to 7 devices, although you will only be able to play audio from one device at a time.
Clearing the paired devices list
If you are having trouble connecting your Bluetooth device, we recommend you clear all pairing information. To do this, select MENU > Clear devices.
You will also need to delete Ruark R3 from the paired devices list on your Bluetooth device before pairing it to your R3 again.
For more information visit www.ruarkaudio.com/support.
CD player
To insert a CD, gently push it into the CD slot. Once loaded it will play automatically.
Now playing information
Generally, track number and time is shown on audio CDs and track and album name is shown on MP3 CDs.
19:15
Kings of Leon Use Somebody
To change what is displayed select MENU > Info and choose from album and artist information, progress bar or filename (options will vary according to the type of CD).
Play / Pause
Press ▶ play or pause a track
Stop play
Long press▶II
Skip track
Press▶▶ to skip to the next or previous track
Fast-forward or rewind
Press and hold▶▶ to fast-forward or rewind
Eject
Press the eject button next to the CD slot
Shuffle
To play tracks in random order select
MENU > Shuffle > On
Repeat
To repeat a single track or all tracks, select
MENU > Repeat > One or All
Any folder structure on MP3/WMA/AAC disks will be ignored and the tracks will show in a single list
Rights-protected WMA and AAC cannot be played
Music player
Music player enables you to play audio files stored on a computer on your network or USB memory stick.
USB music player
To play audio from a USB mass-storage device (must be FAT32 format) such as a USB memory stick, connect it to the USB socket on the back of your R3.
When you first connect a USB mass-storage device, your R3 will automatically ask if you want to view the track list. Otherwise, to view the track list select Menu > USB.
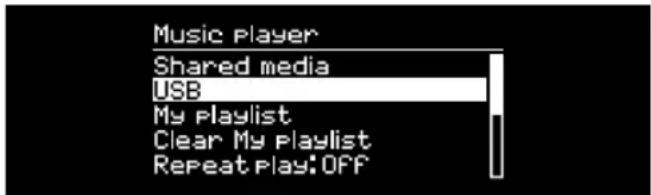
Network music player
Your R3 is fully DLNA compatible and will play music stored in shared media libraries on other devices on your network. A shared library might be on a laptop, smartphone or tablet, but it could also be on a dedicated music server such as a NAS drive (Network Attached Storage).
Most computers running Windows are already configured as media servers as are most NAS drives and some routers will also work as media servers. There are many apps available for Mac, iOS, Linux, Android, Windows phone, Blackberry, Symbian, etc. that will turn your MP3 player, smartphone or tablet into a music server.
To play music shared by devices on your network select Menu > Shared media. After your R3 has scanned your network for shared media you will see a list of music servers consisting of the computer name and shared media name, for example
The menus after this are generated by the media server, although in most cases you will find options to browse by genre, folder, artist, album etc.
If your R3 is not connected to a network it will attempt to connect.
For more information visit
www.ruarkaudio.com/support.
Browse and play music
Rotate the CONTROL KNOB to scroll though the track lists, then press the knob to open the highlighted folder/album or play the track.
To go back to the previous screen press BACK.
Pause track
Press ▶ and then press again to play.
Skip track
Press ▶▶▶ to ◀skip to the next or previous track
Fast-forward or rewind
Press and hold ▶ or to fast-forward or rewind.
Shuffle
To play tracks in random order, select MENU > Shuffle and press the CONTROL KNOB to toggle shuffle play on and off.
NOTE: It may not be possible to use this function if the folder contains a large number of tracks.
Repeat
To repeat a single track or all the tracks in the current folder, select MENU > Repeat and press the CONTROL KNOB to choose one, all or off.
My playlist
You can create your own playlist and queue of up to 500 tracks. These can be a mixture of tracks from any available media servers and an attached USB device. To manage your playlist, select Menu > My playlist.
To add a track or folder to your playlist, highlight it then press and hold the CONTROL KNOB for two seconds.
To remove a track from your playlist, highlight the track in My playlist and then press and hold the CONTROL KNOB for two seconds.
EN
Please note that your playlist will stored as long as your R3 remains on or in standby but will be cleared if you turn it off.
Now Playing information
Typically, the track name is shown with additional information below. To change what is displayed select MENU > Info and choose from album and artist information, show the progress bar or data format.
Prune servers
Your R3 will automatically store the name of media servers it has connected to and that are not currently available are shown with a question mark before their name eg '?Home-Laptop'. You can remove them from the list by selecting MENU > Prune servers > YES.
Line in and optical
You can listen to audio from an external analogue audio source by connecting it to Line in or a digital source by connecting it to Optical.
Input level adjustment
For best audio performance, we recommend you balance the volume level of an external device (eg portable music player or turntable) so its volume is about the same as inbuilt sources like CD or USB.
If the volume is lower, increase the input level.
If the volume is higher or distorts, decrease the input level.
You can adjust the input level by selecting MENU > Input level and choose your desired level.
If your external audio source has a volume control you may also need to adjust that.
Line in input levels
- 3dB (devices with high output level)
- 0dB (devices with standard 2.1Vrms line level output)
+6dB (default) - 12dB (eg smartphones with high headphone output)
- 18dB (eg smartphones with normal headphone output)
For best audio performance, we recommend you balance the volume level of external devices by adjusting input levels.
Alarms, snooze and sleep
Setting an alarm
An active alarm is indicated by the alarm icon and when it sounds, the icon flashes.
Select MENU > System > Date and time > Alarms and choose alarm 1 or alarm 2 using the CONTROL KNOB.
Choose when the alarm will sound (off, daily, once, weekends or weekdays), set the time and then choose to have the alarm play a radio station, CD or sound a tone and choose the volume. Finally, select save to save the alarm and exit the set up menu.
NOTE: it is not possible to use a Bluetooth source, USB or network music server for the alarm.
Snooze
Press the CONTROL KNOB to temporarily silence a sounding alarm, press it again to increase the snooze period (5, 10, 15 or 30 minutes).
To cancel an alarm that is sounding or in snooze mode, press and hold the CONTROL KNOB for two seconds.
Sleep timer
To set the time after which your R3 will automatically switch to standby, select MENU > System > Date and time > Sleep.
Choose the delay in minutes (Off, 15, 30, 45, 60) and finally press the knob to confirm your selection. The display then dims to standby brightness, returns to the Now-playing screen and displays the sleep icon.
EN
Guarantee
Register your product to get an extended three-year guarantee.
As standard, this product is guaranteed to be free from defects for a period of two years from date of purchase, but this is extended to three years if you register your product at www.ruarkaudio.com.
This guarantee remains valid providing this product has been treated with due care and attention. Product failure through accidental damage, excessive wear and tear, negligence or unauthorised modification will void this guarantee.
If this product was purchased in the UK and it develops a fault, please contact the retailer from which it was purchased, or contact us directly via our website www.ruarkaudio.com/support.
For products purchased outside the UK the distributor in the country of purchase guarantees the product. For details, please contact the local Ruark distributor or outlet.
If returning this product, please ensure it is packed in its original packaging and a proof of purchase is included.
This guarantee in no way varies or removes the purchaser's statutory rights.
Errors and omissions excepted.
General care
- Clean with a soft, lint-free duster or slightly dampened cloth. Do not use wax sprays or other substances as these may damage the surface finish or impair performance.
- Do not expose your unit to direct sunlight, high humidity, dust, excessive vibration, or extreme temperatures, all of which can affect the finish, performance and reliability of the unit.
- Recommended operating temperature range is 5°C to 40°C.
- Natural wood finishes will vary and lighten or darken with age, particularly when exposed to sunlight.
Copyright and trademarks
© Ruark Audio. All rights reserved. Ruark Audio, the Ruark Audio logo, and other Ruark Audio marks are owned by Ruark Audio and may be registered. All other trademarks are the property of their respective owners.
Bluetooth® and associated logos are registered trademarks owned by Bluetooth SIG, Inc.
Qualcomm aptX is a product of Qualcomm Technologies International, Ltd.
The Spotify software is subject to third party licenses found here: www.spotify.com/connect/third-party-licenses All other trademarks are the property of their respective owners.
ruarkaudio
R3 Kompakt Musiksystem Brugervejledning
Internet radio, Spotify Connect, Amazon Music, Deezer, TIDAL, UPnP™ DLNA
natural_image
Line drawing of a rectangular electronic device with a front panel and two legs (no text or symbols)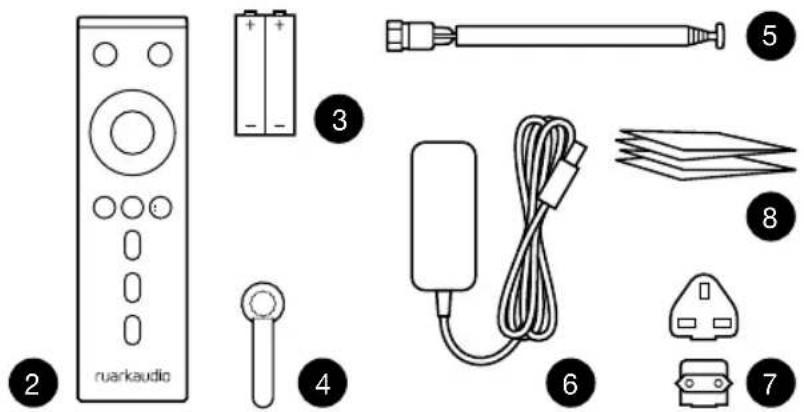
Knapper
9. STANDBY
10. KONTROLKNAP / VÆLG
Oversigt
- Ekstern sensor
- Omgivelseslys sensor
- CD-indstik
- OLED display
- Betjening
- CD-indstik
- 75mm Ruark NS+ drivere
- USB C (5V 1A)
- Optisk input
- Ethernet
- DAB-FM-antenne
- Jævnstrømsstik (14V 2.85A)
- Line in
- Line out
- Hovedtelefon ud (3.5mm)
DA
Godt begyndt
Fællesfunktioner
DA
Systemindstillinger
Bas og diskant
MENU > System > Audio > Bas og Diskant
Lydstyrke
Lydstyrke booster automatisk diskant- og basfrekvenserne ved lavere lydstyrker.
MENU > System > Audio > Loudness
3D-lyd
MENU > System > Date and time
*Dynamic Label Segment
Skift station
Kings of Leon Use Somebody
Internet radio, Spotify Connect, Amazon Music, Deezer, TIDAL, UPnP™ DLNA
natural_image
Line drawing of a rectangular electronic device with a front panel and mounting feet (no text or symbols)
Kontrollen
9. STANDBY
Übersicht
*Dynamic Label Segment
Sender wechseln
Kings of Leon Use Somebody
www.spotify.com/connect/third-party-licenses
natural_image
Line drawing of a rectangular electronic device with a front panel and mounting feet (no text or symbols)
Controles
9. STANDBY
10. MANDO DE CONTROL / SELECCIONAR
Descripción
Press 📁 to turn the radio on.
Funciones comunes
Encendido y reposo
Ajustes del sistema
Graves y agudos
CE INFORMATIONS SUR LA CONFORMITÉ À LA CE
Radio Internet, Spotify Connect, Amazon Music, Deezer, TIDAL, UPnP™ DLNA
Prises Line, RCA 2,3Vrms
Prise Line out, RCA 2,0Vrms
Prise Ethernet (RJ45)
USB 2.0 5W (5V 1A)
Prise casque 3,5mm, 25mW 16-32 Ohm
Puissance
natural_image
Line drawing of a rectangular electronic device with a front panel and mounting feet (no text or symbols)
Boutons
9. STANDBY
10. BOUTON DE COMMANDE / SELECT
Changer de station radio FM
Changer de station radio DAB
Radio DAB, DAB+ FM con RDS
Radio Internet, Spotify Connect, Amazon Music, Deezer, TIDAL, UPnP™ DLNA
Wi-Fi 802.11b/g/n con sicurezza WEP, WPA e WPA2
MP3 48kHz 320kbps, AAC 96kHz 320kbps,
FLAC 24-bit 48kHz, WAV 16-bit 48kHz / 24 bit 44.1kHz,
WMA 44.1kHz 320kbps
Bluetooth SBC, AAC, A2DP, aptX
Ingressi e uscite
Ingresso ottico digitale (TOSLINK) 24-bit 192kHz
Consumo in stand-by: 1,6W
Batterie telecomando: 2 x 1,5V AAA
natural_image
Line drawing of a rectangular electronic device with a front panel and mounting feet (no text or symbols)
Comandi
9. STANDBY
10. MANOPOLA DI CONTROLLO / SELECT
Panoramica
Funzioni comuni
MENU > System > Date and time
MENU > System > Network > Keep connected
natural_image
Line drawing of a rectangular electronic device with a front panel and two legs (no text or symbols)
製品概要
主な機能
Kings of Leon Use Somebody
ネットワークミュージックプレーヤー
natural_image
Line drawing of a rectangular electronic device with a front panel and two legs (no text or symbols)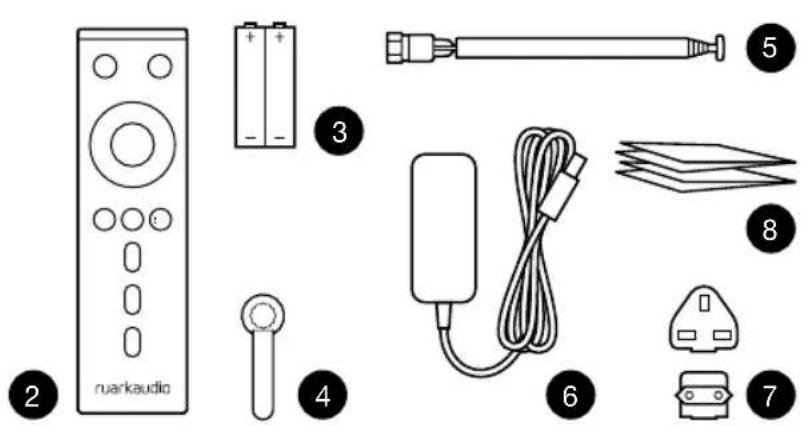
조절 장치
일반 기능
스위치 켜기와 스탠바이로 들어가기
시스템 설정
75 Ohm F-type DAB/FM-antenne-invoer
CD-speler
CD, CD-ROM, CD-R/RW disks
MP3, WMA, AAC 320kbps
Digitaal audio
Audiofiele 32-bits 112dB audiostereo DAC
Internetradio, Spotify Connect, Amazon Music, Deezer, TIDAL, UPnP™ DLNA
Wi-Fi 802.11b/g/n ondersteunt WEP, WPA & WPA2 veiligheid
MP3 48kHz 320kbps, AAC 96kHz 320kbps,
FLAC 24-bit 48kHz, WAV 16-bit 48kHz / 24 bit 44.1kHz,
WMA 44.1kHz 320kbps
Bluetooth: SBC, AAC, A2DP, aptX
natural_image
Line drawing of a rectangular electronic device with a front panel and two legs (no text or symbols)
Knoppen
9. STANDBY
10. CONTROL KNOB / SELECT
Overzicht
Fast-forward of rewind track
Systeeminstellingen
Bas en treble
MENU > System > Audio > Bass of Treble
Geluidssterkte
MENU > System > Date and time
MENU > System > Network > Keep connected
Van station wisselen
Van station wisselen
Kings of Leon Use Somebody
Fast-forward of rewind
Network music player
Your R3 is fully DLNA compatible and will play music stored in shared media libraries on other devices on your network. A shared library might be on a laptop, smartphone or tablet, but it could also be on a dedicated music server such as a NAS drive (Network Attached Storage).
Most computers running Windows are already configured as media servers as are most NAS drives and some routers will also work as media servers. There are many apps available for Mac, iOS, Linux, Android, Windows phone, Blackberry, Symbian, etc. that will turn your MP3 player, smartphone or tablet into a music server.
To play music shared by devices on your network select Menu > Shared media. After your R3 has scanned your network for shared media you will see a list of music servers consisting of the computer name and shared media name, for example
The menus after this are generated by the media server, although in most cases you will find options to browse by genre, folder, artist, album etc.
If your R3 is not connected to a network it will attempt to connect.
For more information visit
www.ruarkaudio.com/support.
Browse and play music
Rotate the CONTROL KNOB to scroll though the track lists, then press the knob to open the highlighted folder/album or play the track.
To go back to the previous screen press BACK.
Fast-forward of rewind
75 Ohm F-type DAB/FM antenne-inngang
CD spiller
CD, CD-ROM, CD-R/RW disker
MP3, WMA, AAC 320kbps
Digital lyd
Audiofil 32-bit 112dB lydstereo DAC
Internett radio, Spotify Connect, Amazon Music, Deezer, TIDAL, UPnP™ DLNA
Wi-Fi 802.11b/g/n støtter WEP, WPA & WPA2 sikkerhet
MP3 48kHz 320kbps, AAC 96kHz 320kbps,
FLAC 24-bit 48kHz, WAV 16-bit 48kHz / 24 bit 44.1kHz,
WMA 44.1kHz 320kbps
Bluetooth: SBC, AAC, A2DP, aptX
natural_image
Line drawing of a rectangular electronic device with a front panel and two legs (no text or symbols)
Kontroller
9. STANDBY
10. KONTROLLKNAPP / SELECT
Vanlige funksjoner
MENU > System > Network > Keep connected
*Dynamic Label Segment
Endre stasjon
Kings of Leon Use Somebody
natural_image
Line drawing of a rectangular electronic device with a front panel and two legs (no text or symbols)
Элементы управления
9. КНОПКА STANDBY
Обзор
natural_image
Line drawing of a rectangular electronic device with a front panel and mounting feet (no text or symbols)
控制按钮
-
待机
-
控制旋钮/选择
常用功能
开机和待机
浏览菜单、歌曲和电台列表
要更改设置 - 按下 MENU 键
要在各选项之间滚动 - 旋转控制旋钮
要选择选项 - 按下控制旋钮
MENU > System > Date and time
MENU > System > Network > Keep connected
网络音乐播放器
www.spotify.com/connect/third-party-licenses
所有其他商标均为其各自所有者的财产。
R3 緊湊型音樂系統 使用说明书
ZH-S
安全與法規信息
natural_image
Line drawing of a rectangular electronic device with a front panel and mounting feet (no text or symbols)
控制按鈕
9. 待機
- 控制旋鈕/選擇
概覽
常用功能
開機和待機
瀏覽菜單、歌曲和電台列表
要更改設置 - 按下 MENU 鍵
要在各選項之間滾動-旋轉控制旋鈕
要選擇選項-按下控制旋鈕
系統設置
低音和高音
MENU > System > Audio > Bass, Treble
MENU > System > Date and time
MENU > System > Network > Keep connected
網絡音樂播放器
www.spotify.com/connect/third-party-licenses
所有其他商標均為其各自所有者的財產。
一般注意事項
natural_image
Silhouette of a tree with a broad canopy and trunk (no text or symbols)ruarkaudio
59 Tailors Court, Temple Farm Industrial Estate,
Southend on Sea, Essex, SS2 5TH, UK
www.ruarkaudio.com

GREAT
BRITISH
DESIGN
20211021.1