
TX43LX700E - TV PANASONIC - Free user manual and instructions
Find the device manual for free TX43LX700E PANASONIC in PDF.
| Product type | LED TV |
| Model | TX-43LX700E |
| Brand | Panasonic |
| Dimensions with stand (W × H × D) | 966.6 × 619 × 216.4 mm |
| Weight with stand | 7.2 kg |
| Power supply | 220-240 V~, 50/60 Hz |
| Standby consumption | Less than 0.5 W |
| Resolution | 4K Ultra HD (3840 × 2160) |
| Connectivity | HDMI (3 including 1 eARC), USB 2.0, USB 3.0, Ethernet, built-in Wi-Fi, Bluetooth 5.0, optical digital audio output, headphone jack, AV input |
| Smart features | Android TV, built-in Google Assistant, built-in Chromecast, Netflix, Prime Video, YouTube, Google Play |
| TV reception | DVB-T/T2, DVB-C, DVB-S/S2 |
| Sound | 20 W speakers (2 × 10 W), Dolby Audio, surround sound modes, night mode |
| USB playback formats | Photo, music, video, documents (FAT32, up to 1 TB) |
| Care and cleaning | Wipe with a soft, dry cloth. For stubborn dirt, use a damp cloth with diluted neutral detergent. Unplug before cleaning. |
| Safety instructions | Do not expose to moisture, do not open the housing, maintain ventilation of at least 10 cm, use the supplied stand, wall mounting by qualified personnel. |
| Remote control batteries | 2 AAA batteries (alkaline), do not mix types, remove if not used for extended periods |
| Operating temperature | 0 to 45 °C |
| Wall mount | VESA 300 × 300 mm (M6 screws, depth 12-15 mm) |
| General information | Manufactured by Panasonic Entertainment & Communication Co., Ltd. Full manual available as PDF on notice-facile.com. |
Frequently Asked Questions - TX43LX700E PANASONIC
User questions about TX43LX700E PANASONIC
0 question about this device. Answer the ones you know or ask your own.
Ask a new question about this device
Download the instructions for your TV in PDF format for free! Find your manual TX43LX700E - PANASONIC and take your electronic device back in hand. On this page are published all the documents necessary for the use of your device. TX43LX700E by PANASONIC.
USER MANUAL TX43LX700E PANASONIC
Operating Instructions
LED TV
Model No.
TX-43LX700E TX-43LX710E
natural_image
Front view of a black rectangular TV with stand legs (no visible text or symbols)(image: TX-50LX700E*)
Thank you for purchasing this Panasonic product.
Please read these instructions carefully before operating this product and retain them for future reference.
Please carefully read the "Safety Precautions" of this manual before use.
The images shown in this manual are for illustrative purposes only.
Please refer to Pan European Guarantee Card if you need to contact your local Panasonic dealer for assistance.

Contents
Be Sure to Read
Important Notice ....3
Safety Precautions ....5
Setting Up the TV....9
Connecting the TV....11
Initial Setup....13
Operating the TV 14
Watching External Inputs....16
Using Homepage - Apps....17
Using the Menu Functions....18
Using Media Player 21
Additional Information....22
Troubleshooting....23
Maintenance....24
Specifications 25
Oss License....27

text_image
HE NC Advance™ Covered by patents at patent list access advance.comDolby Audio
The terms HDMI, HDMI High-Definition Multimedia Interface, and the HDMI Logo are trademarks or registered trademarks of HDMI Licensing Administrator, Inc.
Dolby, Dolby Audio, and the double-D symbol are trademarks of Dolby Laboratories. Manufactured under license from Dolby Laboratories. Confidential unpublished works. Copyright © 1992-2015 Dolby Laboratories. All rights reserved.
Wi-Fi ^ is a registered trademark of Wi-Fi Alliance ^ . WPA2 ^TM , WPA ^TM are trademarks of Wi-Fi Alliance ^ .
The Bluetooth ^® word mark and logos are registered trademarks owned by Bluetooth SIG, Inc. and any use of such marks by Panasonic Entertainment & Communication Co., Ltd. is under license.
DVB and the DVB logos are trademarks of the DVB Project.
x.v.Colour ^TM is a trademark.
DiSEqC ^TM is a trademark of EUTELSAT.
Google is a trademark of Google LLC.
Amazon, Prime Video and all related logos are trademarks of Amazon.com, Inc. or its affiliates.
This product complies with the UHD Alliance Technical Specification: UHDA Specified Reference Mode, Version 1.0. FILMMAKER MODE™ logo is a trademark of the UHD Alliance, Inc. in the United States and other countries.
The illustration for TX-50LX700E* is used in this manual unless otherwise mentioned. Illustrations shown may be different depending on the model.
Important Notice
Notice for DVB/Data broadcasting/ IPTV functions
- This TV is designed to meet the standards (as of December, 2020) of DVB-T/T2 (MPEG2, MPEG4-AVC (H.264) and MPEG HEVC (H.265)) digital terrestrial services, DVB-C (MPEG2, MPEG4-AVC (H.264) and MPEG HEVC (H.265)) digital cable services and DVB-S (MPEG2, MPEG4-AVC (H.264) and MPEG HEVC (H.265)) digital satellite services.
Consult your local dealer for availability of DVB-T/T2 or DVB-S services in your area.
Consult your cable service provider for availability of DVB-C services with this TV.
- This TV may not work correctly with the signal which does not meet the standards of DVB-T/T2, DVB-C or DVB-S.
- Not all the features are available depending on the country, area, broadcaster, service provider, satellite and network environment.
- Not all CI modules work properly with this TV. Consult your service provider about the available CI module.
- This TV may not work correctly with CI module that is not approved by the service provider.
- Additional fees may be charged depending on the service provider.
- Compatibility with future services is not guaranteed.
Internet apps, voice control function are provided by their respective service providers, and may be changed, interrupted, or discontinued at any time.
Panasonic assumes no responsibility and makes no warranty for the availability or the continuity of the services.
Panasonic does not guarantee operation and performance of peripheral devices made by other manufacturers; and we disclaim any liability or damage arising from operation and/or performance from usage of such other maker's peripheral devices.

Do not touch or be close to the ANTENNA, SATELLITE IN and HDMI, and prevent electrostatic discharge to disturb, these terminals while in USB and LAN operation mode, or it will cause the TV to stop working or abnormal status.
Handling of customer information
Certain customer information such as IP address of your device (this TV)'s network interface will be collected as soon as you connect your Panasonic-branded smart television (this TV) or other devices to the internet (excerpted from our privacy policy). We do this to protect our customers and the integrity of our Service as well as to protect the rights or property of Panasonic.
When using Internet connecting function of this TV, after agreeing (in the jurisdictions where customer's consent is required to collect personal information under applicable privacy laws) to or reviewing Panasonic's terms of service/privacy policy (hereinafter referred to as terms and conditions etc.), customer information on the use of this unit may be collected and used according to terms and conditions etc.
- Panasonic will not be held responsible for collecting or using customer information via application provided by third party on this TV or website.
- When entering your credit card number, name, etc., pay special attention to the trustworthiness of the provider.
- Registered information may be registered in the server etc. of provider. Before repairing, transferring or discarding this TV, be sure to erase the information according to the terms and conditions etc. of provider.
The recording and playback of content on this or any other device may require permission from the owner of the copyright or other such rights in that content. Panasonic has no authority to and does not grant you that permission and explicitly disclaims any right, ability or intention to obtain such permission on your behalf. It is your responsibility to ensure that your use of this or any other device complies with applicable copyright legislation in your country. Please refer to that legislation for more information on the relevant laws and regulations involved or contact the owner of the rights in the content you wish to record or playback.
This product is licensed under the AVC patent portfolio license for the personal use of a consumer or other uses in which it does not receive remuneration to (i) encode video in compliance with the AVC Standard ("AVC Video") and/or (ii) decode AVC Video that was encoded by a consumer engaged in a personal activity and/or was obtained from a video provider licensed to provide AVC Video. No license is granted or shall be implied for any other use.
Additional information may be obtained from MPEG LA, L.L.C.
See http://www.mpegla.com.

This mark indicates the product operates on AC voltage.

This mark indicates a Class II or double insulated electrical appliance wherein the product does not require a safety connection to electrical earth (ground).
Transport only in upright position.
Safety Precautions
To help avoid risk of electrical shock, fire, damage or injury, please follow the warnings and cautions below:

Mains plug and lead
Warning
If you detect anything unusual, immediately remove the mains plug.

• Mains plug types vary between countries.
- This TV is designed to operate on AC \~ 220-240 V, 50/60 Hz.
- Insert the mains plug fully into the mains socket.
- To turn off the apparatus completely, you must pull the mains plug out of the mains socket.
Consequently, the mains plug should be easily accessible at all times.
- Disconnect the mains plug when cleaning the TV.
- Do not touch the mains plug with wet hands.

• Do not damage the mains lead.
- Do not place a heavy object on the lead.
- Do not place the lead near a high temperature object.
- Do not pull on the lead. Hold onto the mains plug body when disconnecting the plug.
- Do not move the TV with the lead plugged into a mains socket.
- Do not twist the lead, bend it excessively or stretch it.
- Do not use a damaged mains plug or mains socket.
- Ensure the TV does not crush the mains lead.


Take care
Warning
- Do not remove covers and never modify the TV yourself as live parts are accessible and risk of electric shock when they are removed. There are no user serviceable parts inside.


- Do not expose the TV to rain or excessive moisture. This TV must not be exposed to dripping or splashing water and objects filled with liquid, such as vases, must not be placed on top of or above the TV.


- Do not insert foreign objects into the TV through the air vents.
- If the TV is used in an area where insects may easily enter the TV.
It is possible for insects to enter the TV, such as small flies, spiders, ants, etc. which may cause damage to the TV or become trapped in an area visible on the TV, e.g. within the screen.
- If the TV is used in an environment where there is dust or smoke.
It is possible for dust/smoke particles to enter the TV through the air vents during normal operation which can become trapped inside the unit. This may cause overheating, malfunction, deterioration in picture quality, etc.
- Do not use an unapproved pedestal/mounting equipment. Be sure to ask your local Panasonic dealer to perform the setup or installation of approved wall-hanging brackets.
- Do not apply any strong force or impact to the display panel.
• Ensure that children do not climb on the TV. - Do not place the TV on sloping or unstable surfaces, and ensure that the TV does not hang over the edge of the base.


Warning Stability Hazard
A TV may fall, causing serious personal injury or death. Many injuries, particularly to children, can be avoided by taking simple precautions such as:
- ALWAYS use cabinets or stands or mounting methods recommended by the manufacturer of the TV.
- ALWAYS use furniture that can safely support the TV.
- ALWAYS ensure the TV is not overhanging the edge of the supporting furniture.
- ALWAYS educate children about the dangers of climbing on furniture to reach the TV or its controls.
- ALWAYS route cords and cables connected to your TV so they cannot be tripped over, pulled or grabbed.
- NEVER place a TV in an unstable location.
- NEVER place the TV on tall furniture (for example, cupboards or bookcases) without anchoring both the furniture and the TV to a suitable support.
- NEVER place the TV on cloth or other materials that may be located between the TV and supporting furniture.
- NEVER place items that might tempt children to climb, such as toys and remote controls, on the top of the TV or furniture on which the TV is placed.
If the existing TV is going to be retained and relocated, the same considerations as above should be applied.
• This TV is designed for table-top use.
- Do not expose the TV to direct sunlight and other sources of heat.


To prevent the spread of fire, keep candles or other open flames away from this product at all times

■ Suffocation/Choking Hazard
Warning
- The packaging of this product may cause suffocation, and some of the parts are small and may present a choking hazard to young children. Keep these parts out of reach of young children.
Pedestal
Warning
- Do not disassemble or modify the pedestal.
English
Caution
- Do not use any pedestal other than the one provided with this TV.
- Do not use the pedestal if it becomes warped or physically damaged. If this occurs, contact your nearest Panasonic dealer immediately.
- During setup, make sure that all screws are securely tightened.
- Ensure that the TV does not suffer any impact during installation of the pedestal.
- Ensure that children do not climb onto the pedestal.
- Install or remove the TV from the pedestal with at least two people.
- Install or remove the TV according to the specified procedure.
Radio waves
Warning
- Do not use the TV and the remote control in any medical institutions or locations with medical equipment. Radio waves may interfere with the medical equipment and may cause accidents due to malfunction.
- Do not use the TV and the remote control near any automatic control equipment such as automatic doors or fire alarms. Radio waves may interfere with the automatic control equipment and may cause accidents due to malfunction.
- Keep at least 15 cm away from the TV and the remote control if you have a cardiac pacemaker. Radio waves may interfere with the operation of the pacemaker.
- Do not disassemble or alter the TV and the remote control in any way.
Common Interface
- Turn the TV off with Mains power On/Off switch whenever inserting or removing the CI module.
- If a smart card and a CI module come as a set, first insert the CI module, then insert the smart card into the CI module.
- Insert or remove the CI module completely in the correct direction as shown.
- Normally encrypted channels will appear. (Viewable channels and their features depend on the CI module.)
If encrypted channels do not appear
→ [Common Interface] ([Setup] menu)
- There might be some CI modules in the market with older firmware versions that do not work fully interoperable with this new CI+ v1.4 TV. In this case, please contact your content provider.
- Be sure to remove the CI module card, etc. before repairing, transferring or discarding.
TV
text_image
Diagram showing a device with a label pointing to a screen, likely illustrating a process or system.CI module

Built-in wireless LAN
Caution
- Do not use the built-in wireless LAN to connect to any wireless network (SSID*) for which you do not have usage rights. Such networks may be listed as a result of searches. However, using them may be regarded as illegal access.
* SSID is a name for identifying a particular wireless network for transmission. - Do not subject the built-in wireless LAN to high temperatures, direct sunlight or moisture.
• Data transmitted and received over radio waves may be intercepted and monitored. - The built-in wireless LAN uses 2.4 GHz and 5 GHz frequency bands. To avoid malfunctions or slow response caused by radio wave interference when using the built-in wireless LAN, keep the TV away from other devices that use 2.4 GHz and 5 GHz signals such as other wireless LAN devices, microwave ovens, and mobile phones.
- When problems occur due to static electricity, etc., the TV might stop operating to protect itself. In this case, turn the TV off at the Mains power On/Off switch, then turn it back on.

Bluetooth® wireless technology
Caution
- The TV and the remote control use the 2.4 GHz radio frequency ISM band (Bluetooth®). To avoid malfunctions or slow response caused by radio wave interference, keep the TV and the remote control away from the devices such as other wireless LAN devices, other Bluetooth® devices, microwaves, mobile phones and the devices that use 2.4 GHz signal.

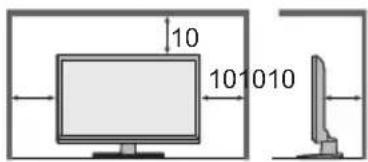
Ventilation
Caution
Allow sufficient space (at least 10 cm) around the TV in order to help prevent excessive heat, which could lead to early failure of some electronic components.
text_image
10 10 10 10(cm)
- Ventilation should not be impeded by covering the ventilation openings with items such as newspapers, tablecloths and curtains.


- Whether you are using a pedestal or not, always ensure the vents at the bottom of the TV are not blocked and there is sufficient space to enable adequate ventilation.

Moving the TV
Caution
Before moving the TV, disconnect all cables.
- At least two people are required to move the TV to prevent injury that may be caused by the tipping or falling of TV.
- Do not hold the screen part as shown below when moving the TV. This may cause malfunction or damage.

text_image
Diagram showing a flat-screen TV with a prohibition symbol indicating no restrictions.
When not in use for a long time
Caution
This TV will still consume some power even in the Off mode, as long as the mains plug is still connected to a live mains socket.
- Remove the mains plug from the wall socket when the TV is not in use for a prolonged period of time.

Excessive volume
Caution
- Do not expose your ears to excessive volume from the headphones. Irreversible damage can be caused.


- If you hear a drumming noise in your ears, turn down the volume or temporarily stop using the headphones.
Battery for the Remote Control
Warning
- Keep the batteries out of reach of children to prevent swallowing. Adverse physical effects can result if accidentally swallowed. If you suspect a child has swallowed one, seek medical attention immediately.
Caution
- Incorrect installation may cause battery leakage, corrosion and explosion.
- Replace only with the same or equivalent type.
• Do not mix old and new batteries. - Do not mix different battery types (such as alkaline and manganese batteries).
• Do not use rechargeable batteries (Ni-Cd, etc.).
• Do not bum or break up batteries. - Do not expose batteries to excessive heat such as sunshine, fire or the like.
• Make sure you dispose of batteries correctly. - Remove the battery from the unit when not using for a prolonged period of time to prevent battery leakage, corrosion and explosion.
LED TV
Declaration of Conformity (DoC)
"Hereby, Panasonic Entertainment & Communication Co., Ltd. declares that this TV is in compliance with the essential requirements and other relevant provisions of the Directive 2014/53/EU."
If you want to get a copy of the original DoC of this TV, please visit the following website:
https://www.ptc.panasonic.eu/compliance-documents
Authorized Representative:
Panasonic Testing Centre
Panasonic Marketing Europe GmbH
Winsbergring 15, D-22525 Hamburg, Germany

5.15 — 5.35 GHz band of wireless LAN is restricted to indoor operation only in the following countries.
Austria, Belgium, Bulgaria, Czech Republic, Denmark, Estonia, France, Germany, Iceland, Italy, Greece, Spain, Cyprus, Latvia, Liechtenstein, Lithuania, Luxembourg, Hungary, Malta, Netherlands, Norway, Poland, Portugal, Romania, Slovenia, Slovakia, Turkey, Finland, Sweden, Switzerland, Croatia Maximum radio-frequency power transmitted in the frequency bands
| Type of wireless | Frequency band | Maximum EIRP |
| Wireless LAN | 2412-2472 MHz | 18 dBm |
| 5150-5250 MHz | 18 dBm | |
| 5725-5850 MHz | 13.7 dBm | |
| Bluetooth® | 2402-2480 MHz | 7 dBm |

Moving the TV
Caution
Before moving the TV, disconnect all cables.
- Move the TV with at least two people. Support as shown to avoid injury by the TV tipping or falling.
natural_image
Illustration of two workers exchanging a package with a magnified inset showing hand gesture (no text or symbols)
Use conditions
Caution
- This appliance is intended for use in tropical climates.
Setting Up the TV
Supplied accessories
Accessories may not be placed all together. Take care not to throw them away unintentionally.
Operating Instructions
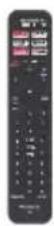
Remote Control
- RC700E or RC730E
→ (p.14)
Batteries (AAA) × 2
(p.10)

Mains Lead
→ (p.5)
Mini Jack Adapter
Adapter AV

Pedestal
43-inch model
Assembly screws


Base

50-inch model
• Assembly screws


Base

55-inch model
• Assembly screws


Base

65-inch model
• Assembly screws


Base

75-inch model
• Assembly screws


Base

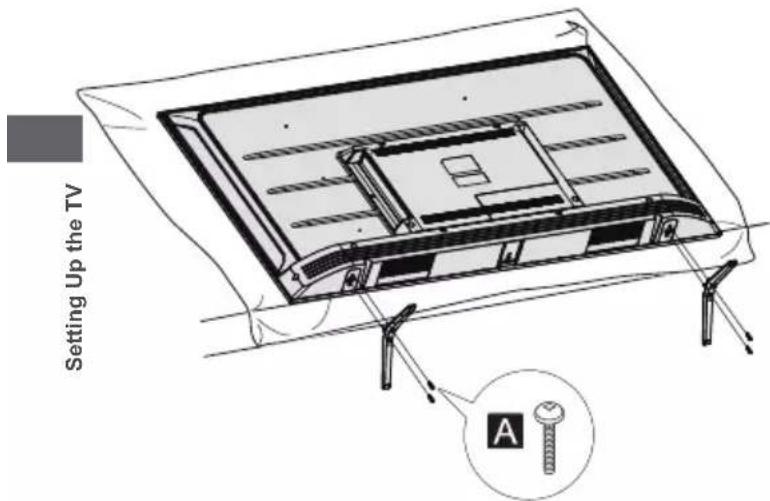
Attaching the pedestal
1 Assemble the pedestal
text_image
Setting Up the TV ARemoving the pedestal from the TV
Be sure to remove the pedestal in the following way when using the wall-hanging bracket or repacking the TV.
1 Lay the TV on a foam mat or thick soft cloth on a table.
2 Remove the assembly screws A from the TV.
Inserting remote's batteries

text_image
Push down the cover Note the correct polarity (+ or -)Wall mounting the TV (optional)
Please contact your local Panasonic dealer to purchase the recommended wall-hanging bracket.
Rear of the TV (View from the side)
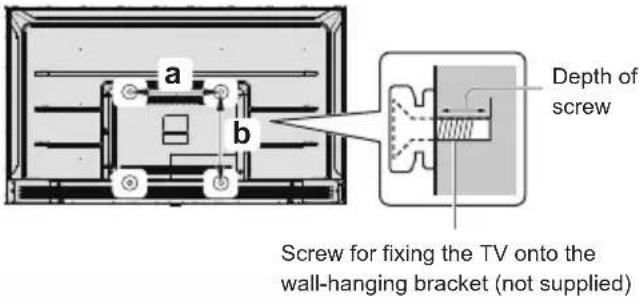
text_image
a b Depth of screw Screw for fixing the TV onto the wall-hanging bracket (not supplied)Holes for wall-hanging bracket installation
Model a b
| 43-inch 300 mm 300 mm |
| 50-inch 300 mm 300 mm |
| 55-inch 300 mm 300 mm |
| 65-inch 400 mm 300 mm |
| 75-inch 400 mm 300 mm |
Screw specification
| Model Type | Depth of screw | |
| Minimum | Maximum | |
| 43-inch M6 12 mm 15 mm | ||
| 50-inch M6 12 mm 15 mm | ||
| 55-inch M6 12 mm 15 mm | ||
| 65-inch M6 12 mm 15 mm | ||
| 75-inch M6 12 mm 15 mm | ||
Warning
- When optional accessories such as wall brackets etc. are used, always read and follow the manufacturer installation and usage instructions.
- Do not mount the unit directly below ceiling lights (such as spotlights or halogen lights) which typically give off high heat. Doing so may warp or damage plastic cabinet parts.
- When installing wall brackets you must ensure the wall bracket is not electrically grounded to metal wall studs. Always ensure that there are no electrical cables, pipes etc. in the wall before you begin the wall bracket installation.
• To prevent fall and injury, remove the TV from its fixed wall position when it is no longer in use.
Connecting the TV
- Please ensure the TV is disconnected from the mains socket/power point before attaching or disconnecting any RF/AV leads.
- External equipment and cables are for illustrative purposes only and not supplied with this TV.
- Check the type of terminals and cable plugs are correct when connecting.
- When using an HDMI cable, use the fully wired one.
- Keep the TV away from electronic equipment (video equipment, etc.) or equipment with an infrared sensor. Otherwise, distortion of image/ sound may occur or operation of other equipment may be interfered.
- Also read the manual of the equipment being connected.
Terminals
Rear of the TV

text_image
1 USB 2.0 2 USB 3.0 3 ETHERNET 4 SATELLITE IN 5 ANTENNA IN 6 DIGITAL AUDIO OUT 7 HDMI 1(eARC) 8 HDMI 2 9 COMMON INTERFACE 10 HDMI 3 11 HEADPHONE 12 AV INConnections
Aerial
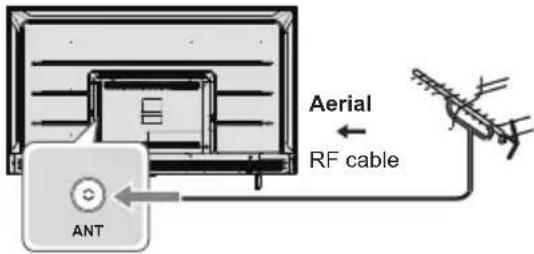
text_image
Aerial RF cable ANT- Keep RF (aerial) cable away from the mains lead to avoid and minimise mains interference pickup.
• Do not place the RF cable under the TV. - An aerial, correct cable (75 Ω coaxial) and correct terminating plug are required to obtain optimum quality picture and sound.
- If a communal aerial system is used, you may require the correct connection cable and plug between the wall aerial socket and the TV.
- Your local Television Service Centre or dealer may be able to assist you in obtaining the correct aerial system for your particular area and the accessories required.
- Any matters regarding aerial installation, upgrading of existing systems or accessories required, and the costs incurred, are the responsibility of you, the customer.
- If the aerial is placed in the wrong location, interference might happen.

text_image
Diagram showing electrical connections with labeled components and a checkmark indicator
text_image
Diagram showing cable routing between a monitor and two surveillance cameras, with a warning symbol indicating cancellation.Blu-Ray Player

flowchart
graph LR
    TV["TV"] -->|HDMI 1/2/3| Cable["Hybrid Cable"]
    Cable --> Blu-Ray_Player["Blu-Ray Player"]
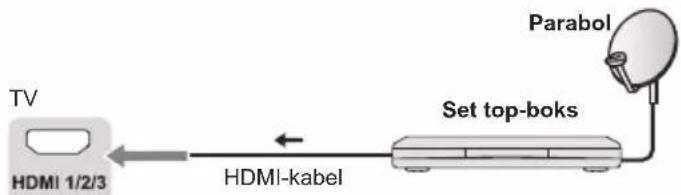
Set top box
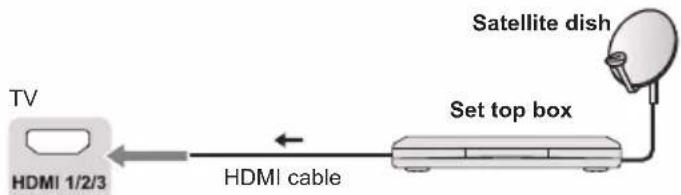
flowchart
graph LR
    TV["TV"] -->|HDMI 1/2/3| Cable["HDMI cable"]
    Cable --> SetTopBox["Set top box"]
    SetTopBox --> SatelliteDish["Satellite dish"]
AV / Game equipment
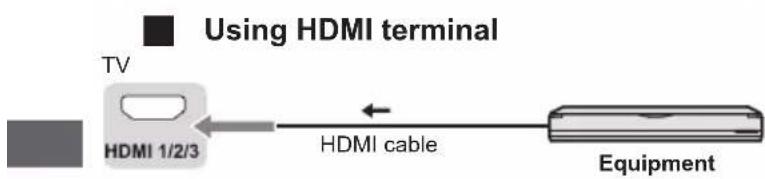
flowchart
graph LR
    A["TV"] --> B["HDMI 1/2/3"]
    B --> C["HDMI cable"]
    C --> D["Equipment"]
    style A fill:#99ccff,stroke:#333
    style D fill:#cccccc,stroke:#333
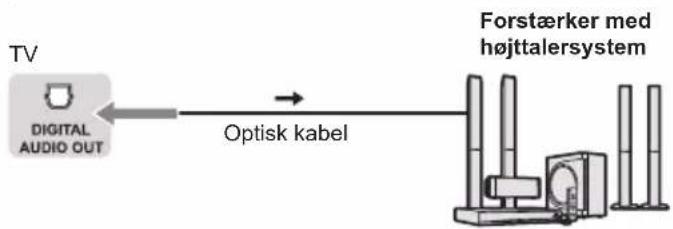
Speaker system
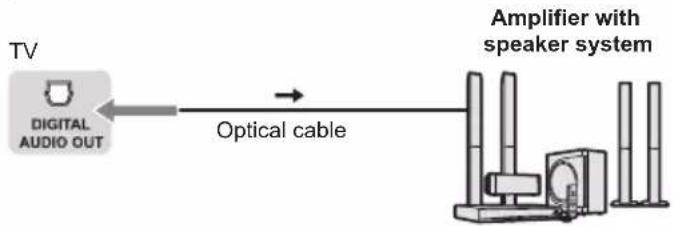
flowchart
graph LR
    A["TV"] --> B["Optical cable"]
    B --> C["Amplifier with speaker system"]
    C --> D["Antenna unit"]
    D --> E["Antenna unit"]
    E --> F["Antenna unit"]
    F --> G["Antenna unit"]
    G --> H["Antenna unit"]
    H --> I["Antenna unit"]
    I --> J["Antenna unit"]
    J --> K["Antenna unit"]
    K --> L["Antenna unit"]
    L --> M["Antenna unit"]
    M --> N["Antenna unit"]
    N --> O["Antenna unit"]
    O --> P["Antenna unit"]
    P --> Q["Antenna unit"]
    Q --> R["Antenna unit"]
    R --> S["Antenna unit"]
    S --> T["Antenna unit"]
    T --> U["Antenna unit"]
    U --> V["Antenna unit"]
    V --> W["Antenna unit"]
    W --> X["Antenna unit"]
    X --> Y["Antenna unit"]
    Y --> Z["Antenna unit"]
    Z --> AA["Antenna unit"]
    AA --> AB["Antenna unit"]
    AB --> AC["Antenna unit"]
    AC --> AD["Antenna unit"]
    AD --> AE["Antenna unit"]
    AE --> AF["Antenna unit"]
    AF --> AG["Antenna unit"]
    AG --> AH["Antenna unit"]
    AH --> AI["Antenna unit"]
    AI --> AJ["Antenna unit"]
    AJ --> AK["Antenna unit"]
    AK --> AL["Antenna unit"]
    AL --> AM["Antenna unit"]
    AM --> AN["Antenna unit"]
    AN --> AO["Antenna unit"]
    AO --> AP["Antenna unit"]
    AP --> AQ["Antenna unit"]
    AQ --> AR["Antenna unit"]
    AR --> AS["Antenna unit"]
    AS --> AT["Antenna unit"]
    AT --> AU["Antenna unit"]
    AU --> AV["Antenna unit"]
    AV --> AW["Antenna unit"]
    AW --> AX["Antenna unit"]
    AX --> AY["Antenna unit"]
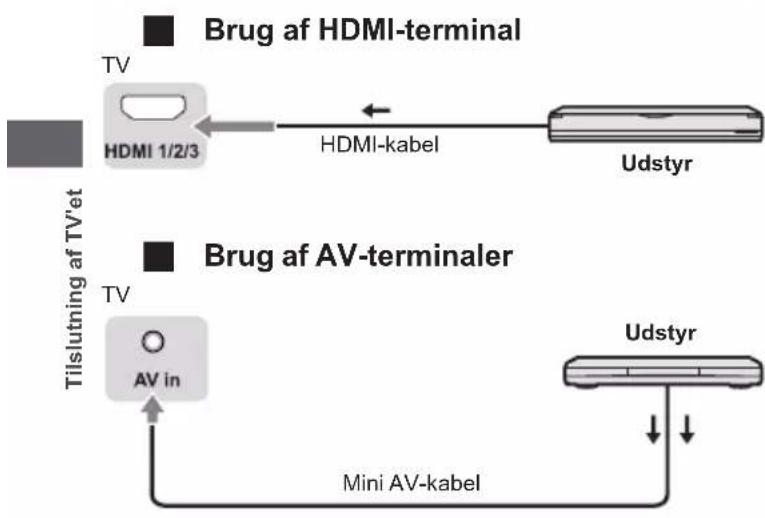
Connecting the TV
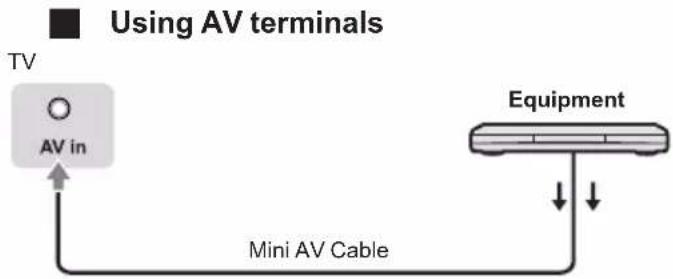
flowchart
graph TD
    A["TV"] --> B["AV in"]
    B --> C["Mini AV Cable"]
    C --> D["Equipment"]
    style A fill:#000,stroke:#fff,color:#fff
    style D fill:#fff,stroke:#000,stroke-width:2px
- To enjoy the sound from the external equipment in multi-channel sound (e.g. Dolby Digital 5.1ch), connect the equipment to the amplifier. For the connections, read the manuals of the equipment and amplifier.
DVD Recorder / VCR

text_image
TV HDMI 1/2/3 HDMI cable DVD Recorder/ VCRAmplifier

flowchart
graph TD
    A["TV"] --> B["HDMI 1 (eARC)"]
    B --> C["HDMI cable"]
    C --> D["Amplifier with speaker system"]
    D --> E["Equipment"]
- Use HDMI1 to connect the TV to an amplifier which has eARC/ARC(Audio Return Channel) function. If connecting to an amplifier without eARC/ARC function, use DIGITAL AUDIO OUT.
Initial Setup
Plug the mains plug into the socket outlet and turn on the TV.
It may take a few seconds before the screen is displayed.
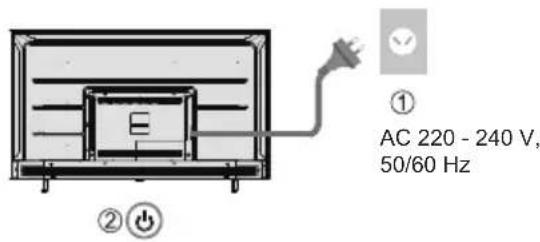
text_image
① AC 220 - 240 V, 50/60 Hz ② ⏻Google - Initial Setup
When you turn on the TV for the first time, there will show a wizard to guide you to finish the following initial settings:
Step 1: Select the menu language as you need.
Note: English (United States) is recommended. Illustrations within this publication are provided for reference only.
text_image
Welcome English(United States) Azerbaijan Bosanaki Čebina Dansk DeutschStep 2: (Only for some countries) Select whether or not to use and Android device to setup the TV.

text_image
Quickly set up your TV with your Android phone? You can easily transfer your Android phones WiFi network and Google Account to your TV
text_image
Google Quick Setup 1. On your Android Phone, open the pre-installed app "Google" 2. Type or say, "Ok Google, set up my device" 3. Tap PANASONIC TV/7821 on the listNote: If you don't want to use your Android device to setup the TV, you will skip to Step 3. If you want to use your Android device to setup the TV, please turn on the Bluetooth functions of your Android phone, then find and open "Google" application on your phone. Follow the instruction tips to set device.
Step 3: Select whether or not to connect your TV set to the Wi-Fi network.

text_image
Select your Wi-Fi network You can also connect an Ethernet cable to connect to the Internet. WIFI AUSU_astinf_rpn_4 SM_PUB SM_TEST_HK SM_TVTEST_04 WIFINote: If you have connected the TV to the WI-FI network, it will check for updates like Google service updates and so on. Then please select whether or not to sign in to your Google account.
Step 4: Read to accept the Google terms of service and privacy policy.

text_image
Did you know? Did you know that your TV has settings and that you can change them now, or later in Setting? How your TV uses location. You can allow apps and services to use your TV's location. Google may also collect and use location date to help provide and improve services that use location.Step 5: Select whether or not to let Google or third party to use your TV location.
text_image
Google Google Services Select each to learn more about each service, such as how to turn it on Accept or off later. Data will be used according to Google's Privacy Policy Click "Accept" to confirm your selection of these Google services settings. Use location How much we want with your permission is the location calculated from W. F. Google's called location data periodically and use the data in an emergency way to improve location security and better based services Help Improve Android Automatically sell diagnostic information in Google Services and your privacy Google Assistant sends services you list to a unique siteStep 6: Select whether or not to allow Google to help improve your Android TV.

text_image
Google Help improve Android Automatically send diagnostic information to Google, like crash reports and usage data from your device, apps, and Chromecast built-in. This information won't be used to identify you. You can adjust these permissions at any time from device settings. Learn more at: g.co/AndroidUsageHelp and g.co/cast/device_stats.
text_image
PICTURE OFF TIMER INPUT NETFLIX AUDIO LINK prime video APPS Google Play YouTube MENU EXIT BACK FAY OK OFFON Multi TEXT STTL 1 2 3 4 5 6 7 8 9 0 MEDIA PLAYER LAST VIEW Panasonic TVRemote Control Functions
Most of your television's functions are available via the menus that appear on the screen. The remote control supplied with your set can be used to navigate through the menus and to configure all the general settings.
POWER ⏻ (On/Off button) Turns the TV on or off
PICTURE ▶ To enter the picture mode.
OFF TIMER ⏻ To enter the sleep timer.
INPUT → To enter source selection interface
NETFLIX Goes to the NETFLIX homepage
AUDIO LINK Goes to the AUDIO LINK homepage
prime video Goes to the prime video homepage
■■ APPS To select the apps
Google Play Goes to the Google Play homepage
YouTube Goes to the YouTube homepage
Colour buttons Performs multiple operations which correspond to the operation guide displayed on the menu screen
MENU To open the settings menu
Goes to the smart TV homepage
Press to display the electronic programme guide
i Display to the information
OK Confirms your selection.
(up, down, left and right direction buttons) Highlights different items in the menu system and adjusts the menu controls.
EXIT ✗ To exit the program
BACK ← Exit the menu and return to the previous menu
OPTION Displays the options menu of selected functions
FAV To enter the channel list
(Mic) (Available only when the network connection is normal.)
To open the apps, move the apps or remove from favorites
To fast backward
▶ To play
▶ To fast forward

To end the running program

To pause

Start recording

Increases or decreases the volume
MUTE

To mute and un-mute the sound
TEXT

To show the picture and text
STTL

To show the subtitles

Channel up / down
0\~9
Select the digital key number
MEDIA PLAYER
To enter the media player
LAST VIEW

Return to the last program
text_image
MENU EXIT i OK BACK FAV OPTION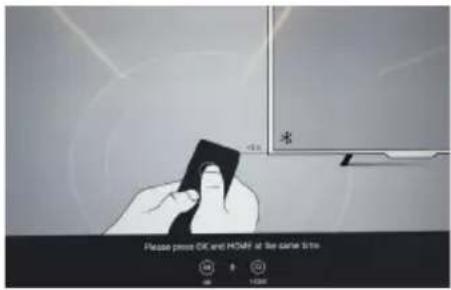
text_image
Please press OK and HORN at the same time.How to Pair Remote Control with the TV
This is a Bluetooth remote control, and before using it, please pair it with the TV firstly. The following steps are for your reference:
Step 1: Press button to enter the home page.
Step 2: Press button to enter the "RC pairing".
Step 3: Follow the "Settings tips" page, press OK and together.
Step 4: The screen will display "Pairing..." and the screen will display "Success!" after pairing is complete.
NOTE: If you wait more than 2 minutes and it can't pair, please repeat the above steps for pairing again.
If you want to unpair the Bluetooth remote, follow these steps:
Step 1: Press button to enter the home page.
Step 2: Press ▲/▼/◄/► to choose ⚙, and then press OK to enter.
Step 3: Press ▼ to select "Remotes & accessories" and then to choose the Bluetooth remote name to enter next steps.
Step 4: Press unpair and then choose OK button.
■ When remote control does not respond
- Press and hold the button as shown below for 3 seconds to reset remote control.

- Aim remote control reception and unpair by following below. Home > Setting > Remotes & accessories > RCU03 > Unpair
Using the TV controls
43/50/55/65-inch model
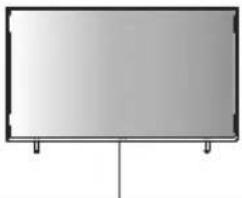
natural_image
Simple diagram of a blank rectangular panel with two side supports (no text or symbols)Indicators on the TV

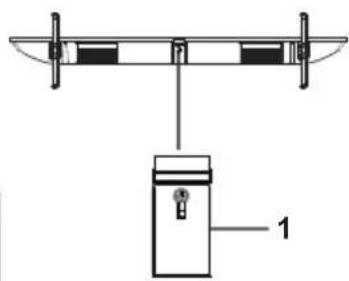
text_image
Technical diagram showing a mechanical or electrical component with labeled part '1'1 Power On/Power Off
2 Power LED
Red: Standby
- Green: On
3 Remote control signal receiver
75-inch model

natural_image
Simple diagram of a blank rectangular panel with two side supports (no text or symbols)Indicators on the TV


natural_image
Architectural cross-section diagram of a building facade with windows and doorways (no text or symbols)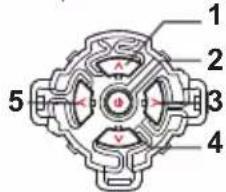
text_image
1 2 3 4 51 Channel Up
Cursor Up
• Makes selections in the menu system.
2 Displays [Menu]/Source Select/Mains power On/Off switch
• Turns the TV on or standby.
- The TV is on, press it, bring up the main menu or confirm selections in submenu.
- Before enter menu, long press it for 5 seconds to go to Standby.
3 Volume Down
Cursor Left
- Makes selections and/or adjustments when in the menu system.
4 Channel Down
Cursor Down
• Makes selections in the menu system.
5 Volume Up
Cursor Right
- Makes selections and/or adjustments when in the menu system.
6 Power LED
Red: Standby
Green: On
7 Remote control signal receiver
Watching External Inputs
1 Connect the external equipment.
(p. 12)
2 Display the [Input] menu, then select the input of the connected equipment.
![PANASONIC TX43LX700E - Display the [Input] menu, then select the input of the connected equipment. - 1](/content/2026/04/613838/images/c220a9da4226941a1936c141ff7c21251686612a3f3f3a7c1dd0d58084628c8e.jpg)
text_image
ATV CABLE ANTENNA SATELLITE AV HDMI 1 HDMI 2 HDMI 3 Android TV HomePress OK key only can access.
![PANASONIC TX43LX700E - Display the [Input] menu, then select the input of the connected equipment. - 2](/content/2026/04/613838/images/9349472fbadf96b284fc270ff27cfcff822bcdf285f228336102c00ad930a87f.jpg)
Note
- If the external equipment has an aspect adjustment function, set it to "16:9".
Note: This manual is for common use. Figures and illustrations in this User Manual are provided for reference only and may differ from actual product appearance. And for some models, certain options are not available.
You can select all the features from homepage.
Press to display homepage.
Press ▲/▼/◄/► to select icons from the screen list.
Press OK to enter each option.
To exit the APP, press ← or .
Google Assistant: Click to interact with Google Assistant of the TV.
Notifications: Remind you of system-critical information, such as low disk space, Google sign in or account errors, network connectivity issues, etc.
Input: Select the input source.
Settings: Access the system setting.
Apps: Show the list of favorite applications, or access the application center.
CUSTOMISE CHANNELS: Add and remove channels from your Home screen.
Note:
1) The functions and contents of "Home Page" may vary by different countries or models.
2) Before using network functions in home page like network applications and so on, please connect the TV to the network firstly.
3) Icon copyrights are owned by the application providers.
Using the Menu Functions
Using Quick Access Menu
Note: Some of the functions might be unavailable in certain sources. And for some models, certain options are not available.
This section explores the menus and settings of your TV. Each menu is outlined and detailed to help you get the most from your TV. To access the menu system:
- In TV mode, press OPTION remote control to display the quick access list.
- Press ▲/▼ to select the desired item, then press OK to open the corresponding submenu.
- In submenu, use ◀/▶ and OK buttons to make the adjustments, or use ▲/▼ to select an item, use OK to enter and operate according to the on-screen display or guide.
- Press to return to the previous menu.
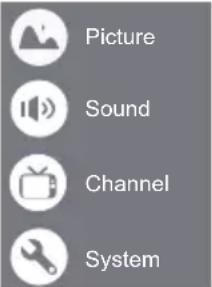
Option
Picture: Enter to adjust picture mode or advanced settings.
Sound: Select this option to set the sound adjustments.
Channel: Select this option to adjust the channel.
System: Select this option to adjust the settings.
text_image
Picture Sound Channel SystemPicture

text_image
Picture Sound Channel System Picture Mode Normal Backlight 100 ECO Setting High Aspect Ratio 16:9 Advanced SettingsPicture Mode: To select the mode of Normal, Dynamic, Filmmaker, Sport, Game and Custom.
Backlight: Select the level of 1-100.
ECO Setting: To select the Off, Low and High.
Aspect Ratio:
Displays the [Aspect Ratio] screen. Follow the operation guide to select the mode. [4:3] / [16:9] / Auto / Original.
Advanced Settings:
Color Temperature: To select the Normal, Warm, Cool.
Dynamic Contrast: To select ON or OFF.
HDMI PC/AV Mode: Auto
Overscan: To select ON or OFF.
Noise Reduction: To select Off, Low, Medium, High and Auto.
Picture Reset: To reset the picture.
Gamma: Select 2.2 or 2.4.
Motion Estimate and Motion Compensation (MEMC): To select Off, Low, Middle, and High.
Sound

text_image
Picture Sound Mode Normal Surround Mode Sound Night Mode Sound Only Channel Output Device Speaker Digital Output PCM System Advanced SettingsSound Mode: To select the mode of Standard, Speech, Music, Stadium and User.
Surround Mode: Select OFF/ Pure Sound/ Surround.
Night Mode: Select ON or OFF.
Sound Only: Select it and the TV screen will turn off in 10 seconds.
Output Device: To select the Speaker, SPDIF/Optical and HDMI-ARC.
Digital Output: Select the PCM/ByPass/Auto.
Advanced Settings:
- DAC-4 Dialogue Enhanced
- DAC-4 Dialogue Enhanced Level
- Balance
- Digital Audio Delay (ms)
- Digital Audio Volume
- eARC
- Sound Reset
Channel
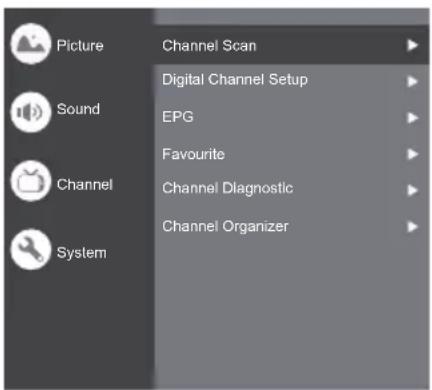
text_image
Picture Sound Channel System Channel Scan Digital Channel Setup EPG Favourite Channel Diagnostic Channel OrganizerNote: This function is only available in TV mode.
Channel Scan: Allows you to scan for all available analog and digital channels.
Digital Channel Setup:
To select the option to adjust the Subtitle Setup, Teletext Setup, Audio Setup, LCN, Auto Service Update, Update Scan.
EPG:
Press OK/▶ to enter the Program Guide menu.
Favourite:
Setup favourite channel list.
Channel Diagnostic:
Press OK/▶ to display some signal information on the current digital channel, such as signal strength, frequency, etc.
Channel Organizer:
This option allows you to organize channels.
System
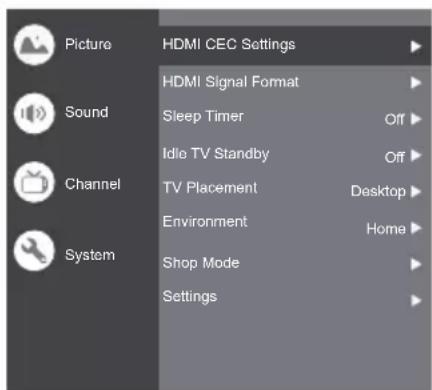
text_image
Picture Sound Channel System HDMI CEC Settings HDMI Signal Format Sleep Timer Idie TV Standby TV Placement Environment Shop Mode Settings Off Off Desktop HomeHDMI CEC Settings:
CEC control: To select On or Off.
Device Auto Power Off: To select On or Off.
Tv Auto Power On: To select On or Off.
CEC Device List: Turn devices on and select [Enable] to enable control of HDMI devices.
HDMI Signal Format: To select On or Off.
Idle TV Standby: To select After 1 hour of inactivity, After 2 hour of inactivity, After 4 hour of inactivity, After 24 hour of inactivity or Off.
TV Placement: To select Desktop and Wallmount.
Environment: To select Home and Shop.
Shop Mode: To select E-Sticker.
Settings:
- Lock: Click and lock the TV.
- Power: Turn the Wake On Network and Network Standby on or off.
- Recording Storage: Put the storage device and record the storage.
- Privacy Notice: The content about privacy notice.
- OSS License: The content about oss license.
The input
Press then press ▲/▼ to select your desired source, and then press OK to confirm.
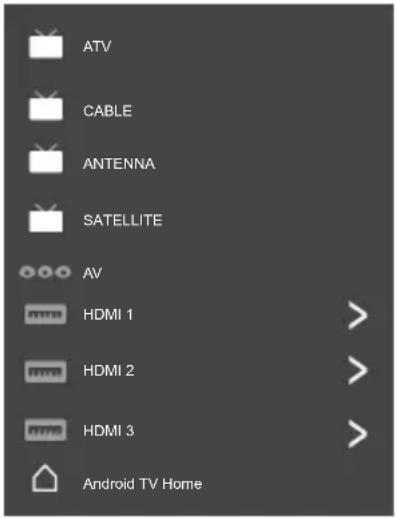
text_image
ATV CABLE ANTENNA SATELLITE AV HDMI 1 HDMI 2 HDMI 3 Android TV HomeChannels setup (ATV and CABLE)
text_image
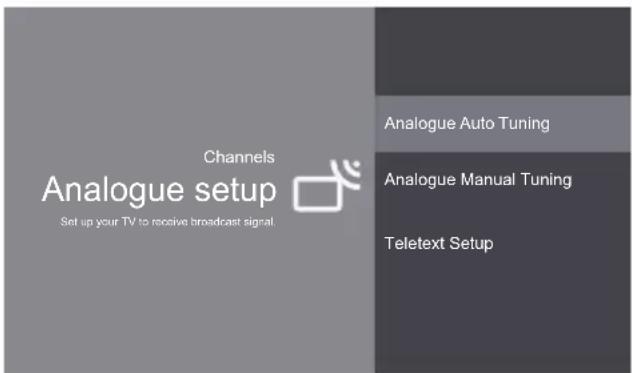
Channels Analogue setup Set up your TV to receive broadcast signal. Analogue Auto Tuning Analogue Manual Tuning Teletext SetupAnalogue setup: Select ATV and enter.
- Analogue Auto Tuning: Press OK to start the automatic search process. The search may take a few minutes.
- Analogue Manual Tuning: Press OK to enter the interface.
Press ▲/▼ to set program, TV system or color system item, then Press ▲/▼ select frequency and press OK to search channel.
- Teletext Setup: Press OK and then use ▲/▼ to select preferred teletext.
text_image
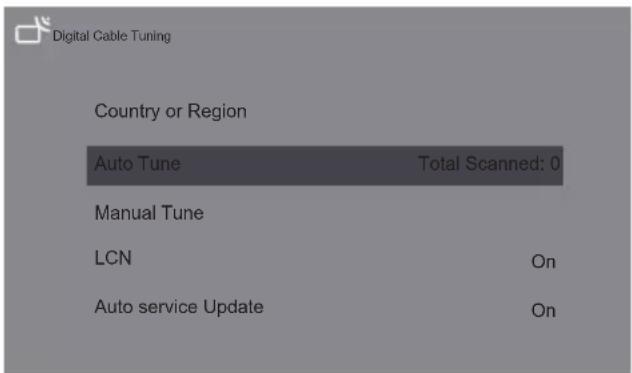
Digital Cable Tuning Country or Region Auto Tune Total Scanned: 0 Manual Tune LCN On Auto service Update OnDigital Cable Tuning: Select Cable and enter.
Auto Tune: Press OK to start the automatic search process. The search may take a few minutes. During the process, you can press Back choose YES to exit.
Manual Tune: Select the channel number and start to scan
LCN: Select On or Off.
Auto service Update: Select On or Off.
TV Settings
Press 🏠 then press ▲/▼ to select your desired settings, and then press OK to confirm.
Settings
General Settings

Network & Internet No network connected

Accounts & sign-in No accounts

Apps

Device Preferences

Remotes & accessories
General Settings:
Network & Internet: Connect the network.
See all
Other options
Add new network
Scanning always available
Let Google's location service and other apps scan for networks, even when Wi-Fi is off.
Ethernet
Ethernet
Connected
Proxy settings: HTTP proxy is used by the browser but may not be used by other apps.
IP settings: To use DHCP or Static
Accounts & sign-in: To sign in the accounts.
Apps:
See all apps
App permissions
Special app access
Security & restrictions
Device Preferences

About

Date & time

Language

Keyboard

Display & Sound

Storage

Home screen

Google Assistant

Chromecast built-in

Screen saver

Energy saver

Location

Usage & diagnostics

Accessibility

Reboot
About: The information of this TV.
Date & time: Adjust date and time.
Language: Select the language.
Keyboard: Select and adjust keyboard
Display & Sound: Adjust display and sound.
Storage: Check the device storage.
Home screen: Customize channels, reorder apps and open source licenses
Google Assistant: To use the Google Assistant.
Chromecast built-in: To use the Chromecast built-in.
Screen saver: Select the mode of Screen saver.
Energy saver: To turn off display.
Location: To estimate location.
Usage & diagnostics: Automatically send diagnostic information to Google, like crash reports and usage data from your device, apps, and Chromecast built-in.
Accessibility:
Captions
High contrast text
(Experimental)
Text to speech
Accessibility shortcut
Services
TalkBack
Off
Switch Access
Off
TVserviceManager
On
Reboot: To reboot the TV.
Remotes & accessories
To searching for accessories...
(Before pairing your Bluetooth devices, make sure they're in pairing mode)
Using Media Player
Media Player allows you to enjoy photo, music or video recorded on a USB Flash Memory.
- The picture may not appear correctly on this TV depending on the digital cameras used.
- Display may take some time when there are many files and folders in the USB Flash Memory.
- Partly degraded files might be displayed at a reduced resolution.
- The folder and file names may be different depending on the digital camera used.
Inserting / Removing the USB Flash Memory

text_image
TV • Insert or remove straight and completely. 5V 900mA MAX 5V 500mA MAXStarting Media Player
1 Insert the USB Flash Memory.
2 Select the mode.
Select
Access
[Document]: Displays the thumbnail of all documents in the USB Flash Memory.
[Photo]: Displays the thumbnail of all photos in the USB Flash Memory.
[Music]: Displays the thumbnail of music folders in the USB Flash Memory.
[Video]: Displays the thumbnail of video titles in the USB Flash Memory.
[Disk]: Displays the thumbnail of all documents in the USB Flash Memory.
[Contents Display]
Follow the operation guide to perform available operations.
When the cursor stays on the icon, it displays the information of the highlighted content.
Document Video Photo Music Disk
![PANASONIC TX43LX700E - [Contents Display] - 1](/content/2026/04/613838/images/2676bb97467f193a837947dd0108710a31abadf75eec6d2b010ffdf37da2b5ff.jpg)
natural_image
Six identical empty white rectangular boxes arranged in a 2x2 grid on a dark background (no text or symbols)Document:
- Select Document icon.
- Press up, down, left or right direction button to select your desired file and press OK to play.
- Use OK key to see more option: ZOOM+, ZOOM-.
- Press return key of remote to stop playing.
Video:
- Select Video icon, then press OK button to view movie file.
- Press up, down, left or right direction button to select your desired file and press OK to play.
- While playing a Video, press the OPTION to display the play console. For the Play console, Press OK key of remote to play and pause the video file. Left key of remote to fast backward. Right key of remote to fast forward.
- Use OPTION see more option: Photo scale, Looping mode, Subtitle, Subtitle code, Audio track, information and video list.
- Press return key of remote to stop playing and press return again to exit.
Photo:
- Select Picture icon, then press OK button to view the picture.
- Press up, down, left or right direction button to select your desired picture file and press OK to show.
- While showing picture, press OK to display the play console. For previous and next use remote left and right key.
- Use OK key to see more option: Left rotation, Right rotation, ZOOM+, ZOOM-, Manual play/Auto play, Information, Play mode, Play interval, BGM: On or Off.
Music:
- Select Music icon, then press OK button to listen to music.
- Press up, down, left or right direction button to select your desired file and press OK to play.
-
The Play console includes Previous, Play/Pause, Fast backward/Fast forward, Next.
Press KEY to see play list and video list. -
Press return key of remote to stop playing.
Disk:
- Select Disk icon, then press OK button to choose folder.
- Press up, down, left or right direction button to select your desired file and press OK to play.
- Press return key of remote to stop playing.
Additional Information
Auto power standby function
The TV will automatically go into Standby mode in the following conditions:
• No signal is received for 15 minutes.
• [Sleep timer] is active in the [System] menu (p. 19).
Input signal that can be displayed
| Signal name HDMI | |
| 525 (480)/60i, 60p | ○ |
| 625 (576)/50i, 50p | ○ |
| 750 (720)/60p, 50p | ○ |
| 1,125 (1,080)/60i, 50i | ○ |
| 1,125 (1,080)/60p, 50p, 24p | ○ |
| 2,250 (2,160)/60p, 50p, 24p | ○ |
○ Mark: Applicable input signal
- Signals other than above may not be displayed properly.
- The above signals are reformatted for optimal viewing on your display.
HDMI connection
This TV incorporates HDMI ^™ technology. HDMI (high-definition multimedia interface) is the world's first complete digital consumer AV interface complying with a non-compression standard.
HDMI allows you to enjoy high-definition digital images and high-quality sound by connecting the TV and the equipment.
■ Applicable HDMI features
• Input audio signal:
2ch Linear PCM (sampling frequencies - 48 kHz, 44.1 kHz, 32 kHz)
• Input video signal:
→ "Input signal that can be displayed" (p. 16)
Match the output setting of the digital equipment.
USB Flash Memory
For playing back in Media Player
Format: FAT32
Compliance:
USB2.0 port: Supports only USB1.1 or USB2.0 standard.
USB3.0 port: Supports only USB1.1 or USB2.0 or USB3.0 standard.
Maximum USB capacity supported is 1TB.
Note
• Data modified with a PC may not be displayed.
- Do not remove the device while the TV is accessing data. Otherwise this can damage the device or TV.
- Do not touch the pins on the device.
- Insert the device in the correct direction. Otherwise this can damage device or TV.
- Electrical interference, static electricity, or erroneous operation may damage the data or device. Panasonic is not liable for any deterioration or damage of data or device during operations with the TV.
- It is recommended to connect the USB Flash Memory directly to the TV's USB port.
- Some USB devices or USB HUB may not be used with this TV.
- You cannot connect any devices by using the USB port.
- Additional information for USB devices may be on the following website. (English only)
http://panasonic.jp/support/global/cs/tv/
Troubleshooting
Before requesting service or assistance, please follow these simple guides to resolve the problem. If an error message appears, follow the message's instructions. If the problem still persists, please contact your local Panasonic dealer for assistance.
Screen
Red, blue, green or black spots on the screen.
This is the characteristic of liquid crystal panels. The liquid crystal panel is built with very high precision technology. Occasionally, a few non-active pixels may appear on the screen as points of red, green, blue or black. This does not affect the performance of your TV and it is not a quality problem.
Chaotic image, noisy.
→ Set [Noise reduction] in the [Picture] menu to remove noise (p. 18).
→ Check nearby electrical products (car, motorcycle, fluorescent lamp).
No image is displayed.
→ Check the settings of [Contrast] or [Brightness] in the [Picture] menu (p. 18).
→ Check the TV is in AV mode. If the TV is in AV mode, check the selected input mode match the output of the external equipment (p. 19).
Unusual image is displayed.
Turn the TV off with Mains power On/Off switch (p. 16), then turn it on again.
Pictures from equipment connected via HDMI are unusual.
- Check the HDMI cable is connected properly.
→Turn the TV and equipment off, then turn them on again.
→ Check an input signal from the equipment (p. 12).
→ Use equipment compliant with EIA/CEA-861/861D.
Sound
No sound is produced.
- Check the sound mute setting (p. 18) and volume.
Low level or distorted sound.
→ Sound signal reception may be deteriorated.
Sound output via HDMI connection is unusual.
→ Set the sound setting of the connected equipment to "2ch L.PCM".
General
The TV goes into Standby mode.
This TV is equipped with auto power standby function (p. 22).
The remote control does not work or is intermittent.
→ Replace the batteries (p. 10).
-Point the remote control directly at the remote control signal receiver of the TV (within about 7 m and 30 degree angle).
→ Situate the TV away from sunshine or block sources of bright light from shining on the remote control signal receiver of the TV.
Parts of the TV become hot.
Even if the temperature of parts of the front, top and rear panels has risen, these temperature rises do not cause any problems in terms of performance or quality.
The TV panel moves slightly when it is pushed with a finger.
Clattered sound might be heard.
→ There is some flexibility around the panel to prevent damage. This is not a malfunction.
Overcurrent error message appears.
The connected USB device might cause this error. Remove the device and turn the TV off with Mains power On/Off switch, then turn it on again.
- Check foreign objects are not inside the USB port.
Maintenance
First, remove the mains plug from the socket outlet.
Regular care
• Gently wipe the surface of the display panel, cabinet and pedestal by using a soft cloth.
- Wipe the mains plug with a dry cloth at regular intervals. Moisture and dust may lead to fire or electrical shock.
For stubborn dirt
First clean the dust on the surface. Dampen a soft cloth with clean water or diluted neutral detergent (1 part detergent to 100 parts water). Wring the cloth and wipe the surface. Finally, wipe away all the moisture.
Caution
- Do not use a hard cloth or rub the surface too hard as this could scratch the surface.
- Do not subject the TV's surfaces to water or detergent. Liquid inside the TV could lead to product failure.
- Do not subject the surfaces to insect repellent, solvent, thinner or other volatile substances. This may degrade surface quality or cause peeling of the paint.
- The surface of the display panel is specially treated and may be easily damaged. Take care not to tap or scratch the surface with your fingernail or other hard objects.
- Do not allow the cabinet and pedestal to make contact with a rubber or PVC substance for a long time. This may degrade surface quality.
Specifications
Model no.
43-inch model
TX-43LXW704 TX-43LXW724
50-inch model
TX-50LXW704 TX-50LXW724
55-inch model
TX-55LXW704 TX-55LXW724
65-inch model
TX-65LXW704 TX-65LXW724
75-inch model
TX-75LXW704 TX-75LXW724
Dimensions (W x H x D)
43-inch model
966.6 x 619 x 216.4 mm (With Pedestal)
966.6 x 566.7 x 88.6 mm (TV only)
50-inch model
1121.4 x 704.4 x 246.7 mm (With Pedestal)
1121.4 x 648.9 x 90 mm (TV only)
55-inch model
1236 x 774 x 247.9 mm (With Pedestal)
1236 x 718.2 x 89.9 mm (TV only)
65-inch model
1460.1 x 903.0 x 290.7 mm (With Pedestal)
1460.1 x 841.1 x 84.7 mm (TV only)
75-inch model
1673.2 x 1035.1 x 352.4 mm (With Pedestal)
1673.2 x 967.8 x 74.3 mm (TV only)
Mass
43-inch model
7.2 kg (With Pedestal)
7.0 kg (TV only)
50-inch model
9.9 kg (With Pedestal)
9.7 kg (TV only)
55-inch model
11.7 kg (With Pedestal)
11.5 kg (TV only)
65-inch model
17.8 kg (With Pedestal)
17.3 kg (TV only)
75-inch model
29.0 kg (With Pedestal)
28.0 kg (TV only)
Connection terminals
AV in
Mini, 1.0 V[p-p] (75 Ω)
EARPHONE
Mini, 150mV rms\~ 250mV rms
HDMI 1 / 2 / 3 input
TYPE A Connectors
USB
USB2.0 DC 5V, Max.500 mA
USB3.0 DC 5V, Max.900 mA
Speaker Output
43/50/55/65/75-inch model
Audio output
20 W (10 W + 10 W)
9 Systems
| Systems Function | |
| 1 PAL B, G | |
| 2 PAL I | |
| 3 PAL D, K Reception of broadcast | |
| 4 NTSC 4.43 | |
| 5 NTSC 3.58 | Playback from special |
| 6 PAL | VCR's or DVD |
| 7 PAL 60 Hz/5.5 MHz | Playback from special |
| 8 PAL 60 Hz/6.0 MHz | disc players and special |
| 9 PAL 60 Hz/6.5 MHz | VCR's or DVD |
Receiving channels (Analogue TV)
VHF BAND
| 2-12 (PAL) |
| 0-12 (PAL B AUST.) |
| 1-9 (PAL B N.Z.) |
| 1-12 (PAL) |
UHF BAND
| 21-69 (PAL G, H, I) |
| 28-69 (PAL B AUST.) |
| 13-57 (PAL D, K) |
Digital TV
| DVB-T/T2 Standard |
Aerial input
VHF / UHF
Operating conditions
Temperature
| 0 °C - 45 °C |
Humidity
| 20 % - 80 % RH (non-condensing) |
Note
- Design and Specifications are subject to change without notice. Mass and Dimensions shown are approximate.
Built-in wireless LAN
Standard compliance and Frequency range
| IEEE 802.11 a/b/g/n/ac |
| 2.4~2.5GHz and 5.15~5.825GHz |
Security
| Support for WPA/WPA2 |
Built-in Bluetooth
| Bluetooth V5.02.4~2.485GHz |
Note
- Design and Specifications are subject to change without notice. Mass and Dimensions shown are approximate.
- For more product information, please visit EPREL: https://eprel.ec.europa.eu.
EPREL registration number is available on https://eprel.panasonic.eu/product.
Oss License
This product incorporates the following software:
(1) The software developed independently by or for Panasonic Entertainment & Communication Co., Ltd.,
(1) The software owned by third party and licensed to Panasonic Entertainment & Communication Co., Ltd.,
(2) The software licensed under the GNU General Public License, Version 2.0 (GPL V2.0),
(3) The software licensed under the GNU LESSER General Public License, Version 2.1 (LGPL V2.1), and/or
(4) Open source software other than the software licensed under the GPL V2.0 and/or LGPL V2.1.
The software categorized as (3) - (5) are distributed in the hope that it will be useful, but WITHOUT ANY WARRANTY, without even the implied warranty of MERCHANTABILITY or FITNESS FOR A PARTICULAR PURPOSE. Please refer to the detailed terms and conditions thereof [System > Settings > Oss License]
At least three (3) years from delivery of this product, Panasonic will give to any third party who contacts us at the contact information provided below, for a charge no more than our cost of physically performing source code distribution, a complete machine-readable copy of the corresponding source code covered under GPL V2.0, LGPL V2.1 or the other licenses with the obligation to do so, as well as the respective copyright notice thereof.
Contact Information: osd-cd-request@gg.jp.panasonic.com
Disposal of Old Equipment and Batteries
Only for European Union and countries with recycling systems
These symbols on the products, packaging, and/or accompanying documents mean that used electrical and electronic products and batteries must not be mixed with general household waste.
For proper treatment, recovery and recycling of old products and used batteries, please take them to applicable collection points in accordance with your national legislation. By disposing of them correctly, you will help to save valuable resources and prevent any potential negative effects on human health and the environment.
For more information about collection and recycling, please contact your local authority. Penalties may be applicable for incorrect disposal of this waste, in accordance with national legislation.
Note for the battery symbol (bottom symbol):
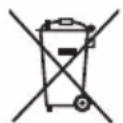
This symbol might be used in combination with a chemical symbol. In this case it complies with the requirement set by the Directive for the chemical involved.
Customer's Record
The model number and serial number of this product may be found on its rear panel. You should note this serial number in the space provided below and retain this book, plus your purchase receipt, as a permanent record of your purchase to aid in identification in the event of theft or loss, and for Warranty Service purposes.
Model Number ____
Serial Number
Kasutusjuhend
LED TELER
Eesti
Mudeli nr.
TX-43LX700E TX-43LX710E
natural_image
Front view of a modern black flat-screen TV with stand legs (no visible text or symbols)(kujutis: TX-50LX700E*)
Täname, et ostsite selle Panasonicu toote.
HE NC Advance™ Covered by patents at patentist.accessadvance.com
Dolby Audio
text_image
Diagram showing a TV-mounted device with a prohibition symbol indicating no protection.natural_image
Illustration of two workers exchanging a package with a handshake (no text or symbols)
Kasutustingimused
Ettevaatust
Patareid (AAA), 2 tk
→(Ik 10)

Toitejuhe
→(Ik 5)

Minipistikuga adapter
AV-adapter

Tugialus
43-tolline mude
• Montaažikruvid
A (ST4 × 20) × 4
Alus

50-tolline mude
• Montaažikruvid
A (ST5 × 25) × 4
Alus

55-tolline mudel
• Montaažikruvid
A (ST5 × 25) × 4
Alus

65-tolline mudel
• Montaažikruvid
A (M5 × 25) × 4
Alus

75-tolline mude
• Montaažikruvid
A (M6 × 35) × 4
Alus

text_image
Diagram showing cable installation with labeled components and a checkmark indicating inspection or status.
natural_image
Diagram of a TV set with cable and antenna connections, no text or symbols presentBlu-Ray pleier

flowchart
graph LR
    A["Teler"] --> B["HDMI 1/2/3"]
    B --> C["HDMI-kaabel"]
    C --> D["Blu-Ray pleier"]
text_image
Welcome English(United States) Azarkangam Bosanskii Čebirna Dansk Deutschtext_image
Quickly set up your TV with your Android phone? You can easily transfer your Android phone's Wi-Fi network and Google Account to your TV Continue Skip
text_image
Google Quick Setup 1. On your Android Phone, open the pre-installed app "Google" 2. Type or say, "OK Google, set up my device" 3. Tap PANASONIC TV(762) on the listtext_image
Select your Wi-Fi network You can also connect an Ethernet cable to connect to the internet. WIFI AUSU/output_rpn_4 SR_PUB SM_TEST_HK SM_TVTEST_04 WIFItext_image
Did you know? Did you know that your TV has settings and that you can change them now, or later in Setting? How your TV uses location. You can allow apps and services to use your TV's location. Google may also collect and use location date to help provide and improve services that use location.text_image
Google Google Services Select one below Select each to learn more about each service, such as how to turn it on Accept or off later. Data will be used according to Google's Privacy Policy. Click "Accept" to confirm your selection of these Google services settings. Use location Active Google requests with your permission to use online versioned from WiFi Google may selected locations displayed periodically and/or this data in an enterprise way to improve location security and better business settings. Help Improve Android Automatically and diagnostic information is Google Services and your privacy Google Authorized services you look for a unique codetext_image
Google Help improve Android Automatically send diagnostic information to Google, like crash reports and usage data from your device, apps, and Chromecast built-in. This information won't be used to identify you. You can adjust these permissions at any time from device settings. Learn more at: g.co/AndroidUsageHelp and g.co/cast/device_stats. Yes No
text_image
PICTURE OFF TIMER INPUT NETFLIX AUDIO LINK prime video APPS Google Play YouTube MENU EXIT BACK FAY OK OFFON Multi TEXT STTL 1 2 3 4 5 6 7 8 9 0 MEDIA PLAYER LAST VIEW Panasonic TVtext_image
Please press OK and Ⓞ/Shift at the same time.natural_image
Simple diagram of a blank rectangular board with two side supports (no text or symbols)Teleri näidikud


text_image
Technical diagram showing a mechanical assembly with labeled component 1natural_image
Architectural cross-section diagram of a building facade with windows and doorways (no text or symbols)
text_image
1 2 3 4 51 Kanal üles
Kursor üles
| Mini, 1,0 V [p-p] (75 Ω) |
KUULARID
| Mini, 150 mV rms, vahelduvvool, 250 mV rms |
HDMI 1 / 2 / 3 sisend
| A tüüpi pistmikud |
USB
| USB 2.0, alalisvool 5 V, max 500 mA |
| USB 3.0, alalisvool 5 V, max 900 mA |
Kõlari väljund
43/50/55/65/75-tolline mudel
| 2–12 (PAL) |
| 0–12 (PAL B AUST.) |
| 1–9 (PAL B N.Z.) |
| 1–12 (PAL) |
UHF-sagedusriba
| 21–69 (PAL G, H, I) |
| 28–69 (PAL B AUST.) |
| 13–57 (PAL D, K) |
Digi-TV
DVB-T/T2 standardne
Antennisisend
VHF / UHF
Kasutustingimused
Temperatuur
| 0 °C - 45 °C |
Niiskus
| 20% - 80% RH (kondenseerumata) |
Märkus
natural_image
Front view of a black rectangular TV with stand legs (no visible text or symbols)HE NC Advance™ Covered by patents at patent list.accessadvance.com
Dolby Audio
text_image
Diagram showing a device with a label pointing to a screen, likely illustrating a process or operation.СІ модул

text_image
Diagram showing a device with a prohibition symbol indicating no protection or disapproval.natural_image
Illustration of two workers exchanging a package with a magnified inset showing hand gesture (no text or symbols)Условия за употреба
Внимание
text_image
Diagram showing electrical connections between a device with labeled components and a checkmark indicator.
natural_image
Diagram of a TV setup with antenna, cable, and wiring connections (no text or symbols)Blu-Ray плейър

text_image
Quickly set up your TV with your Android phone? You can easily transfer your Android phone's WiFi network and Google Account to your TV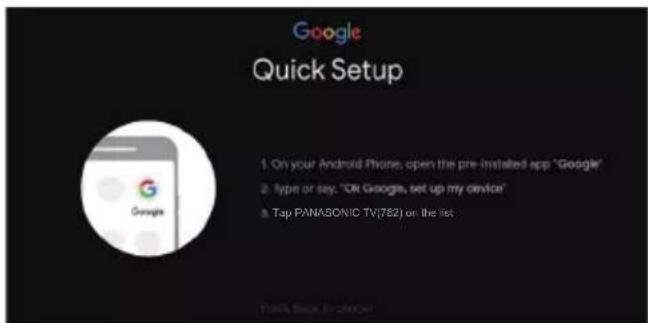
text_image
Google Quick Setup 1. On your Android Phone, open the pre-installed app "Google" 2. Type or say, "OK Google, set up my device" 3. Top PANASONIC TV(T82) on the listtext_image
Select your Wi-Fi network You can also connect an Ethernet cable to connect to the Internet. WIFI AUSU_asml_rpt_4 SM_PUB SM_TEST_HK SM_TVTEST_34 WIFItext_image
Did you know? Did you know that your TV has settings and that you can change them now, or later in Setting? How your TV uses location. You can allow apps and services to use your TV's location. Google may also collect and use location date to help provide and improve services that use location.text_image
Google Google Services Select each to learn more about each service, such as how to turn it on Accept or off later. Data will be used according to Google's Privacy Policy. Click "Accept" to confirm your selection of these Google services settings. Sood one below Use location Allow Google and apps with your permission is one location connected from WiFi Google in any selected location data periodically and use this data on an application way to improve location security and location settings Help improve Android Automatically best diagnostic information to Google Services and your privacy Google Assistant sends services you let to a service usertext_image
Google Help improve Android Yes No Automatically send diagnostic information to Google, like crash reports and usage data from your device, apps, and Chromecast built-in. This information won't be used to identify you. You can adjust these permissions at any time from device settings. Learn more at: g.co/AndroidUsageHelp and g.co/cast/device_stats.
text_image
PICTURE OFF TIMER INPUT NETFLIX AUDIO LINK prime video APPS Google Play YouTube MENU EXIT BACK FAY OK OFFON Multi TEXT STTL 1 2 3 4 5 6 7 8 9 0 MEDIA PLAYER LAST VIEW Panasonic TVtext_image
Please press OK and HOME at the same time.natural_image
Simple diagram of a blank rectangular panel with two side supports (no text or symbols)natural_image
Technical diagram of a mechanical device with two vertical supports and a labeled component (no text or symbols present)natural_image
Simple diagram of a blank rectangular panel with two side supports (no text or symbols)natural_image
Architectural cross-section diagram of a building facade with windows and doorways (no text or labels)
text_image
1 2 3 4 5natural_image
Front view of a black rectangular TV displaying flat screen and stand (no visible text or symbols)Covered by patents at patentist.accessadvance.com

Dolby Audio
natural_image
Diagram showing a device with an arrow pointing to a screen (no text or symbols present)Modul Cl
text_image
Diagram showing a monitor with a prohibition symbol indicating no protection or prohibition in the front panel.Panasonic Testing Centre
Panasonic Marketing Europe GmbH
natural_image
Illustration of two workers exchanging a package with a magnified inset showing hand gesture (no text or symbols)
Warunki użytkowania
Przestroga
text_image
Diagram showing electrical connections with labeled components and a checkmark indicator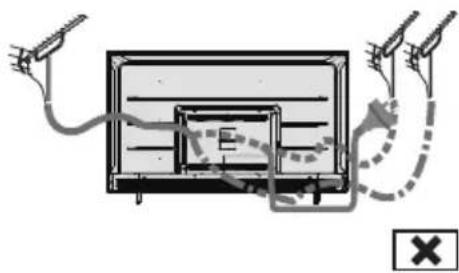
text_image
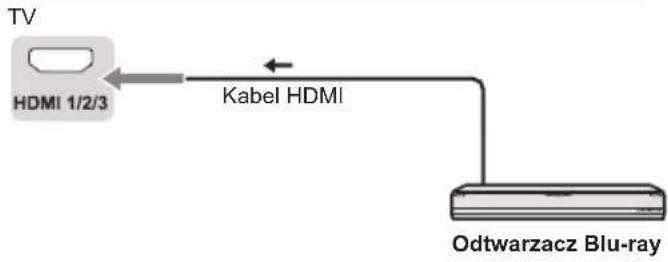
Diagram showing a monitor with labeled components and signal paths, including a cross symbol indicating cancellation or error.Odtwarzacz Blu-ray
flowchart
graph LR
    TV["TV"] -->|HDMI 1/2/3| Kabel["Kabel HDMI"]
    Kabel --> Odtwarzacz["Odtwarzacz Blu-ray"]
text_image
Quickly set up your TV with your Android phone? You can easily transfer your Android phone's WiFi network and Google Account to your TV Continue Skip
text_image
Google Quick Setup 1. On your Android iPhone, open the pre-installed app "Google" 2. Type or say: "Ok Google, set up my device" 3. Tap PANASONIC-TV/821 on the listtext_image
Select your Wi-Fi network You can also connect an Ethernet cable to connect to the internet. WIFI AUSUasted_rpi_4 SN_PUB SN_TEST_HK SN_TVTEST_S4 WIFItext_image
Did you know? Did you know that your TV has settings and that you can change them now, or later in Setting? How your TV uses location. You can allow apps and services to use your TV's location. Google may also collect and use location date to help provide and improve services that use location.text_image
Google Google Services Select one below Select each to learn more about each service, such as how to turn it on Accept or off later. Data will be used according to Google's Privacy Policy. Click "Accept" to confirm your selection of these Google services settings. Use location Allow Google and agree with your preferences to use location estimated from other Google's only selected location data periodically and use the data in an anonymous way to improve location security and better access services Help improve Android Automatically send diagnostic information to Google Services and your privacy Google Assistant sends services you talk to a service centertext_image
Google Help improve Android Automatically send diagnostic information to Google, like crash reports and usage data from your device, apps, and Chromecast built-in. This information won't be used to identify you. You can adjust these permissions at any time from device settings. Learn more at g.co/AndroidUsageHelp and g.co/cast/device_stats.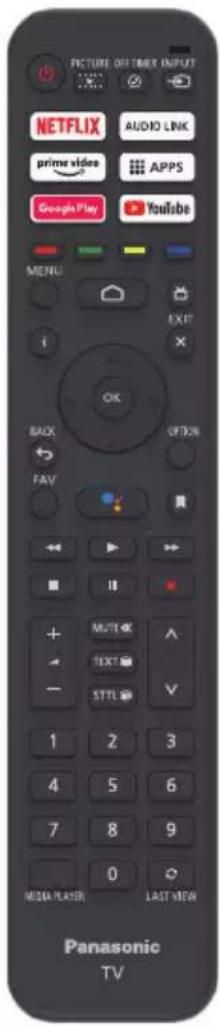
text_image
PICTURE OFF TIMER INPUT NETFLIX AUDIO LINK prime video APPS Google Play Youtube MENU EXIT BACK FAV OK NEXT OPTION Multi OK TEXT STTL 1 2 3 4 5 6 7 8 9 0 MEDIA PLAYER LAST VIEW Panasonic TVFunkcje pilota
text_image
Please press OK and HOME at the same time.natural_image
Pure technical line drawing of a structural beam or support structure without any text, numbers, or symbols
natural_image
Architectural cross-section diagram of a two-story building facade with windows and doorways (no text or symbols)
text_image
1 2 3 4 5natural_image
Six white rectangular outlines arranged in two rows on a dark background (no text or symbols)Dokument:
Mini, 1,0 V[p-p] (75 Ω)
EARPHONE
Mini, 150 mV–250 mV rms
Wejście HDMI 1/2/3
Gniazda TYP A
USB
USB2.0 5 V DC, maks. 500 mA
USB3.0 5 V DC, maks. 900 mA
Wyjście głośników
natural_image
Front view of a black rectangular TV displaying flat screen and stand (no visible text or symbols)(på billedet: TX-50LX700E*)
Covered by patents at patentist.accessadvance.com

Dolby Audio
text_image
Diagram showing a TV mounted on a stand with a prohibition symbol indicating no protection.Panasonic Testing Centre
Panasonic Marketing Europe GmbH
Winsbergring 15, 22525 Hamburg, Tyskland

natural_image
Illustration of two workers exchanging a package with a magnified inset showing hand gesture (no text or symbols)
Brugsforhold
Forsigtig
text_image
Diagram showing electrical connections with labeled components and a checkmark indicator
text_image
Diagram showing cable routing between a monitor and two surveillance cameras, with a warning symbol indicating cancellation.BluRay-afspiller

flowchart
graph LR
    TV["TV"] -->|HDMI 1/2/3| HDMI-kabel["HDMI-kabel"]
    HDMI-kabel <-->|HDMI-kabel| BluRay-afspiller["BluRay-afspiller"]
Set top-boks
flowchart
graph LR
    TV["TV"] -->|HDMI 1/2/3| HDMI_kabel["HDMI-kabel"]
    HDMI_kabel <-->|Set top-boks| Parabol["Parabol"]
AV-/Spiludstyr
flowchart
graph LR
    A["TV"] --> B["HDMI 1/2/3"]
    B <--> C["HDMI-kabel"]
    C --> D["Udstyr"]
    E["Tilslutning af TV'et"] --> F["TV"]
    F --> G["AV in"]
    G --> H["Mini AV-kabel"]
    I["Brug af HDMI-terminal"] --> J["Brug af AV-terminaler"]
    K["Udstyr"] --> L["↓"]
    M["↓"] --> N["Mini AV-kabel"]
Højttalersystem
text_image
Quickly set up your TV with your Android phone? You can easily transfer your Android phone's Wi-Fi network and Google Account to your TV Continue Skip
text_image
Google Quick Setup 1. On your Android Phone, open the pre-installed app "Google" 2. Type or say, "OK Google, set up my device" 3. Tap PANASONIC TV(762) on the listtext_image
Select your Wi-Fi network You can also connect an Ethernet cable to connect to the internet. WIFI AUSU.asml_rpl_4 SM_PUB SM_TEST_HK SM_TVTEST_34 WIFItext_image
Did you know? Did you know that your TV has settings and that you can change them now, or later in Setting? How your TV uses location. You can allow apps and services to use your TV's location. Google may also collect and use location date to help provide and improve services that use location.text_image
Google Google Services Select each to learn more about each service, such as how to turn it on Accept or off later. Data will be used according to Google's Privacy Policy Click "Accept" to confirm your selection of these Google services settings. Select one below Use location Allow Google and access with your privacy for the location estimated from We Google may received locations previously and/or the file data for an acceptance way to improve locals accessing and maintaining local services Help improve Android Automatically post-disgoative information to Google Services and your privacy Google Assistant works to you talk for a unique issuetext_image
Google Help improve Android Automatically send diagnostic information to Google, like crash reports and usage data from your device, apps, and Chromecast built-in. This information won't be used to identify you. You can adjust these permissions at any time from device settings. Learn more at: g.co/AndroidUsageHelp and g.co/cast/device_stats. Yes No
text_image
PICTURE OFF TIMER INPUT NETFLIX AUDIO LINK prime video APPS Google Play Youtube MENU EXIT BACK FAV OK NEXT OPTION Multi OK TEXT STTL 1 2 3 4 5 6 7 8 9 0 MEDIA PLAYER LAST VIEW Panasonic TVPICTURE ▶ Åbner billedtilstand.
OFF TIMER ⏻ Åbner autosluk-timeren.
text_image
Please press OK and HOME at the date time.natural_image
Simple diagram of a blank rectangular board with two side supports (no text or symbols)text_image
Technical diagram of a mechanical device with labeled component 11 Tænd/sluk
2 LED-kontrollampe
Rød: Standby
Grøn: Til
natural_image
Simple diagram of a blank rectangular panel with two side supports (no text or symbols)natural_image
Architectural cross-section diagram of a two-story building facade with windows and doors (no text or symbols)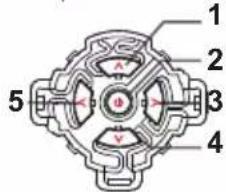
text_image
1 2 3 4 51 Kanal op
Markør op
• Foretager valg i menusystemet.
natural_image
Six white rectangular outlines arranged in two rows on a dark background (no text or symbols)Dokument:
Mini, 1,0 V[p-p] (75 Ω)
HOVEDTELEFONER
Mini, 150 mV rms-250 mV rms
HDMI-indgang 1 / 2 / 3
TYPE A-stik
USB
| 2-12 (PAL) |
| 0-12 (PAL B AUST.) |
| 1-9 (PAL B N.Z.) |
| 1-12 (PAL) |
UHF-BÅND
| 21-69 (PAL G, H, I) |
| 28-69 (PAL B AUST.) |
| 13-57 (PAL D, K) |
Digital TV
DVB-T/T2-standard
Antenneindgang
VHF / UHF
Driftsforhold
Temperatur
| 0 °C - 45 °C |
Luftfugtighed
| 20 % - 80 % RH (ikke-kondenserende) |
Bemærk
natural_image
Front view of a black rectangular TV with stand legs (no visible text or symbols)Covered by patents at patentist.accessadvance.com

Dolby Audio
text_image
Diagram showing a device with a label pointing to a screen, likely illustrating a software interface or installation.CI-Modul
text_image
Diagram showing a device with a prohibition symbol indicating no protection or disapproval.Panasonic Testing Centre
Panasonic Marketing Europe GmbH
Winsbergring 15, D-22525 Hamburg, Deutschland

natural_image
Illustration of two workers exchanging a package with a handshake (no text or symbols)
Einsatzbedingungen
Vorsicht
natural_image
Diagram of a flat-screen TV with screw and cable attachment, showing internal structure and mounting bracket (no text or symbols)text_image
Diagram showing electrical connections with labeled components and a checkmark indicator
natural_image
Diagram of a solar panel installation with two antennas and connecting wires (no text or labels)
Blu-Ray-Player
Fernsehgerät
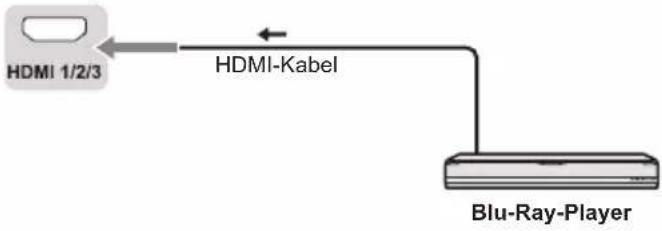
flowchart
graph LR
    A["HDMI 1/2/3"] --> B["HDMI-Kabel"]
    B --> C["Blu-Ray-Player"]
AV / Gaming-Gerät
text_image
Welcome English(United States) Apostojecan Rosanskii Četima Danak Deutschtext_image
Quickly set up your TV with your Android phone? You can easily transfer your Android phone's WiFi network and Google Account to your TV Continue Skip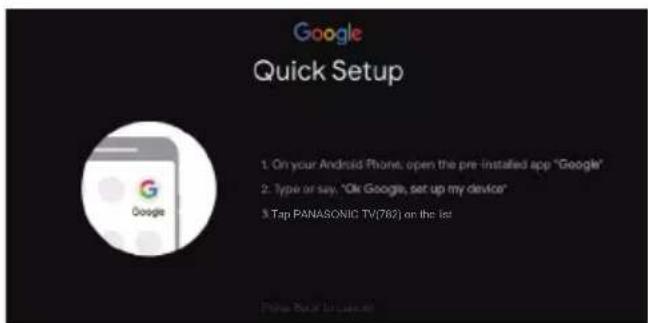
text_image
Google Quick Setup 1. On your Android Phone, open the pre-installed app "Google" 2. Type or say, "Ok Google, set up my device" 3. Tap PANASONIC TV(782) on the listtext_image
Select your Wi-Fi network You can also connect an Ethernet cable to connect to the internet. WIFI AUSU_sainl_rpn_4 SM_PUB SM_TEST_HK SM_TVTEST_04 WIFItext_image
Did you know? Did you know that your TV has settings and that you can change them now, or later in Setting? How your TV uses location. You can allow apps and services to use your TV's location. Google may also collect and use location date to help provide and improve services that use location.text_image
Google Google Services or off later. Data will be used according to Google's Privacy Policy. Click "Accept" to confirm your selection of these Google services settings. Select one below AcceptSelect each to learn more a Use location Use enough resources and provides the use location estimated from WiFi Google may created location data partially only and use this data in an enterprise way to improve locations activity and further selected sites Help improve Android Automatically send diagnostic information to Google Services and your privacy Google Analyzed tools, services your list to a unique codetext_image
Google Help improve Android Automatically send diagnostic information to Google, like crash reports and usage data from your device, apps, and Chromecast built-in. This information won't be used to identify you. You can adjust these permissions at any time from device settings. Learn more at: g.co/AndroidUsageHelp and g.co/cast/device_stats. Yes No
text_image
PICTURE OFF TIMER INPUT NETFLIX AUDIO LINK prime video APPS Google Play YouTube MENU EXIT BACK ON FAV Multi TEXT STTL 1 2 3 4 5 6 7 8 9 0 MEDIA PLAYER LAST VIEW Panasonic TVtext_image
Please press OK and HOURS of the same time.natural_image
Simple diagram of a blank rectangular panel with two side supports (no text or symbols)natural_image
Technical diagram of a mechanical device with a labeled component (no text or symbols present)1 Ein-/Ausschalten
2 Betriebs-LED
natural_image
Simple diagram of a blank rectangular panel with two side supports at the bottom (no text or symbols)natural_image
Architectural cross-section diagram of a building facade with windows and doorways (no text or labels)
text_image
1 2 3 4 51 Kanal aufwärts
Cursor aufwärts
natural_image
Six identical empty rectangular boxes arranged in a 2x2 grid on a dark background (no text or symbols)Dokument:
natural_image
Front view of a modern black flat-screen TV with stand legs (no visible text or symbols)(illustration : TX-50LX700E*)
text_image
HE NC Advance™ Covered by patents at patent list access advance.comDolby Audio
text_image
Diagram showing a monitor with a prohibition symbol indicating no protection or prohibition in the front panel.Panasonic Testing Centre
Panasonic Marketing Europe GmbH
Winsbergring 15, D-22525 Hamburg, Allemagne

natural_image
Illustration of two workers exchanging a package with a magnified inset showing hand gesture (no text or symbols)text_image
Antenne Câble RF ANTtext_image
Diagram showing electrical connections with labeled components and a checkmark indicator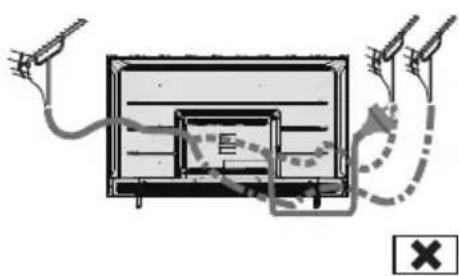
natural_image
Diagram of a basketball court with two cameras and a marked gate, showing no text or symbolsLecteur Blu-Ray
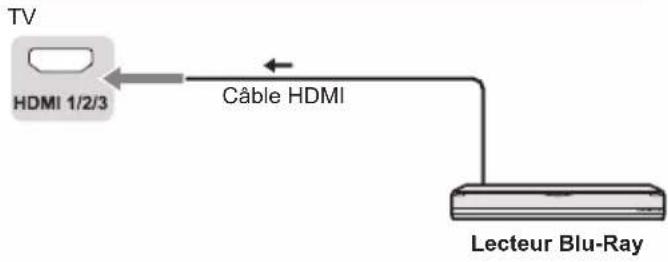
text_image
Quickly set up your TV with your Android phone? You can easily transfer your Android phone's WiFi network and Google Account to your TV Continue Skip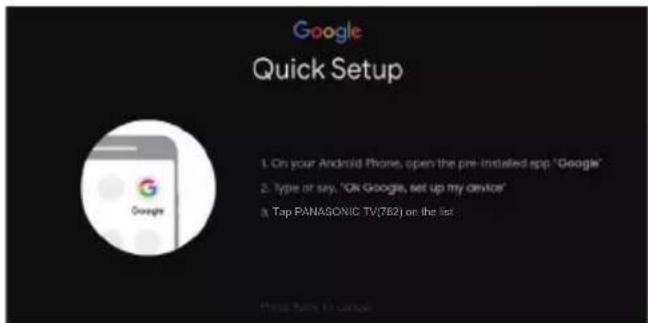
text_image
Google Quick Setup 1. On your Android Phone, open the pre-installed app "Google" 2. Type or say, "OK Google's set up my device" 3. Tap PANAGONIC TV(762) on the listtext_image
Select your Wi-Fi network You can also connect an Ethernet cable to connect to the Internet. WIFI AUSU_astril_ipri_4 SM_PUB SM_TEST_HK SM_TVTEST_04 WIFItext_image
Did you know? Did you know that your TV has settings and that you can change them now, or later in Setting? How your TV uses location. You can allow apps and services to use your TV's location. Google may also collect and use location date to help provide and improve services that use location.text_image
Google Google Services Select each to learn more about each service, such as how to turn it on Accept or off later. Data will be used according to Google's Privacy Policy. Click "Accept" to confirm your selection of these Google services settings. Use location After Google's privacy with your permission is use locations estimated from W. F. Google's collected location data periodically and use this data in an emergency way to improve location service and other business services Help Improve Android automatically oral diagnostics information to Google Services and your privacy Google Assistant needs services you tell to a unique 2016text_image
Google Help improve Android Automatically send diagnostic information to Google, like crash reports and usage data from your device, apps, and Chromecast built-in. This information won't be used to identify you. You can adjust these permissions at any time from device settings. Learn more at: g.co/AndroidUsageHelp and g.co/cast/device_stats.
text_image
PICTURE OFF TIMER INPUT NETFLIX AUDIO LINK prime video APPS Google Play Youtube MENU EXIT BACK FAV OK NEXT OPTION Multi OK TEXT STTL 1 2 3 4 5 6 7 8 9 0 MEDIA PLAYER LAST VIEW Panasonic TVtext_image
Please press OK and HOME at the same time.natural_image
Technical diagram of a mechanical device with a labeled component (no text or symbols present)natural_image
Architectural cross-section diagram of a two-story building facade with windows and doorways (no text or symbols)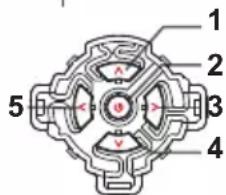
text_image
1 2 3 4 5Gestion des services TV
Activé
natural_image
Six identical empty rectangular boxes arranged in a 2x2 grid on a dark background (no text or symbols)Document :
Dimensions (L x H x P)
Modèle 43 pouces
natural_image
Front view of a modern black TV with stand legs (no visible text or symbols)HE NC Advance™ Covered by patents at patent list access advance.com
Dolby Audio
text_image
Diagram showing a TV screen with a prohibition symbol indicating no restrictionsPanasonic Testing Centre
Panasonic Marketing Europe GmbH
Winsbergring 15, D-22525 Hampuri, Saksa

natural_image
Illustration of two workers exchanging a package with a magnified inset showing hand gesture (no text or symbols)
Käyttöehdot
Varoitus
text_image
Diagram showing cable installation with labeled components and a checkmark indicating approval or verification.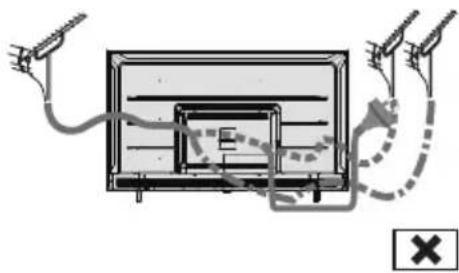
natural_image
Diagram of a TV set with cable and antenna connections, no text or symbols presentBlu-ray-soitin

flowchart
graph LR
    TV["TV"] -->|HDMI 1/2/3| HDMI_kaapeli["HDMI-kaapeli"]
    HDMI_kaapeli -->|HDMI-kaapeli| Blu-ray-soitin["Blu-ray-soitin"]
Digisovitin
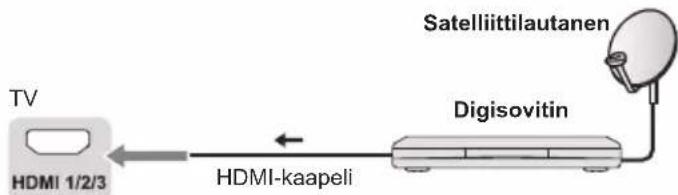
flowchart
graph LR
    TV["TV"] -->|HDMI 1/2/3| HDMI1["HDMI 1/2/3"]
    HDMI1 -->|HDMI-kaapeli| next_to_next_to_Digisovitin["Digisovitin"]
    next -->|Satelliittilautanen| Satellite["Satelliittilautanen"]
AV-/pelilaitteisto

text_image
Quickly set up your TV with your Android phone? You can easily transfer your Android phones WiFi network and Google Account to your TV Continue Stop
text_image
Google Quick Setup 1. On your Android Phone, open the pre-installed app "Google" 2. Type or say, "On Google, set up my device" 3. Tap PANASONIC TV/821 on the listtext_image
Select your Wi-Fi network You can also connect an Ethernet cable to connect to the Internet. WIFI AUSU_asterl_ipri_4 SM_PUB SM_TEST_HK SM_TVTEST_04 WIFItext_image
Did you know? Did you know that your TV has settings and that you can change them now, or later in Setting? How your TV uses location. You can allow apps and services to use your TV's location. Google may also collect and use location date to help provide and improve services that use location.text_image
Google Google Services Select each to learn more about each service, such as how to turn it on Accept or off later. Data will be used according to Google's Privacy Policy. Click "Accept" to confirm your selection of these Google services settings. Use location How Google is easy to use your permission to one location estimated from the Google's colored location data periodically and use this data in an engines way to improve location security and better based services Help Improve Android Automatically use diagnostics information to Google Services and your privacy Google Assistant needs services you tell to a unique 2018text_image
Google Help improve Android Automatically send diagnostic information to Google, like crash reports and usage data from your device, apps, and Chromecast built-in. This information won't be used to identify you. You can adjust these permissions at any time from device settings. Learn more at g.co/AndroidUsageHelp and g.co/cast/device_stats.
text_image
FACTURE OS TIMES INPUT NETFLIX AUDIO LINK prime video APPS Google Play Youtube MENU EXIT BACK OFF FAV Multi TEXT STTL 1 2 3 4 5 6 7 8 9 0 MEDIA PLAYER LAST VIEW Panasonic TVtext_image
Please press OK and HOME at the same timenatural_image
Simple diagram of a blank rectangular panel with two side supports (no text or symbols)TV:n merkkivalot


text_image
Technical diagram of a mechanical device with labeled component 1natural_image
Simple diagram of a blank rectangular panel with two side supports (no text or symbols)TV:n merkkivalot
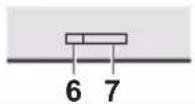

natural_image
Architectural cross-section diagram of a two-story building facade with windows and doors (no text or symbols)
text_image
1 2 3 4 51 Kanava ylös
Kohdistin ylös
Mini, 1,0 V[p-p] (75 Ω)
KUULOKKEET
Mini, 150 mV rms\~ 250 mV rms
natural_image
Front view of a modern black flat-screen TV with stand legs (no visible text or symbols)Covered by patents at patentist accessadvance.com

Dolby Audio
text_image
Diagram showing a TV screen with a prohibition symbol indicating no restrictionsPanasonic Testing Centre
Panasonic Marketing Europe GmbH
natural_image
Illustration of two workers exchanging a package with a magnified inset showing hand gesture (no text or symbols)text_image
Diagram showing electrical connections between a device with labeled components and a checkmark indicator.
natural_image
Diagram of a TV set with antenna cables and signal paths, no text or symbols presentBlu-Ray speler

flowchart
graph LR
    TV["TV"] -->|HDMI 1/2/3| HDMI_kabel["HDMI-kabel"]
    HDMI_kabel --> Blu-Ray_speler["Blu-Ray speler"]
Set-top box
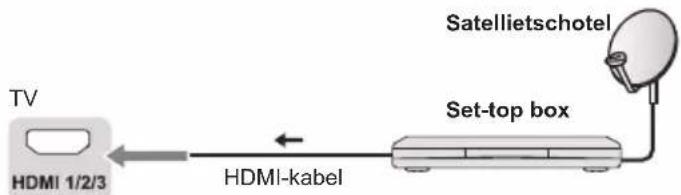
flowchart
graph LR
    TV["TV"] -->|HDMI 1/2/3| HDMI_kabel["HDMI-kabel"]
    HDMI_kabel <-->|HDMI-kabel| Set-topBox["Set-top box"]
    Set-topBox -->|Satellietschotel| Satellite["Satellietschotel"]
AV-/game-apparatuur
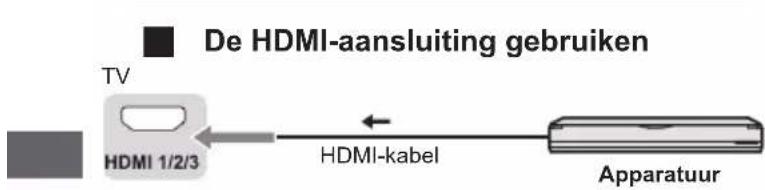
flowchart
graph LR
    TV["TV"] -->|De HDMI-aansluiting gebruiken| HDMI1["+"]
    HDMI1 -->|HDMI-kabel| Apparatuur["Apparatuur"]
Luidsprekersysteem

flowchart
graph LR
    A["TV"] --> B["Digital Audio Out"]
    B --> C["Optische kabel"]
    C --> D["Versterker met luidsprekersysteem"]
De tv aansluiten
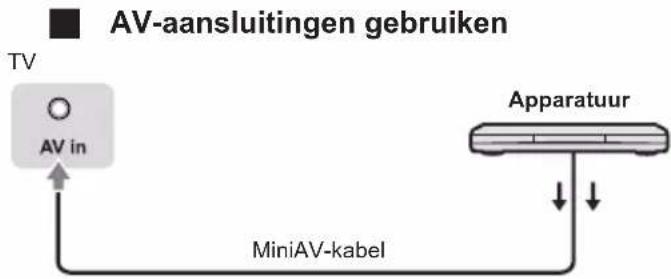
flowchart
graph TD
    A["TV"] --> B["AV in"]
    B --> C["MiniAV-kabel"]
    C --> D["Apparatuur"]
    D -->|Down arrow| C
    D -->|Up arrow| C
text_image
Quickly set up your TV with your Android phone? You can easily transfer your Android phone's Wi-Fi network and Google Account to your TV Continue Skip
text_image
Google Quick Setup 1. On your Android Phone, open the pre-installed app "Google" 2. Type or say, "OK Google, set up my device" 3. Tap PANASONIC-TV/821 on the listtext_image
Select your Wi-Fi network You can also connect an Ethernet cable to connect to the internet. WIFI AUSU_xstnl_rpi_4 SW_PUB SW_TEST_HK SW_TVTEST_04 WIFItext_image
Did you know? Did you know that your TV has settings and that you can change them now, or later in Setting? How your TV uses location. You can allow apps and services to use your TV's location. Google may also collect and use location date to help provide and improve services that use location.text_image
Google Google Services Select one below Select each to learn more about each service, such as how to turn it on Accept or off later. Data will be used according to Google's Privacy Policy. Click "Accept" to confirm your selection of these Google services settings. Use location Allow Google and agree with your satisfaction is use location estimated from next year. Google may select location data periodically and use this data in an analytical way to improve customers security and better access Help Improve Android Automatically send diagnostic information to Google Services and your privacy Google Assistant sends services you tell to a service usertext_image
Google Help improve Android Yes No Automatically send diagnostic information to Google, like crash reports and usage data from your device, apps, and Chromecast built-in. This information won't be used to identify you. You can adjust these permissions at any time from device settings. Learn more at: g.co/AndroidUsageHelp and g.co/cast/device_stats.
text_image
PICTURE OFF TIMER INPUT NETFLIX AUDIO LINK prime video APPS Google Play YouTube MENU EXIT BACK FAV OK NEXT OPTION Multi TEXT STTL 1 2 3 4 5 6 7 8 9 0 NEGA PLAYER LAST VIEW Panasonic TVprime video De Prime Video-homepagina openen
APPS Apps selecteren
Google Play De Google Play-homepagina openen
YouTube De YouTube-homepagina openen
text_image
Please press OK and HOURS at the same time.natural_image
Simple diagram of a blank rectangular panel with two side supports (no text or symbols)natural_image
Technical diagram of a mechanical device with a labeled component (no text or symbols present)1 In-/uitschakelen
2 Aan-/uit-led
natural_image
Simple diagram of a blank rectangular panel with two side supports (no text or symbols)natural_image
Architectural cross-section diagram of a two-story building facade with windows and doors (no text or symbols)
text_image
1 2 3 4 51 Kanaal omhoog
Cursor omhoog
Overscan: Selecteer AAN of UIT
CEC-bediening: Selecteer Aan of Uit.
LCN: Selecteer Aan of Uit.
Automatische service-update: Selecteer Aan of Uit.
Tv-instellingen
natural_image
Six white outlined squares arranged in two rows on a dark background (no text or symbols)Document:
Mini, 1,0 V[p-p] (75 Ω)
HOOFDTELEFOON
Mini, 150mV rms\~ 250mV rms
HDMI-ingangen 1 / 2 / 3
TYPE A connectoren
USB
USB2.0 DC 5V, Max.500 mA
USB3.0 DC 5V, Max.900 mA
Luidsprekeruitgang
43/50/55/65/75-inch model
Audio-uitgang
20 W (10 W + 10 W)
9 systemen
| 2-12 (PAL) |
| 0-12 (PAL B AUST.) |
| 1-9 (PAL B N.Z.) |
| 1-12 (PAL) |
UHF-BAND
| 21-69 (PAL G, H, I) |
| 28-69 (PAL B AUST.) |
| 13-57 (PAL D, K) |
Digitale tv
| DVB-T-/T2-standaard |
Antenne-ingang
VHF / UHF
Gebruiksvoorwaarden
Temperatuur
0 - 45 °C
Vochtigheid
natural_image
Front view of a modern black flat-screen TV with stand legs (no visible text or symbols)(ilustrace: TX-50LX700E*)
text_image
HE NC Advance™ Covered by patents at patent list.accessadvance.comDolby Audio
text_image
Diagram showing a monitor with a labeled prohibition symbol, indicating no protection or prohibition in the display.Panasonic Testing Centre
Panasonic Marketing Europe GmbH
natural_image
Illustration of two workers exchanging a package with a magnified inset showing hand gesture (no text or symbols)
Podmínky použití
Varování
text_image
Diagram showing electrical connections with labeled components and a checkmark indicator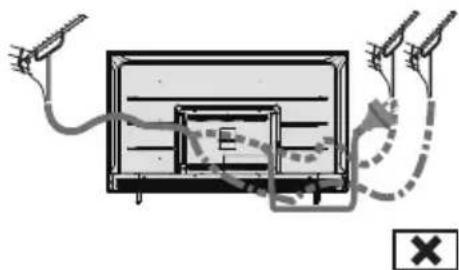
text_image
Diagram showing a basketball court with surveillance cameras and a warning symbol, including a cross mark indicating invalid status.Blu-Ray přehrávač

text_image
Quickly set up your TV with your Android phone? You can easily transfer your Android phone's WiFi network and Google Account to your TV Continue Skip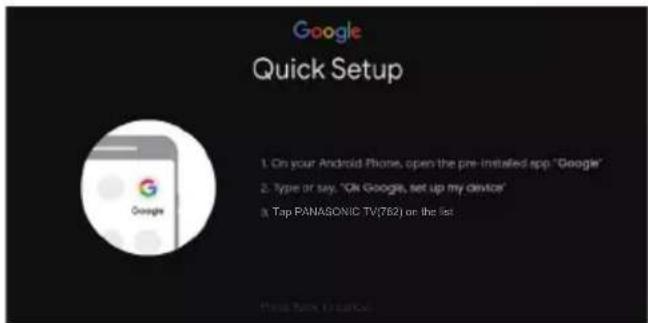
text_image
Google Quick Setup 1. On your Android Phone, open the pre-installed app "Google" 2. Type or say, "ON Google, set up my device" 3. Tap PANAGONIC TV(762) on the listtext_image
Select your Wi-Fi network You can also connect an Ethernet cable to connect to the internet. WIFI AUSU)-(aspL)-(rpl_4 SW_PUB SW_TEST_HK SW_TVTEST_S4 WIFItext_image
Did you know? Did you know that your TV has settings and that you can change them now, or later in Setting? How your TV uses location. You can allow apps and services to use your TV's location. Google may also collect and use location date to help provide and improve services that use location.text_image
Google Google Services Select each to learn more about each service, such as how to turn it on Accept or off later. Data will be used according to Google's Privacy Policy. Click "Accept" to confirm your selection of these Google services settings. Use location Allow Google and more with your practitioners in use location settled from W-11 Google may collected locations directly normally and your this data is an acceptance way to improve locations acquirers and other health services Help improve Android Automatically oral diagnostic information to Google Services and your privacy Google Assistant remedy services you talk to a unique sitetext_image
Google Help improve Android Automatically send diagnostic information to Google, like crash reports and usage data from your device, apps, and Chromecast built-in. This information won't be used to identify you. You can adjust these permissions at any time from device settings. Learn more at: g.co/AndroidUsageHelp and g.co/cast/device_stats.
text_image
PICTURE OFF TIMER INPUT NETFLIX AUDIO LINK prime video APPS Google Play Youtube MENU EXIT BACK FAV OK NEXT OPTION Multi OK TEXT STTL 1 2 3 4 5 6 7 8 9 0 MEDIA PLAYER LAST VIEW Panasonic TVtext_image
Please press OK and HOME at the same timenatural_image
Simple diagram of a blank rectangular panel with two side supports (no text or symbols)Indikátory na televizoru

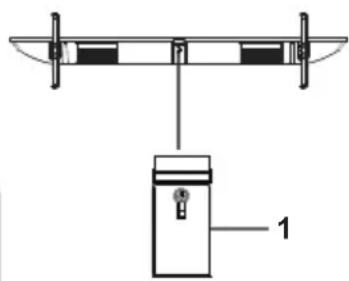
natural_image
Technical diagram of a mechanical device with a labeled component (no text or symbols present)1 Zapnout/Vypnout
natural_image
Architectural cross-section diagram of a two-story building facade with windows and doors (no text or symbols)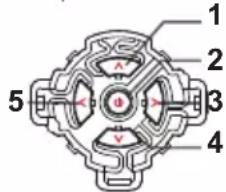
text_image
1 2 3 4 5Mini, 1,0 V[p-p] (75 Ω)
SLUCHÁTKA
Mini, 150 mV rms \~ 250 mV rms
Vstup HDMI 1 / 2 / 3
Konektory typu A
USB
USB 2.0 DC 5 V, max. 500 mA
USB 3.0 DC 5 V, max. 900 mA
Výstup reproduktoru
natural_image
Front view of a modern black flat-screen TV with stand legs (no visible text or symbols)(slika: TX-50LX700E*)
Hvala vam što ste kupili ovaj Panasonic proizvod.
text_image
HE NC Advance™ Covered by patents at patentist.accessadvance.comDolby Audio
Izrazi HDMI, HDMI High-Definition Multimedia Interface i HDMI logotip zaštitni su znakovi ili registrirani zaštitni znakovi tvrtke HDMI Licensing Administrator, Inc.
Dolby, Dolby Audio i simbol dvostrukog D su zaštitni znakovi Dolby Laboratories.
Proizvedeno prema licenci Dolby Laboratories.
Povjerljivi neobjavljeni radovi. Autorsko pravo © 1992-2015
Dolby Laboratories. Sva prava pridržana.
Wi-Fi ^ je registrirani zaštitni znak tvrtke Wi-Fi Alliance ^ . WPA2 ^TM , WPA ^TM su zaštitni znakovi Wi-Fi Alliance ^ .
Riječ i logotipi Bluetooth® su registrirani zaštitni znakovi u vlasništvu Bluetooth SIG, Inc. i svaka upotreba takvih znakova od strane Panasonic Entertainment & Communication Co., Ltd. je pod licencom.
DVB i DVB logotipi su zaštitni znakovi DVB Projecta.
text_image
TV CI modutext_image
Diagram showing a TV screen with a prohibition symbol indicating no restrictionsnatural_image
Illustration of two workers exchanging a package with a magnified inset showing hand gesture (no text or symbols)
Uvjeti korištenja
Oprez
text_image
Diagram showing electrical connections with labeled components and a checkmark indicator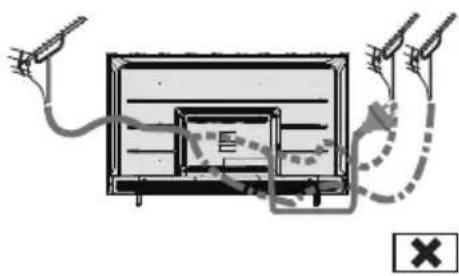
natural_image
Diagram of a TV set with cable and antenna connections, no text or symbols presentBlu-Ray player

flowchart
graph LR
    TV["TV"] -->|HDMI 1/2/3| Kabel["HDMI kabel"]
    Kabel --> Blu-Ray_Player["Blu-Ray player"]
Set top kutija
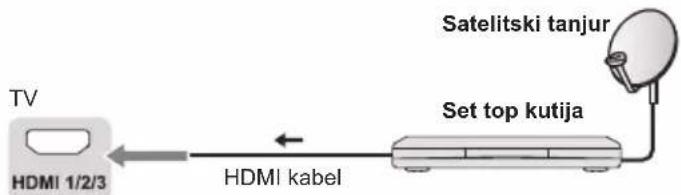
flowchart
graph LR
    TV["TV"] -->|HDMI 1/2/3| Kabel["HDMI kabel"]
    Kabel -->|Satelitski tanjur| Satelitik["Satelitski tanjur"]
    Satelitik --> Settopkutija["Set top kutija"]
AV / Oprema za igre

flowchart
graph LR
    A["TV"] --> B["HDMI 1/2/3"]
    B --> C["HDMI kabel"]
    C --> D["Oprema"]
    style A fill:#99ccff,stroke:#333
    style B fill:#e6f7ff,stroke:#333
    style C fill:#ffffff,stroke:#333
    style D fill:#ffffff,stroke:#333
Sustav zvučnika

flowchart
graph LR
    A["TV"] --> B["OPTički kabel"]
    B --> C["Pojačalo sa sustavom zvučnika"]
    A --> D["DIGITAL AUDIO OUT"]
Spajanje TV-a
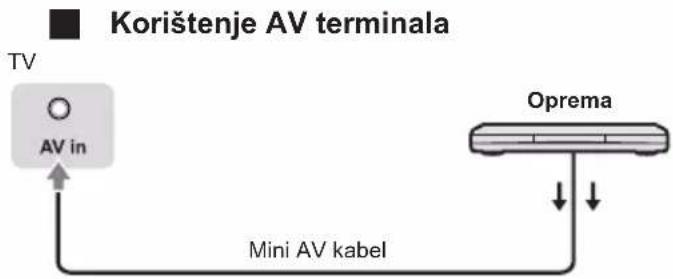
flowchart
graph TD
    TV["TV"] -->|AV in| A["Mini AV kabel"]
    A -->|Oprema| B["Oprema"]
- Za uživanje u zvuku s vanjske opreme u višekanalnom zvuku (npr. Dolby Digital 5.1ch), spojite opremu na pojačalo. Za priključke pročitajte priručnike opreme i pojačala.
DVD snimač / VCR

text_image
TV HDMI 1/2/3 HDMI kabel DVD snimač/VCRPojačalo
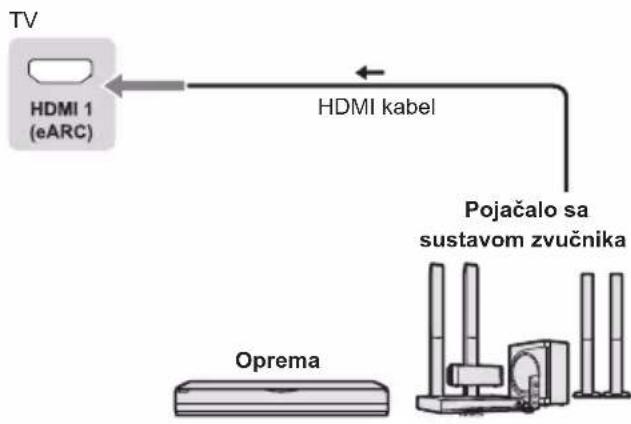
flowchart
graph TD
    A["TV"] --> B["HDMI 1 (eARC)"]
    B --> C["HDMI kabel"]
    C --> D["Oprema"]
    D --> E["Pojačalo sa sustavom zvučnika"]
- Koristite HDMI1 za povezivanje TV-a na pojačalo koje ima funkciju eARC/ARC (povratni audio kanal). Ako spajate na pojačalo bez eARC/ARC funkcije, koristite DIGITALNI AUDIO IZLAZ.
Početno postavljanje
Utaknite mrežni utikač u utičnicu i uključite TV.
text_image
Welcome English(United States) Azarbançam Bosaniki Čelmina Dasok Daumchtext_image
Quickly set up your TV with your Android phone? You can easily transfer your Android phone's WiFi network and Google Account to your TV
text_image
Google Quick Setup 1. On your Android Phone, open the pre installed app "Google" 2. Type or say, "Ok Google, set up my device" 3. Tap PANASONIC TV(782) on the listNapomena: Ako ne želite koristiti svoj Android uređaj za postavljanje TV-a, preskočit ćete na korak 3. Ako želite koristiti svoj Android uređaj za postavljanje TV-a, uključite Bluetooth funkcije na svom Android telefonu, zatim pronađite i otvorite aplikaciju "Google" na svom telefonu. Slijedite upute za postavljanje uređaja.
Korak 3: Odaberite želite li ili ne povezati svoj TV prijemnik na Wi-Fi mrežu.
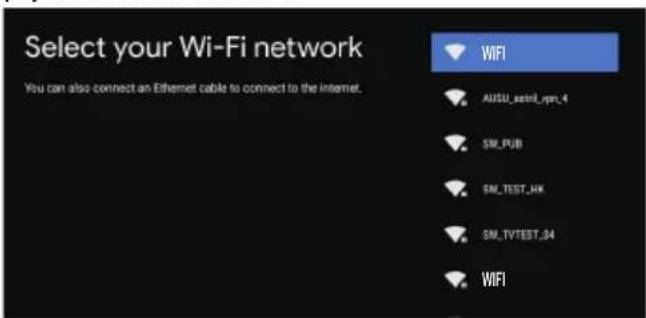
text_image
Select your Wi-Fi network You can also connect an Ethernet cable to connect to the Internet. WIFI AUSU_asterl_rpr_4 SM_PUB SM_TEST_HK SM_TVTEST_04 WIFINapomena: Ako ste televizor spojili na WI-FI mrežu, on će provjeriti ima li ažuriranja poput ažuriranja Googleovih usluga i tako dalje. Zatim odaberite hoćete li se prijaviti na svoj Google račun ili ne.
text_image
Did you know? Did you know that your TV has settings and that you can change them now, or later in Setting? How your TV uses location. You can allow apps and services to use your TV's location. Google may also collect and use location date to help provide and improve services that use location.Korak 5: Odaberite želite li dopustiti Googleu ili trećoj strani da koristi lokaciju vašeg TV-a.

text_image
Google Google Services Select each to learn more about each service, such as how to turn it on Accept or off later. Data will be used according to Google's Privacy Policy. Click "Accept" to confirm your selection of these Google services settings. Use location How much we want with your permission is the location calculated from W-FL Google's called location data periodically and use the data in an engines way to improve location security and other-based services Help Improve Android Automatically sell diagnostic information in Google Services and your privacy Google Assistant sends services you list to a unique siteKorak 6: Odaberite želite li dopustiti Googleu da vam pomogne poboljšati vaš Android TV.

text_image
Google Help improve Android Automatically send diagnostic information to Google, like crash reports and usage data from your device, apps, and Chromecast built-in. This information won't be used to identify you. You can adjust these permissions at any time from device settings. Learn more at: g.co/AndroidUsageHelp and g.co/cast/device_stats.
text_image
PICTURE OFF TIMER INPUT NETFLIX AUDIO LINK prime video APPS Google Play YouTube MENU EXIT BACK FAY OK OFFON Multi TEXT STTL 1 2 3 4 5 6 7 8 9 0 MEDIA PLAYER LAST VIEW Panasonic TVFunkcije daljinskog upravljača
Za ulazak u media player


Povratak na zadnji program

text_image
MENU EXIT i OK BACK FAV OPTION
text_image
Please press OK and HASH at the start time.Kako upariti daljinski upravljač s televizorom
Ovo je Bluetooth daljinski upravljač i prije upotrebe ga najprije uparite s TV-om. Sljedeći su koraci za vašu referencu:
natural_image
Simple diagram of a blank rectangular board with two side supports (no text or symbols)Indikatori na TV-u
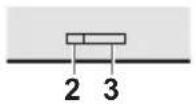

text_image
Technical diagram of a mechanical device with labeled component 1natural_image
Architectural cross-section diagram of a two-story building facade with windows and doorways (no text or labels)Indikatori na TV-u

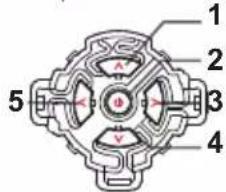
text_image
1 2 3 4 529,0 kg (s postoljem)
28,0 kg (samo TV)
| 2-12 (PAL) |
| 0-12 (PAL B AUST.) |
| 1-9 (PAL B N.Z.) |
| 1-12 (PAL) |
UHF POJAS
| 21-69 (PAL G, H, I) |
| 28-69 (PAL B AUST.) |
| 13-57 (PAL D, K) |
Digitalna TV
DVB-T/T2 Standard
Zračni ulaz
VHF / UHF
Radni uvjeti
Temperatura
| 0 °C - 45 °C |
Vlažnost
natural_image
Front view of a modern black TV with two legs and a flat screen (no visible text or symbols)Covered by patents at patentist.accessadvance.com

Dolby Audio
Termini HDMI, HDMI High-Definition Multimedia Interface un HDMI logotips ir HDMI Licensing Administrator, Inc. prečzīmes vai registrētas prečzīmes.
text_image
Diagram showing a TV screen with a prohibition symbol indicating no restrictions
Panasonic Testing Centre
Panasonic Marketing Europe GmbH
Winsbergring 15, D-22525 Hamburg, Germany

natural_image
Illustration of two workers exchanging a package with a magnified inset showing hand gesture (no text or symbols)Lietošanas apstākļi
Uzmanību!
text_image
Diagram showing electrical connections with labeled components and a checkmark indicator
text_image
Diagram showing a monitor with cable routing and signal lines, including a cross symbol indicating cancellation or error.Blu-Ray atskanotājs
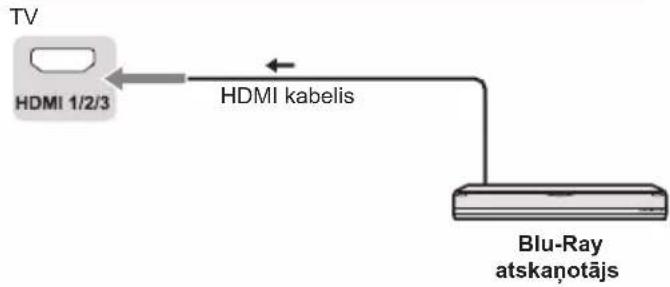
text_image
Welcome English(United States) Azerbaijan Bosavlaki Četima Gansk Deutschtext_image
Quickly set up your TV with your Android phone? You can easily transfer your Android phone's Wi-Fi network and Google Account to your TV Continue Skip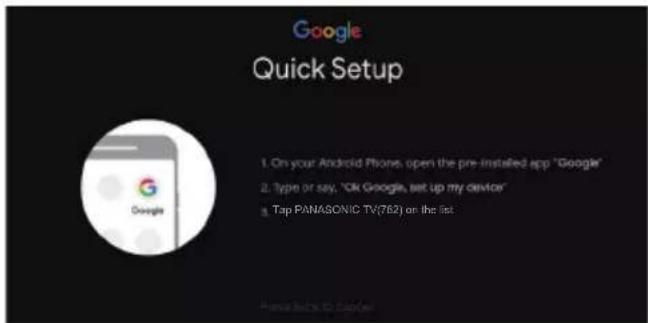
text_image
Google Quick Setup 1. On your Android Phone, open the pre-installed app "Google" 2. Type or say, "OK Google, set up my device" 3. Tap PANASONIC TV(762) on the listtext_image
Select your Wi-Fi network You can also connect an Ethernet cable to connect to the Internet. WIFI AUSU_axml_ipri_4 SN_PUB SN_TEST_HK SN_TVTEST_04 WIFItext_image
Did you know? Did you know that your TV has settings and that you can change them now, or later in Setting? How your TV uses location. You can allow apps and services to use your TV's location. Google may also collect and use location date to help provide and improve services that use location.text_image
Google Google Services Select each to learn more about each service, such as how to turn it on Accept or off later. Data will be used according to Google's Privacy Policy. Click "Accept" to confirm your selection of these Google services settings. Use location active Google services with user permission to use creation performed by Wi-Fi Google may created location displayed periodically and use this data in an analytics way to improve locations security and information-based services Help improve Android Automatically and diagnostic information is Google Services and your privacy Google Authorized services you look for a unique codetext_image
Google Help improve Android Automatically send diagnostic information to Google, like crash reports and usage data from your device, apps, and Chromecast built-in. This information won't be used to identify you. You can adjust these permissions at any time from device settings. Learn more at: g.co/AndroidUsageHelp and g.co/cast/device_stats. Yes No
text_image
PICTURE OFF TIMER INPUT NETFLIX AUDIO LINK prime video APPS Google Play YouTube MENU EXIT BACK FAY OK OFFON Multi TEXT STTL 1 2 3 4 5 6 7 8 9 0 MEDIA PLAYER LAST VIEW Panasonic TVtext_image
Please press OK and HOURS of the same time.natural_image
Simple diagram of a blank rectangular panel with two side supports (no text or symbols)Indikatori uz televizora
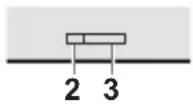

natural_image
Technical diagram of a mechanical device with two vertical supports and a labeled component (no text or symbols present)natural_image
Architectural cross-section diagram of a two-story building facade with windows and doorways (no text or symbols)
text_image
1 2 3 4 5natural_image
Front view of a modern black TV displaying on a stand (no visible text or symbols)HE NC Advance™ Covered by patents at patentist.accessadvance.com
Dolby Audio
text_image
Diagram of a flat-screen TV with a prohibition symbol indicating no restrictions on the screen.natural_image
Illustration of two workers exchanging a package with a magnified inset showing hand gesture (no text or symbols)Naudojimo salygos
Ispėjimas
text_image
Aeraline RF laidas ANTtext_image
Diagram showing electrical connections with labeled components and a checkmark indicator
natural_image
Diagram of a TV set with cable and antenna connections, no text or symbols present„Blu-Ray“ grotuvas
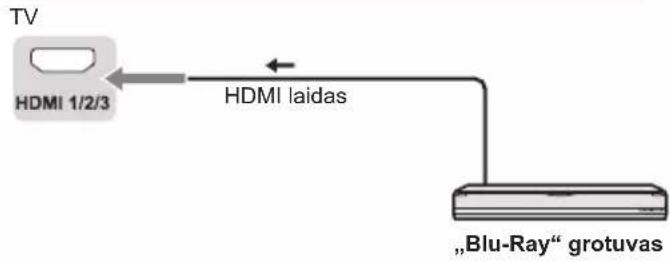
flowchart
graph LR
    TV["TV"] --> HDMI1["HDMI 1/2/3"]
    HDMI1 -->|HDMI laidas| Grotuvas[""Blu-Ray" grotuvas"]
AV / žaidimų įranga

flowchart
graph LR
    TV["TV"] --> HDMI1["+"]
    HDMI1["+"] --> HDMI2["+"]
    HDMI2["+"] --> Iranga["Iranga"]
    HDMI1["+"] <--> HDMI2["+"]
    style TV fill:#99ccff,stroke:#333
    style Iranga fill:#cccccc,stroke:#333
text_image
Quickly set up your TV with your Android phone? You can easily transfer your Android phone's WiFi network and Google Account to your TV Browse Skip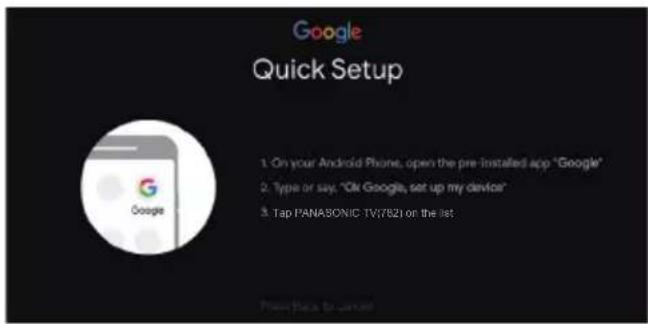
text_image
Google Quick Setup 1: On your Android Phone, open the pre-installed app "Google" 2: Type or say, "Ok Google, set up my device" 3: Tap PANASONIC TV/821 on the listtext_image
Select your Wi-Fi network You can also connect an Ethernet cable to connect to the Internet. WIFI AUSU_asterl_ipri_4 SM_PUB SN_TEST_HK SN_TVTEST_04 WIFItext_image
Did you know? Did you know that your TV has settings and that you can change them now, or later in Setting? How your TV uses location. You can allow apps and services to use your TV's location. Google may also collect and use location date to help provide and improve services that use location.text_image
Google Google Services Select each to learn more about each service, such as how to turn it on Accept or off later. Data will be used according to Google's Privacy Policy. Click "Accept" to confirm your selection of these Google services settings. Select one or below Use location All the Google service with your permission is new location estimated from W.F. Google's called location data periodically and use this data in an engines way to improve location security and other based services Help improve Android and/or modify cloud diagnostics information to Google Services and your privacy Google Assistant sends services you like to a service 2016text_image
Google Help improve Android Automatically send diagnostic information to Google, like crash reports and usage data from your device, apps, and Chromecast built-in. This information won't be used to identify you. You can adjust these permissions at any time from device settings. Learn more at: g.co/AndroidUsageHelp and g.co/cast/device_stats.
text_image
PICTURE OFF TIMER INPUT NETFLIX AUDIO LINK prime video APPS Google Play Youtube MENU EXIT BACK ON FAV Multi OK TEXT ✓ STTL 1 2 3 4 5 6 7 8 9 0 MEDIA PLAYER LAST VIEW Panasonic TVtext_image
Please press OK and HOLE at the same time.natural_image
Simple diagram of a blank rectangular panel with two side supports (no text or symbols)natural_image
Diagram of a mechanical device with a labeled component (no text or symbols present)natural_image
Simple diagram of a blank rectangular panel with two side supports (no text or symbols)

natural_image
Architectural cross-section diagram of a two-story building facade with windows and doors (no text or symbols)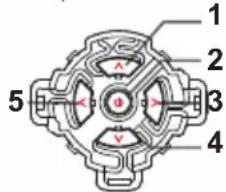
text_image
1 2 3 4 5Mini, 1,0 V[p-p] (75 Ω)
AUSINÈS
Mini, 150 mV vkv\~ 250 mV vkv
HDMI 1 / 2 / 3 jvestis
TYPE A jungtys
USB
USB2.0 nuol. sr. 5 V, maks. 500 mA
USB3.0 nuol. sr. 5 V, maks. 900 mA
| 2-12 (PAL) |
| 0-12 (PAL B AUST.) |
| 1-9 (PAL B N.Z.) |
| 1-12 (PAL) |
UHF JUOSTA
| 21-69 (PAL G, H, I) |
| 28-69 (PAL B AUST.) |
| 13-57 (PAL D, K) |