SS21225 - Fan Sogo - Free user manual and instructions
Find the device manual for free SS21225 Sogo in PDF.

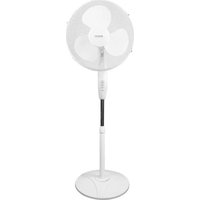
| Product type | Wall/stand fan |
| Brand | Sogo |
| Model | SS21225 |
| Blade diameter | 40 cm (16 inches) |
| Power supply | 220-240 V~50/60 Hz |
| Power | 50 W |
| Number of speeds | 3 |
| Speed control | Pull cord |
| Oscillation | Yes, push button |
| Tilt | Adjustable up or down (locking screw) |
| Main material | Plastic and metal |
| Installation type | Stand with round base and column |
| Noise level | Not specified |
| Safety | Protective grill, automatic shut-off in case of overheating (not specified), disconnect before cleaning |
| Cleaning | Soft cloth and soapy water, do not use solvents |
| Dimensions (height x width x depth) | Approximately 130 x 40 x 40 cm (estimated) |
| Weight | Not specified |
| Included accessories | Base, column, grilles, blades, nuts, screws, oscillation button |
| Compliance | Directives 2006/95/EC, 2004/108/EC, 2011/65/EU, 2009/125/EC |
| Usage | Indoor domestic use only |
Frequently Asked Questions - SS21225 Sogo
User questions about SS21225 Sogo
0 question about this device. Answer the ones you know or ask your own.
Ask a new question about this device
Download the instructions for your Fan in PDF format for free! Find your manual SS21225 - Sogo and take your electronic device back in hand. On this page are published all the documents necessary for the use of your device. SS21225 by Sogo.
USER MANUAL SS21225 Sogo
Caution: please read and preserve these important instructions
CÓMO MONTAR Y UTILIZAR
Instructions for use
IMPORTANT
Read this instruction booklet carefully.
SAFETY PRECAUTION
1) Always plug the power cord into a 220-240V AC wall outlet
2) Do not use outdoors, your appliance is made solely for household use.
3) Do not operate the appliance of cord or plug has been damaged, it must be replaced by the manufacture or its service agent or a similarly qualified person in order to avoid any hazards.
4) Never leave the appliance within reach of children without supervision, the use of this appliance by young children or by disabled person must always be supervised.
5) Unplug the fan before cleaning, transportation and after you have finished using the fan.
6) Never place the appliance, the power cable or the plug in water or in any other liquids; never spray liquids onto the fan.
7) Avoid contact with moving parts.
8) Deformation or operation failure may take place when the appliance is used at unstable places or near to places with heating sources.
9) Do not operate in presence of explosives of flammable fumes.
10) This appliance can be used by children aged from 8 years and above and persons
with reduced physical, sensory or mental capabilities or lack of experience and knowledge if they have been given supervision or instruction concerning use of the appliance in a safe way and understand the hazards involved. Children shall not play with the appliance. Cleaning and user maintenance shall not be made by children without supervision.
11) Always disconnect the appliance from the supply if it is left unattended and before assembling, disassembling or cleaning.
12) This appliance shall not be used by children. Keep the appliance and its cord out of reach of children.
- Never insert fingers, pencils or any other object through the guard when fan is running.
- Disconnect fan when moving it from one location to another.
- Disconnect fan when removing guards for cleaning.
- Be sure fan is on a stable surface when operating to avoid overturning.
- Do not use fan near window, rain may create electrical hazard.
FOR SHIPPING PURPOSE THE FAN IS PACKED & DISASSEMBLED
HOW TO ASSEMBLE AND USE
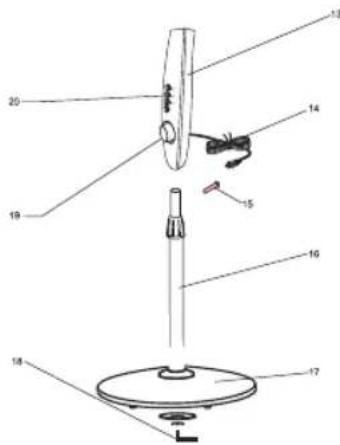
1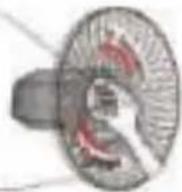 2 2 | Remove spinner and special nut from shaft of motor. Align the holes of back guard to the front of motor cover and fix with the special nut. |
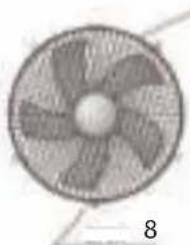
 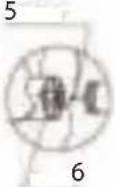 | Mount fan blade to motor shaft and be sure that the grooves at the rear of the blade is aligned with the stopper pin on the shaft. Fix the blade with spinner by turning it in counter-clockwise (tighten) direction. |
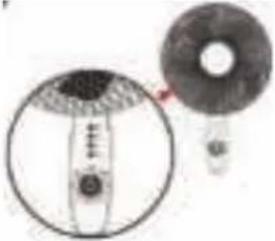
 7 7 | Mount front guard onto rear guard by inserting rear guard & secure clips on front guard.Tighten the screw on the edge of the rear grill through front. |
 | HOW TO SWITCH ON THE FANTo turn on the fan, press the push button of the desired speed from 1 – 3. To stop the fan, press the 0 button.Caution:Always unplug your fan when not in use |
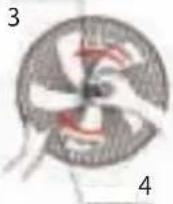
OSCILLATION
The knob stops at two steps. The top step stops the oscillation of the fan. The low step is to start the head oscillation of the fan. Push or pull the oscillation knob to operate.

HOW TO ADJUST WIND DIRECTION
To tilt up or down, loosen the knob screw, hold lightly the top of bottom of the guard, tilt to the desired direction. Then tighten the screw knob.
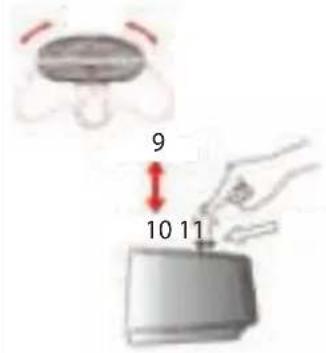
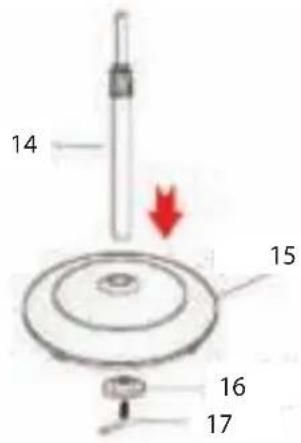
HOW TO ATTACH THE STAND TO BASE
- Insert the stand pipe into the hole on the fan base
2.Fix the stand pipe on the base with the stopper plate & hook bolt -
Align the stand pipe and tighten the hook bolt on the slot of the stand pipe
-
Special screw
- Back guard
- Spinner
- Fan Blade
- Rotor shaft
- Grooves
- Front guard
- Screw
- Stops oscillating
- Oscillating
- Oscillation knob
- Tilting up or down
- Knob screw
- Stand pipe
- Fan base
-
Stopper plate
-
Hook bolt
HOW TO CLEAN
1) Unplug the fan before cleaning.
2) Use a soft cloth to clean. In case dirt does not come easily, use soapy water. Do not use thinner or other solvents.
WARNING
- This appliance is not intended for use by persons (including children) with reduced physical sensory or mental capabilities or lack of experience and knowledge unless they have been given supervision or instruction concerning the use of the appliance by a person responsible for their safety.
- If the supply cord is damaged, send to its agent for repair as special purpose tools are required!
TECHNICAL SPECIFICATIONS
Voltage / Frequency: 220 - 240V\~ 50/60Hz
Power Consumption: 50W
Mode d'emploi
ATTENTION
COMMENT ASSEMBLER ET COMMENT UTILISER
DECLARATION OF CONFORMITY
This device complies with Directive 2006/95/EC Low Voltage Directive 2004/108/EC Electromagnetic Compatibility with Directive 2011/65/EU on the restriction of the use of certain hazardous substances in electrical and electronic equipment and Directive 2009/125/EC on the eco-design requirements applicable to energy-related products.

DÉCLARATION DE CONFORMITÉ
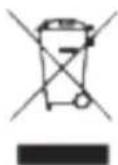
This symbol means that in case you wish to dispose of the product once its working life has ended, take it to an authorised waste agent for the selective collection of waste electrical and electronic equipment (WEEE).
Imported by:
Sanysan Appliances S.L, CIF: B98753056, Spain Made in P.R.C