KD-R472 - Car stereo JVC - Free user manual and instructions
Find the device manual for free KD-R472 JVC in PDF.

User questions about KD-R472 JVC
0 question about this device. Answer the ones you know or ask your own.
Ask a new question about this device
Download the instructions for your Car stereo in PDF format for free! Find your manual KD-R472 - JVC and take your electronic device back in hand. On this page are published all the documents necessary for the use of your device. KD-R472 by JVC.
USER MANUAL KD-R472 JVC
MANUEL D'INSTRUCTIONS
CD-RECEIVER
Information on Disposal of Old Electrical and Electronic Equipment and Batteries (applicable for countries that have adopted separate waste collection systems)
Products and batteries with the symbol (crossed-out wheeled bin) cannot be disposed as household waste.
Old electrical and electronic equipment and batteries should be recycled at a facility capable of handling these items and their waste byproducts.
Contact your local authority for details in locating a recycle facility nearest to you. Proper recycling and waste disposal will help conserve resources whilst preventing detrimental effects on our health and the environment.
Notice: The sign "Pb" below the symbol for batteries indicates that this battery contains lead.
Declaration of Conformity with regard to the EMC Directive Declaration of Conformity with regard to the RoHS Directive 2011/65/EU Manufacturer: JVC KENWOOD Corporation 3-12, Moriya-cho, Kanagawa-ku, Yokohama-shi, Kanagawa, 221-0022, Japan EU Representative: JVC Technical Services Europe GmbH Konrad-Adenauer-Allee 1-11, D-61118 Bad Vilbel, Germany
Déclaration de conformité se rapportant à la directive EMC
Déclaration de conformité se rapportant à la directive RoHS 2011/65/EU
Fabricant:
JVC KENWOOD Corporation
3-12, Moriya-cho, Kanagawa-ku, Yokohama-shi, Kanagawa, 221-0022, Japan
Representants dans l'UE:
JVC Technical Services Europe GmbH
Konrad-Adenauer-Allee 1-11, D-61118 Bad Vilbel, Germany
1 Cancel the demonstration
2 Set the clock
3 Set the basic settings
CD/USB/iPod/Android 5
RADIO 7
AUX 8
AUDIO SETTINGS 9
DISPLAY SETTINGS 11
REFERENCES 12
Maintenance
More information
TROUBLESHOOTING 14
SPECIFICATIONS 15
INSTALLATION /
CONNECTION 16
BEFORE USE
IMPORTANT
- To ensure proper use, please read through this manual before using this product. It is especially important that you read and observe Warning and Caution in this manual.
- Please keep the manual in a safe and accessible place for future reference.
Warning
Do not operate any function that takes your attention away from safe driving.
Caution
Volume setting:
- Adjust the volume so that you can hear sounds outside the car to prevent accidents.
- Lower the volume before playing digital sources to avoid damaging the speakers by the sudden increase of the output level.
General:
- Avoid using the external device if it might hinder safe driving.
- Make sure all important data has been backed up. We shall bear no responsibility for any loss of recorded data.
- Never put or leave any metallic objects (such as coins or metal tools) inside the unit, to prevent a short circuit.
- If a disc error occurs due to condensation on the laser lens, eject the disc and wait for the moisture to evaporate.
How to read this manual
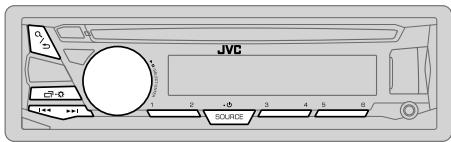
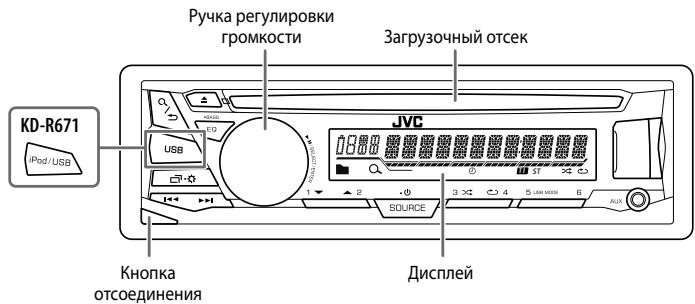
- Operations are explained mainly using buttons on the faceplate of KD-R571.
- English indications are used for the purpose of explanation. You can select the display language from the menu. ( 4)
- [XX] indicates the selected items.
- ( XX) indicates references are available on the stated page.
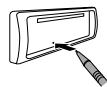
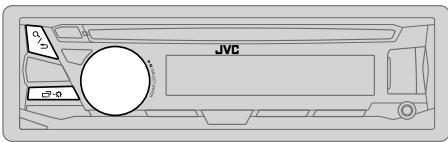
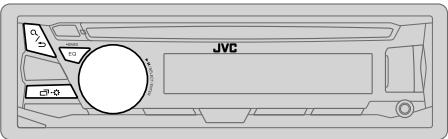
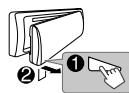
Faceplate
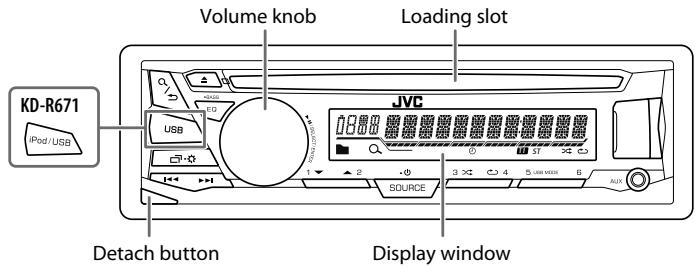

Attach
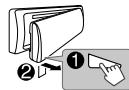
Detach
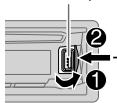
How to reset
Your preset adjustments will be erased except stored radio stations.
| To | On the faceplate |
| Turn on the power | Press SOURCE-⊙. • Press and hold to turn off the power. |
| Adjust the volume | Turn the volume knob. |
| Press the volume knob to mute the sound or pause playback. • Press again to cancel. | |
| Select a source | • Press SOURCE-⊙ repeatedly. • Press SOURCE-⊙, then turn the volume knob within 2 seconds. |
| Change the display information | Press ⊙-⊙ repeatedly. (→13) |

Cancel the demonstration
When you turn on the power (or after you reset the unit), the display shows: "CANCEL DEMO" "PRESS" "VOLUME KNOB"
1 Press the volume knob.
[YES] is selected for the initial setup.
2 Press the volume knob again.
"DEMO OFF" appears.

Set the clock
1 Press and hold
2 Turn the volume knob to select [CLOCK], then press the knob.
3 Turn the volume knob to select [CLOCK SET], then press the knob.
4 Turn the volume knob to make the settings, then press the knob. Day Hour Minute
5 Turn the volume knob to select [24H/12H], then press the knob.
6 Turn the volume knob to select [12 HOUR] or [24 HOUR], then press the knob.
7 Press to exit.
To return to the previous setting item, press .

Set the basic settings
1 Press and hold .
2 Turn the volume knob to select an item (see the following table), then press the knob.
3 Repeat step 2 until the desired item is selected or activated.
4 Press to exit.
To return to the previous setting item, press / .
Default: XX
| SETTINGS | |
| BEEP | ON: Activates the keypress tone. ; OFF: Deactivates. |
| SRC SELECT | |
| AM* | ON: Enables AM in source selection. ; OFF: disables. |
| AUX* | BT ADAPTER: Selects when the KS-BTA100 Bluetooth adapter is connected to the AUX jack. (→8) ; ON: Enables AUX in source selection. ; OFF: Disables. |
| F/W UPDATE | |
| SYSTEM | |
| F/W xxxx | YES: Starts upgrading the firmware. ; NO: Cancels (upgrading is not activated). For details on how to update the firmware, see: <http://www.jvc.net/cs/car/>. |
| CLOCK | |
| CLOCK SYNC | AUTO: The clock time is automatically set using the Clock Time (CT) data in FM Radio Data System signal. ; OFF: Cancels. |
| CLOCK DISP | ON: The clock time is shown on the display even when the unit is turned off. ; OFF: Cancels. |
| ENGLISH | |
| PYCBCKII | Select the display language for menu and music information if applicable. By default, ENGLISH is selected. |
| ESPANOL | |
- Not displayed when the corresponding source is selected.
Start playback
The source changes automatically and playback starts.
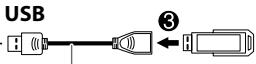
CD
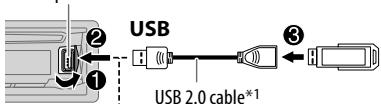
USB input terminal
(commercially available)
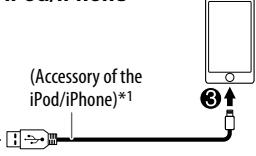
iPod/iPhone

ANDROID*2
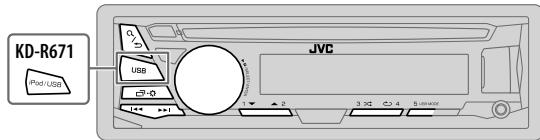
Selectable source:
KD-R671:
CD/USB/USB-IPOD/Android
KD-R571 / KD-R474 / KD-R472 /
KD-R471:
CD/USB/Android

To directly select USB/ USB-IPOD/Android source, press iPod / USB or USB.
| To | On the faceplate | |
| Reverse / Fast-forward*3 | Press and hold |▶/▶. | |
| Select a track/file | Press |▶/▶. | |
| Select a folder*4 | Press 2 ▲/1 ▼. | |
| Repeat play*5 | Press 4 ▽ repeatedly. | |
| TRACK RPT/ ALL RPT : Audio CD | ||
| TRACK RPT/ FOLDER RPT/ ALL RPT : MP3/WMA/WAV/FLAC file | ||
| ONE RPT/ ALL RPT/ RPT OFF : iPod or ANDROID | ||
| Random play*5 | Press 3 >□ repeatedly. | |
| ALL RND/ RND OFF : Audio CD | ||
| FOLDER RND/ ALL RND/ RND OFF : MP3/WMA/WAV/FLAC file | ||
| SONG RND/ ALL RND/ RND OFF : iPod or ANDROID | ||
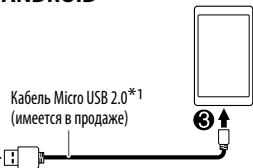
1 Do not leave the cable inside the car when not using.
2 When connecting an Android device, "Press [VIEW] to install JVC MUSIC PLAY APP" is shown. Follow the instructions to install the application. You can also install the latest version of JVC MUSIC PLAY application on your Android device before connecting. (→ 12)
3 For ANDROID: Applicable only when [AUTO MODE] is selected. (→ 6)
4 For CD: Only for MP3/WMA files. This does not work for iPod/Android.
*5 For iPod/Android: Applicable only when [HEAD MODE]/[AUTO MODE] is selected. (→ 6)
Select control mode
While in USB-IPOD source, press 5 USB MODE repeatedly.
HEAD MODE: Control iPod from this unit.
IPHONE MODE: Control iPod using the iPod itself. However, you can still play/ pause or file skip from this unit.
While inAndroid source,press 5 USB MODE repeatedly.
AUTO MODE: Control Android device from this unit via JVC MUSIC PLAY application installed in the Android device.
AUDIO MODE: Control Android device using the Android device itself via other media player applications installed in the Android device. However, you can still play/pause or file skip from this unit.
Select music drive
Press 5 USB MODE repeatedly.
Stored songs in the following drive will be played back.
- Selected internal or external memory of a smartphone (Mass Storage Class).
- Selected drive of a multiple drives device.
Change the playback speed of the Audiobook
(For KD-R671)
While listening to the iPod and [HEAD MODE] is selected....
1 Press and hold
2 Turn the volume knob to select [IP0D], then press the knob.
3 Press the volume knob to select [AUDIOBOOKS].
4 Turn the volume knob to select an item, then press the knob. 0.5 × SPEED / 1 × SPEED / 2 × SPEED: Select the desired playback speed of the Audiobooks sound file in your iPod/iPhone. (Default: Depends on your iPod/iPhone setting.)
5 Press to exit.
To return to the previous setting item, press / .
Select a file from a folder/list
1 Press /
2 Turn the volume knob to select a folder/list, then press the knob.
3 Turn the volume knob to select a file, then press the knob.
Quick Search
If you have many files, you can search through them quickly.
Turn the volume knob quickly to browse through the list quickly.
- Not applicable for iPod.
Alphabet search (applicable only for iPod):
You can search for a file according to the first character.
Press 2 ▲/1▼ or turn the volume knob quickly to select the desired character (A to Z/0 to 9/Others).
-
Select "OTHERS" if the first character is other than A to Z, 0 to 9.
-
To return to the previous setting item, press Q / .
To cancel, press and hold Q / - For iPod, applicable only when [HEAD MODE] is selected.
- ForAndroid,applicable only when [AUTO MODE] is selected.
"ST" lights up when receiving an FM stereo broadcast with sufficient signal strength.
Search for a station
1 Press SOURCE- repeatedly to select FM or AM.
2 Press / to search for a station automatically. (or)
Press and hold / until "M" flashes, then press repeatedly to search for a station manually.
Settings in memory
You can store up to 18 stations for FM and 6 stations for AM.
Store a station
While listening to a station....
Press and hold one of the number buttons (1 to 6). (or)
1 Press and hold the volume knob until "PRESET MODE" flashes.
2 Turn the volume knob to select a preset number, then press the knob. The preset number flashes and "MEMORY" appears.
Select a stored station
Press one of the number buttons (1 to 6). (or)
1 Press /
2 Turn the volume knob to select a preset number, then press the knob to confirm.
Other settings
1 Press and hold
2 Turn the volume knob to select [TUNER], then press the knob.
3 Turn the volume knob to select an item (see the following table), then press the knob.
4 Repeat step 3 until the desired item is selected/ activated or follow the instructions stated on the selected item.
5 Press to exit.
To return to the previous setting item, press / .
Default: XX
| RADIO TIMER | Turns on the radio at a specific time regardless of the current source. 1 ONCE/DAILY/ WEEKLY/OFF: Select how often the timer will be turned on. 2 FM/ AM: Select the band. 3 01 to 18 (for FM)/ 01 to 06 (for AM): Select the preset station. 4 Set the activation day*1 and time. “◎” lights up when complete. Radio Timer will not activate for the following cases. • The unit is turned off. • [OFF] is selected for [AM] in [SRC SELECT] after Radio Timer for AM is selected. (⇒ 4) |
| SSM | SSM 01 – 06 / SSM 07 – 12 / SSM 13 – 18: Automatically resets up to 18 stations for FM. “SSM” stops flashing when the first 6 stations are stored. Select SSM 07 – 12 / SSM 13 – 18 to store the following 12 stations. |
*1 Selectable only when [ONCE] or [WEEKLY] is selected in step 1.
Default: XX
| LOCAL SEEK | ON: Searches only FM stations with good reception. ; OFF: Cancels. • Settings made are applicable only to the selected source/station. Once you change the source/station, you need to make the settings again. |
| IF BAND | AUTO: Increases the tuner selectivity to reduce interference noises from adjacent FM stations. (Stereo effect may be lost.) ; WIDE: Subjects to interference noises from adjacent FM stations, but sound quality will not be degraded and the stereo effect will remain. |
| MONO | ON: Improves the FM reception, but the stereo effect will be lost. ; OFF: Cancels. |
| NEWS-STBY*2 | ON: The unit will temporarily switch to News Programme if available. ; OFF: Cancels. |
| REGIONAL*2 | ON: Switches to another station only in the specific region using the “AF” control. ; OFF: Cancels. |
| AF SET*2 | ON: Automatically searches for another station broadcasting the same program in the same Radio Data System network with better reception when the current reception is poor. ; OFF: Cancels. |
| TI SET*2 | ON: Allows the unit to temporarily switch to Traffic Information if available (“TI” lights up). ; OFF: Cancels. |
| PTY SEARCH*2 | Select a PTY code (see below). If there is a station broadcasting a program of the same PTY code as you have selected, that station is tuned in. |
PTY code: NEWS, AFFAIRS, INFO, SPORT, EDUCATE, DRAMA, CULTURE, SCIENCE, VARIOUS, POP M (music), ROCKM (music), EASY M (music), LIGHT M (music), CLASSICS, OTHER M (music), WEATHER, FINANCE, CHILDREN, SOCIAL, RELIGION, PHONE IN, TRAVEL, LEISURE, JAZZ, COUNTRY, NATION M (music), OLDIES, FOLK M (music), DOCUMENT
*2 Only for FM source.
AUX
Use a portable audio player
1 Connect a portable audio player (commercially available).
3.5 mm stereo mini plug with "L" shaped connector (commercially available)
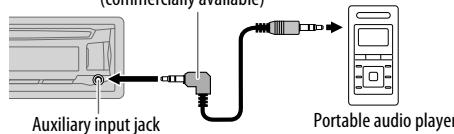
2 Select [ON] for [AUX] in [SRC SELECT]. ( 4)
3 Press SOURCE- repeatedly to select AUX.
4 Turn on the portable audio player and start playback.

Use a 3-core plug head stereo mini plug for optimum audio output.
Use a Bluetooth device
1 Connect the Bluetooth adapter, KS-BTA100 (separately purchased).
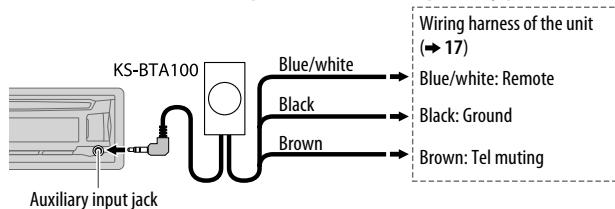
2 Register (pair) the Bluetooth device with KS-BTA100.
3 Select [BT ADAPTER] for [AUX] in [SRC SELECT]. ( 4)
4 Press SOURCE- repeatedly to select BT AUDIO.
5 Start using the Bluetooth device.
For details, refer to the instruction manual of KS-BTA100.
Select a preset equalizer
Press EQ-BASS repeatedly. (or)
Press EQ-BASS, then turn the volume knob within 5 seconds.
Preset equalizer: FLAT (default), HARD ROCK, HIP HOP, JAZZ, POP, R&B, TALK, USER, VOCAL BOOST, BASS BOOST, CLASSICAL, DANCE
Store your own sound settings
1 Press and hold EQ-BASS to enter EASY EQ setting.
2 Turn the volume knob to select an item, then press the knob. Refer to [EASY EQ] for setting and the result is stored to [USER].
- To return to the previous setting item, press .
- To exit, press EQ-BASS.
Other settings
1 Press and hold
2 Turn the volume knob to select an item (see the following table), then press the knob.
3 Repeat step 2 until the desired item is selected/activated or follow the instructions stated on the selected item.
4 Press to exit.
To return to the previous setting item, press .
Default: XX
| EQ SETTING | ||
| EQ PRESET | Select a preset equalizer suitable to the music genre. (Select [USER] to use the settings made in [EASY EQ].)FLAT (default) / HARD ROCK / HIP HOP / JAZZ / POP / R&B / TALK / USER / VOCAL BOOST / BASS BOOST / CLASSICAL / DANCE | |
| EASY EQ | Adjust your own sound settings. The settings are stored to [USER].SUB.W SP*1*2: 00 to +06 (Default: 03SUB.W*1*3: -08 to +08 00BASS LVL: -06 to +06 00MID LVL: -06 to +06 00TRE LVL: -06 to +06 00 | |
| PRO EQ | 1 BASS / MIDDLE / TREBLE: Select a sound tone.2 Adjust the sound elements of the selected sound tone.BASS Frequency: 60/80/100/200 HZ (Default: 80 HzLevel: -06 to +06 00Q: Q1.0/ Q1.25/ Q1.5/ Q2.0MIDDLE Frequency: 0.5/1.0/1.5/2.5 KHZ (Default: 1.0 KHZLevel: -06 to +06 00Q: Q0.75/ Q1.0/ Q1.25 01.25TREBLE Frequency: 10.0/12.5/15.0/17.5 KHZ (Default: 10.0 KHZLevel: -06 to +06 00Q: Q FIX | |
| AUDIO | ||
| BASS BOOST | +01 — +05 (+01): Selects your preferred bass boost level. ; OFF: Cancels. | |
| LOUD | 01 / 02: Boosts low or high frequencies to produce a well-balanced sound at low volume. ; OFF: Cancels. | |
1 Displayed only when [SUB.W] is set to [ON]. (→ 10)
2 Displayed only when [SPK/PRE OUT] is set to [SUB.W/SUB.W]. (→ 10)
*3 Displayed only when [SPK/PRE OUT] is set to [REAR/SUB.W] or [SUB.W/SUB.W]. (→ 10)
| SUB.W LEVEL*4 | SPK-OUT*5 | 00 to +06 (+03): Adjusts the output level of the subwoofer connected via speaker lead. (⇒ 17) |
| PRE-OUT*6 | -08 to +08 (00): Adjusts the output level of the subwoofer connected to the lineout terminals (REAR/SW) through an external amplifier. (⇒ 17) | |
| SUB.W*6 | ON / OFF: Turns on or off the subwoofer output. | |
| SUB.W LPF*4 | THROUGH: All signals are sent to the subwoofer. ; LOW 55HZ / MID 85HZ / HIGH 120HZ: Audio signals with frequencies lower than 55 Hz/ 85 Hz/ 120 Hz are sent to the subwoofer. | |
| SUB.W PHASE*4 | REVERSE (180°)/ NORMAL (0°): Selects the phase of the subwoofer output to be in line with the speaker output for optimum performance. (Selectable only if a setting other than [THROUGH] is selected for [SUB.W LPF].) | |
| FADER | R06 — F06 (00): Adjusts the front and rear speaker output balance. | |
| BALANCE*7 | L06 — R06 (00): Adjusts the left and right speaker output balance. | |
| VOL ADJUST | -15 — +06 (00): Preset the initial volume level of each source (compared to the FM volume level). Before adjustment, select the source you want to adjust. ("VOL ADJ FIX" appears if FM is selected.) | |
| AMP GAIN | LOW POWER: Limits the maximum volume level to 25. (Select if the maximum power of each speaker is less than 50 W to prevent damaging the speakers.) ; HIGH POWER: The maximum volume level is 35. | |
| D.T.exp(Digital Track Expander) | ON: Creates realistic sound by compensating the high-frequency components and restoring the rise-time of the waveform that are lost in audio data compression. ; OFF: Cancels. | |
| TEL MUTING*8 | ON: Mutes the sounds while using the cellular phone (not connected through KS-BTA100). ; OFF: Cancels. | |
| SPK/PRE OUT | Depending on the speaker connection method, select the appropriate setting to get the desired output. (⇒ Speaker output settings) | |
4 Displayed only when [SUB.W] is set to [ON].
5 Displayed only when [SPK/PRE OUT] is set to [SUB.W/SUB.W].
6 Displayed only when [SPK/PRE OUT] is set to [REAR/SUB.W] or [SUB.W/SUB.W].
7 This adjustment will not affect the subwoofer output.
*8 Does not work if [BT ADAPTER] is selected for [AUX] in [SRC SELECT]. (⇒ 4)
Speaker output settings
Select the output setting for the speakers [SPK/PRE OUT], base on the speaker connection method.
Connection via lineage terminals
For connections through an external amplifier. ( 17)
(For KD-R671)
| Setting on [SPK/PRE OUT] | Audio signal through lineout terminal | |
| FRONT | REAR/SW | |
| REAR/REAR | Front speakers output | Rear speakers output |
| REAR/SUB.W | Front speakers output | Subwoofer output |
| SUB.W/SUB.W | Front speakers output | Subwoofer output |
(For KD-R571 / KD-R474 / KD-R472 / KD-R471)
| Setting on [SPK/PRE OUT] | Audio signal through lineout terminal |
| REAR/SW | |
| REAR/REAR | Rear speakers output |
| REAR/SUB.W | Subwoofer output |
| SUB.W/SUB.W | Subwoofer output |
Connection via speaker leads
For connections without using an external amplifier. However, with this settings you can also enjoy the subwoofer output. ( 17)
| Setting on [SPK/PRE OUT] | Audio signal through rear speaker lead | |
| L (left) | R (right) | |
| REAR/REAR | Rear speakers output | Rear speakers output |
| REAR/SUB.W | Rear speakers output | Rear speakers output |
| SUB.W/SUB.W | Subwoofer output | (Mute) |
If [SUB.W/SUB.W] is selected:
- [HIGH 120HZ] is selected in [SUB.W LPF] and [THROUGH] is not available.
- [R01] is selected in [FADER] and selectable range is [R06] to [00]
1 Press and hold
2 Turn the volume knob to select an item (see the following table), then press the knob.
3 Repeat step 2 until the desired item is selected/activated or follow the instructions stated on the selected item.
4 Press to exit.
To return to the previous setting item, press / .
Default: XX
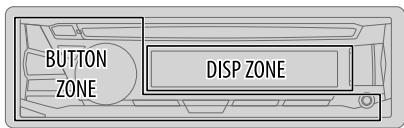
| DISPLAY | |
| DIMMER | Dim the display and buttons illumination. OFF: Dimmer is turned off. ON: Dimmer is turned on. Brightness changes to [NIGHT] setting. (⇒ [BRIGHTNESS]) DIMMER TIME: Set the dimmer on and off time. 1 Turn the volume knob to adjust the [ON] time, then press the knob. 2 Turn the volume knob to adjust the [OFF] time, then press the knob. (Default: [ON]: 18:00 or 6:00 PM [OFF]:6:00 or 6:00 AM) AUTO: Dimmer turns on and off automatically when you turn off or on the car headlights.*1 |
*1 The illumination control wire connection is required. (→ 17)
| BRIGHTNESS | Set the button, display and USB input terminal brightness for day and night separately. 1 DAY / NIGHT: Select day or night. 2Select a zone. 3Set the brightness level (00 to 31). (Default: BUTTON ZONE: DAY: 25; NIGHT: 09 DISP ZONE: DAY: 31; NIGHT: 12) |
| SCROLL*2 | ONCE: Scrolls the display information once.; AUTO: Repeats scrolling at 5-second intervals. ; OFF: Cancels. |
| COLOR (for KD-R571) | |
| PRESET | Select a color for the buttons illumination. • COLOR 01 to COLOR 49 [COLOR 08] • USER: The color you have created for [DAY COLOR] or [NIGHT COLOR] is shown. • COLOR FLOW01 to COLOR FLOW03: Color changes at different speeds. |
| DAY COLOR | Make your own day and night colors for the buttons illumination. 1 RED / GREEN / BLUE: Select a primary color. 2 00 to 31: Select the level. Repeat steps 1 and 2 for all primary colors. • Your setting is stored to [USER] in [PRESET]. |
| NIGHT COLOR | |
| MENU COLOR | ON: Changes the button illumination in menu mode or when selecting a music file from a folder/list. ; OFF: Cancels. |
[NIGHT COLOR] or [DAY COLOR] is changed by turning on or off your car's headlight.
*2 Some characters or symbols will not be shown correctly (or will be blanked).
■ Maintenance
Cleaning the unit
Wipe off dirt on the faceplate with a dry silicone or soft cloth.
Cleaning the connector
Detach the faceplate and clean the connector gently with a cotton swab, being careful not to damage the connector.
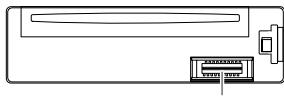
Connector (on the reverse side of the faceplate)
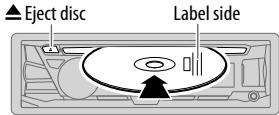
Handling discs:
- Do not touch the recording surface of the disc.
- Do not stick tape etc. on the disc, or use a disc with tape stuck on it.
- Do not use any accessories for the disc.
- Clean from the center of the disc and move outward.
- Clean the disc with a dry silicone or soft cloth. Do not use any solvents.
- When removing discs from this unit, pull them out horizontally.
- Remove burrs from the center hole and disc edge before inserting a disc.
■ More information
Visit also the following website
- Latest firmware updates and latest compatible item list
AndroidTM application JVC MUSIC PLAY - Any other latest information
About discs and audio files
- This unit can only play the following CDs:

-
This unit can play back multi-session discs; however, unclosed sessions will be skipped during playback.
-
Unplayable discs:
-
Discs that are not round.
- Discs with coloring on the recording surface or discs that are dirty.
- Recordable/ReWritable discs that have not been finalized.
-
8 cm CD. Attempting to insert using an adapter may cause malfunction.
-
DualDisc playback: The Non-DVD side of a "DualDisc" does not comply with the "Compact Disc Digital Audio" standard. Therefore, the use of Non-DVD side of a DualDisc on this product cannot be recommended.
-
Playable files:
-
File extensions: MP3 (.mp3), WMA (.wma)
- Bit rate: MP3: 8 kbps — 320 kbps
WMA: 32 kbps — 192 kbps - Sampling frequency:
MP3: 48 kHz, 44.1 kHz, 32 kHz, 24 kHz, 22.05 kHz, 16 kHz, 12 kHz, 11.025 kHz, 8 kHz
WMA: 8 kHz — 48 kHz - Variable bit rate (VBR) files.
Maximum number of characters for file/folder name:
It depends on the disc format used (includes 4 extension characters—<.mp3> or <.wma>).
- ISO 9660 Level 1 and 2: 32 characters
- Romeo: 32 characters
- Joliet: 32 characters
- Windows long file name: 32 characters
About USB devices
- This unit can play MP3/WMA/WAV/FLAC files stored on a USB mass storage class device.
- You cannot connect a USB device via a USB hub.
-
Connecting a cable whose total length is longer than 5m may result in abnormal playback.
The maximum number of characters for: -
Folder names: 64 characters
- File names: 64 characters
- MP3 Tag: 64 characters
WMA Tag: 64 characters
WAV Tag: 64 characters - FLAC Tag: 64 characters
REFERENCES
- This unit can recognize a total of 15 000 files, 500 folders (999 files per folder including folder without unsupported files), and of 8 hierarchies.
- This unit cannot recognize a USB device whose rating is other than 5V and exceeds 1 A.
About iPod/iPhone
Made for
- iPod touch (2nd, 3rd, 4th, and 5th generation)
- iPod classic
- iPod nano (3rd, 4th, 5th, 6th, and 7th generation)
- iPhone 3G, 3GS, 4, 4S, 5, 5S, 5C, 6, 6 Plus
- It is not possible to browse video files on the "Videos" menu in [HEAD MODE].
- The song order displayed on the selection menu of this unit may differ from that of the iPod/ iPhone.
About Android device
This unit supports Android OS 4.1 and above.
- Some Android devices (with OS 4.1 and above) may not fully support Android Open Accessory (AOA) 2.0.
- If the Android device supports both mass storage class device and A0A 2.0, this unit always playback via A0A 2.0 as priority.
Change the display information
Each time you press the display information changes.
- If the information is unavailable or not recorded, "NO TEXT", "NO NAME", or other information (eg. station name) appears.
| FM or AM | Frequency ↔ Day/Clock |
| (For FM Radio Data System stations only)Station name (PS) ⇒ Frequency ⇒ Program type (PTY) ⇒ Radio text+ ⇒ Day/Clock ⇒ (back to the beginning) | |
| CD or USB | (For CD-DA)Playing time ⇒ Day/Clock ⇒ Disc name ⇒ Track title ⇒ (back to the beginning) |
| (For MP3/WMA/WAV/FLAC files)Playing time ⇒ Day/Clock ⇒ Album title/Artist ⇒ Track title ⇒ Folder/file name ⇒ (back to the beginning) | |
| USB-IPOD or ANDROID | Playing time ⇒ Day/Clock ⇒ Album title/Artist ⇒ Track title ⇒ (back to the beginning) |
| AUX | AUX ↔ Day/Clock |
| BT AUDIO | BT AUDIO ↔ Day/Clock |
Available Cyrillic letters
Available characters Display indications


TROUBLESHOOTING
| Symptom | Remedy | |
| General | Sound cannot be heard. | ·Adjust the volume to the optimum level. ·Check the cords and connections. |
| "MISWIRING CHECK WIRING THEN PWR ON" appears. | Turn the power off, then check to be sure the terminals of the speaker wires are insulated properly. Turn the power on again. | |
| "PROTECTING SEND SERVICE" appears. | Send the unit to the nearest service center. | |
| Source cannot be selected. | Check the [SRC SELECT] setting. (⇒ 4) | |
| Radio | ·Radio reception is poor. ·Static noise while listening to the radio. | Connect the antenna firmly. |
| O/USB /iPod | Disc cannot be ejected. | Press and hold ▲ to forcibly eject the disc. Be careful not to drop the disc when it is ejected. |
| "In DISC" appears. | Make sure nothing is blocking the loading slot when you eject the disc. | |
| "PLEASE" and "EJECT" appear alternately. | Press ▲, then insert the disc correctly. | |
| Playback order is not as intended. | The playback order is determined by the file name (USB) or the order in which files were recorded (disc). | |
| Elapsed playing time is not correct. | This depends on the recording process earlier. | |
| "Not SUPPORT" appears and track skips. | Check whether the track is a playable format. (⇒ 12) | |
| "READING" keeps flashing. | ·Do not use too many hierarchical levels and folders. ·Reload the disc or reattach the USB device. | |
| "CANNOT PLAY" flashes and/or connected device cannot be detected. | ·Check whether the connected device is compatible with this unit and ensure the files are in supported formats. (⇒ 12) ·Reattach the device. | |
| Symptom | Remedy | |
| CD/USB/iPod | The iPod/iPhone does not turn on or does not work. | Check the connection between this unit and iPod/iPhone. Detach and reset the iPod/iPhone using hard reset. |
| Correct characters are not displayed. | This unit can only display uppercase letters, numbers, and a limited number of symbols. (⇒ 4) | |
| ANDROID | Sound cannot be heard during playback. Sound output only from the Android device. | Reconnect the Android device. If in [AUDIO MODE], launch any media player application on the Android device and start playback. If in [AUDIO MODE], relaunch the current media player application or use another media player application. Restart the Android device. If this does not solve the problem, the connected Android device is unable to route the audio signal to unit. (⇒ 13) |
| Cannot playback at [AUTO MODE]. | Make sure JVC MUSIC PLAY APP is installed on the Android device. (⇒ 5) Reconnect the Android device and select the appropriate control mode. (⇒ 6) If this does not solve the problem, the connected Android device does not support [AUTO MODE]. (⇒ 13) | |
| "NO DEVICE" or "READING" keeps flashing. | Switch off the developer options on the Android device. Reconnect the Android device. If this does not solve the problem, the connected Android device does not support [AUTO MODE]. (⇒ 13) | |
| Playback is intermittent or sound skips. | Turn off the power saving mode on the Android device. | |
| "CANNOT PLAY" | Make sure Android device contains playable audio files. Reconnect the Android device. Restart the Android device. | |
If you still have troubles, reset the unit. ( 3)
SPECIFICATIONS
| Tuner | FM | Frequency Range | 87.5 MHz — 108.0 MHz (50 kHz step) |
| Usable Sensitivity (S/N = 26 dB) | 0.71 μV/75 Ω | ||
| Quieting Sensitivity (DIN S/N = 46 dB) | 2.0 μV/75 Ω | ||
| Frequency Response (±3 dB) | 30 Hz — 15 kHz | ||
| Signal-to-Noise Ratio (MONO) | 64 dB | ||
| Stereo Separation (1 kHz) | 40 dB | ||
| MW | Frequency Range | 531 kHz — 1611 kHz (9 kHz step) | |
| Usable Sensitivity (S/N = 20 dB) | 28.2 μV | ||
| LW | Frequency Range | 153 kHz — 279 kHz (9 kHz step) | |
| Usable Sensitivity (S/N = 20 dB) | 50 μV | ||
| CD player | Laser Diode | GaAlAs | |
| Digital Filter (D/A) | 8 times over sampling | ||
| Spindle Speed | 500 rpm — 200 rpm (CLV) | ||
| Wow & Flutter | Below measurable limit | ||
| Frequency Response (±1 dB) | 20 Hz — 20 kHz | ||
| Total Harmonic Distortion (1 kHz) | 0.01 % | ||
| Signal-to-Noise Ratio (1 kHz) | 105 dB | ||
| Dynamic Range | 90 dB | ||
| Channel Separation | 85 dB | ||
| MP3 Decode | Compliant with MPEG-1/2 Audio Layer-3 | ||
| WMA Decode | Compliant with Windows Media Audio | ||
| USB | USB Standard | USB 1.1, USB 2.0 (Full speed) |
| Compatible Devices | Mass storage class | |
| File System | FAT12/ 16/ 32 | |
| Maximum Supply Current | DC 5 V----1 A | |
| MP3 Decode | Compliant with MPEG-1/2 Audio Layer-3 | |
| WMA Decode | Compliant with Windows Media Audio | |
| WAV Decode | Linear-PCM | |
| FLAC Decode | FLAC files | |
| Auxiliary | Frequency Response (±3 dB) | 20 Hz---20 kHz |
| Input Maximum Voltage | 1 000 mV | |
| Input Impedance | 30 kΩ | |
| Audio | Maximum Output Power | 50 W×4 or 50 W×2 + 50 W×1 (Subwoofer = 4 Ω) |
| Full Bandwidth Power (at less than 1 % THD) | 22 W×4 | |
| Speaker Impedance | 4 Ω---8 Ω | |
| Preout Level/Load (CD/USB) | 2 500 mV/10 kΩ load | |
| Preout Impedance | ≤ 600 Ω | |
| General | Operating Voltage (10.5 V---16 V allowable) | 14.4 V |
| Maximum Current Consumption | 10 A | |
| Operating Temperature Range | -10°C---+60°C | |
| Installation Size (W×H×D) | 182 mm×53 mm×158 mm | |
| Weight | 1.1 kg |
Warning
- The unit can only be used with a 12 V DC power supply, negative ground.
- Disconnect the battery's negative terminal before wiring and mounting.
- Do not connect Battery wire (yellow) and Ignition wire (red) to the car chassis or Ground wire (black) to prevent a short circuit.
- Insulate unconnected wires with vinyl tape to prevent a short circuit.
- Be sure to ground this unit to the car's chassis again after installation.
Caution
- For safety's sake, leave wiring and mounting to professionals. Consult the car audio dealer.
- Install this unit in the console of your vehicle. Do not touch the metal parts of this unit during and shortly after use of the unit. Metal parts such as the heat sink and enclosure become hot.
- Do not connect the wires of speakers to the car chassis or Ground wire (black), or connect them in parallel.
- Connect speakers with a maximum power of more than 50W . If the maximum power of the speakers is lower than 50W , change the [AMP GAIN] setting to avoid damaging the speakers. ( 10)
- Mount the unit at an angle of less than 30^ .
- If your vehicle wiring harness does not have the ignition terminal, connect Ignition wire (red) to the terminal on the vehicle's fuse box which provides 12 V DC power supply and is turned on and off by the ignition key.
- Keep all cables away from heat dissipate metal parts.
- After the unit is installed, check whether the brake lamps, blinkers, wipers, etc. on the car are working properly.
- If the fuse blows, first make sure the wires are not touching car's chassis, then replace the old fuse with one that has the same rating.
Basic procedure
1 Remove the key from the ignition switch, then disconnect the terminal of the car battery.
2 Connect the wires properly. See Wiring connection. (→ 17)
3 Install the unit to your car. See Installing the unit (in-dash mounting).
4 Connect the terminal of the car battery.
5 Reset the unit. ( 3)
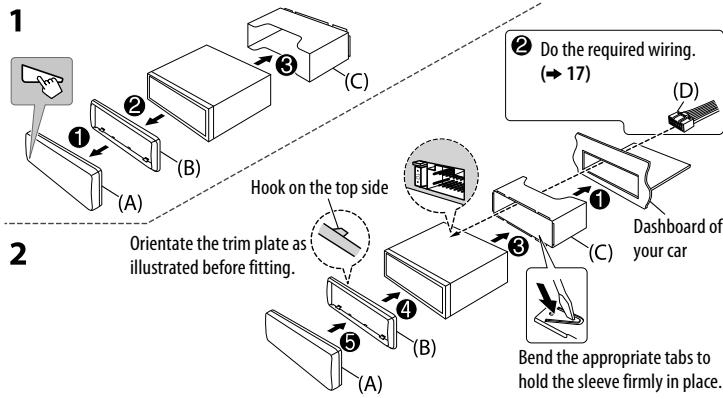
Installing the unit (in-dash mounting)
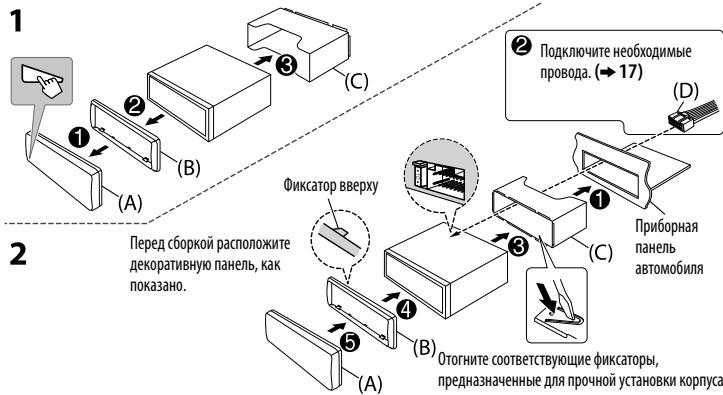
When installing without the mounting sleeve
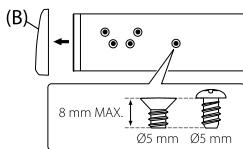
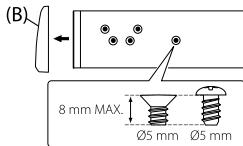
1 Remove the mounting sleeve and trim plate from the unit.
2 Align the holes in the unit (on both sides) with the vehicle mounting bracket and secure the unit with screws (commercially available).
Use only the specified screws. Using wrong screws might damage the unit.
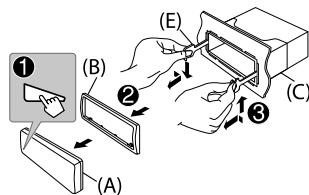
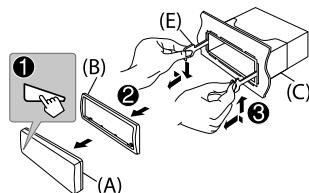
How to remove the unit
Wiring connection
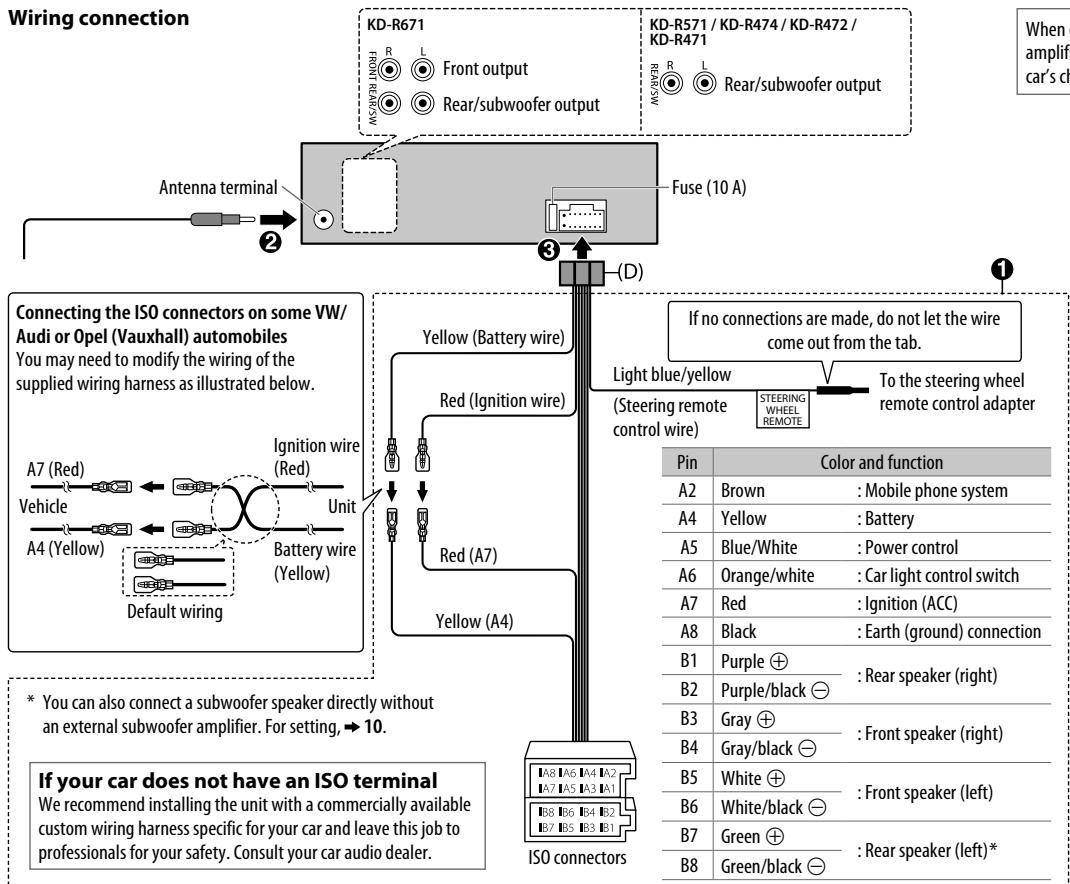
Part list for installation
When connecting to an external amplifier, connect its ground wire to the car's chassis to avoid damaging the unit.
(A) Faceplate

(B) Trim plate

(C) Mounting sleeve
(D) Wiring harness
(E) Extraction key

TABLE DES MATIERES
CD/USB/iPod/Android 5
RADIO 7
AUX 8
RéGLAGES AUDIO 9
RéGLAGES D'AFFICHAGE 11
RÉFERENCES 12
Entretien
Plus d'informations
GUIDE DE DÉPANNAGE 14
SPÉCIFICATIONS 15
INSTALLATION /
RACCORDEMENT 16
AVANT L'UTILISATION
IMPORTANT
CD/USB/iPod/Android 5
RADIO 7
AUX 8

DIGITAL AUDIO ReWritable
CD/USB/iPod/Android 5
PAДИОПРЕМнК 7
AUX 8
3BYKOBbIE HACTPOIKN 9
HACTPOIKIINCPIIE 11
CIPABOCHbIE MATEPNAJIbl 12
06cnykubahne
DOnoJIHnTeIbHaN HΦOpMaZna
YCTPAHEHNE IPOBJIEM 14
TEXHNUECKNE
XAPAKTEPNUCTUKU 15
YCTAHOBKA N
ПОДКЛIOUЧЕНЕ 16
Kaonb3oBaTbcdaHHbIMpyKOBOCTBOM
-Операци NBяСНЯТСВ OСHOBHOM C ИСПОЛБЗОВАнЕМ KНОПК Ha nepeДнй панели модели KD-R571.
B o6b3nHtBbHx cIeRnx HcN0Ib3yIOCTc HnDnKaUcIu nHaHfNlCKOM 3bIke. Bb M0KETe Bbl6paTb 3bIK OTo6paxEHIN m3 MeHO. (一4)
- [XX] 0603Haayet Bbl6paHHbIe 3JMeHtbl.
- ( XX) O3HaayaeT, YTO MaTePnaIbI DoCTynHbI Ha yKa3aHHoN CTpaHnIe.
Pepednnaheb

PpknpeHne
OToeHHeHne

PopdoKc6poca
3anporpaMMnpoBaHnble
HaCTPoiK, KPOME COXpAHeHHbIX
B PAmTn PAIOOCTaHcN, 6yDyT
ydaJIeHbI.
Hauano Bocnpoun3Veeden
ПлкхСОДТУМАТМИЗЕСКА МЕСНЮТСHA,И <|im_start|>assistant нанчэдагТВОСРОТБЕDEНGE.

CD
BxOdHn USB-pa3bem
Ka6ebIb USB 2.0*1
(mmeetBnpoaaxe)
iPod/iPhone
ANDROID*2
IocTyHbIe Ipa BbIbopa
NCTOUYHKN:
KD-R671:
CD/USB/USB-IPOD/Android
KD-R571/KD-R474/KD-R472/
KD-R471:
CD/USB/Android
Yto6bI Hanpmyo Bb6paTb NCTouHnK USB/USB-IPOD/Android, Haxmnte
iPod/USBWIMUSB
U3meHHe NcKOpOCTN BOCPOn3BedeHn ayDnOKHnRn (Audiobook)
(JRAKD-R671)
Пи послuyшавим iPod, когда вьбрано [HEAD MODE]....
1 Haxmte u ydepknaBaiTe haxaToK hONky
2IobepHNte pyuKy perynipOBKn rpoMkoCTn IaBb6opA 3aTeM hakMNte ee.
3 Haxmmtpepyky perynipobkn rpoMkoctn, 4to6bbl6paTbnIeMeHT [AUDIOB0OKS].
4 TObepHnTe pykny perynipOBkn rpoMkoCTn dIy BbI6pa 3aTeMa Haxmnte pyky.
0.5× SPEED / 1× SPEED / 2× SPEED: Bb6peipere jzemaemyko kocopctb Bocnpo3BdEHHa 38ykbokor paoIa3 kateropori "Audiobooks"Ha iPod/iphone.
(По умолчаню: 3авспт OT насторки iPod/Phone.)
5 Haxmnte 4nBbIXoJa.
Дя ВОЗВРATAΚпренидушему Зелем entу NahtpoКи НжмITE KONIKYQ/→.
Bb6op paia n3 npkn/cnncka
1 HaKMnTe KhoNky /
2 IobepHnITE pyKUpyeRyIINPOBKB rPOMKoCTN dNra BbI6Opa nankc/ cnKNa, a 3aTeM HAKMNTE pyKUy.
3 ПовернITE руку рениювки ромковши за вьбoga Файla,а 3aTeM нажмITE руку.
BbIctpbI nonck
Ecn y Ba Ic Mecetra BoJbOe KOJIueCTBO foAINOB, Bbl MOKeTbe BInONHnIb b6IbTbr NIOCK NO HIM.
CIPABOCHbIE MATEPNAJIbI
-Даимец уточеду можек ралочь ватыdo 15 000 садов,500nanok (999 садов nanke,Бкногая nanky 6ez henoIgDkBaMbEAmBhoN 的8甲胺xyn.
- YTO tycPBTOB he paco3n3aet yctPBCTBA USB C HOMMHANHBM HANPAKHEHEM,OTNIHbIM oT 5 B,N HOMHHAMBHbIM TOKON CBVUEI A 1
06 iPod/iPhone
Made for
- iPod touch (2nd, 3rd, 4th u 5th generation)
- iPod classic
- iPod nano (3rd, 4th, 5th, 6th u 7th generation)
iPhone 3G, 3GS, 4, 4S, 5, 5S, 5C, 6, 6 Plus - Плосмот BPdoeФайноВ МнEO"Videos"В ржиме [HEAD MODE] HeBO3MOxHeN.
- Topjokn OTOb6aekhenia Nceeh B MEmIO bIbOpa DAnHOrO UcTpoCTBa MOKET OTOnHAtzBc OT TopjoknA neceB N pOnpRbtebae IPod/IFhone.
06 yctpoictbax Android
-ДанhoeустбюпдержьаertAndroid OS 4.1и Вьиe.
- Hekotophe yctrojcbTa Android (c OS 4.1 n BvIe) MoryT He noJdePkrmbTb PnIOHcTb Android Open Accessor (AOA) 2.0.
- EcnIyUcTpoIcTBo Android odHOBpeMeHHNoIeepKbMaTea3ZaONMHaIOuIeYeUcTpoCTBa 60IbIoIe EMKOCTn I AOA 2.0, daHnooe YcTpoIcTBo BceRa DcoPnI3BDoIT UpeE3 AOA 2.0 bKaueCTBe npHOpITeta.
I3mehenhe oTo6paKaemn HhOpMaun
KaKdoe HauTae KhoKn C- nepeKIOuayet OTo6paXaemyUHΦopMaio.
EcnHnHpMaTuaHeN DoctyTuHaI hnnAteHn3aCana, Oto6paKaetra CcooSuHeneN"NO TEXT"; "NO NAME"; nnn dpyrta HnHpMaTuaHe (hAnHPmEr, HsBaHBeNae PdouToCTAHUn).
Ctanhaptnna npoceypa
1 13aBNEKITE KJIouN 13aZMAK3aZKIAHANH, 3aTEM OTcoeDNHNTpe 3aBeM -ABTOMObUNHOrO AKKMyIIToPA.
2 PpaBnIbHO nOdkNIOUHTe npOBoJa.
Cm. pa3dien "PoioknoueHne npoBOOb" ( 17)
3 YctahOBte yCTpoCTBO B BaIeM abTOMO6nne.
Cm. pa3dien"YctaHObKa yCTpoiCTBa (yCTaHOBk B npn6OpHy nHaenb).
4 NpoknIOHTe KEmmy
abTOMo6nIbHoro aKKymyIaTOPa.
5 BbINOJIHnTe c6poc yctpoiCTBa. ( 3)
YcTaHOBKa yCtpoiCTBa (yCtahOBKa B npu6OpHyo naHeIb)
Pn yctaHOBke 6e3 nocaoHoro Kopnyca
1 CHIMMITE noCaoDChyB KOpNc uKeKopATNBHyO naHEn bCyTPOCTBA.
2 CoBMeCTnTe OTBePcTnB yCtPoIcTBe (c 6oEnx CTopoH) C MOHTaXHoKOHCoIbBo ABTOMObnu IN 3aKePmTe yCtPoIcTBO BnHTaMn (KOToPbIe MoKHO npNo6pctn B Mara3nHe)
NcnoIb3yIe TOnBko CneuAnbHnBe BnHTbl. IcnoIb3OBaHnHe HenoDxOaIHX BnHTOB MokET pINBECTNI K NOBpeXdEHNO YcTPOJCTBA.
IopraoknBneueHna yctpoiCTBa

Iopknouchen npoB0OB
PnnpoDcOeMHENH BHeUHero YcUmNtEnera
poDcOeMHNITe erO npOBoD 3aZEMMeHNs K KopnyCy
ABTOMOBNI, TTObI pNeOToBpATiTb NOBpEKdHne
yctPOrCTBa.
Cnncok Detanei yctaHOBKn
(A)пеледяпань
The marking of products using lasers
The label is attached to the chassis/case and says that the component uses laser beams that have been classified as Class 1. It means that the unit is utilizing laser beams that are of a weaker class. There is no danger of hazardous radiation outside the unit.
- Microsoft and Windows Media are either registered trademarks or trademarks of Microsoft Corporation in the United States and/or other countries.
- "Made for iPod," and "Made for iPhone" mean that an electronic accessory has been designed to connect specifically to iPod, or iPhone, respectively, and has been certified by the developer to meet Apple performance standards. Apple is not responsible for the operation of this device or its compliance with safety and regulatory standards. Please note that the use of this accessory with iPod or iPhone may affect wireless performance.
- iPhone, iPod, iPod classic, iPod nano, and iPod touch are trademarks of Apple Inc., registered in the U.S. and other countries.
Lightning is a trademark of Apple Inc.
Android is trademark of Google Inc.
libFLAC
Copyright (C) 2000,2001,2002,2003,2004,2005,2006,2007,2008,2009 Josh Coalson
Redistribution and use in source and binary forms, with or without modification, are permitted provided that the following conditions are met:
- Redistributions of source code must retain the above copyright notice, this list of conditions and the following disclaimer.
- Redistributions in binary form must reproduce the above copyright notice, this list of conditions and the following disclaimer in the documentation and/or other materials provided with the distribution.
- Neither the name of the Xiph.org Foundation nor the names of its contributors may be used to endorse or promote products derived from this software without specific prior written permission.
THIS SOFTWARE IS PROVIDED BY THE COPYRIGHT HOLDERS AND ONTRIButors "AS IS" AND ANY EXPRESS OR IMPLIED WARRANTY, INCLUDING, BUT NOT LIMITED TO, THE IMPLIED WARRANTYES OF MERCHANTABILITY AND FITNESS FOR A PARTICULAR PURPOSE ARE DISCLAIMED. IN NO EVENT SHALL THE FOUNDATION OR COLNTRIBUTORS BE LIABLE FOR ANY DIRECT, INDIRECT, INCIDENTAL, SPECIAL, EXEMPLARY, OR CONSEQUENTIAL DAMAGES (INCLUDING, BUT NOT LIMITED TO, PROCEDURE OF SUBSTITUTE GOODSOR SERVICES;LOSSOFUSE,DATA,OR PROFITS;OR BUSINESSINTERRUPTION) HOWEVER CAUSED AND ON ANY THEORY OF LIABILITY, WHETHER IN CONTRACT,STRICT LIABILITY, OR TORT (INCLUDING NEGLIGENCE OR OTHERWISE) ASING IN ANY WAY OUT OF THE USE OF THIS SOFTWARE, EVEN IF ADVISED OF THE POSSIBILITY OF SUCH DAMAGE.