Turbo Turtle - Pool POLARIS - Free user manual and instructions
Find the device manual for free Turbo Turtle POLARIS in PDF.

| Product Type | Automatic pool cleaner |
| Brand | Polaris |
| Model | Turbo Turtle |
| Category | Pool |
| Usage | Above-ground pools (Turbo Turtle model); also available for inground pools (Polaris 165) |
| Dimensions | Approximately 40 cm diameter |
| Weight | Approximately 2.5 kg |
| Power source | Hydraulic (pool water pressure) |
| Recommended operating pressure | 5 to 10 psi (35 to 70 kPa) |
| Filtration capacity | Reusable filter bag |
| Hose length | Adaptable to pool depth and length |
| Cleaning type | Suction and jet sweeping |
| Movement mechanism | Random, direction change every 15 to 25 seconds |
| Relief valve | Cleaner speed adjustment |
| Universal wall fitting | Included (1-1/2 inch female thread) |
| Included accessories | Surface module, wheel cage, sweep hose, jet sweep head, all-purpose bag, float hose, quick connect, universal wall fitting (UWF) |
| Maintenance | Regular cleaning of bag and filter strainer |
| Precautions | Disconnect before backwashing or chemical treatment; remove before swimming |
| Spare parts | Use only genuine Polaris parts |
| Warranty | Warranty card to be returned |
| Customer service | Zodiac Pool Systems LLC |
Frequently Asked Questions - Turbo Turtle POLARIS
User questions about Turbo Turtle POLARIS
0 question about this device. Answer the ones you know or ask your own.
Ask a new question about this device
Download the instructions for your Pool in PDF format for free! Find your manual Turbo Turtle - POLARIS and take your electronic device back in hand. On this page are published all the documents necessary for the use of your device. Turbo Turtle by POLARIS.
USER MANUAL Turbo Turtle POLARIS
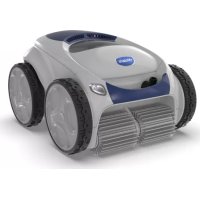
natural_image
Three industrial water purifier devices: a flat-tube manometer, a turtle-shaped device, and a coiled-coated device (no visible text or symbols)OWNER'S MANUAL
English | Français | Deutsch
- Before installing the Polaris®, make sure the pool filter is clean.
- New plumbing lines should be flushed out before installing the Polaris.
- Do not handle the Polaris while it is operating.
• Always remove the Polaris before swimmers enter the pool. - Disconnect the Polaris from the pool wall when cleaning or backwashing the pool filter.
- After cleaning or backwashing, let the filtration system run for at least five minutes before re-connecting the Polaris.
- Always remove the Polaris from the pool before chemical shock treatments.
For customer service or support:
- Please mail Warranty Card immediately.
• To contact Polaris: Zodiac Pool Systems LLC
2882 Whiptail Loop #100
1-800-822-7933
polarispool.com
Carlsbad, CA 92010
Zodiac Pool Systems Canada, Inc.
2-3365 Mainway
Burlington, ON, Canada L7M 1A6
1-800-647-4004
polarispool.ca
WARNING: USE OF POLARIS 65/TURBO TURTLE, 165 IN A VINYL LINER POOL
Certain vinyl liner patterns are particularly susceptible to rapid surface wear or pattern removal caused by objects coming into contact with the vinyl surface, including pool brushes, pool toys, floats, fountains, chlorine dispensers, and automatic pool cleaners. Some vinyl liner patterns can be seriously scratched or abraded simply by rubbing the surface with a pool brush. Ink from the pattern can also rub off during the installation process or when it comes into contact with objects in the pool. Zodiac Pool Systems LLC is not responsible for, and the Limited Warranty does not cover, pattern removal, abrasion or markings on vinyl liners.
Introduction
Congratulations on the purchase of your new automatic pool cleaner, and thank you for choosing Polaris. The Polaris® 65/Turbo Turtle for above ground pools and the Polaris 165 for in-ground vinyl or fiberglass pools are designed to give you years of dependable and efficient service.
Like most mechanical devices, these cleaners will require periodic adjustments, routine maintenance, and the replacement of certain hardworking parts. Please have your cleaner checked occasionally by your local Polaris dealer or authorized service center.
Always insist on genuine Polaris replacement parts. Non-Polaris parts are not made to our specifications. They may have an adverse effect on the operation of your Polaris or may even damage it.
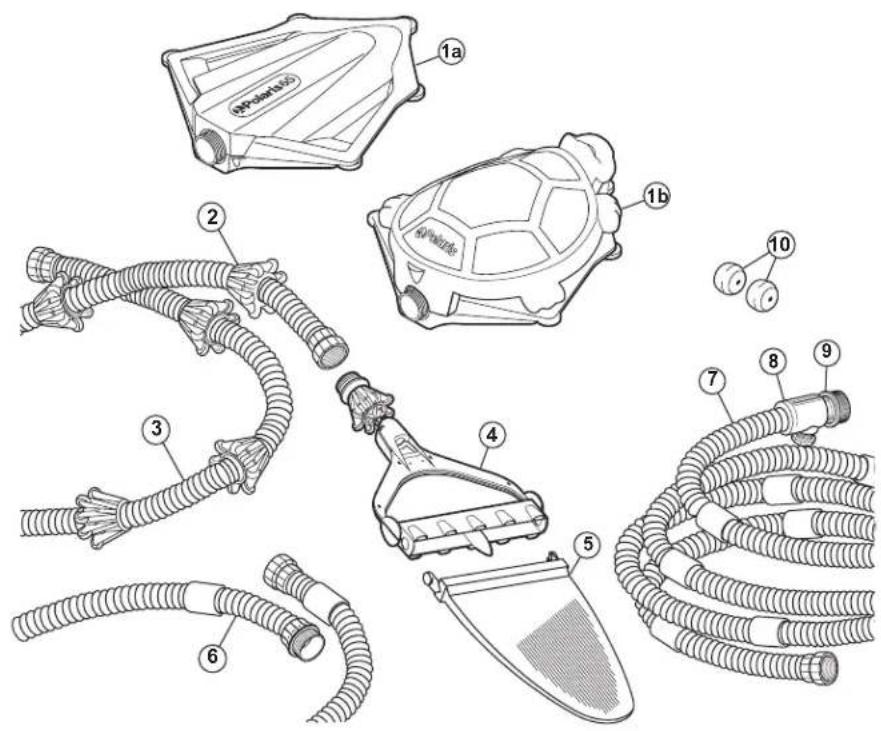
Polaris Complete Cleaner
1a. Surface Module
1b. Turtle Top
2. Wheel Cage
3. Sweep Hose
4. Jet Sweep Assembly
5. All-Purpose Bag
- Float Hose Extension with Connector - 165 and Turbo Turtle only
- Float Hose
8 Quick Disconnect - Universal Wall Fitting (UWF)
- Eyeball Regulators (2) - 165 only
text_image
Technical diagram of a medical device with labeled parts including hoses, connectors, and a device housingQuick Installation Instructions
Three quick steps to install and get maximum performance from the Polaris®:
• Install the Universal Wall Fitting (UWF) with Quick Disconnect
- Adjust sweep hose to fit pool depth
- Adjust float hose to fit pool length
1
Install the Universal Wall Fitting
Installs in minutes on pools with a 1-1/2" female threaded return line.
- Turn on the filtration pump and flush out the plumbing line. Turn pump off.
- Polaris 165 Only — Use the return line nearest the center point of the longest pool wall for the Polaris. If there are two, choose the return line closest to the pool equipment. Place the eyeball regulator disks into the remaining return lines.
- Remove the UWF from the Quick Disconnect and screw the UWF into the return opening.
- Turn the Quick Disconnect clockwise into the UWF and pull away to secure.
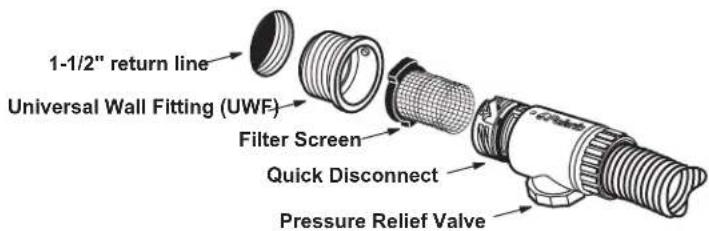
text_image
1-1/2" return line Universal Wall Fitting (UWF) Filter Screen Quick Disconnect Pressure Relief ValveIf the return line has either of the fittings diagrammed below, remove the parts as shown and then install the UWF.
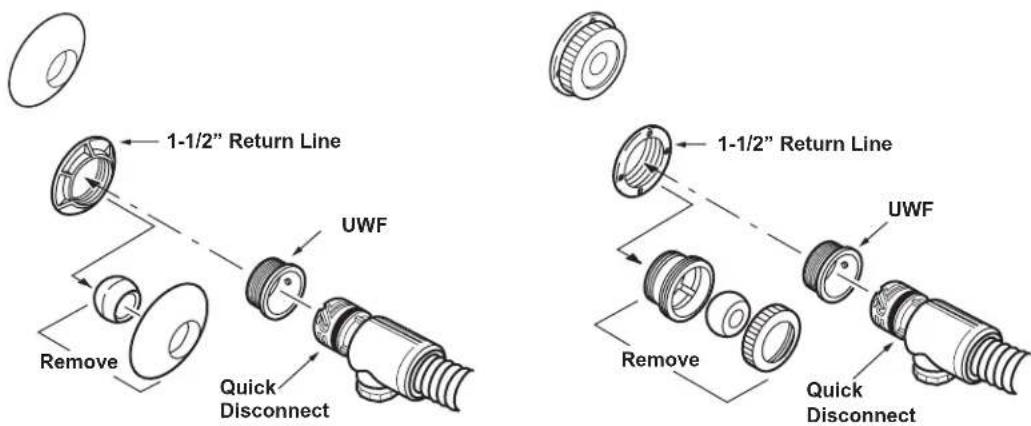
text_image
1-1/2" Return Line UWF Remove Quick Disconnect 1-1/2" Return Line UWF Remove Quick DisconnectIf the return line differs from all of these, contact Polaris for assistance.
2
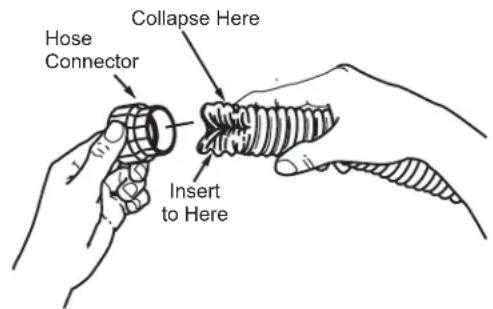
Adjust Sweep Hose to Fit Pool Depth
- Measure the deepest part of the pool. Add two feet to this measurement to determine the correct length for the sweep hose.
- If the sweep hose is longer than the measured amount, cut off the excess hose.
- Remove the hose connector from the excess hose piece just cut.
- Use fingers to collapse sweep hose. Push hose into connector until the first groove is inside.
- Slide fingers inside hose, through connector, and pop hose back to original shape.
text_image
Hose Connector Collapse Here Insert to Here3
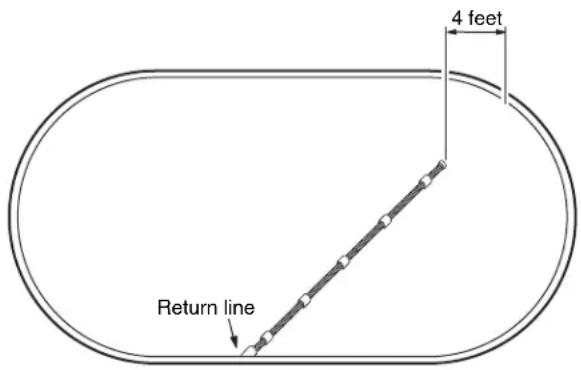
Adjust Float Hose to Fit Pool Length
With float hose attached to the pool wall at the return line, extend the hose to the farthest point of the pool. The end of the hose should be 4 feet shorter than this point.
Hose too long? Cut the excess float hose. Remove the hose connector from the excess hose piece and attach it to the new end of the float hose as instructed above.
text_image
4 feet Return lineHose too short? For Polaris ^® 165 only, add the float hose extension between the existing float hose section and the surface module. Remeasure and adjust as necessary.
- Open the frame of filter bag completely and attach it to jet sweep assembly. Attach assembly to sweep hose.
- Attach float hose and sweep hose to the surface module.
- Put the Polaris in the pool and turn on the pool filtration pump.
- Extend the float hose to the farthest point in the pool. When the pool pump is running, the surface module should be approximately one foot from the pool wall.
Fine Tuning the Polaris® Cleaner
When operating correctly, the Polaris vacuums and sweeps all surfaces, moving randomly throughout the pool. The surface module floats on the water's surface recirculating clean, filtered water. The sweep hose and filter bag move across the pool floor collecting dirt and debris.
Approximately every 15-25 seconds the Polaris will change directions.
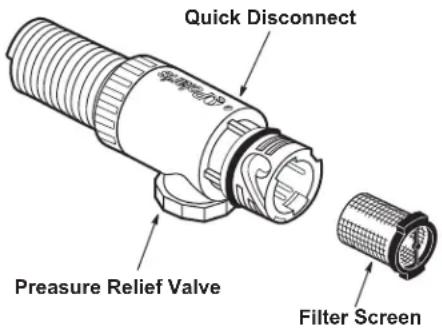
Pressure Relief Valve
The pressure relief valve in the Quick Disconnect automatically releases water if the Polaris is receiving too much water pressure. It can also be used to regulate the movement of the cleaner.
If the Polaris changes directions too quickly, adjust the pressure relief valve to slow the cleaner.
text_image
Quick Disconnect Pressure Relief Valve Filter ScreenRoutine Maintenance
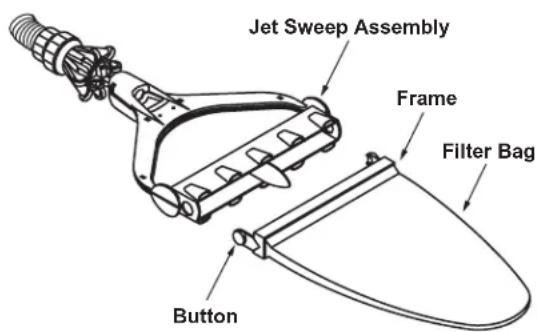
Cleaning the Filter Bag
Depress the buttons on the jet sweep assembly to release the bag. Turn the filter bag inside-out to remove the debris.
Open frame completely and reattach bag.
text_image
Jet Sweep Assembly Frame Filter Bag ButtonCleaning the Filter Screen
The filter screen inside the Quick Disconnect captures debris missed by the pool filtration system. To clean, pull it out, rinse it and press it back into place.
Backwashing the Pool Filter
Always disconnect the Polaris from the pool wall before cleaning or backwashing the pool filter. After cleaning or backwashing, let the filtration system run for at least five minutes to flush out the return lines before re-connecting the Polaris.
Storage and Winterizing
Never store the Polaris in direct sunlight. When storing for the winter, drain out all the water (freeze damage is not covered under the warranty). Remove the sweep jet assembly from the sweep hose and store it flat. Hang or lay the hoses straight. Remove all fittings from the return lines including the UWF. In some cases, it may be necessary to use the UWF Removal Tool (part #10-102-00) available from an authorized Polaris dealer.
Troubleshooting
If the Polaris ^® cleaner regularly displays the following actions, adjustments may be necessary to restore performance. Refer to exploded parts diagram for part references.
Action: Polaris does not clean the entire pool or runs slowly.
Solution: 1. Verify that the pressure relief valve is releasing water. If it is not, clean or backwash the pool filter.
- Check the filter screen in the quick disconnect and clean if necessary.
- Verify that the float hose is the proper length.
- Remove the surface module top. With the Polaris operating, verify that the randomizer tube is moving back and forth.
Ifitisnot moving: Turn off pump, disconnect hoses, look into the mechanism and locate the filter connector inside the randomizer tube. If it is covered with debris or algae, remove the connector chamber, cylinder, and piston. Pull out the randomizer tube and clean the filter connector. If the connector is clean, replace the piston.
If it is moving: Watch the randomizer ball in the mechanism. If it does not move within 2 minutes, replace the randomizer tube and piston.
- Verify that the water pressure is between 5 and 10 psi. A pressure tester (part #6-113-00) is available through your participating Polaris dealer.
Action: Surface module dives under the water or leans to one side.
Solution:1.Straightentwisted hoses.
- Lift surface module out of the water, empty it and then shake it. If water is still heard inside, remove the top, pull out the drain plug assembly and drain the module.
- Adjust the pressure relief valve until the surface module levels off.
- Verify that the water pressure is between 5 and 10 psi. A pressure tester (part #6-113-00) is available from an authorized Polaris dealer.
Action: The float hose remains coiled.
Solution: 1. See "Polaris does not clean entire pool."
- Lay the float hose out straight in the sun to remove the coils.
Action: Surface module moves too fast.
Solution: 1. Adjust the pressure relief valve until the surface module slows down.
-
165 only: Remove one of the eyeball regulators and readjust the pressure relief valve if necessary.
-
Verify that the water pressure is between 5 and 10 psi.
Action: Bag does not stay on the pool floor.
Solution: 1. Verify that the bag has been installed correctly.
- Check for air bubbles around the jet body assembly. This may indicate air in the plumbing lines.
- See "Surface module moves too fast."
Informations importantes
2882 Whiptail Loop #100
Carlsbad, CA 92010
1-800-822-7933
polarispool.com
Zodiac Pool Systems Canada, Inc.
2-3365 Mainway
Burlington, ON, Canada L7M 1A6
1-800-647-4004
polarispool.ca
AVERTISSEMENT CONCERNANT L'UTILISATION DU POLARIS DANS UNE PISCINE A REVETEMENT VINYLE
text_image
Technical diagram of a powertrain device with labeled parts including hoses, sensors, and a battery.Installation du raccord mural universel (UWF)
2882 Whiptail Loop #100
Carlsbad, CA 92010
1-800-822-7933
polarispool.com
Zodiac Pool Systems Canada, Inc.
2-3365 Mainway
Burlington, ON, Canada L7M 1A6
1-800-647-4004
polarispool.ca
text_image
Technical diagram showing exploded view of a medical device with labeled parts including a turtle, hoses, and a shield.2882 Whiptail Loop #100
Carlsbad, CA 92010
1-800-822-7933
polarispool.com
Zodiac Pool Systems Canada, Inc.
2-3365 Mainway
Burlington, ON, Canada L7M 1A6
1-800-647-4004
polarispool.ca
ADVERTENCIA: USO DEL POLARIS EN UNA PISCINA REVESTIDA DE VINILO
text_image
Technical diagram of a medical device with labeled parts including hoses, connectors, and a turtle.2882 Whiptail Loop #100
Carlsbad, CA 92010
1-800-822-7933
polarispool.com
Zodiac Pool Systems Canada, Inc.
2-3365 Mainway
Burlington, ON, Canada L7M 1A6
1-800-647-4004
polarispool.ca
AVVERTENZA: USO DEL POLARIS IN UNA PISCINA CON RIVESTIMENTO IN VINILE
text_image
Technical diagram of a medical device with labeled parts including hoses, connectors, and a device labeled 1a.2882 Whiptail Loop #100
Carlsbad, CA 92010
1-800-822-7933
polarispool.com
Zodiac Pool Systems Canada, Inc.
2-3365 Mainway
Burlington, ON, Canada L7M 1A6
1-800-647-4004
polarispool.ca
text_image
Technical diagram of a vacuum cleaner with labeled parts including hoses, air purifier, and control panelZodiac Pool Systems LLC
2882 Whiptail Loop # 100, Carlsbad, CA 92010
1.800.822.7933 | polarispool.com
Zodiac Pool Systems Canada, Inc.
2-3365 Mainway Burlington, ON, Canada
L7M 1A6
1-800-647-4004 | polarispool.ca
^® 2021 Zodiac Pool Systems LLC
All rights reserved. Polaris® and the 3-wheeled cleaner design are registered trademarks of Zodiac Pool Systems LLC. All other trademarks referenced are the property of their respective owners.
TL-1021 Rev. D 1103