
PIXEL - Pool POLARIS - Free user manual and instructions
Find the device manual for free PIXEL POLARIS in PDF.

| Product Type | Robotic pool cleaner |
| Brand | Polaris |
| Model | PIXEL |
| Dimensions (L x W x H) | 36 x 29 x 29 cm |
| Weight | 6 kg |
| Charger power supply | 110-240 V, 50/60 Hz, Class II |
| Battery voltage | 21.6 V DC |
| Battery capacity | 5.1 Ah |
| Operating power | 25 W |
| Filtration | General purpose filter basket |
| Cycle duration | 90 minutes (floor only) |
| Water temperature | 13 °C to 35 °C |
| Operating depth | 0.4 m to 4 m |
| Charging temperature | 5 °C to 43 °C |
| Package contents | Cleaner, removal hook, charger, floating leash |
| Safety | Double insulation, requires GFCI outlet, auto shut-off when out of water |
| Maintenance | Clean filter basket after each cycle, replace brushes and tracks if worn |
| Spare parts | Available at polarispool.com |
| Warranty | Subject to product registration and invoice |
Frequently Asked Questions - PIXEL POLARIS
User questions about PIXEL POLARIS
0 question about this device. Answer the ones you know or ask your own.
Ask a new question about this device
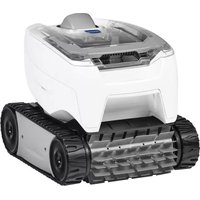
Download the instructions for your Pool in PDF format for free! Find your manual PIXEL - POLARIS and take your electronic device back in hand. On this page are published all the documents necessary for the use of your device. PIXEL by POLARIS.
USER MANUAL PIXEL POLARIS
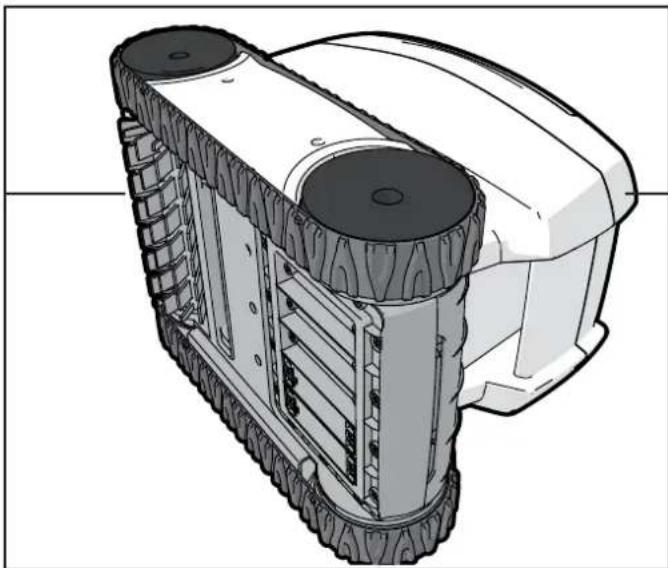
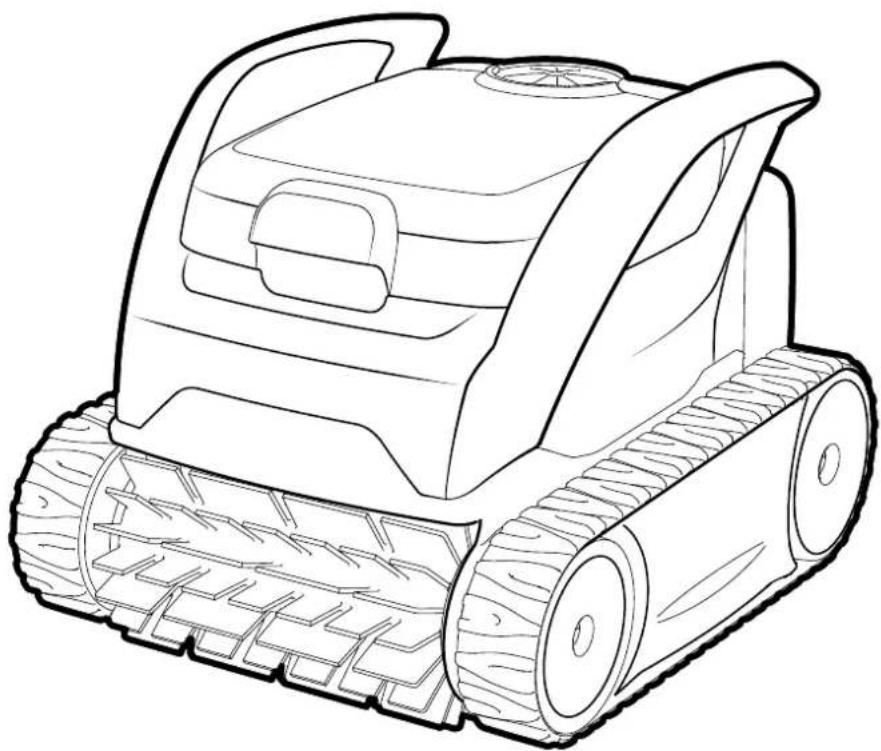
natural_image
Line drawing of a tracked robotic vehicle with visible tracks and wheels (no text or symbols)PIXEL™ Compact Cordless Robotic Cleaner
TYPE ET37--
WARNING
FOR YOUR SAFETY – For anything other than the routine cleaning and maintenance described in this guide, this product must be serviced by a qualified professional with sufficient experience in pool equipment installation and maintenance so that all of the instructions in the product's complete installation and operations manual can be followed exactly. All safety instructions in the complete manual must be followed explicitly in order to prevent injury hazards. Improper installation and/or operation may void the warranty. Never turn the cleaner on unless it is fully submerged in the water. Doing so may void the warranty and may cause severe damage to the cleaner motors.
Table of Contents
Section 1. Important Safety Instructions......4
Section 2. Cleaner Specifications ....6
2.1 General Specifications 6
Section 3. General Cleaner Operation ......6
3.1 Set Up Charging....7
3.2 Information/Status LED 7
3.3 Charger Status 7
3.4 Starting the Cleaner 8
3.5 Submerge the Cleaner 8
3.6 Removal 9
Section 4. Maintenance....10
4.1 Clean the Filter Canister....10
4.2 Charge the Cleaner 10
4.3 Storage....10
4.4 Replacing Wear Parts....11
4.5 Replacing the Tracks....12
4.6 Spare Parts....12
4.7 Recycling & Disposal....12
Section 5. Troubleshooting .... 13
5.1 General Troubleshooting 13
5.2 Cleaner Error Codes....14
SAVE THESE INSTRUCTIONS
THANK YOU FOR PURCHASING THIS POLARIS CLEANER.
YOUR POLARIS ROBOTIC CLEANER HAS BEEN DESIGNED AND MANUFACTURED TO BE EASILY INSTALLED AND TO PROVIDE LOW MAINTENANCE OPERATION. PRIOR TO INSTALLING YOUR NEW POLARIS CLEANER, PLEASE DO THE FOLLOWING:
1) Apply for product registration.
2) Record your purchase information on the spaces provided below.
3) Attach your invoice (or a copy) to this page.
Taking these steps will help ensure prompt warranty service, should it be required. If service is required, please contact your original dealer. If the original dealer does not perform warranty service, please visit polarispool.com to locate an independent service company near you. If you are unable to locate a service company, please call our Technical Support department at 1.800.822.7933.
RECORD YOUR POLARIS CLEANER DATA HERE:
Date of Purchase ____ Purchased From ____ Serial Number: ____
(located on robot head)
City ____ State/Province ____ Zip/Postal Code ____
FCC Statement
This device complies with Part 15 of the FCC Rules and IC license-exempt RSS standard. Operation is subject to the following two conditions: (1) this device may not cause harmful interference, and (2) this device must accept any interference received, including interference that may cause undesired operation.
NOTE: This equipment has been tested and found to comply with the limits for a Class B digital device, pursuant to part 15 of the FCC Rules. These limits are designed to provide reasonable protection against harmful interference in a residential installation. This equipment generates, uses and can radiate radio frequency energy and, if not installed and used in accordance with the instruction, may cause harmful interference to radio communications. However, there is no guarantee that interference will not occur in a particular installation. If this equipment does cause harmful interference to radio or television reception which can be determined by turning the equipment off and on, the user is encouraged to try to correct interference by one or more of the following measures:
- Reorient or relocate the receiving antenna.
– Increase the separation between the equipment and receiver. - Connect the equipment into an outlet on circuit different from that to which the receiver is connected.
- Consult the dealer or an experienced radio/TV technician for help
CAUTION
Any changes or modifications not expressly approved by the part responsible for compliance could void the user's authority to operate the equipment.
SAVE THESE INSTRUCTIONS
Section 1. Important Safety Instructions
READ AND FOLLOW ALL INSTRUCTIONS
Congratulations on purchasing this Polaris Robotic Cleaner. Please read through the entire manual before installing your new robotic pool cleaner. Your cleaner must be installed and operated as specified.
WARNING
Failure to comply with the following warnings can result in permanent injury, electrocution or death.
PREVENT ELECTRICAL SHOCK
To reduce risk of electrical shock:
- Please read the manual carefully, especially the safety instructions, and make sure you understand them fully before using the product. Only use the equipment for the purposes specifically intended by the manufacturer. Carefully follow the instructions on operation, maintenance and repair.
- This Cleaner is not suitable for use by children and people with reduced physical, sensory or mental capabilities or inexperienced people who are not familiar with the product. Children should be supervised to ensure that they do not play with the appliance, even when it is not in operation.
- Operators who perform maintenance must be fully conversant with its special features and safety regulations. Before using the cleaner, carefully read the operating manual and make sure you understand the instructions.
- Only use original spare parts, do not change the design of the Cleaner, do not remove, bypass or tamper with the safety devices installed. The manufacturer shall not be held liable if non-original spare parts are used. Failure to comply with this requirement may seriously endanger the health and safety of people.
- Ensure the cleaner is turned off before performing any adjustment or maintenance that the user is authorized to perform. Cleaning and maintenance must not be performed by children.
- Do not use the cleaner if the top cover or brushes are damaged.
- Never use and recharge the cleaner in explosive and/or flammable environments.
- Only use the battery charger supplied by the manufacturer. Improper use may cause electric shocks, overheating or leakage of corrosive liquids from the battery.
- If any liquid leaks, wash the cleaner with water/neutralizer; in case of contact with eyes, seek medical attention. Liquid ejected from the battery may cause irritation or burns.
- If the battery charger is damaged, have it replaced by the manufacturer or an authorized Fluidra dealer. DO NOT attempt to service the battery charger. A damaged cord can lead to contact with live parts.
- The product contains magnets and components that emit electromagnetic fields. The magnets and electromagnetic fields can interfere with pacemakers, defibrillators and other medical devices. Keep a safe distance between the medical device and the product. Consult your doctor or the manufacturer of the medical device for specific information about it. If you think that the product is interfering with a pacemaker, defibrillator, or any other medical device, stop using the product starting from the distance at which you feel interference.
- Do not smoke around, or allow the cleaner to be near sparks or flames. The batteries can generate gases which could possibly ignite.
- If at any time you detect any physical damage to the cleaner chassis, such as swollen or cracked casing, STOP and do not continue discharging or charging the battery.
- Never attempt to disassemble a battery pack. A battery can produce a short circuit causing severe burns. Avoid contact between any wires or metal items that could cause sparking and short circuit the battery. If a battery leak occurs, avoid any contact with the leaking fluids and place the cleaner in a plastic bag. Wear complete eye protection, gloves and protective clothing when disposing of cleaner. If leaking fluids come in contact with skin and clothing, wash immediately with plenty of soap and water. If leaking fluids come in contact with eyes, do not rub eyes, immediately flush eyes with cool running water for at least 15 minutes and do not rub them. Seek medical attention as soon as possible.
- Do not use a battery operated appliance that is damaged or modified. Damaged or modified batteries may exhibit unpredictable behavior resulting in fire, explosion, or risk of injury.
- Connect unit to receptacle protected by a ground fault circuit interrupter (GFCI). Such a GFCI receptacle should be provided by a qualified installer and should be tested on a routine basis. To test the GFCI, push the test button. The GFCI should interrupt power. Push the reset button. Power should be restored. If the GFCI fails to operate in this manner, the GFCI is defective. If the GFCI interrupts power to the pump without the test button being pushed, a ground current is flowing, indicating the possibility of an electric shock. Do not use this product. Disconnect the cleaner and have the problem corrected by a qualified service representative before using.
WARNING
- Do not enter pool while the Polaris cleaner is in water.
- To reduce the risk of electrical shock, do not use the Polaris robotic cleaner or charger if the cord is worn or damaged. Contact Zodiac Pool Systems LLC Technical Support immediately for proper servicing and replacement of the damaged cord.
- Do not use a battery pack or battery operated appliance that is damaged or modified. Damaged or modified batteries may exhibit unpredictable behavior resulting in fire, explosion or risk of injury.
- Double insulation—For continued protection against possible electric shock, use only identical replacement parts when servicing. Do not attempt repair of the Polaris robotic cleaner, charger, or power cord.
- DO NOT USE AN EXTENSION CORD TO CONNECT THE CHARGING ADAPTER TO ELECTRIC SUPPLY; PROVIDE A PROPERLY LOCATED GFCI RECEPTACLE.
• NEVER OPEN CHARGING ADAPTER. - UNDER ABUSIVE CONDITIONS, LIQUID MAY BE EJECTED FROM THE BATTERY; AVOID CONTACT. LIQUID EJECTED FROM THE BATTERY MAY CAUSE IRRITATION OR BURNS. IF CONTACT ACCIDENTALLY OCCURS, FLUSH WITH WATER. IF LIQUID CONTACTS EYES, SEEK MEDICAL ATTENTION.
- DO NOT EXPOSE A BATTERY PACK OR APPLIANCE TO FIRE OR EXCESSIVE TEMPERATURE. EXPOSURE TO FIRE OR TEMPERATURE ABOVE 265°F/130°C MAY RESULT IN AN EXPLOSION.
Battery Life & Disposal of Li-Ion Batteries
- Regulations and laws pertaining to the recycling and disposal of Li-Ion batteries vary from country to country as well as by state and local governments. You should check the laws and regulations where you live.
- There are a number of facilities that recycle Li-Ion batteries. The Rechargeable Battery Recycling Corporation's web site, www.rbrc.org is an excellent source for finding a facility to handle these types of batteries. If you are not sure if your waste facility can handle Li-Ion batteries, contact them and verify if they are permitted or not.
- Remember that before any type of disposal the batteries should be discharged completely. Tape the cleaner charging contacts with electrical tape and package so as to prevent contacts accidentally coming together at any time.
- This cleaner contains a maintenance-free, rechargeable lithium ion battery pack, which must be disposed properly. Recycling is required.
Battery Charger
- Use ONLY the battery charger provided with this appliance.
- The battery charger must be connected only to a supply circuit that is protected by a ground-fault by a GFCI.
PREVENT CHILD INJURY AND DROWNING
• To reduce the risk of injury, do not permit children to operate this product. The appliance is not a toy for children.
- Do not let anyone, especially small children, sit, step, lean, or climb on any equipment installed as part of your pool's operational system.
CAUTION
Failure to comply with the following warnings could cause damage to pool equipment or personal injury.
- The Polaris cleaner must be installed and operated as specified.
- Clean the filter canister in the Polaris cleaner after each use.
- Do not use the product in your pool if the water temperature is above 95^ (35°C) or below 55^ (13°C).
- This product is intended for use with permanently-installed pools. Do not use with storable pools. A permanently-installed pool is constructed in or on the ground or in a building such that it cannot be readily disassembled for storage. A storable pool is constructed so that it is capable of being readily disassembled for storage and reassembled to its original integrity.
USE OF THE POLARIS ROBOTIC CLEANER IN A VINYL LINER POOL
- Certain vinyl liner patterns are particularly susceptible to rapid surface wear of pattern removal caused by objects coming into contact with the vinyl surface, including pool brushes, pool toys, floats, fountains, chlorine dispensers, and automatic pool cleaners. Some vinyl liner patterns can be seriously scratched or abraded simply by rubbing the surface with a pool brush. Ink from the pattern can also rub off during the installation process or when it comes into contact with objects in the pool. Zodiac Pool Systems LLC is not responsible for, and the Limited Warranty does not cover, pattern removal, abrasion or markings on vinyl liners.
SAVE THESE INSTRUCTIONS
Section 2. Cleaner Specifications
2.1 General Specifications
The general specifications for the cleaner are as follows:
WARNING
Only use the battery charger supplied with the cleaner.
| Battery Charger Supply Voltage | 110-240V AC; 50/60 Hz Class II* |
| Supply Voltage 21.6V DC | |
| Battery Capacity 5.1 Ah | |
| Operating Power 25 W | |
| Cleaner Size (WxDxH) 14 x | 11.4 x 11.4 inches(36 x 29 x 29 cm) |
| Weight of Cleaner 13 lbs. (6 kg) | |
| Packed Weight 17.6 lbs. (8 kg) | |
| Filtration All-purpose filter canister | |
| Cycle Lengths 90 min floor only | |
| Charge Temperature | Max 109°F (43°C)Min 40°F (5°C) |
| Water Temperature Range | Max 95°F (35°C)Min 55°F (13°C) |
| Operating Depth | Max 13 ft. (4 m)Min 15 in. (40 cm) |
*Class II: An appliance with double insulation or reinforced insulation that does not require grounding.
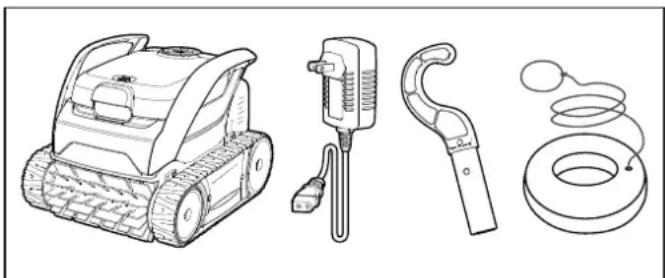
Contents
The packaging should contain the following items:
- Polaris Cleaner
- Removal Hook
- Charger
- Floating Leash
natural_image
Line drawings of four different household appliances: a tracked robot, a handheld device, a curved tool, and a coiled ring (no text or symbols present)Figure 1. Contents
Section 3. General Cleaner Operation
CAUTION
To prevent damage to the cleaner, be sure to adhere to the following guidelines:
- Remove the cleaner from the pool after the cleaning cycle is completed.
- Store out of direct sunlight or inclement weather.
- For retrieval, use the manual retrieval hook or floating leash.
- Take additional care when lifting the cleaner out of the pool. It becomes heavier when filled with water.
- Always remove the cleaner from pool when super chlorinating or adding acid.
- Do not handle cleaner while it is in operation.
- Ensure that the cleaner is not in running mode before handling.
WARNING
DO NOT use an extension cord with the Charger
- Follow all charging instructions and do not charge outside of the temperature range specified in the instructions. Charging improperly or at temperatures outside of the specified range may damage the battery and increase the risk of fire.
- When charging, cleaner must NOT be exposed to direct sunlight, rain or inclement weather, heat ignition sources, pool and spa chemicals or water. DO NOT position cleaner and Charger on direct contact with soil.
IMPORTANT
- Start the cleaner, then fully submerge in the water to start cleaning cycle.
- At the end of each cycle, remove the cleaner from the pool and recharge.
- Clean the filter canister after each cleaning cycle.
- Do not leave your cleaner in the pool on a permanent basis.
The Polaris robotic cleaner includes a safety feature that automatically stops the cleaner if it is powered on but not submerged in water.
3.1 Set Up Charging
- Select an indoor charging location (GFCI outlet) at least 11.5 ft (3.5 m) away from the pool, out of direct sunlight, rain or inclement weather.
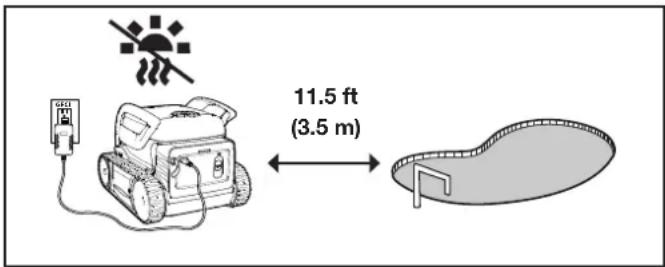
Figure 2. Charging Location
- Plug charger into a GFCI outlet.
-
Before using the cleaner for the first time, fully charge the cleaner until the battery indicator shows solid green.
-
Dry the cleaner and charging contacts, then charge the cleaner before every cleaning cycle. The battery indicator slowly blinks orange while charging, slowly blinks green when it can be used to run a cycle, and shows solid green when fully charged.
WARNING
Failure to comply with the following warnings can result in permanent injury, electrocution or drowning.
PREVENT ELECTRICAL SHOCK AND FIRE
- Only connect the charger to a receptacle protected by a ground fault circuit interrupter (GFCI). Contact a certified electrician if you cannot verify that the receptacle is protected by a GFCI.
- Do not use an extension cord to connect the charger.
- Do not allow anyone to swim while the cleaner is in the pool.
- Follow all charging instructions and do not charge cleaner outside of the temperature range specified in the instructions. Charging improperly or at temperatures outside of the specified range may damage the battery and increase the risk of fire.
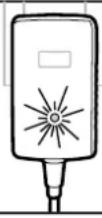
3.2 Information/Status LED

| While Charging | Solid Green Fully charged | |
| Blinking Green Ready to run a full cycle (1 h 30 min) | ||
| Blinking Orange Low Battery, charging | ||
| Blinking Red Error. See “Troubleshooting” on page 13. | ||
| Ready to Start (unplugged) | Solid Green Ready to immerse | |
| Solid Orange Low Battery | ||
| Blinking Orange Very low battery, cannot run | ||
| Blinking Red Error. See “Troubleshooting” on page 13. | ||
| During Cycle | Solid Green Cycle in progress | |
| Solid Orange Low Battery | ||
| Blinking Red Error. See “Troubleshooting” on page 13. | ||
| Off Cycle complete | ||
IMPORTANT: The Cleaner goes into deep sleep after 8 days of inactivity to protect the battery. When all indicators are off, the cleaner is in sleep mode. Plug in the charger to wake it up. If this does not work, see "Troubleshooting" on page 13.
3.3 Charger Status
 | Solid Green Charger receiving power. Cleaner not plugged into charger. |
| Solid Red Cleaner plugged into charger and is charging. | |
| Solid Green Cleaner plugged into charger and is fully charged. |
3.4 Starting the Cleaner
- Replace the protective cap over the charging port.
- Start the cleaner by sliding the power switch down and releasing it.

natural_image
Line drawing of a robotic device with a hand pressing a button on the side panel (no text or symbols)Figure 3. Slide Down and Release
- The cleaner does not begin moving until it senses water.
3.5 Submerge the Cleaner

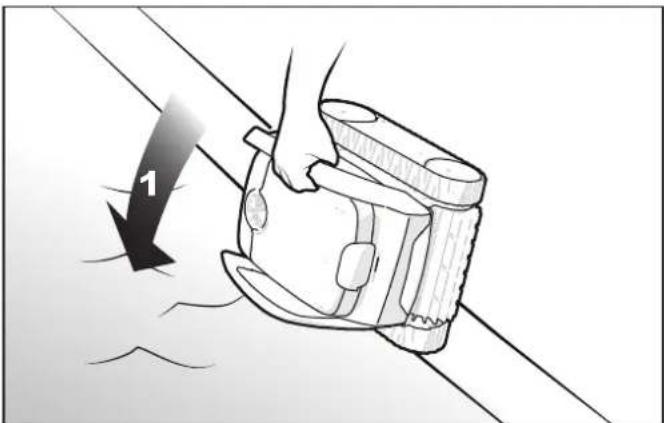
OPTIONAL: Attach the floating leash to the handle to assist with removal of the cleaner from above-ground pools.
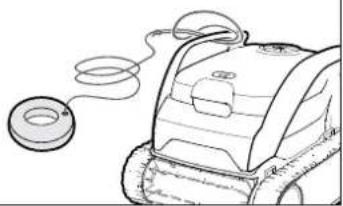
natural_image
Line drawing of a robotic vacuum cleaner with coiled cable and a spool attached (no text or symbols)- At the center point, submerge the cleaner in the pool and hold in the vertical position to release any air trapped inside.
natural_image
Illustration of a hand using a cable to lift a seatbelt, with a directional arrow labeled '1' indicating force or movement (no text or symbols beyond the label)Figure 4. Submerge the Cleaner Vertically
- Wait for bubbles to stop completely, then let the cleaner sink to the bottom of the pool.
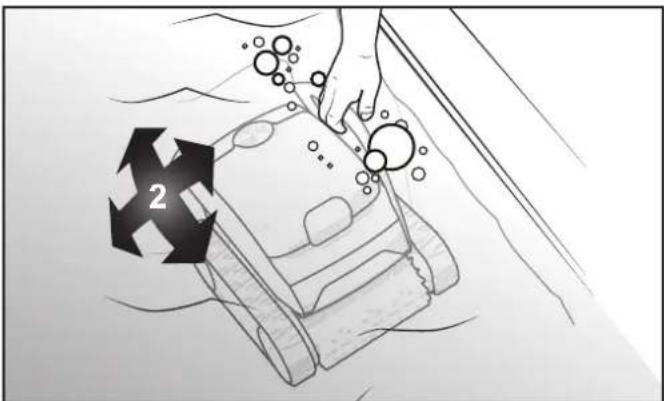
Figure 5. Cleaner Sinking to the Bottom of the Pool
- Cleaning cycle will start when the cleaner detects the pool water.
| WARNING | |
| Do not enter pool while the robotic cleaner is in water. | |
3.6 Removal
Remove the cleaner from the water using either the hook -OR- the floating leash:
Hook Removal
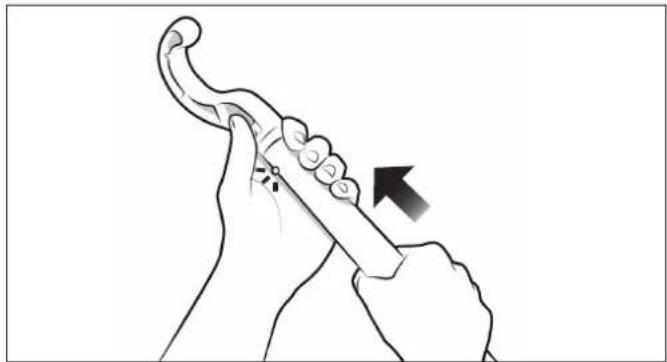
- Attach the hook provided to a standard pool cleaning pole (not included).
natural_image
Illustration of a hand holding a curved object with an arrow indicating motion (no text or symbols)Figure 6. Removal Hook
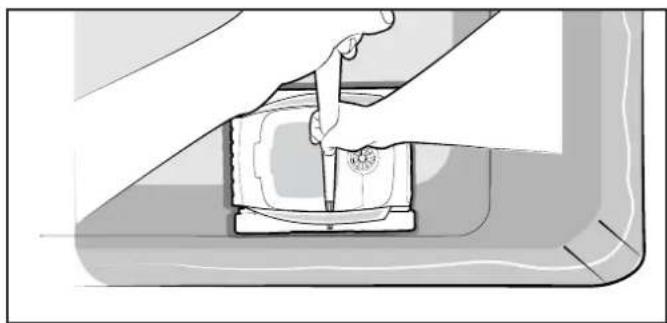
- Secure the hook on the cleaner handle. Bring the cleaner to the waterline.
natural_image
Illustration of a hand using a tool to press or install a mechanical component (no text or symbols visible)Figure 7. Secure the Hook
- Pull up the cleaner by the handle and hold vertically to let the water drain into the pool.
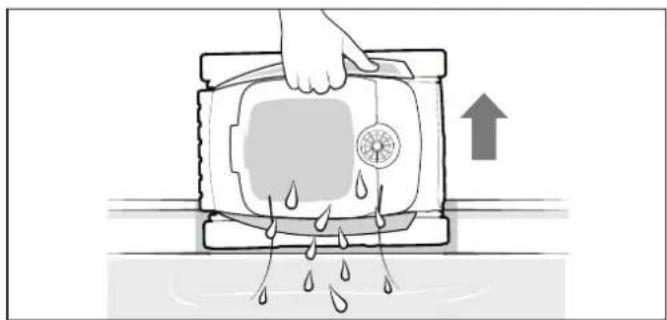
natural_image
Illustration of a hand pressing down on a water tank with water droplets, showing fluid flow (no text or symbols)Figure 8. Drain the Cleaner
Floating Leash Removal
- Grab the floating ring and pull cleaner toward the surface
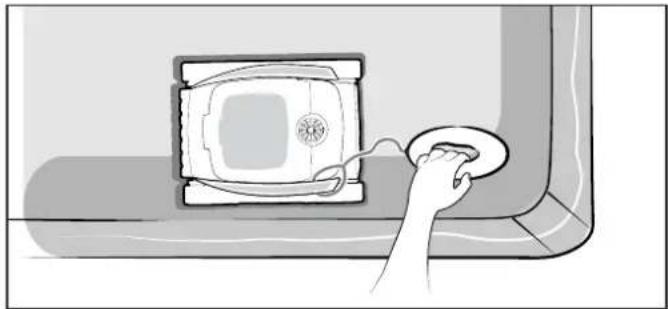
natural_image
Illustration of a hand inserting a plug into a device component (no text or symbols visible)Figure 9. Grab the Floating Leash
- Pull up the cleaner by the handle and hold vertically to let the water drain into the pool.
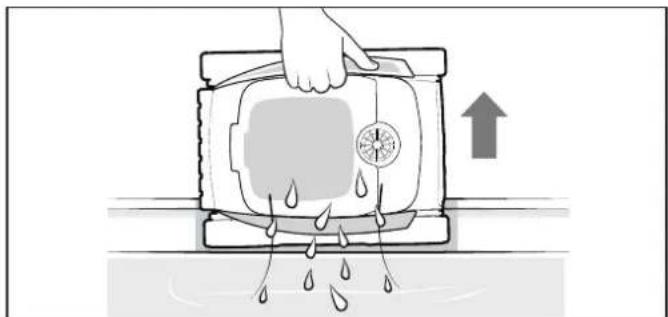
natural_image
Illustration of a hand pressing down on a water bath with water droplets, showing an upward arrow (no text or symbols)Figure 10. Drain the Cleaner
Section 4. Maintenance

WARNING
To avoid electric shock and other hazards which could result in permanent injury or death, disconnect (unplug) the cleaner from the power source before performing any cleaning and maintenance.
4.1 Clean the Filter Canister
The filter canister should be cleaned at the end of each cycle before debris dries.
- Open the cover.
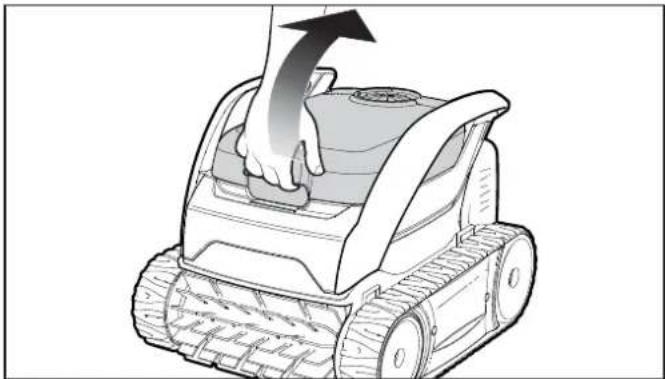
natural_image
Illustration of a robotic lawn mower with hand pressing down and upward motion arrow (no text or symbols)Figure 11. Lift Cleaner Cover
- Remove the filter canister from the cleaner.
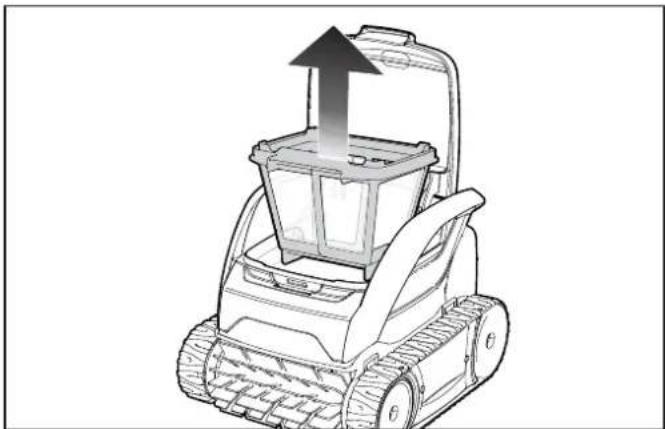
natural_image
Line drawing of a lawn mower with an upward arrow indicating motion or force (no text or symbols)Figure 12. Remove Filter Canister
- Empty all debris from the filter canister, then rinse the filter and the cleaner using a hose.
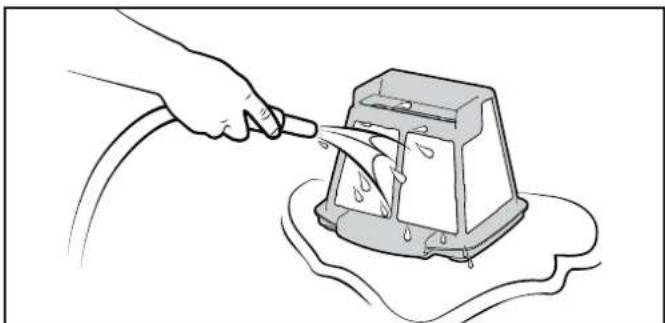
natural_image
Illustration of a hand using a tool to lift a component into a container (no text or symbols)Figure 13. Wash the Filter Canister
NOTE: Periodically, remove the filter canister and clean thoroughly with soapy water and a soft bristle brush
- Replace the filter canister into the cleaner.
4.2 Charge the Cleaner
- Always dry the cleaner and charging contacts before charging.
- Charge and store the cleaner in an indoor location.
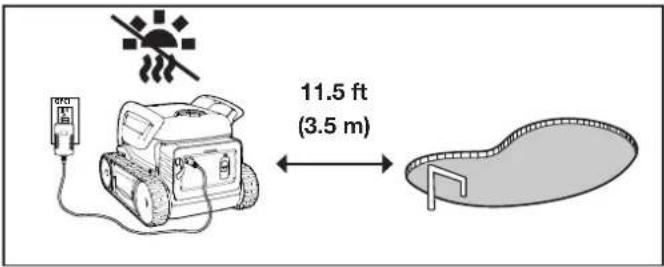
Figure 14. Charging Location
4.3 Storage
Everyday Storage
Store the cleaner in a protected and dry place with an ambient temperature between 50°F (10°C) and 70°F (21°C), out of reach of children, pets, other foreign objects, etc.
- Never store or dry the cleaner in direct sunlight.
- DO NOT expose cleaner to fire, excessive temperatures, ignition sources, or pool and spa chemicals.
- DO NOT leave the cleaner in the water when not in use.
Long-Term & Winter
Remove the cleaner from the pool and drain all water to avoid freezing water damage (freeze damage is not covered under warranty).
For long term storage, it is recommended to store the cleaner at 80-100% of battery capacity (indicated by solid GREEN LED).
You may either:
- Leave the cleaner and charger connected until next use.
- Disconnect and recharge the cleaner at the start of season.
Store cleaner and charger out of direct sunlight, rain or inclement weather.
4.4 Replacing Wear Parts
4.4.1 Replacing Brushes
The cleaner is fitted with PVC brushes with a "wear" indicator.
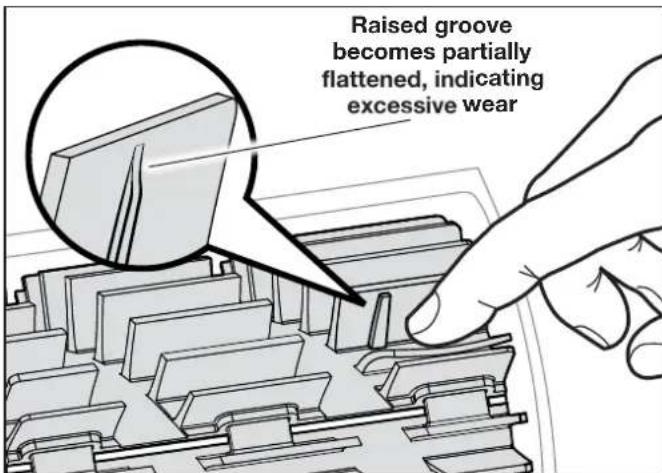
Figure 15. Worn Brush Indicator
To maintain cleaner performance at its best you need to replace the brush as soon as one of the wear indicators is reached (even if the blade wear is not even). It is recommended that you replace the brush when the rubber is worn down to the top of the wear indicator (or every two years, whichever comes first).
To replace a worn brush:
- Separate the edges of the brush and undo the tabs. Remove the worn brushes.
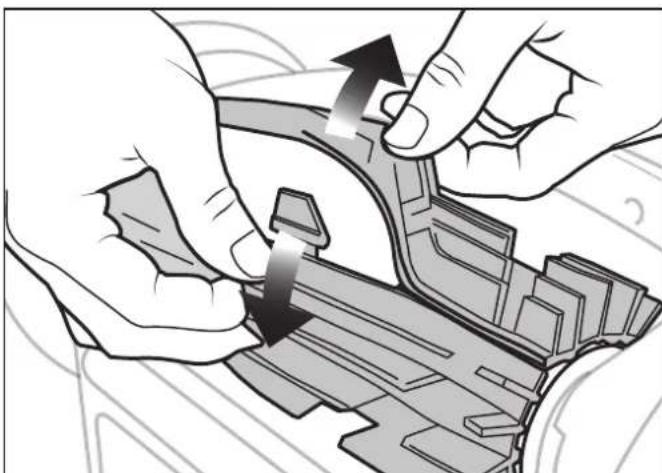
natural_image
Illustration of hands assembling a mechanical component with directional arrows indicating assembly (no text or symbols)Figure 16. Undo the Tabs of the Brush
- To install the new brush, position the new brush on the roller with the cleaning blades facing away from the roller.
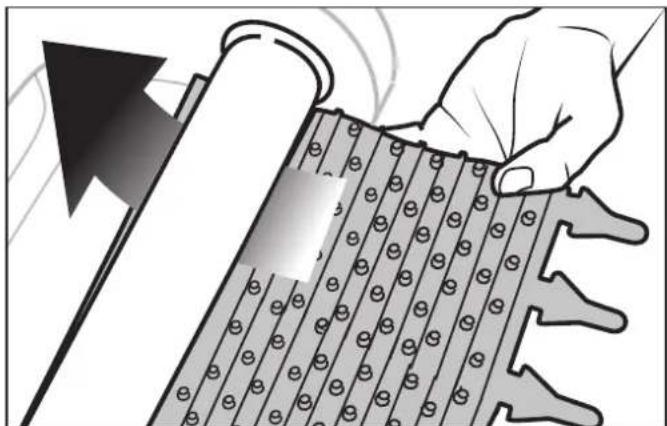
natural_image
Illustration of a hand holding a rolled-up sheet of material with circular holes, next to a directional arrow (no text or symbols)Figure 17. Install the New Brush
- Thread each tab into the slot provided and gently feed it through until the heel comes out at the other side of the slot.
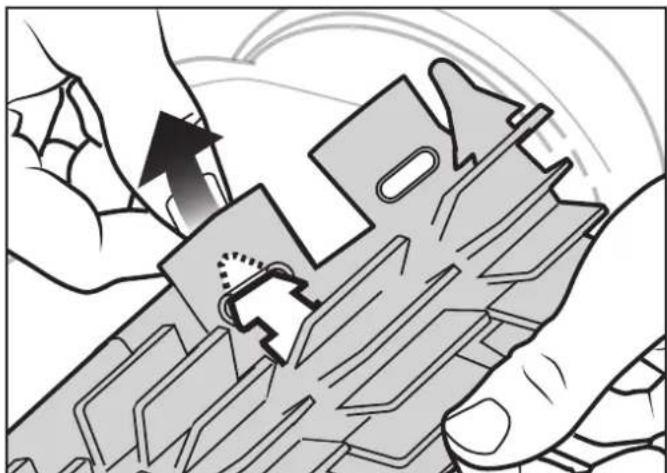
natural_image
Illustration of hands assembling a circuit board with a gear mechanism (no text or symbols)Figure 18. Pull Tabs Through Each Slot
- Use a pair of scissors to cut the tabs 3/4 inch from the heel so that they are no higher than the cleaning blade.
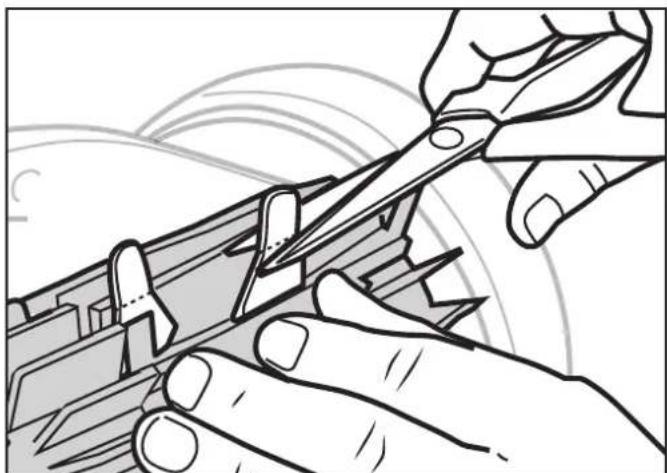
natural_image
Line drawing of hands using a tool to cut or adjust a mechanical component (no text or symbols present)Figure 19. Cut Tabs
4.5 Replacing the Tracks
- Stand the cleaner on its side.
natural_image
Technical illustration of a tracked robotic vehicle with visible tracks and wheels (no text or symbols)Figure 20. Stand Cleaner on its Side
- Starting at one of the wheels, pull on the inside of the track to separate the tire lip from the wheel. Remove the track from the cleaner.
- To install a new track, place the inside rib of the track into the groove in the first wheel.
- Stretch the track around the second wheel. Push and position the rib of the track so that the track is seated properly in the groove of the wheel.
- Verify the rib of the track is positioned properly within the groove of each of the wheels. If necessary, turn the wheels gently to seat track.

natural_image
Mechanical assembly diagram showing a conveyor belt with rollers and a moving gear (no text or symbols)Figure 21. Stretch Track Around Wheels
4.6 Spare Parts
The complete spare parts list and exploded view is available on the Polaris website.
• USA: polarispool.com
• Canada: polarispool.ca
Contact your local maintenance provider to perform diagnostic tests or repairs not shown in general maintenance.
4.7 Recycling & Disposal
The battery and cleaner must be serviced and/or replaced by a qualified service professional. DO NOT attempt to service the product yourself.
Disposal of Li-Ion Batteries
- Regulations and laws pertaining to the recycling and disposal of Li-Ion batteries vary from country to country as well as by state and local governments. You should check the laws and regulations where you live.
- There are a number of facilities that recycle Li-lon batteries. The Rechargeable Battery Recycling Corporation's web site, www.rbrc.org is an excellent source for finding a facility to handle these types of batteries. If you are not sure if your waste facility can handle Li-lon batteries, contact them and verify if they are permitted or not.
- Remember that before any type of disposal the batteries should be discharged completely. Tape the cleaner charging contacts with electrical tape and package so as to prevent contacts accidentally coming together at any time.
- This cleaner contains a maintenance-free, rechargeable lithium ion battery pack, which must be disposed properly. Recycling is required.
Section 5. Troubleshooting
5.1 General Troubleshooting
The following list provides some helpful hints for troubleshooting common challenges when using the cleaner.
| User Issue Possible Cause Suggested Solution | ||
| The cleaner does not stay on the pool surface or is floating excessively. | There is air trapped inside the cleaner housing. | Remove cleaner from pool and re-submerge (see “Submerge the Cleaner” on page 8). |
| The filter canister is full or dirty. | Dispose of debris and thoroughly clean the filter canister with mild soap and a soft brush. Then, re-submerge the cleaner (see “Clean the Filter Canister” on page 10). | |
| The cleaner is not moving. | The cleaner may not be charged. | The outlet the charger is connected to is not supplying electrical power. Check that the outlet to which the charger is connected is receiving electricity. |
| Cycle not started. Remove from water and start the cleaner by sliding the power switch down and releasing it. | ||
| Reset needed. Try turning the cleaner off, then on again to see if that helps. If not, turn off the cleaner using the slider by sliding down and holding for 20 seconds. Then, connect the cleaner to the charger to wake it up. If the problem is not resolved, contact your local retailer to request a diagnostic review or contact Technical Support at 1.800.822.7933. | ||
| The cleaner does not fully charge. | Dirty charging contacts. If the indicator does not turn green after 6 + hours of charging, clean the charging contacts on both cleaner and charger with a cloth and fresh water. Dry the cleaner before connecting to charger after each cycle use. | |
| The cleaner is not cleaning the pool effectively. | Filter canister is full or dirty. Dispose of debris and thoroughly clean the filter canister with mild soap and a soft brush. Then, re-submerge the cleaner (see “Clean the Filter Canister” on page 10). | |
| Brushes are worn. | Check the wear indicator(s) (see “Replacing Wear Parts” on page 11). | |
| Tire track coming off wheels. | Verify track is properly inserted in the wheel grove. If problem persists, replace the tire track (see “Replacing the Tracks” on page 12). | |
| The cleaner is not fully charged. | Charge the cleaner. | |
| The cleaner does not collect debris or go forward. | Debris jamming traction motor. | Remove any debris in the front brush area. |
5.2 Cleaner Error Codes
| Blinking Red Error Solutions | ||
 | Motor Error | Turn cleaner wheels to ensure they are not jammed.Check brushes and tracks for debris.Contact your retailer for a diagnostic review or contact Technical Support at 1.800.822.7933. |
 | Battery Error | The battery block needs to be replaced.Contact your retailer for a diagnostic review or contact Technical Support at 1.800.822.7933. |
 | Charging Error | Clean the charging contacts on the cleaner with a cloth and fresh water (non-salt water). |
 | Charging Error (too hot/cold) | The temperature detected during charging is outside of the recommended temperature range for recharging the cleaner 40^ — 109^ ( 5^ — 43^ ).Charging is paused until temperature is within normal range.Charge the cleaner in a new location. |
NOTES
Zodiac Pool Systems LLC
2882 Whiptail Loop # 100
Carlsbad, CA 92010, USA
PolarisPool.com | 1.800.822.7933
Zodiac Pool Systems Canada, Inc.
2-3365 Mainway
Burlington, ON L7M 1A6, Canada
PolarisPool.ca | 1.800.822.7933
A Fluidra Brand
©2024 Zodiac Pool Systems LLC. All rights reserved. ZODIAC is a registered trademark of Zodiac International, S.A.S.U., used under license. All other trademarks are the property of their respective owners.
H0847100_REVA
natural_image
Line drawing of a tracked robotic vehicle with visible tracks and wheels (no text or symbols)Robot nettoyeur sans fil compact PIXEL™
TYPE ET37--
AVERTISSEMENT
natural_image
Line drawings of four different automotive components: a tracked robot, handheld device, hook handle, and ring (no text or symbols)Figure 1. Contenu
natural_image
Line drawing of a robotic vehicle with a hand pressing a button on the side panel (no text or symbols)natural_image
Line drawing of a robotic device with a coiled cable and a ring, no text or symbols presentnatural_image
Line drawing of a hand holding a curved object with an arrow indicating motion (no text or symbols)natural_image
Illustration of a hand using a tool to press or install a small electronic device (no text or symbols visible)Figure 7. Fixer le crochet
natural_image
Illustration of a hand pressing down on a water tank with water droplets falling, no text or symbols presentnatural_image
Illustration of a hand inserting a plug into a wall-mounted device (no text or symbols visible)natural_image
Illustration of a hand pressing down on a water tank with water droplets falling, no text or symbols presentnatural_image
Line drawing of a robotic lawn mower with hand pressing down (no text or symbols)natural_image
Line drawing of a robotic lawn mower with an upward arrow indicating motion (no text or symbols)Figure 12. Retirer la cartouche filtrante
natural_image
Line drawing of a hand pouring liquid into a mechanical device (no text or symbols)Figure 13. Laver la cartouche filtrante
natural_image
Illustration of hands assembling a mechanical component with directional arrows indicating motion (no text or symbols)natural_image
Illustration of a hand holding a rolled-up sheet of material with circular holes, next to a black arrow and abstract background (no text or symbols)natural_image
Illustration of hands assembling a mechanical component with arrows indicating motion (no text or symbols)natural_image
Illustration of hands using a tool to cut or adjust a mechanical component (no text or symbols visible)natural_image
Technical illustration of a tracked robotic vehicle showing front wheel, side wheels, and internal components (no text or symbols)natural_image
Mechanical assembly diagram showing a chain with pulleys and motion arrows (no text or symbols)Zodiac Pool Systems LLC
2882 Whiptail Loop # 100
Carlsbad, CA 92010, USA
PolarisPool.com | 1.800.822.7933
Zodiac Pool Systems Canada, Inc.
2-3365 Mainway
Burlington, ON L7M 1A6, Canada
PolarisPool.ca | 1.800.822.7933
Une marque Fluidra
natural_image
Line drawing of a tracked robotic vehicle with visible tracks and wheels (no text or symbols)natural_image
Line drawings of four different cleaning and repair tools: a tracked robot, a handheld tool, a curved tool, and a coiled ring (no text or symbols present)Figura 1. Contenido
natural_image
Line drawing of a robotic device with a hand pressing a button on the side panel (no text or symbols)natural_image
Line drawing of a robotic vacuum cleaner with a coiled cable attached (no text or symbols)natural_image
Line drawing of a hand holding a curved object with an arrow indicating motion (no text or symbols)natural_image
Illustration of a hand using a tool to press or install a small electronic component (no text or symbols visible)Figura 7. Fije el gancho
natural_image
Illustration of a hand pressing down on a water tank with water droplets falling, no text or symbols presentnatural_image
Illustration of a hand inserting a plug into a wall-mounted device (no text or symbols visible)Figura 9. Sujete la correa flotante
natural_image
Illustration of a hand pressing down on a water tank with water droplets falling, no text or symbols presentnatural_image
Line drawing of a robotic lawn mower with hand pressing down (no text or symbols)natural_image
Line drawing of a robotic lawn mower with a bucket cover and upward arrow indicating motion (no text or symbols)natural_image
Illustration of a hand pouring liquid into a mechanical device with a coiled cable (no text or symbols)natural_image
Illustration of hands assembling a mechanical component with directional arrows indicating assembly (no text or symbols)natural_image
Illustration of a hand holding a rolled-up sheet of material with circular holes, next to a stylized arrow (no text or symbols)natural_image
Illustration of hands assembling electronic components with a magnifying glass (no text or symbols)natural_image
Illustration of hands using scissors to cut a mechanical component (no text or symbols visible)natural_image
Technical illustration of a tracked robotic vehicle with visible tracks and wheels (no text or symbols)natural_image
Diagram of a robotic conveyor belt system with motion arrows indicating movement (no text or symbols)Zodiac Pool Systems LLC
2882 Whiptail Loop # 100
Zodiac Pool Systems Canada, Inc.
2-3365 Mainway
- PIXEL™ Compact Cordless Robotic Cleaner
- WARNING
- Table of Contents
- Section 1. Important Safety Instructions......4
- Section 2. Cleaner Specifications ....6
- Section 3. General Cleaner Operation ......6
- Section 4. Maintenance....10
- Section 5. Troubleshooting .... 13
- SAVE THESE INSTRUCTIONS
- FCC Statement
- CAUTION
- Section 1. Important Safety Instructions
- READ AND FOLLOW ALL INSTRUCTIONS
- Failure to comply with the following warnings can result in permanent injury, electrocution or death.
- PREVENT ELECTRICAL SHOCK
- Battery Life & Disposal of Li-Ion Batteries
- Battery Charger
- PREVENT CHILD INJURY AND DROWNING
- Failure to comply with the following warnings could cause damage to pool equipment or personal injury.
- USE OF THE POLARIS ROBOTIC CLEANER IN A VINYL LINER POOL
- Section 2. Cleaner Specifications
- General Specifications
- Contents
- Section 3. General Cleaner Operation
- IMPORTANT
- Set Up Charging
- PREVENT ELECTRICAL SHOCK AND FIRE
- Starting the Cleaner
- Submerge the Cleaner
- Removal
- Hook Removal
- Floating Leash Removal
- Section 4. Maintenance
- Clean the Filter Canister
- Charge the Cleaner
- Storage
- Everyday Storage
- Long-Term & Winter
- Replacing Wear Parts
- Replacing Brushes
- Replacing the Tracks
- Spare Parts
- Recycling & Disposal
- Disposal of Li-Ion Batteries
- Section 5. Troubleshooting
- General Troubleshooting
- NOTES
- A Fluidra Brand
- Robot nettoyeur sans fil compact PIXEL™
- AVERTISSEMENT
Brand : POLARIS
Model : PIXEL
Category : Pool