MGD18 - Oven Vollrath - Free user manual and instructions
Find the device manual for free MGD18 Vollrath in PDF.

User questions about MGD18 Vollrath
0 question about this device. Answer the ones you know or ask your own.
Ask a new question about this device
Download the instructions for your Oven in PDF format for free! Find your manual MGD18 - Vollrath and take your electronic device back in hand. On this page are published all the documents necessary for the use of your device. MGD18 by Vollrath.
USER MANUAL MGD18 Vollrath
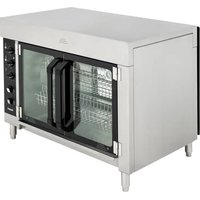
68InchDigitalConveyorPizzaOvens
ModelMGD18
ThankyouforpurchasingthisVollrathequipment.Beforeoperatingthe equipment,readandfamiliarizeyourselfwiththefollowingoperating andsafetyinstructions.SAVETHESEINSTRUCTIONSFORFUTURE REFERENCE.
SAFETYPRECAUTIONS
Toensuresafeoperation, read the following statements and understand their meaning. This manual contains safety precautions which are explained below. Pleasereadcarefully.

WARNING
Warningisusedtoindicatethepresenceofahazardthatwillorcan causeseverepersonalinjuryordeath.

CAUTION
Cautionisusedtoindicatethepresenceofahazardthatwillorcan causeminorormajorpersonalinjuryifthecautionisignored.
NOTICE: Notice is used to note information that is important but not hazard-related.
Toreduceriskofinjuryordamagetotheequipment
- Plugonlyintogroundedelectricaloutletsmatchingthevoltageon theratingplate.
- Usethisequipmentinaflat,levelposition.
- Unplugequipmentandletitcoolbeforecleaningormoving. Equipmentremainshotafteritisturnedoff.
- Donottouchduringoperation.
- Unplugwhennotinuse.
- Keepequipmentandpowercordawayfromopenflames,electric burnersorexcessiveheat.
- Donotoperateunattended.
- Closelysuperviseequipmentoperatinginpublicareasand/oraroundchildren.
- Donotoperateifequipmenthasbeendamagedorismalfunctioning inanyway.
natural_image
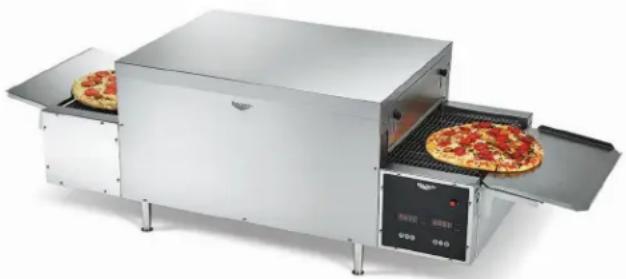
Modern kitchen electric oven with two pizza slices and a digital display unit (no visible text or symbols)| ItemNo.ModelDescription | ||
| P06-20818 | 18"wideconveyor,208V | |
| P06-2201818"widecMGPyor | 220V | |
| P06-2401818"wideconveyor | 240V | |
FUNCTIONANDPURPOSE
This equipment is intended to bake fresh dough and par-baked pizzas, flatbreads, calzones and toasts sandwiches. It is not intended to bake frozen or deep dish pizzas, ort o cook raw food or raw pizzatoppings. It is intended for use in commercial food service operation that serve pizzas, but that also serve other menu items. It is intended for occasional, not continuous use. It is not intended for pizzerias, household, industrial or laboratory use.
VentlessOperation
ThisovenisUL tested and verified for ventless operation under the following conditions:
- Forusewithpre-cookedfoodssuchaspizzatoppings,sandwiches andmeltingcheese
- Notforusewithrawand/orfattyproteinssuchasskin-onorbone-in chicken, hamburgermeatorsausages
Note: Localcodes may apply. Approval for ventless operation is subject to the local authority having Jurisdiction (AHJ). Please contact your AHJ form more information
CLEARANCEANDENVIRONMENTREQUIREMENTS
Donotplacethisovenonsurfacesornearwalls, partitionsorkitchen furnitureunlesstheyaremadeofnon-combustiblematerialorcladwith non-combustibleheat-insulatingmaterial.Ovensmustnotbeusednear orbelowcurtainsandothercombustiblematerials.Donotplacethe ovenadjacenttoaheatproducingappliance.
SETUP
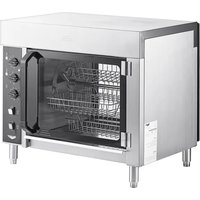
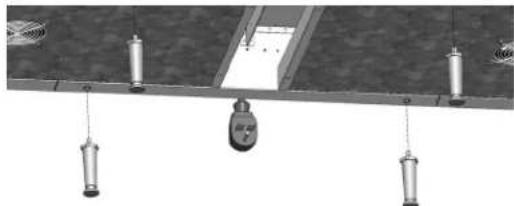
- Placetheovenonahard, flat, stablesurface.
- Installthelegs. Twopeoplerequired. Haveonepersonliftoneendof theovenwhiletheotherpersoninstallsthelegs. Repeatfortheother sideoftheoven.
NOTICE: Legsmustbeinstalled. Failuretoinstallthelegswill restrictairflowandcausetheoventooverheat.
natural_image
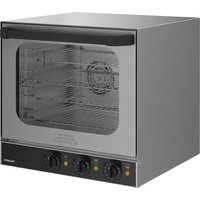
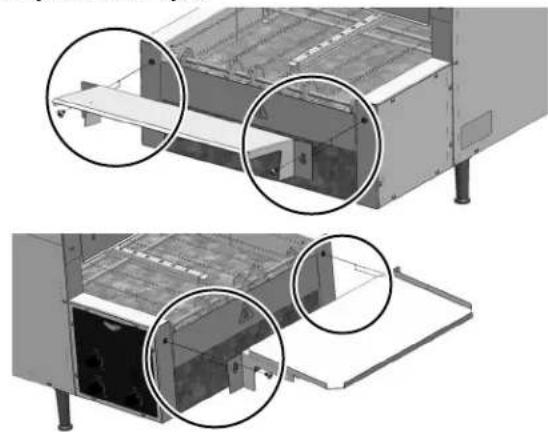
Diagram of a mechanical or electrical setup with hanging weights and a central device (no visible text or symbols)- Install the load and unload tray stomatch the convey or direction. Theload trays slant stoward the conveyor. The unload trays slants away from the conveyor.
natural_image
Technical illustration of a device with two views showing internal components and mounting brackets (no text or symbols)BEFOREFIRSTUSE
- Cleantheoven. See "DailyCleaning" on page 5.
FROZEN/FRESHDOUGHHANDLINGTIPS
The following are general tips. Follow any instruction specific to your brand of dough or recipe.
- Removethewrappingfromfrozendoughballs.
- Placethedoughballsafewinchesapart, intoaproofingboxorona sheetpan.
- Lightlyspraytopofthedoughballswithanon-stickcookingspray, thencoverwithalayeroffreezerpaper.
•Refrigerateovernight.
- Removeonlyenoughdoughballsfromthesheetpanto accommodatewhatyouwillneedforafewhours.
- Sprinkleflour, cornmealor Pizza Crispontothesurfaceon which you plantorolloutthedough.
- Rollthedough, starting from the center and working your way to the outer edges. Turnthedough as you work toward the outer edgesto maintain around shape.
- Usearollingpin,doughpressordoughsheetertoformthedough tothedesiredsizeandthickness.
- Placetheflattenedshellontoadarkmetalorseasonedpizzascreen orpan.
NOTICE: Freshdoughpizzasmustbebakedonmetalpizza screensorpizzapans. Do NOT put freshdoughpizzas directly on the conveyor. Doughwill stick to or fall through the conveyor.
NOTICE: Do NOT use paper pizzapans in this oven. Paper pizza pans will burn and could create a fire hazard.
NOTICE: Darkmetalorseasoned metalscreensorpansperform best. Shinymetaloraluminumfoilwillreflectheataway from thepizza and preventingbrowning.
PIZZAASSEMBLYTIPS
- Spreadthesauce, starting from the center and moving toward the outer edges of the crust to ensure a uniform thickness of sauce. Leave an inch of space to the outer edge of the crust to allow the crust to brown. Spreadingsaucetoo closetotheedge prevent the crust from browning.
- Spreadouthighmoisturecontenttoppings,suchasvegetables. Highmoisturetoppingswillpreventthesurroundingareasfrom bakinguntilALLofthemoisturehasevaporated.
FEATURES
text_image
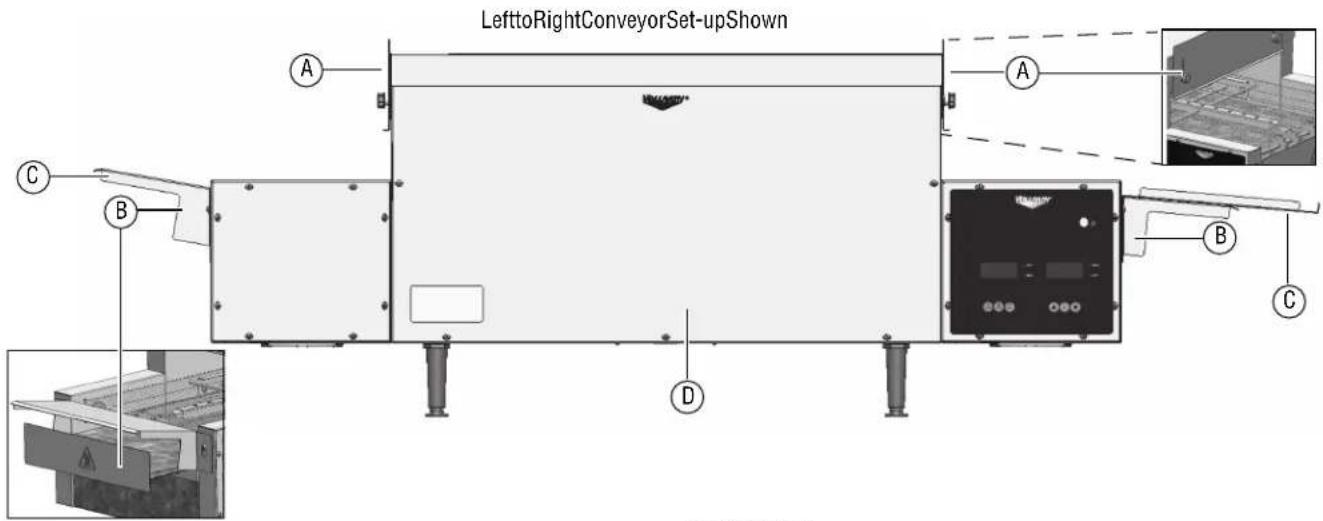
LefttoRightConveyorSet-upShown A B C D A B CFrontView
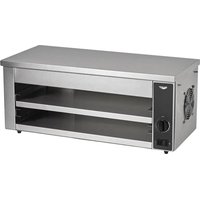
AHeatShield
BCrumbTray
CLoad/UnloadTrays
Load.Slantstowardconveyor
Unload.Slantsawayfromconveyor
DResetButton(Referenceonly.Seepage6.)
BackView
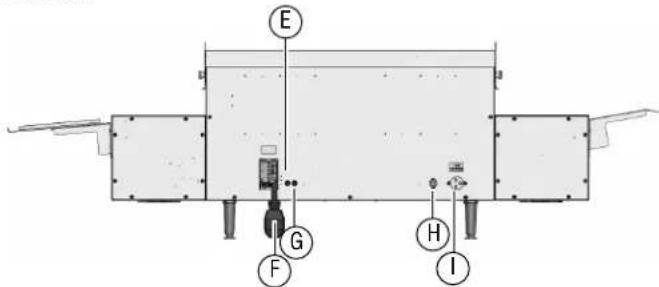
text_image
E G F H IEControlPanelCircuitBreaker
FPowerCord
GConveyorCircuitBreaker
HMainPowerSwitch-Turnsonmainpowertotheoven
IOvenStackerReceptacle.Powerstheovenstackeraccessory.
ControlPanel

PowerButton-Presstoturnontheheatingelementsand conveyor.

SpeedButton-Presstosetthetimeittakesforfoodtopass throughtheoven.

RecipeButton-Presstoselectarecipe.Therearesix customizablerecipeprograms.Eachrecipeincludestemperature settingsforeachovenzoneandtheconveyorspeed.
Pizza 1-2 Selectforpizzasthathave1-2topping
Pizza 3-4 Selectforpizzasthathave3-4toppings
Calzone Selectforbakingfreshdoughcalzones
Sandwich Selectfortoastingsandwiches
M1 Createyourownrecipeprogram
M2 Createyourownrecipeprogram

TempButton-Therearefourtemperaturezones, twoontopofthe ovenandtwoonthebottom. Foradiagram, see "Change Temperatures" on page 5.

UpButton-Presstoscrollthroughtherecipesortoincreasethe speedortemperature.

SetButton-Presstoselectarecipeorsaveachangetothespeed ortemperature.

DownButton-Presstoscrollthroughtherecipesortodecrease thespeedortemperature.
OPERATION
AdjusttheHeatShields
Rotatetheknobstoadjusttheheatshieldstoallowfoodtopassinto theoven,andtoregulatetheamountofheatretainedateachendofthe oventoachievedesiredresults.
Tips:
| MenultemSuggestions | |
| FreshdoughEntry | tryshieldallthewaydown,andexitshieldpartiallydowntoretainheattobakethedough. |
| ParbakedEntry | andexitshieldshalfwaydowntofinishcrustandbrownthetoppings. |
| SandwichEntry | andexitshieldshalfwaydown. |
| CalzoneEntry | andexitshieldshalfwaydown. |
Preheat
- Plugtheovenintoagroundedelectricaloutletthatmatchesthe ratingonthenameplatefoundontheoven.
NOTICE: Usingavoltageotherthanthenameplateratedvoltage willcausedamagetotheunit.Incorrectvoltage, modificationtothepowercordorelectricalcomponents candamageunitandwillvoidthewarranty.
-
Position themainpowerswitchonthebackofoventotheON position.
-
Pressandreleaseonthedisplay.Youwillhearabeep.The ovenwillstarttopreheat.Thedisplaywillread:

text_image
PIZZA ZONE 1 WARMING ZONE 2 ZONE 3 ZONE 4- Theovenwillbereadytouseinapproximately20minutes. The displaywillread:

text_image
REDY ZONE 1 ZONE 3 ZONE 2 ZONE 4- Pressandrelease.

-
Presstoscrollthroughtherecipeoptions.
-
Pressandreleasetoselectarecipe.
-
Adjust the recipes settings according to the menu item to be baked. See "Adjust the Recipe Settings" on this page.
-
Wait5minutesfortheoventoadjusttothenewsettings.
Test
NOTICE: Freshdoughpizzasmustbebakedonmetalpizzascreens orpizzapans. Do NOT put freshdoughpizzas directly on the conveyor. Doughwillsticktoorfallthrough the conveyor.
NOTICE: Do NOT use paper pizzapans in this oven. Paper pizzapans will burn and could create a fire hazard.
NOTICE: Darkmetalorseasoned metals screens and pans perform best. Shinymetal oraluminum foil will reflect the ataway from the pizza and preventing browning.
-
Testthesettingsbyplacingasamplepizzaintotheoven.
-
Monitor the baking process and adjust the temperatures and conveyorspeed to prevent the pizza from burning.
-
Evaluatetheresults.
AdjusttheRecipeSettings
Customizethedefaultrecipesettingstomeetyourbakingneeds.
STEP1:SelectaRecipetoAdjust
- Pressandrelease. The control panel will beep.
- Pressandreleaseortoscrollthroughtherecipes.
- Pressandreleasetoselectarecipe.
Note: Presssetwithin10secondsorthechangewillnotbesaved.
STEP2:SelectSettingstoAdjust
ChangetheConveyorSpeed
- Pressandrelease. The current speed will display.
Tip: Forpizzastartwitha7:30passtime. Idealpasstime is dependentonthetypeofcrustandtoppings. - Pressandreleasetheortochangethespeed.
- Pressandreleasetoselectandsavetheselection.

text_image
07:30 ZONE 1 ZONE 3 ZONE 2 ZONE 4ChangetheTemperatures
- Therearefourtemperaturezones.Zonesarealwaysinthesame location,regardlessofthedirectionoftheconveyor.

text_image
1 2 3 4 ConveyorDirection PizzaDirectionThroughZones LefttoRight 1and3 → 2and4 RighttoLeft 1and3 ← 2and4- Pressandrelease.Zone:1rdisplayed.

text_image
ZJ-S ZONE 1 ZONE 3 400F ZONE 2 ZONE 4- Pressandreleaseortochangetheteperature.
Tip: For pizza, set the bottom heat approximately 75 ° to 100° degrees hotter than the top control. Ideal temperatures are dependent on the type of crust and toppings.
- Pressandreleasetosavetheselection. Thedisplaywill advancetonextheatzone.

text_image
Z2-S ZONE 1 ZONE 3 325F ZONE 2 ZONE 4- Pressandrelease. The control panel will beep.
- Pressandreleaseortoscrollthroughtherecipes.
- Pressandreleasetoselectarecipe.
- Allow time for the event to adjust tonewheat settings before replacing apizza on the conveyor.
- Donotoverloadtheoven. Waitafewminutesfortheoventorecover beforeplacingthenextpizzaontotheconveyor. Maximumovencapacity: One16"diameterpizzaormultiplesmaller pizzaswithacombinedmaximumdiameterof16"
IfaPizzaisStuckintheOven
- Pressandholduntilthedisplayshows

text_image
OFF ZONE 1 ZONE 3 ZONE 2 ZONE 4- Unplugtheoven.
- Lettheovencoolcompletely.
- Usetongstoremovethepizza. Takecaretonotbumptheglass heatingelementsaboveandbelowtheconveyor.
ChangetheConveyorDirection
- Pressandholdtheuntilyofheartwobeeps.
- The conveyor will stop. After about 10 seconds it will start again in the opposite direction.
StandbyMode
Usestandbymodetoreduceelectricalconsumptionbyup75%during non-peakusagetime.
ToPlacetheOveninStandbyMode
- Pressandrelease and the same time recipe
- Thedisplaywillshow

text_image
STANDBY ZONE 1 ZONE 3 ZONE 2 ZONE 4ToCancelStandbyMode
- Pressanybuttononthecontrolpaneltoreturntheoventofull power.
- ThedisplaywillshowWARMINGuntiltheovenreachesthe temperaturefortheselectedrecipe.

text_image
PIZZA ZONE 1 WARMING ZONE 2 ZONE 3 ZONE 4- Whentheovenreachesthettemperature, thedisplaywillshow

text_image
REDY ZONE 1 ZONE 3 ZONE 2 ZONE 4CLEANING
| WARNING |
| ElectricalShockHazard Donotspraywaterorcleaningproducts.Liquidcouldcontact theelectricalcomponentsandcauseashortcircuitoran electricalshock. |
| CAUTION | |
| BurnHazard Allowequipmenttocoolbeforemovingorcleaning. |
NOTICE: Donotuseabrasivematerials, scratchingcleansersor scouringpadstocleantheexterioroftheequipment. Thesecandamagethefinish.
DailyCleaning

text_image
1.Pressandholdunt/theisplayshows OFF ZONE 1 ZONE 2 ZONE 3 ZONE 4- Unplugtheoven.
- Lettheovencoolcompletely.
4.Slightly dampenasoftclothwithwarmwater. - Usethedampenedclothocleantheexterioroftheoven, theair intakeundertheoven, thefeedramp, and collectiontray.
CleantheConveyor
Tip: UseM1 or M2 to create a "recipe" with settings for cleaning the oven,
-
Plugintheoven.
-
Pressandrelease.

3.Setthetemperatureinall4zonesto150
4. Settheconveyorspeedto90seconds
5. Pressandholdaheatresistant(steelwool, metalwirebrush, etc) abrasivepadorbrushagainsttheconveyor.Movethepadorbrush backandforth(lefttoright)acrosstheconveyortoremovefood debris.
6. Empty and clean the crumbtrays.
| CAUTION | |
| BurnHazard Crumbtraysmaybehot.Useovenmittstoprotechhands. | |
SpecialInstructionsforVentlessOperation
Cleantheadjacentsurfacesandkitchenequipmentatleasteveryother monthormorefrequentlyasneeded.
PREVENTATIVE MAINTENANCE
Contactanauthorized service agent for a professional cleaning of the components.
TROUBLESHOOTING
| ProblemMightbeCausedByCourseofAction | ||
| Ovenwillnotturnonwhenthepower buttononthefrontoftheovenis pressed. | MasterOn/Offswitchonthebackofthe ovenisintheOFFposition. | PositiontheswitchtotheONposition. |
| Ovenispluggedintoincorrectvoltage.Checkvoltageatthewalloutlet.Plugovenintocorrectvoltage. | ||
| Displayoncontrolpanelisblank,ovenis pluggedinandturnedon. | Controlpanelcircuitbreaker,locatedon thebackoftheoven,mayhavetripped. | Checkforabrokenheatingelement.Replaceeelement.Afterthe issuehasbeenresolved,pressthebuttononthecircuitbreakerto resetit. |
| Displayshowsanzonealarm:prb1, prb2, prb3, prb4 andthecontrol panelemitsacontinuousbeep. | Temperatureprobeinthezoneindicated bythealarmcodeisnotresponding. | Pressanykeytoturnoffthealarm.ContactVollrathTechnical Services. |
| DisplaywillnotchangefromWarming toRedy. | Oneheatzonemaynotbeon.Examineheatingelementsineachheatzonetoverifytheyare working. | |
| Ovenispluggedintoincorrectvoltage.Checkvoltageatthewalloutlet.Plugovenintocorrectvoltage. | ||
| DisplaychangesfromWarming to Heating anddoesnotdisplayRedy. | Temperaturesettinginoneormore zonesmaybetoohigh. | Maximumtemperatureforeachzoneis550 °F.Adjustthe temperaturestobelowthemaximum. |
| Conveyorwillnotreversedirection.Theconveyormaybeobstructed.Checkforandclearobstructionsintheconveyor. | ||
| Thespeedbuttonwasnotbeenpressed correctly. | Pressandholdthespeedbuttonuntilyouheartwobeeps. | |
| Theremaybeabproblemwiththedrive systemrelay. | ContactVollrathTechnicalServices. | |
| Conveyorspeedwillnotchange.Setbuttonwasnotpressedaftersetting thenewspeed. | PresstheSetbuttonafterchangingthespeed.See“Changethe ConveyorSpeed”onpage4. | |
| Theremaybeabproblemwiththedriver board. | ContactVollrathTechnicalServices. | |
| Conveyorwillnotturn,buttheoven heats. | Theconveyormaybeobstructed.Checkforandclearobstructionsintheconveyor. | |
| Theremaybeabproblemwithoneofthe components. | ContactVollrathTechnicalServices. | |
| Conveyorcircuitbreaker,locatedonthe backoftheoven,mayhavetripped. | Pressthebuttononthecircuitbreakertoresetit. | |
| Toporbottomheatertubesdonotheat.Onedmoreheatingelementsmayhave burnedoutinthezoneindicatedbythe alarmcodeshownonthedisplay. | Pressanykeytoturnoffthealarm.ContactVollrathTechnical Services. | |
| Ovenrepeatedlyoverheats.Thecrumbtraymaynotbeinstalled.Verifythecrumbtrayisinstalled. | ||
| Thefanmaybedirty.Verifythefanbladesofbothfansareclean.Seetheinstructions belowforinspectingandcleaningthefanblades. | ||
Thefanbladesmaybedirty.Inspectthefanbladesofbothtoseeftheyaredirty.1. Pressandholdthepowerbuttononthefrontoftheovenuntil thedisplayshowsOFF.Unplugtheoven.2. Wait30minutesfortheovencool.3. Cleanthefanblades.4. Plugintheoven.5. Pressthepowerbuttononthefrontoftheoven.6. Presstheresetbutton.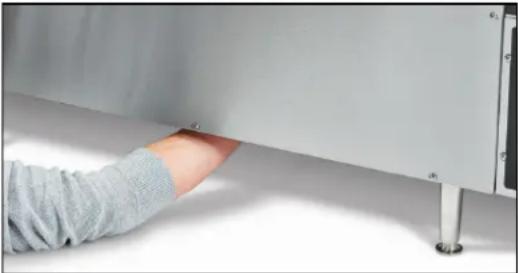 7. IftheproblempersistscalVollrathTechnicalServices. 7. IftheproblempersistscalVollrathTechnicalServices. | ||
| There may be a problem with the fan. | Run the oven for 10 minutes. If the fan does not run, contact VollrathTechnicalServices. | |
| Thefanisnotrunning. | Theremaybeabproblemwiththefanor fanswitch. | Runtheovenfor10minutes.Ifthefandoesnotrun,contact VollrathTechnicalServices. |
| Theovenisturnedoffandthefanis running. | Normaloperation.Thefanturnsonas neededtocooltheoven. | - |
Thispageintentionallyleftblank.
SERVICEANDREPAIR
Whenunderwarranty,repairisavailableforthisproduct.Tobegintheprocess:
- Contact Vollrath Technical Services at 1-800-309-2250. Please be ready with the item number, model number and serial number. You can find this information on the nameplate located on the side or back of the equipment. Also please provide a proof of purchase indicating the date the equipment was purchased.
- A technical services representativewill helpyoutroubleshoot the problem over the phone.
- If the representative determines the issue requires professional service, he or she will help you locate an authorized service center.
- Contact the authorized service center to make arrangements for the repair. Vollrath will cover the cost to repair and/or replace defective parts withintheequipmentwarrantyperiod.
WARRANTYSTATEMENTFORTHEVOLLRATHCO.L.L.C.
The Vollrath Company LLC warrants the products it manufactures or distributes against defects in materials and workmanship as specifically described in our full warranty statement. In all cases, the warranty runs from the date of the end user's original purchase date found on the receipt. Any damages from improper use, abuse, modification or damage resulting from improper packaging during return shipment for warranty repair will not be recovered under warranty.
The warranty does not apply to products purchased for personal, family or household use, and The Vollrath Company LLC does not offer a written warranty top purchasers for such uses.
WarrantiedParts: The warranty period is 2 years parts, 1 year labor.
HeaterTubes: The warranty period is 1 year, including labor. Heatertubeglass damage is not covered by this warranty.
Forcompletewarrantyinformation,productregistrationandnewproductannouncements,visitwww.vollrath.com.

www.vollrath.com
The VollrathCompany, L.L.C.
1236North18thStreet
Sheboygan, WI53081-3201U.S.A.
MainTel:800.624.2051or920.457.4851
MainFax:800.752.5620or920.459.6573
CustomerService:800.628.0830
CanadaCustomerService:800.695.8560
TechnicalServices
techservicereps@vollrathco.com
Toasters:1-800-309-2250
AllOtherProducts:800.628.0832
natural_image
Modern kitchen electric oven with two pizza slices and a control panel (no visible text or symbols)natural_image
Diagram of a mechanical or electrical component with suspended weights and a central hanging component (no text or symbols)natural_image
Technical diagram of a mechanical assembly with two magnified circular views highlighting internal components (no text or symbols present)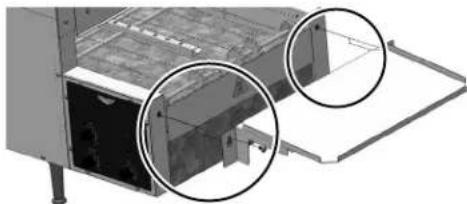
natural_image
Technical diagram of a mechanical device with two circular annotations highlighting internal components (no text or symbols present)AVANTLAPREMIÈREUTILISATION
text_image
E G F H IStandard:800.624.2051ou920.457.4851
Télécopieur:800.752.5620ou920.459.6573
Serviceclientèle:800.628.0830
ServiceclientèleCanada:800.695.8560
Servicestechniques
techservicereps@vollrathco.com
Grille-pains:800.309.2250
natural_image
Exterior view of a modern stainless steel food processing machine with two pizza slices and control panel (no visible text or symbols)| Núm.art. | Modelo | Descripción |
| P06-20818 | MGD18 | Correatransportadorade18"(45,7cm) deancho,208V |
| P06-22018Correatransportadorade18"(45,7cm) deancho,220V | ||
| P06-24018Correatransportadorade18"(45,7cm) deancho,240V |
FUNCIÓNYPROPÓSITO
natural_image
Diagram of a mechanical or electrical component with suspended weights and a central hanging component (no text or symbols)natural_image
Technical diagram of a mechanical device with two magnified views showing internal components (no text or symbols)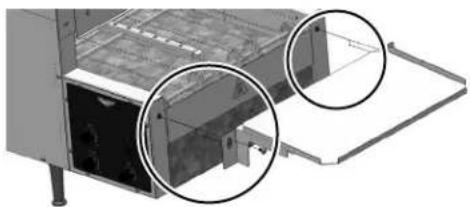
natural_image
3D architectural diagram of a cabinet or storage unit with two circular annotations highlighting internal components (no text or symbols present)ANTESDELPRIMERUSO
text_image
Technical diagram of an industrial machine with labeled components and internal structure, including control panel and assembly details.Vistadelantera
text_image
E G F H IECortacircuitodelpaneldecontrol
FCableeléctrico
GCortacircuitodelacorreatransportadora
HInterruptorprincipal-Enciendeelsuministroprincipaldelhorno