
RO4-208240-15 - Oven Vollrath - Free user manual and instructions
Find the device manual for free RO4-208240-15 Vollrath in PDF.

| Brand | Vollrath |
| Model | RO4-208240-15 |
| Product type | Professional rotisserie oven |
| Capacity | 15 chickens (3 per basket), max total weight 23.8 kg |
| Power supply voltage | 208-240 V |
| Cooking temperature range | 65.6 °C – 232.2 °C (150 °F – 450 °F) |
| Warm holding temperature range | 37.8 °C – 148.9 °C (100 °F – 300 °F) |
| Timer | 15-120 minutes or continuous run |
| Functions | Cooking, warm holding, basket rotation, interior light |
| Material | Stainless steel |
| Legs | 4 legs of 10 cm (4 in) included, mandatory for installation |
| Ventilation | Ventless, compliant with NFPA96 (EPA202 method) |
| Lighting | High temperature lamp, 220-240 V, max 30 W, 300 °C |
| Cleaning | Daily with mild soap and water; do not use steel wool |
| Safety | Safety thermostat, automatic shutdown in case of overheating |
| Included accessories | Baskets, drip tray, carousel, fan cover |
| Repairability | Spare parts available at vollrathfoodservice.com; do not repair yourself |
| Usage | Commercial use only, for fresh food (not frozen) |
| Warranty | Warranty against defects in materials and workmanship (see conditions) |
Frequently Asked Questions - RO4-208240-15 Vollrath
User questions about RO4-208240-15 Vollrath
0 question about this device. Answer the ones you know or ask your own.
Ask a new question about this device
Download the instructions for your Oven in PDF format for free! Find your manual RO4-208240-15 - Vollrath and take your electronic device back in hand. On this page are published all the documents necessary for the use of your device. RO4-208240-15 by Vollrath.
USER MANUAL RO4-208240-15 Vollrath
Thank you for purchasing this Vollrath® product! Save this manual for reference and the packaging in case shipping is necessary.
SAFETY PRECAUTIONS
To help ensure safe use, please read and fully understand this manual and all safety messages before operation!

WARNING
Warning indicates a hazardous situation which, if not avoided, could result in death or serious injury.

CAUTION
Caution indicates a hazardous situation which, if not avoided, could result in minor or moderate injury.
NOTICE: addresses practices not related to physical injury.
To reduce risk of injury or damage to the unit
- Only plug this unit directly into a grounded electrical outlet that matches the nameplate-rated voltage. Do not use extension cords or power strips of any kind.
- Use in a flat, level position.
- Turn off, unplug, and let the unit cool before cleaning or moving and when not in use.
- Outside of unit should not be sprayed with liquid or foam.
- Clean unit with something other than steel wool.
- Keep unit and power cord away from open flames, electric burners, and excessive heat.
- Operate in non-public areas, away from children—and attend the unit during use.
- Only operate a unit that is functioning properly and is not damaged.
- Clean the unit daily.
- Do not set anything on the top of the unit.
- The unit may be hot, even though the indicator light is not illuminated.
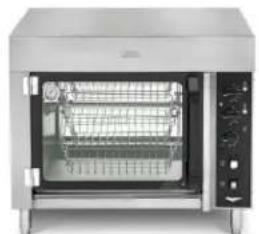
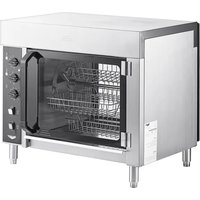
natural_image
Exterior view of a stainless steel electric oven with open lid (no visible text or symbols)ROV-08
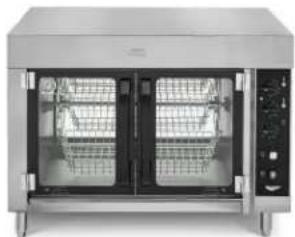
natural_image
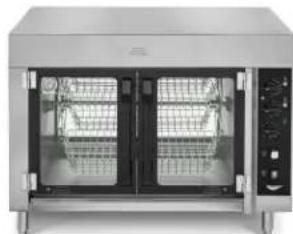
Front view of a stainless steel electric oven with dual doors and control panel (no visible text or symbols)ROV-15
| Item Model Description | |
| RO4-208240-8 ROV | -08 Rotisserie—8-bird, 208-240V |
| RO4-208240-15 ROV | -15 Rotisserie—15-bird, 208-240V |
FUNCTION AND PURPOSE
This unit is intended to cook fresh foods in commercial foodservice operations. It is not intended to cook frozen foods—nor is it intended for household, industrial, or laboratory use.
UNPACKING THE UNIT
- Remove all packing material and tape, as well as any protective plastic.
- Clean any glue residue left over from the plastic or tape.
- Place the unit in desired location.
- Plug unit into a properly-grounded electrical supply matching the nameplate rating.
NOTICE: If incorrect power is supplied, damage can occur.
INSTALLATION
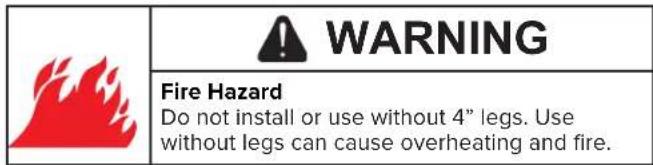
| WARNING | |
| Fire Hazard, Injury, or Property Damage.Unit must be installed by qualified personnel in accordance with all federal, state, and local codes.Improper installation can result in injury or death. |
Location and Clearance Requirements
- This unit should be installed adjacent to non-combustible surfaces in a flat location.
• The supplied legs must be installed. - Ambient temperatures must be at or below 104 °F (40 °C).
Ventless Operation
Based on independent UL testing, this product complies with NFPA96 for ventless operation using the EPA202 test method. Ventless allowance is dependent upon AHJ approval.
Testing was conducted using 2½–3½ pound whole chickens, skin-on and bone-in.
Assembling and Installing Carousel Assembly
- Remove carousel end plates and shaft from the packaging.
- Install end plates to carousel shaft with the provided screws.
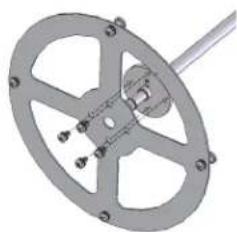
natural_image
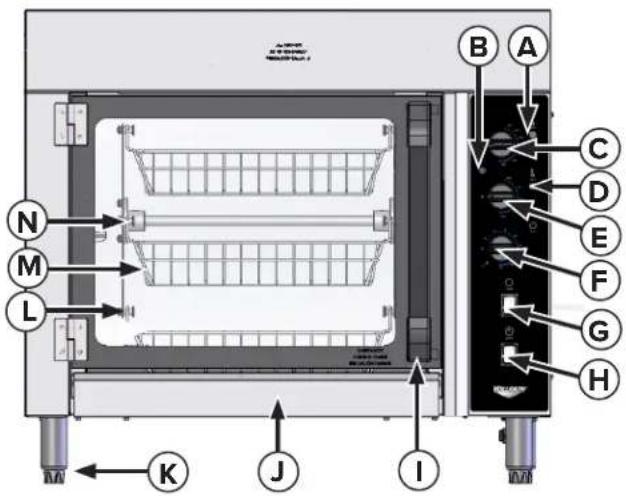
Mechanical gear assembly diagram with no visible text or symbolsA. Cook Indicator Light—indicates when unit is in Cook mode.
B. Heat Indicator Light—cycles on and off while unit is heating; (not a power-indicator). Once set temperature is reached, the light will go out.
C. Cook Temperature Dial—sets cooking temperature from 150^ F– 450^ F ( 65.6^ C– 232.2^ C)
D. Hold-Indicator Light—indicates when unit is in Hold mode.
E. Hold-Temperature Control Dial—sets temperature from 100 °F –300 °F (37.8 °C–148.9 °C) for holding pre-cooked chickens.
F. Timer—heats in Cook mode when set to 15-120 minutes or On.
Unit heats in Hold mode when timer is off.
G. Rotate Switch—starts and stops basket rotation.
H. Power Switch—turns the oven and oven light on and off.
I. Door Handle—opens and closes the oven.
J. Drip Tray—collects grease/oil and is removable for cleaning.
K. Legs—support the unit and provide needed clearance.
L. Pivot Pin—holds and allows baskets to rotate during cooking.
M. Basket—holds food and rotates during rotisserie cooking.
N. Carousel Assembly (removable)—holds and rotates baskets.
O. Fan Cover—is located at the inside top of oven (not shown).
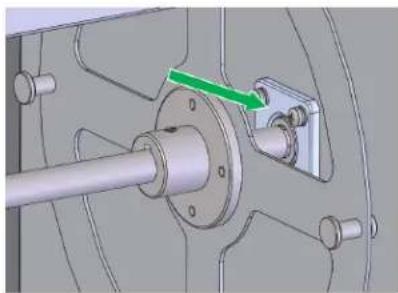
- Install the carousel assembly into the rotisserie. Slide the hexagonal end of the carousel shaft into the motor coupling on the right side of the oven.
natural_image
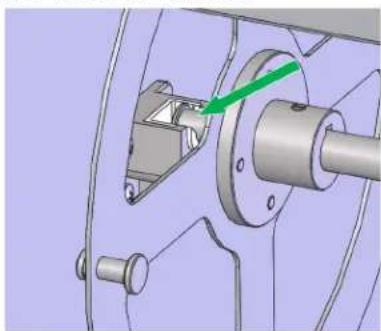
Mechanical assembly diagram showing a shaft and housing with a green arrow indicating a component (no text or symbols present)- Position the free end of the carousel shaft above the carousel holder on the left side of the unit. Allow the carousel shaft to rest in the slot of the carousel holder.
natural_image
Mechanical assembly diagram showing a flanged shaft and housing with a green arrow indicating a component (no text or symbols present)- Power the unit on and turn the rotate switch to ON. Check to ensure the carousel is rotating smoothly.
Install the Included Legs
- Install the included legs to meet agency certifications.
- Ensure the unit is level to avoid damage during operation.
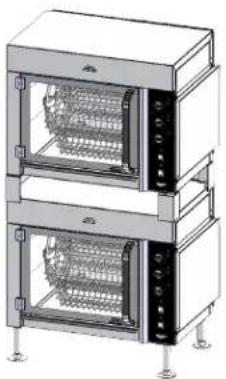
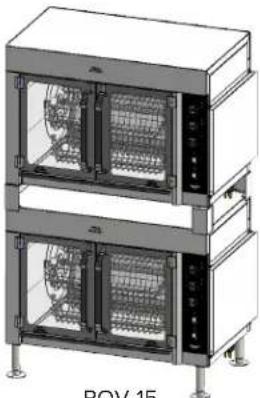
Installation Instructions for Stacked Units
- The appropriate stacking kit must be purchased and assembled as shown below when placing a unit on top of another; item number is 60089 for RO4-208240-8 and 60090 for RO4-208240-15.
natural_image
Technical line drawing of a dual-tiered stainless steel oven (no text or symbols)ROV-08
natural_image
Technical line drawing of a two-tiered rack-mounted oven or control unit (no text or symbols visible)ROV-15
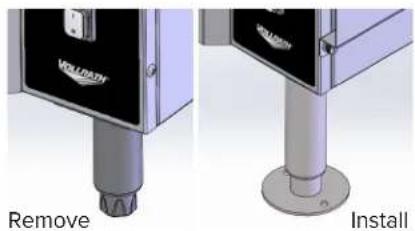
- Stacked units must be bolted to a level floor using the legs provided in the stacking kit. Remove the four standard 4" legs from bottom unit and replace with four 6" legs from kit.
- Side vents included in the stacking kit must be attached to both units. Do this by removing the four screws from the right of the unit and use the screw holes to attach the side vents with the provided thumb screws.

- Remove the four standard 4" legs from the top unit, and replace with the four stacking corners.

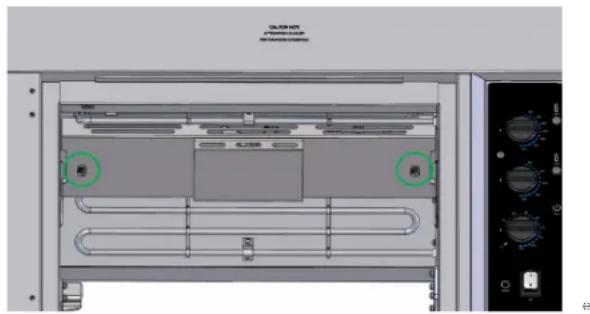
natural_image
3D diagram of an oven with internal circuitry and green circular annotations (no text or symbols)- Ensure units are correctly assembled and bolted to a level floor. Only properly-installed legs and vents included in the Vollrath ^® stacking kit will meet agency requirements.
Before First Use
- Clean the unit per the Cleaning and Maintenance section.
- Set the temperature to 450 °F (232 °C) in cook mode.
- Allow the oven to heat for 30 minutes. Smoke may appear due to the heating elements burning in; this is normal.
- After the 30-minute burn-in period, the unit is ready for use.
OPERATION
| WARNING | |
| Electrical Shock Hazard. Keep water and other liquids from entering the unit. Liquid inside the unit could cause an electrical shock or short circuit. Do not immerse the cord, plug, or unit in water or any other liquid-or operate if the unit or cord are damaged or altered. | |
| ! WARNING |
| Burn Hazard. To avoid burns and splattering, do not touch cookware, heating surfaces, or food-or drop water onto cooking surfaces while operating. |
- Load chickens into baskets. To ensure optimal cooking, chickens should be about the same size and weight.
| Oven Capacity | |
| RO4-208240-8 8 chickens (2/basket), about 3.5 lbs. (1.5 kg) each. Maximum must be < 28 lbs. (12.7 kg). | |
| RO4-208240-15 15 chickens (3/basket), about 3.5 lbs. (1.5 kg) each. Maximum must be < 52.5 lbs. (23.8 kg). | |

NOTICE: Uneven loading could cause baskets to bump each other or sides of the oven and cause damage to the unit.
- Switch power to ON; the oven and Hold lights will illuminate.
- Turn the Timer ON; the Cook Light will illuminate.
- Set COOK thermostat to desired setting; Heating Indicator Light will illuminate. Recommended cooking temperature is 350 °F (177 °C); this might need adjusting based on size and number of chickens, preferences, and other variables.
- Turn Timer to ON or to 90-120 (minutes) to cook.
- Turn Rotate Switch to ON.
- When the timer expires, unit will switch to HOLD and the HOLD light illuminates; baskets will continue to rotate.
- Turn Rotate Switch OFF. When carousel stops, carefully open the door.
- Use a food thermometer to verify each chicken is fully cooked and adjust cooking time as necessary.
- To maintain pre-cooked chickens, turn HOLD Dial to the chosen temperature; Heating-Indicator light will illuminate.
- Unit will stay in HOLD mode until timer is reset or turned on.
NOTICE: When in COOK or HOLD mode, you might hear clunking when the elements are first turned on or after heating for a while, with the Heat Indicator Light cycling on and off for several minutes at a time. This is normal, and confirms the unit is cycling around a set temperature.
NOTICE: United States Public Health Service recommends hot food be held at a minimum of 140 °F (60 °C) to help prevent bacteria growth. Monitor temperatures closely for food safety.
CLEANING AND MAINTENANCE
To prevent fires, maintain appearance, and increase service life, clean your unit daily.
| WARNING | |
| Fire Hazard, Injury, or Property Damage.Overheated grease, oil, or fat vapors can cause a fire. Unit must be cleaned daily. |
| WARNING | |
| Electrical Shock Hazard.Keep water and other liquids from entering the unit. Liquid inside the unit could cause an electrical shock or short circuit.Do not immerse cord, plug, or unit in liquids—or operate if unit or cord are damaged or altered. |
| WARNING | |
| Burn Hazard.To avoid burns and splattering, do not touch cookware, heating surfaces, or food-or drop water onto cooking surfaces while operating. |
NOTICE: Do not use caustic cleaning chemicals, steel wool or commercial lime remover to clean the unit.
- Turn off and unplug the unit.
- Protect your hands and remove hot food.
- Allow the unit to cool completely.
- Remove baskets, drip tray, carousel assembly, and fan cover. Wash, rinse, and thoroughly dry components before reinstalling.
- Clean unit with mild soap and water to remove all grease, oil, and fat.
- Dry unit before installing the drip tray, carousel assembly, fan cover, and baskets.
Remove the Fan Cover
- Turn off and unplug unit and allow it to cool completely.
- Loosen the two thumb screws securing the cover to the top of the oven. Fan Cover must be re-installed prior to use.
Removing the Carousel Assembly
- Turn Off and unplug unit and allow it to cool completely.
- Lift up on the left end of the carousel and pull horizontally to the left to remove from the motor coupling.
Replace the Oven Light
NOTICE: The replacement oven light must be rated for high temperatures within the oven and must match the nameplate voltage, i.e., 220-240V, 30W maximum, 570 °F (300 °C). Individual light bulbs can be purchased as a service part (Vollrath #353866-1).
- Turn off and unplug unit and allow it to cool completely.
- Remove oven light glass cover, then the oven light bulb and replace with new bulb.
TROUBLESHOOTING
| Problem Potential Cause Course of Action | ||
| Upon initial startup, unit does not have heat or power out of the box. | High-Limit Thermostat(s) at bottom of unit may have opened during shipping or storage in very cold temperatures. | Unplug unit. Remove High-Limit Cover(s) at the bottom and reset the High-Limit Button by pressing until it clicks. Reinstall High-Limit Cover(s). Plug unit in and turn on to verify power and heat. |
| Unit does not have power. | Unit is not plugged in. Plug in the unit | |
| There is a problem with the outlet. Contact an authorized service agent. | ||
| Circuit breaker tripped. Reset the breaker. | ||
| Unit is not heating. High-limit reset tripped. Contact Vollrath Technical Services. | ||
| Oven light does not work. Bulb is burned out. Replace the oven light per the preceding instructions. | ||
| Pilot light does not work. There is a problem with the pilot light(s). Contact Vollrath Technical Services. | ||
| Carousel does not rotate. | There is a problem with the motor. | Contact Vollrath Technical Services. |
| There is a problem with the power supply. | Contact Vollrath Technical Services. | |
SERVICE AND REPAIR
Serviceable parts are available on vollrathfoodservice.com.
To avoid serious injury or damage, never attempt to repair the unit or replace a damaged power cord yourself. Do not send units directly to The Vollrath Company LLC. Please contact Vollrath Technical Services for instructions.
When contacting Vollrath Technical Services, please be ready with the item number, model number (if applicable), serial number, and proof of purchase showing the date the unit was purchased.
WARRANTY STATEMENT FOR THE VOLLRATH CO. L.L.C.
This warranty does not apply to products purchased for personal, family or household use, and The Vollrath Company LLC does not offer a written warranty to purchasers for such uses.
The Vollrath Company LLC warrants the products it manufactures or distributes against defects in materials and workmanship as specifically described in our full warranty statement. In all cases, the warranty runs from the date of the end user's original purchase date found on the receipt. Any damages from improper use, abuse, modification, or damage resulting from improper packaging during return shipment for warranty repair will not be covered under warranty.
For complete warranty information, product registration, and new product announcements, visit vollrathfoodservice.com.
The Vollrath Company, L.L.C. Headquarters
1236 North 18th Street
Sheboygan, Wisconsin 53081-3201 USA
Main Tel: 800-319-9549 or 920-457-4851
Main Fax: 800-752-5620 or 920-459-6573
Canada Customer Service: 800-695-8560
Tech Services: techservicereps@vollrathco.com
vollrathfoodservice.com
Vollrath Pujadas Sau
Ctra. de Castanyet, 132
P.O. Box 121
17430 Santa Coloma de Farners
Girona
Spain
Tel. +34 972 843 201
info@pujadas.es
Vollrath de Mexico S. de R.L.
de C.V. Periferico Sur No.
7980 Edificio 2-C Col. Santa
Maria Tequepexpan 45601
Tlaquepaque, Jalisco | Mexico
Tel: +52 33 3133 6767
Tel: +52 33 3133 6769
Fax: +52 33 3133 6768
Vollrath (Shanghai) Trading Limited
Room 906, Building A
Hongwell Plaza
1308 Lianhua Road
Minhang District, Shanghai 20102
Tel: 86-21-50589580
MANUEL D'UTILISATION
RÔTISSOIRE DE POULET
natural_image
Exterior view of a stainless steel electric oven with open lid and control panel (no visible text or symbols)ROV-08 ROV-15
natural_image
Front view of a stainless steel electric oven with dual doors and control panel (no visible text or labels)INSTALLATION
natural_image
Mechanical component diagram showing a circular gear-like structure with mounting holes and central hub (no text or symbols)natural_image
Mechanical assembly diagram showing a shaft and housing with a green arrow indicating direction (no text or symbols)natural_image
Mechanical assembly diagram showing a shaft, housing, and mounting bracket with a green arrow indicating a specific component (no text or symbols present)natural_image
Technical illustration of a dual-tiered stainless steel oven with control panel and mounting base (no text or symbols)ROV-08

natural_image
Illustration of two stacked industrial cabinets with ventilation grilles (no text or symbols visible)ROV-15
natural_image
3D mechanical component with a cylindrical base and mounting base (no visible text or symbols)Installez
natural_image
3D diagram of a device labeled 'Retirez' with red circular markers on its surface (no other text or symbols)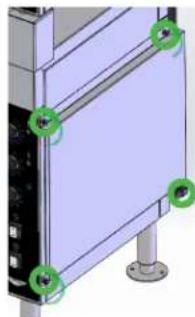
natural_image
3D diagram of a server rack with labeled ports (no text or symbols present)Installez
natural_image
3D rendering of an oven with internal structure and green circular annotations (no text or symbols)natural_image
Technical diagram of a computer monitor with internal components and control knobs (no readable text or symbols)Vollrath (Shanghai) Trading Limited
Room 906, Building A
Hongwell Plaza
1308 Lianhua Road
Minhang District, Shanghai 20102
Tel: 86-21-50589580
VOLLRATH®
MANUAL DEL OPERADOR
HORNO ROSTICERO PARA ASAR POLLOS
natural_image
Exterior view of a stainless steel electric oven with open doors and internal compartments (no visible text or symbols)ROV-08

natural_image
Front view of a stainless steel electric biveli oven with open doors and control panel (no visible text or symbols)ROV-15
INSTALACIÓN


ADVERTENCIA
natural_image
Mechanical gear assembly diagram with no visible text or symbolsnatural_image
Mechanical assembly diagram showing a shaft and mounting bracket with a green arrow indicating direction (no text or symbols)natural_image
Mechanical assembly diagram showing a rotating shaft and housing with a green arrow indicating direction (no text or symbols)natural_image
Technical line drawing of two stacked oven units labeled ROV-08, showing internal grating patterns (no text or symbols on the devices themselves)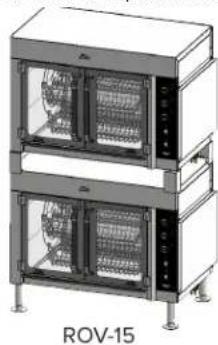
natural_image
Exterior view of two stacked industrial cabinets labeled ROV-15, showing internal circuitry (no text or symbols on the cabinets themselves)natural_image
Close-up of a mechanical device component with a metallic shaft and labeled 'Retire' (no other text or symbols visible)
natural_image
Close-up of a metallic mechanical component with a base and mounting base, labeled 'Instale' (no other text or symbols visible)natural_image
3D diagram of a rectangular panel with red circular markers and the word 'Retire' below, no readable text or symbols on the panel itself.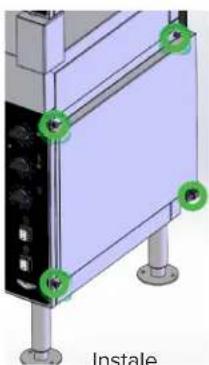
natural_image
3D mechanical assembly diagram showing a mounted component with mounting feet and green circular markers (no text or symbols)natural_image
3D rendering of an oven with internal circuitry and green circular annotations indicating mounting points (no text or symbols present)natural_image
Technical diagram of a computer monitor with ventilation ducts and control panel (no readable text or symbols)A
The Vollrath Company, L.L.C. Headquarters
1236 North 18th Street
Sheboygan, Wisconsin 53081-3201 USA
Main Tel: 800-319-9549 or 920-457-4851
Main Fax: 800-752-5620 or 920-459-6573
Canada Customer Service: 800-695-8560
Tech Services: techservicereps@vollrathco.com
vollrathfoodservice.com
Vollrath Pujadas Sau
Ctra. de Castanyet, 132
P.O. Box 121
17430 Santa Coloma de Farners
Girona
Spain
Tel. +34 972 843 201
info@pujadas.es
Vollrath de Mexico S. de R.L.
de C.V. Periferico Sur No.
7980 Edificio 2-C Col. Santa
Maria Tequepexpan 45601
Tlaquepaque, Jalisco | Mexico
Tel: +52 33 3133 6767
Tel: +52 33 3133 6769
Fax: +52 33 3133 6768
Vollrath (Shanghai) Trading Limited
Room 906, Building A
Hongwell Plaza
1308 Lianhua Road
Minhang District, Shanghai 20102
Tel: 86-21-50589580
- SAFETY PRECAUTIONS
- WARNING
- CAUTION
- NOTICE: addresses practices not related to physical injury.
- To reduce risk of injury or damage to the unit
- FUNCTION AND PURPOSE
- UNPACKING THE UNIT
- INSTALLATION
- Location and Clearance Requirements
- Ventless Operation
- Assembling and Installing Carousel Assembly
- Install the Included Legs
- Installation Instructions for Stacked Units
- Before First Use
- OPERATION
- CLEANING AND MAINTENANCE
- Remove the Fan Cover
- Removing the Carousel Assembly
- Replace the Oven Light
- TROUBLESHOOTING
- SERVICE AND REPAIR
- WARRANTY STATEMENT FOR THE VOLLRATH CO. L.L.C.
- MANUEL D'UTILISATION
- RÔTISSOIRE DE POULET
- VOLLRATH®
- MANUAL DEL OPERADOR
- HORNO ROSTICERO PARA ASAR POLLOS
- INSTALACIÓN
- ADVERTENCIA
Brand : Vollrath
Model : RO4-208240-15
Category : Oven