ST100 HF - Welding machine Toolcraft - Free user manual and instructions
Find the device manual for free ST100 HF Toolcraft in PDF.
User questions about ST100 HF Toolcraft
0 question about this device. Answer the ones you know or ask your own.
Ask a new question about this device
Download the instructions for your Welding machine in PDF format for free! Find your manual ST100 HF - Toolcraft and take your electronic device back in hand. On this page are published all the documents necessary for the use of your device. ST100 HF by Toolcraft.
USER MANUAL ST100 HF Toolcraft
GB Operating instructions
Soldering station
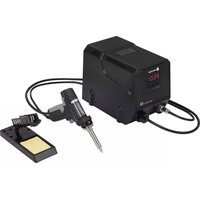
Item No. 1626065 (ST-100HF, 100 W)
Item No. 1626066 (ST-150HF, 150 W) Page 27 - 52
F Mode d'emploi
Station de soudage
www.business.conrad.at
text_image
10 9 8 7 SET:170 TMP:169 1 2 3 4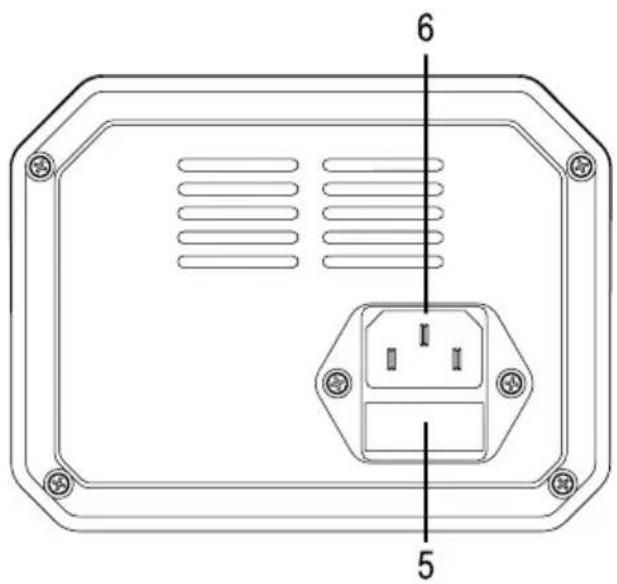
text_image
6 5
text_image
11 12 13
text_image
14 15 16 17 18- Introduction......28
- Explanation of symbols....28
- Intended use....29
- Package contents 29
- Safety information....30
a) General information....30
b) Power cable/mains voltage/fuse 30
c) Setup location....31
d) Operation....32
- Product overview 34
- Installation and operation....35
- Operation 36
a) Switching on and off ....36
b) Setting the soldering tip temperature....36
c) Standby mode 37
d) Power saving mode....37
- Loading/saving temperature settings....38
a) Loading a temperature setting....38
b) Saving a temperature setting....38
- Setup mode 39
a) Enabling/disabling settings mode 39
b) Programming a fixed soldering tip temperature....40
c) Disabling the fixed soldering tip temperature 41
d) Calibration 42
e) Programming a password....43
f) Resetting the password....44
- Soldering....45
- Changing the soldering tip....47
- Replacing the fuse....48
- Maintenance and cleaning....49
- Disposal 49
- Troubleshooting....50
- Technical data....51
1. Introduction
Dear customer,
Thank you for purchasing this product.
This product complies with statutory national and European regulations.
To ensure that the product remains in this state and to guarantee safe operation, always follow the instructions in this manual.

These operating instructions are part of this product. They contain important information on setting up and using the product. Bear this in mind when giving the product to a third party, and keep the operating instructions in a safe place for future reference.
If there are any technical questions, please contact:
International: www.conrad.com/contact
United Kingdom: www.conrad-electronic.co.uk/contact
2. Explanation of symbols

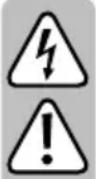
The symbol with the lightning in a triangle indicates that there is a risk to your health, e.g. due to an electric shock.

The symbol with an exclamation mark in a triangle is used to highlight important information in these operating instructions. Always read this information carefully.

The arrow symbol indicates special information and advice on how to use the product.
This product must only be installed and used in dry indoor spaces.

Always follow the instructions in this manual.
3. Intended use
This digital soldering station is designed for soldering tasks in the electrical and electronic sector and can be used with a range of different soft solders (lead, lead-free and silver solder). The soldering temperature is adjustable and the soldering tip can be replaced. A large LCD display shows the preset temperature and the current soldering tip temperature.
The high frequency heating element heats up quickly and enables precise temperature control when soldering.
The soldering station features three programmable buttons. You can assign a temperature to each button.
You can also set a fixed temperature with password protection so that the temperature cannot be changed by other users.
The soldering iron is calibrated for use with the soldering station (temperature precision). If the soldering iron needs to be replaced, you can recalibrate the settings.
The soldering station must only be powered by a mains voltage (230 V/AC, 50 Hz).
For safety and approval purposes, you must not rebuild and/or modify this product. Using the product for purposes other than those described above may damage the product. In addition, improper use can result in a short circuit, fire, electric shock or other hazards. Read the instructions carefully and store them in a safe place. Make this product available to third parties only together with its operating instructions.
This product complies with statutory national and European requirements. All company and product names are trademarks of their respective owners. All rights reserved.
4. Package contents
- Soldering station
- Soldering iron holder
- Mains cable
- Wet cleaning sponge
• Dry cleaning sponge (metal) - Operating instructions
- Soldering iron with soldering tip (replaceable)
Up-to-date operating instructions
Download the latest operating instructions via the link www.conrad.com/downloads or scan the QR code. Follow the instructions on the website.
5. Safety information
Read the operating instructions and safety information carefully. If you do not follow the safety instructions and information on proper handling in this manual, we will assume no liability for any resulting personal injury or damage to property. Such cases will invalidate the warranty/guarantee.
a) General information
- The unauthorized conversion and/or modification of the product is prohibited for safety and approval reasons. Never disassemble the product (apart from changing the soldering tip, replacing a defective fuse or resetting the password as described in these operating instructions)!
- This device is not a toy. Keep it out of the reach of children and pets.
- This product is not intended to be used by people (including children) with impaired physical, sensory or mental capabilities or lack of experience and/or lack of knowledge unless they are supervised by a person responsible for their safety or have received instructions on how to use the product.
- Do not leave packaging material lying around carelessly, as it may become a dangerous toy for children and presents a choking hazard.
- In schools, educational facilities, hobby and DIY workshops, the product must be operated under the supervision of qualified personnel.
- Always comply with the accident prevention regulations for electrical equipment when using the product in industrial facilities.
- Always handle the product carefully. Jolts, impacts or a fall even from a low height may damage the product.
- Consult a technician if you are not sure how to use or connect the product.
- Maintenance, modifications and repairs must be done by a technician or a specialist repair centre.
- If you have questions which remain unanswered by these operating instructions, contact our technical support service or other technical personnel.
b) Power cable/mains voltage/fuse
- This product is built according to protection class I. It must be powered by a standard earthed mains socket.
- Before connecting the soldering station, make sure that the mains voltage in your region meets the specifications on the name plate.
- The mains socket that you use to connect the power cable must be easily accessible.
-
Do not pull the power plug from the mains socket by pulling on the cable.
-
Never touch the power adapter or the mains cable when your hands are damp or wet, as this may cause a fatal electric shock!
-
Do not touch the mains cable or the soldering station if there are any signs of damage, as this may cause a fatal electric shock!
Switch off the mains voltage to the socket containing the power adapter (switch off at the corresponding circuit breaker or remove the fuse, and then switch off at the corresponding RCD protective switch).
You can then unplug the power adapter from the mains socket. -
If the fuse is defective, replace it with a new fuse with the same specifications (type, voltage, rated current, trip characteristics). Never bridge a defective fuse, as this may cause a fire or a fatal electric shock.
- Check the product for any signs of damage before each use. If there are any signs of damage, discontinue use immediately. Take the product to a specialist repair centre or dispose of it in an environmentally friendly manner. If the mains cable is damaged, it must be replaced by a new mains cable with the same specifications.
c) Setup location
- The soldering station must only be used in dry, enclosed indoor areas. It must not become damp or wet. Moisture on the mains cable/power adapter or in the soldering station may cause a fatal electric shock! Important:
The base of the soldering iron holder features a small container that you can use to store the metal cleaner or wet cleaning sponge. The wet cleaning sponge must be dampened with water. You can then use the sponge to remove flux residue from the hot soldering tip. Never immerse the soldering tip or the soldering iron in water.
When moistening the sponge, ensure that water does not drip into the soldering station or onto the soldering iron.
- Avoid direct sunlight, intense heat and cold temperatures. Keep the soldering station away from dust and dirt.
- Place the soldering station on clean, level surface of a sufficient size. Do not place the soldering station on flammable materials (e.g. a carpet or tablecloth). Always use a non-flammable, heatproof surface.
- Keep the soldering station away from flammable or combustible materials (e.g. curtains).
- Never cover the product, as this may cause it to overheat and catch fire. Ensure that there is sufficient ventilation when the soldering station is in use.
- Never insert objects into the ventilation holes on the soldering station, as this can cause a fatal electric shock.
- To prevent scratch/burn marks and discolouration, always use suitable protection when placing the charger on valuable furniture.
- The product must be installed, used and stored out of the reach of children. Children must be supervised to ensure they do not play with the product. Burn hazard!
- Do not use the product in the immediate vicinity of strong magnetic/electromagnetic fields, transmitter aerials or HF generators. These may affect the electronic control system.
- Make sure that the cables are not pinched or damaged by sharp edges. Do not place any objects on the cables.
- Do not place any containers, vases or plants that contain liquid on or next to the soldering station or mains cable.
If liquid enters the soldering station, it may destroy the soldering station and cause a fatal electric shock or fire.
If liquid does enter the soldering station, switch off the mains voltage to the socket containing the mains plug (switch off at the corresponding circuit breaker or remove the fuse, and then switch off at the corresponding RCD protective switch). You can then unplug the power adapter from the mains socket.
Discontinue use immediately and take the product to a specialist repair shop, or dispose of it in an environmentally friendly manner.
d) Operation
- Do not use the soldering station in rooms or in adverse conditions where flammable gas, vapours or dust may be present, as this may cause an explosion.
- Do not cover or fasten any items to the soldering station, as this constitutes a fire hazard.
- Before switching on the soldering station, ensure that you connect the soldering iron to the soldering station.
- Ensure that the soldering tip on the soldering iron is attached correctly. Never use the soldering iron without the soldering tip, as this will damage the heating element and temperature sensor and void the warranty/guarantee!
- Turn the soldering station off before connecting it to the mains. The soldering station is designed to be powered by a mains voltage (230 V/AC, 50 Hz). Always connect the soldering station to a standard earthed mains socket (via the mains cable) that is connected to the public grid.
- The base of the soldering iron holder features a small container that you can use to store the metal cleaner or wet cleaning sponge. The wet cleaning sponge must be dampened with water.
You can then use the dry metal cleaner or the wet sponge to remove flux residue from the hot soldering tip.
Never clean the hot soldering tip with a dry sponge, as this will damage the sponge!
The dry metal cleaner cleans the soldering tip gently and ensures a longer lifespan, as there is no temperature shock from cold water. A small amount of solder will remain on the tip.
- Before first use, the hot soldering tip must be coated with tin. Place a small amount of tin solder (solder wire with flux) onto the soldering tip (the top 5 mm) to cover it with an even film of solder.
- Do not brush solder residue on the soldering tip onto the housing of the soldering station!
- Never use the soldering iron to heat up liquids.
- Never solder live electrical components or parts. Always fully disconnect the device containing the parts that you want to solder from the power supply. After disconnecting it from the power supply, check the voltage with a suitable measuring device and take measures to prevent unauthorized use (e.g. use a warning sign).
Caution!
Touching or soldering capacitors (or similar components) or leads/cables that are connected to capacitors may cause a fatal electric shock! Capacitors may stay charged for several hours after you switch off the power supply!
- Depending on the workpiece or soldering method, the workpiece must be fixed in place with a suitable clamping device. This enables you to use both hands for the soldering process.
- Keep your workstation clean.
- Ensure that there is sufficient lighting.
- Ensure that there is sufficient ventilation when soldering. Solder and flux vapours can be harmful to your health.
- Wash your hands thoroughly after working with leaded solder.
- Do not put solder into your mouth or eat or drink during the soldering process.
- Wear suitable protective clothing and safety goggles when soldering. Liquid/splashing solder may cause serious burns or eye damage.
- Never use soldering flux, acid or similar aids when soldering. These materials can cause bad soldering joints and may damage the soldering tip. For best results, use a solder wire with a flux core.
- When using the soldering iron, do not touch any other part of the soldering iron apart from the handle. Burn hazard! The entire front part of the soldering iron gets very hot during use (and during the heating and cooling process). Always hold the soldering iron using the handle to avoid burning yourself.
- Always solder on non-flammable surfaces. Ensure that there are no neighbouring materials that may be damaged by the heat generated from the soldering iron.
- Only use the product in temperate climates. It is not suitable for use in tropical climates. Refer to the "Technical data" section for information on the permitted ambient conditions.
- Never use the product immediately after it has been brought from a cold room into a warm one. This may generate condensation, which can cause the product to malfunction or damage the interior components. Moisture on the soldering station, mains cable or power adapter may also cause a fatal electric shock! Allow the product to reach room temperature before using it. This may take several hours.
- If it is no longer possible to operate the product safely, stop using it and prevent unauthorized use. Safe operation can no longer be guaranteed if the product:
- is visibly damaged,
- is no longer working properly,
- has been stored for extended periods in poor ambient conditions or
- has been subjected to any serious transport-related stress.
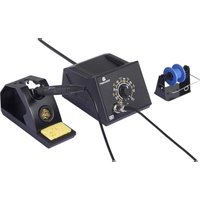
6. Product overview

text_image
10 9 8 7 SET:170 TMP:169 1 2 3 4
text_image
6 5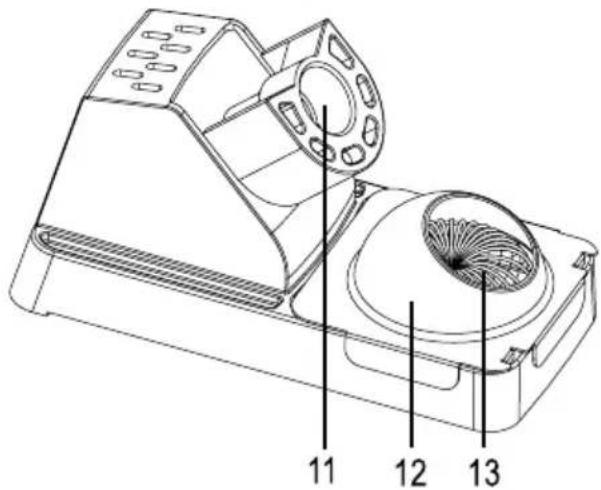
text_image
Technical diagram of a mechanical device with numbered components labeled 11, 12, and 13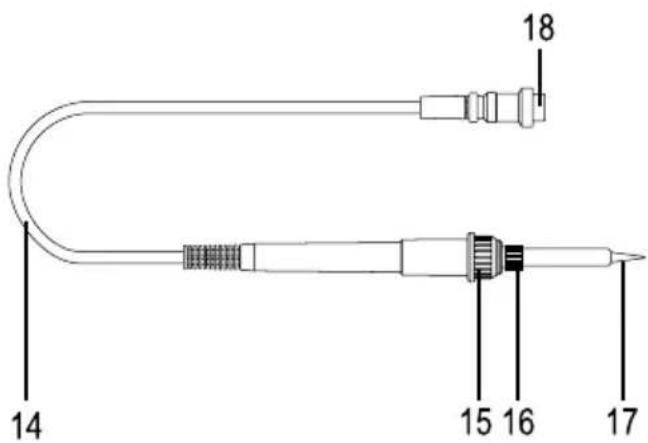
text_image
14 15 16 17 181 On/off switch
2 Control buttons
3 ESD socket
4 Connection socket for soldering iron
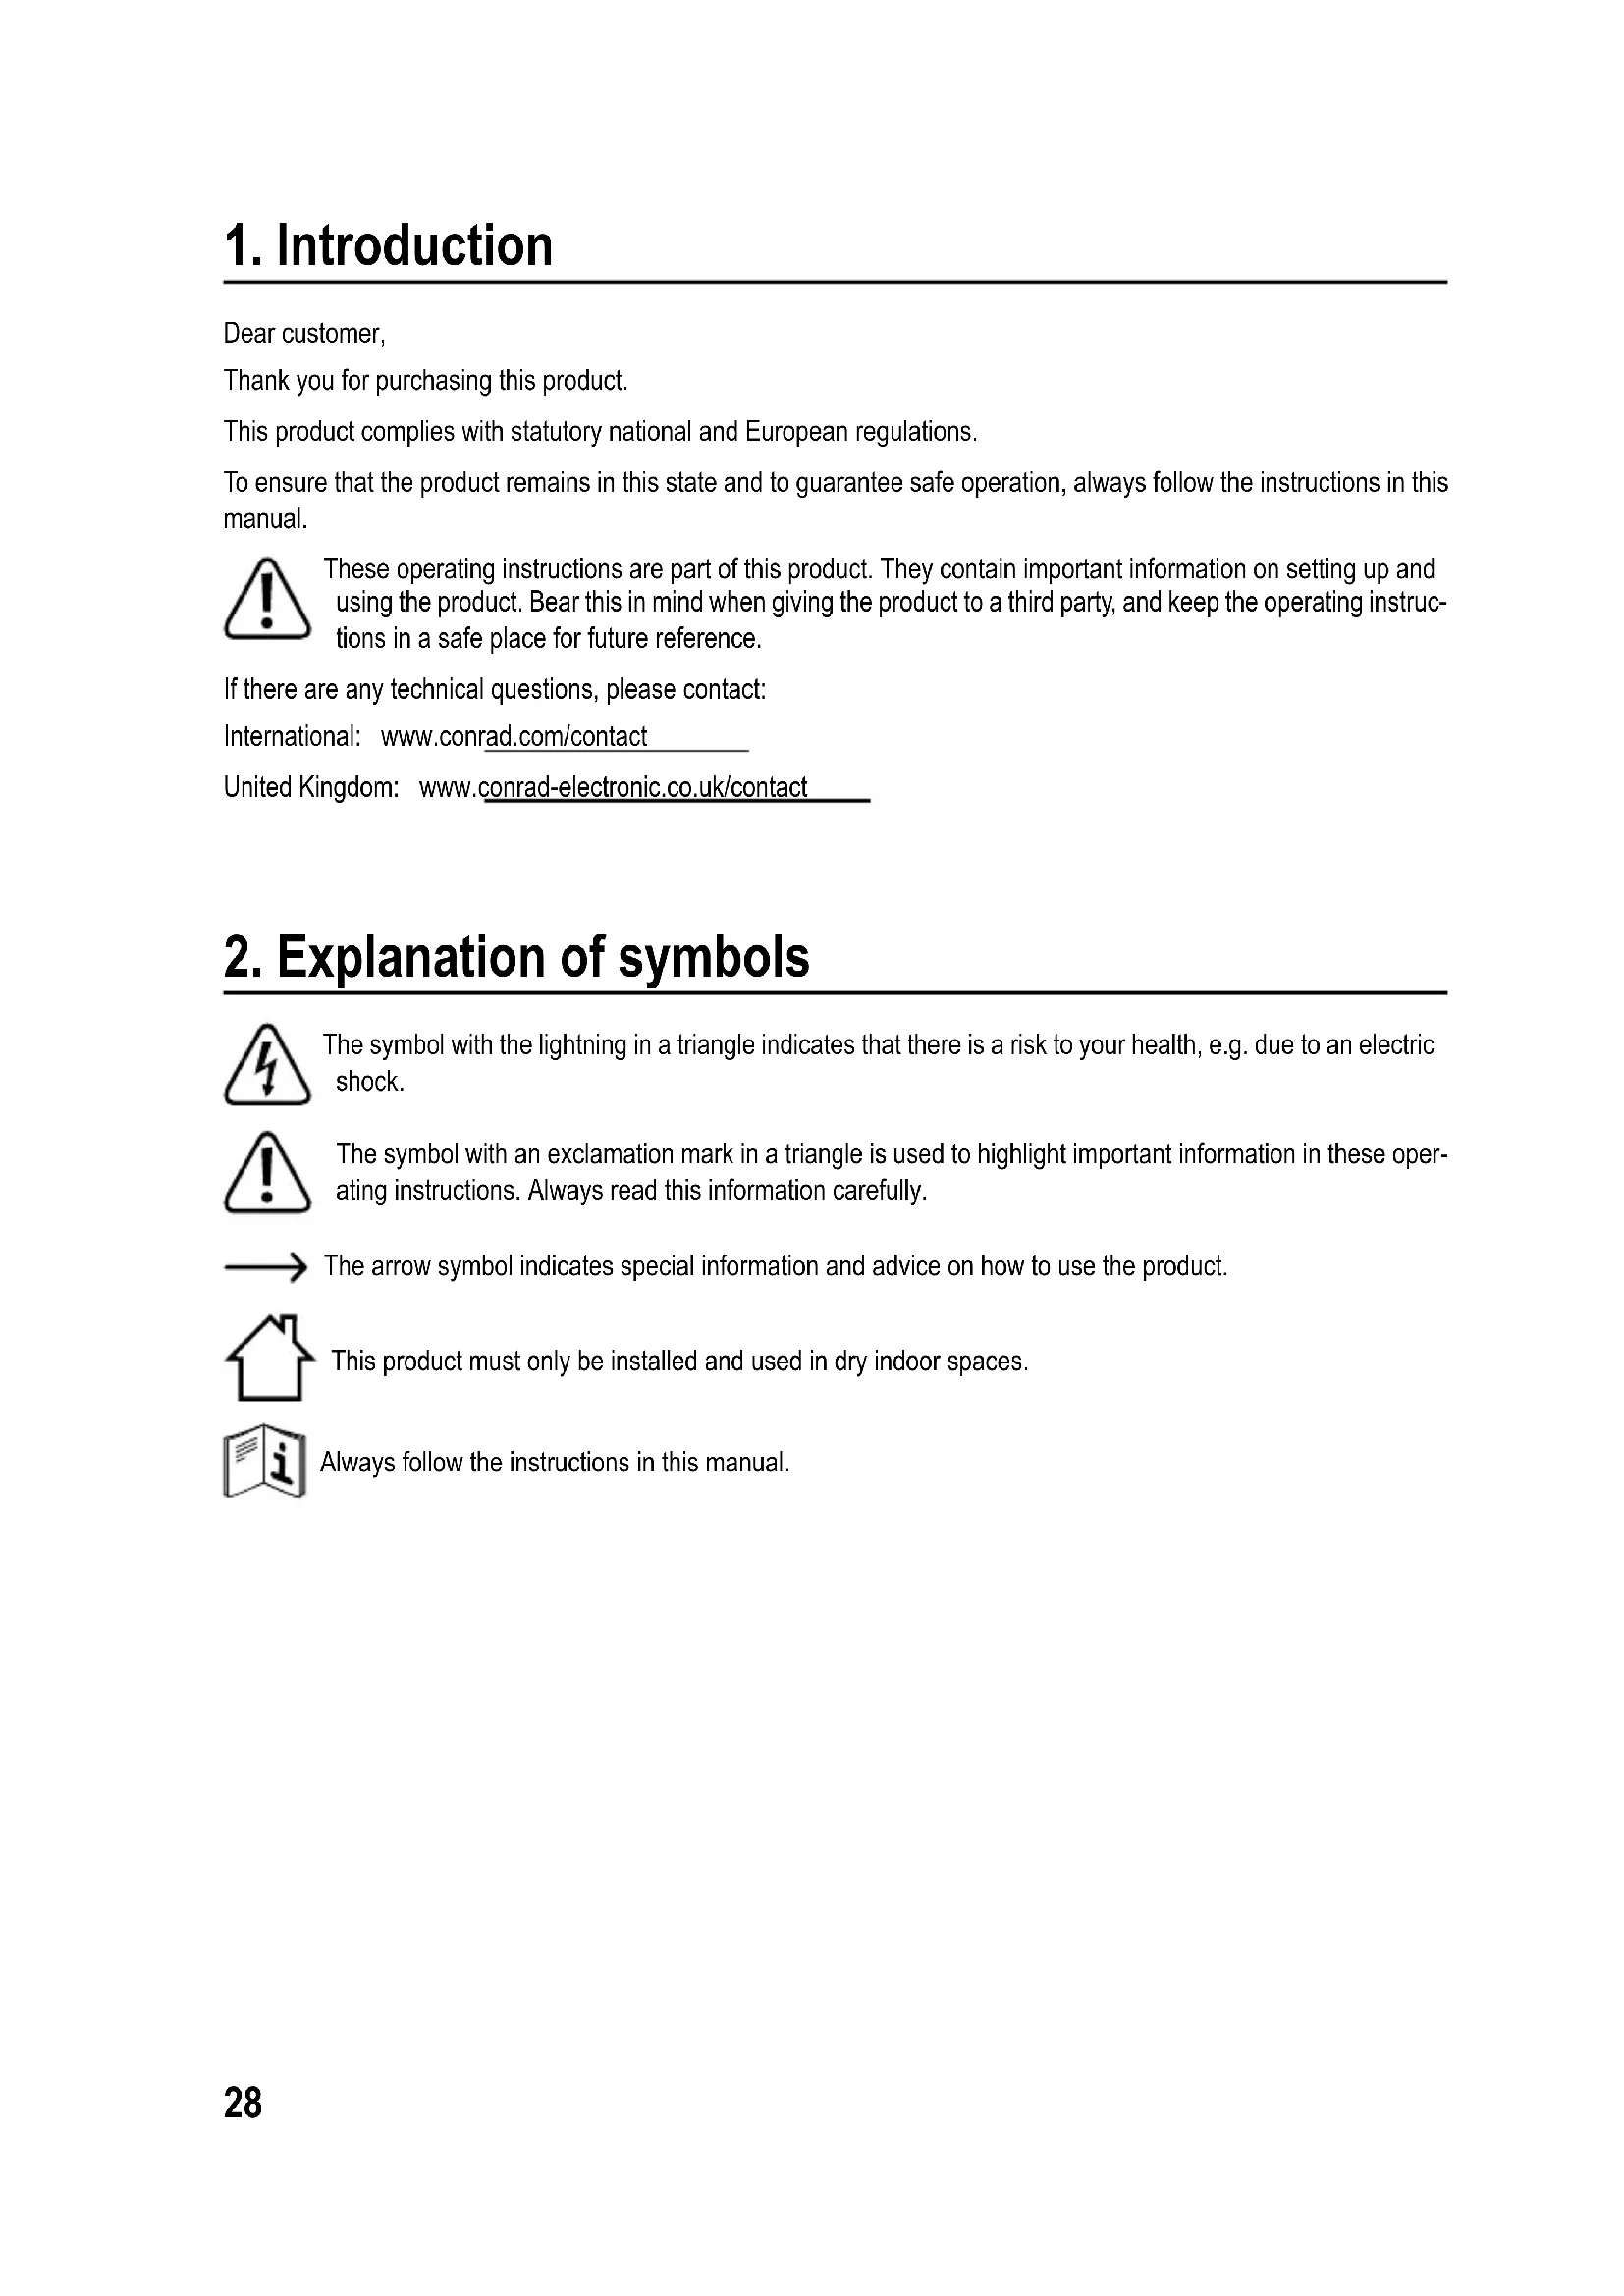
5 Fuse holder
6 Power-in socket for connecting the mains voltage
7 Temperature control dial
8 Status LED for heating function
9 Illuminated display
10 Indicator for displaying the difference between the target and current soldering tip temperature
11 Soldering iron holder
12 Removable protective cover (for use with the dry metal cleaner)
13 Dry/wet sponge (dry sponge pictured)
14 Soldering iron connection cable
15 Heating element screw
16 Cap nut for the soldering tip
17 Soldering tip (replaceable)
18 Soldering iron connector
7. Installation and operation

Follow the information in the "Safety information".
- Place the soldering station and soldering iron stand on a flat, stable and sufficiently large surface away from flammable objects.

Do not place the soldering iron stand on top of other devices. If there is too much solder on the soldering tip, it may drip onto or into the device when you remove or replace the soldering iron.
Soldering residue may also fall off the dry metal cleaner/wet sponge into the device when you are cleaning. This can cause a short circuit.
- Protect heat-sensitive surfaces with a suitable cover. Never place the soldering station and the soldering iron stand on valuable furniture or floors or on a carpet/rug. Maintain a sufficient distance from combustible or flammable objects (e.g. curtains).
- If there is a piece of protective rubber (or other similar material) on the soldering tip, remove it before first use. This is designed to protect the soldering tip during transport and is not required.
- Ensure that the screw (16) for the soldering tip is securely in place (do not use a tool to tighten the screw!).
- Insert the soldering iron into the soldering iron holder (11).
- Place the dry metal cleaner into the container on the soldering stand. Alternatively, insert the wet sponge after dampening it slightly with water.

When using the dry metal cleaner, place the protective cover (12) onto the soldering iron stand. The protective cover holds the metal cleaner in place and prevents solder from splashing onto the sponge.
Dampen the wet sponge with water before use. It must not be too wet; squeeze it to remove any excess water before use. Dampen the sponge from time to time to prevent it from drying out. Wash the sponge occasionally in fresh water.
- Insert the soldering iron connector (18) into the corresponding socket (4) on the soldering station. The connector only fits in one position; do not use any force when inserting it into the socket. Tighten the round cap nut on the connector (do not use any tools!).
- The soldering station features an ESD socket (3) for use on an ESD workstation. Use a suitable cable to connect the ESD workstation to the socket on the soldering station.
- Use the mains cable to connect the power-in socket (6) to a standard earthed mains socket.
8. Operation
a) Switching on and off

Before switching the soldering station on, check that the soldering iron is connected correctly.
Use the on/off switch (1) to turn the soldering station on ("I" = on) or off ("O" = off). The LCD display (9) will turn on when the soldering station switches on.
b) Setting the soldering tip temperature
- The first line of the display ("SET") indicates the target temperature, and the bottom line ("TMP") shows the current temperature measured by the temperature sensor in the soldering iron.
- The status LED (8) above the temperature control dial (7) indicates whether the heating function is activated (the LED turns on when the heating function is activated).

When the soldering iron is in the soldering iron holder (11), the LED will only turn on briefly at occasional intervals, as only a small amount of energy is required to maintain the temperature. When you solder on large components, the LED will turn on very frequently or for longer intervals, as a large amount of energy is required to heat the soldering iron.
- The indicator (10) on the left-hand side of the display shows the difference between the current and target temperature. More bars indicate a larger difference. This enables you to quickly determine whether the preset temperature (shown on the first line of the display ("SET")) has been reached.
- The soldering tip temperature can be set between 50 °C and 480 °C using the temperature control dial (7). Alternatively, you can set the temperature using the three control buttons (2) (briefly press the corresponding button). By default, the keys are programmed with the following temperature settings (see section 9 for instructions on how to change these settings).
Button "1": 150 °C
Button "2": 270 °C
Button "3": 360 °C

Important:
When you set a fixed soldering tip temperature (with password protection, see section 10b), you cannot change the temperature using the temperature control dial or the control buttons.
If you enabled a preset temperature using one of the control buttons and wish to manually change the temperature, turn the temperature control dial (7) slightly in either direction. You can then change the temperature using the temperature control dial (7).
If the temperature control dial (7) is in the leftmost position and you wish to decrease the temperature, turn the temperature control dial slightly in a clockwise direction. You can then set the temperature as usual.
If the temperature control dial (7) is in the rightmost position and you wish to increase the temperature, turn the temperature control dial slightly in an anticlockwise direction. You can then set the temperature as usual.
The temperature control dial (7) is not directly linked to the heating function (as on conventional analogue soldering stations), because the temperature can also be selected using the control buttons.
- The soldering iron requires some time to reach the preset temperature. The status LED (8) flashes when the soldering iron is heating up and reheating.

Smoke emitted from the soldering tip is the result of evaporating residual flux. Make sure that your workplace is sufficiently ventilated (e.g. with an extraction system).
• After you have finished soldering, place the soldering iron back into the holder (11).

Fully insert the soldering iron into the holder so that it will not fall out by accident – fire and burn hazard!
c) Standby mode
The soldering iron automatically switches to standby mode when it is in the soldering iron holder (11) and has not been used for approximately 20 minutes (the soldering iron has a built-in tilt sensor that detects when the soldering iron is not in use).
In standby mode, the temperature drops to 200 °C to save energy and to protect the soldering tip.
"SET: STB" and "TMP:200" will appear on the display.

Warning!
preset temperature is lower than 200 °C, the soldering station will heat up to 200 °C when it is in standby mode!
You can disable standby mode in two ways:
- Briefly press one of the three control buttons (2). The soldering station will return to the preset temperature (pressing the control button only disables standby mode and does not enable the corresponding temperature).
- Remove the soldering iron from the soldering iron holder (the built-in tilt sensor detects movement and disables standby mode).
d) Power saving mode
The soldering iron automatically switches to power saving mode when it is in the soldering iron holder (11) and has not been used for approximately 40 minutes (the soldering iron has a built-in tilt sensor that detects when the soldering iron is not in use).
"zzZZZz.. RESTART" will appear on the display.
To disable power saving mode so that you can use the soldering station again, switch the soldering station off using the on/off switch (1), and then switch it back on.
9. Loading/saving temperature settings
You can save a preset temperature to each of the three control buttons (2), e.g. for different solder types or for SMD soldering. By default, the control buttons (2) are programmed to the following temperature settings:
Button "1": 150 °C
Button "2": 270 °C
Button "3": 360 °C
You can overwrite these settings with your own temperature settings. The temperature settings are retained after the soldering station is switched off.

If you enabled a preset temperature using one of the control buttons (2) and wish to manually change the temperature, turn the temperature control dial (7) slightly in either direction. You can then change the temperature using the temperature control dial (7).
a) Loading a temperature setting
Briefly press the control button for the temperature setting that you want to load. The new target temperature will be displayed on the top line. If this is higher than the previous target temperature, the soldering tip will start to heat up (if the temperature is lower, wait until the soldering tip has cooled down to the new temperature).
b) Saving a temperature setting
- Use the temperature control dial (7) to set the desired temperature (shown next to "SET" on the top line of the display).

If the temperature control dial (7) is in the leftmost position and you wish to decrease the temperature, turn the temperature control dial slightly in a clockwise direction. You can then set the temperature as usual.
If the temperature control dial (7) is in the rightmost position and you wish to increase the temperature, turn the temperature control dial slightly in an anticlockwise direction. You can then set the temperature as usual.
The temperature control dial (7) is not directly linked to the heating function (as on conventional analogue soldering stations), because the temperature can also be selected using the control buttons.
- Hold down the control button that you want to assign a temperature to and wait until the set temperature flashes three times and stays constant. This indicates that the temperature setting has been saved. Release the control button.

The temperature will flash and "PS1", "PS2" or "PS3" will be displayed to the left of the temperature (depending on which button you press). This indicates that the soldering station is saving the temperature setting.
10. Setup mode
You can configure three different settings in settings mode:
- Programming a fixed soldering tip temperature
You can use this function when you plan to use the soldering station in a production facility and do not want other users to change the temperature.
When the soldering station is switched on, the soldering tip will always heat up to the preset temperature. The temperature cannot be changed using the control buttons (2) or the temperature control dial (7).
- Calibrating the soldering tip temperature
The soldering iron was calibrated to the soldering station before the product was shipped. If the soldering iron is replaced (e.g. due to a defect), the soldering tip temperature must be recalibrated. It is also advisable to recalibrate the temperature when using a new/different soldering tip.
A temperature measurement device that can measure temperatures of over 360 °C is required to calibrate the soldering tip. For best results and to prevent false measurements, use a surface probe with a small measuring tip.
- Programming a password
A password is required when you want to program a fixed soldering tip temperature. This prevents other users from changing the soldering tip temperature.
a) Enabling/disabling settings mode
- Switch the soldering station off using the on/off switch (1) ("O" = off).
- Hold down buttons "1" and "3" and switch the soldering station back on using the on/off switch ("I" = on). The firmware version will be displayed.
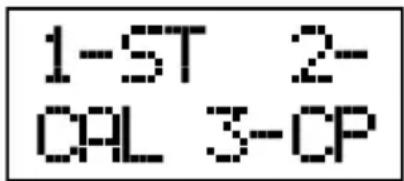
- Release both buttons. The main settings menu will be displayed (see right-hand screenshot).
"1-ST" = Program a fixed soldering tip temperature
"2-CAL" = Calibrate the soldering tip temperature
"3-CP" = Program a password
text_image
1-5T 2- QAL 3-CP- Press button "1", "2" or "3" to select the corresponding setting.
- To exit settings mode, switch the soldering station off using the on/off switch.
b) Programming a fixed soldering tip temperature
- Enable settings mode as described in section 10. a).
If you have not set a password or have not changed the default password ("000"), you must first set a password (see section 10. e). If the password is set to "000", you will not be able to set a fixed soldering tip temperature.
- Press button "1" when the main menu is displayed. If the password is set to "000", "SET PASS FIRST!" will appear for a few seconds, and then the main menu will be displayed. Change the password (see section 10. e).
- "SET TEMP." will appear briefly on the display.
"ENT.PASS 000" will be displayed.
- Use the three control buttons (2) to enter the password.
"1" = Decrease value
“2” = Choose input position
“3” = Increase value
- Hold down button "2" to confirm your entry. The password will flash three times and "SET TEMP 000" will be displayed.
- Enter the desired soldering tip temperature using the three control buttons (2).
"1" = Decrease value
“2” = Choose input position
"3" = Increase value
- Hold down button "2" to confirm your entry. The soldering tip temperature will flash three times and "SET TEMP SUCCESS" will be displayed (= temperature was successfully set).
- The display will revert to the main menu after a few seconds (see screenshot in section 10. a). To exit settings mode, switch the soldering station off using the on/off switch.
The soldering station will automatically heat to the preset soldering tip temperature when it is switched back on. The temperature cannot be changed using the control buttons (2) or the temperature control dial (7).
You can use this function when you plan to use the soldering station in a production facility and do not want other users to change the temperature.
To disable this mode, refer to the instructions in the next section (section c).
c) Disabling the fixed soldering tip temperature
As described in section 10. b), if you have set a fixed soldering tip temperature, the soldering station will automatically heat the soldering iron to the preset temperature when it is switched on. The temperature cannot be changed using the control buttons (2) or the temperature control dial (7).
To disable this function and set the temperature using the control buttons (2) or the temperature control dial (7), follow the steps below:
- Enable settings mode as described in section 10. a).
- Press button "1" when the main menu is displayed.
- "SET TEMP." will appear briefly on the display.
"ENT.PASS 000" will be displayed.
- Use the three control buttons (2) to enter the password.
“1” = Decrease value
“2” = Choose input position
“3” = Increase value
- Hold down button "2" to confirm your entry. The password will flash three times and "SET TEMP 000" will be displayed.
- Leave the temperature setting at "000".
Saving "000" disables the fixed soldering tip temperature. Setting another temperature ("050"...."480") only changes the fixed temperature. The new setting takes effect the next time you restart the soldering station.
Always set the temperature to "000" if you wish to disable the fixed temperature function.
- Hold down button "2". "000" will flash three times and "SET TEMP SUCCESS" will be displayed (= temperature was successfully set).
• After a few seconds the display will revert to the main menu (see screenshot in section 10. a). - Switch the soldering station off using the on/off switch (1).
- After you switch the soldering station back on, you can use the control buttons (2) or the temperature control dial (7) to manually change the soldering tip temperature.
→ If you wish to program a fixed soldering tip temperature, follow the steps in section 10. b).
d) Calibration

Before starting the calibration process, check that the soldering tip has cooled down completely (to room temperature). The temperature of the soldering tip at the start of the calibration process should be +23 ±5 °C. In addition, ensure that the soldering iron is not exposed to a flow of air (e.g. fan or solder fume extraction system), otherwise you will not be able to calibrate the soldering tip and an error message (“CALIBR. FAILED”) will be displayed.

Ensure that the soldering iron is inserted into the soldering iron holder. The heating function will be activated when you start the calibration process. The target temperature is approximately 360 °C .
- Press button "2" when the main menu is displayed (see section 10. a). "CALIBR. MODE" will briefly appear on the display.
"ENT.PASS 000" will be displayed.
- Use the three control buttons (2) to enter the password (the default password is "000"; if you have set another password as described in section10. e), you will need to enter this password.
"1" = Decrease value
“2” = Choose input position
“3” = Increase value
- Hold down button "2" to confirm your entry. The password will flash three times. The soldering station will start the heating process (indicated by the flashing red status LED) and "CNT DOWN" will be displayed. The display will count down from 30 to 1 (30...29...28... 2...1).

As described at the beginning of this section, an error message will be displayed ("CALIBR. FAILED" or "TIP MUST BE COLD") if the soldering iron is not completely cool. The temperature of the soldering tip at the start of the calibration process should be +23 ± 5^ C .
If the error message is displayed, switch off the soldering station and wait until the soldering iron is completely cool before starting the calibration process again.
- The countdown takes about 5 minutes, after which the soldering tip temperature will stabilize. "MEASURE TIP TEMP" will be displayed.

Measure the soldering tip temperature with a suitable temperature measurement device (measure as close as possible to the soldering tip). For best results and to prevent false measurements, use a surface probe with a small measuring tip.
The soldering tip must be clean and well coated with tin.
- Briefly press the "2" button to end the heating process. "MEAS TEM 000" will be displayed.
- Use the three control buttons (2) to enter the measured temperature (permissible range: 320^ to 400^ ).
“1” = Decrease value
“2” = Choose input position
“3” = Increase value
- Hold down button "2" to confirm your entry. The soldering tip temperature will flash three times and "CALIBR. SUCCESS" will be displayed.
If the temperature you entered is not within the permissible range (320 °C to 400 °C), "TEMP. ERROR" will be displayed. You can enter the temperature again after a few seconds (wait until "MEAS TEM" is displayed). Enter a temperature within the permissible range. If you do not know the correct value and wish to exit calibration mode, switch off the soldering station (the previously entered temperature will not be saved).
Start the calibration process again, but wait until the soldering tip has cooled down to room temperature (see the instructions at the beginning of section 10. c).
- After a few seconds the display will revert to the main menu (see screenshot in section 10. a). To exit settings mode, switch the soldering station off using the on/off switch.
e) Programming a password
- Press button "3" when the main menu is displayed (see section 10. a). "PASSWD. CHANGE" will appear briefly on the display.
Subsequently, "OLD PASS 000" (= old password) is displayed.
- Use the three control buttons (2) to enter the old password. The default password is "000".
"1" = Decrease value
"2" = Choose input position
"3" = Increase value
If the password is set to "000", you will not be able to set a fixed soldering tip temperature (see section 10. b).
- Hold down button "2" to confirm your entry. The password will flash three times and "NEW PASS 000" will be displayed.
- Use the three control buttons (2) to enter the new password.
"1" = Decrease value
"2" = Choose input position
“3” = Increase value
- Hold down button "2" to confirm your entry. The password will flash three times and "VERIFY P 000" will be displayed.
- Use the three control buttons (2) to enter the new password again.
“1” = Decrease value
“2” = Choose input position
“3” = Increase value
- Hold down button "2" to confirm your entry. The password will flash three times and "P CHANGE SUCCESS" will be displayed.
- After a few seconds the display will revert to the main menu (see screenshot in section 10. a). To exit settings mode, switch the soldering station off using the on/off switch.

Write the password down. If you forget the password, you can reset it to "000", but this requires you to open the soldering station. This must only be done by people who are trained to repair electrical equipment. This procedure is described in section 10. f).
f) Resetting the password
If you forget the password that you set in section 10. e), the front side of the soldering station has to be removed so that you can reset the password.

This must only be done by people who are trained to repair electrical equipment. Improper use may damage the soldering station and cause a fatal electric shock!
If in doubt, ask a technician to reset the password; do not attempt to reset it yourself.
Follow the steps below:
- Switch the soldering off using the on/off switch ("O" = off).
- Disconnect the soldering station from the mains voltage (remove the plug from the mains socket). Remove the mains cable from the power-in socket (6) on the soldering station. Leave the soldering iron connected.
- Remove the four screws on the front of the soldering station, and then remove the plastic ring. You can then fold down the front side with the circuit board.
- On the back of the circuit board you will find two contacts (see following diagram). These contacts were marked as "X5" when these operating instructions were published. However, you should also be able to find the contacts by referring to the diagram (the contacts are circled in the diagram):

text_image
Reset- Connect these two contacts, e.g. using a jumper/terminal.
- Position the circuit so that it is not in contact with the metal housing.
- Reconnect the soldering station to the mains and switch it on.

Do not reach into the soldering station or touch any electrical contacts. Touching contacts that carry a high voltage may cause a fatal electric shock! Always hold the front plate around the edges. Make sure that the circuit board is not in contact with the metal housing of the soldering station.
- "PASSWD. RESET!" will be displayed on the LC display and the password will be reset to the factory default ("000").
- Switch off the soldering station and disconnect it from the mains (remove the plug from the mains socket). Then disconnect the mains cable from the power-in socket on the soldering station.
- Disconnect the two contacts.
- Place the front panel back onto the soldering station. Take care not to pinch any cables. Replace the plastic ring in the correct position and screw it in place.

Always remember to disconnect the two contacts first!
- Connect the soldering station to the mains voltage and switch it on.
- The soldering station is now ready for use and the password is reset to the factory default ("000").
11. Soldering
- Select an appropriate temperature for the desired soldering process. The temperature must always be higher than the melting point of the solder.
To ensure that the solder melts quickly and flows smoothly, the temperature of the soldering station should be set to at least 50 °C higher than the melting point of the solder.

Soldering for excessively long periods may damage many types of components due to prolonged heat exposure. It is therefore advisable to select a higher soldering tip temperature to keep the soldering process as short as possible.
However, selecting an excessive temperature can also cause problems (e.g. damage components).
- If you need to heat large quantities of solder (e.g. for a large soldering joint or a soldering joint that dissipates heat (such as a cooling plate)), you can set a higher temperature.
- After you set the desired temperature, the soldering tip will take a few seconds to heat up and reach the target temperature.
- Remove the soldering iron from the soldering iron holder (11).

Always use the plastic grips to hold the soldering iron. Never touch the hot tip or the metal shaft, as this may cause burns/injury!
- The solder should melt instantly upon contact with the soldering tip. If smoke is emitted, this is due to evaporating flux contained inside the solder.
- For larger soldering joints, increase the temperature to speed up the soldering process.

Only use the highest temperature setting for as long as necessary to avoid overloading the soldering tip.
- Reduce the temperature of the soldering iron during breaks. This saves energy and prolongs the lifespan of the soldering tip. The soldering station automatically switches to standby mode after 20 minutes of inactivity (see section 8. C) and to power saving mode after 40 minutes of inactivity (see section 8. d).
- Always place the soldering iron into the soldering iron holder (11) when it is heating up and cooling down and when you are not soldering.
- Make sure that the soldering tip is well coated with tin when taking breaks or before switching the soldering station off.
-
Ensure that the soldering contacts on the workpiece are clean. Only use solder designed for electronic work. Acidic solder may damage the soldering tip or the work piece.
-
Heat the soldering joint with soldering tip and apply the solder. Remove the solder from the soldering joint, and then remove the soldering tip. Complete the soldering process quickly to avoid damaging the work piece (e.g. dislocated conductors or overheating components).
- Allow the soldering joint to cool down. Depending on the size of the soldering joint, it may take 1–2 seconds for the solder to harden. Do not move the soldered component or cable during this time, as this may result in a so-called "cold soldering joint". This is a soldering joint with a dull silver look that does not provide a good electrical contact or mechanical joint.
A correctly soldered joint should shine in a similar way to chrome.
- Clean the soldering tip occasionally to remove flux residues (use the dry metal cleaner or a damp sponge). To do this, briefly wipe the soldering tip using the cleaner or sponge.

Do not press the soldering tip into the sponge or hold the soldering tip on the sponge for too long, as this may damage the sponge. It would also cause the soldering station to adjust the heating power.
Ensure that the sponge is sufficiently damp. Never clean the soldering tip with a dry sponge!
You can also use the dry metal cleaner provided instead of the sponge.
Mechanical damage to the soldering tip destroys the protective coating and reduces its lifespan. Do not clean the soldering tip with sharp objects or a metal brush.
- When you have finished soldering, clean the soldering tip to remove flux residues (see above), and then coat the soldering tip with tin. Apply a small amount of tin to the soldering tip, ensuring that the tin forms an even layer on the tip. This prevents corrosion on the soldering tip.
Place the soldering iron into the soldering iron holder (11). Switch off the soldering station ("O" = OFF).

It takes 10–15 minutes for the soldering iron to cool down completely. Do not touch the soldering tip or holder during this time – burn hazard!
To prevent the risk of a fire, allow the soldering station to cool down completely before storing it.
12. Changing the soldering tip
Depending on the soldering work you wish to complete, you may need to change the soldering tip (a number of soldering tips are available to order as accessories).
→ Compatible accessories can be purchased at www.conrad.com on the corresponding product page (enter the soldering station item number in the search box).
Only use soldering tips that are recommended for use with the soldering station.
Using other soldering tips may result in false temperature measurements (i.e. the actual temperature of the soldering tip is different to the temperature shown on the display) and damage the heating element, which will void the warranty/guarantee!
Use a very fine soldering tip when working with small components and a wider/flatter tip for larger components. A larger soldering tip can transfer more heat, which speeds up the soldering process.
The soldering tip is subjected to a mechanical and thermal load during use. Over time, the soldering tip will become blunt (especially with very fine soldering tips), meaning that you will not be able to solder precisely on small components.
The lifespan of the soldering tip depends on several factors. For example, high soldering temperatures significantly reduce the lifespan.
Follow the steps below to replace the soldering tip:
- Turn off the soldering station and let the soldering iron cool down completely.
- Loosen and remove the cap nut (16) on the metal shaft of the soldering iron.
→ The heating/cooling process may cause the cap nut to become very tight.
If so, loosen the cap nut (16) with a pair of pliers. However, do not use any force, as this may damage the heating element and void the warranty/guarantee!
- Remove the soldering tip from the heating element.
- Insert a new soldering tip onto the heating element.
- Replace the cap nut and tighten it with your hand. Do not use any force!
- If you have a suitable temperature measurement device, calibrate the soldering tip temperature (see section 10. d).
13. Replacing the fuse
The fuse protects the device against overload. The fuse should not be triggered during normal use.
The fuse may be triggered by a fault in the soldering iron or a short circuit in the cable between the soldering iron and the soldering station. The fuse may also be triggered by a fault in the soldering station.
Follow the steps below to replace a defective fuse:
- Switch off the soldering station. If the soldering iron is still hot, allow it to cool down completely.
- Disconnect the soldering station from the mains voltage (remove the plug from the mains socket). Then disconnect the mains cable from the soldering station.
- Remove the fuse holder (5) below the power-in socket (6). This can be carefully prised out of place with a flat screwdriver.
- Remove the fuse from the fuse holder.
- Check the fuse, e.g. with an appropriate meter (digital multimeter).
If the fuse is defective, replace it with a new fuse of the same type (see "Technical data" at the end of these operating instructions).

Never use a fuse with other specifications. Never bridge a defective fuse!
- Insert the new fuse into the fuse holder. Insert the fuse holder back into the soldering station until it clicks into place.
- Connect the soldering station to the mains and switch it back on.

If the fuse blows again, disconnect the soldering station from the mains and ask a technician to conduct a comprehensive check.
14. Maintenance and cleaning
- The soldering station is maintenance-free, except for the occasional replacement of the soldering tip, sponge and fuse. Servicing and repair work must be done by a technician.
- Before cleaning the soldering station, disconnect it from the mains and remove the mains plug from the mains socket.
- Allow the soldering iron and soldering station to cool down completely.
- Use a clean, soft and dry cloth to clean the exterior of the soldering station.
- Never use aggressive detergents or other chemical solutions, as these may damage the housing (discolourations) or cause the product to malfunction.
- The soldering tip does not require any special cleaning. It is sufficient to clean it occasionally by using the wet sponge or dry metal cleaner to remove flux residues and excessive solder.
- The soldering tip must be coated with tin before the soldering station is switched off. This prevents corrosion on the soldering tip and prolongs its lifespan.
15. Disposal
Electronic devices are recyclable waste and must not be placed in household waste. At the end of its service life, dispose of the product according to the relevant statutory regulations.
16. Troubleshooting
| Problem Solution | |
| No information is shown on the display | • Is the soldering station connected to the mains and switched on?• Has the fuse blown? |
| The error message “H-E” is displayed | • The soldering station has detected an internal error in the heating electronics (“H-E” = heater error). Switch the soldering station off, and then switch it back on.• Is the soldering iron connected to the soldering station correctly?• The soldering iron may be faulty (cable, heating element or temperature sensor). |
| The error message “SE” is displayed | • The soldering station has detected a problem with the soldering iron (“SE” = sensor error). Is the soldering iron connected to the soldering station correctly?• The soldering iron may be faulty (cable or temperature sensor). |
| It takes a long time for the temperature to drop when you decrease the temperature. | • This is normal and does not indicate a fault. The heating element and soldering tip take a while to cool down to the lower temperature setting. |
| The solder is not liquid. • The temperature is too low. | • The heat from the soldering iron is dissipated too quickly (e.g. when using larger work pieces). Set a higher temperature or use a soldering tip with a larger/flatter tip.• The soldering iron is not suitable (e.g. when soldering gutters).• The soldering station is only designed for use with soft solders. |
| The preset temperature is not correct | • When you use a measurement device to check the temperature of the soldering tip, the measured temperature may differ slightly from the preset temperature (the temperature sensor measures the temperature in the heating element; the measurement device measures the temperature on the outside of the soldering tip).• Calibrate the temperature in the settings menu. |
| The temperature cannot be set using the control buttons or the temperature control dial | • The soldering station was programmed to a fixed temperature (see section 10. b). Refer to the instructions in section 10. c) to disable this function. |
| Smoke is emitted from the soldering tip | • The flux in the solder wire evaporates during the soldering process. This is normal and does not indicate a fault. Ensure that the workspace is sufficiently ventilated and do not inhale the flux vapours. |
17. Technical data
| Version ST-100HF ST-150HF | ||
| Item no. 1626065 1626066 | ||
| Soldering station | ||
| Operating voltage 230 V/AC, 50 Hz | ||
| Power consumption Max. 105 W Max. 155 W | ||
| Fuse 5 x 20 mm microfuse, | 250 V, 2 A, time-delay fuse | 5 x 20 mm microfuse, 250 V, 2.5 A, time-delay fuse |
| Protection class I | ||
| ESD socket 4 mm round socket | ||
| Contact resistance of ESD socket - ground contact | 1 MΩ | |
| Dimensions (W x H x D) 122 x 99 x 178 mm | ||
| Weight 2580 g 3010 g | ||
| Soldering iron | ||
| Operating voltage | 36 V/AC | |
| Heating frequency | 380 kHz | |
| Power | 100 W | 150 W |
| Soldering tip temperature | Adjustable via soldering station, +50 °C to +480 °C (in 1 °C increments) | |
| Temperature stability | ±1 °C | |
| Heating duration (50 °C to 480 °C) | 25 secs | 18 secs |
| Heating element | Electromagnetic heating element | |
| Cable length | Approx. 100 cm | |
| Handle length | Approx. 112 mm | |
| Weight (incl. cable) | Approx. 110 g | |
| Soldering iron stand | ||
| Dimensions (W x H x D) | 71 x 85 x 158 mm | |
| General information | ||
| Ambient conditions | Temperature 0 °C to +40 °C, relative humidity 10% to 90%, non-condensing | |
Page
France (email) : technique@conrad-france.fr
text_image
10 9 8 7 SET:170 TMP:169 1 2 3 4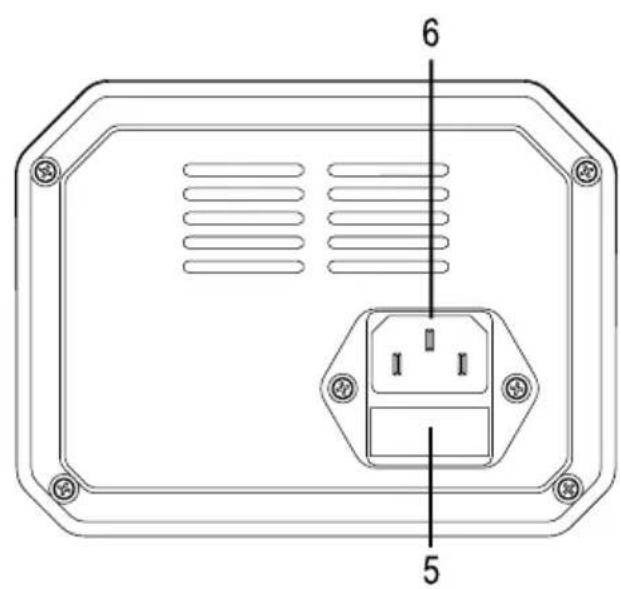
text_image
6 5
text_image
11 12 13
text_image
14 15 16 17 18GB This is a publication by Conrad Electronic SE, Klaus-Conrad-Str. 1, D-92240 Hirschau (www.conrad.com).
All rights including translation reserved. Reproduction by any method, e.g. photocopy, microfilming, or the capture in electronic data processing systems require the prior written approval by the editor. Reprinting, also in part, is prohibited. This publication represents the technical status at the time of printing.
Copyright 2019 by Conrad Electronic SE.
Copyright 2019 by Conrad Electronic SE.
Copyright 2019 by Conrad Electronic SE.