
MultiSync LCD1550XBK - Monitor NEC - Free user manual and instructions
Find the device manual for free MultiSync LCD1550XBK NEC in PDF.
| Brand | NEC |
| Model | MultiSync LCD1550XBK |
| Product Type | Color LCD Monitor |
| Screen Size | 15 inches (diagonal) |
| Optimal Resolution | 1024 x 768 |
| Video Connectivity | DVI-D (digital) and DVI-A (analog) input via mini D-SUB 15-pin |
| Power Supply | 220-240 V AC, 50/60 Hz |
| Energy Certification | ENERGY STAR |
| Ergonomic Adjustments | Height, tilt, swivel (landscape/portrait), pivot |
| OSM Controls | Brightness, contrast, position, clock, phase, color (sRGB, Native, Custom), sharpness, expanded mode, video detection, DVI selection |
| Auto Video Detection | First detection, Last detection, No priority |
| Cleaning | Lint-free, non-abrasive cloth; do not use any cleaning solution or glass cleaner |
| Safety | Do not open the housing; use the power cord appropriate for your country; do not expose to water or heat sources; provide adequate ventilation |
| Package Contents | Monitor with stand, power cord(s), video signal cable (mini D-SUB to DVI-A), DVI-D to DVI-D cable, CD-ROM with software and manual |
| Wall Mount | VESA compatible; use the 4 screws provided; GS-approved arm recommended |
Frequently Asked Questions - MultiSync LCD1550XBK NEC
User questions about MultiSync LCD1550XBK NEC
0 question about this device. Answer the ones you know or ask your own.
Ask a new question about this device
Download the instructions for your Monitor in PDF format for free! Find your manual MultiSync LCD1550XBK - NEC and take your electronic device back in hand. On this page are published all the documents necessary for the use of your device. MultiSync LCD1550XBK by NEC.
USER MANUAL MultiSync LCD1550XBK NEC
Declaration of the Manufacturer
We hereby certify that the colour monitor
MultiSync LCD1550X (LCD1550X)
is in compliance with
Council Directive 73/23/EEC:
- EN 60950
Council Directive 89/336/EEC:
- EN 55022
- EN 61000-3-2
- EN 61000-3-3
- EN 55024
and marked with

NEC-Mitsubishi Electric Visual Systems, Corp.
MS Shibaura Bldg., 13-23,
Shibaura 4-chome,
Minato-Ku, Tokyo 108-0023, Japan
VCCI Statement
Congratulations! You have just purchased a TCO'99 approved and labeled product! Your choice has provided you with a product developed for professional use. Your purchase has also contributed to reducing the burden on the environment and also to the further development of environmentally adapted electronics products.

Why do we have environmentally labelled computers?
In many countries, environmental labelling has become an established method for encouraging the adaptation of goods and services to the environment. The main problem, as far as computers and other electronics equipment are concerned, is that environmentally harmful substances are used both in the products and during the manufacturing. Since it has not been possible for the majority of electronics equipment to be recycled in a satisfactory way, most of these potentially damaging substances sooner or later enter Nature.
There are also other characteristics of a computer, such as energy consumption levels, that are important from the viewpoints of both the work (Internal) and natural (external) environments. Since all methods of conventional electricity generation have a negative effect on the environment (acidic and climate-influencing emissions, radioactive waste, etc.), it is vital to conserve energy. Electronics equipment in offices consume an enormous amount of energy since they are often left running continuously.
What does labelling involve?
This product meets the requirements for the TCO'99 scheme which provides for international and environmental labelling of personal computers. The labelling scheme was developed as a joint effort by the TCO (The Swedish Confederation of Professional Employees), Svenska Naturskyddsforeningen (The Swedish Society for Nature Conservation) and Statens Energimyndighet (The Swedish National Energy Administration).
The requirements cover a wide range of issues: environment, ergonomics, usability, emission of electrical and magnetic fields, energy consumption and electrical and fire safety.
The environmental demands concern restrictions on the presence and use of heavy metals, brominated and chlorinated flame retardants, CFCs (freons) and chlorinated solvents, among other things. The product must be prepared for recycling and the manufacturer is obliged to have an environmental plan which must be adhered to in each country where the company implements its operational policy. The energy requirements include a demand that the computer and/or display, after a certain period of inactivity, shall reduce its power consumption to a lower level in one or more stages. The length of time to reactivate the computer shall be reasonable for the user.
Labelled products must meet strict environmental demands, for example, in respect of the reduction of electric and magnetic fields, physical and visual ergonomics and good usability.
Environmental Requirements
Flame retardants
Flame retardants are present in printed circuit boards, cables, wires, casings and housings. In turn, they delay the spread of fire. Up to thirty percent of the plastic in a computer casing can consist of flame retardant substances. Most flame retardants contain bromine or chloride and these are related to another group of environmental toxins, PCBs, which are suspected to give rise to severe health effects, including reproductive damage in fisheating birds and mammals, due to the bioaccumulative* processes. Flame retardants have been found in human blood and researchers fear that disturbances in foetus development may occur.
TCO'99 demand requires that plastic components weighing more than 25 grams must not contain flame retardants with organically bound chlorine and bromine. Flame retardants are allowed in the printed circuit boards since no substitutes are available.
Lead\*\*
Lead can be found in picture tubes, display screens, solders and capacitors. Lead damages the nervous system and in higher doses, causes lead poisoning.
TCO'99 requirement permits the inclusion of lead since no replacement has yet been developed.


Cadmium\*\*
Cadmium is present in rechargeable batteries and in the colour generating layers of certain computer displays. Cadmium damages the nervous system and is toxic in high doses.
TCO'99 requirement states that batteries, the colourgenerating layers of display screens and the electrical or electronics components must not contain any cadmium.
Mercury\*\*
Mercury is sometimes found in batteries, relays and switches, Mercury damages the nervous system and is toxic in high doses.
TCO'99 requirement states that batteries may not contain any Mercury. It also demands that no mercury is present in any of the electrical or electronics components associated with the display unit.
CFCs (freons)
CFCs (freons) are sometimes used for washing printed circuit boards. CFCs break down ozone and thereby damage the ozone layer in the stratosphere, causing increased reception on Earth of ultraviolet light with consequent increased risks of skin cancer (malignant melanoma).
The relevant TCO'99 requirement; Neither CFCs nor HCFCs may be used during the manufacturing and assembly of the product or its packaging.
* Bio-accumulative is defined as substances which accumulate within living organisms.
** Lead, Cadmium and Mercury are heavy metals which are Bioaccumulative.
To obtain complete information on the environmental criteria document, order from:
TCO Development Unit
SE-114 94 Stockholm
SWEDEN
FAX Number: +46 8 782 92 07
E-mail (Internet): development@tco.se
You may also obtain current information on TCO'99 approved and labelled products by visiting their website at:
http://www.tco-info.com/

bar
| Language | Value | |---|---| | English | 100 | | Česky | 95 | | Deutsch | 90 | | Ελληνικά | 85 | | Español | 80 | | Français | 75 | | Italiano | 70 | | Nederlands | 65 | | Polski | 60 | | Русский | 55 | | Türkçe | 50 |

WARNING

TO PREVENT FIRE OR SHOCK HAZARDS, DO NOT EXPOSE THIS UNIT TO RAIN OR MOISTURE. ALSO, DO NOT USE THIS UNIT'S POLARIZED PLUG WITH AN EXTENSION CORD RECEPTACLE OR OTHER OUTLETS UNLESS THE PRONGS CAN BE FULLY INSERTED. REFRAIN FROM OPENING THE CABINET AS THERE ARE HIGH VOLTAGE COMPONENTS INSIDE. REFER SERVICING TO QUALIFIED SERVICE PERSONNEL.
CAUTION
RISK OF ELECTRIC SHOCK • DO NOT OPEN


TO REDUCE THE RISK OF ELECTRIC SHOCK, DO NOT REMOVE COVER (OR BACK). NO USER SERVICEABLE PARTS INSIDE. REFER SERVICING TO QUALIFIED SERVICE PERSONNEL.

This symbol warns user that uninsulated voltage within the unit may have sufficient magnitude to cause electric shock. Therefore, it is dangerous to make any kind of contact with any part inside this unit.

This symbol alerts the user that important literature concerning the operation and maintenance of this unit has been included. Therefore, it should be read carefully in order to avoid any problems.
Caution:
When operating the MultiSync LCD1550X (LCD1550X) with a 220-240V AC power source in Europe, use the power cord provided with the monitor.
In the UK, a BS approved power cord with a moulded plug has a Black (five Amps) fuse installed for use with this equipment. If a power cord is not supplied with this equipment please contact your supplier.
When operating the MultiSync LCD1550X with a 220-240V AC power source in Australia, use the power cord provided with the monitor.
For all other cases, use a power cord that matches the AC voltage of the power outlet and has been approved by and complies with the safety standard of your particular country.
ENERGYSTAR is a U.S. trademark.
As an ENERGYSTAR® Partner, NEC-Mitsubishi Electronics Display of America, Inc. has determined that this product meets the ENERGYSTAR guidelines for energy efficiency. The ENERGYSTAR emblem does not represent EPA endorsement of any product or service.
IBM PC/XT/AT, PS/2, MCGA, VGA, 8514/A and XGA are registered trademarks of International Business Machines Corporation.
Apple and Macintosh are registered trademarks of Apple Computer Inc.
Microsoft and Windows are registered trademarks of the Microsoft Corporation.
NEC is a registered trademark of NEC Corporation.
All other trademarks or registered trademarks are property of their respective owners.
English-1


Contents
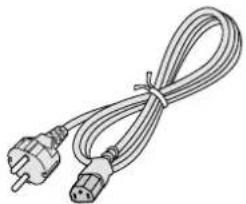
Your new NEC MultiSync LCD monitor box* should contain the following:
- MultiSync LCD1550X monitor with tilt base
- Power Cord(s)
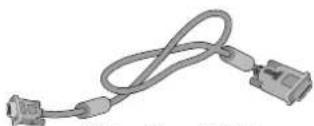
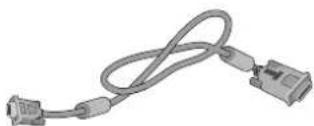
• Video Signal Cable (15-pin mini D-SUB male to DVI-A)
• Video Signal Cable (DVI-D to DVI-D Cable) - User's Manual
- NEC LCD Setup Software, Pivot Software, User's Manual and other helpful files. To see the User's Manual, Acrobat Reader 4.0 must be installed on your PC.
natural_image
Coiled electrical plug and socket (no text or symbols visible)Power Cord(s)
natural_image
Coiled cable with two connectors (no text or symbols visible)Video Signal Cable
natural_image
Illustration of a flat-screen computer monitor with control buttons and a base (no text or symbols visible)
natural_image
Pure electrical connector diagram without any text, numbers, or symbols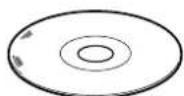
Software CD
Video Signal Cable (DVI-D to DVI-D Cable)
* Remember to save your original box and packing material to transport or ship the monitor.
English-2

Quick Start
English
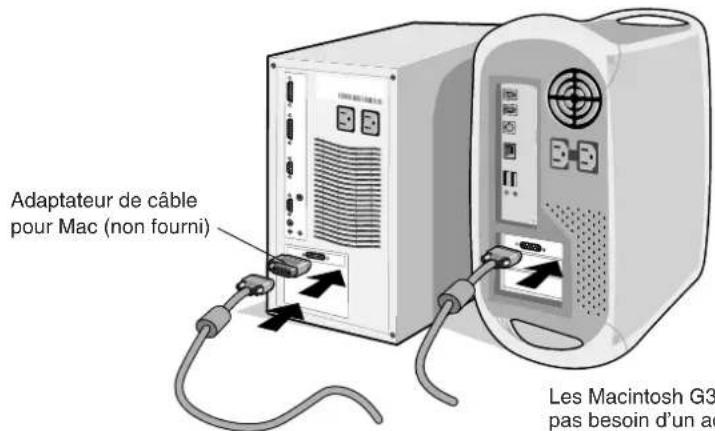
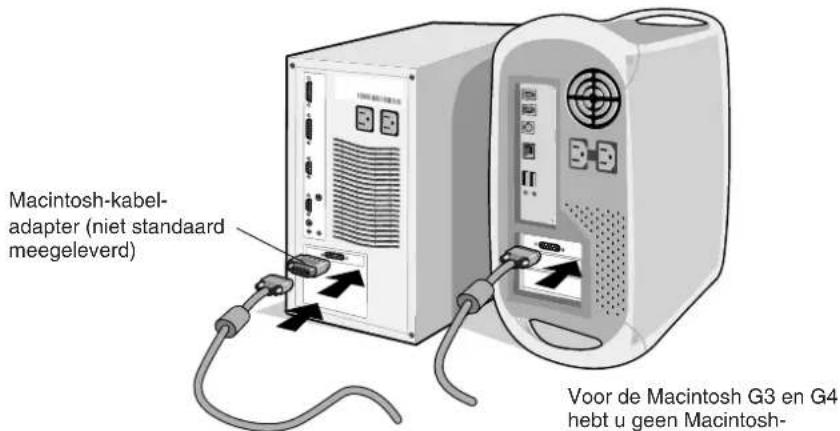
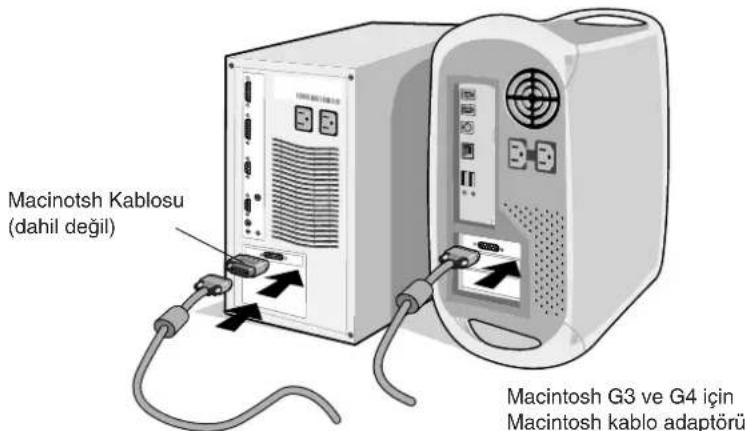
To attach the MultiSync LCD monitor to your system, follow these instructions:
- Turn off the power to your computer.
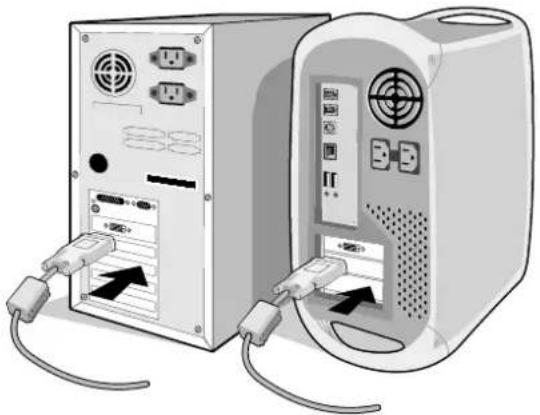
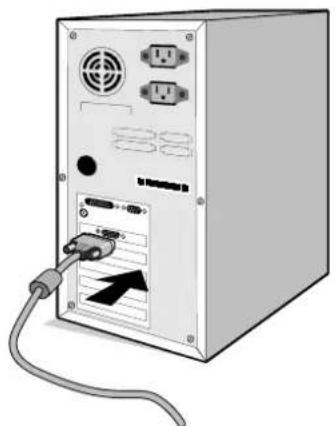
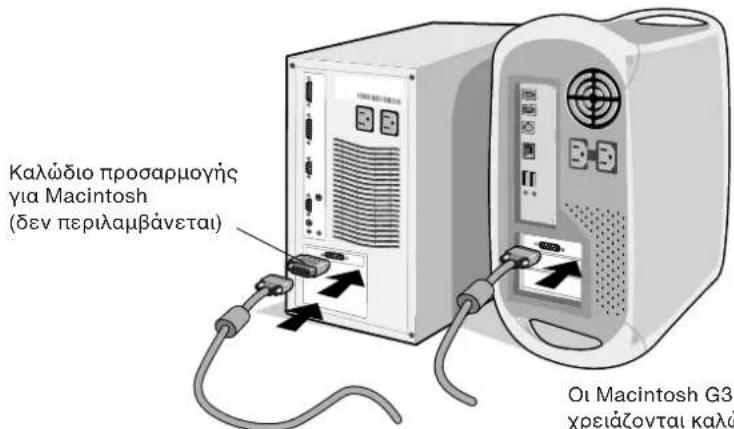
- For the PC or Mac with DVI digital output: Connect the DVI-D to DVI-D signal cable to the connector of the display card in your system (Figure A.1). Tighten all screws.
For the PC with Analog output: Connect the 15-pin mini D-SUB to DVI-A signal cable to the connector of the display card in your system (Figure A.2).
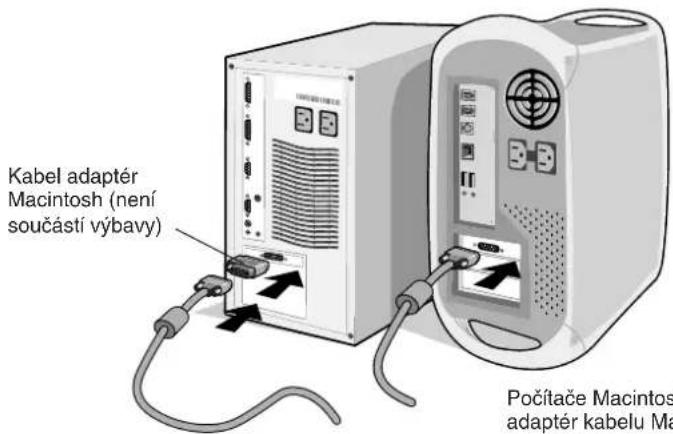
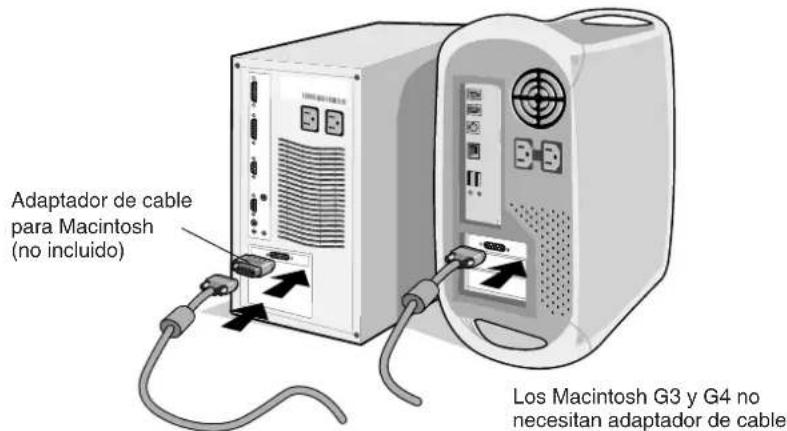
For the Mac: Connect the MultiSync Macintosh cable adapter to the computer (Figure B.1). Attach the 15-pin mini D-SUB signal cable to the MultiSync Macintosh cable adapter (Figure B.1).
NOTE: Some Macintosh systems do not require a Macintosh cable adapter.
- Remove connector cover. Connect the DVI signal cable to the connector on the back of the monitor. Place the video signal cable (Figure C.1).
Replace connector cover.
NOTE: Incorrect cable connections may result in irregular operation, damage display quality/components of LCD module and/or shorten the module's life.
- Remove power cord cover. Connect one end of the power cord to the AC inlet on the back of the monitor and the other end to the power outlet (Figure D.1). Replace the power cord cover.
NOTE: Please refer to Caution section of this manual for proper selection of AC power cord.
- Check the Vacation Switch on the right hand side of the monitor is in the ON position. Turn on the monitor with the Power Button (Figure E.1) and the computer.
NOTE: There are two switches: one on the right side and one on the front side of the monitor. DO NOT switch on/off quickly.
English-3


- To complete the setup of your MultiSync LCD monitor, use the following OSM controls:
• A uto Adjust Contrast (Analog input only)
• A uto Adjust (Analog input only)
Refer to the Controls section of this User's Manual for a full description of these OSM controls.
NOTE: If you have any problems, please refer to the Troubleshooting section of this User's Manual.
NOTE: Refer to User's Manual in the NEC LCD Setup Software CD case for installation and operation of this software.
natural_image
Two computer monitors connected by cable, one with ports and arrows indicating data transfer (no visible text or symbols)Figure A.1

natural_image
Front view of a computer tower drive with ports and cable (no visible text or labels)Figure A.2
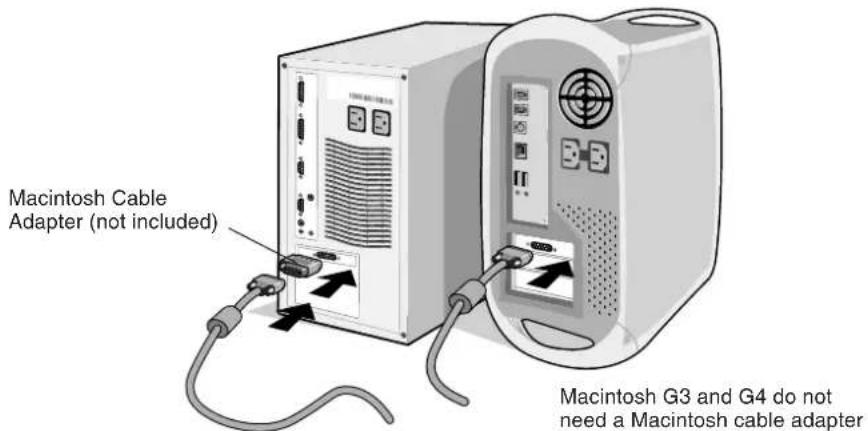
Figure B.1
English-4


Figure E.1
English-5
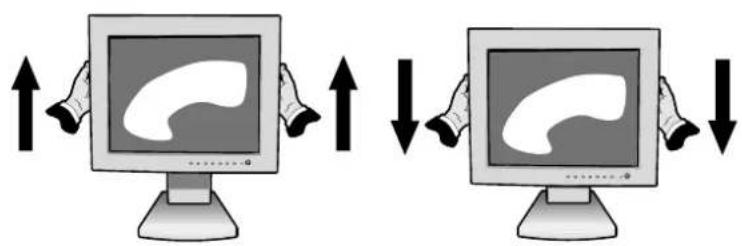
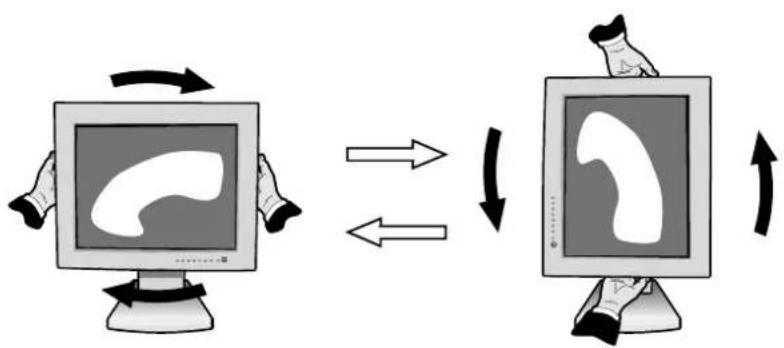
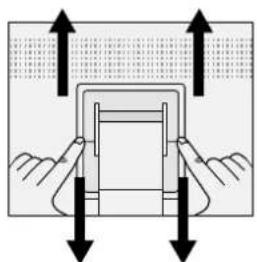
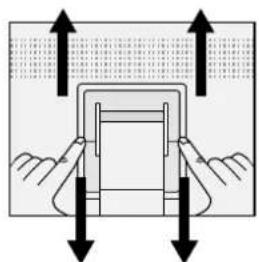
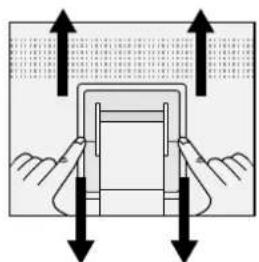
Raise and Lower Monitor Screen
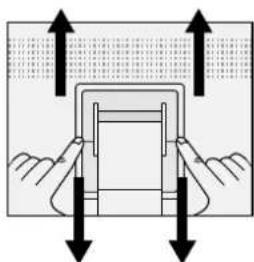
The monitor may be raised or lowered in either Portrait or Landscape mode.
To raise or lower screen, place hands on each side of the monitor and lift or lower to the desired height (Figure RL.1).
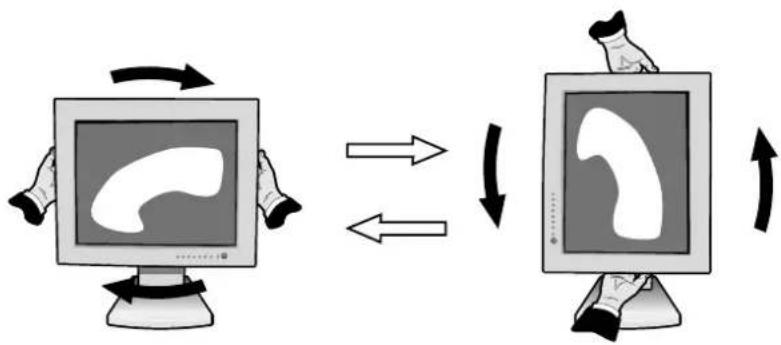
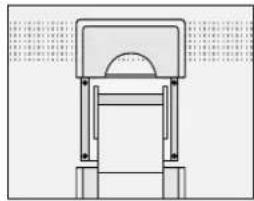
Screen Rotation
Before rotating, the screen must be raised to the highest level to avoid knocking the screen on the desk or pinching your fingers.
To raise the screen, place hands on each side of the monitor and lift up to the highest position (Figure RL.1).
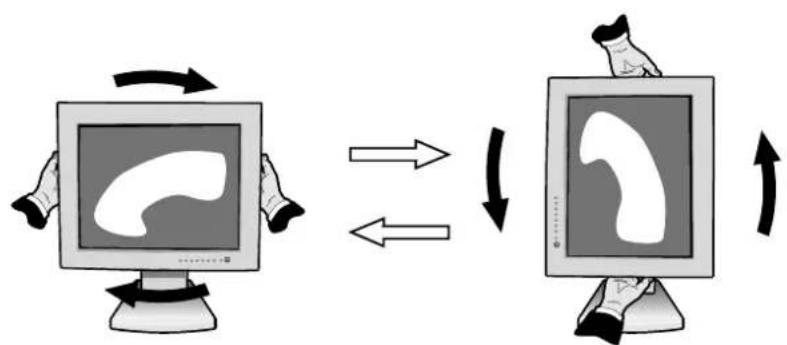
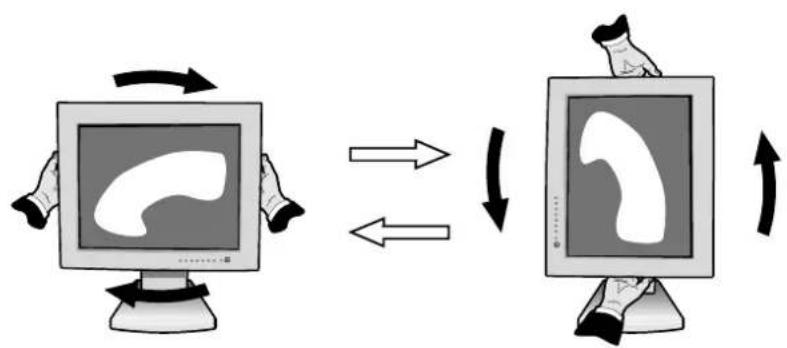
To rotate screen, place hands on each side of the monitor screen and turn clockwise from Landscape to Portrait or counter-clockwise from Portrait to Landscape (Figure R.1).
To toggle the orientation of the OSM menu between Landscape and Portrait modes, press the RESET button while OSM menu is off.
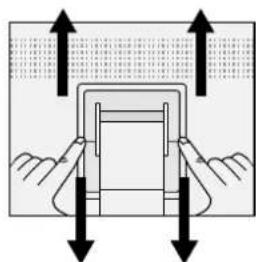
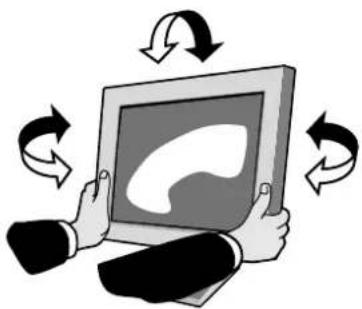
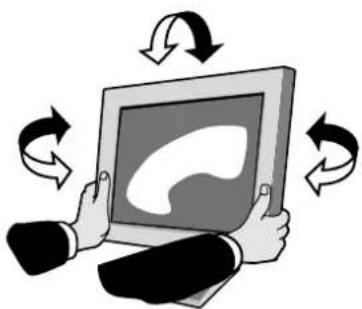
Tilt and Swivel
Grasp both sides of the monitor screen with your hands and adjust the tilt and swivel as desired (Figure TS.1).
Remove Monitor Stand for Mounting
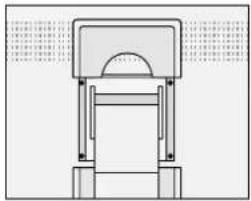
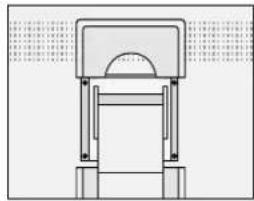
To prepare the monitor for alternate mounting purposes:
- Disconnect all cables.
- Place hands on each side of the monitor and lift up to the highest position (Figure RL.1).
- Place monitor face down on a non-abrasive surface (Place the screen on a 50 mm platform so that the stand is parallel with the surface.) (Figure S.1).
- Press the “▼” portion with your index finger and at the same time slide the lower stand cover. (Figure S.2)
Next, lift up the stand, remove the lower stand cover, then go on to remove the upper stand cover. (Figure S.3)
Return the stand to its original position, remove the 4 screws that connect the monitor to the stand, and lift off the stand assembly.
(Figure S.4)
English-6


- Reverse this process to reattach stand.
NOTE: Use only VESA-compatible alternative mounting method.
English
natural_image
Two identical computer monitors with hand gestures showing upward and downward movement (no text or symbols)Figure RL.1

Figure R.1

natural_image
Illustration of hands holding a tablet with a speech bubble icon, surrounded by curved arrows indicating rotation (no text or symbols)Figure TS.1
English-7


Figure S.1
natural_image
Diagram of a mechanical or structural assembly with arrows indicating direction (no text or symbols)Figure S.2 Figure S.3

natural_image
Technical line drawing of a mechanical assembly or support structure (no text or symbols)
Figure S.4
Caution: Please use the attached screws (4pcs) when mounting. Tofulfil the safety requirements the monitor must be mounted to an arm which guarantees the necessary stability under consideration of the weight of the monitor. The LCD monitor shall only be used with an approved arm (e.g. GS mark).
English-8

Controls
English
OSM (On-Screen-Manager) Controls
The OSM controls on the front of the monitor function as follows: To access OSM press any of the control buttons (◀, ▶, -, +). To change DVI/D-SUB signal input, press the NEXT button. To rotate OSM between Landscape and Portrait modes, press the RESET button.
NOTE: OSM menu must be closed in order to change signal input and to rotate.
Control Menu
EXIT Exits the OSM controls. Exits to the OSM main menu.
CONTROL ▶ Moves the highlighted area left/right to select control menus. Moves the highlighted area up/down to select one of the controls.
ADJUST -/+ Moves the bar left/right to increase or decrease the adjustment. Activates Auto Adjust function. Enter the sub menu.
NEXT Moves the highlighted area of main menu right to select one of the controls.
RESET Resets the highlighted control menu to the factory setting. Resets the highlighted control to the factory setting.
NOTE: When RESET is pressed in the main and sub-menu, a warning window will appear allowing you to cancel the RESET function by pressing the EXIT button.
English-9


Brightness/Contrast Controls

BRIGHTNESS
Adjusts the overall image and background screen brightness.

CONTRAST
Adjusts the image brightness in relation to the background.

AUTO ADJUST (Analog input only)
Adjusts the image displayed for non-standard video inputs.
AUTO
Auto Adjust (Analog input only)
Automatically adjusts the Image Position, the H. Size and Fine setting.

Position Controls (Analog input only)

LEFT/RIGHT
Controls Horizontal Image Position within the display area of the LCD.

DOWN/UP
Controls Vertical Image Position within the display area of the LCD.

H. SIZE
Adjusts the horizontal size by increasing or decreasing this setting.

FINE
Improves focus, clarity and image stability by increasing or decreasing this setting.

Colour Control Systems
Six colour presets select the desired colour setting (sRGB and NATIVE colour presets are standard and cannot be changed). Colour temperature increases or decreases in each preset.
English-10


R,Y,G,C,B,M,S
Increases or decreases Red, Yellow, Green, Cyan, Blue, Magenta and Saturation depending upon which is selected. The change in colour will appear on screen and the direction (increase or decrease) will be shown by the colour bars.
sRGB
sRGB mode dramatically improves the colour fidelity in the desktop environment by a single standard RGB colour space. With this colour supported environment, the operator could easily and confidently communicate colours without further colour management overhead in the most common situations.
NATIVE
Original colour presented by the LCD panel that is unadjustable.

Tools 1
a→a
SHARPNESS
This function is digitally capable to keep crisp image at any timings. It is continuously adjustable to get distinct image or soft one as you prefer, and set independently by different timings.

EXPANSION MODE
Sets the zoom method.
H-EXPANSION
The horizontal image is expanded to approximately 2 times.
V-EXPANSION
The vertical image is changeable.

VIDEO DETECT
Selects the method of video detection when more than one computer is connected.
English-11


FIRST DETECT
The video input has to be switched to "FIRST DETECT" mode. When current video input signal is not present, then the monitor searches for a video signal from the other video input port. If the video signal is present in the other port, then the monitor switches the video source input port to the new found video source automatically. The monitor will not look for other video signals while the current video source is present.
LAST DETECT
The video input has to be switched to the “LAST DETECT” mode. When the monitor is displaying a signal from the current source and a new secondary source is supplied to the monitor, then the monitor will automatically switch to the new video source. When current video input signal is not present, then the monitor searches for a video signal from the other video input port. If the video signal is present in the other port, then the monitor switches the video source input port to the new found video source automatically.
NONE
The Monitor will not search the other video input port unless the monitor is turned on.

DVI SELECTION
This function selects EDID Data for ANALOG signal or DIGITAL signal on the DVI input.
When the DVI-D is connected to DVI, DVI Selection is recommended to be selected to DIGITAL.
When the DVI-A is connected to DVI, DVI Selection is recommended to be selected to ANALOG.
DIGITAL
EDID DATA for DVI DIGITAL input is available.
ANALOG
EDID DATA for DVI ANALOG input is available.
English-12


Tools 2

LANGUAGE
OSM control menus are available in seven languages.

OSM POSITION
You can choose where you would like the OSM control image to appear on your screen. Selecting OSM Location allows you to manually adjust the position of the OSM control menu left, right, down or up.

OSM TURN OFF
The OSM control menu will stay on as long as it is use. In the OSM Turn Off submenu, you can select how long the monitor waits after the last touch of a button to shut off the OSM control menu. The preset choices are 10, 20, 30, 45, 60 and 120 seconds.

OSM LOCK OUT
This control completely locks out access to all OSM control functions. When attempting to activate OSM controls while in the Lock Out mode, a screen will appear indicating the OSM controls are locked out. To activate the OSM Lock Out function, press ,then ▶ and hold down simultaneously. To de-activate the OSM Lock Out, press ,then ▶ and hold down simultaneously.

RESOLUTION NOTIFIER
This optimal resolution is 1024 x 768. If ON is selected, a message will appear on the screen after 30 seconds, notifying you that the resolution is not at 1024 x 768.

FACTORY PRESET
Selecting Factory Preset allows you to reset all OSM control settings back to the factory settings. Individual settings can be reset by highlighting the control to be reset and pressing the RESET button.
English-13


Information
MODE
DISPLAY MODE
Provides information about the current resolution display and technical data including the preset timing being used and the horizontal and vertical frequencies. Increases or decreases the current resolution. (Analog input only)

MONITOR INFO
Indicates the model and serial numbers of your monitor.
OSM Warning
OSM Warning menus disappear with Exit button.
NO SIGNAL: This function gives a warning when there is no Horizontal or Vertical Sync Signal present and advises you to check all Video Inputs on the monitor and computer to make sure they are properly connected. After power is turned on or when there is a change of input signal or video is inactive, the No Signal window will appear.
RESOLUTION NOTIFIER: This function gives a warning of use with optimized resolution. After power is turned on or when there is a change of input signal or the video signal doesn't have proper resolution, the Resolution Notifier window will open. This function can be disabled in the TOOL menu.
OUT OF RANGE: This function gives a recommendation of the optimized resolution and refresh rate. After the power is turned on or there is a change of input signal or the video signal doesn't have proper timing, the Out Of Range menu will appear.
NOTE: If "① CHANGE DVI SELECTION" is displayed, switch to DVI SELECTION.
English-14

Recommended Use
English
Safety Precautions and Maintenance

FOR OPTIMUM PERFORMANCE, PLEASE NOTE THE FOLLOWING WHEN SETTING UP AND USING THE MULTISYNC LCD COLOUR MONITOR:

- DO NOT OPEN THE MONITOR. There are no user serviceable parts inside and opening or removing covers may expose you to dangerous shock hazards or other risks. Refer all servicing to qualified service personnel.
- Do not spill any liquids into the cabinet or use your monitor near water.
- Do not insert objects of any kind into the cabinet slots, as they may touch dangerous voltage points, which can be harmful or fatal or may cause electric shock, fire or equipment failure.
- Do not place any heavy objects on the power cord. Damage to the cord may cause shock or fire.
- Do not place this product on a sloping or unstable cart, stand or table, as the monitor may fall, causing serious damage to the monitor.
- Do not place any objects onto the monitor and do not use the monitor outdoors.
- The inside of the fluorescent tube located within the LCD monitor contains mercury. Please follow the bylaws or rules of your municipality to dispose of the tube properly.
Immediately unplug your monitor from the wall outlet and refer servicing to qualified service personnel under the following conditions:
- When the power supply cord or plug is damaged.
- If liquid has been spilled, or objects have fallen into the monitor.
- If the monitor has been exposed to rain or water.
- If the monitor has been dropped or the cabinet damaged.
- If the monitor does not operate normally by following operating instructions.
- Do not bend power cord.
- Do not use monitor in high temperatured, humid, dusty, or oily areas.
- Do not cover vent on monitor.
- If monitor is broken, do not come in contact with the liquid crystal.
- If glass is broken. Handle with care.
English-15

CAUTION
- Allow adequate ventilation around the monitor so that heat can properly dissipate. Do not block ventilated openings or place the monitor near a radiator or other heat sources. Do not put anything on top of monitor.
- The power cable connector is the primary means of detaching the system from the power supply. The monitor should be installed close to a power outlet which is easily accessible.
- Handle with care when transporting. Save packaging for transporting.

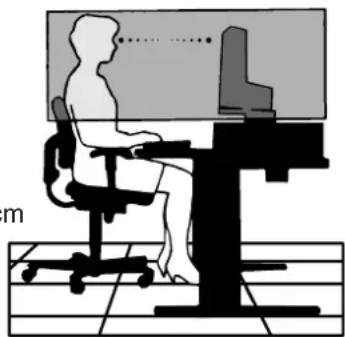
CORRECT PLACEMENT AND ADJUSTMENT OF THE MONITOR CAN REDUCE EYE, SHOULDER AND NECK FATIGUE. CHECK THE FOLLOWING WHEN YOU POSITION THE MONITOR:

- F or optimum performance, allow 20 minutes for warm-up.
- Adjust the monitor height so that the top of the screen is at or slightly below eye level. Your eyes should look slightly downward when viewing the middle of the screen.
- P position your monitor no closer than 40 cm and no further away than 70 cm from your eyes. The optimal distance is 58 cm.
- Rest your eyes periodically by focusing on an object at least 6 m away. Blink often.
- P position the monitor at a 90° angle to windows and other light sources to minimize glare and reflections. Adjust the monitor tilt so that ceiling lights do not reflect on your screen.
- If reflected light makes it hard for you to see your screen, use an antiglare filter.
- Clean the LCD monitor surface with a lint-free, non-abrasive cloth. Avoid using any cleaning solution or glass cleaner!
- Adjust the monitor's brightness and contrast controls to enhance readability.
- Use a document holder placed close to the screen.
- Position whatever you are looking at most of the time (the screen or reference material) directly in front of you to minimize turning your head while you are typing.
natural_image
Silhouette of a person sitting at a desk with a computer, no text or symbols presentEnglish-16


- A v oid displaying fixed patterns on the monitor for long periods of time avoid image persistence (after-image effects).
- Get regular eye checkups.
English
Ergonomics
To realize the maximum ergonomics benefits, we recommend the following:
- Use the preset Size and Position controls with standard signals.
- Use the preset Colour Setting.
- Use non-interlaced signals with a vertical refresh rate between 60-75 Hz.
- Do not use primary colour blue on a dark background, as it is difficult to see and may produce eye fatigue to insufficient contrast.
English-17

natural_image
Blank white image with a color palette bar at the top and corner (no text or symbols)English-18

VAROVÁNÍ

CHRAŃTE ZAŘÍZENÍ PŘED DEŠTĚM A VLHKEM. ZABRÁNÍTE TAK NEBEZPEČÍ POŽÁRU NEBO ÚRAZU ELEKTRICKÝM PROUDEM. POLARIZOVANOU ZÁSTRČKU JEDNOTKY NEPOUŽÍVEJTE VE SPOJENÍ SE ZÁSUVKOU PRODLUŽOVACÍ ŠŇÚRY NEBO JINÝMI ZÁSUVKAMI, POKUD KOLÍKY NELZE ZCELA ZASUNOUT. UVNITŘ ZAŘÍZENÍ SE NACHÁZÍ VYSOKONAPĚTOVÉ KOMPONENTY, PROTO SKŘÍŇ NEOTEVÍREJTE. SERVIS SVĚŘTE KVALIFIKOVANÉ OSOBĚ.
UPOZORNĚNÍ
RIZIKO ÚRAZU ELEKTRICKÝM PROUDEM • NEOTVÍRAT

UPOZORNĚNÍ
Z DÜVODU SNÍŽENÍ RIZIK ÚRAZU ELEKTRICKÝM PROUDEM NEODNÍMEJTE KRYT (NEBO ZADNÍ ČÁST). UVNITŘ SE NENACHÁZEJÍ DÍLY, DO KTERÝCH UŽIVATEL MŮŽE ZASAHOVAT. SERVIS SVĚŘTE KVALIFIKOVANÉ OSOBĚ.

natural_image
Coiled electrical plug and socket (no text or symbols visible)Napájecí kabely
natural_image
Illustration of a flat-screen computer monitor with control buttons and a stand (no text or symbols visible)
natural_image
Simple line drawing of a coiled cable or connector with two connectors (no text or symbols)natural_image
Two computer desktop units connected by cable, one with ports and arrows indicating connection (no visible text or symbols)Obrázek A.1

natural_image
Front view of a computer tower with ventilation fans and USB cable (no visible text or labels)Obrázek A.2
natural_image
Two identical computer monitors with hand gestures showing upward and downward movement (no text or symbols)Obrázek RL.1
flowchart
graph TD
    A["Computer monitor with icon"] -->|Upward/Downward| B["Computer monitor with curved interface"]
    B -->|Upward/Downward| A
Obrázek R.1

natural_image
Illustration of hands holding a tablet with a speech bubble icon, surrounded by curved arrows indicating rotation (no text or symbols)Obr. TS.1
Česky-7

Česky


natural_image
Color palette bar and a grid of squares with a central crosshair (no text or symbols)
Obrázek S.1

natural_image
Diagram of a mechanical or electrical component with arrows indicating direction (no text or symbols)natural_image
Technical line drawing of a mechanical assembly or support structure (no text or symbols)
Obrázek S.4
natural_image
Silhouette of a person sitting at a desk with a computer, no text or symbols presentČesky-16


natural_image
Coiled electrical plug and socket (no text or symbols visible)Netzkabel
natural_image
Illustration of a flat-screen computer monitor with control buttons and a stand (no text or symbols visible)
natural_image
Pure electrical circuit lines without any symbolsnatural_image
Two computer monitors connected by cable, one with ports and arrows indicating data transfer (no visible text or symbols)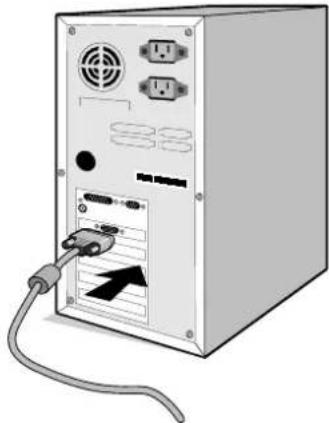
natural_image
Front view of a computer tower with ventilation slots and cable (no visible text or labels)natural_image
Two identical computer monitors with hand gestures showing upward and downward movement (no text or symbols)
Abbildung RL.1


Abbildung R.1

natural_image
Illustration of hands holding a tablet with a speech bubble, surrounded by curved arrows indicating rotation (no text or symbols)natural_image
Diagram of a mechanical assembly with arrows indicating force or movement (no text or symbols)natural_image
Pure technical line drawing of a mechanical device without any text, numbers, or symbols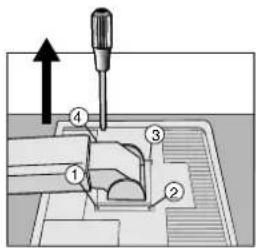
Abbildung S.4

natural_image
Silhouette of a person sitting at a desk with a computer, no text or symbols visibleDeutsch-16


natural_image
Blank white image with a color palette bar at the top and corner corners (no text or symbols)Deutsch-18

ΠΡΟΕΙΔΟΠΟΙΗΣΗ

natural_image
Coiled electrical plug and socket (no text or symbols visible)natural_image
Illustration of a flat-screen computer monitor with control buttons and a stand (no text or symbols visible)
natural_image
Illustration of a coiled cable with two connectors (no text or symbols)natural_image
Two computer monitors connected by cable, one with ports and arrows indicating data transfer (no visible text or symbols)Σχήμα Α.1
natural_image
Front view of a computer tower drive with ports and cable (no visible text or labels)Σχήμα Α.2
natural_image
Two identical computer monitors with hand gestures showing upward and downward movement (no text or symbols)Σχήμα ΡΛ.1
EXANYKA
flowchart
graph TD
    A["Computer monitor with abstract icon"] --> B["Computer screen with abstract icon"]
    B --> C["Computer screen with unidirectional arrow"]
Σχήμα P.1
natural_image
Illustration of hands holding a tablet with a speech bubble icon, surrounded by curved arrows indicating rotation (no text or symbols)natural_image
Diagram of a mechanical or structural assembly with arrows indicating direction (no text or symbols)Σχήμα Σ.2 Σχήμα Σ.3

natural_image
Technical line drawing of a mechanical assembly or support structure (no text or symbols)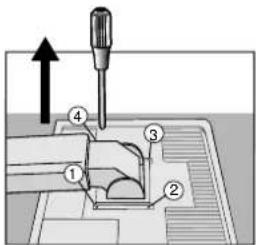
Σχήμα Σ.4
H.SIZE (OPIZONTIO MEΓΕΘΟΣ)
natural_image
Silhouette of a person sitting at a desk using a computer, viewed from behind (no text or symbols present)Ελληνικά-16


natural_image
Coiled electrical outlet cable with two terminal connectors (no text or symbols visible)natural_image
Coiled cable with two connectors (no text or symbols visible)natural_image
Illustration of a flat-screen computer monitor with control buttons and a curved base (no text or symbols visible)
natural_image
Pure electrical circuit lines without any symbolsnatural_image
Two computer monitors connected by cable, one with ports and arrows indicating data transfer (no visible text or symbols)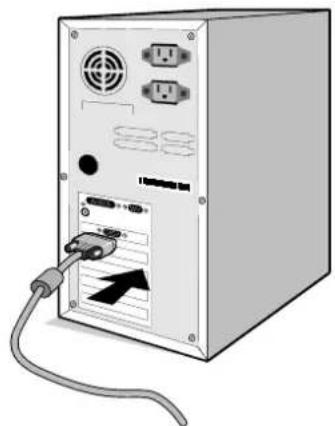
natural_image
Front view of a computer tower drive with cable and ventilation slots (no visible text or symbols)Figura A.1 Figura A.2
natural_image
Two identical computer monitors with hand gestures showing upward and downward movement (no text or symbols)Figura RL.1

flowchart
graph TD
    A["Computer monitor with icon"] -->|Upward/Downward| B["Computer monitor with curved interface"]
    B -->|Upward/Downward| A

Figura R.1

natural_image
Illustration of hands holding a tablet with a speech bubble icon, surrounded by curved arrows indicating rotation (no text or symbols)Figura TS.1
Español-7


Figura S.1

natural_image
Diagram of a mechanical assembly with arrows indicating force or movement (no text or symbols)Figura S.2 Figura S.3

natural_image
Pure technical line drawing of a mechanical assembly without any text, numbers, or symbols
Figura S.4
natural_image
Silhouette of a person sitting at a desk with a computer, no text or symbols presentEspañol-16


natural_image
Blank white image with a color palette bar at the top and corner (no text or symbols)Español-18


AVERTISSEMENT

POUR ÉVITER LES RISQUES D'INCENDIE OU D'ÉLECTROCUTION, N'EXPOSEZ PAS L'APPAREIL À LA PLUIE OU À L'HUMIDITÉ. DE MÊME, N'UTILISEZ PAS LA PRISE POLARISÉE DE CET APPAREIL AVEC UNE RALLONGE OU D'AUTRES PRISES SI ELLES NE PEUVENT ÊTRE TOTALEMENT ENFONCÉES. N'OUVREZ PAS LE BOÎTIER CAR IL CONTIENT DES COMPOSANTS À HAUTE TENSION. CONFIEZ TOUS LES TRAVAUX DE DÉPANNAGE À DU PERSONNEL TECHNIQUE QUALIFIÉ.
ATTENTION
RISQUE D'ÉLECTROCUTION • NE PAS OUVRIR


ATTENTION
POUR RÉDUIRE LES RISQUES D'ÉLECTROCUTION, N'ENLEVEZ PAS LE CAPOT (OU L'ARRIÈRE). VOUS NE POUVEZ RÉPARER AUCUNE PIÈCE INTERNE. CONFIEZ TOUS LES TRAVAUX DE DÉPANNAGE À DU PERSONNEL TECHNIQUE QUALIFIÉ.

natural_image
Coiled electrical plug and terminal outlet (no text or symbols visible)natural_image
Illustration of a flat-screen computer monitor with control buttons and a stand (no text or symbols visible)
natural_image
Pure electrical circuit lines without any symbolsnatural_image
Two computer monitors connected by cable, one with ports and arrows indicating connection (no visible text or symbols)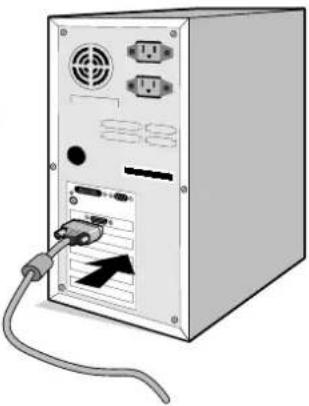
natural_image
Front view of a computer tower drive with cable and ports, no visible text or symbolsFigure A.2
Figure A.1
natural_image
Color palette bar with grayscale gradient and a small crosshair symbol (no text or labels)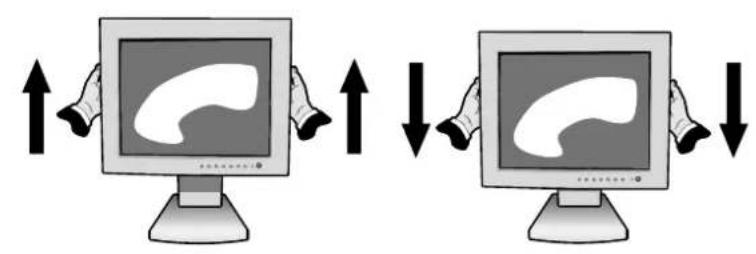
Figure RL.1


flowchart
graph LR
    A["User with monitor icon"] -->|Upward/Downward| B["Computer monitor with hand gesture"]
    B -->|Left/Right| C["User with monitor icon"]
    C -->|Upward/Downward| D["User with monitor icon"]

Figure R.1

natural_image
Illustration of hands holding a tablet with a speech bubble icon, surrounded by curved arrows indicating rotation (no text or symbols)natural_image
Diagram of a mechanical assembly with arrows indicating force or movement (no text or symbols)Figure S.2 Figure S.3
natural_image
Pure technical line drawing of a mechanical assembly without any text, numbers, or symbols
Figure S.4
natural_image
Silhouette of a person sitting at a desk with a computer, viewed from behind (no text or symbols present)Français-16


natural_image
Blank white image with a color palette bar at the top and corner (no text or symbols)Français-18

AVVERTENZA

PER EVITARE IL PERICOLO DI INCENDI O SCOSSE ELETTRICHE, NON ESPORRE L'UNITA' A PIOGGIA O UMIDITA'. INOLTRE, NON USARE LA SPINA POLARIZZATA DELL'UNITA' CON UNA PRESA DI CAVO DI PROLUNGA O ALTRE PRESE A MENO CHE I POLI DELLA SPINA SI INSERISCANO COMPLETAMENTE. NON APRIRE LA CARROZZERIA POICHE' ALL'INTERNO VI SONO COMPONENTI SOTTO ALTA TENSIONE. PER LA MANUTENZIONE RIVOLGERSI A PERSONALE DI MANUTENZIONE QUALIFICATO.
ATTENZIONE
PERICOLO DI SCOSSA ELETTRICA • NON APRIRE


ATTENZIONE
PER EVITARE IL RISCHIO DI SCOSSA ELETTRICA, NON TOGLIERE IL COPERCHIO (O LA COPERTURA POSTERIORE). ALL'INTERNO NON VI SONO PARTI MANUTENIBILI DALL'UTENTE. PER LA MANUTENZIONE RIVOLGERSI A PERSONALE DI MANUTENZIONE QUALIFICATO.

natural_image
Coiled electrical plug with two terminal connectors (no text or symbols visible)natural_image
Coiled cable with two connectors (no text or symbols visible)natural_image
Illustration of a flat-screen computer monitor with control buttons and a stand (no text or symbols visible)
natural_image
Simple line drawing of a coiled cable or connector with two connectors (no text or symbols)natural_image
Two computer desktop units connected by cable, one with a USB port and arrow indicating connection (no visible text or symbols)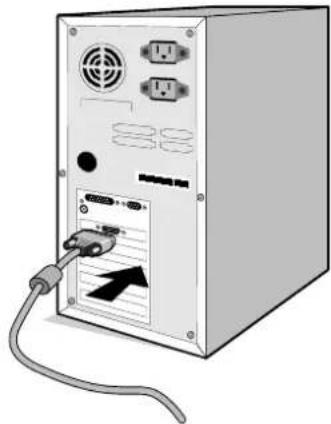
natural_image
Front view of a computer tower drive with cable and ventilation slots (no visible text or symbols)Figura A.1 Figura A.2

Figura RL.1

flowchart
graph TD
    A["Computer monitor with curved object"] --> B["Leftward arrow"]
    B --> C["Rightward arrow"]
    C --> D["Leftward arrow"]
    D --> E["Rightward arrow"]
Figura R.1

natural_image
Illustration of a person holding a tablet with a speech bubble icon, surrounded by curved arrows indicating rotation (no text or symbols)Figura TS.1
Italiano-7


Figura S.1
natural_image
Diagram of a mechanical assembly with arrows indicating force or movement (no text or symbols)Figura S.2 Figura S.3

natural_image
Pure technical line drawing of a mechanical assembly without any text, numbers, or symbols
Figura S.4
Controlli OSM (On-Screen Manager):
natural_image
Silhouette of a person sitting at a desk with a computer, no text or symbols visibleItaliano-16


natural_image
Blank white image with a color palette bar at the top and corner (no text or symbols)Italiano-18

WAARSCHUWING

STEL DEZE EENHEID NIET BLOOT AAN REGEN OF VOCHT, OM ZO DE KANS OP BRAND OF ELEKTRISCHE SCHOKKEN TE VERMIJDEN. GEBRUIK DE GEPOLARISEERDE STEKKER VAN DEZE EENHEID NIET MET EEN VERLENGSNOER OF CONTACTDOOS OF ANDERE STOPCONTACTEN TENZIJ U D E POLEN VOLLEDIG IN HET CONTACTPUNT KUNT PLAATSEN. OPEN DE BEHUIZING NIET. DEZE BEVAT ONDERDELEN DIE ONDER HOGE SPANNING STAAN. HET ONDERHOUD MAG ALLEEN WORDEN UITGEVOERD DOOR BEVOEGDE EN HIERVOOR OPGELEIDE ONDERHOUDSTECHNICI.
LET OP!
KANS OP ELEKTRISCHE SCHOKKEN • NIET OPENEN


VERWIJDER DE BEHUIZING NIET (NOCH DE ACHTERZIJDE) OM DE KANS OP ELEKTRISCHE SCHOKKEN TE BEPERKEN. BEVAT GEEN INTERNE ONDERDELEN DIE DOOR DE GEBRUIKER KUNNEN WORDEN VERVANGEN OF ONDERHOUDEN. HET ONDERHOUD MAG ALLEEN WORDEN UITGEVOERD DOOR BEVOEGDE EN HIERVOOR OPGELEIDE ONDERHOUDSTECHNICI.

natural_image
Two computer monitors connected by cable, one with ports and arrows indicating data transfer (no visible text or symbols)Illustratie A.1

natural_image
Front view of a computer tower drive with ports and cable (no visible text or labels)Illustratie A.2
natural_image
Two identical computer monitors with hand gestures showing up and down states (no text or symbols)Illustratie RL.1

flowchart
graph TD
    A["Computer monitor with abstract symbol"] --> B["Computer screen with abstract symbol"]
    B --> C["Computer screen with abstract symbol"]
Illustratie R.1
Nederlands

natural_image
Illustration of hands holding a tablet with a speech bubble icon, surrounded by curved arrows indicating rotation (no text or symbols)Illustratie TS.1
Nederlands-7


Illustratie S.1

natural_image
Diagram of a mechanical or electrical component with arrows indicating direction, no text or symbols presentnatural_image
Pure technical line drawing of a mechanical assembly without any text, numbers, or symbols
Illustratie S.4
SHARPNESS (SCHERPTE)
natural_image
Silhouette of a person sitting at a desk using a computer, viewed from behind (no text or symbols present)Nederlands-16


natural_image
Coiled electrical plug and socket (no text or symbols visible)natural_image
Coiled cable with two connectors (no text or symbols visible)natural_image
Illustration of a white CRT computer monitor with control buttons and a stand (no text or symbols visible)
natural_image
Pure electrical circuit lines without any symbolsnatural_image
Two computer monitors connected by cable, one with a black arrow pointing to the internal ports (no visible text or symbols)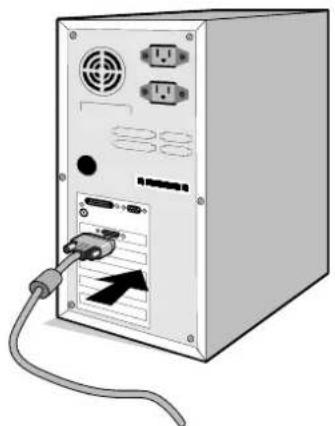
natural_image
Front view of a computer tower with USB cable and ventilation slots (no visible text or labels)natural_image
Two identical computer monitors with hand gestures showing upward and downward movement (no text or symbols)Rysunek RL.1
flowchart
graph TD
    A["Computer monitor with abstract icon"] -->|Bidirectional arrow| B["Computer monitor with abstract icon"]
    B -->|Unidirectional arrow| A
Rysunek R.1

natural_image
Illustration of hands holding a tablet with a speech bubble icon, surrounded by curved arrows indicating rotation (no text or symbols)natural_image
Color palette bar and a grid of squares with a central crosshair (no text or symbols)
Rysunek S.1
natural_image
Diagram of a mechanical or electrical component with bidirectional arrows indicating force or movement (no text or symbols)Rysunek S.2 R
natural_image
Pure mechanical diagram of a press or lifting device without any text, numbers, or symbolsysunek S.3

Rysunek S.4
a→a SHARPNESS (OSTROŚĆ)
natural_image
Silhouette of a person sitting at a desk with a computer, viewed from behind (no text or symbols)Polski
Polski-17

natural_image
Coiled electrical plug and socket (no text or symbols visible)Кабель(и) питания
natural_image
Coiled cable with two connectors (no text or symbols visible)natural_image
Illustration of a flat-screen computer monitor with control buttons and a stand (no text or symbols visible)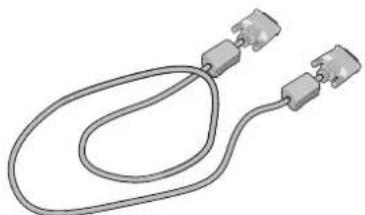
natural_image
Illustration of a coiled cable or connector with two connectors (no text or symbols)natural_image
Two computer monitors connected by cable, one with a USB port and arrow indicating connection (no visible text or symbols)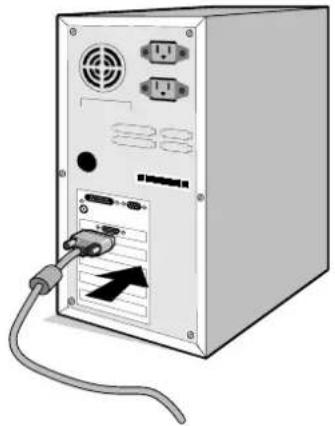
natural_image
Front view of a computer tower with ventilation slots and USB cable (no visible text or labels)Рисунок А.2
Рисунок А.1

natural_image
Two identical computer monitors with hand gestures showing upward and downward movement (no text or symbols)Рисунок RL.1

flowchart
graph LR
    A["Computer monitor with abstract curved arrow"] -->|Forward| B["Computer monitor with curved arrow"]
    B -->|Reverse| A
Рисунок R.1

natural_image
Illustration of hands holding a tablet with a speech bubble icon, surrounded by curved arrows indicating rotation (no text or symbols)Рисунок TS.1
Русский-7


Рисунок S.1
natural_image
Diagram of a mechanical or electrical component with arrows indicating direction, no text or symbols presentnatural_image
Pure technical line drawing of a mechanical assembly without any text, numbers, or symbols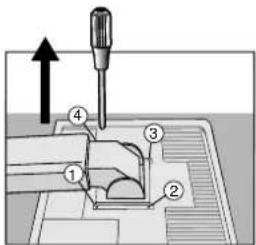
Рисунок S.4
natural_image
Silhouette of a person sitting at a desk with a computer, viewed from behind (no text or symbols)Русский-16
natural_image
Blank white image with a color palette bar at the top and corner markers (no text or symbols)Русский-18

DİKKAT

YANGIN VE ŞOK TEHLİKELERİNİ ÖNLEMEK İÇİN CİHAZ YAĞMUR YA DA NEME MARUZ KALMAMALIDIR. AYRICA BU CİHAZİN POLARİZE FİŞİNİ UÇLAR TAM OTURMADIĞI SÜRECE BİR UZATMA KABLOSU YA DA BAŞKA PRIZLERDE KULLANMAYIN.
natural_image
Two computer monitors connected by cable, one with a USB port and arrow indicating connection (no visible text or symbols)
natural_image
Front view of a computer tower drive with ports and cable (no visible text or labels)Şekil A.2
Şekil A.1
natural_image
Two identical computer monitors with hand gestures showing upward and downward movement (no text or symbols)Şekil RL.1
flowchart
graph TD
    A["Computer monitor with curved interface"] --> B["Computer monitor with curved interface"]
    B --> C["Computer monitor with curved interface"]
Şekil R.1
natural_image
Illustration of hands holding a tablet with a speech bubble icon, surrounded by curved arrows indicating rotation (no text or symbols)Şekil TS.1
Türkçe
Türkçe-7


natural_image
Color palette bar with grayscale gradient and a central crosshair (no text or symbols)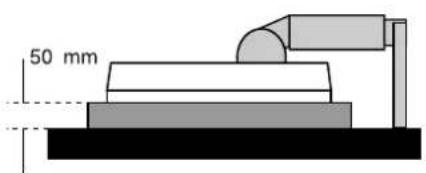
Şekil S.1
natural_image
Diagram of a mechanical or electrical component with arrows indicating direction (no text or symbols)Şekil S.2 Şekil S.3
natural_image
Technical line drawing of a mechanical assembly or support structure (no text or symbols)
Şekil S.4
H. SIZE (YATAY BOYUT)
natural_image
Silhouette of a person sitting at a desk with a computer, viewed from behind (no text or symbols)Türkçe-16


natural_image
Blank white image with a color palette bar at the top and corner markers (no text or symbols)Türkçe-18

natural_image
Color palette bar and a separate color swatch with a crosshair for selection (no text or symbols)NEC

natural_image
Two identical circular markers with crosshairs on a white background, no text or symbols present.Printed in Japan
CP871C191A10


- Declaration of the Manufacturer
- Why do we have environmentally labelled computers?
- What does labelling involve?
- Environmental Requirements
- Flame retardants
- Lead\*\*
- Cadmium\*\*
- Mercury\*\*
- CFCs (freons)
- TCO Development Unit
- WARNING
- CAUTION
- Caution:
- English-1
- Contents
- English-2
- Quick Start
- English-3
- English-5
- Raise and Lower Monitor Screen
- Screen Rotation
- Tilt and Swivel
- Remove Monitor Stand for Mounting
- English-6
- English-7
- English-8
- Controls
- OSM (On-Screen-Manager) Controls
- Control Menu
- English-9
- Brightness/Contrast Controls
- BRIGHTNESS
- CONTRAST
- AUTO ADJUST (Analog input only)
- Position Controls (Analog input only)
- LEFT/RIGHT
- DOWN/UP
- SIZE
- FINE
- Colour Control Systems
- English-10
- R,Y,G,C,B,M,S
- sRGB
- NATIVE
- Tools 1
- a→a
- SHARPNESS
- EXPANSION MODE
- H-EXPANSION
- V-EXPANSION
- VIDEO DETECT
- English-11
- FIRST DETECT
- LAST DETECT
- NONE
- DVI SELECTION
- DIGITAL
- ANALOG
- English-12
- Tools 2
- LANGUAGE
- OSM POSITION
- OSM TURN OFF
- OSM LOCK OUT
- RESOLUTION NOTIFIER
- FACTORY PRESET
- English-13
- Information
- DISPLAY MODE
- MONITOR INFO
- OSM Warning
- English-14
- Recommended Use
- Safety Precautions and Maintenance
- English-15
- English-16
- Ergonomics
- English-17
- VAROVÁNÍ
- UPOZORNĚNÍ
- Česky-16
- Deutsch-16
- ΠΡΟΕΙΔΟΠΟΙΗΣΗ
- H.SIZE (OPIZONTIO MEΓΕΘΟΣ)
- Ελληνικά-16
- Español-16
- AVERTISSEMENT
- ATTENTION
- Français-16
- AVVERTENZA
- ATTENZIONE
- Controlli OSM (On-Screen Manager):
- Italiano-16
- WAARSCHUWING
- LET OP!
- SHARPNESS (SCHERPTE)
- Nederlands-16
- a→a SHARPNESS (OSTROŚĆ)
- Polski-17
- Русский-16
- DİKKAT
- SIZE (YATAY BOYUT)
- Türkçe-16
- NEC
Brand : NEC
Model : MultiSync LCD1550XBK
Category : Monitor