KSB5010CA - Blender KITCHENAID - Free user manual and instructions
Find the device manual for free KSB5010CA KITCHENAID in PDF.

User questions about KSB5010CA KITCHENAID
0 question about this device. Answer the ones you know or ask your own.
Ask a new question about this device
Download the instructions for your Blender in PDF format for free! Find your manual KSB5010CA - KITCHENAID and take your electronic device back in hand. On this page are published all the documents necessary for the use of your device. KSB5010CA by KITCHENAID.
USER MANUAL KSB5010CA KITCHENAID
KSB5000 KSB5010 KSB5060 KSB5011 KSB5015
INSTRUCTIONS INSTRUCTIONS INSTRUCCIONES
natural_image
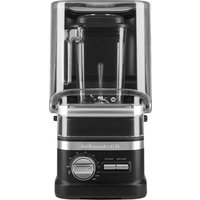
Modern kitchen blender with a black handle and control panel (no visible text or symbols)WELCOME TO THE WORLD OF KITCHENAID.
We're committed to helping you create a lifetime of delicious meals for family and friends. To help ensure the longevity and performance of your appliance, keep this guide handy. It will empower you with the best way to use and care for your product. Your satisfaction is our #1 goal. Remember to register your product online at www.kitchenaid.com or by mail using the enclosed Product Registration Card.
natural_image
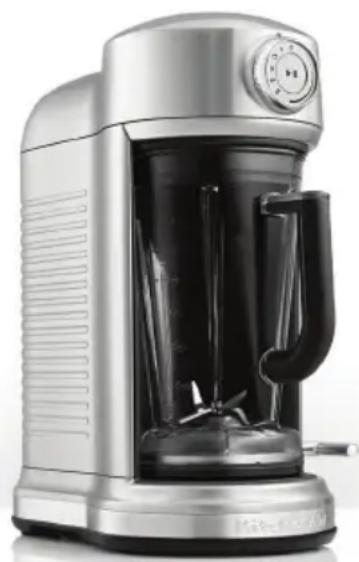
Exterior view of a modern kitchen blender with a black handle and control panel (no visible text or symbols)Join us in the kitchen at www.kitchenaid.com.
TABLE OF CONTENTS
BLENDER SAFETY
Important safeguards....4
Electrical requirements 5
Motor horsepower....5
PARTS AND FEATURES
Parts and accessories....6
ASSEMBLING THE BLENDER
Preparing the Blender for use 7
Blender does not operate when a setting is selected....14
Blender stops while blending 14
WARRANTY AND SERVICE.... 15
PROOF OF PURCHASE & PRODUCT REGISTRATION
Always keep a copy of the itemized sales receipt showing the date of purchase of your Blender. Proof of purchase will assure you of in-warranty service. Before you use your Blender, please fill out and mail your product registration card packed with the unit, or register online at www.kitchenaid.com. This card will enable us to contact you in the unlikely event of a product safety notification and assist us in complying with the provisions of the Consumer Product Safety Act. This card does not verify your warranty. Please complete the following for your personal records:
Model Number
Serial Number
Date Purchased
Store Name
Your safety and the safety of others are very important.
We have provided many important safety messages in this manual and on your appliance. Always read and obey all safety messages.

This is the safety alert symbol.
This symbol alerts you to potential hazards that can kill or hurt you and others.
All safety messages will follow the safety alert symbol and either the word "DANGER" or "WARNING." These words mean:
! DANGER
You can be killed or seriously injured if you don't immediately follow instructions.
WARNING
You can be killed or seriously injured if you don't follow instructions.
All safety messages will tell you what the potential hazard is, tell you how to reduce the chance of injury, and tell you what can happen if the instructions are not followed.
State of California Proposition 65 Warnings:
WARNING: This product contains one or more chemicals known to the State of California to cause cancer.
WARNING: This product contains one or more chemicals known to the State of California to cause birth defects or other reproductive harm.
IMPORTANT SAFEGUARDS
When using electrical appliances, basic safety precautions should always be followed, including the following:
I. Read all instructions.
2. To protect against risk of electrical shock, do not put Blender in water or other liquid.
3. Close supervision is necessary when any appliance is used by or near children.
4. Unplug from outlet when not in use, before putting on or taking off parts, and before cleaning.
5. Avoid contact with moving parts.
6. Do not operate the Blender with a damaged cord or plug or after appliance malfunctions, or is dropped or damaged in any manner. Return appliance to the nearest Authorized Service Center for examination, repair or electrical or mechanical adjustment.
7. Do not use outdoors.
8. Do not let cord hang over edge of table or counter.
9. Keep hands and utensils out of container while blending to reduce the risk of severe injury to persons or damage to the Blender. A scraper may be used but must be used only when the Blender is not running.
10. Blades are sharp. Handle carefully.
II. The use of attachments, including canning jars, not recommended by KitchenAid may cause a risk of injury to persons.
12. Flashing light indicates ready to operate - avoid any contact with blades or moveable parts.
13. This product is designed for household use only.
14. Do not use appliance for other than intended use.
SAVE THESE INSTRUCTIONS
Electrical requirements
WARNING

Electrical Shock Hazard
Plug into a grounded 3 prong outlet.
Do not remove ground prong.
Do not use an adapter.
Do not use an extension cord.
Failure to follow these instructions can result in death, fire, or electrical shock.
Voltage: 120 Volts A.C. only
Wattage: 1300 watts
Frequency: 60 Hz
NOTE: If the plug does not fit in the outlet, contact a qualified electrician. Do not modify the plug in any way. Do not use an adapter.
Do not use an extension cord. If the power supply cord is too short, have a qualified electrician or serviceman install an outlet near the appliance.
Motor horsepower
Motor horsepower for the Blender motor was measured using a dynamometer, a machine that laboratories routinely use to measure the mechanical power of motors. Our 1.8 peak horsepower (HP) motor reference reflects the horsepower output of the motor itself and not the Blender's horsepower output in the Blender pitcher. As with any blender, the power output in the pitcher is not the same as the horsepower of the motor itself. This motor delivers 1.4 peak HP in the pitcher enabling your Blender to deliver robust power for all your recipes.
NOTE: In accordance with guidelines from the American Heart Association, as with many products containing magnets, it is recommended that those with implantable pacemakers/defibrillators should use care with the Blender and keep their device 12 inches away from the Blender.
Parts and accessories
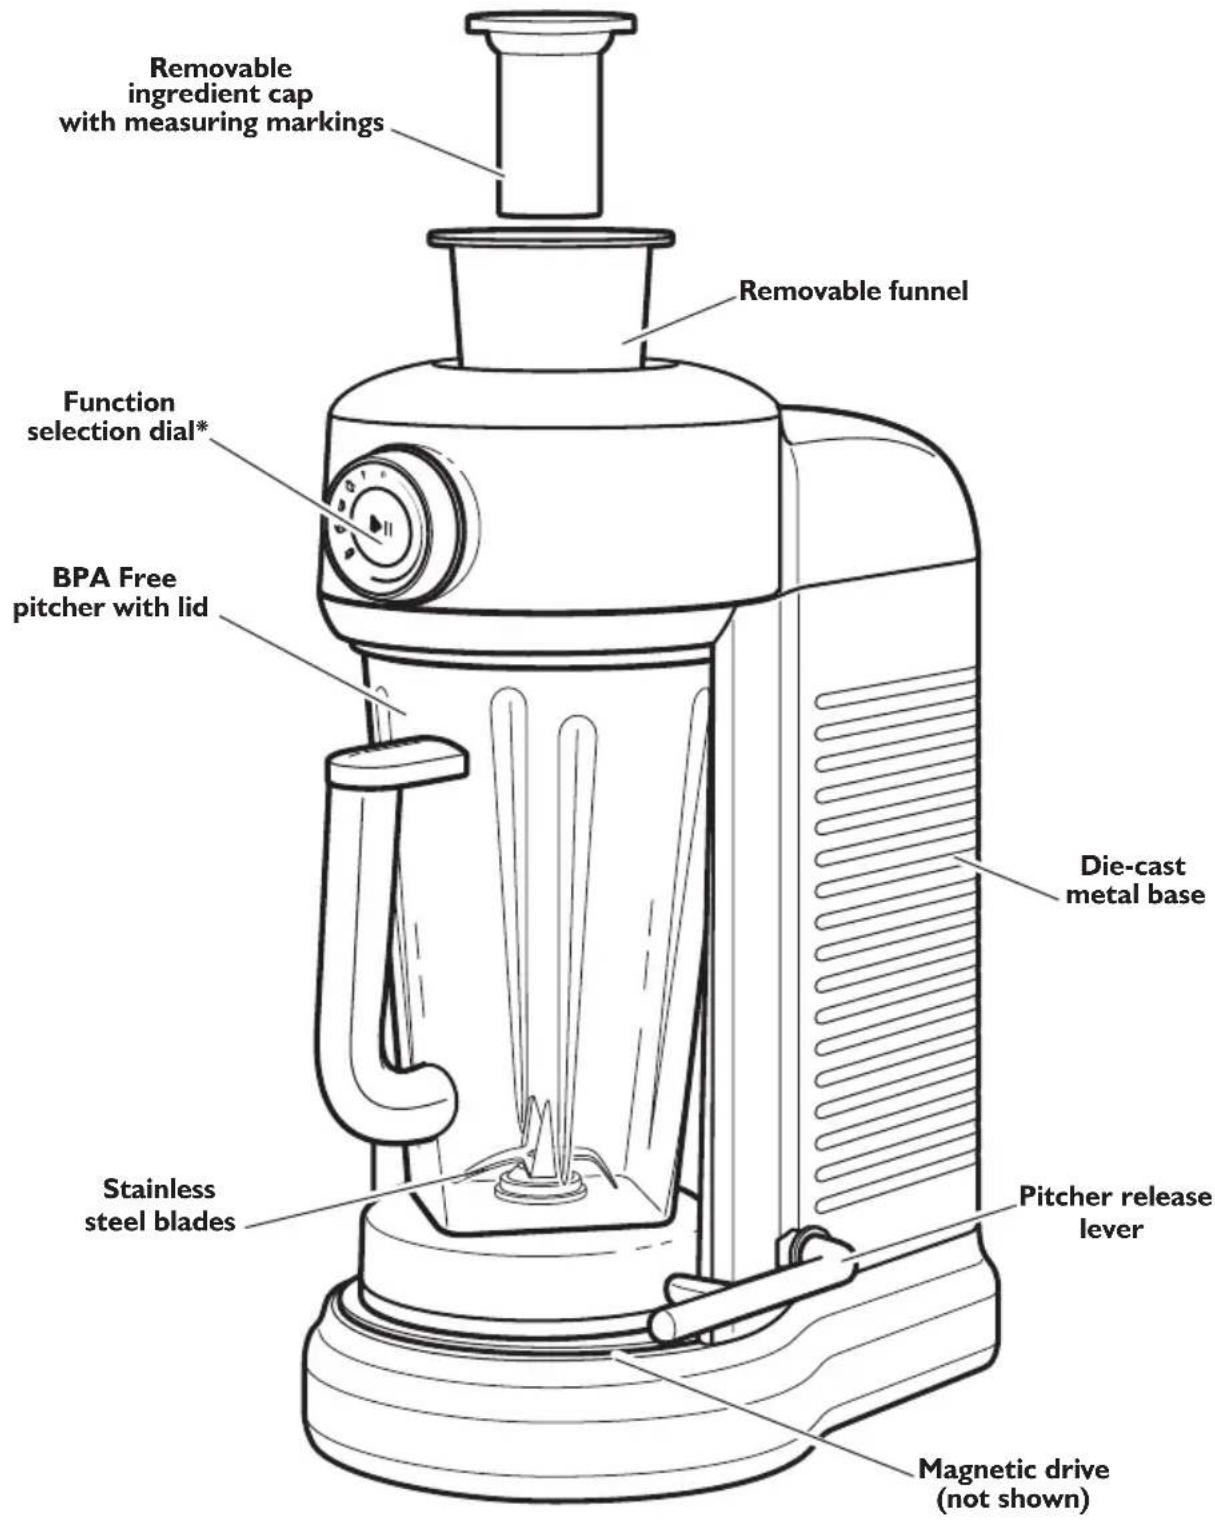
text_image
Removable ingredient cap with measuring markings Removable funnel Function selection dial* BPA Free pitcher with lid Die-cast metal base Stainless steel blades Pitcher release lever Magnetic drive (not shown)* See the "Blender function guide" section.
Preparing the Blender for use
WARNING

Electrical Shock Hazard
Plug into a grounded 3 prong outlet.
Do not remove ground prong.
Do not use an adapter.
Do not use an extension cord.
Failure to follow these instructions can result in death, fire, or electrical shock.
Before first use
Before using your Blender for the first time, wipe Blender base with a warm damp cloth, then wipe clean with a damp cloth. Dry with a soft cloth. Wash pitcher, lid, and ingredient cup in warm, sudsy water (see "Care and cleaning" section). Rinse parts and wipe dry.
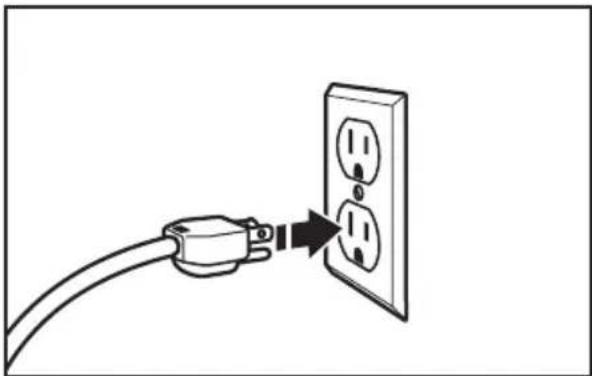
natural_image
Line drawing of an electrical outlet with a cable inserted, showing two outlets and a power plug (no text or symbols)Before using the Blender, plug into a grounded 3-prong outlet.
For more information about how to get the most out of your Blender, visit www.blendwithkitchenaid.com for videos.
Before operating the Blender, make sure the pitcher is properly locked into the Blender base.
The Blender will not run if the pitcher and lid are not fully in place. If you pull the Blender out of the base before the Blender stops running, the blade brake will kick in to stop the blades, and the Blender will stop after a few seconds.

natural_image
Circular diagram with play button, arrows, and circular design elements (no text or symbols)The Blender has four pre-set recipe programs: Icy Drinks/Smoothies, Milkshakes, Soups/Sauces, and Juice. It also features Variable Speed and Pulse selections that allow you to customize your blending for any recipe you make. See “Blender function guide” for more detailed information.
natural_image
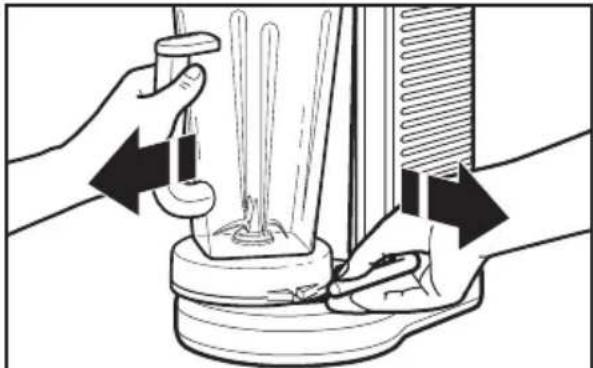
Illustration of hands operating a blender with arrows indicating process direction (no text or symbols)Remove the pitcher from the Blender base in order to fill it with ingredients. Pull the pitcher release lever to help remove the pitcher. Grab the handle firmly, and pull the pitcher straight towards you to remove.

natural_image
Illustration showing a hand pouring liquid into a trash bin and then dropping into a lid with a downward arrow (no text or symbols)2 Put ingredients in the pitcher. Add liquids first, then soft foods, then ice or frozen fruit last. Do not fill the pitcher beyond the max fill line - especially when using primarily liquids. Put the lid on the pitcher spout first, then push down on the side of the lid near the handle, ensuring that the lid is on straight. The Blender will not work without the lid in place.
natural_image
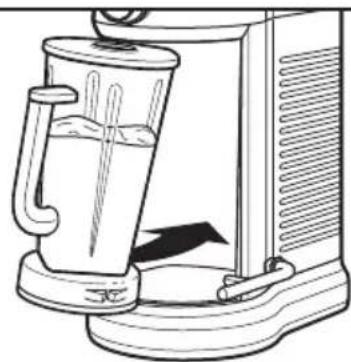
Line drawing of a blender with liquid inside, showing mechanical components and a black arrow indicating motion (no text or symbols)3 Align the top of the pitcher to slide under the top of the base, and slide pitcher forward into the housing. Ensure that the pitcher goes in straight and is secured in place.
natural_image
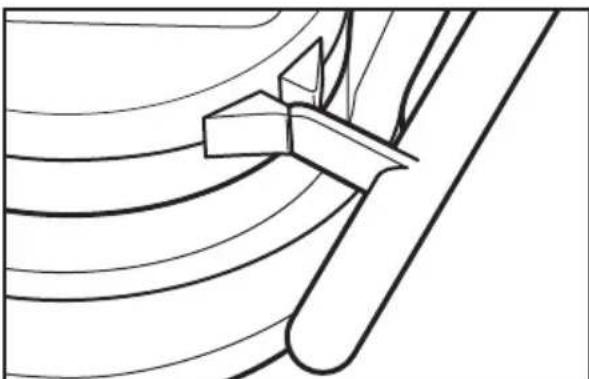
Pure technical line drawing of a mechanical component or tool, no text or symbols present4 Ensure that the pitcher is fully in place by making sure that the tab on the pitcher release handle sits between the two triangular notches on the base of the pitcher. You will hear a click when the pitcher is fully in place.
NOTE: There should be a half inch (1,27 cm) of platform evenly visible around the pitcher when it's fully locked in place.
text_image
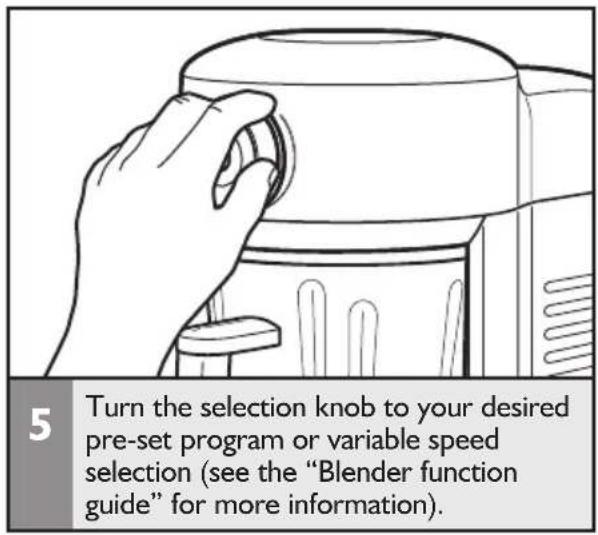
5 Turn the selection knob to your desired pre-set program or variable speed selection (see the "Blender function guide" for more information).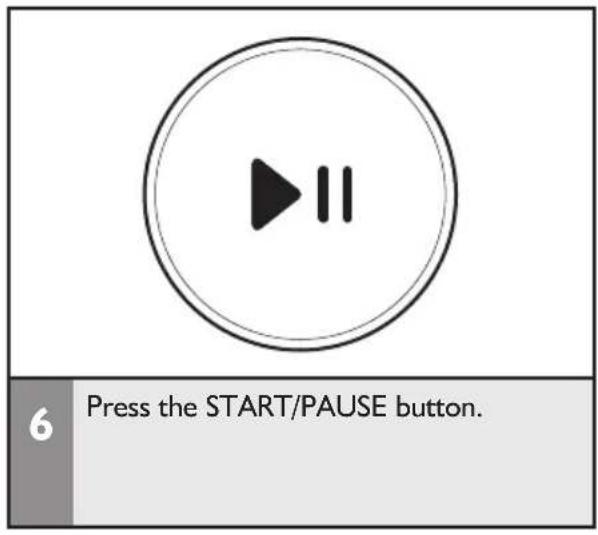
text_image
6 Press the START/PAUSE button.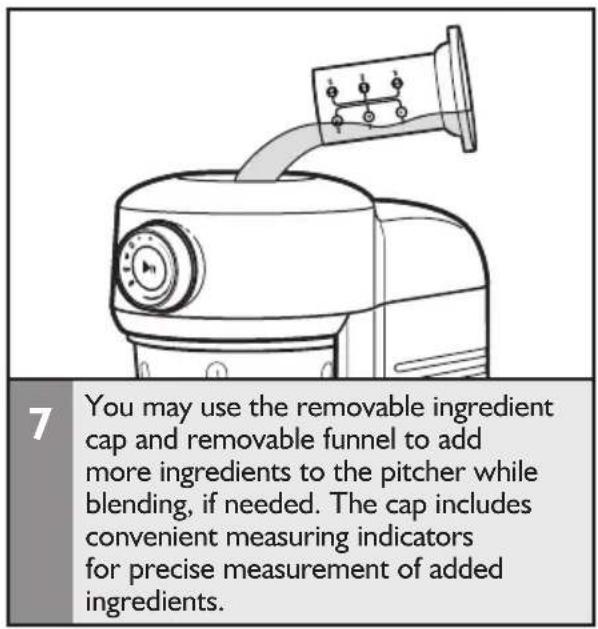
text_image
7 You may use the removable ingredient cap and removable funnel to add more ingredients to the pitcher while blending, if needed. The cap includes convenient measuring indicators for precise measurement of added ingredients.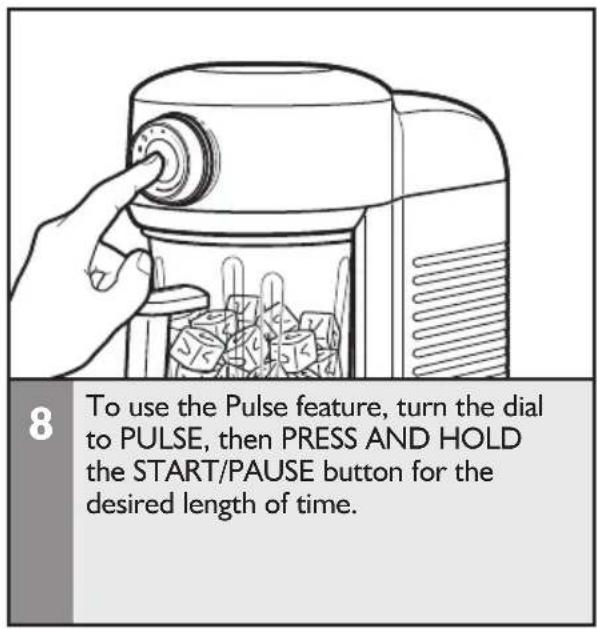
text_image
To use the Pulse feature, turn the dial to PULSE, then PRESS AND HOLD the START/PAUSE button for the desired length of time.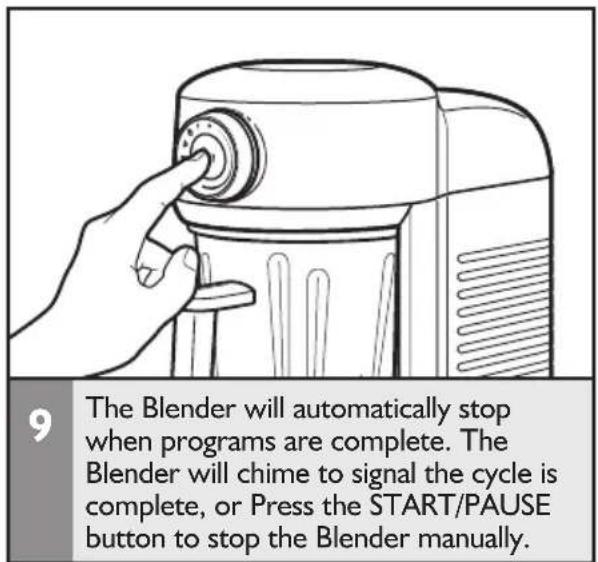
text_image
9 The Blender will automatically stop when programs are complete. The Blender will chime to signal the cycle is complete, or Press the START/PAUSE button to stop the Blender manually.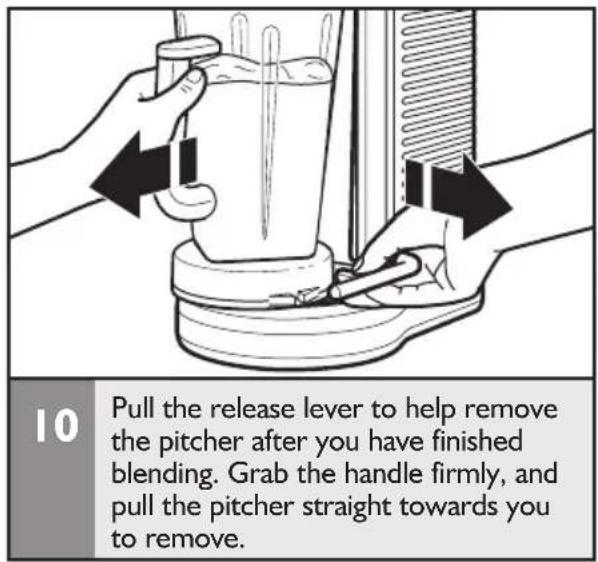
text_image
10 Pull the release lever to help remove the pitcher after you have finished blending. Grab the handle firmly, and pull the pitcher straight towards you to remove.
Blender function guide

natural_image
Circular diagram with play button and circular elements, no readable text or symbolsThe four pre-set recipe programs were each developed based on typical recipes in that category. However, you'll find that not all recipes are exactly the same, and sometimes a particular recipe might blend more to your preference on a program that is not obvious. For example, some milkshakes with frozen fruit blend better on the Icy Drinks/Smoothies program. Also, when making smoothies, you might prefer the finer texture that the Juice program creates. We encourage you to experiment to find the best program for your favorite recipes.
| Setting | Description | Blending time(in min:sec) | Items to blend | |
| [058A]ICY DRINKS/SMOOTHIES | Quick pulses of power to crush large amounts of hard foods, such as ice, frozen vegetables, or frozen fruits. | 1:05 | Blended ice drinksCrushed ice | Frozen chopped fruit (defrost slightly until it can be probed with a knife tip) |
 MILKSHAKES MILKSHAKES | Long, slow speed blending to create smooth, uniform consistency when blending thick, sticky foods. | 1:39 | Ice cream based drinksSherbet/Icemilk-based drinksFrozen yogurt-based drinks | Smooth ricotta or cottage cheesePureed fruit or vegetables/Baby foodPureed meat/Baby food meatPancake/Waffle batter |
| [DDZS]SOUPS/SAUCES | Gradual ramp-up of speed and power.Ideal for blending hot ingredients in particular. | 1:25 | Hot drinksSoup | Salad dressingHot sauces |
| [OXZZ]JUICE | High blade speed to blend to a fine texture for recipes with foods high in fiber, or with skins, or seeds. | 1:29 | Fruit juice from frozen concentrateFruit-based drinks (thin) | Cold fruit or vegetable sauceFinely chopped fresh fruitsFinely chopped fresh vegetables |
| ###PULSE | Allows precise control of the duration and frequency of blending.Great for recipes that require a light touch. | Short pulses of 2-3 seconds as needed | Savory crumb toppingSweet crumb toppingMeat salad for sandwich filling | Chopped fruitsChopped vegetables |
| VARIABLE SPEEDS | Adjustable speeds for fine tuned chopping and blending needs to prepare any recipe. | Up to 2:00, as needed for desired recipe | PestoDipsMeat salad for sandwich fillingGrated hard cheese | Fluffy gelatin for pie/dessertsCheesecakeMousse |
Quick tips
Using the Blender
- Stop the Blender before using utensils in the pitcher. Use a rubber spatula to mix ingredients only when the Blender is off. Never use any utensil, including spatulas, in the pitcher while the motor is running.
- The Blender is capable of handling hot ingredients. Cool hot foods, if possible, before blending.
- For best results, when blending hot food or liquids, do not fill the Blender pitcher to the top. Secure the lid, remove the center ingredient cap and place a towel over the top.
- The blender is not intended to be used as a heating device.
Magnetic blending
- Be aware that the Blender jar and Blender base contain magnets that may attract other items. For example, the jar may attract adjacent metal utensils when placed on a countertop.
- Metal items may also be attracted to the Blender base if jar is not in place. However, the Blender will not run without the jar and lid in place.
- Check that jar bottom is free of small magnetic debris before each use.
Blending on variable speed
- For mixtures blended on the Variable Speeds setting, start the blending process at a lower speed to thoroughly combine the ingredients. Then increase to a higher speed, as desired. You'll find that the pre-set recipe programs will make blending easier by varying the speed level automatically.
- Because the Blender can work without user intervention, the Variable Speed function will automatically turn off after approximately 2 minutes to ensure it does not run longer than intended and the recipe does not get overblended. If you want to blend longer, reset the Blender to the “OFF/O” position and run it again as needed.
Using the ingredient feed
- If desired, you can remove center ingredient cap to add ingredients while the Blender is operating.
- The ingredient cap and funnel will need to be washed even if ingredients are not added through the ingredient feed.
- For thorough processing of ingredients, add them early in the cycle so that the Blender can process them fully.
- If chunks of fruit and vegetables are desired, add the ingredients towards the end of the blending cycle.
- If the ingredient cap does not fully seat, make sure the funnel is fully in the down position. If you are having trouble, rotate either the funnel or the cap until you find the correct position.
- Wipe out inner funnel liner after each use.
Crushing ice
- Ice directly from the freezer will crush better than partially melted ice for snow.
- Smaller ice cubes can be chopped or crushed faster than large ones.
- For best results, crush ice by adding it through the ingredient feed as the Blender is running.
Cleaning the Blender
- Clean the Blender thoroughly after every use. Be sure to unplug before cleaning.
• To avoid damaging the Blender, do not immerse the Blender base or cord in water.
• To avoid scratching the Blender, do not use abrasive cleansers or scouring pads.

natural_image
Line drawing of a hand operating a portable device with a rotary knob (no text or symbols)To clean the Blender base and cord: Unplug the Blender before cleaning. Wipe with a warm, damp cloth; wipe clean with a damp cloth, and dry with a soft cloth. Make sure to clean inside the ingredient feed each time.
natural_image
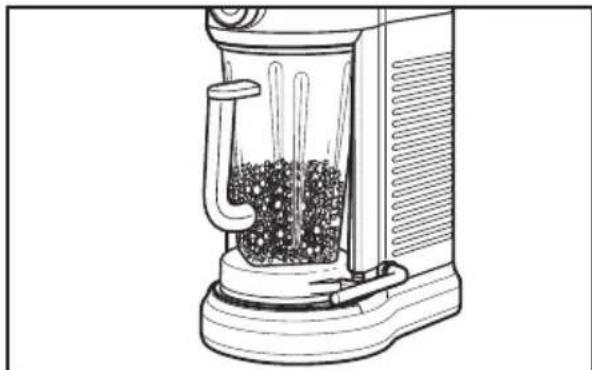
Line drawing of a kitchen blender with granular contents inside (no text or symbols)2 To quickly clean the Blender while in the base: Add I drop of dish soap to half a pitcher of water, and run on the icy Drinks/Smoothies cycle. Discard water when cycle is finished, and rinse completely.
text_image
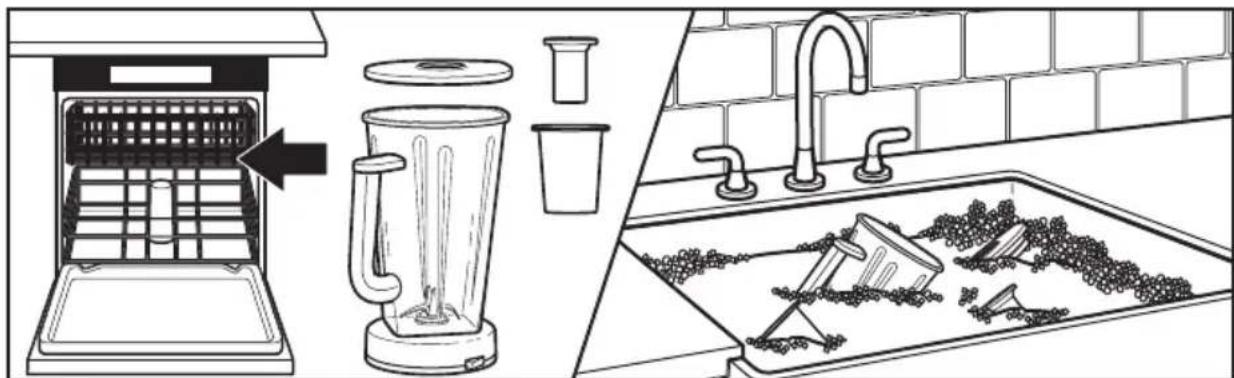
Diagram illustrating kitchen cleaning steps: slicing a blender into an oven, adding a cup, and finishing with buckets on a sink.3 To clean pitcher, lid, ingredient cap, and funnel: Wash all items in the dishwasher on the top or bottom rack. Or hand wash with soapy water, rinse, and wipe dry. Make sure that all Blender parts are dry before storing for longer periods of time.
NOTE: For best results when cleaning the Blender, completely disassemble the lid, ingredient cap and funnel and thoroughly wash all parts after each use.
Understanding the Blender flash codes
IMPORTANT: The Blender will not operate at any speed unless the START/PAUSE button is pressed first.
| LED is flashing slowly LED is flashing rapidly LED is not flashing | ||
 |  |  |
| Ready modeIf the LED slowly glows with increasing intensity and then is off, the Blender is ready for blending. Press START/PAUSE button to start blending. | Error modeIf the LED flashes on/off in rapid bursts, the Blender is not ready for blending.The most common reasons include:- Pitcher is not properly in place- Pitcher was removed before blending was completed- Blender is jammedFirst, rotate the knob to “OFF/O”. Next, make sure the pitcher is properly in place. Then, choose your selection and press the START/PAUSE button.If Blender is jammed, it will stop running to avoid damage to the motor. Press START/ PAUSE, then unplug the power cord. Remove the pitcher from the base, and with a scraper, free the blades by breaking up or removing the contents at the bottom of the pitcher.To restart, rotate the knob to “OFF/O” position and then rotate to knob selection and press START/PAUSE. | If the LED does not flash after a setting is selected, the Blender is not ready for blending.The most common reasons include:- Blender is in “sleep mode”- Blender has been unplugged or a power outage has occurredThe Blender may have gone into an inactive mode or “sleep mode.” This feature saves power if the Blender is left unattended for a few minutes. Resetting the dial to “OFF/O” brings the Blender back into “active mode”. First, rotate the knob to “OFF/O”. Next, make sure the pitcher is properly in place. Then, choose your selection and press the START/ PAUSE button.If the Blender still does not work, see below for further information on ways to correct the operation error. |
Blender does not operate when a setting is selected
WARNING

Electrical Shock Hazard
Plug into a grounded 3 prong outlet.
Do not remove ground prong.
Do not use an adapter.
Do not use an extension cord.
Failure to follow these instructions can result in death, fire, or electrical shock.
- If the LED is flashing on/off in rapid bursts, the pitcher might not be fully in place or the Blender might have gone into "sleep mode" and need to be reset to "OFF/O". Follow the "Error mode" instructions.
- Check to see if the Blender is plugged into a grounded 3-prong outlet. If it is, press START/PAUSE; then unplug the Blender. Plug it back in to the same outlet, and press START/PAUSE. If the Blender still does not work, check the fuse or circuit breaker on the electrical circuit the Blender is connected to and make sure the circuit is closed.
- The pitcher might not be fully in place. Ensure it is all the way in and the lid is aligned.
- The Blender may need to be reset. Turn it to the "OFF/O" position and back to your desired setting.
Blender stops while blending
- Power Loss - Rotate selection dial to the "OFF/O" position and then rotate to desired selection setting and press START/PAUSE.
- The Blender automatically shuts off after approximately 2 minutes of blending on Variable Speed. To reset it, turn the selection dial to the "OFF/O" position, and then back to your desired setting, and press START/PAUSE.
- The Blender may be jammed. If it is jammed, the Blender will stop running to avoid damage to the motor. Rotate the knob to "OFF/O", then unplug the power cord. Remove the pitcher from the base, and with a scraper, free the blades by breaking up or removing the contents at the bottom of the pitcher. To restart, rotate the knob to "OFF/O" position and then rotate to knob selection and press START/PAUSE.
If the problem cannot be fixed with the steps provided in this section, contact an authorized service center (see "Warranty and service" section).
KitchenAid® Blender Warranty for the 50 United States, the District of Columbia, Puerto Rico, and Canada
This warranty extends to the purchaser and any succeeding owner for Blender operated in the 50 United States, the District of Columbia, Puerto Rico, and Canada.
Length of Warranty: Seven Year Full Warranty from date of purchase.
KitchenAid Will Pay Hassle-Free Replacement of your Blender. See the next for Your Choice of: page for details on how to arrange for service, or call the Customer eXperience Center toll-free at
1-800-541-6390.
OR

text_image
KITCHENAID THASSLE-FREE REPLACEMENT WARRANTY DEROUT IN MATERIAL provided by an AThe replacement parts and repair labor costs to correct defect in materials and workmanship. Service must be provided by an Authorized KitchenAid Service Center.
KitchenAid Will A. Repairs when Blender is used in other than normal Not Pay for: single family home use.
B. Damage resulting from accident, alteration, misuse or abuse.
C. Any shipping or handling costs to deliver your Blender to an Authorized Service Center.
D. Replacement parts or repair labor costs for Blender operated outside the 50 United States, District of Columbia, Puerto Rico, and Canada.
DISCLAIMER OF IMPLIED WARRANTIES; LIMITATION OF REMEDIES
IMPLIED WARRANTIES, INCLUDING TO THE EXTENT APPLICABLE WARRANTIES OF MERCHANTABILITY OR FITNESS FOR A PARTICULAR PURPOSE, ARE EXCLUDED TO THE EXTENT LEGALLY PERMISSIBLE. ANY IMPLIED WARRANTIES THAT MAY BE IMPOSED BY LAW ARE LIMITED TO ONE YEAR, OR THE SHORTEST PERIOD ALLOWED BY LAW. SOME STATES AND PROVINCES DO NOT ALLOW LIMITATIONS OR EXCLUSIONS ON HOW LONG AN IMPLIED WARRANTY OF MERCHANTABILITY OR FITNESS LASTS, SO THE ABOVE LIMITATIONS OR EXCLUSIONS MAY NOT APPLY TO YOU.
IF THIS PRODUCT FAILS TO WORK AS WARRANTED, CUSTOMER'S SOLE AND EXCLUSIVE REMEDY SHALL BE REPAIR OR REPLACEMENT ACCORDING TO THE TERMS OF THIS LIMITED WARRANTY. KITCHENAID AND KITCHENAID CANADA DO NOT ASSUME ANY RESPONSIBILITY FOR INCIDENTAL OR CONSEQUENTIAL DAMAGES. This warranty gives you specific legal rights and you may also have other rights which vary from state to state or province to province.
Hassle-Free Replacement Warranty – 50 United States, District of Columbia, and Puerto Rico
We're so confident the quality of our products meets the exacting standards of KitchenAid that, if your Blender should fail within the first seven years of ownership, KitchenAid will arrange to deliver an identical or comparable replacement to your door free of charge and arrange to have your original Blender returned to us. Your replacement unit will also be covered by our seven year limited warranty.
If your Blender should fail within the first seven years of ownership, simply call our toll-free Customer eXperience Center at 1-800-541-6390 Monday through Friday. Please have your original sales receipt available when you call. Proof of purchase will be required to initiate the claim. Give the consultant your complete shipping address. (No P.O. Box numbers, please.)
When you receive your replacement Blender, use the carton, packing materials, and prepaid shipping label to pack up your original Blender and send it back to KitchenAid.
Hassle-Free Replacement Warranty – Canada
We're so confident the quality of our products meets the exacting standards of the KitchenAid brand that, if your Blender should fail within the first seven years of ownership, we will replace your Blender with an identical or comparable replacement. Your replacement unit will also be covered by our one year limited warranty.
If your Blender should fail within the first seven years of ownership, simply call our toll-free Customer eXperience Center at I-800-807-6777 Monday through Friday. Please have your original sales receipt available when you call. Proof of purchase will be required to initiate the claim. Give the consultant your complete shipping address.
When you receive your replacement Blender, use the carton, packing materials, and prepaid shipping label to pack up your original Blender and send it back to KitchenAid.
Arranging for Service after the Warranty Expires, or Ordering Accessories and Replacement Parts
In the United States and Puerto Rico:
For service information, or to order accessories or replacement parts, call toll-free at 1-800-541-6390 or write to:
Customer eXperience Center, KitchenAid Small Appliances, P.O. Box 218, St. Joseph, MI 49085-0218
Outside the United States and Puerto Rico:
Consult your local KitchenAid dealer or the store where you purchased the Blender for information on how to obtain service.
For service information in Canada:
Call toll-free I-800-807-6777.
For service information in Mexico:
Call toll-free 01-800-0022-767.
BIENVENUE DANS LE MONDE DE KITCHENAID.
natural_image
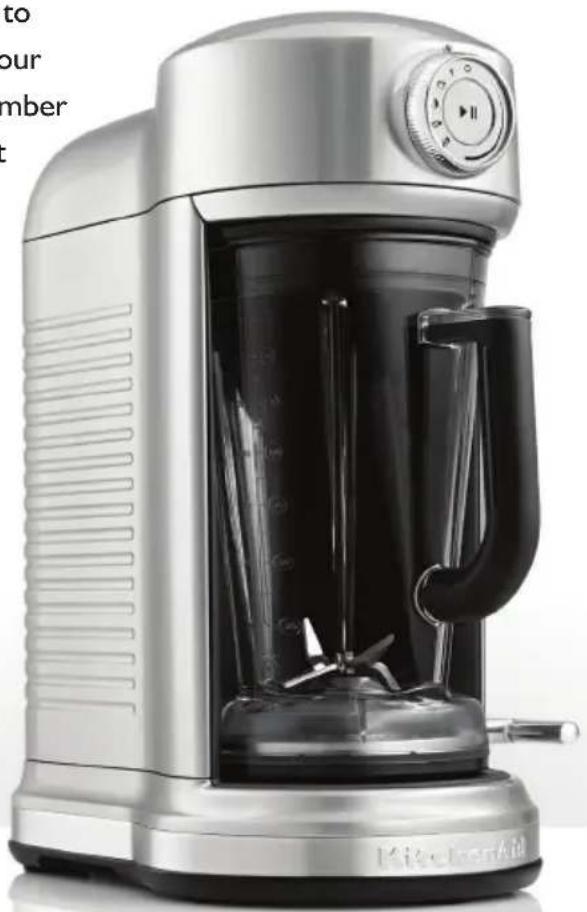
Exterior view of a modern kitchen blender with a black handle and control panel (no visible text or symbols)natural_image
Line drawing of a cable inserted into an electrical outlet with two outlets (no text or symbols)natural_image
Circular diagram with play button and directional arrows, no text or symbols presentnatural_image
Illustration of hands operating a blender with arrows indicating process direction (no text or symbols)natural_image
Illustration showing a hand pouring liquid into a trash bin and then dropping into a lid with a downward arrow (no text or symbols)natural_image
Line drawing of a blender with liquid inside, showing mechanical components and a directional arrow (no text or symbols)natural_image
Pure technical line drawing of a mechanical component or tool without any text, numbers, or symbolsnatural_image
Circular diagram with play button and control icons (no text or symbols)natural_image
Line drawing of a hand operating a portable kitchen appliance (no text or symbols)natural_image
Line drawing of a kitchen blender with granular contents inside (no text or symbols)text_image
Diagram illustrating kitchen cleaning steps: slicing into a blender with a brush, adding granular material, and cleaning the sink with buckets.text_image
KITCHENAID HASSLE-FREE REPLACEMENT WARRANTY QUALITYCustomer eXperience Center, KitchenAid Small Appliances, P.O. Box 218, St. Joseph, MI 49085-0218
natural_image
Exterior view of a modern kitchen stand mixer (no visible text or symbols)Únase a nosotros en la cocina, visite www.kitchenaid.com.
ÍNDICE
natural_image
Line drawing of a cable inserted into an electrical outlet with two outlets (no text or symbols)natural_image
Circular diagram with play button and directional arrows, no text or symbols presentnatural_image
Illustration of hands operating a blender with arrows indicating process direction (no text or symbols)natural_image
Illustration showing a hand pouring liquid into a trash bin and then dropping into a plastic cup (no text or symbols)natural_image
Line drawing of a blender with liquid inside, placed on a stand next to a computer (no text or symbols)natural_image
Pure technical diagram showing curved layered structures without any text, numbers, or symbolsnatural_image
Circular diagram with play button and directional arrows, no text or symbols presentnatural_image
Line drawing of a hand operating a portable kitchen appliance (no text or symbols)natural_image
Line drawing of a kitchen blender with a side panel and lid (no text or symbols)text_image
Diagram illustrating kitchen cleaning and cleaning process with labeled components including a blender, mixer, and sink.text_image
KITCHENIAID HASSLE-FREE REPLACEMENT WARRANTY QUALITY®/™ © 2014 KitchenAid. All rights reserved. Used under license in Canada.