
Ghost X - Action camera Drift - Free user manual and instructions
Find the device manual for free Ghost X Drift in PDF.

| Product type | Sports camera |
| Brand | Drift |
| Model | Ghost X |
| Dimensions | 43 x 82.2 x 31.4 mm (L x W x H) |
| Weight | 120 g |
| Battery | Integrated 1500 mAh Lithium-ion |
| Power supply | USB 5V via mini-USB cable |
| Maximum video resolution | 1080p |
| Photo resolution | 4, 8, 12 megapixels |
| Viewing angle | 90°, 115°, 140° (adjustable) |
| Screen | Color dot matrix LCD |
| Storage | microSD/HC/XC card up to 128 GB (class 10 or higher) |
| Connectivity | Wi-Fi 2.4 GHz, mini-USB 10-pin, A/V output and HDMI via adapter |
| Lens rotation | 330° |
| Recording modes | Video, Photo, Timelapse, Photoburst |
| Special features | Tag Video, Car DVR, instant start, filters (Normal/Vivid/Low Light) |
| Exposure | Adjustable: -2 to +2 in steps of 1 |
| Self-timer | 3s, 5s, 10s |
| ISO sensitivity | 100, 200, 400, 800, Auto |
| Operating temperature | 0°C to 40°C (estimate) |
| Care and cleaning | Wipe with a dry cloth; keep rubber seals clean |
| Safety | Do not expose to water; use with care while driving |
| Included accessories | Universal clip, flat and curved adhesive mounts, reset tool, USB-Mic converter, mini-USB cable |
| Warranty | See supplier terms (not applicable in case of mishandling) |
Frequently Asked Questions - Ghost X Drift
User questions about Ghost X Drift
0 question about this device. Answer the ones you know or ask your own.
Ask a new question about this device
Download the instructions for your Action camera in PDF format for free! Find your manual Ghost X - Drift and take your electronic device back in hand. On this page are published all the documents necessary for the use of your device. Ghost X by Drift.
USER MANUAL Ghost X Drift
Thank you for purchasing the Drift Ghost X
CUSTOMER SUPPORT
Download the full manual and check our official website for firmware updates, customer support, and info on all of our products.
https://driftinnovation.com/
If you have any suggestions, comments or concerns; please contact our customer support team at:
support@driftinnovation.com
WARRANTY
Warranty does not apply if the product is damaged due to physical abuse, mishandling, accident, fire, frostbite, water damage, negligence or failure to follow the supplied operating instructions. For more information on your warranty, see:
https://driftinnovation.com/warranty
3-4 About Your Camera | Package Contents
5-6 Initial Setup | Getting Started
7 Camera Modes
8 Settings Menu
9-10 Settings
11 Mounting the Camera
12-13 Feature Overview
14 Accessory Guide
15 Wi-Fi + Firmware
16 Connecting Your Camera
17-18 Specifications
19-20 Disclosures
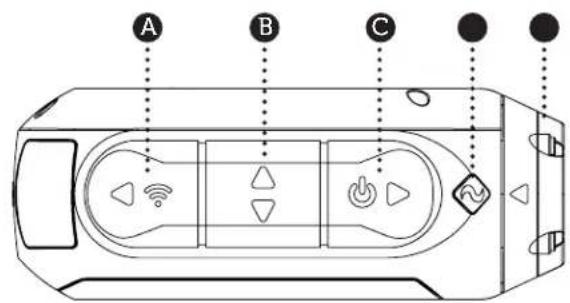
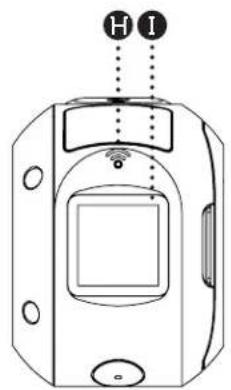
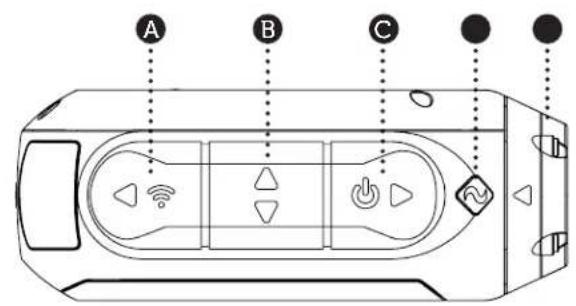
A Rear Button
Middle Button
C
D Status LED
E Rotating Lens
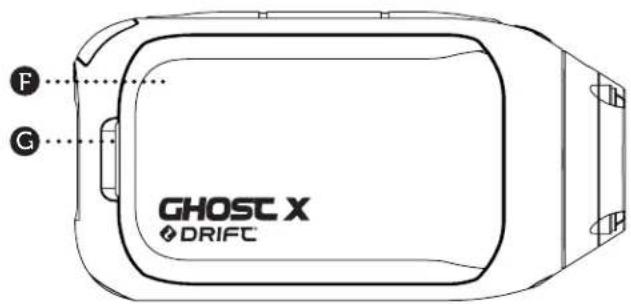
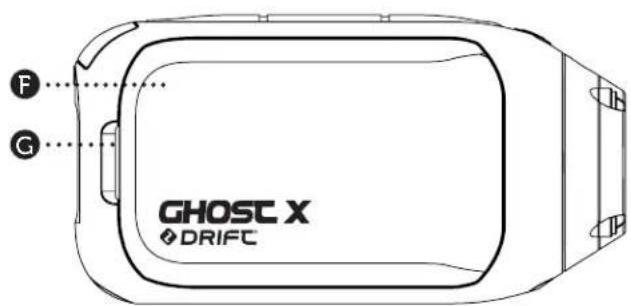
F Battery Module
G Module Latch
Wi-Fi LED
Rear Screen
Microphone
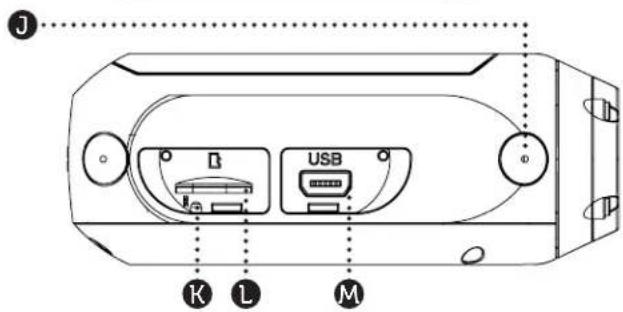
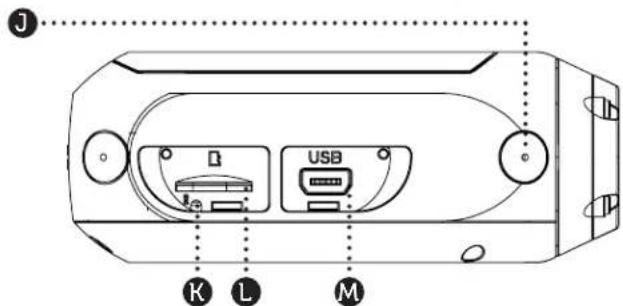
K Reset Button
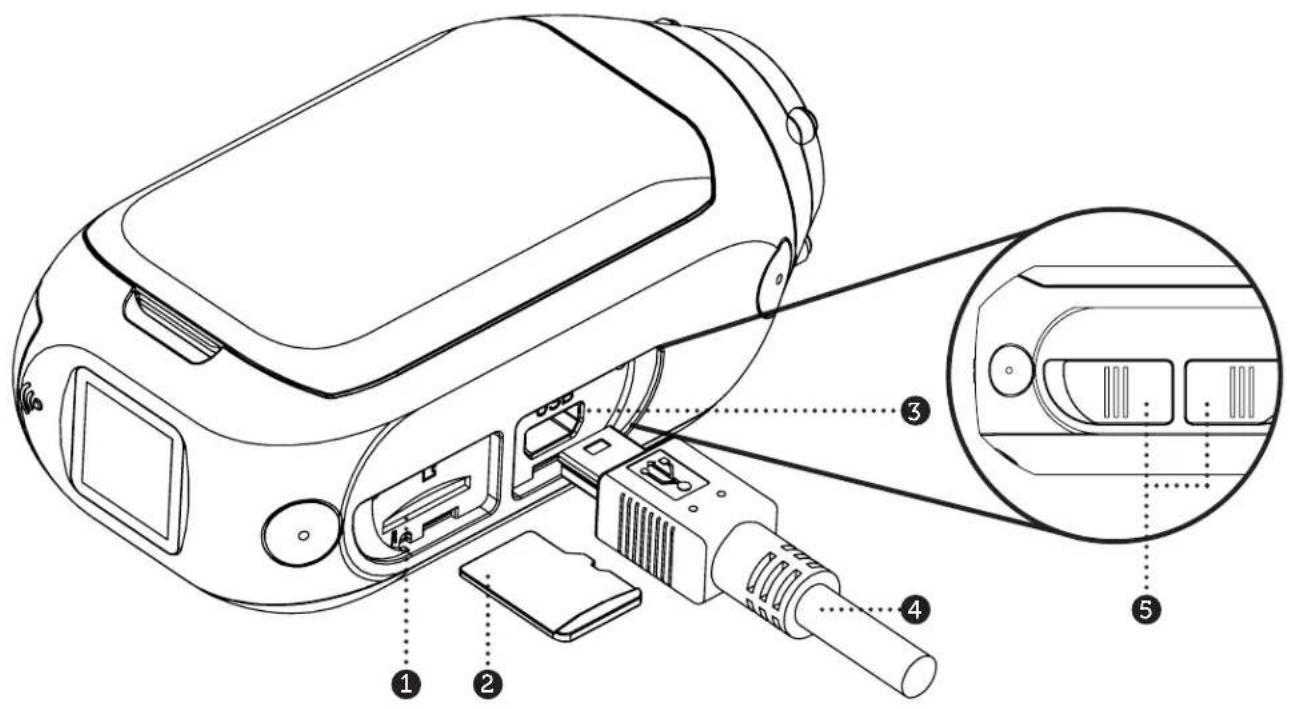
MicroSD Card Slot
M 10 Pin Mini USB Port
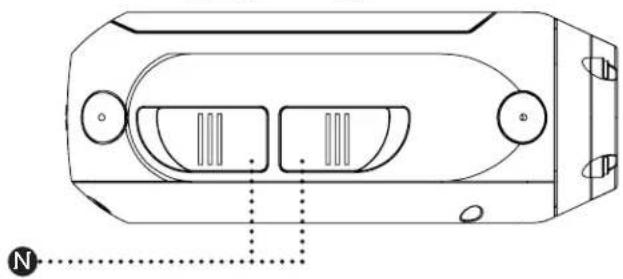
Rubber Cover
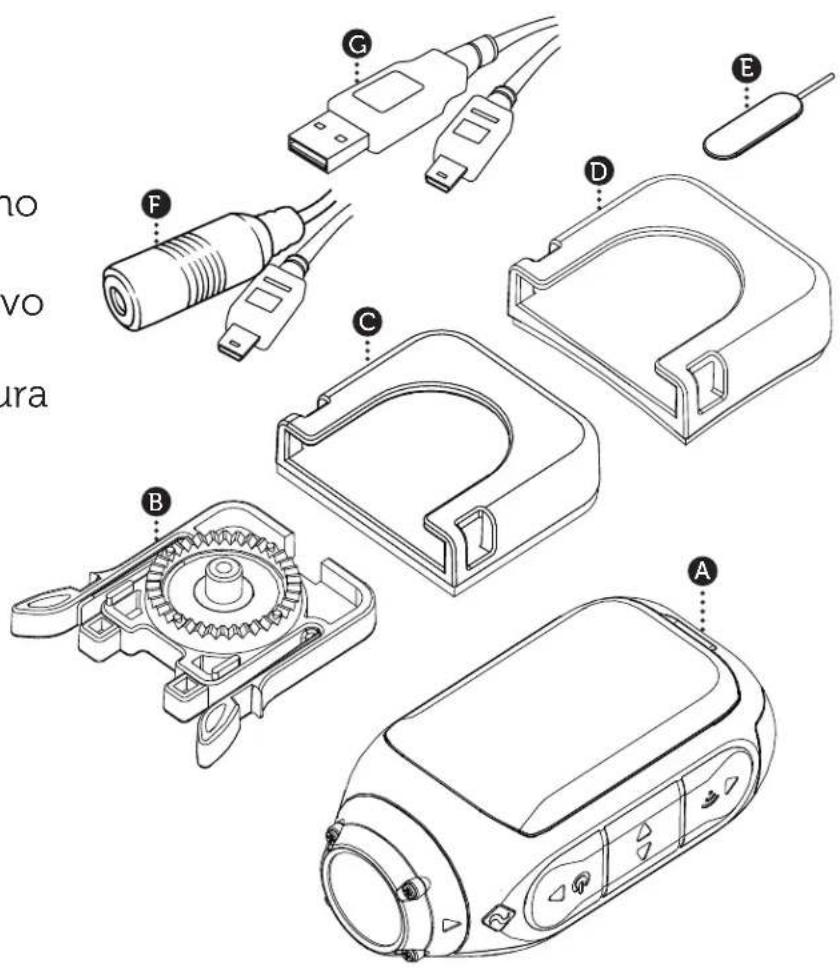
Ghost X Camera
Universal Clip
Flat Adhesive Mount
D Curved Adhesive Mount
Reset Tool
F USB-Mic Converter
G MiniUSB Cable

- Uncover the microSD slot by lifting its rubber cover.
- Insert a Class 10 or higher microSD/HC/XC card (up to 128GB). Format before first usage!
- Uncover the mini USB port by lifting its rubber cover
- Connect the camera via a mini USB cable to a powered USB port, and charge the battery for 2.5 hours before first use.
- Replace the rubber covers securely to cover both the microSD slot and mini USB port. You are ready to go!
Getting Started

POWER ON/OFF
- Press and hold the button to power on.
- The Rear Screen will power on, showing the welcome display.
- The camera is now ready to record video or take photos.
- Current camera mode is indicated by the colour of the Status LED and Rear Screen, along with the icon in the top left of the Rear Screen.
- To power off, press and hold the button for 3 seconds.
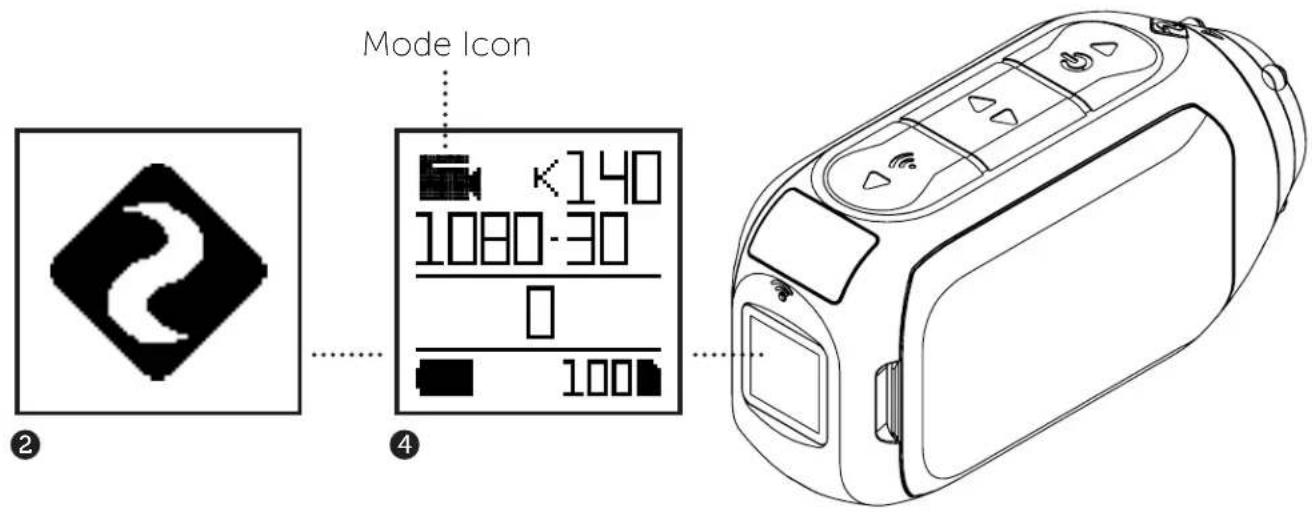
MODE NAVIGATION
To change the current camera recording mode, press the button; changing between Video, Photo, Timelapse, Photoburst, and General Settings modes.

VIDEO MODE
(Green LED) Press the button to start recording. The Status LED and LCD backlight will flash red to indicate recording. Press the button again to stop recording.
VIDEO SETTINGS
- Resolution
Frame Rate

PHOTO MODE
(Yellow LED) The camera will capture still images when the button is pressed, and the status LED and LCD screen will flash red each time a photo is captured.
PHOTO SETTINGS
- Resolution

TIMELAPSE MODE
(Purple LED) Press the button to capture a series of still images at a specified rate. The Status LED and LCD screen will flash red each time an image is captured. To stop recording, press the button once more.
TIMELAPSE SETTINGS
- Resolution
- Timelapse Interval

PHOTOBURST MODE
(Cyan LED) The camera will capture a burst of still images for an allotted duration and at a specified rate, when the button is pressed. For best results, use a memory card with the highest possible data rate.
PHOTOBURST SETTINGS
- Resolution
- Burst Duration/Capture Rate
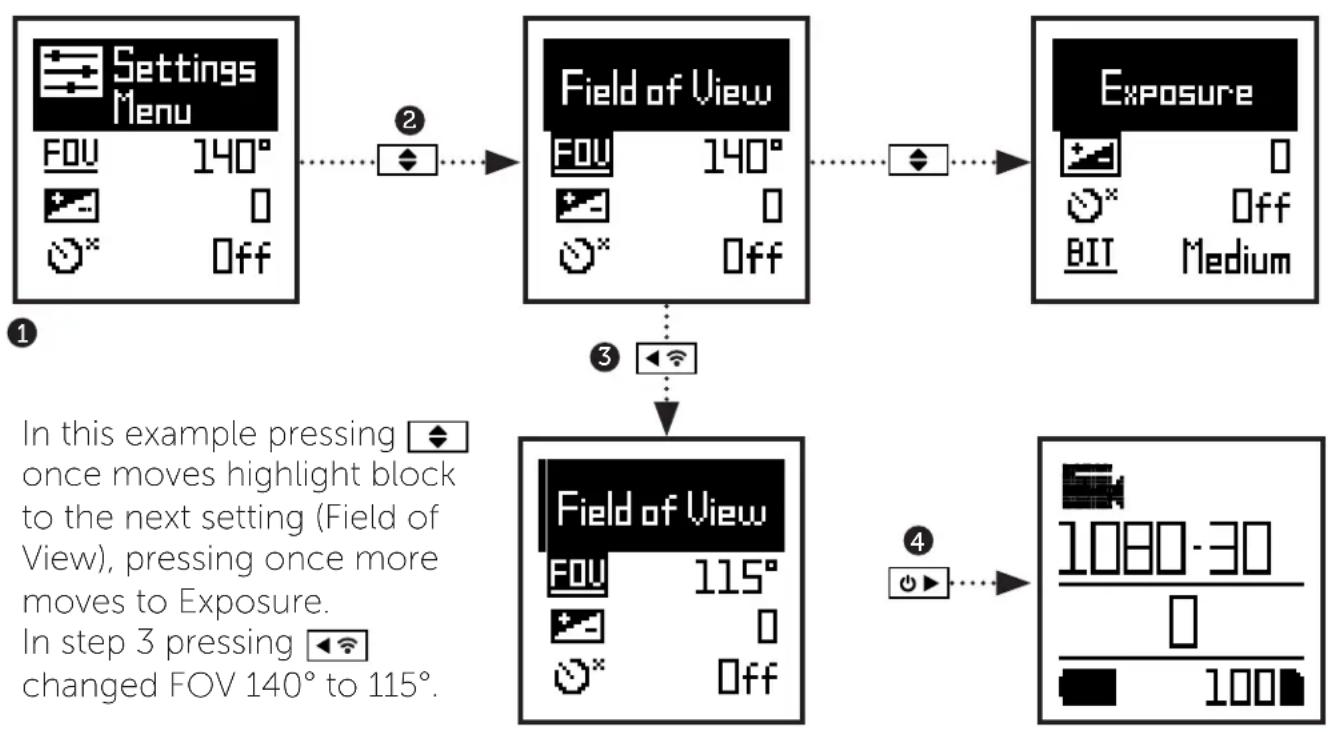
CHANGE SETTINGS
In any mode press the button to highlight a setting.
Press the l button to change the option for the highlighted setting.
SETTINGSMENUNAVIGATION
- On arrival to the settings menu, the highlight black box rests on the top, highlighting the Settings Menu icon as the starting position.
- Press the button to navigate down, this highlights the next setting. Press hold the button to scroll upwards.
- Press the button to change the option for that setting.
- At any time, press the button to change mode (returning to Video).
Wi-Fi
OFF/ON
Field of View
90^ / 115^ / 140^
Exposure
-2/-1/0/+1/+2
Self Timer
OFF/3S/5S/10S
Video Bit Rate
HIGH/MEDIUM/LOW
Video Filter
ISO
100 / 200 / 400 / 800 / AUTO
Video Tagging
OFF/ON
Video Tagging Interval
10S/30S/1MIN/2MIN
Car DVR
OFF/ON
Car DVR Loop Interval
Microphone Sensitivity
OFF/1/2/3/4/5
Speaker Volume
OFF / LOW / MED / HIGH
Status Indicator LED
OFF/ON
Instant Record
OFF/ON
Date
YY/MM/DD HH/mm
Date Stamp
OFF/ON
Camera Off
NEVER / 2MIN / 5MIN / 10MIN / 20MIN
THM Files
ON/OFF
Language
EN / CN
Reset Settings
YES / NO
Format SD Card
YES / NO
Serial Number
XXXXXX
Firmware Version
XXXXXX
Check our official website for firmware updates.
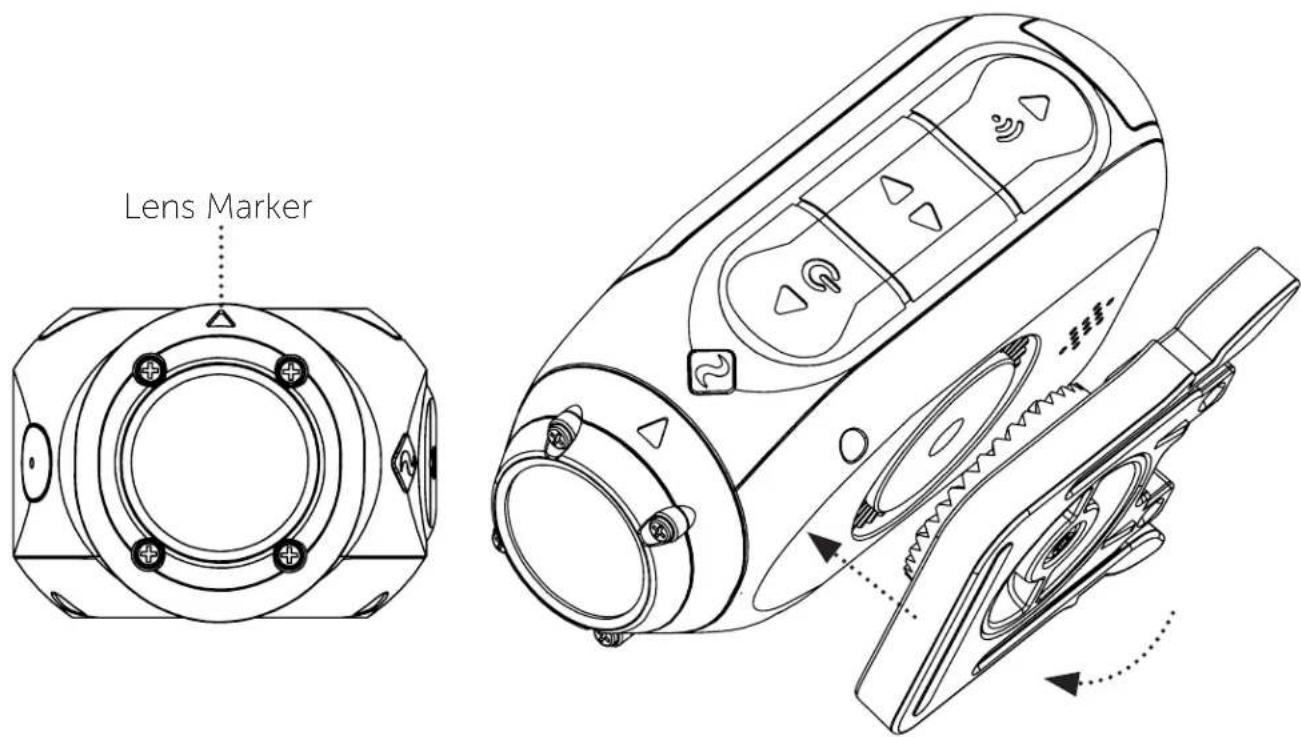
Mounting the Camera
- Attach the Universal Clip to the camera in any 360^ orientation as needed -- first position the clip in the desired orientation, then secure by rotating the screw base by hand.
- Slide the Universal Clip into your chosen mount, ensuring that it 'clicks' into place. *Double check it has been fully inserted by pushing out the clips.
- Align your shot. Rotate the lens by hand, using the lens marker as an 'up' reference, maintaining it perpendicular to the ground for correct orientation.
CAR DVR MODE
This hands-off mode is ideal for insurance and security purposes.
The camera records footage in a continuous loop style (DVR Intervals) recording loop after loop until it fills the MicroSD Card. Once full, the oldest loops will be deleted as the newer ones are saved. The DVR loop interval can be 10s, 30s, 1min, 2min, 5min or 10min.
VIDEO TAGGING
When activated, this feature allows the camera to continuously record video, but only save when important footage is "Tagged".
While recording video, pressing the button will save video from a past and future interval since hitting the button - effectively filming an event which has passed and subsequent developments. For example, with a video tagging interval of 30s selected, the camera will save the previous 30s, and an additional 30s - a total of 1m "tagged" footage.
Video Tagging requires a class 10 micro SD card with 4GB of free space to function correctly.
INSTANT ON MODE
Enabling Instant On Mode allows the camera to turn on, and start recording with a single press of the button.
BIT RATE
Users can choose to keep the normal compression used by the H.264 codec, or if they prefer, allow a higher flow of data for preserving more of the original recording. This will result in a bigger file size.
FILTER
Quickly tailor your cameras settings to the recording conditions with filters.
Choose between Normal / Vivid / Low Light .

PIVOT MOUNT
Mountable anywhere at nearly any angle, the Drift Pivot Mount is your tool to capture the moment from any point of view you can imagine. Includes flat and curved adhesives, and can be used together with any other Drift mount.
HANDLEBAR MOUNT
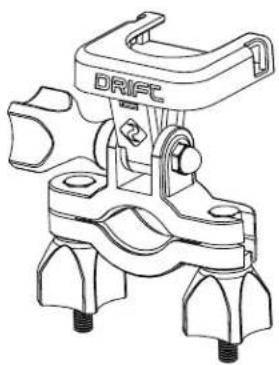
The Drift handlebar mount is the perfect accessory for riders, whatever your discipline. Compatible with bars between 19mm and 36mm, and capable of pivoting more than 180 degrees, the handlebar mount opens up almost any angle for your video.
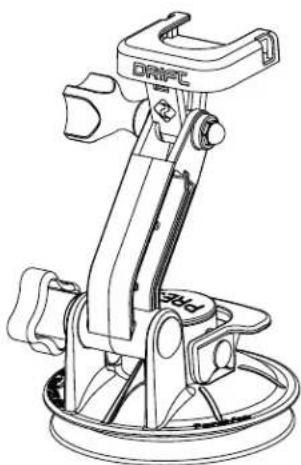
SUCTION CUP MOUNT
The ideal accessory for mounting your Ghost X to any non-porous flat surface. Ideal for use on car windshields or bodywork, the Suction Cup makes it simple to turn, tilt, and rotate your camera 360^ .
按钮。
Wi-Fi can also be turned on via the cameras settings menu.
Setup your shot, capture, playback, edit and live stream on your mobile device.


INSTALLING FIRMWARE
Download the latest firmware from the Drift website and copy the Ghost_X.bin file into the root of a formatted micro SD card. Insert the micro SD card into the camera and power on.
The camera screen will display 'Firmware Updating' as the update is installed. Once complete, the camera will power down.
CONNECTING TO A PC
- Connect the camera using the USB cable (provided); the camera screen will show a USB icon.
- The camera's folder may open automatically; if not, open using My Computer.
- The camera should be recognised as a removable disk; double-click to open.
- Open the DCIM folder to access your files.
CONNECTING TO A MAC
- Connect the camera using the USB cable (provided); the camera screen will show a USB icon.
- The camera's folder may open automatically; if not, open using Finder.
- The camera should be recognised as an external device; double-click to open.
- Open the DCIM folder to access your files.
Video Resolution and Frame Rates:
1080P (1920 X 1080 16:9) 25 / 30 FPS
960P (1280 x 960 4:3) 25/30 FPS
720P (1280 X 720 16:9)
WVGA (854 x 480 16:9)
File format: .MP4 (H.264 codec)
Sensor type: CMOS
Field-of-view (diagonal): 90^ / 115^ / 140^
Lens focal range:
Lens rotation: 330°
Photo mode: 4/8/12 mega-pixels
Exposure: Auto / Step Manual (Advanced Users)
LCD Screen: Color Dot Matrix Backlit LCD
Memory Capacity: Micro SD, SDHC, SDXC memory cards up to 128GB
Specifications
EN
8
Inputs:
Outputs: A/V and HDMI Out via USB Adapter.
Connectivity: USB Plug And Play, Mini USB 10 Pin.
Power:
Wi-Fi Frequency: 2.4GHz
Camera Dimensions: 43 (W) x 82.2 (L) x 31.4 (D) mm
Weight: 120g
Compatibility: Windows XP and up / Mac OS 10.2 and up
For viewing / editing minimum requirements include: 8GB RAM integrated graphics, 4th generation i5 and 17 Intel® Core™ or AMD A10-7800 APU.
Discreet graphics cards starting from GeForce® GTX™ 650, or AMD Radeon™ HD 7000 Series and above.
FCC/CE Information
This device complies with Part 15 of the FCC Rules.
Operation is subject to the following two conditions:
(1) this device may not cause harmful interference, and
(2) this device must accept interference received, including interference that may cause undesired operation.
WARNING
Changes or modifications to this unit not expressly approved by the party responsible for compliance could void the user's authority to operate the equipment.
The equipment has been tested and found to comply with the limits for a Class B digital device, pursuant to Part 15 of the FCC Rules. These limits are designed to provide reasonable protection against harmful interference in a residential installation. This equipment generates, uses, and can radiate radio frequency
energy and, if not installed and used in accordance with the instructions, may cause harmful interference to radio communications. However, there is no guarantee that interference will not occur in a particular installation. If this equipment does cause harmful interference to radio or television reception, which can be determined by powering the equipment on and off, the user is encouraged to try to correct the interference by one or more of the following measures:
Reorient or relocate the receiving antenna; Increase the separation between the equipment and the receiver; Connect the equipment into an outlet on a circuit different from that which the receiver is connected;
Consult the dealer or an experienced radio / TV technician for help.
This device complies with Industry Canada license-exempt RSS standard(s).
Operation is subject to the following two conditions:
(1) this device may not cause interference, and
(2) this device must accept any interference, including interference that may cause undesired operation of the device.
This equipment complies with FCC radiation exposure limits set forth for an uncontrolled environment. This equipment should be installed and operated with minimum distance 20cm between the radiator & your body. This transmitter must not be co-located or operating in conjunction with any other antenna or transmitter.
MOTORCYCLE DISCLAIMER
Interacting with the camera while riding could cause a crash, which may lead to serious injury or death to yourself or others.
- Keep eyes and mind on the road;
- Avoid looking at the camera for any long periods of time
- Stop the vehicle in a safe location before adjusting the camera.
https://driftinnovation.com/
support@driftinnovation.com
GARANTIE
https://driftinnovation.com/warranty
Camera Off NEVER/2MIN/5MIN/10MIN/20MIN
THM Files ON/OFF
Language EN / CN
Reset Settings YES/NO
Format SD Card YES / NO
Serial Number XXXXXX
Firmware Version XXXXX
Video Resolution and Frame Rates:
1080P (1920 X 1080 16:9)
25 / 30 FPS
960P (1280 x 960 4:3)
25/30 FPS
720P (1280 X 720 16:9)
WVGA (854 x 480 16:9)
Format du dossiert:
.MP4 (H.264 codec)
Type du senseur:
CMOS
Champ de vision (diagonale):
90^ / 115^ / 140^
Gamage de lentille focale:
.5m to infinité
Micro SD, SDHC, SDXC
https://driftinnovation.com/
https://driftinnovation.com/warranty
Datum TT/MM/JJ SS/MM
Datumssstempel AUS/EIN
https://driftinnovation.com/
support@driftinnovation.com
GARANTÍA
https://driftinnovation.com/warranty
Puerto MINI USB 10 pines

Cubierta de Goma

Containido del Paquete

A Drift Ghost X
B Clip Universal
Sopporte Adhesivo Plano
Soporte Adhesivo Curvo
E Herramienta de restaura
F Convertidor USB-Microfono
Cable Mini-USB
Download on the App Store

ANDROID APP ON Google play
INSTALACION DE FIRMWARE
CÓMOCONNECTARLA A UNA PC
https://driftinnovation.com/
support@driftinnovation.com
GARANZIA
https://driftinnovation.com/warranty
Camera Spenta MAI / 2MIN / 5MIN / 10MIN / 20MIN
Documenti THM ON/OFF
Lingua EN / CN
Micro SD, SDHC, SDXC schede