
SCR55 - Solar pool reel GRE - Free user manual and instructions
Find the device manual for free SCR55 GRE in PDF.
| Product type | Automatic solar pool cover reel |
| Brand | Gre |
| Model | SCR55 |
| Compatibility | Round, rectangular and oval pools |
| Maximum cover length | 5.50 meters |
| Power supply | Solar panel or electric current (adapter not included) |
| Operating modes | Manual and automatic (electric), with or without timer |
| Main functions | Deployment, retrieval, pause, timer setting |
| Remote control range | 50 meters (operating range) |
| Support type | T-shape or U-shape (depending on installation) |
| Materials | Metal components (M5, M6 screws) and plastic, solar panel |
| Dimensions (approximate) | Length: 120 cm, width: 30 cm, height: 40 cm (estimate) |
| Weight (approximate) | Approximately 15 kg (estimate) |
| Warranty | 2 years, compliance with replacement or repair |
| Maintenance and cleaning | Clean the solar panel with a soft cloth and soapy water; check connections |
| Safety | Automatic stop at end of travel with timer |
| Spare parts and repairability | Spare parts available (screws, brackets, solar panel); repair by certified professional |
| General information | Compliant with environmental standards; recycling via collection points |
Frequently Asked Questions - SCR55 GRE
User questions about SCR55 GRE
0 question about this device. Answer the ones you know or ask your own.
Ask a new question about this device
Download the instructions for your Solar pool reel in PDF format for free! Find your manual SCR55 - GRE and take your electronic device back in hand. On this page are published all the documents necessary for the use of your device. SCR55 by GRE.
USER MANUAL SCR55 GRE
natural_image
Circular logo with stylized 'Gre' lettering on black background (no additional text or symbols)www.grepool.com
Instruction Manual - Manual de Instrucciones
Unfolds to a maximum length of 5.50 m. Suitable for round, square or oval swimming pools.
natural_image
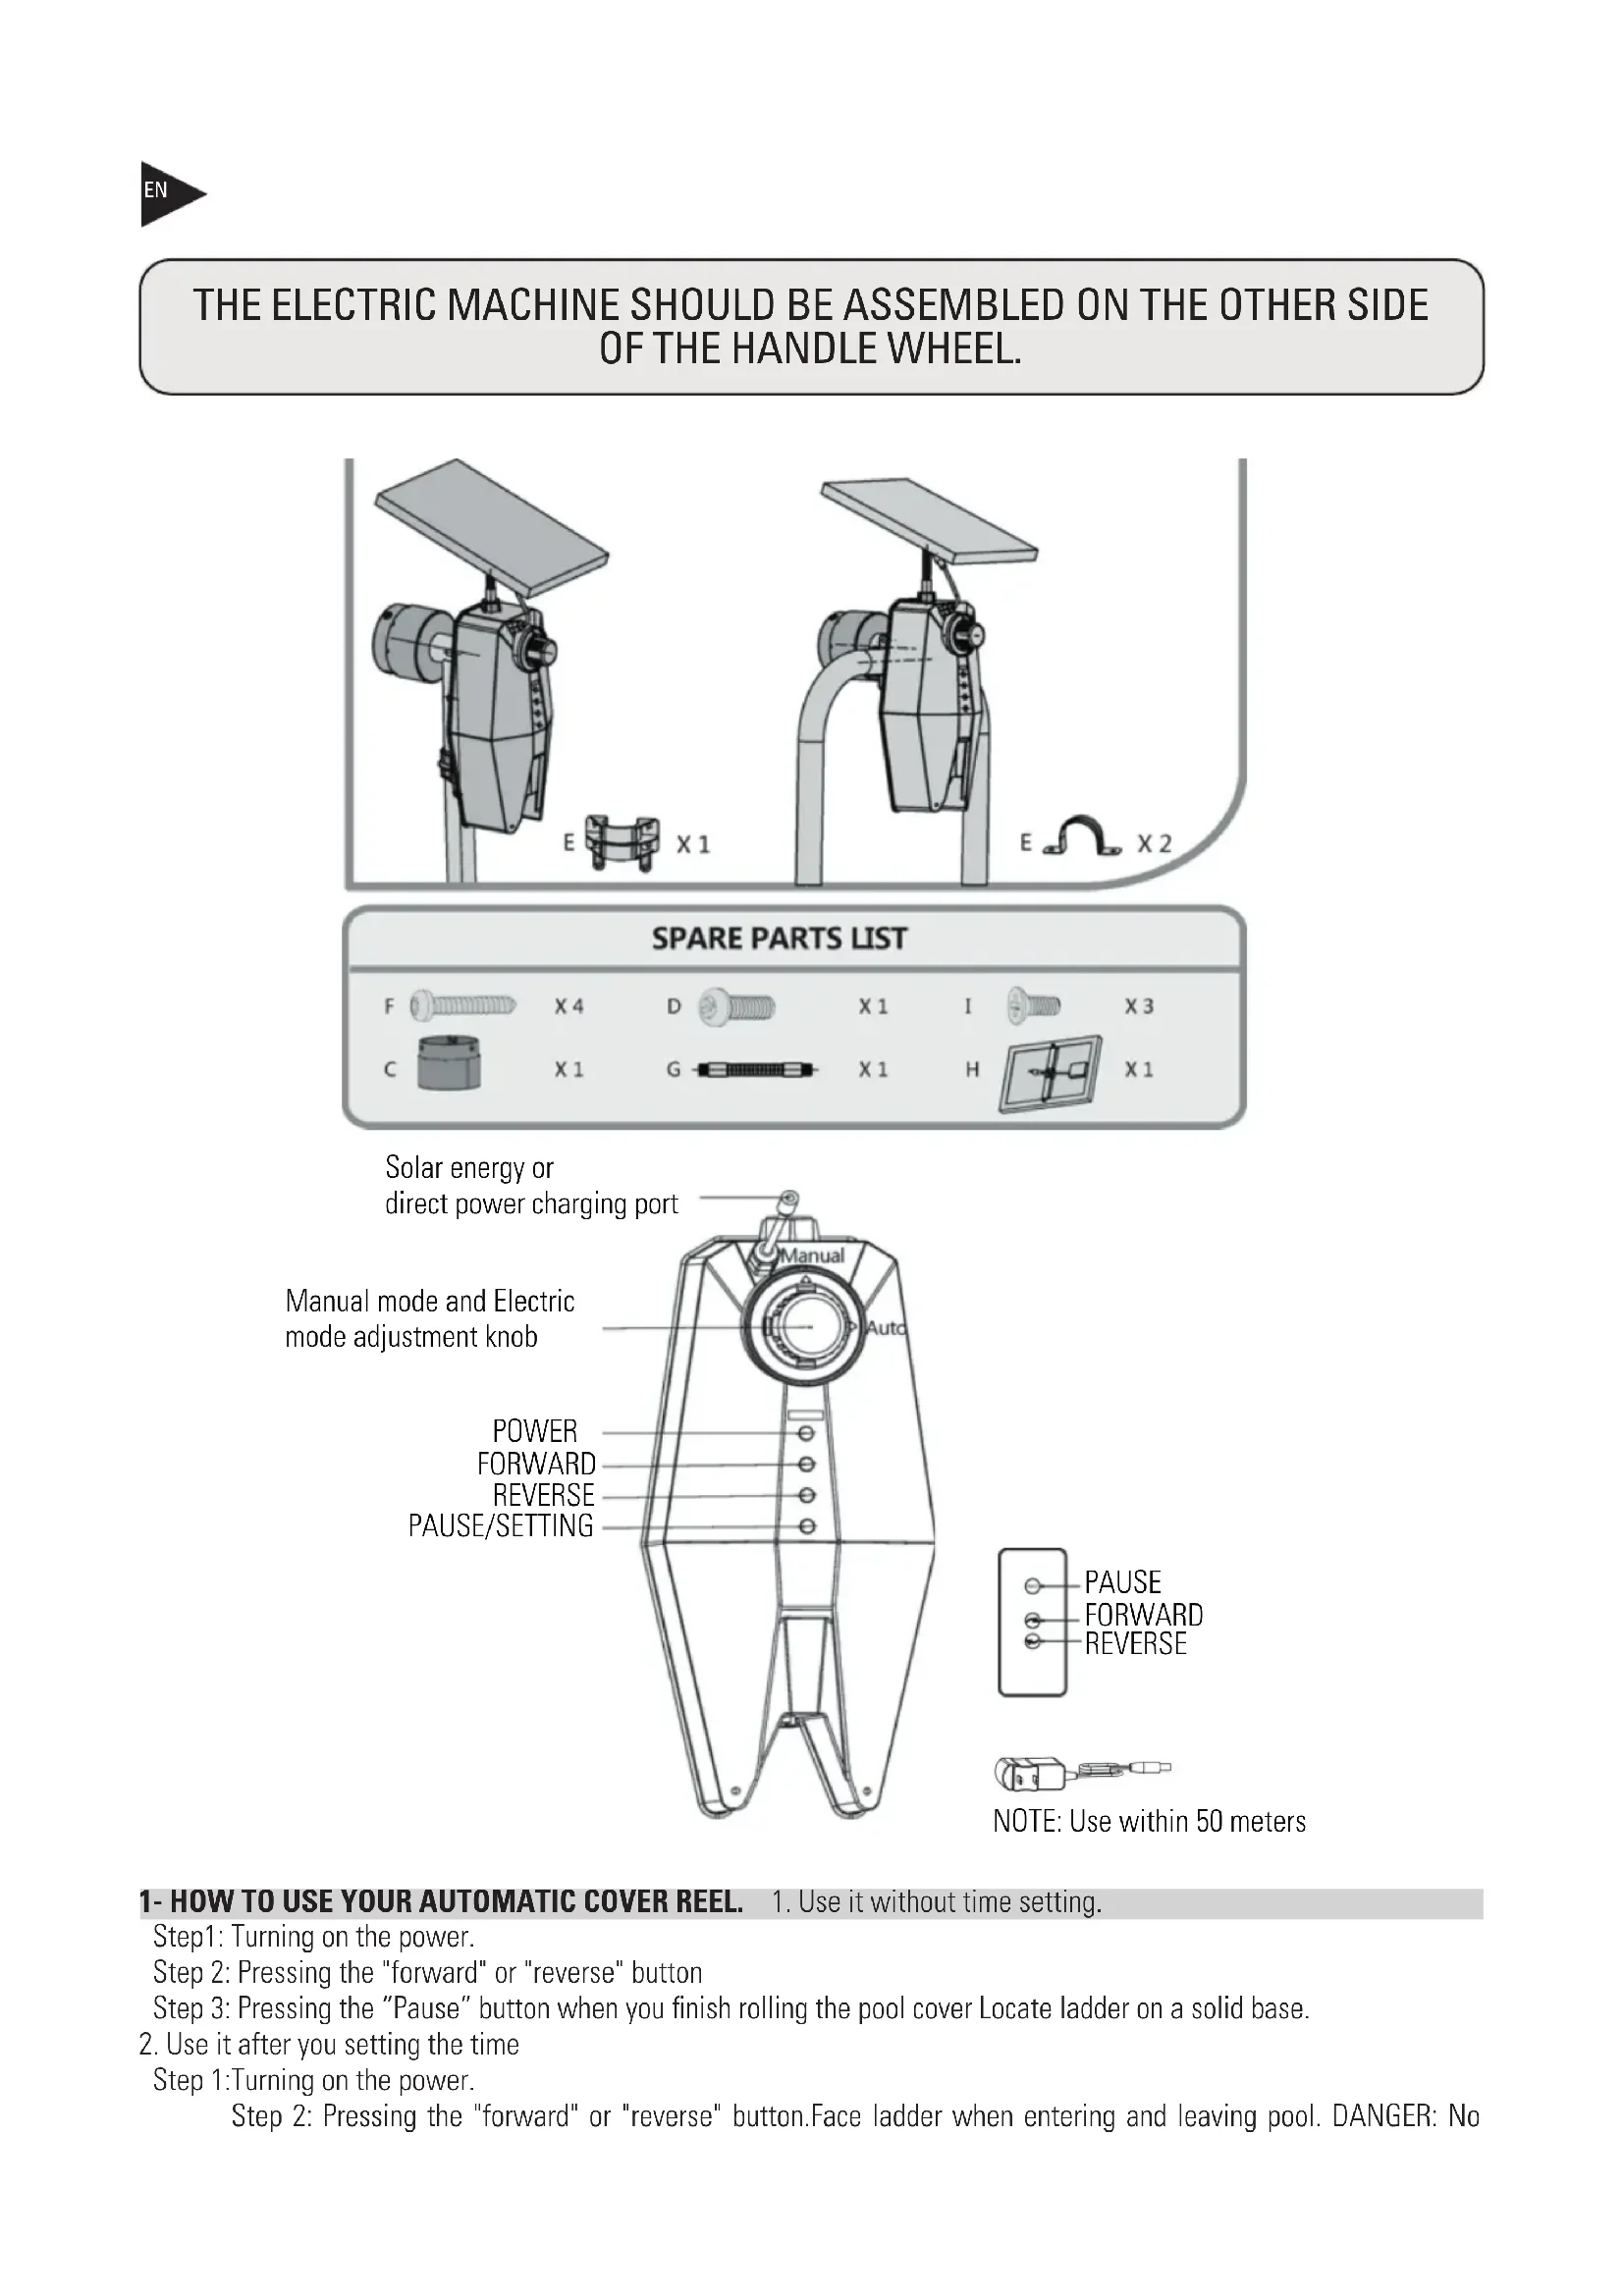
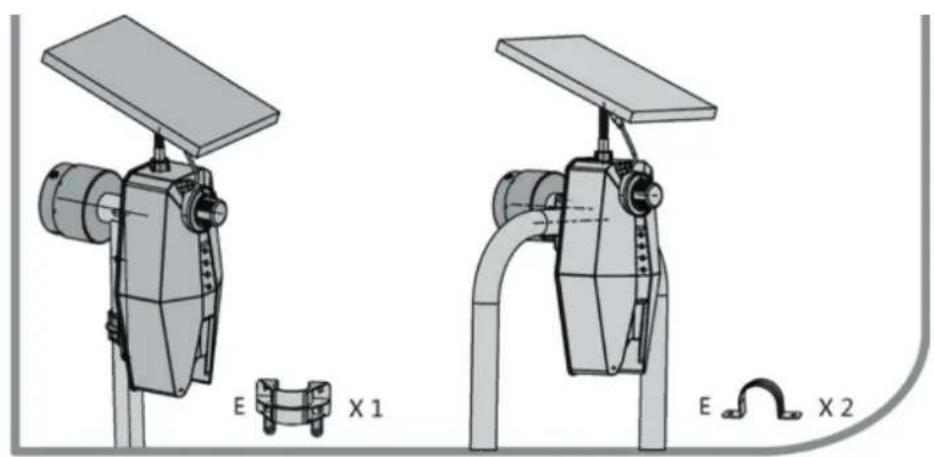
Exterior view of a solar-powered device with mounted sensors and a panel (no text or symbols visible)THE ELECTRIC MACHINE SHOULD BE ASSEMBLED ON THE OTHER SIDE OF THE HANDLE WHEEL.
natural_image
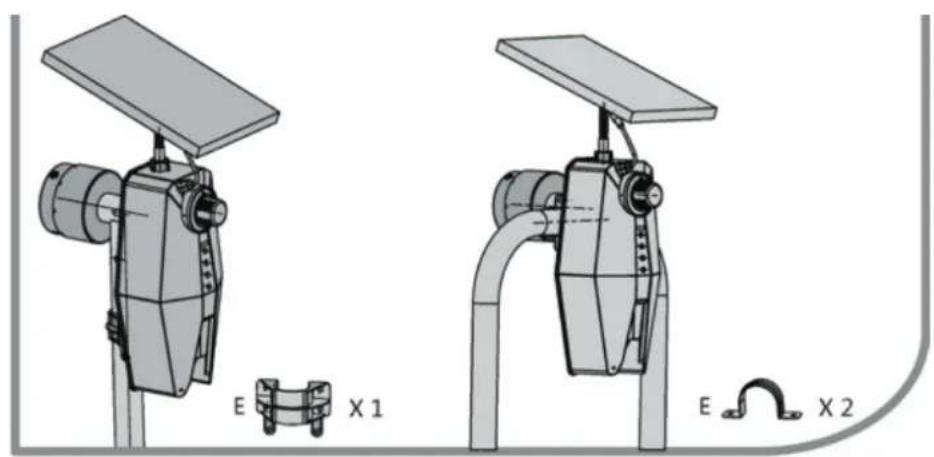
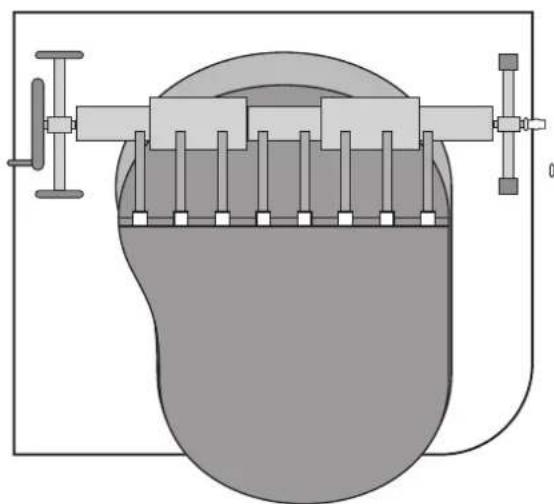
Technical illustration of two industrial equipment setups with solar panels and a mechanical clamp, labeled E X1 and E X2 (no text or symbols on the devices themselves)SPARE PARTS LIST


X1

X3
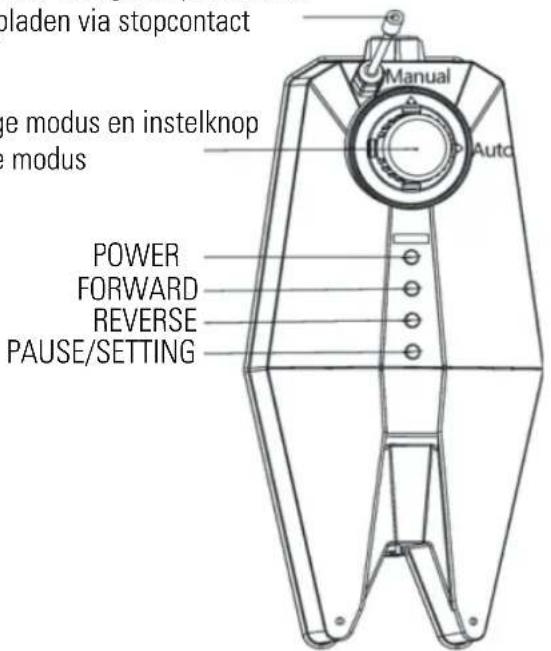
Solar energy or
direct power charging port
Manual mode and Electric mode adjustment knob
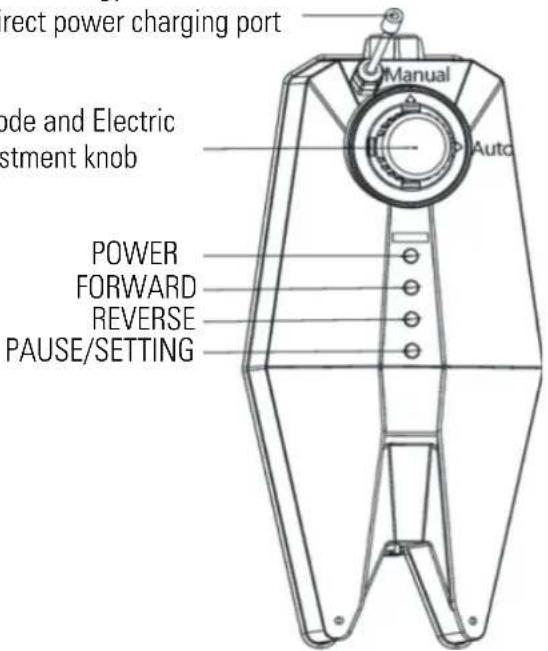
text_image
rect power charging port Manual Auto ode and Electric stment knob POWER FORWARD REVERSE PAUSE/SETTING

NOTE: Use within 50 meters
1- HOW TO USE YOUR AUTOMATIC COVER REEL. 1. Use it without time setting.
Step1: Turning on the power.
Step 2: Pressing the "forward" or "reverse" button
Step 3: Pressing the "Pause" button when you finish rolling the pool cover Locate ladder on a solid base.
- Use it after you setting the time
Step 1: Turning on the power.
Step 2: Pressing the "forward" or "reverse" button.Face ladder when entering and leaving pool. DANGER: No
Jumping or Diving from ladder.
The roller will stop automatically after finishing rolling the cover, you don't need to wait and press the "Pause" button.
2- HOW TO SET THE WORKING TIME.
- Turning on the power.
- Pressing and holding the "Setting" button for three seconds.
- When the power indicator start blinking, then it enters the setting mode.
- Pressing the "forward" or "reverse" button for time keeping until you finish rolling the pool cover.
- Then press the "Setting" botton again.
NOTE: If you want to set time again, repeat these steps. The Forward time and reverse time will be the same after setting the time.
3- HOW TO ASSEMBLE THE ELECTRIC MACHINE ON YOUR MANUAL POOL COVER REEL
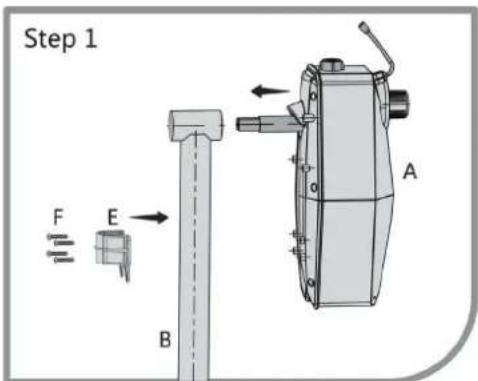
Assemble it on T shape frame pool cover reel.
text_image
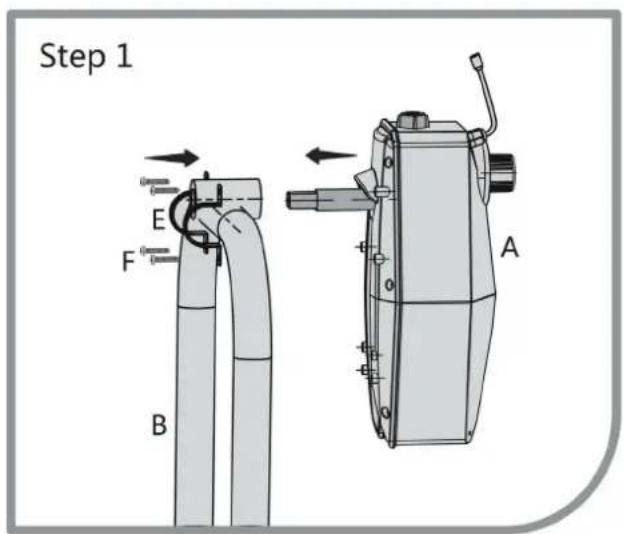
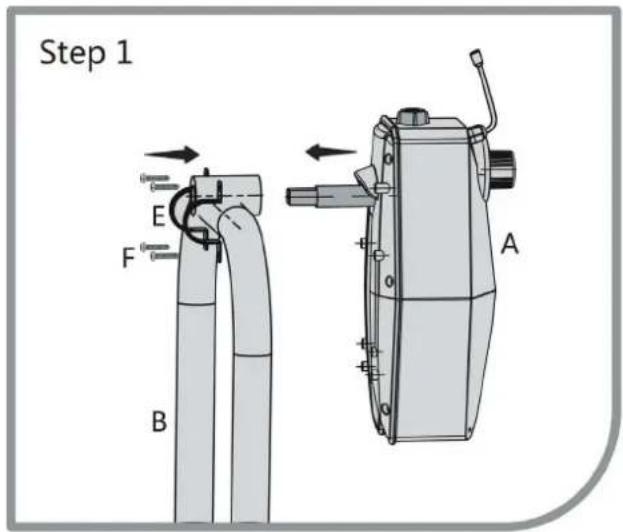
Step 1 F E B A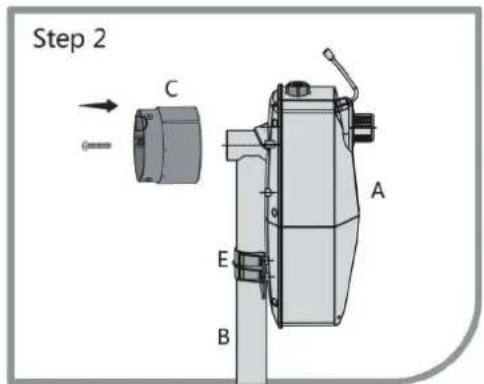
text_image
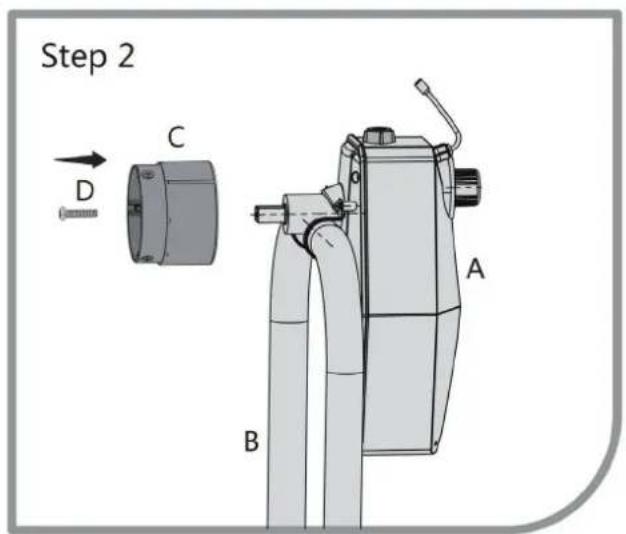
Step 2 C A E BStep 2: Take Part C and connect it with part A, Secure the assembly with the metal screw D (M6 screw).
Step 1: Take part A and inset it into the hole of Part B. Take part E and secure the automatic machine on frame (part B) with four M5 metal screws (part F)
text_image
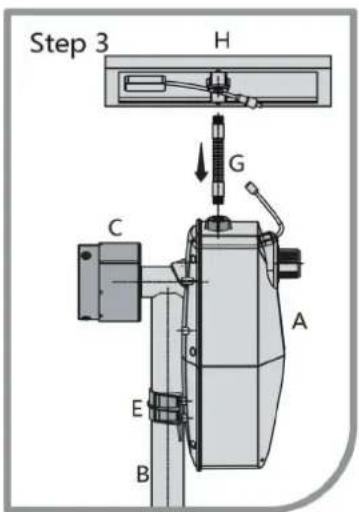
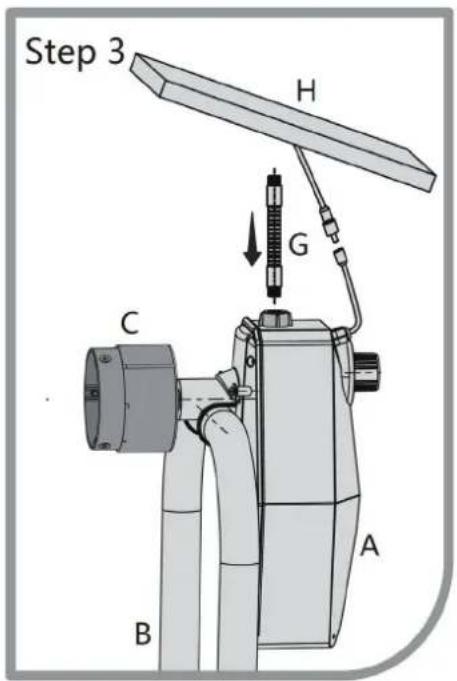
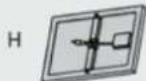
Step 3 H G C A E B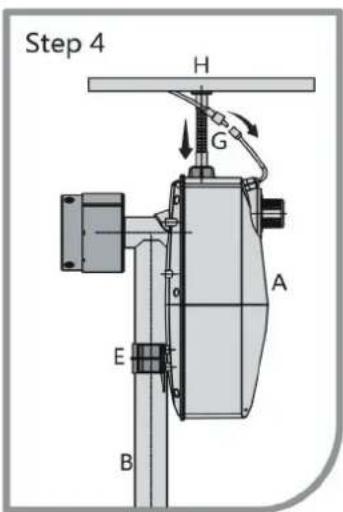
text_image
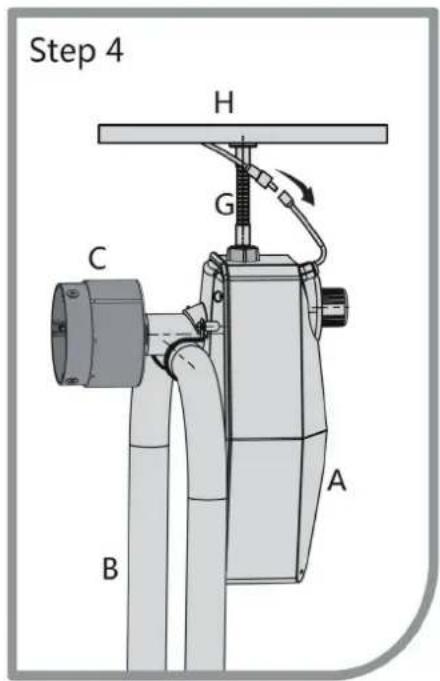
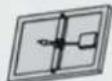
Step 4 H G A E B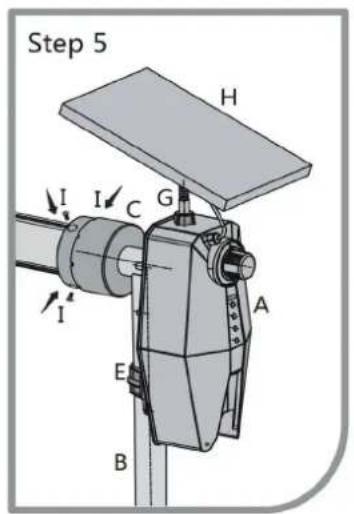
text_image
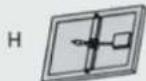
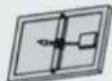
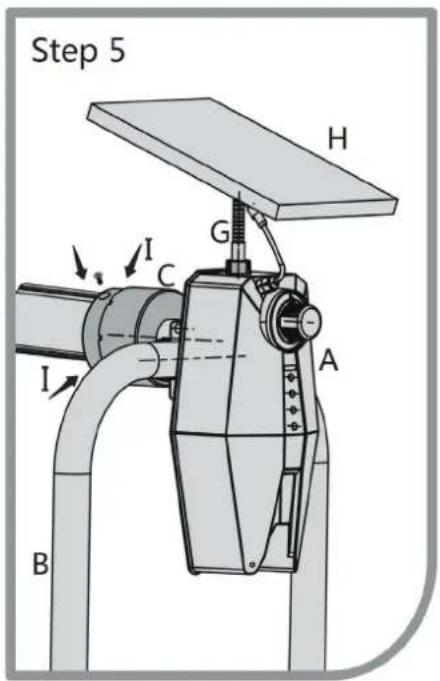
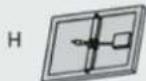
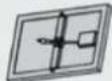
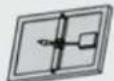
Step 5 H I I C G A E BStep 3: Take part G and insert it into the hole on the top of electric machine. And then connect part H (solar panel) with the other end of part G.
Step 4: Connect the line of part H with the line on electric machine, and then fix the waterproof cap tightly.
Step 5: Fix part C and the tube with Part I
Assemble it on U shape frame pool cover reel.
text_image
Step 1 E F B AStep 1: Take part A and inset it into the hole of Part B. Take part E and secure the automatic machine on frame (part B) with four M5 metal screws (part F).
text_image
Step 2 C D A BStep 2: Take Part C and connect it with part A, Secure the assembly with the metal screw D (M6 screw).
text_image
Step 3 H G C O A B Step 3Step 3: Take part G and insert it into the hole on the top of electric machine. And then connect part H (solar panel) with the other end of part G.
text_image
Step 4 H G C A BStep 4: Connect the line of part H with the line on electric machine, and then fix the waterproof cap tightly.
text_image
Step 5 H G I C A I BStep 5: Fix part C and the tube with Part I
natural_image
Technical illustration of two industrial equipment setups with solar panels and a mechanical clamp, labeled E X1 and E X2 (no text or symbols on the devices themselves)LISTA DE PIEZAS


text_image
Technical diagram of a mechanical device with labeled components A, B, C, and E, showing directional arrows and component positioning.text_image
H G A E B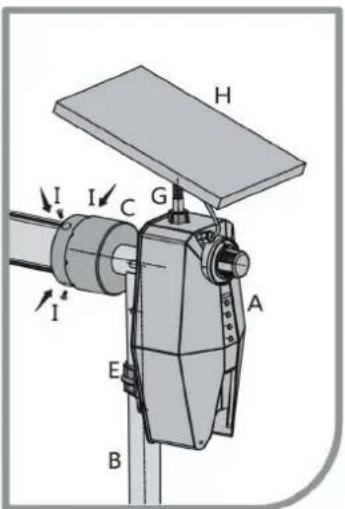
text_image
H I I C G A E Btext_image
H G I C A I Bnatural_image
Technical illustration of two industrial equipment setups with solar panels and a mechanical clamp, labeled E X1 and E X2 (no text or symbols on the devices themselves)LISTE DE PIÈCES


X4
×1


X1
X1
I
H

×3
×1
text_image
H G A E B
text_image
H I I C G A E Btext_image
H G I C A I Bnatural_image
Technical illustration of two mechanical device setups with solar panels and a U-shaped pipe, labeled E X1 and E X2 (no text or symbols on the devices themselves)STÜCKLISTE

text_image
F X 4 D X 1 I X 3 C X 1 G X 1 H X 1text_image
H G A E B
text_image
H I I C G A E Btext_image
H G I C A I Bnatural_image
Technical illustration of two mechanical pump devices with labeled components (X1 and X2), no text or symbols present.text_image
H G A E B
text_image
Technical diagram of a mechanical device with labeled components and directional arrows indicating motion or force directions.text_image
H G I C A I Bnatural_image
Technical illustration of two industrial equipment setups with solar panels and a mechanical clamp, labeled E X1 and E X2 (no text or symbols on the devices themselves)LIJST LOSSE COMPONENTEN


X4
×1


×1
X1
I
H

X3
X1
Zonne-energie of poort direct opladen via stopcontact
Handmatige modus en instelknop Elektrische modus
text_image
pladen via stopcontact e modus en instelknop modus POWER FORWARD REVERSE PAUSE/SETTING Manual Auto
text_image
Stap 1 F E B A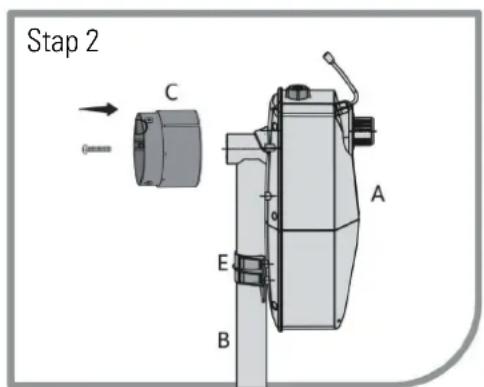
text_image
Step 2 C A E Btext_image
Stap 3 Stap 4 Stap 5 G C A E B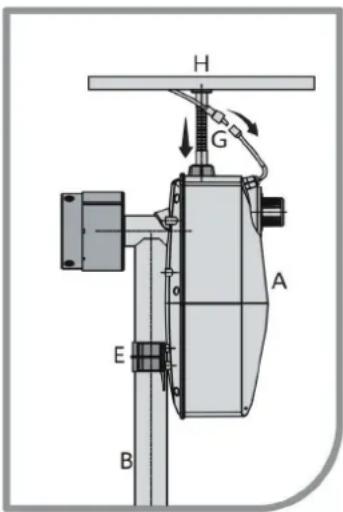
text_image
H G A E B
text_image
H I I C G A E Btext_image
Stap 1 E F B Atext_image
H G I C A I Bnatural_image
Technical illustration of two industrial equipment setups with solar panels and a mechanical clamp, labeled E X1 and E X2 (no text or symbols on the devices themselves)text_image
H G A E B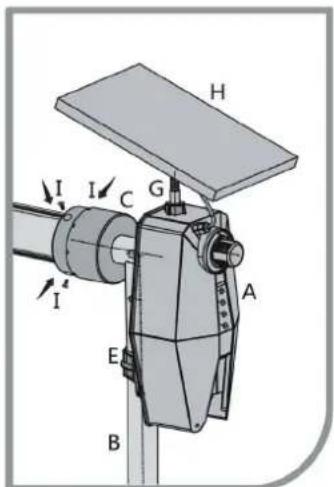
text_image
H I I C G A E Btext_image
H G I C A I Bnatural_image
Technical illustration of two industrial equipment setups with solar panels and a mechanical clamp, labeled E X1 and E X2 (no text or symbols on the devices themselves)LISTA ELEMENTÓW


text_image
H G A E Btext_image
H I I C G A E Btext_image
H G I C A I Bnatural_image
Technical illustration of two mechanical pump devices labeled X1 and X2, showing internal components and mounting brackets (no text or symbols beyond labels)LISTA ELEMENTÓW


text_image
H G A E Btext_image
H I I C G A E Btext_image
H G I C A I Bnatural_image
Technical illustration of two industrial equipment setups with solar panels and a mechanical clamp, labeled E X1 and E X2 (no text or symbols on the devices themselves)LISTA ELEMENTÓW


text_image
H G A E Btext_image
H I I C G A E BKrok 5: Pripevnite diel C a hadičku s
Namontujte ho na navijak rámu krytu bazéna v tvare U.
Krok 1
text_image
Step 1 E F B Atext_image
H G I C A I BKrok 5: Diel C a potrubie pripevnite k dielu I
MASINA ELECTRICA TREBUIE ASAMBLATA PE CEALALTA LATURA A ROTII MANUALE.
natural_image
Technical illustration of two industrial equipment setups with solar panels and a mechanical clamp, labeled E X1 and E X2 (no text or symbols on the devices themselves)LISTA ELEMENTÓW


×1

×3
text_image
H G A E Btext_image
H I I C G A E Btext_image
H G I C A I Bnatural_image
Technical illustration of two industrial equipment setups with solar panels and a mechanical clamp, labeled E X1 and E X2 (no text or symbols on the devices themselves)FÖRTECKNING RESERVDELAR


text_image
H G A E Btext_image
H I I C G A E Btext_image
H G I C A I Bnatural_image
Black-and-white photo of a solar-powered installation on a wooden deck, with a worker monitoring the installation (no visible text or symbols)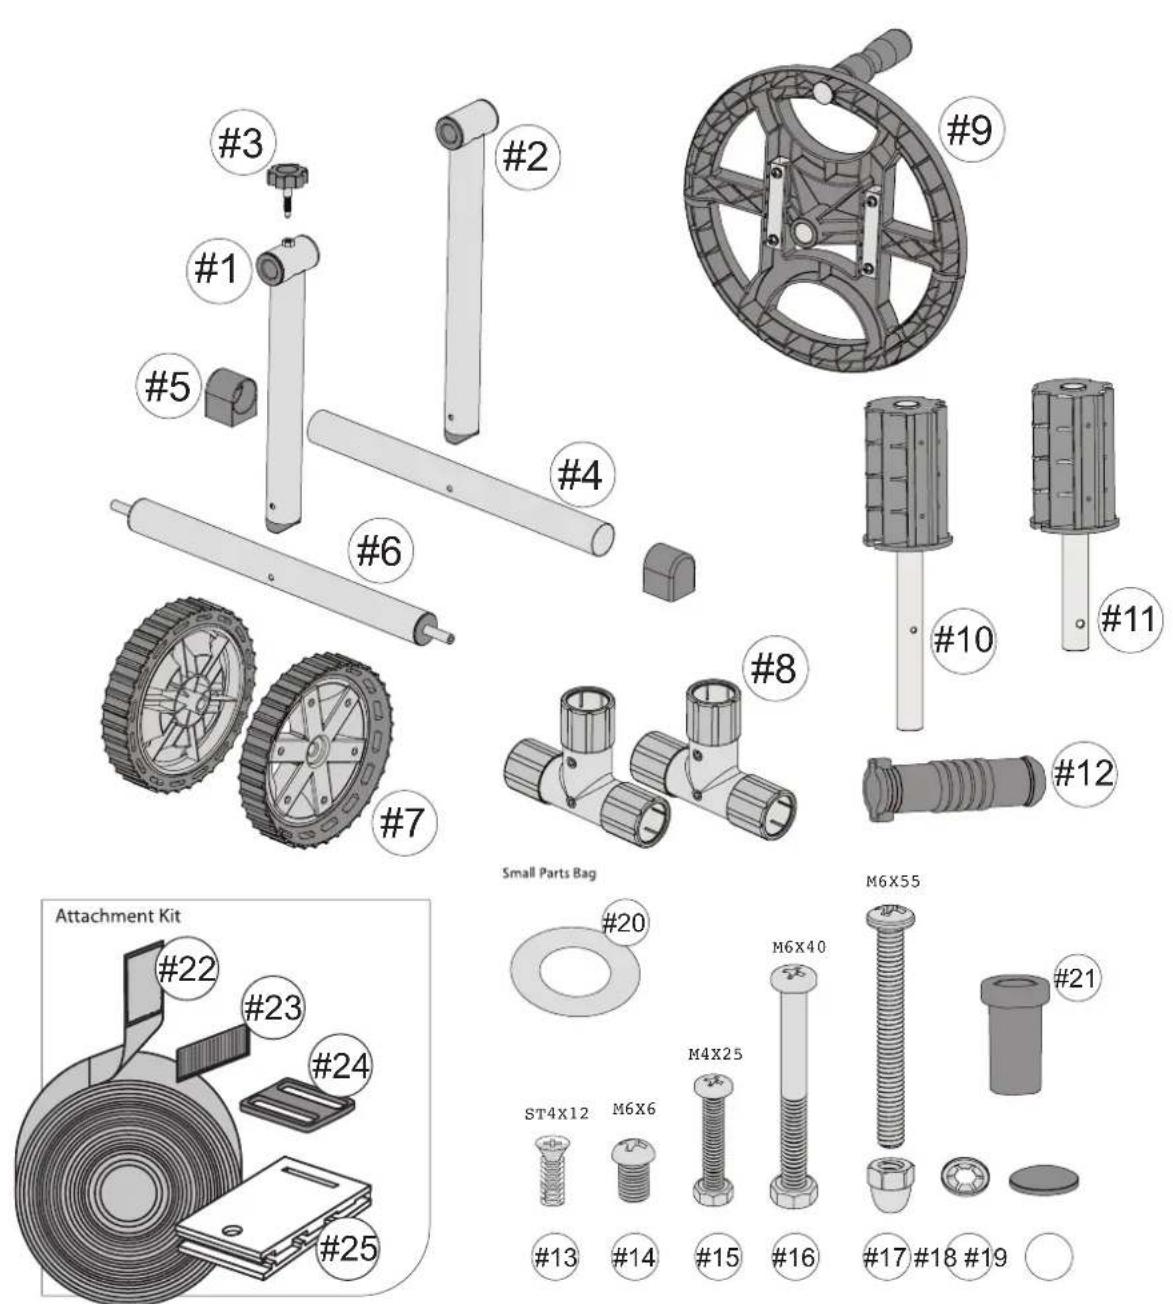
text_image
Exploded view diagram of a small mechanical assembly with numbered parts and labeled parts like wheel rim, hose, and washer.
| Ref | Qty |
| #1 | 1 |
| #2 | 1 |
| #3 | 1 |
| #4 | 1 |
| #5 | 2 |
| #6 | 1 |
| #7 | 2 |
| #8 | 2 |
| #9 | 1 |
| #10 | 1 |
| #11 | 1 |
| #12 | 1 |
| #13 | 4 |
| #14 | 6□ / 12□ |
| #15 | 1 |
| #16 | 1 |
| #17 | 4 |
| #18 | 2 |
| #19 | 2 |
| #20 | 1 |
| #21 | 1 |
| #22 | 8 |
| #23 | 8 |
| #24 | 8 |
| #25 | 8 |
text_image
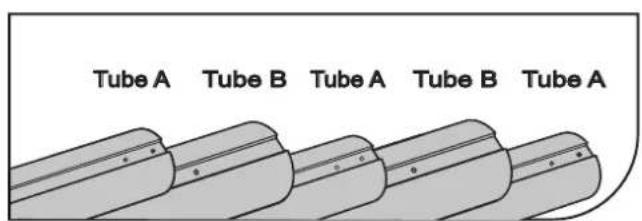
Tube A Tube B Tube A Tube B Tube A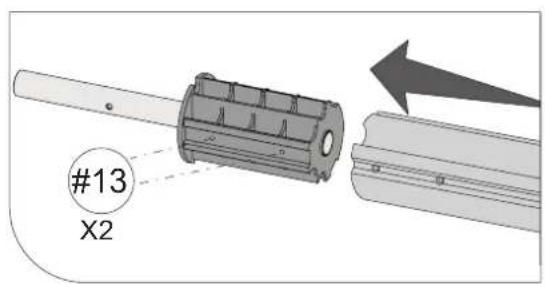
text_image
#13 X2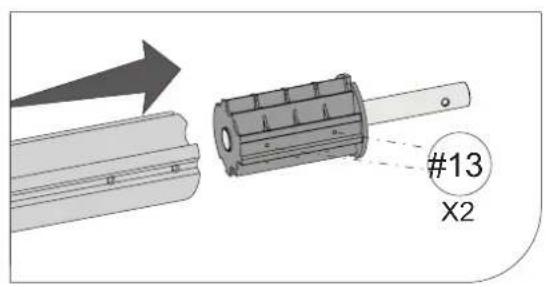
text_image
#13 X2
text_image
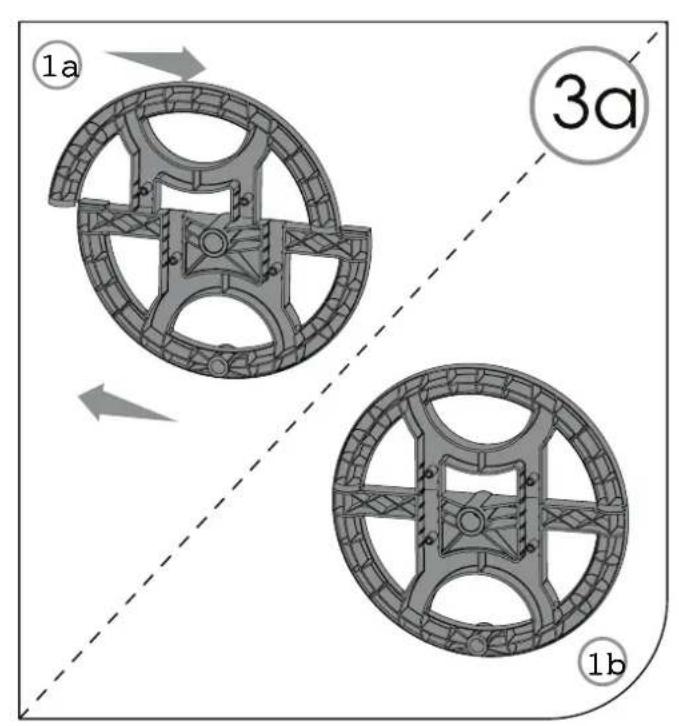
1a 3a 1b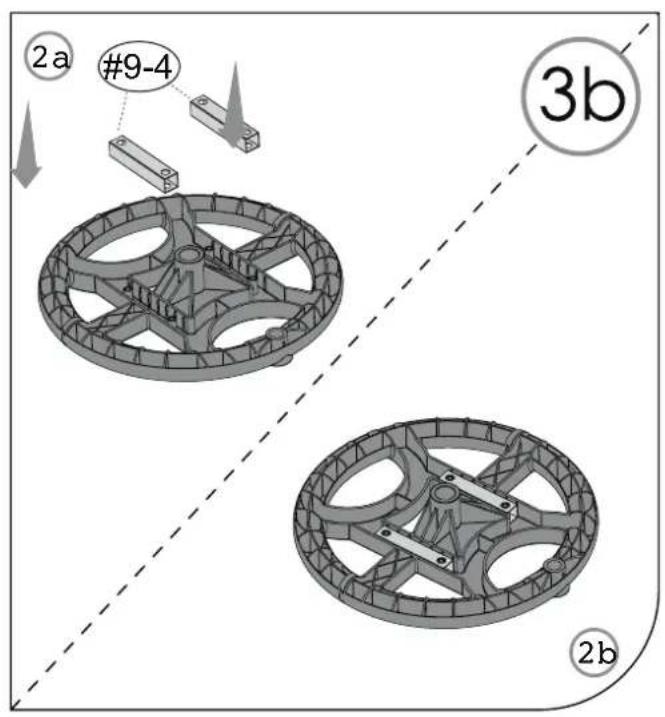
text_image
2a #9-4 3b 2b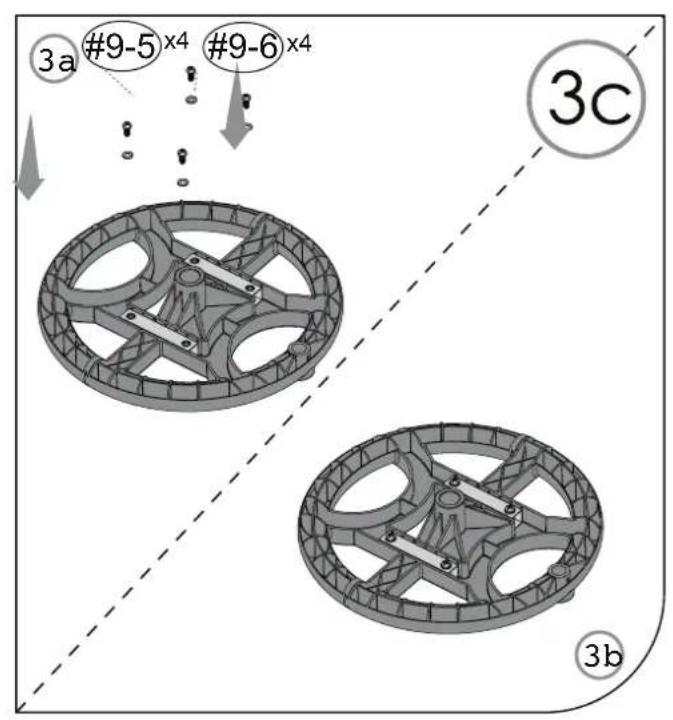
text_image
3a #9-5 x4 #9-6 x4 3c 3b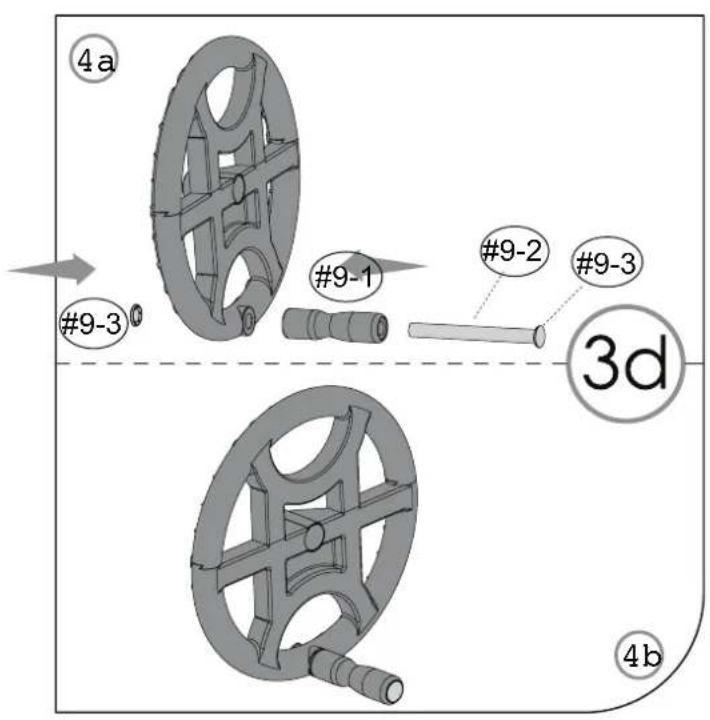
text_image
4a #9-3 #9-1 #9-2 #9-3 3d 4b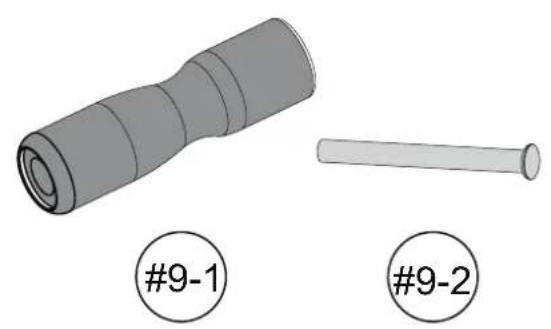
natural_image
Two mechanical components labeled #9-1 and #9-2, shown in grayscale with no visible text or symbols on the parts themselves.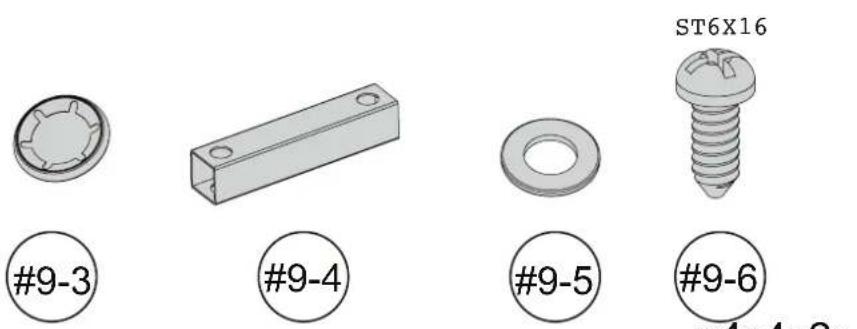
text_image
#9-3 #9-4 #9-5 #9-6 ST6X16 x4x4x2x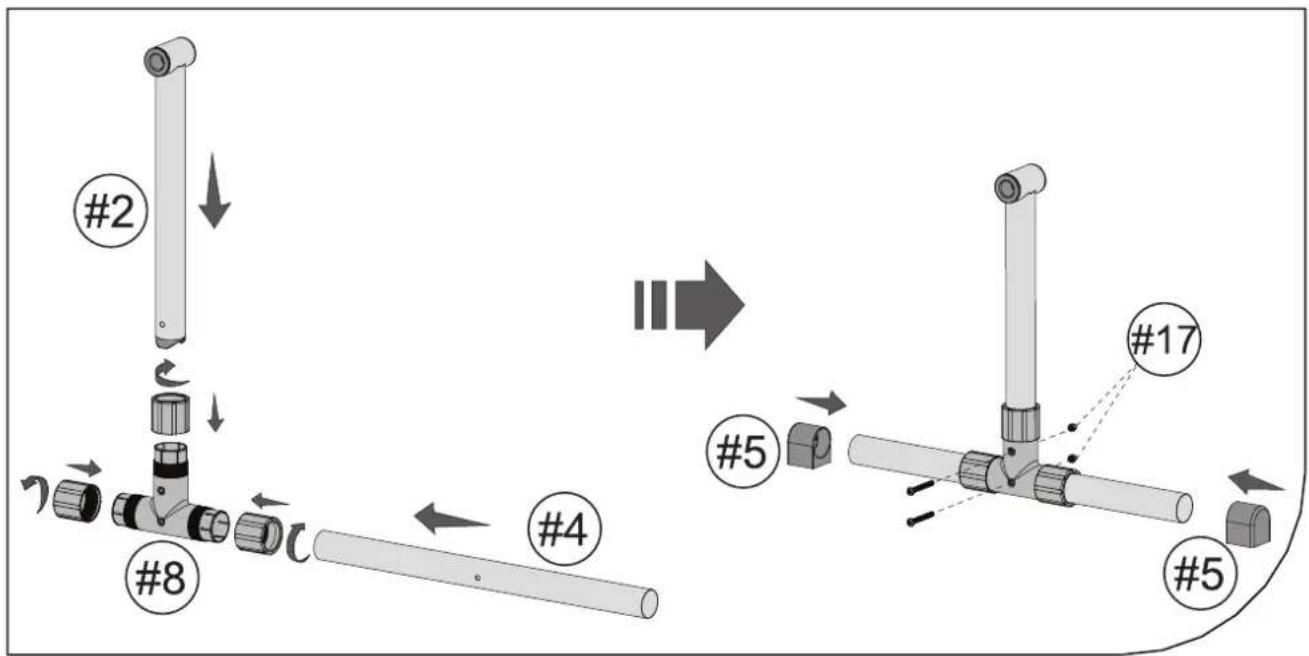
flowchart
graph TD
    A["Step #2"] --> B["Assembly #8"]
    B --> C["Step #4"]
    C --> D["Step #5"]
    D --> E["Step #17"]
    E --> F["Assembly #5"]
    style A fill:#f9f,stroke:#333
    style B fill:#ccf,stroke:#333
    style C fill:#cfc,stroke:#333
    style D fill:#fcc,stroke:#333
    style E fill:#cff,stroke:#333
    style F fill:#ffc,stroke:#333


flowchart
graph TD
    A["#1"] --> B["#8"]
    B --> C["Rotation"]
    C --> D["#6"]
    D --> E["#7"]
    E --> F["#3"]
    F --> G["#17"]
    G --> H["#7"]
    style A fill:#f9f,stroke:#333
    style B fill:#f9f,stroke:#333
    style C fill:#f9f,stroke:#333
    style D fill:#f9f,stroke:#333
    style E fill:#f9f,stroke:#333
    style F fill:#f9f,stroke:#333
    style G fill:#f9f,stroke:#333
    style H fill:#f9f,stroke:#333

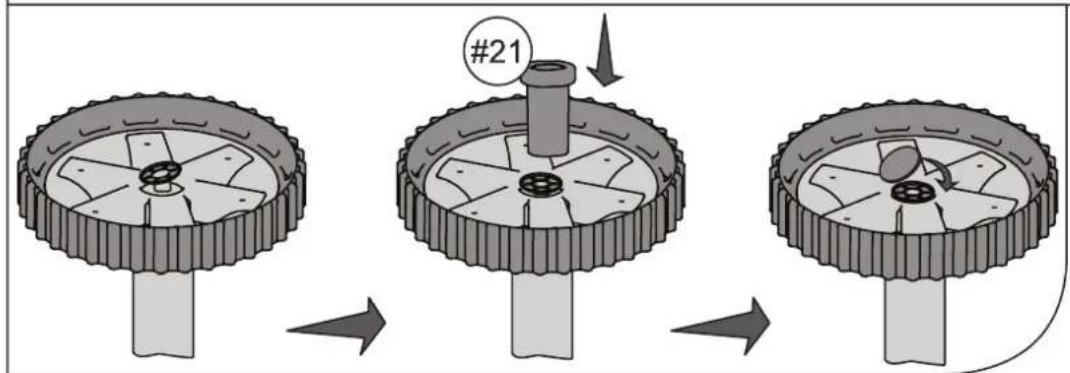
text_image
#21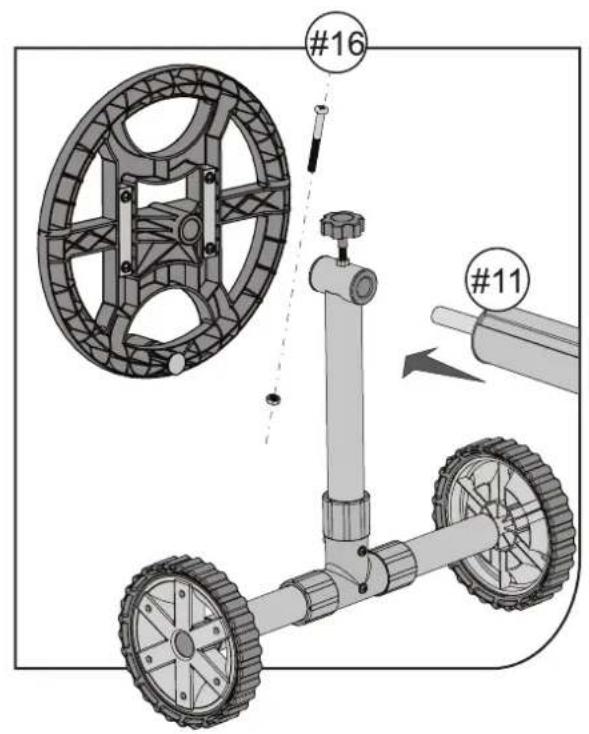
text_image
#16 #11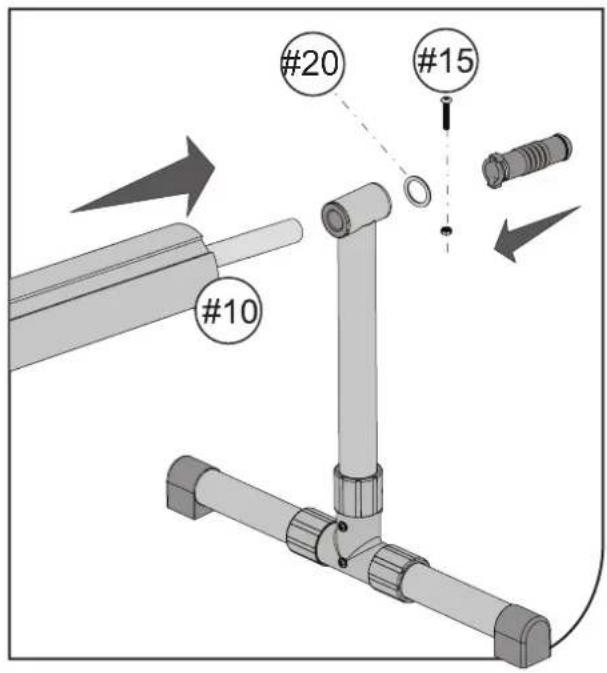
text_image
#10 #20 #15
text_image
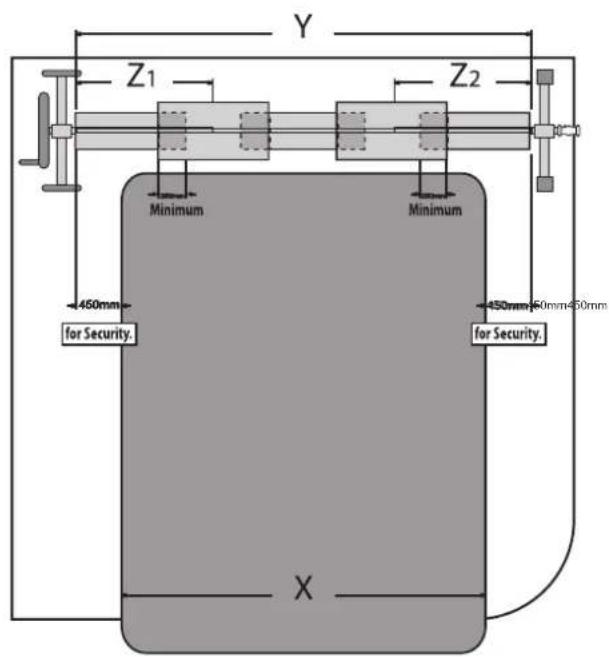
Y Z1 Z2 Minimum Minimum 450mm for Security. 450mm 60mm-60mm for Security. X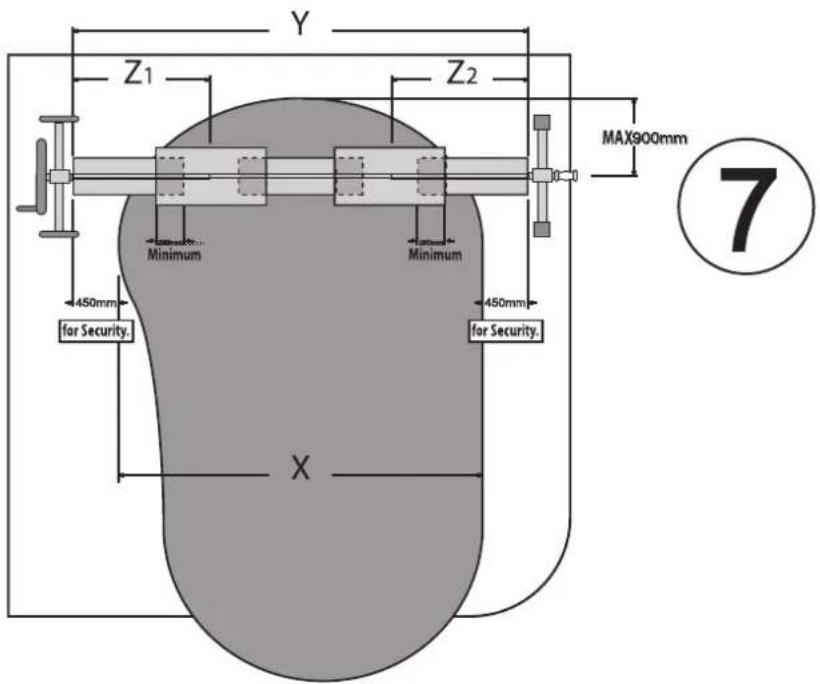
text_image
Y Z1 Z2 MAX900mm Minimum Minimum 450mm for Security. 450mm for Security. X 7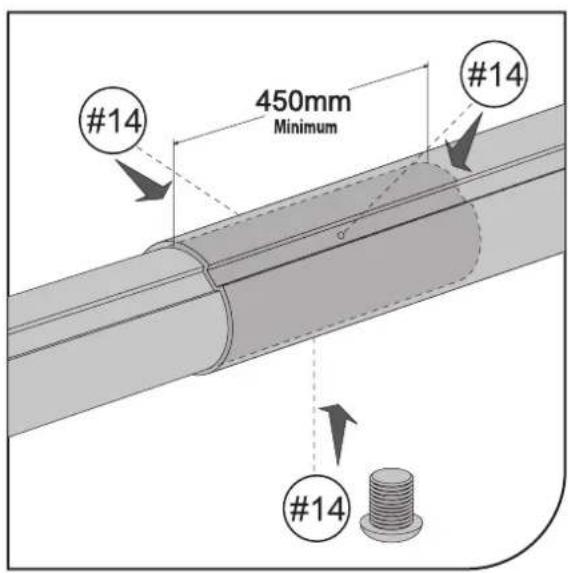
text_image
#14 450mm Minimum #14 #14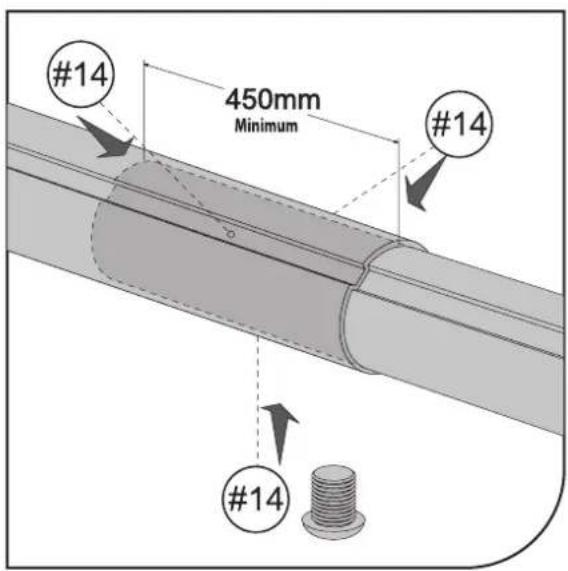
text_image
#14 450mm Minimum #14 #14
natural_image
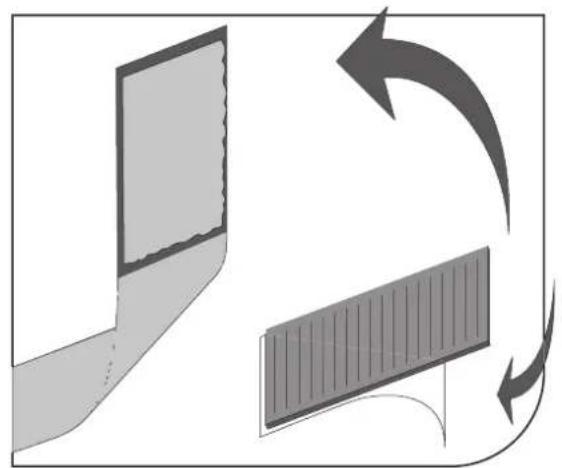
Diagram showing two panels with curved arrows indicating rotation or flow, no text or symbols present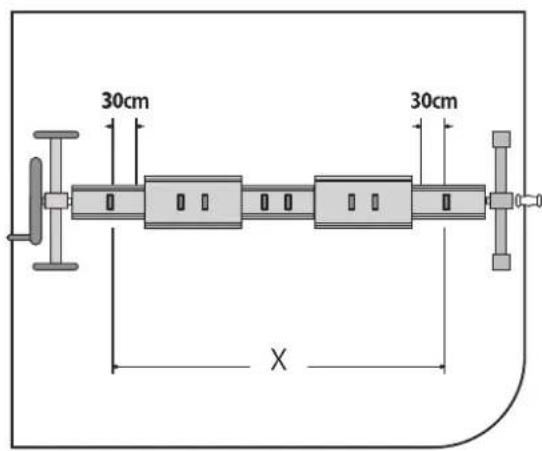
text_image
30cm 30cm X9
natural_image
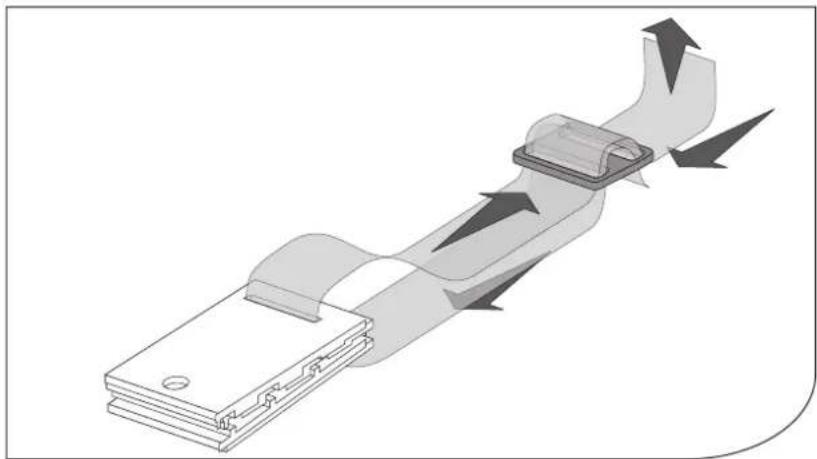
Diagram of a mechanical assembly with directional arrows indicating motion or flow (no text or symbols)10
natural_image
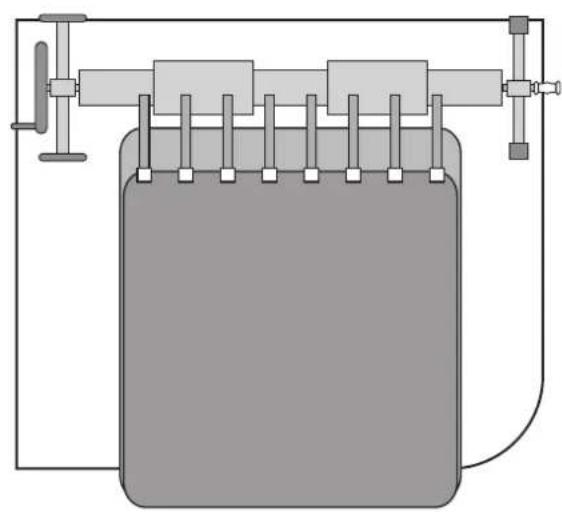
Simple line drawing of a mechanical device with a rectangular block and connecting rods (no text or symbols)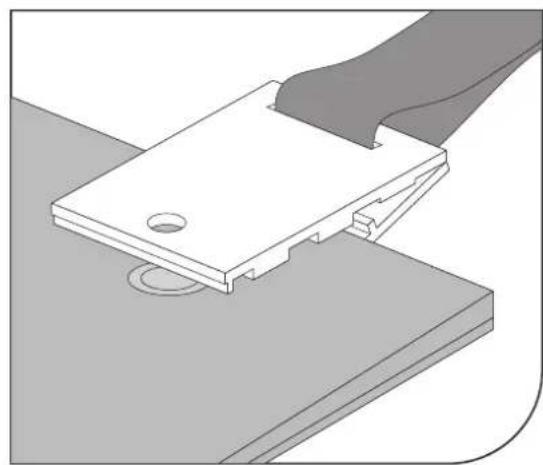
natural_image
3D illustration of a mechanical component with a handle and mounting base (no text or symbols)11 a
natural_image
Pure mechanical diagram of a cylindrical device with internal components and no text or symbols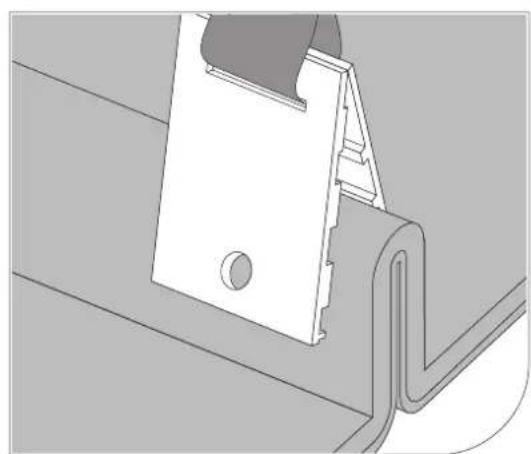
natural_image
Technical diagram of a mechanical clamp or bracket assembly (no text or symbols visible)11b
1- GUARANTEE CERTIFICATE
GENERAL TERMS
- In accordance with these provisions, the seller guarantees that the product corresponding to this guarantee ("the Product") is in perfect condition at the time of delivery.
- The Guarantee Term for the Product is two (2) years from the time it is delivered to the purchaser.
- In the event of any defect in the Product that is notified by the purchaser to the seller during the Guarantee Term, the seller will be obliged to repair or replace the Product, at his own cost and wherever he deems suitable, unless this is impossible or unreasonable.
- If it is not possible to repair or replace the Product, the purchaser may ask for a proportional reduction in the price or, if the defect is sufficiently significant, the termination of the sales contract.
- The replaced or repaired parts under this guarantee, will not extend the guarantee period of the original Product, but will have a separate guarantee.
- In order for this guarantee to come into effect, the purchaser must provide proof of the date of purchase and delivery of the Product.
- If, after six months from the delivery of the Product to the purchaser, he notifies a defect in the Product, the purchaser must provide proof of the origin and existence of the alleged defect.
- This Guarantee Certificate is issued without prejudice to the rights corresponding to consumers under national regulations.
INDIVIDUAL TERMS
- This guarantee covers the products referred to in this manual.
- This Guarantee Certificate will only be applicable in European Union countries.
- For this guarantee to be effective, the purchaser must strictly follow the Manufacturer's instructions included in the documentation provided with the Product, in cases where it is applicable according to the range and model of the Product.
- When a time schedule is specified for the replacement, maintenance or cleaning of certain parts or components of the Product, the guarantee will only be valid if this time schedule has been followed.
LIMITATIONS
- This guarantee will only be applicable to sales made to consumers, understanding by “consumer”, a person who purchases the Product for purposes not related to his professional activities.
- The normal wear resulting from using the product is not guaranteed. With respect to expendable or consumable parts, components and/or materials, such as batteries, light bulbs, etc. the stipulations in the documentation provided with the Product, will apply.
- The guarantee does not cover those cases when the Product; (I) has been handled incorrectly; (II) has been repaired, serviced or handled by non- authorised people or (III) has been repaired or serviced not using original parts. In cases where the defect of the Product is a result of incorrect installation or start-up, this guarantee will only apply when said installation or start-up is included in the sales contract of the Product and has been conducted by the seller or under his responsibility

2-CROSSED-OUT WASTE CONTAINER
- In order to reduce the amount of waste of electric and electronic apparatus, to reduce the danger of components, to encourage the reuse of apparatus, to assess waste and to set up a suitable waste treatment system, with the aim of improving the efficiency of environmental protection, a set of rules has been established applicable to the manufacture of the product and other rules regarding the correct environmental treatment when these products become waste.
- It is also intended to improve the environmental practices of all agents involved in electrical and electronic goods, including manufacturers, distributors, users and particularly those directly involved in the treatment of waste derived from these apparatus.
• From 13th August 2005, there are two ways of disposing of this apparatus: - If you purchase a new equivalent apparatus or which has the same functions as the one you wish to dispose of, you can hand it over, free of charge, to the distributor when making your purchase, or
- You can take it to local collection points.
• We shall cover waste treatment costs. - The apparatus are labelled with a symbol of a “crossed-out waste container”. This symbol means that the apparatus is subject to selected waste collection, different from general waste collection.
- Our products are designed and manufactured with top-quality, environmental-friendly materials and components, which can be reused and recycled. In spite of this, several parts of this product are not biodegradable and therefore it should not be left in the environment. For the correct recycling of this product, please completely detach the electrical motor from the rest of the filtration equipment.
1- CERTIFICADO DE GARANTÍA
ASPECTOS GENERALES
INDIVIDUÁLNÍ PODMÍNKY
MANUFACTURAS GRE, S.A.
ARITZ BIDEA N° 57 BELAKO INDUSTRIALDEA, APARTADO 69
48100 MUNGUIA (VIZCAYA) ESPAÑA
N° Reg. Ind. 48-06762
• We reserve the right to change all or part of the articles or contents of this document, without prior notice
- Nos reservamos el derecho de cambiar total o parcialmente las características de nuestros artículos o el contenido de este documento sin previo aviso
- Nous nous réservons le droit de modier totalement ou en partie les caractéristiques de nos articles ou le contenu de ce document sans préavis
- Wir behalten uns das Recht vor, die technischen Daten unserer Artikel oder den Inhalt dieses Dokumentes ohne vorherigen Hinweis ganz oder teilweise zu ändern
- Ci riserviamo il diritto di cambiare totalmente o parzialmente le caratteristiche tecniche dei nostri prodotti ed il contenuto di questo documento senza nessun preavviso
- Wij behouden ons het recht voor geheel of gedeeltelijk de kenmerken van onze artikelen of de inhoud van deze handleiding zonder voorafgaand bericht te wijzigen
- Reservamo-nos o direito de alterar, total ou parcialmente, as características dos nossos artigos ou o conteúdo deste documento sem aviso prévio.
• Zastrzegamy sobie prawo do zmiany w całości lub części niniejszej instrukcji bez uprzedniej informacji
- Vyhrazujeme si právo na změnu součástí nebo prvků výrobku nebo obsahu tohoto dokumentu bez oznámení.
- Vyhradzujeme si právo na zmenu všetkých článkov alebo ich častí alebo obsahu tohto dokumentu bez predchádzajúceho upozornenia.
- Ne rezervăm să schimbăm total sau partial articolele sau conținutul acestui document, fără notificare prealabilă.
- Vi förbehåller oss rätten att ändra hela eller delar av funktionerna i artiklarna eller innehållet i detta dokument utan föregående meddelande.

text_image
Grewww.grepool.com
We reserve to change all of part of the articles or contents of this document, without prior notice.