NSPB120 - Speakers YAMAHA - Free user manual and instructions
Find the device manual for free NSPB120 YAMAHA in PDF.
| Brand | YAMAHA |
| Model | NSPB120 |
| Category | Home Theater Speaker System (5 pieces) |
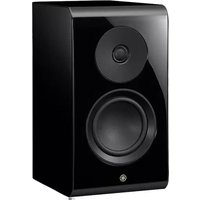
| Speaker Type | 2-way, acoustic suspension, magnetic shielding |
| Speakers | Woofer: 6.5 cm cone × 2; Tweeter: 2 cm silk dome tweeter |
| Nominal Power | 30 W |
| Maximum Power | 100 W |
| Impedance | 6 Ω |
| Frequency Response | 110 Hz - 46 kHz (-10 dB), 100 kHz (-30 dB) |
| Sensitivity | 82 dB / 2.83 V / 1 m |
| Unit Weight (each satellite/center) | 1.8 kg |
| Included Speaker Cable | 24.5 m |
| Supplied Accessories | Center speaker brackets (2), anti-slip pads (4 pairs) |
| Maintenance | Wipe with a dry, clean cloth; do not use chemical products |
| Safety | Do not expose to rain, moisture, heat sources; do not disassemble; refer repairs to an authorized Yamaha service center |
| Warranty | 2 years (parts and labor) in the EEA and Switzerland |
Frequently Asked Questions - NSPB120 YAMAHA
User questions about NSPB120 YAMAHA
0 question about this device. Answer the ones you know or ask your own.
Ask a new question about this device
Download the instructions for your Speakers in PDF format for free! Find your manual NSPB120 - YAMAHA and take your electronic device back in hand. On this page are published all the documents necessary for the use of your device. NSPB120 by YAMAHA.
USER MANUAL NSPB120 YAMAHA
(NS-PB120: NS-B120 + NS-C120)
SPEAKER PACKAGE
PACKAGE ENCEINTES
Precautions
Please read the following operating precautions before use. Yamaha will not be held responsible for any damage and/or injury caused by not following the cautions below.
- To assure the finest performance, please read this manual carefully. Keep it in a safe place for future reference.
- Install the speakers in a cool, dry, clean place – away from windows, sources of heat, sources of excessive vibration, dust, moisture or cold. Avoid sources of electrical humming (e.g., transformers and motors). To prevent fire or electric shock, do not expose the speakers to rain or water.
- To prevent the enclosure from warping or discoloring, do not expose the speakers to direct sunlight or excessive humidity.
- Avoid installing the speakers where foreign objects may fall onto them and/or where they may be exposed to liquid dripping or splashing.
- Do not place the following objects on top of the speakers:
- Other components, as they might damage or discolor the surface of the speakers.
– Burning objects (e.g., candles), as they might cause fire, damage to the speakers or personal injury. - Containers of liquid, as they might spill and cause electric shock to the user or damage to the speakers.
- Do not place the speakers where they are liable to be knocked over or struck by falling objects. Stable placement will also ensure better sound performance.
- Placing the speakers on the same shelf or rack as the turntable can result in feedback.
- Any time you note distortion, reduce the volume control on your amplifier to lower setting. Never allow your amplifier to be driven into "clipping". Otherwise, the speakers may be damaged.
- When using an amplifier with a rated output power higher than the nominal input power of the speakers, care should be taken not to exceed the maximum input of the speakers.
- Do not attempt to clean the speakers with chemical solvents as this might damage the finish. Use a clean, dry cloth.
- Do not attempt to modify or fix the speakers. Contact qualified Yamaha service personnel when service is needed. The cabinet should never be opened for any reason.
- Secure placement or installation is the owner's responsibility. Yamaha is not liable for accidents caused by improper placement or installation of speakers.
Information for Users on Collection and Disposal of Old Equipment
This symbol on the products, packaging, and/or accompanying documents means that used electrical and electronic products should not be mixed with general household waste.
For proper treatment, recovery and recycling of old products, please take them to applicable collection points, in accordance with your national legislation and the Directives 2002/96/EC.
By disposing of these products correctly, you will help to save valuable resources and prevent any potential negative effects on human health and the environment which could otherwise arise from inappropriate waste handling.
For more information about collection and recycling of old products, please contact your local municipality, your waste disposal service or the point of sale where you purchased the items.
[Information on Disposal in other Countries outside the European Union]
This symbol is only valid in the European Union. If you wish to discard these items, please contact your local authorities or dealer and ask for the correct method of disposal.
Contents
Package contents ......2
Installing the speakers ......2
Installing the center speaker.... 3
Installing the front/surround speakers .... 3
Wall-mounting the speakers 4
Connecting the speakers ....5
Connection diagram.... 5
Specifications 6
Package contents
Thank you for choosing the Yamaha NS-PB120 Speaker Package.
Make sure the package contains the following items.
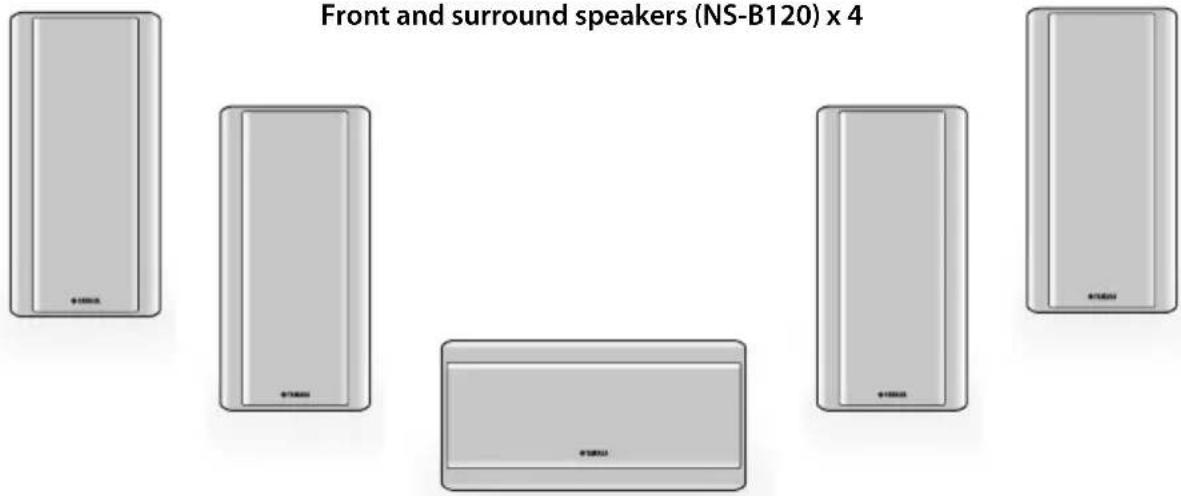
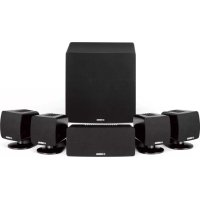
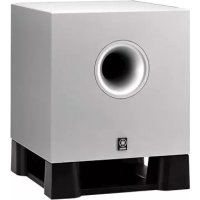
Front and surround speakers (NS-B120) x 4
Center speaker (NS-C120) x 1
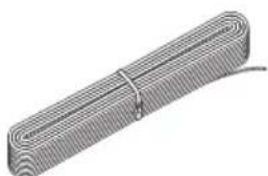
natural_image
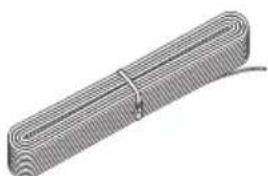
Illustration of a coiled wire or filament with a looped ends and a string, no text or symbols present.Speaker cable 24.5 m (80 ft.) x1

Fastener x 2 (for center speaker)
Non-skid pads (4 pcs) x 4 (for front and surround speakers)
Installing the speakers
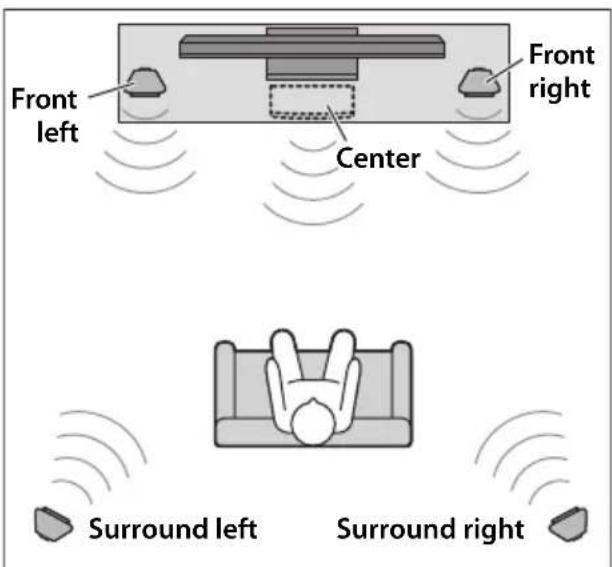
Before you connect the speakers, place each speaker in its respective location. Speaker positioning is very important as it affects the overall sound quality of the system. Place the speakers in locations that will optimize the sound quality at your listening position. Refer to the illustration.
Note
• The speakers feature a magnetically shielded design. However, there is still a chance that placing them too close to a CRT-type TV set might impair picture color. Should this happen, move the speakers away from the TV set.
Installing the center speaker
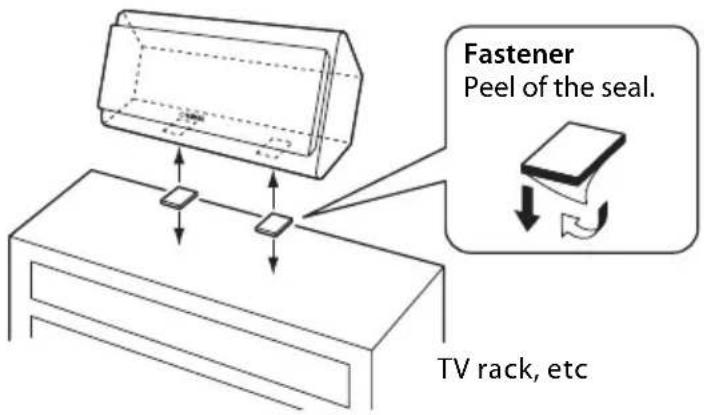
Place the center speaker centrally between the front speakers, facing directly forward.
When placing it on a flat surface (TV rack, etc), affix the supplied fasteners to bottom of the speaker as shown left.
When wall-mounting it, see "Wall-mounting the speakers" (page 4).
Note
- Wipe the surface clean before affixing the fasteners. If the surface is dirty, oily or wet, adhesive strength is weakened and the speaker may fall.
Installing the front/surround speakers
Front speakers:
Place the two front speakers on the left and right sides of the TV, at approximately the same height as the TV, facing directly forward.
Surround speakers:
Place the left and right surround speakers behind your listening position, facing slightly inward.
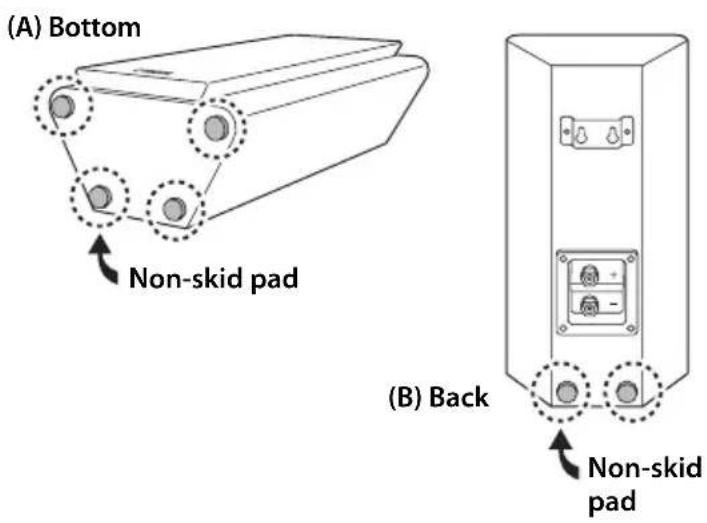
When placing them on a flat surface (hard floor, etc), affix the supplied non-skid pads to the corners of the bottom of the speaker as shown left (Fig. A). The pads will prevent the speaker from moving around.
When wall-mounting them, affix the supplied non-skid pads to the lower corners of the back of the speaker as shown left (Fig. B). For details, see "Wall-mounting the speakers" (page 4).
Wall-mounting the speakers
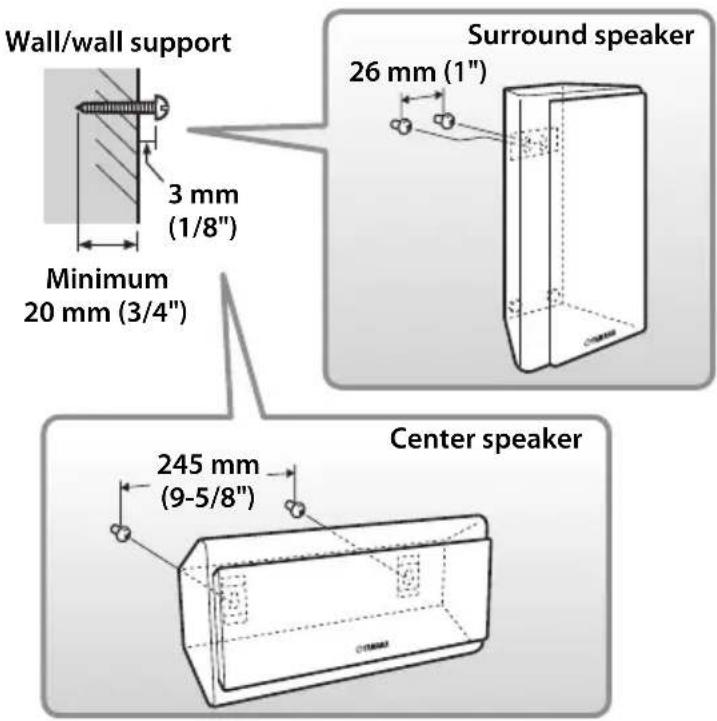
You can mount the speakers on the wall as follows.
1 Install screws into a solid wall or wall support as shown left. Use 3.5 to 4 mm (1/8") diameter self-tapping screws.
2 Hang each speaker by its keyhole slots onto the protruding screws.
Note
• Make sure the shaft of the screw is seated in the narrow part of the keyhole slot. Otherwise, the speaker may fall.
Warnings
• Each speaker weighs 1.8 kg (4.0 lbs.). Do not mount the speakers on thin plywood or on a wall with a soft surface material. Otherwise, the screws may pull out of the surface and the speakers may fall, possibly damaging the speakers or causing personal injury.
- Do not affix the speakers to a wall using nails, adhesives, or unstable hardware. Long-term use and vibration may cause the speakers to fall.
• To avoid accidents resulting from tripping over loose speaker cables, affix the cables to the wall.
- Mount the speakers in a wall location that will be unlikely to result in injury to an individual's head.
- When using speaker brackets (commercially available) to mount the speakers on the wall or ceiling, we strongly recommend using safety wire (may be supplied with the bracket) between the speaker and bracket to prevent the speaker from falling.
- If you are not sure of a safe way to install these speakers, consult a professional installer or a building contractor.
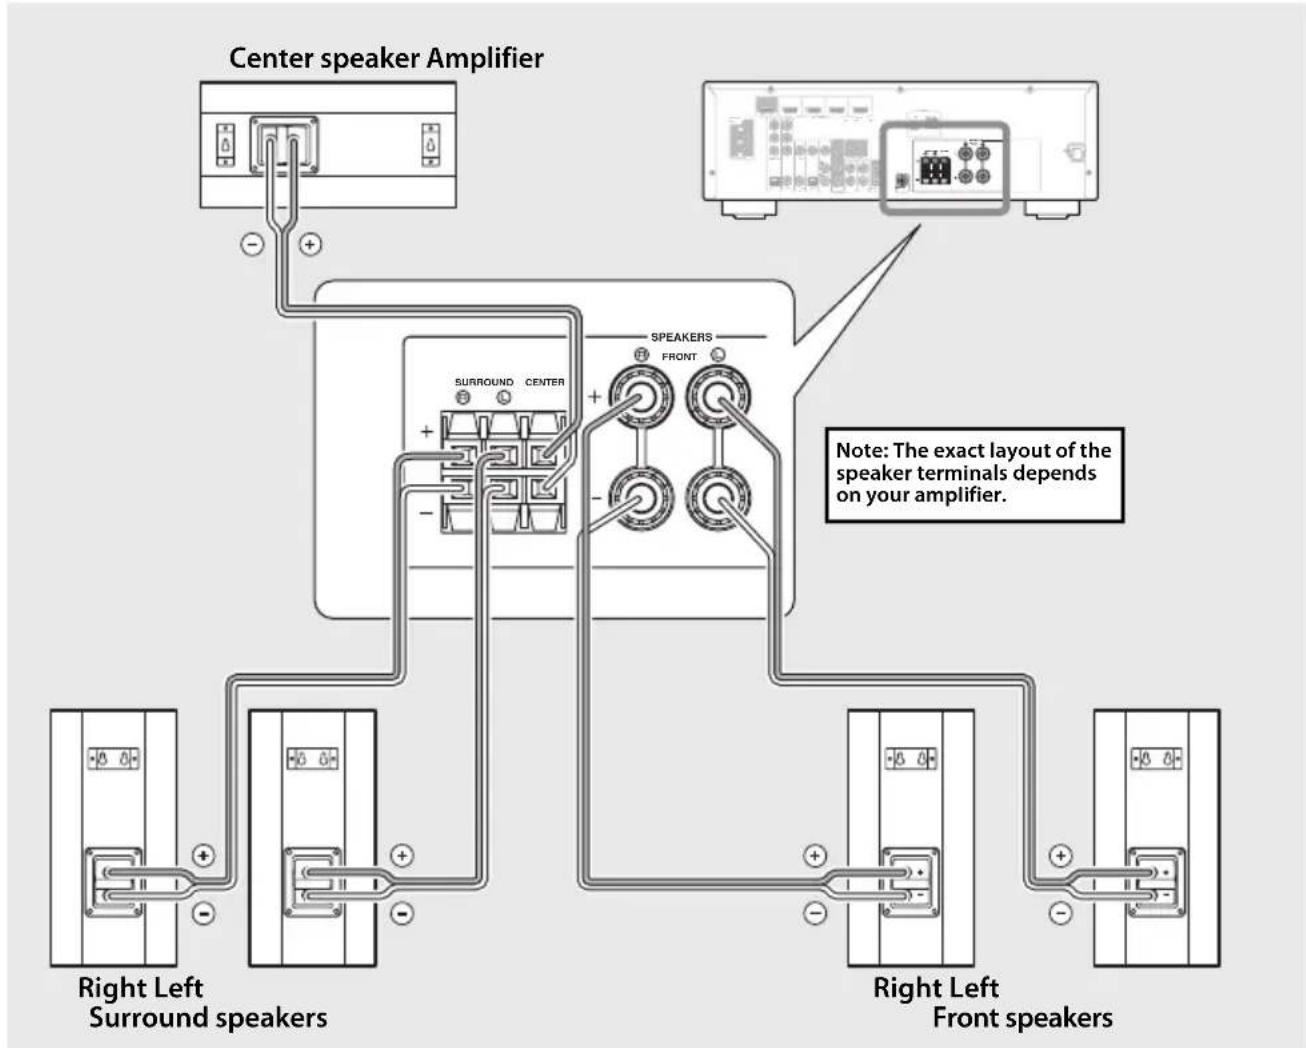
Connecting the speakers
Caution: Make sure the power cables for your AV components are disconnected from the AC wall outlets before making any connections.
Connection diagram
flowchart
graph TD
    A["Center speaker Amplifier"] --> B["Surround speakers"]
    A --> C["Front speakers"]
    B --> D["Right Left Surround speakers"]
    C --> E["Right Left Front speakers"]
    D --> F["SPEAKERS FRONT"]
    E --> F
    style A fill:#f9f,stroke:#333
    style B fill:#ccf,stroke:#333
    style C fill:#cfc,stroke:#333
    style D fill:#fcc,stroke:#333
    style E fill:#cff,stroke:#333
    style F fill:#ffc,stroke:#333
■Preparing the speaker cables
Once you have positioned the speakers, cut the 24.5-meter (80 ft.) speaker cable into five cables for connecting the front right/left speakers, center speaker and surround right/left speakers.
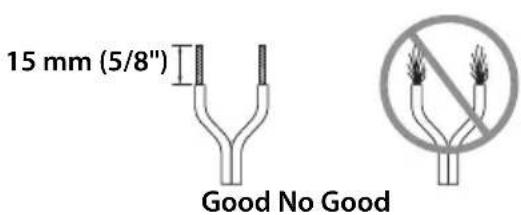
1 Cut the supplied speaker cable to suitable length for each speaker.
2 Remove about 15 mm (5/8") of insulation from the end of each speaker cable.
3 Twist the bare wires tightly so the individual strands are not splayed.
Notes
- Make the speaker cables as short as possible. Do not bundle or roll up excess cable.
- Be careful not to injure yourself while preparing the speaker cables.
■Operating the speaker terminals
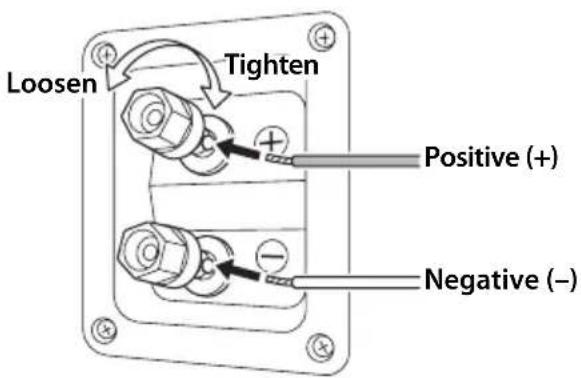
1 Rotate the speaker terminal counterclockwise to loosen it.
2 Insert the bare wire.
3 Rotate the speaker terminal clockwise to tighten it.
4 Test the security of the connection by pulling gently on the cable.
Notes
- Make sure the terminal is gripping the bare wire, not the insulation.
- Make sure the bare wires do not touch each other, as this could damage the speaker or amplifier.
- If the connections are faulty, you will hear no sound from the speakers.
■Connecting to an amplifier
Connect each speaker to the appropriate speaker terminals on your amplifier by using the cables you prepared earlier. For details, see “Connection diagram” (page 5).
Make sure you connect the speakers with the correct polarity—positive (+) terminals to positive (+) terminals, and negative (−) terminals to negative (−) terminals. If you get them crossed over, the sound will be unnatural and lack bass.
In your AV receiver's speaker size settings, specify small (or "S") for all of the NS-PB120 speakers.
Once you have connected all of the speakers, plug the amplifier and other AV components into suitable AC wall outlets.
Specifications
Type.....2-way acoustic suspension magnetic shielding type
Driver ....Woofer: 6.5 cm (2-1/2") cone type x 2 Tweeter: 2 cm (3/4") silk dome type
Nominal input power 30 W
Maximum input power ....100 W
Impedance 6 Ω
Frequency response ....110 Hz - 46 kHz (-10 dB) - 100 kHz (-30 dB)
Sensitivity....82 dB/2.83 V, 1 m
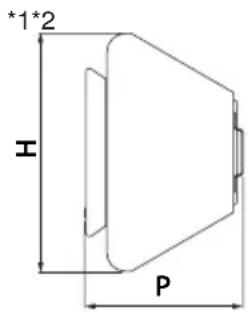
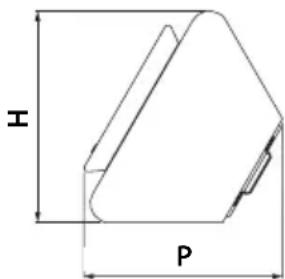
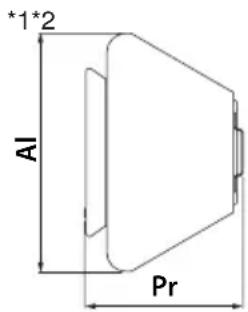
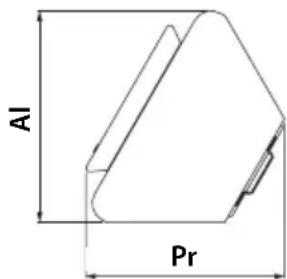
Dimensions (W x H x D)
NS-B120....150 x 305 x 99 mm (5-7/8 x 12 x 3-7/8")
NS-C120....305 x 150 x 99 mm (12 x 5-7/8 x 3-7/8") *1
305 x 133 x 125 mm (12 x 5-1/4 x 4-1/2") *2
NS-C120
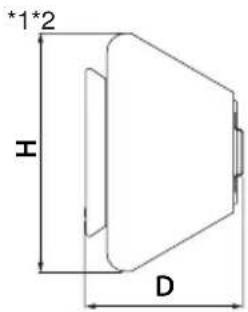
Weight....1.8 kg (4.0 lbs)
Specifications are subject to change without notice.
Précautions
natural_image
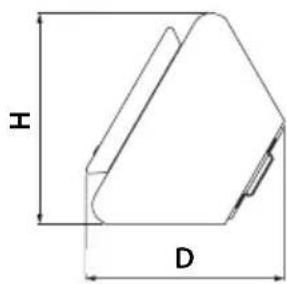
Illustration of a coiled wire or filament with a looped ends and a string, no text or symbols present.Dimensions (L x H x P)
NS-B120 150 x 305 x 99 mm
NS-C120....305 x 150 x 99 mm*1
305 x 133 x 125 mm*2
NS-C120
Poids....1,8 kg
Altavoz central (NS-C120) x 1
natural_image
Illustration of a coiled wire or filament with a looped ends and a central loop, no text or symbols present.NS-C120.... 305 x 150 x 99 mm*1
305 x 133 x 125 mm*2
NS-C120
Peso 1,8 kg
natural_image
Illustration of a coiled spring or coil with a looped ends and a straight wire (no text or symbols)Limited Guarantee for European Economic Area (EEA) and Switzerland
Thank you for having chosen a Yamaha product. In the unlikely event that your Yamaha product needs guarantee service, please contact the dealer from whom it was purchased. If you experience any difficulty, please contact Yamaha representative office in your country. You can find full details on our website (http://www.yamaha-hifi.com/ or http://www.yamaha-uk.com/ for U.K. resident).
The product is guaranteed to be free from defects in workmanship or materials for a period of two years from the date of the original purchase. Yamaha undertakes, subject to the conditions listed below, to have the faulty product or any part(s) repaired, or replaced at Yamaha's discretion, without any charge for parts or labour. Yamaha reserves the right to replace a product with that of a similar kind and/or value and condition, where a model has been discontinued or is considered uneconomic to repair.
Conditions
- The original invoice or sales receipt (showing date of purchase, product code and dealer's name) MUST accompany the defective product, along with a statement detailing the fault. In the absence of this clear proof of purchase, Yamaha reserves the right to refuse to provide free of charge service and the product may be returned at the customer's expense.
- The product MUST have been purchased from an AUTHORISED Yamaha dealer within the European Economic Area (EEA) or Switzerland.
- The product must not have been the subject of any modifications or alterations, unless authorised in writing by Yamaha.
- The following are excluded from this guarantee:
a. Periodic maintenance and repair or replacement of parts due to normal wear and tear.
b. Damage resulting from:
(1) Repairs performed by the customer himself or by an unauthorised third party.
(2) Inadequate packaging or mishandling, when the product is in transit from the customer. Please note that it is the customer's responsibility to ensure the product is adequately packaged when returning the product for repair.
(3) Misuse, including but not limited to (a) failure to use the product for its normal purpose or in accordance with Yamaha's instructions on the proper use, maintenance and storage, and (b) installation or use of the product in a manner inconsistent with the technical or safety standards in force in the country where it is used.
(4) Accidents, lightning, water, fire, improper ventilation, battery leakage or any cause beyond Yamaha's control.
(5) Defects of the system into which this product is incorporated and/or incompatibility with third party products.
(6) Use of a product imported into the EEA and/or Switzerland, not by Yamaha, where that product does not conform to the technical or safety standards of the country of use and/or to the standard specification of a product sold by Yamaha in the EEA and/or Switzerland.
- Where the guarantee differs between the country of purchase and the country of use of the product, the guarantee of the country of use shall apply.
- Yamaha may not be held responsible for any losses or damages, whether direct, consequential or otherwise, save for the repair or replacement of the product.
- Please backup any custom settings or data, as Yamaha may not be held responsible for any alteration or loss to such settings or data.
- This guarantee does not affect the consumer's statutory rights under applicable national laws in force or the consumer's rights against the dealer arising from their sales/purchase contract.