
JARO 5003 M - Lamp BRENNENSTUHL - Free user manual and instructions
Find the device manual for free JARO 5003 M BRENNENSTUHL in PDF.

| Product type | Mobile LED projector with telescopic stand |
| Brand | Brennenstuhl |
| Model | JARO 5003 M |
| Protection rating (IP) | IP65 |
| Rated voltage | 220-240 V ~ 50/60 Hz |
| Use | Indoor and outdoor |
| Adjustment | Adjustable orientation with quick lock |
| Transport handle | Yes |
| Telescopic stand | Yes, adjustable height |
| Pole mounting | Fixing screw on the tube |
| Light source | Non-replaceable LED |
| Cleaning | Dry or slightly damp cloth, no solvent |
| Maintenance | Check for damage before use |
| Safety | Do not look directly into the beam, stable use, non-replaceable cable |
| Spare parts | Original replacement safety window |
| Repairability | Non-replaceable light source, replace entire unit |
| Disposal | Compliant with WEEE directive, do not dispose of with household waste |
| Warranty and declaration | Declaration of conformity available from the manufacturer |
Frequently Asked Questions - JARO 5003 M BRENNENSTUHL
User questions about JARO 5003 M BRENNENSTUHL
0 question about this device. Answer the ones you know or ask your own.
Ask a new question about this device
Download the instructions for your Lamp in PDF format for free! Find your manual JARO 5003 M - BRENNENSTUHL and take your electronic device back in hand. On this page are published all the documents necessary for the use of your device. JARO 5003 M by BRENNENSTUHL.
USER MANUAL JARO 5003 M BRENNENSTUHL
GB Operating instructions.... 7
natural_image
Diagram showing a cross-shaped object transforming into a rectangle with diagonal lines (no text or symbols)GB Operating Instructions Mobile LED Light / Tripod LED Light
JARO
Note: Before use of the floodlight, please carefully read the operating instructions and store them at a proper location!
TECHNICAL DATA
Protection class: I
IP class: IP 65
Nominal voltage 230 V versions: 220-240 V\~50/60 Hz
Nominal voltage 110 V versions: 100-130 V\~50/60 Hz
Connection line: H07RN-F 3G1,0
Power factor: see table (page 2)
These LED floodlights are suitable for indoor and outdoor lighting purposes.
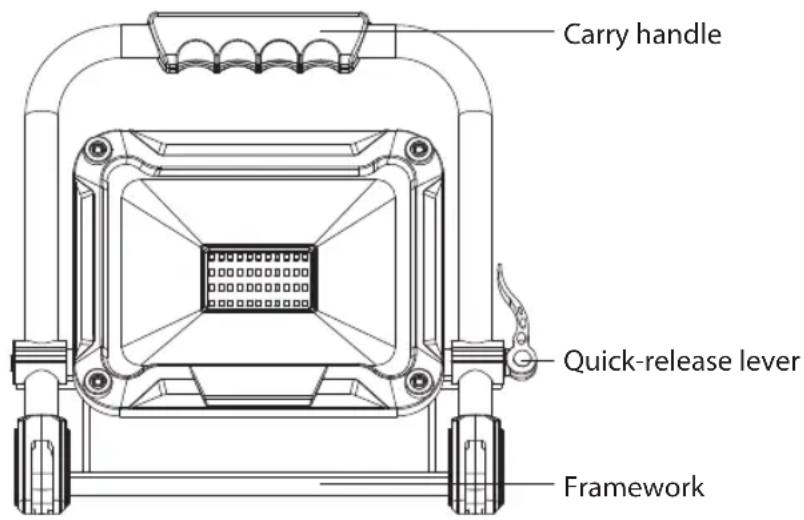
OPERATION
Place the floodlight on a dry and level surface. The inclination of the floodlight is adjustable. To do so, loosen the lateral quick release, turn the lamp head into the desired position and lock the quick release again.
OPERATION
TRIPOD, LED FLOODLIGHT
The floodlight with type designation "T" is supplied with tripod.
In this connection, you must imperatively ensure sufficient stability of the tripod and firm assembly of the floodlight.
Tripod for individual floodlight 20 W: extendible from 75 cm to 160 cm Tripod for individual floodlight 30/50 W: extendible from 86 cm to 152 cm Tripod for double floodlight 2 x 20 W: extendible from 82 cm to 142 cm
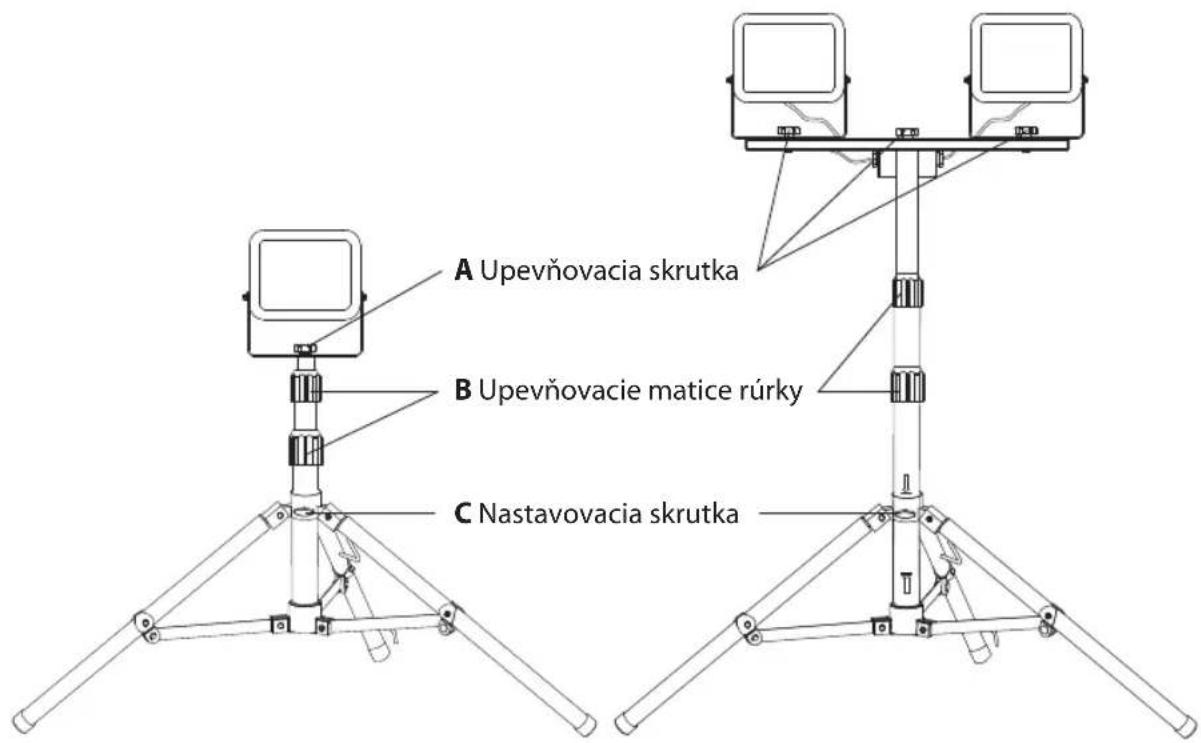
ASSEMBLY OF THE LED FLOODLIGHT ON THE TRIPOD
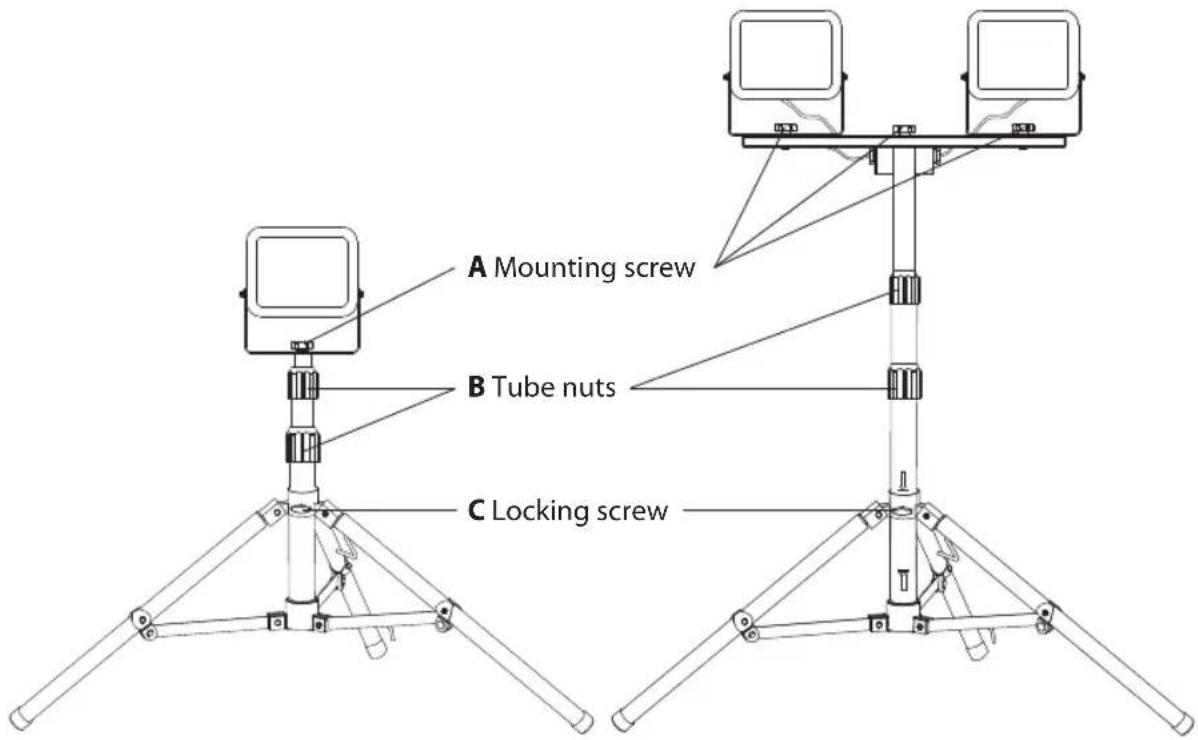
Loosen the locking screw (C). Fold out the feet completely. Afterwards, re-tighten the locking screw (C).
There are two arrows at the tube. These mark the area where the ring of the feet (1) have to be placed to ensure sufficient stability of the tripod. The refore make sure that the ring of the feet (1) matches insides the arrows area.

Fasten the LED floodlight by means of the locking screw (A) at the central hole of the fastening bracket on the tripod.
To change the tripod height, loosen the tube nuts (B). Extend the tripod up to the desired height and re-tighten the tube nuts (B).
SAFETY INFORMATION
-
Before use, always check the floodlight and the power supply line for any possible damage. Never use the floodlight in case of any damage. Caution! In case of a damaged floodlight or a damaged power supply line there will be a risk of fatal injury from electrical current!
-
The external flexible cable or cord of this luminaire cannot be replaced. If the cord is damaged, the luminaire should be destroyed.
2.1. Valid for articles JARO 7000 M / JARO 7003 M / JARO 7003 CM / JARO 7002 M / JARO 7012 M.
If the external flexible cable or cord of this luminaire is damaged, it shall be exclusively replaced by the manufacturer or his service agent or a similar qualified person in order to avoid a hazard.
- The floodlight must be grounded properly.
- The floodlight must not be used without properly attached sealing rings!
- LED floodlights are extremely bright. Please never look directly into the light.
- If the protective cover is broken, it should be replaced by an original Brennenstuhl protective cover before further use of the floodlight.
natural_image
Diagram showing a cross-shaped structure transforming into a rectangular block with diagonal lines (no text or symbols)- Make sure that the floodlight has a safe and stable position.
Make sure that the cables are not crushed or damaged otherwise.
- Keep the floodlight away from children. Children are not aware of the risks imposed by electric current.
MAINTENANCE
The light source of this lamp cannot be replaced; if the light source has reached the end of its service life, the entire lamp has to be replaced.
CLEANING
Do not use solvents, caustic cleaning agents or similar products. Only use a dry or slightly moistened cloth for cleaning.
DISPOSAL
Dispose of electric appliances in an environmentally friendly manner! Electric appliances must not be disposed of in household waste!
The European Directive 2012/19/EU on Waste Electrical and Electronic Equipment rules that used electric appliances should be collected separately and recycled in an environmentally friendly manner.
For possibilities of disposal of the used appliance, please contact your local or municipal administration.
DECLARATION OF CONFORMITY
The declaration of conformity is stored at the manufacturer's.
Addresses
Câble de raccordement : H07RN-F 3G1,0
natural_image
Diagram showing a cross-shaped object transforming into a rectangle with diagonal lines (no text or symbols)DÉCLARATION DE CONFORMITÉ
natural_image
Diagram showing a cross-shaped object transforming into a rectangle with diagonal lines (no text or symbols)natural_image
Diagram showing a cross-shaped object transforming into a rectangle with diagonal lines (no text or symbols)natural_image
Diagram showing a cross-shaped object transforming into a rectangle with diagonal lines (no text or symbols)natural_image
Diagram showing a cross-shaped object transforming into a rectangle with diagonal lines (no text or symbols)natural_image
Mechanical linkage diagram with labeled component (no text or symbols)natural_image
Diagram showing a cross-shaped object transforming into a rectangle with diagonal lines (no text or symbols)natural_image
Diagram showing a cross-shaped object transforming into a rectangular block with diagonal lines (no text or symbols)natural_image
Diagram showing a cross-shaped object transforming into a rectangle with diagonal lines (no text or symbols)natural_image
Diagram showing a cross-shaped structure transforming into a rectangle with diagonal lines (no text or symbols)natural_image
Mechanical linkage diagram with labeled component 1 (no text or symbols beyond label)natural_image
Diagram showing a cross-shaped structure transforming into a rectangular block with diagonal lines (no text or symbols)natural_image
Diagram showing a cross-shaped object transforming into a rectangle with diagonal lines (no text or symbols)natural_image
Technical line drawing of a mechanical device with mounting brackets and central chip (no text or symbols)natural_image
Diagram showing a cross-shaped object transforming into a rectangle with diagonal lines (no text or symbols)natural_image
Diagram showing a cross-shaped object transforming into a rectangle with diagonal lines (no text or symbols)natural_image
Diagram showing a cross-shaped object transforming into a rectangle with diagonal lines (no text or symbols)MONTÁŽ LED LAMPY NA STOJAN
natural_image
Diagram showing a cross-shaped object transforming into a rectangle with diagonal lines (no text or symbols)natural_image
Diagram showing a cross-shaped object transforming into a rectangle with diagonal lines (no text or symbols)- Prepričajte se, da je re ektor nameščen na varni in stabilni površini.