
AirSens CO2 - Measuring equipment Soler & Palau - Free user manual and instructions
Find the device manual for free AirSens CO2 Soler & Palau in PDF.
| Product Type | Smart indoor air quality sensor with WiFi communication |
| Brand | Soler & Palau |
| Model | AirSens CO2 |
| Dimensions (H x W x D) | 89 x 122 x 26 mm |
| Weight | 150 g |
| Power supply | 100-240 VAC, 50/60 Hz |
| Electrical protection | Class II |
| Enclosure protection rating | IP30 |
| Operating temperature | 0 °C to 50 °C |
| Operating humidity | 10% to 95% non-condensing |
| CO2 measurement range | 450-2000 ppm |
| VOC measurement range | 450-2000 ppm (CO2 equivalent) |
| Relative humidity measurement range | 45-100% RH |
| Temperature measurement range | 0-50 °C |
| CO2 accuracy | ±50 ppm |
| Temperature accuracy | ±0.4 °C |
| WiFi communication | 2.4 GHz, max power <20 dBm (EIRP), BW 40 MHz |
| Main functions | Monitoring CO2, VOC, RH, TEMP via CONNECTAIR platform; ventilation control by relay and analog output 0-10 V |
| Operating modes | MF1: Relay+Connectair; MF2: Output 0-10V+Connectair; MF3: Output 2-10V+Connectair; MF4: Connectair controller |
| LED display | Two-color (MF1) or three-color (MF2-4) LED diffuser for concentration level visualization |
| Calibration | Built-in auto-calibration (up to 2 weeks); manual calibration possible |
| Maintenance | Regular inspection, disconnect before cleaning, avoid dirt accumulation |
| Installation requirements | Type X, recommended height 1.5-1.8 m, protected from water sprays (IP30) |
| Electrical connection | Terminals for cable min. 0.5 mm² / max. 1.5 mm² (power and relay); 0.25/1.0 mm² (analog output) |
| Recycling | Dispose of the device at a recycling center or follow local recycling guidelines |
Frequently Asked Questions - AirSens CO2 Soler & Palau
User questions about AirSens CO2 Soler & Palau
0 question about this device. Answer the ones you know or ask your own.
Ask a new question about this device
Download the instructions for your Measuring equipment in PDF format for free! Find your manual AirSens CO2 - Soler & Palau and take your electronic device back in hand. On this page are published all the documents necessary for the use of your device. AirSens CO2 by Soler & Palau.
USER MANUAL AirSens CO2 Soler & Palau
MF4: Control Connectair - [SW1-3=ON, SW4=OFF]
Consumo maximal 1,0W
Corriente maxima 0,01A
Salida 0-10Vdc, 2-10Vdc, corriente maxima 20mA
Relé NC. 3A - 250Vac
Relé NO 3A-250Vac
Caracteristicas WIFI:
Frecuencia 2,4GHz
Potencia max. <20dBm (PIRE)
BW. 40MHz
Conexión electrica:
Todoos cablesutilizadosdeferancumplirconlaIEC60.227.
5 x TERMINales, alimentacion y rele ....Cable min. 0,5 mm² / Cable max. 1,5 mm² Tornillo M3 y apriete 0,5 Nm
2 x terminales, salute analógica....... Cable min. 0,25 mm²/ Cable max. 1,0 mm² Tornillo M2 y apriete 0,3 Nm
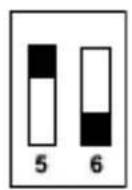
Version VOC [SW5=ON, SW6=OFF]

Version HR [SW5=OFF, SW6=ON]
Intelligent IAQ sensor with WIFI communication to monitor concentration values through the CONNECTAIR® platform (www.conectairapp.com). In addition to displaying concentration parameters, this model continue to allow ventilation control systems through relay and/or 0-10V analog output.
Concentration shown through CONNECTAIR:
Model CO2 VOC RH TEMP
AIRSENS IAQ XXX X
SECURITY
Installation must be carried out by a qualified professional. Make sure that the installation complies with mechanical and electrical national regulations. Once in service, the appliance must comply with corresponding Directives.
Do not use this device in explosive or corrosive atmospheres.
This appliance is considered to be suitable for use in countries having a warm damp equitable climate as specified in IEC 60721-2-1. It may also be used in other countries.
This appliance can be used by children aged from 8 years and above and persons with reduced physical, sensory or mental capabilities or lack of experience and knowledge if they have been given supervision or instruction concerning use of the appliance in a safe way and understand the hazards involved. Children must not play with the appliance. Cleaning and user maintenance shall not be made by children without supervision.
INSTALLATION
This device must be installed in a dry environment (IP30), over a flat surface through fixing points (see Fig.3) and will require a type X installation. Height installation recommended between 1,5 and 1,8m . At the same time, it is important to choose an installation location free of conditions that could influence the measurement such as direct sun light, too close occupant proximity, air flow coming from windows or doors or ventilation systems.
The front cover is opened a tool pressing both pressure closures located at both edges of the cover (see Fig.4). For safety reasons, cables must be retained using the support provided (see Fig.5).
In case of an installation where cabling is outdoors, it must be installed inside a cable ducting system with IP4X protection degree classified as "cable ducting with access cover that can only be opened with a tool" according to UNE-EN 50.085-1: Cable trunking systems and cabling ducting systems for electrical installations-Part 1: General requirements.
START UP
WIFI network connection (via CONNECTAIR® App)
To connect to a WIFI network within the range of the equipment and direct to the platform CONNECTAIR®, follow steps below:
- Sign up.
- Follow the steps once you select the "+" icon on the main screen:


WIFI network connection (via computer)
To connect to a WIFI network within the coverage of the equipment and to direct to the CONNECTAIR® platform, follow steps below:
-
Turn on the AIRSENS WIFI device. The red D17 LED from main PCB board will light.
-
Connect your device (smartphone, tablet, computer) with the WIFI network genera ted by the AIRSENS WIFI device. Depending on device used, will be necessary to deactivate 4G/5G mobile network.
-
Search the available WIFI network in the menu of your device and select:
a. Network: AIRSENS WIFI + 4 characters (Ex.: AIRSENS WIFI 47b1)
b. Password: 0000 + 4 characters shown in the name of the network (Ex.: 000047b1)
-
Once connected (1), open your device's browser and enter the IP address (http://10.10.10.1) and follow the instructions on the screen. Through this interface, the AIRSENS WIFI device will connect to the fixed WIFI network (must be 2,4GHz) within the coverage of the equipment. Use your WIFI network password.
-
Access to www.connectairapp.com and register by following the instructions on the screen [2].
-
When you have registered, you can assign the unit by entering the serial number [SERIAL NUMBER] with ten digits, which you will find on the back side of the equipment cover, scanning the QR code or on the electronic board.
-
The first time that an AIRSENS WIFI device is linked with the CONNECTAIR platform, it is necessary to use the command "Obtain password" for its generation and validation. Make sure the mobile device and AIRSENS are connected to the same WIFI network.
(1) In case of an error in the connection, the WIFI network of the device will remain visible for an hour. Try again.
(2) In case of having disabled 4G/5G mobile network, activate to be able to enter to website address.
IMPORTANT: In case of many AIRSENS WIFI devices within the same range, carry out a connection procedure to the WIFI network in a staggered and individual way per device.
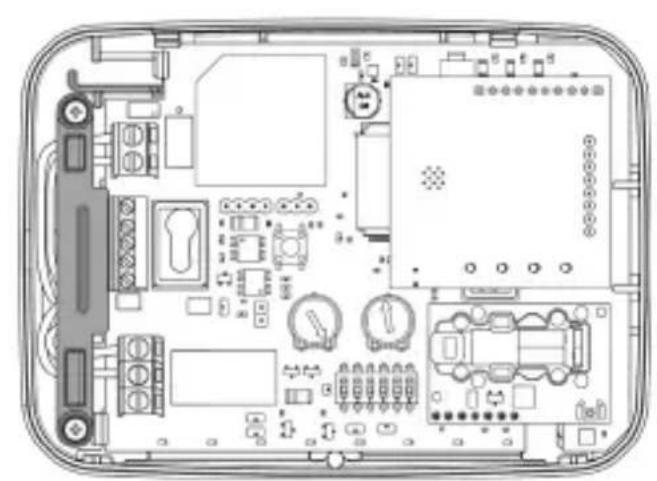
In case to link the AIRSENS WIFI device to a new WIFI network, when it has already been linked to another one, previously reset the WIFI antenna by pressing the button located in the lower left corner for 5 seconds (see Fig.1). Then follow the steps described above.
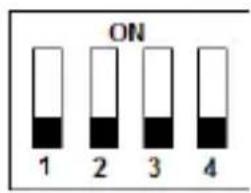
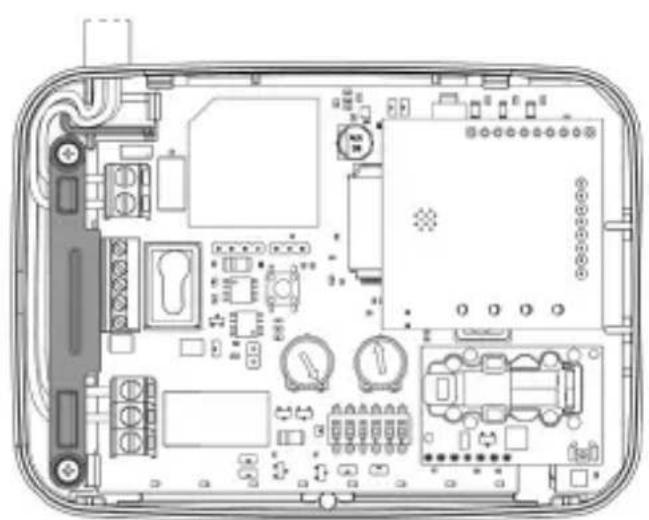
Operating modes (see Fig.2)
MF1: Relay + Connectair (reading) - [SW1-4=OFF]
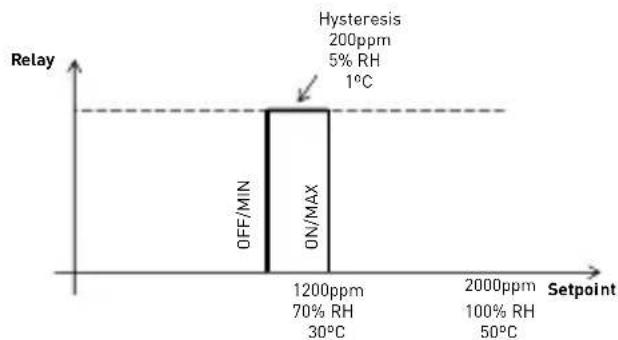
Adjustable relay via P1 potentiometer. Factory settings: 1200 ppm / 73%HR / 30°C
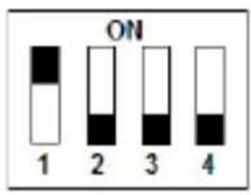
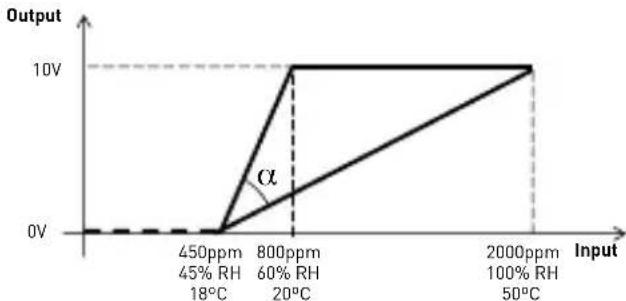
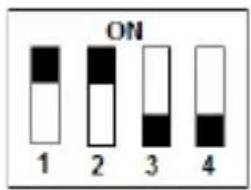
MF2: 0-10Vdc output analogue signal + Connectair (reading) - [SW1=ON, SW2-4=OFF]
0-10Vdc output analogue signal adjustable via P1 potentiometer. Factory settings: 1200 ppm / 73%HR / 30°C
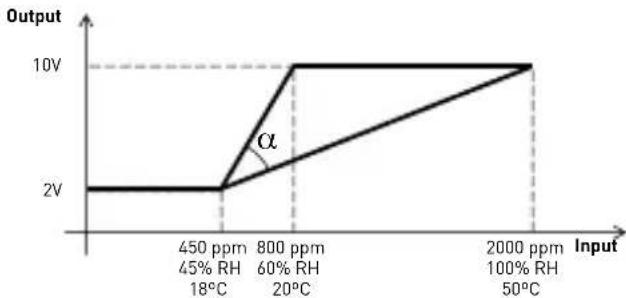
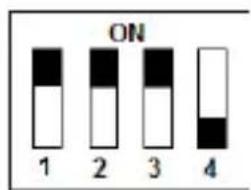
MF3: 2-10Vdc output analogue signal + Connectair (reading) - [SW1-2=ON, SW3-4=OFF]
2-10Vdc output analogue signal adjustable via P1 potentiometer. Factory settings: 1200 ppm / 73%HR / 30°C
MF4: Connectair control - [SW1-3=ON, SW4=OFF]
Access to reading, edition and communication of working parameters via Connectair. Relay and output analogue signal enabled. Factory settings: 1200 ppm / 73% HR / 30^
Note: If other switch combination is chosen, LED diffuser is switched off and digital/ analogue signals are inoperative.
AIRSENS WIFI devices have two LEDs aggrupation. Three on the main PCB board and another four on the WIFI antenna (see Fig.1).
| Location LED Colour Description | ||
| Main PCB board | D17 Red On: Device powered | |
| D16 Red Flicking: Trying to establish communication with the WIFI antenna without success | ||
| D18 Yellow Blinking: On every 60 seconds indicates communication with established antenna | ||
| WIFI antenna | From left to right | Green On: Powered antenna |
| Red On: Linked WIFI but no internet connectionSlow flashing: Reset to configure new WIFI activatedFast flashing: Factory reset activated | ||
| Orange On: Device issuing its own WIFI (AIRSENS_WIFI_XXXX) to connect with mobile device and link to WIFI within its rangeFlashing: Sending information to CONNECTAIR® | ||
| Orange On: Error Reading equipment IDFast flashing: Main board info reading | ||
LED diffuser

The device displays a real-time concentration level. In operation mode 1, the illumination is two-color while in modes 2, 3 and 4 this is three-color.
Relay + Connectair (reading) - [SW1-4=OFF]
Green: Value below set point.
Red: Value above set point.
Other modes
Green: ≤ 800ppm / ≤ 60%HR / 21-25°C
Orange: 800 - 1200ppm / 60 - 80%HR / 18-21 °C and 25-35°C
Red: > 1200ppm / > 80%HR / <18°C and >35°C
Special limits are provided in the LED diffuser for cases where AIRSENS is installed in an area with permanently high concentration. This special mode is activated by SW4=ON.
New colour limits
Green: ≤slant 950ppm
Orange: 950 - 1350ppm
Red: > 1350ppm
CALIBRATION / RESET
Automatic calibration
AIRSENS intelligent IAQ sensor incorporates a self-calibration algorithm that allows adaptation to the environment. This adaptation could be prolonged for two weeks until the reading is fine-tuned, and there may be periods of time with LED diffuser in red. During this period it is necessary to keep the equipment powered so as not to interrupt the self-calibration process.
Manual calibration of CO2 Sensor
For those situations where the automatic calibration was a problem, we can force a manual calibrate pushing the button (see Fig.1) during more than 10 seconds until the light guide blinks on color green.
During the following 10 minutes we have to avoid occupying the same room and we must open the windows and/or the ventilation system in maximum performance in order to obtain a level of C02 similar to the outdoor area. After 10 minutes, the light guide will blink off and the equipment is going to consider that the concentration is 450ppm .
Reset
Manual way to start a reset process is disconnecting power supply, wait at least 30 seconds and power again the electronic control.
EN
TECHNICAL DATA
Power supply voltage. 100-240Vac - 50/60Hz
Protection against electric shock......Class II
Installation type required.......Tipo X
Maximum consumption 1,0W
Maximum current. 0,01A
Output. 0-10Vdc, 2-10Vdc, maximum current 20mA
Relay NC .3A - 250Vac
Relay NO .3A-250Vac
WIFI features:
Frequency. 2,4GHz
Max. power.<20dBm (EIRP)
BW. 40MHz
Electric connection: All cables used must fulfil with IEC 60.227.
5 x terminals, supply and relay............Min. 0,5 mm² cable / Max. 1,5 mm² cable M3 screw and 0,5 Nm torque
2 x terminals, analogue output............Min. 0,25 mm² cable / Max. 1,0 mm² cable M2 screw and 0,3 Nm torque
Note: Same tool can be used for both terminals types
Measurement range:
CO2. 450-2000ppm
VOC. 450-2000ppm (CO2 equivalent relative)
RH. 45-100%
TEMP 18-50°C
Accuracy:
CO2. 50ppm
VOC. 100ppm
RH. 2%
T. ±0,4°C
Warm-up time:
C02. 1 minute
VOC. 5 minutes (relative reference)
RH/T 30 seconds
Ambient air humidity 10-95% without condensation
Case dimensions [height x width x deep.] ..89 x 122 x 26 mm

ENVIRONMENTAL DATA
Ambient temperature 0-50°C
Covering classification.. IP30
Pollution degree. 2
Weight 150g
MAINTENANCE
Disconnect from supply before removing. Prevent the possibility of anyone else connecting it while it is being inspected. Regular inspection of the appliance is required, the frequency must be depend of the working conditions to avoid the accumulation of dirt that could trigger risks and would reduce the life expectancy. In all maintenance work, safety regulations in each country must be taken into account.
PUTTING OUT OF SERVICE AND RECYCLING
EEC legislation and our consideration of future generations mean that we should always recycle materials where possible; please do not forget to deposit all packaging in the appropriate recycling bins. If your device is also labeled with this symbol, please take it to the nearest Waste Management Plant at the end of its servicable life.
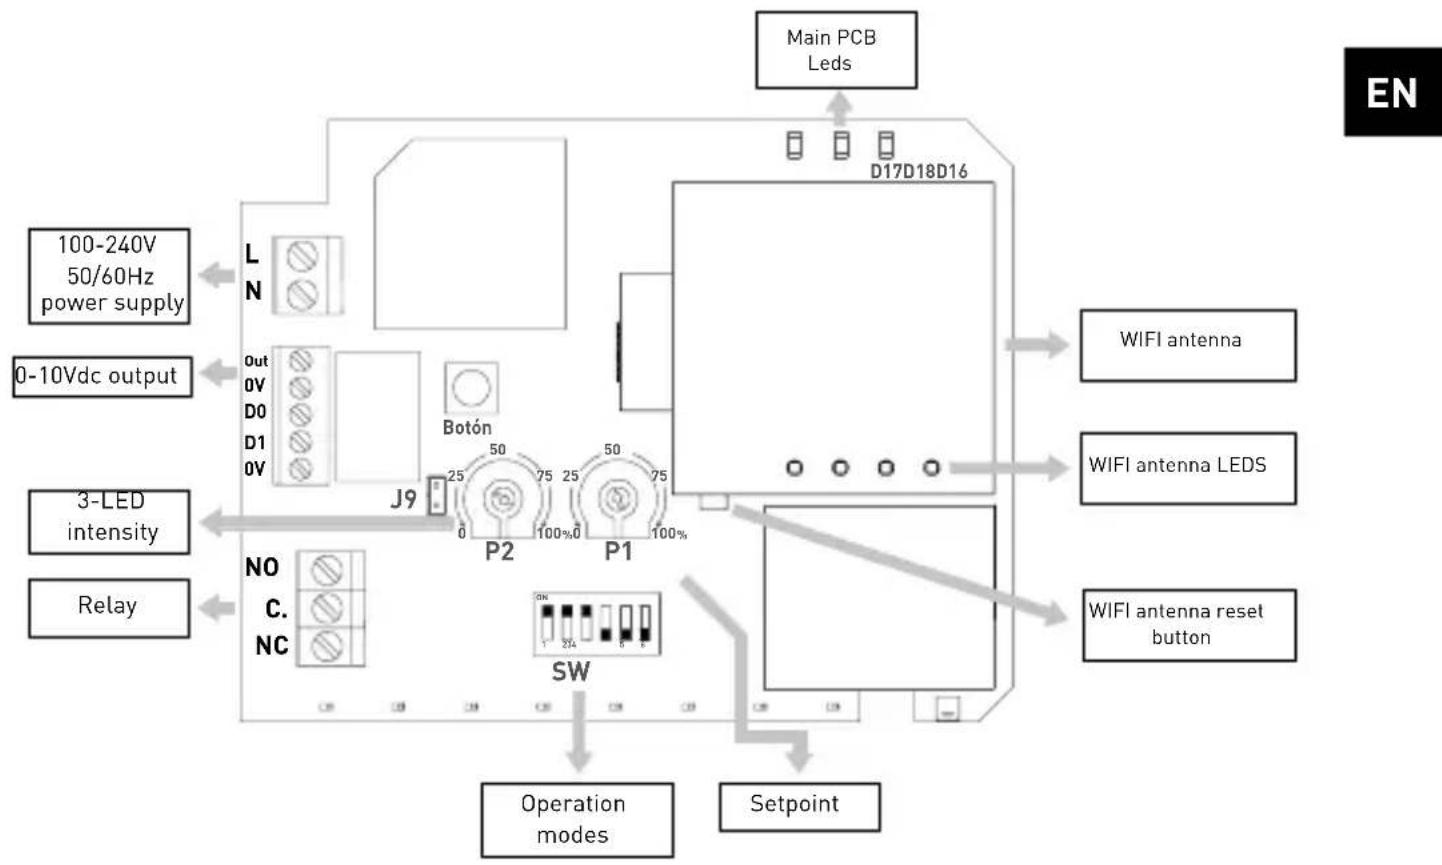
Fig. 1: Electronic board

Fig. 2: Operating modes

MF1: Relay + Connectair (reading)
Adjustable relay via P1 potentiometer
MF2: 0-10Vdc output + Connectair (reading)
Adjustable angle via P1 potentiometer
MF3: 2-10Vdc output + Connectair (reading)
Adjustable angle via P1 potentiometer
MF4: Connectair control
Access to all operating modes and parameters via Connectair.
Note: If other switch combination is chosen, LED diffuser is switched off and digital/analoggue signals are inoperative.
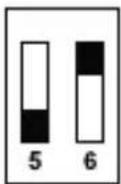
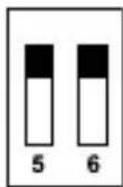
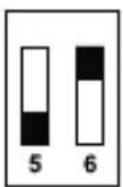
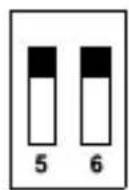
Analogic output configuration
Depending on the configuration of SW5 and SW6 we can obtain the following versions:
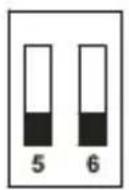
CO2 Version (Default)
[SW5-SW6=OFF]
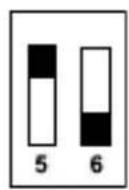
VOC Version
[ \text{[SW5=ON, SW6=OFF]} ]

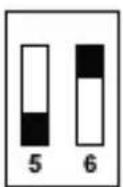
RH Version
[ \text{[SW5=OFF, SW6=ON]} ]

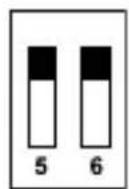
Temperature version
[ \text{[SW5-SW6=ON]} ]
| P1 potentiometer position (%) | MF1 mode: Set Point MF2/MF3 mode: Upper limit | ||
| ppm HR Temp [°C] | |||
| 0 800 60 20,0 | |||
| 5 860 62 21,5 | |||
| 10 920 64 23,0 | |||
| 15 980 66 24,5 | |||
| 20 1040 68 26,0 | |||
| 25 1100 70 27,5 | |||
| 30 1160 72 29,0 | |||
| 35 1220 74 30,5 | |||
| 40 1280 76 32,0 | |||
| 45 1340 78 33,5 | |||
| 50 1400 80 35,0 | |||
| 55 1460 82 36,5 | |||
| 60 1520 84 38,0 | |||
| 65 1580 86 39,5 | |||
| 70 1640 88 41,0 | |||
| 75 1700 90 42,5 | |||
| 80 1760 92 44,0 | |||
| 85 1820 94 45,5 | |||
| 90 1880 96 47,0 | |||
| 95 1940 98 48,5 | |||
| 100 2000 100 50,0 | |||
FRANÇAIS

MF1: Relais + Connectair (lecture) - [SW1-4=OFF]
Relais + Connectair (lecture) - [SW1-4=OFF]
Consommation maximale. 1,0W
Courant maximum. 0,01A
Sortie. 0-10Vdc, 2-10Vdc, courant maximal 20mA
Relais NC 3A - 250Vac
Relais NO 3A - 250Vac
[ \text{[SW5=ON, SW6=OFF]} ]


Version RH
[ \text{[SW5=OFF, SW6=ON]} ]
Version Température
[ \text{[SW5-SW6=ON]} ]
| Position du potentiamètre P1 (%) | Mode MF1: Consigne Mode MF2/MF3: Limite supérieure | ||
| ppm HR Temp [°C] | |||
| 0 800 60 20,0 | |||
| 5 860 62 21,5 | |||
| 10 920 64 23,0 | |||
| 15 980 66 24,5 | |||
| 20 1040 68 26,0 | |||
| 25 1100 70 27,5 | |||
| 30 1160 72 29,0 | |||
| 35 1220 74 30,5 | |||
| 40 1280 76 32,0 | |||
| 45 1340 78 33,5 | |||
| 50 1400 80 35,0 | |||
| 55 1460 82 36,5 | |||
| 60 1520 84 38,0 | |||
| 65 1580 86 39,5 | |||
| 70 1640 88 41,0 | |||
| 75 1700 90 42,5 | |||
| 80 1760 92 44,0 | |||
| 85 1820 94 45,5 | |||
| 90 1880 96 47,0 | |||
| 95 1940 98 48,5 | |||
| 100 2000 100 50,0 | |||
ITALIANO
Connession network WIFI (tramite pc)
MF4: Controllo Connectair - [SW1-3=ON, SW4=OFF]
Consumo massimo 1,0W
[ \text{[SW5=ON, SW6=OFF]} ]
Versione HR
[ \text{[SW5=OFF, SW6=ON]} ]

MF4: Connectair Control - [DIP1-3=ON, DIP4=OFF]
Maximaler Stromverbrauch. 1,0W
VOC. 450-2000ppm (CO2 equivalent relative)
RH. 45-100%
TEMP 0-50°C
Toleranzen:
C02. ±50ppm
VOC. 100ppm
RH. 2%
T. ±0,4°C
Aufwärmzeit:
C02. 1 Minute
[ \text{[SW5=ON, SW6=OFF]} ]
HR-Version [SW5=OFF, SW6=ON]
Version Temperatur [SW5-SW6=ON]

| P1 Potentiometer Position (%) | MF1 Modus: Sollwert MF2/MF3 Modus: Obergrenze | ||
| ppm HR Temp [°C] | |||
| 0 800 60 20,0 | |||
| 5 860 62 21,5 | |||
| 10 920 64 23,0 | |||
| 15 980 66 24,5 | |||
| 20 1040 68 26,0 | |||
| 25 1100 70 27,5 | |||
| 30 1160 72 29,0 | |||
| 35 1220 74 30,5 | |||
| 40 1280 76 32,0 | |||
| 45 1340 78 33,5 | |||
| 50 1400 80 35,0 | |||
| 55 1460 82 36,5 | |||
| 60 1520 84 38,0 | |||
| 65 1580 86 39,5 | |||
| 70 1640 88 41,0 | |||
| 75 1700 90 42,5 | |||
| 80 1760 92 44,0 | |||
| 85 1820 94 45,5 | |||
| 90 1880 96 47,0 | |||
| 95 1940 98 48,5 | |||
| 100 2000 100 50,0 | |||
NEDERLANDS
MF4: Controle Connectair - [SW1-3=ON, SW4=OFF]
[ \text{[SW5=ON, SW6=OFF]} ]

HR-versie
[ \text{[SW5=OFF, SW6=ON]} ]

Temperatuurversie
[ \text{[SW5-SW6=ON]} ]

| Positie potentiometer P1 (%) | MF1-modus: Instelpunt MF2/MF3-modus Bovengrens | ||
| ppm HR Temp [°C] | |||
| 0 800 60 20,0 | |||
| 5 860 62 21,5 | |||
| 10 920 64 23,0 | |||
| 15 980 66 24,5 | |||
| 20 1040 68 26,0 | |||
| 25 1100 70 27,5 | |||
| 30 1160 72 29,0 | |||
| 35 1220 74 30,5 | |||
| 40 1280 76 32,0 | |||
| 45 1340 78 33,5 | |||
| 50 1400 80 35,0 | |||
| 55 1460 82 36,5 | |||
| 60 1520 84 38,0 | |||
| 65 1580 86 39,5 | |||
| 70 1640 88 41,0 | |||
| 75 1700 90 42,5 | |||
| 80 1760 92 44,0 | |||
| 85 1820 94 45,5 | |||
| 90 1880 96 47,0 | |||
| 95 1940 98 48,5 | |||
| 100 2000 100 50,0 | |||
CESKY
Uvod
MF2: 0-10 Vdc analogovy vystup + Connectair (cteni) - [SW1 = ON, SW2-4 = OFF]
MF4: Ovladani Connectair - [SW1-3 = ON, SW4 = OFF]
Pristup k rizeni pomoci Connectair. Tovarni nastaveni je 1200 ppm / 73%HR / 30°C
Trida el. ochrany Trida II
Požadovany druh instalace .........Typ X
Maximánlí spotreba 1,0W
Maximánlí proud 0,01A
Vystup. 0-10Vdc, 2-10Vdc, maximálí proud 20 mA

Relé NC. 3A - 250Vac
Relé NO 3A-250Vac
Verze VOC [SW5=ON, SW6=OFF]
Verze RH [SW5=OFF, SW6=ON]
Temperature version [SW5-SW6=ON]
| Nastavení potenciometru P1 (%) | režim MF1: pracovné bod režimiy MF2/MF3: horní limit | |
| ppm HR Teplota [°C] | ||
| 0 800 60 20,0 | ||
| 5 860 62 21,5 | ||
| 10 920 64 23,0 | ||
| 15 980 66 24,5 | ||
| 20 1040 68 26,0 | ||
| 25 1100 70 27,5 | ||
| 30 1160 72 29,0 | ||
| 35 1220 74 30,5 | ||
| 40 1280 76 32,0 | ||
| 45 1340 78 33,5 | ||
| 50 1400 80 35,0 | ||
| 55 1460 82 36,5 | ||
| 60 1520 84 38,0 | ||
| 65 1580 86 39,5 | ||
| 70 1640 88 41,0 | ||
| 75 1700 90 42,5 | ||
| 80 1760 92 44,0 | ||
| 85 1820 94 45,5 | ||
| 90 1880 96 47,0 | ||
| 95 1940 98 48,5 | ||
| 100 2000 100 50,0 | ||
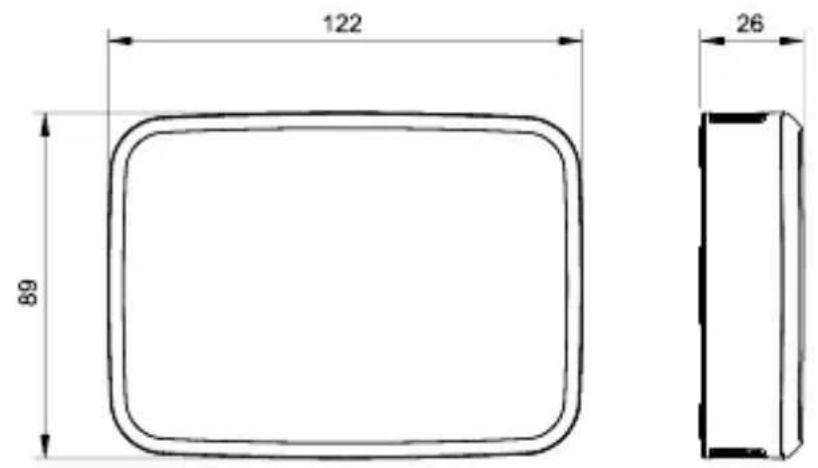
Fig.3: Dimensiones / Dimensions / Dimensioni / Abmessungen / Afmetingen / Rozměry
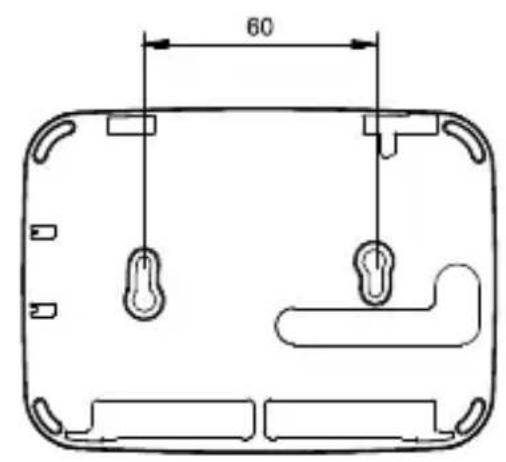
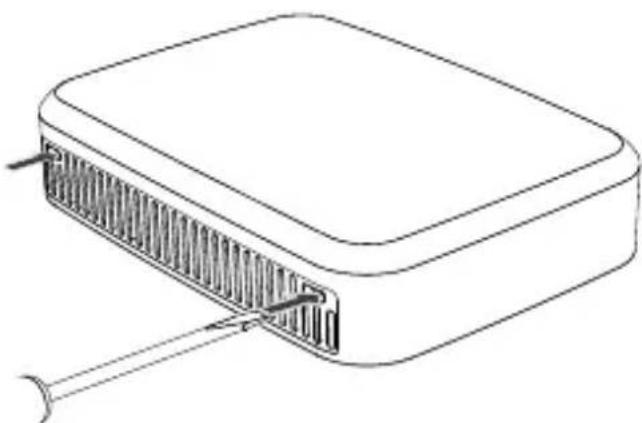
Fig.4: Desmontaje tapa frontal / Front cover dismounting / Demontage du couvercle / Smontaggio coperchio frontale / Demontage der Frontabdeckung / Demontage voorklep / Sejmutí prédniho krytu
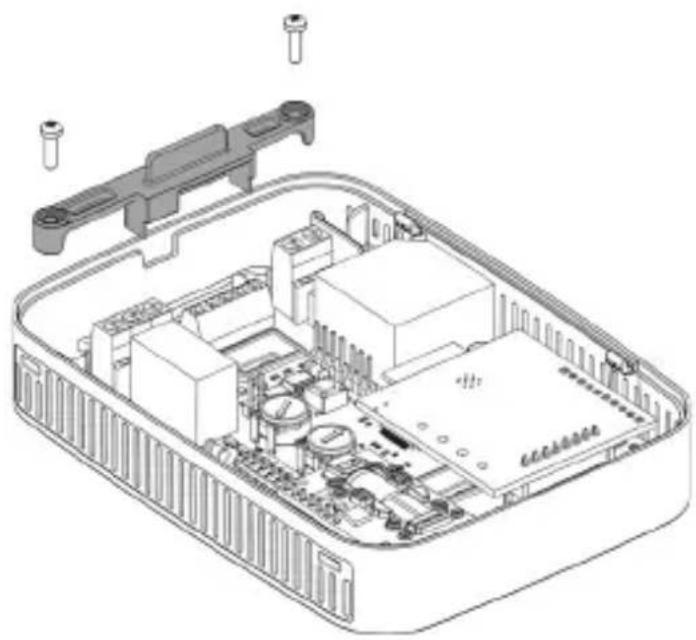
Fig.5: Retencion cables / Cable retention / Fissaggio del cavo / Retention de cables / Zugentlastung / Kabel borging / Upevneni kabelu

S&P SISTemas DE VENTILACION, S.L.U.
C. Llevant, 4
Poligono Industrial Llevant 08150 Parets del Valles Barcelona - España
Tel. +34 93 571 93 00 www.solerpalau.com

Ref. 9023117401