— Hi-fi system — Mode d'emploi PDF")
LIFE P64014 (MD 43365) - Hi-fi system MEDION - Free user manual and instructions
Find the device manual for free LIFE P64014 (MD 43365) MEDION in PDF.
User questions about LIFE P64014 (MD 43365) MEDION
0 question about this device. Answer the ones you know or ask your own.
Ask a new question about this device
Download the instructions for your Hi-fi system in PDF format for free! Find your manual LIFE P64014 (MD 43365) - MEDION and take your electronic device back in hand. On this page are published all the documents necessary for the use of your device. LIFE P64014 (MD 43365) by MEDION.
USER MANUAL LIFE P64014 (MD 43365) MEDION
natural_image
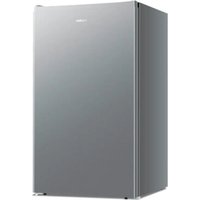
Black audio streaming setup with two speakers and a central MEOHON audio speaker (no visible text or symbols on main components)DAB+ Micro Audio System
DAB+ Micro Audio System
1. Information about this user manual....41
1.1. Explanation of symbols ......41
2. Proper use
3. EU declaration of conformity.... 43
4. Safety information ......ES
4.1. Operating safety....44
4.2. Installation location ....44
4.3. Repairs....45
4.4. Ambient temperature ....46
4.5. Power supply 46
4.6. CD player....47
4.7. Handling batteries 4
5. Package contents
6. Device overview
6.1. Top....50
6.2. Front....51
6.3. Back....52
6.4. Remote control....53
7. Getting started
7.1. Unpacking and setting up ....54
7.2. Inserting/replacing batteries in the remote control ....54
7.3. Connecting the loudspeakers ....54
7.4. Antenna connection 5
7.5. Mains connection ....5
7.6. Connecting USB devices 55
7.7. Connecting an external device to the LINE IN connection ....55
7.8. Switching the device on/off 55
7.9. Operation using the controls on the device or remote control .....55
7.10. Volume/mute/equaliser....55
7.11. Dimmer function....56
7.12. Setting the language 56
7.13. Setting the time and date manually....56
8. Switching on the device/standby 56
9. Radio mode 56
9.1. DAB mode....57
9.2. FM mode ....58
9.3. Station information 5
10. Sleep timer 59
11. Alarm times....59
11.1. Setting the alarm time 60
EN
11.2. Stopping the alarm/activating the snooze function ....61
12. Playing back CDs and USB storage media 61
12.1. Notes on the media 61
12.2. Track information (ID3) 62
12.3. Inserting/removing a disc 62
12.4. Inserting USB memory sticks 62
12.5. Starting/stopping playback....62
12.6. Track selection, fast rewind/forward ....62
12.7. Folder selection 62
12.8. Programming the track playing order 63
12.9. Repeat / random playback / intro 63
13. Bluetooth mode 63
13.1. Connecting Bluetooth devices ....64
13.2. Control via remote control (Bluetooth range) 64
14. Playback on the LINE IN connection 64
15. System menu 64
16. Resetting the device.... 66
15.1. Overview of the menus ....65
17. Troubleshooting 67
18. Cleaning 68
19. Storing the device when not in use....68
20. Disposal 69
21. Technical specifications 70
22. Service information 72
23. Legal notice 73
24. Privacy statement 74
1. Information about this user manual

Thank you for choosing our product. We hope you enjoy using this device.
Please read the safety instructions and the user manual carefully before using the device for the first time. Note the warnings on the device and in the user manual.
Always keep the user manual close to hand. If you sell the device or give it away, please ensure that you also pass on this user manual. It is an essential component of the product.
1.1. Explanation of symbols
If a block of text is marked with one of the warning symbols listed below, the hazard described in that text must be avoided to prevent the potential consequences described there from occurring.

DANGER!
Warning: risk of fatal injury!

WARNING!
Warning: risk of possible fatal injury and/or serious irreversible injuries!

CAUTION!
Warning: risk of minor and/or moderate injuries!

WARNING!
Warning: risk of electric shock!

More detailed information on using the device!
- Bullet point/information on steps during operation
▶ Instruction to be carried out
2. Proper use
Your device can be used in a range of ways: The device is intended for playing sound media (CDs, MP3 data media, USB devices), as well as for radio reception. You can also connect it to external devices to play audio data wirelessly, using Bluetooth.
- The device is only intended for private use and not for industrial/commercial use.
Note that no liability will be accepted if this product is not used for its intended purpose:
- Do not modify the device without our express agreement and do not use any accessories that have not been supplied or approved by us.
- Only use replacement parts or accessories that we have supplied or approved.
- Comply with all the information in this user manual, especially the safety information. Any other use is considered improper and can cause personal injury or property damage.
- Do not use the device in potentially explosive atmospheres. This includes petrol stations, fuel storage areas and areas where solvents are processed. This device must also not be used in areas with particle-laden air (for example flour or wood dust).
- Do not use the device outdoors.
- Do not expose the device to extreme conditions. Avoid:
–high humidity or wet conditions
—extremely high or low temperatures
–direct sunlight
-naked flames.
3. EU declaration of conformity
MEDION AG hereby declares that this device complies with the fundamental requirements and the other relevant provisions of:
• Radio Equipment Directive 2014/53/EU
• Ecodesign Directive 2009/125/EC (and Ecodesign Regulation 2019/1782)
• RoHS Directive 2011/65/EU.
You can download the complete EU Declaration of Conformity at www.medion.com/conformity.
4. Safety information
4.1. Operating safety
This device may be used by children over the age of 8 and by persons with limited physical, sensory or mental abilities or by those without experience and knowledge, if they are supervised or have been instructed in the safe use of the device and have understood the dangers that result from it.
- Children should be supervised to ensure they do not play with this device.
- Cleaning and user maintenance may not be carried out by children unless they are supervised.
- Keep the device and accessories out of reach of children.

DANGER!
Risk of choking and suffocation!
Packaging film can be swallowed or used improperly, creating a risk of choking and suffocation.
- Keep packaging material such as plastic film or plastic bags away from children.
4.2.Installationlocation
- Keep your device and all connected components away from moisture and avoid dust, heat, direct sunlight and naked flames (such as candles, for instance). Non-compliance with these instructions can lead to faults or damage to the display.
-
Do not use the device outdoors as it could be damaged by weather such as rain, snow etc.
-
Avoid exposing the device and the power pack to water droplets or spray and do not place any liquid-filled containers (vases or similar) on or next to the device or the power pack. Liquids penetrating the device may impair the electrical safety of the product.
- The slots and openings on the device are for ventilation purposes. Do not cover these openings (risk of overheating, fire hazard)!
- Position the cables so that no-one can tread on them or trip over them.
- Make sure that there is enough clearance between the device and any surrounding furniture or walls. Ensure a minimum clearance of 10 cm around the device for sufficient ventilation.
- Place and operate all the components on a stable, level and vibration-free surface in order to prevent the device from falling.
4.3. Repairs
- Contact customer services if:
–the mains cable is burnt or damaged
–liquid has penetrated the device
—the device is not operating correctly
–the device has fallen or the housing is damaged.
- Repairs to your device should only be carried out by qualified specialists.
- If a repair must be carried out, please contact only our authorised service partners.
4.4. Ambient temperature
- The device can be operated at an ambient temperature of 0^ to +35^ and at a relative humidity of < 80% (non-condensing).
- When switched off, the device can be stored at temperatures of between -20^ and +60^ .

DANGER!
Risk of electric shock!
Major changes in temperature or fluctuations in humidity can cause moisture to build up within the device due to condensation – this can cause an electrical short circuit.
▶ After transporting the device, wait until it has reached ambient temperature before switching it on.
4.5. Power supply

DANGER!
Risk of electric shock!
Even when the mains switch is off, some components of the device are live.
In order to disconnect the power to your device or to completely isolate the device from voltage sources, remove the mains plug from the socket.
- Operate the device only from a 220 to 240V 50 to 60Hz earthed power socket that is close by and easy to access.
- To disconnect the power supply from your device, unplug the mains plug from the power socket.

DANGER!
Risk of electric shock!
The device contains live parts. They pose a risk of electric shock or fire if an unintentional short circuit occurs.
▶ Never open the housing and never insert any objects through the slots and openings into the device!
- Do not place any objects on the cables as they may be damaged.
- Keep the device at a distance of at least one metre from sources of high-frequency or magnetic interference (televisions, speakers, mobile telephones etc.) to avoid malfunctions and data loss.
4.6. CD player

text_image
LASER KLASSE 1 CLASS 1 LASER PRODUCT APPAREIL LASER DE CATEGORIE 1The CD player is a class 1 laser product. The device has a safety system that prevents dangerous laser beams from escaping during normal use. To avoid eye injuries, never tamper with or damage the device's safety system.
4.7. Handling batteries
The remote control is battery-operated. Please note the following:
- Keep new and used batteries out of the reach of children. Do not swallow batteries as they can cause chemical burns.

WARNING!
Risk of chemical burns!
The remote control supplied with the device contains a battery. If this battery is swallowed, it can cause serious internal chemical burns within 2 hours, which may prove fatal.
▶ Seek medical help immediately if you think that batteries may have been swallowed or secreted in any part of the body.
- Stop using the remote control if you cannot close the battery compartment securely, and keep it well away from children.
- Before inserting the batteries, check that the contacts in the device and on the batteries are clean and, if necessary, clean them.
• Always use new batteries of the same type. Never use old and new batteries together.
- Pay attention to the polarity (+/−) when inserting the batteries.
- There is a risk of explosion if batteries are replaced incorrectly! Only replace batteries with those of the same or an equivalent type.
- Never try to recharge non-rechargeable batteries. Risk of explosion!
- Never expose the batteries to excessive heat (such as direct sunlight, fire or similar).
- Store batteries in a cool, dry place. Strong direct heat can damage batteries. Do not expose the device to sources of intense heat.
- Never short-circuit batteries.
- Never throw batteries into a fire.
- Remove leaking batteries from the device immediately. Clean the contacts before inserting new batteries. Battery acid can cause chemical burns!
• Always remove flat batteries from the device.
- If the device is not going to be used for long periods, remove the batteries.
5. Package contents
Please check your purchase to ensure that all items are included. If anything is missing, please contact us within 14 days of purchase. The following items are supplied with your device:
- Micro audio system
• 2 loudspeaker boxes - 1 remote control
- 1 x 1.5 V AAA battery
- Wire antenna
- Documentation

DANGER!
Risk of choking and suffocation!
Packaging film can be swallowed or used improperly, creating a risk of choking and suffocation.
▶ Keep packaging material such as plastic film or plastic bags away from children.
6. Device overview
6.1. Top
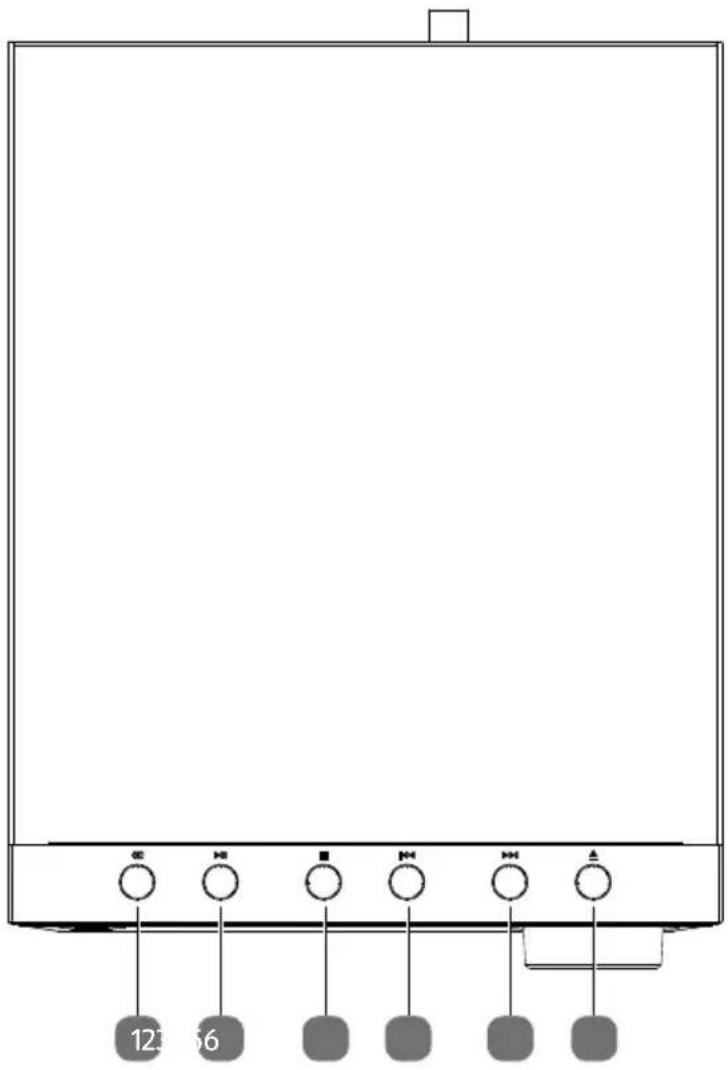
text_image
12 561) - Select playback mode
2) ▶ II – Start/pause playback
3) ■ - Stop playback
4) ◀◀ – Previous track; rewind
5) ◀◀/▶▶ – Next track; fast forward
6) ▲ - Open/close disc tray
6.2. Front
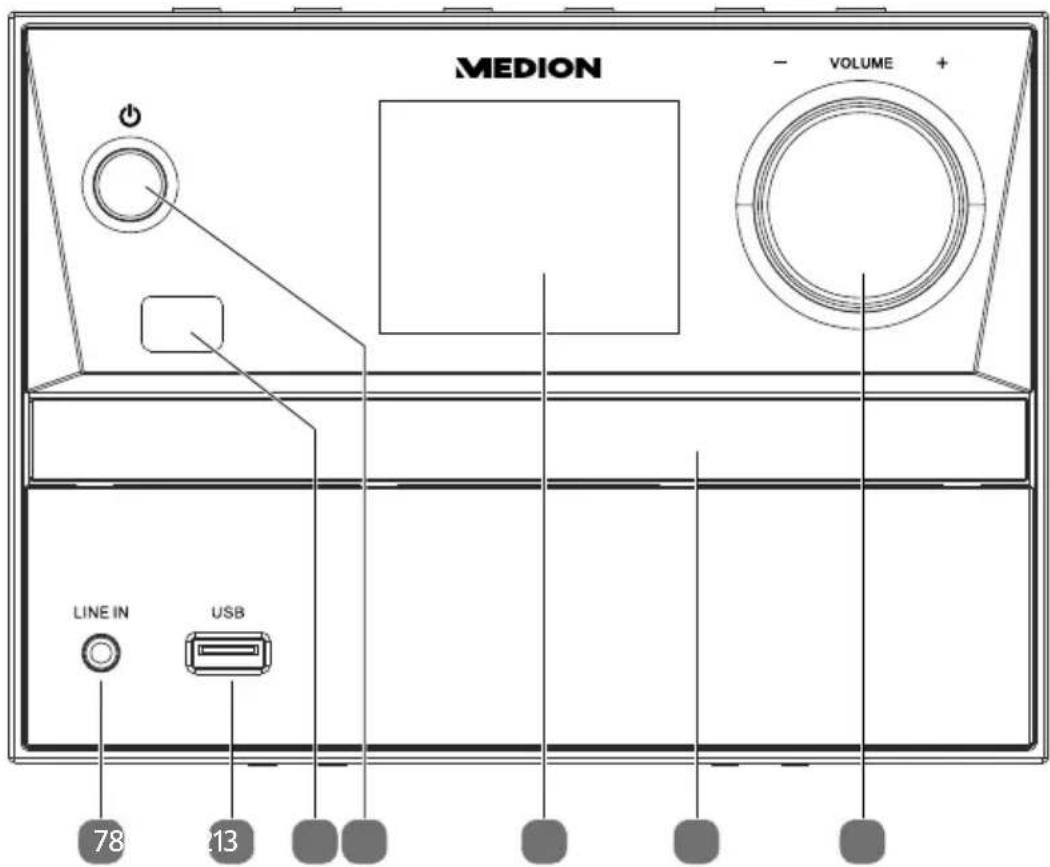
text_image
MEDION VOLUME + - LINE IN USB 78 137) LINE IN – Connection socket for external audio device (3.5 mm cinch)
8) USB - USB port
9) Infrared transmitter on the remote control
10) - Switch on the device/switch to standby mode
11) Display
12) CD compartment
13) -VOLUME+ – Volume control
6.3. Back
text_image
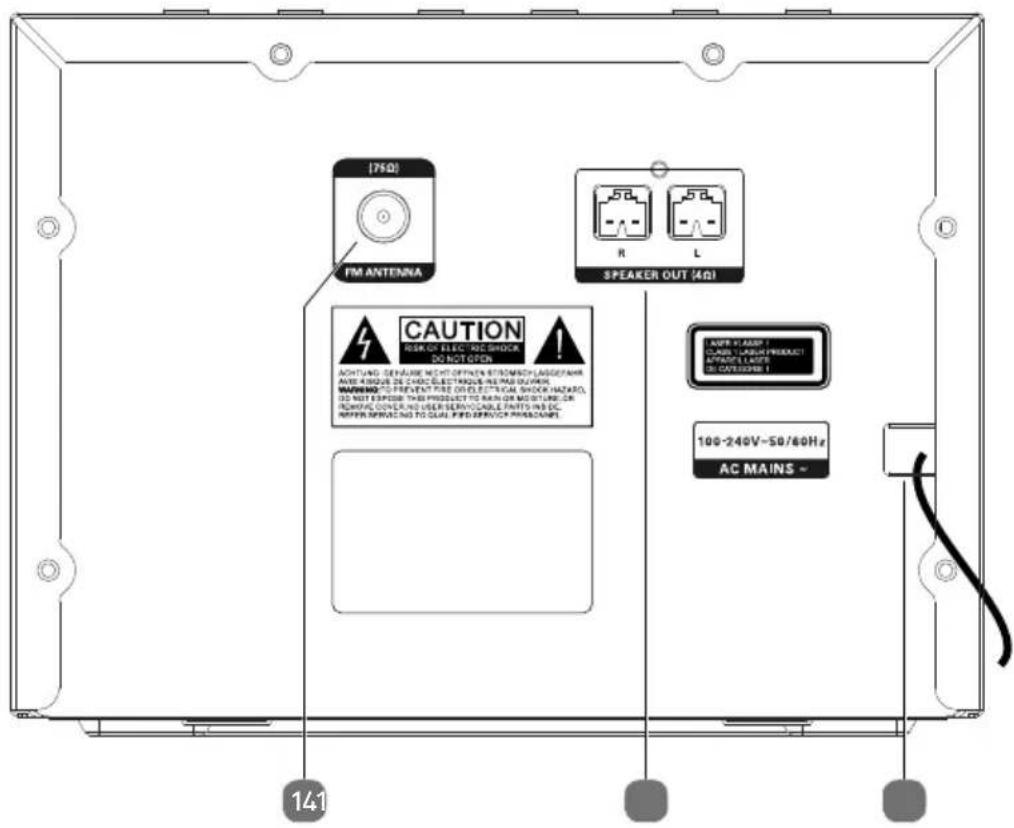
[75Ω] FM ANTENNA R L SPEAKER OUT [4Ω] CAUTION RESK OF ELECTRIC SHOCK DO NOT DOOR ACHTUNG. DÉVAURE MIGHT OFFRATS STRONG/LEASCHANS AVIER ENQUISE DE CHOC ELECTRIGUE INSURANCE WARNING TO PREVENT PASE ON ETRICAL SHOCK HAZARD, DO NOT EXPOXIR THE PRODUCT TO RAIN OR MOISTURE OR REMOVAL COVER IN USE SERVOCABLE PAINTS IN DC. REPER OPENING TO QUAL FIPS SERVICE PROCEDURE AWEI CLASS1 CLASS 1, BASE PRODUCT APPROD. CLASS DE CATEGORIES1 100-240V~50/60Hz AC MAINS ~ 14114) FM ANTENNA – Wire antenna connection socket
15) SPEAKER OUT L/R – Connection jacks for loudspeakers
16) Mains connection
6.4. Remote control
text_image
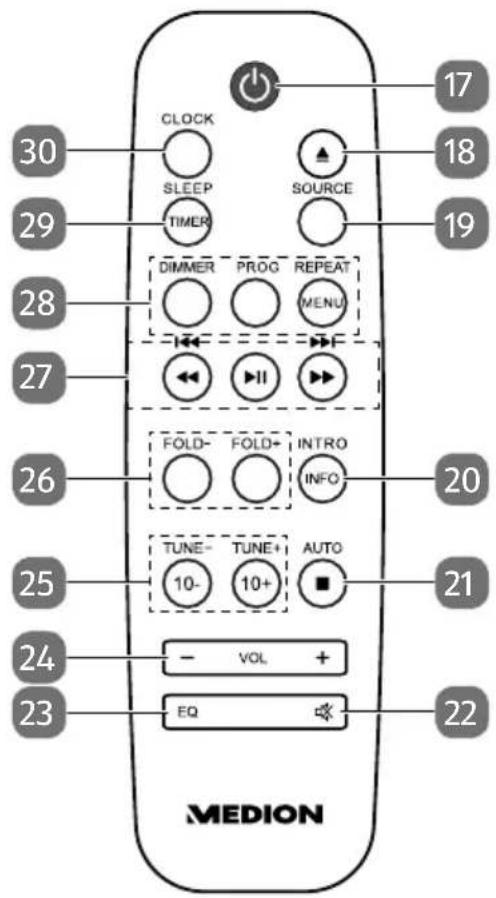
30 29 28 27 26 25 24 23 CLOCK SLEEP TIMER DIMMER PROG REPEAT MENU FOLD- FOLD+ INTRO INFO TUNE- TUNE+ AUTO 10- 10+ EQ MEDION 17 18 19 20 21 2217) - Switch device on / switch to standby mode
18) - Open/close disc tray
19) SOURCE – Select playback mode
20) INFO – Radio: display station information, CD/USB: display track information; INTRO – Play track for 10 seconds
21) ■/AUTO – Stop playback/scan for radio stations
22) - Mate
23) EQ – Select equaliser mode;
24) VOL -/+ - Increase/reduce volume
25) TUN -/+ - Station search backwards/forwards
10 -/+ - Skip back/forward 10 tracks
26) FOLD -/+ - CD/USB: previous/next folder
27) ▶ II – Start/pause playback;
◀/▶ – Rewind/fast forward;
|◀/▶▶| – Previous/next track
28) DIMMER – Set display brightness;
PROG – Save button;
REPEAT/MENU – Set repeat function/open menu
29) SLEEP – Call up sleep mode;
TIMER – Set timer
30) CLOCK – Display/set time
7. Getting started
7.1. Unpacking and setting up
Place the device on a sturdy, level surface. Take care to ensure the following:
- the device is not exposed to intense sources of heat;
- the device is not exposed to direct sunlight;
- the device does not come into contact with liquids, not even water droplets or spray.

Unplug the device's mains plug before connecting a device.
7.2. Inserting/replacing batteries in the remote control
Insert the 1.5 V AAA battery in the remote control.
▶ Open the battery compartment cover.
Insert the battery so that the negative pole contacts the springs.
▶ Replace the battery compartment cover.

WARNING!
Risk of explosion if batteries are replaced incorrectly.
▶ Replace batteries only with the same or equivalent type.
7.3. Connecting the loudspeakers
▶ Ensure that your device is not connected to the mains power supply.
Plug the speaker cables into the correct, corresponding sockets on the rear of the Micro Audio System. R (right) for the right loudspeaker, L (left) for the left loudspeaker.
7.4. Antenna connection
To receive radio signals, connect the wire antenna to the FM ANTENNA connection socket on the device and move it until you get the best reception.
7.5. Mains connection
Once all other components are connected, connect the power cable.
Plug the mains plug into a properly installed 220–240 V \~ 50/60 Hz earthed power socket that is always easy to access.

If you do not need to use the device for a relatively long time, take it out of operation by unplugging the mains adapter from the mains power socket!
7.6. Connecting USB devices
USB memory sticks can be connected to the USB port. This enables music tracks to be played from a USB memory stick. The USB port does not support video playback.
▶ Plug a USB device into the USB port.
7.7. Connecting an external device to the LINE IN connection
There is a 3.5 mm jack labelled LINE IN on the front of the device.
▶ Plug the connection cable with a 3.5 mm jack plug into the jack connection.
7.8. Switching the device on/off
▶ Press the ⏻ button to switch on the device. The last source set is then played.
▶ Press the ⏻ button again to switch the device into standby mode.
7.9. Operation using the controls on the device or remote control
You can activate the main play functions on your audio system using the buttons on the device. In addition to the basic controls, the remote control also provides additional options for using all functions of your device.
In this user manual, we refer to the remote control buttons. If reference is made to the controls on the device itself, this will be clearly indicated.
7.10. Volume/mute/equaliser
To adjust the volume, use the VOL- and VOL+ buttons on the remote control or the control on the device.
▶ Press to mute the sound. It is shown on the display. Press the button again to cancel the mute setting. It disappears from the display.
▶ Press the EQ button once or several times to select one of the various sound presets: FLAT, ROCK, POP, CLASSIC.
7.11. Dimmer function
You can set the display brightness to two levels:
▶ Press the DIMMER button several times until the required brightness has been set.
7.12. Setting the language
You can select the following languages for the applicable menu language: English, German, Italian and French.
▶ Press and hold the MENU button until the menu is shown on the display.
▶ Press the ◀ or ▶ buttons to select SYSTEM.
▶ Press ▶ II to open the system settings.
▶ Press the ◀ or ▶ button to select LANGUAGE (depending on the language set, this may also be called LANGUE, LINGUA or SPRACHE).
▶ Press ▶ II to open the language settings.
▶ Press the ◀◀ or ▶◀ buttons to select your preferred language.
▶ Press ▶ II to confirm the selected language.
7.13. Setting the time and date manually
When the device is switched on for the first time, it automatically sets the date and time using the radio signals. Manual setting is not usually necessary. If this is necessary as a result of poor signal reception, proceed as follows:
▶ Press the CLOCK button. The hour then flashes on the display.
▶ Press the ◀◀ or ▶◀ buttons to set the desired hour and press ▶ ll to confirm.
▶ Press the ◀◀ or ▶◀ buttons to set the desired minutes and press ▶ ll to confirm.
▶ Press the ◀ or ▶ buttons to set the desired day and press ▶ II to confirm.
▶ Press the ◀◀ or ▶◀ buttons to set the desired month and press ▶ II to confirm.
▶ Press the ◀ or ▶ buttons to set the desired year.
▶ Then press the ▶ II button to confirm and store the configured settings.
You can configure additional manual settings for the time and date. An overview of the entire device menu is available in section "15. System menu" on page 64.
8. Switching on the device/standby
▶ Press the button to switch on the device.
▶ Press the ⏻ button again to switch the device back into standby mode. The time is displayed and the standby LED lights up.
9. Radio mode
You can use this device to receive FM and DAB stations.
Your device has the Dynamic Label Segment (DLS) information service, which displays information such as artist, song titles or current traffic news on the display.
9.1. DAB mode
When the device is switched on, press the SOURCE button on the remote control or the button on the device
▶ Use ◀ or ▶ to select the required source until DAB/DAB+ is highlighted on the display.
▶ Press ▶ II to confirm.
9.1.1. Retrieving stations from the station list
▶ Press the TUNE- or TUNE+ buttons once or several times to select the required DAB station from the station list.
▶ Press ▶ II to play the station.
Stations in the station list that cannot currently be played are highlighted with a ? symbol.
9.1.2. Storing stations automatically
A station list including all DAB stations that can be received was already created the first time the device was switched on. The stations are stored in alphabetical order.
You can, however, also manually perform a new search:
▶ Press the AUTO button to start the search.
The search is performed and all stations found are stored again. While this is happening, the search progress and the number of stations stored is displayed.

The previously stored station slots are overwritten.
9.1.3. Searching for stations manually
▶ Press and hold the MENU button until the menu is shown on the display.
▶ Press the ◀ or ▶ buttons to select MANUAL TUNE and press ▶ II to confirm.
The first reception block 5A with the corresponding frequency is shown on the display.
▶ Use the ◀◀ or ▶◀ buttons to select the required reception block. Familiarise yourself with the blocks that can be received in your transmission area.
▶ Press the ▶ II button to open the channel. The field strength of the selected block is shown on the display.
9.1.4. Storing a radio station
You can store 30 preset DAB stations.
▶ Set the preferred DAB station as described in section "9.1.1. Retrieving stations from the station list" on page 57.
▶ Press and hold the PROG button until PRESET STORE is shown on the display and a list of memory slots appears.
▶ Use the ◀ or ▶ buttons to select the required reception block.
▶ Press the ▶ II button to store the station in the memory slot. A confirmation message appears on the display.
9.1.5. Retrieving stored stations
▶ Briefly press one of the ◀◀ or ▶◀I buttons to run through the stored stations. The selected memory slot number is shown on the display.
9.2. FM mode
When the device is switched on, press the SOURCE button on the remote control or the Button on the device
▶ Use ◀◀ or ▶◀ to select the required source until FM is highlighted on the display.
▶ Press ▶ II to confirm.
9.2.1. Storing stations automatically
▶ Press the AUTO button to start the search.
The search is performed and all stations found are stored. While this is happening, the search progress and the number of stations stored is displayed.

The previously stored station slots are overwritten.
9.2.2. Searching for stations manually
▶ Press the TUNE- or TUNE+ button once or several times to select the desired frequency.
▶ Press and hold either the TUNE- or TUNE+ button to start an automatic station search forwards/backwards. The station search stops when the next strongest station signal is reached.
9.2.3. Storing a radio station
You can store 30 preset FM stations.
▶ Set the preferred FM station as described in section "9.2.2. Searching for stations manually" on page 58.
▶ Press and hold the PROG button until PRESET STORE is shown on the display and a list of memory slots appears.
▶ Use the ◀ or ▶ buttons to select the required reception block.
▶ Press the ▶ II button to store the station in the memory slot. A confirmation message appears on the display.
9.2.4. Retrieving stored stations
▶ Briefly press one of the ◀◀ or ▶◀ buttons to run through the stored stations. The selected memory slot number is shown on the display.
9.3. Station information
Use the Radio Data System to display more information, such as the radio station name, the radio text or the current type of programme for a radio station.
▶ Press the INFO button once, or several times, to display these functions.
10. Sleep timer
It is possible to programme a sleep timer on the device. After the set time, the device automatically switches to standby mode.
When the device is switched on, press the SLEEP button several times to set the required duration (15, 30, 45, 60 minutes, off).
The moon symbol is shown on the display along with the elapsing timer.
To switch off the sleep timer before the time has elapsed, press the SLEEP button several times until the moon symbol turns off.
11. Alarm times
It is possible to set two alarm times on the device. You can be woken by radio play-back or playback from a CD or USB stick. In addition, you can implement the alarm daily or only on certain days.
11.1. Setting the alarm time
If the device is switched on, press the ⏻ button until the device switches to standby mode. Only the date with both alarm times underneath are shown on the small display.
▶ Press and hold the TIMER button for a few seconds. ALARM 1 SETUP is shown on the display.
- Press the TIMER again to select the required ALARM 1 or ALARM 2 and press
- II to confirm.
▶ Use the ◀ or ▶ buttons to select the hour for the alarm time and press the ▶ II button to confirm.
▶ Use the ◀ or ▶ buttons to select the minutes for the alarm time and press the ▶ II button to confirm.
▶ Use the ◀◀ or ▶▶ buttons to select the alarm duration (15, 30, 45, 60, 90 minutes) and press the ▶ II button to confirm.
▶ Use the ◀ or ▶ buttons to select how you would prefer to be woken: DAB radio (DAB), FM radio (FM), CD (CD), USB stick (USB) and press the ▶ II button to confirm.
If you have selected DAB or FM, the radio station selection now appears. Select LAST LISTENED to be woken by the last radio station that was listened to or select one of the stored stations (1–30; only when stations have already been stored). Press the ▶ II button to confirm.
▶ Use the ◀ or ▶ buttons to set how regularly the alarm is to sound (daily, once, weekends, work days) and press the ▶ II button to confirm.
▶ Use the ◀ or ▶ buttons to select the alarm volume (min. level 4) and press the ▶ II button to confirm.
▶ Then use the ◀ or ▶ buttons to switch the alarm on/off and press the ▶ II button to confirm.
If at least one alarm is switched on, an alarm symbol with the number of alarms is shown on the display. In standby mode, the alarm status with the set alarm time is displayed.

When in DAB alarm mode, if the set station is not available at the wake-up time, no tone is played.
11.2. Stopping the alarm/activating the snooze function
When the alarm sounds, you can
▶ press ⏻ to deactivate it until the next alarm time
▶ or press the ▶ II button to start the snooze function for 9 minutes. If the snooze function is active, the remaining time is shown on the display. To stop the snooze function before the time has elapsed, press to deactivate the alarm until the next alarm time.
11.2.1. Activating/deactivating the alarm
▶ Press and hold the TIMER button for a few seconds. ALARM 1 SETUP is shown on the display.
▶ Press the TIMER again to select the required ALARM 1 or ALARM 2.
▶ Use the ◀◀ or ▶◀ buttons to switch the alarm time on/off and press the ▶ II button to confirm.
If an alarm is switched on, the alarm time is shown next to the respective alarm symbol. If the alarm is switched off, OFF is shown in this position.
12. Playing back CDs and USB storage media
When the device is switched on, press the SOURCE button on the remote control or the button on the device
▶ Use ◀ or ▶ to select the required source until CD or USB is highlighted on the display.
▶ Press ▶ II to confirm.
12.1. Notes on the media
USB memory sticks can be connected to the USB port. Note the following:
- Due to the numerous different file systems and file formats, connected USB memory sticks cannot be guaranteed to function.
- Depending on the size of the data medium, it may take some time for the system to be detected.
- Supported file systems are FAT16 and FAT32. The supported file format is MP3.
- Depending on the medium, certain functions may not be supported. For example, on an audio CD you might not be able to select a track or the track information.
- External hard disks are not supported.
12.2. Track information (ID3)
If the CD or the USB memory stick contains tracks with ID3 information, press INFO while a track is playing to display this information about the tracks one after the other. You will see the track, artist and album name on the display.
12.3. Inserting/removing a disc
Ensure there is approximately 15 cm of space in front of the device so that the CD can be ejected easily.
When the device is switched on, open the CD tray by pressing the ▲ button.
▶ Always place a CD in the disc tray with the labelled side facing upwards.
▶ Press th▲ button to close the disc tray.
READING will appear on the display.
The total number of tracks on the CD and the total running time are displayed. The first track then starts playing automatically.
If no disc is inserted, or if the disc cannot be read, NO DISC is shown on the display.
▶ Press the ▲ button to eject the CD again. OPEN appears on the display and the CD is ejected.
12.4. Inserting USB memory sticks
Insert the USB memory stick into the USB port.
The tracks are read, and the display shows the total number of albums and tracks in stop mode.
12.5. Starting/stopping playback
▶ Press the ▶ II button to start playing tracks. To pause playback, press the button again. Press the button again to resume playback.
12.6. Track selection, fast rewind/forward
▶ Press the ◀ button to go back to the start of the track that is currently being played. Press the button again to skip to the previous track. Use the ▶ button to skip to the next track.
▶ Hold down the ◀ button to fast rewind within a track or hold down the ▶ button to fast forward.
12.7. Folder selection
If you are playing MP3 files, you can store them in different folders to make it easier to keep an overview of the tracks.
▶ Press either the FOLD- or FOLD+ button to change folder on an MP3 data medium.
12.8. Programming the track playing order
Use the programme function to create your own music playlist by selecting which specific tracks you want to play. You can specify the order in which the list is played yourself. Proceed as follows:
▶ Press ■ to stop playback.
▶ Press the PROG button. A star symbol with the programme position 01 and the track display T1 is shown on the display.
▶ Now press ◀◀ or ▶▶ to select a track.
▶ Press the PROG button to save more tracks in the same way.
▶ Press ▶ II to start playing back the programmed playlist.
▶ To delete the programmed playback, press ■ twice.
12.9. Repeat / random playback / intro
▶ Press the REPEAT button once or several times to run through the repeat modes. The device has a number of different modes:
- Repeat individual track ( ⬇ is shown on the display)
- Repeat all tracks ( ⊆ is shown on the display)
- Play tracks in random order ( ✗ is shown on the display).
If you have programmed a playlist (see previous section), and are shown only when the repeat function is active.
▶ Press the INTRO button to play a few seconds of the tracks, one after the other.
13. Bluetooth mode
You can use Bluetooth to play tracks wirelessly from external devices such as MP3 players or mobile phones with Bluetooth on this device.
When the device is switched on, press the SOURCE button on the remote control or the button on the device
▶ Use ◀ or ▶ to select the required source until BLUETOOTH is highlighted on the display.
▶ Press ▶ II to confirm.
13.1. Connecting Bluetooth devices
- Enable the Bluetooth function on your external device and then connect to it. Refer to the user manual for your device for more information. The audio system's name is "MD 43365".
If you are prompted to enter a password on the external device, enter "0000" as the password.
▶ You have now set up the connection and can use the external device with the audio system.
You can control how tracks are played, the volume and a range of special functions on your external device and on the audio system. What functions are available is dependent on your external device and the software that you use.
If you want to stop data transfer via Bluetooth, either switch off the Bluetooth function on the external device or select a different source on the audio system.
13.2. Control via remote control (Bluetooth range)
You have the following options for controlling the tracks using the audio system's remote control:
To adjust the volume, use the VOL- and VOL+ buttons on the remote control or the control on the device.
- Press ▶ II to start or pause playback.
- Press ◀ or ▶ to go back to the previous track or skip to the next track.
Please note: not every function is available for every external device. Some functions may be displayed in the external device's display.
14. Playback on the LINE IN connection
Connect an external device as described in section "7.6. Connecting USB devices" on page 55. Playback is controlled via the external device.
15. System menu
Proceed as follows to navigate through this menu and change the settings:
If the device is switched on, press and hold the MENU button to access the menu. The menu entries differ depending on the operating mode set. Please refer to the table below for further information.
▶ Use the ◀◀ or ▶◀ buttons to select a specific menu or specific entry.
▶ Press the ▶ II button to open a specific menu or to confirm a setting.
▶ Press MENU to return to the previous menu.
▶ Press and hold MENU to exit the menu directly.
15.1. Overview of the menus
15.1.1. Menus in DAB mode
All setting options for DAB mode can be found here.
| FULL SCAN | Automatic station search | |
| MANUAL TUNE | Select the station block manually, see also “9.1.3. Searching for stations manually” on page 57 | |
| DRC | OFF | Dynamic Range Control (DRC): Compression selection; default setting: off |
| LOW | ||
| HIGH | ||
| PRUNE | Delete all DAB stations that cannot be received in the current region. | |
| YES | Delete the station | |
| NO | Do not delete the stationInactive stations are highlighted in the station list with a ? symbol. | |
SYSTEM: See "15.1.3. System menu" on page 65
15.1.2. Menus in FM mode
All setting options for FM mode can be found here.
| SCAN SETTING | ALL STATIONS | Select whether the search is to include all stations or only stations with a strong signal. |
| STRONG STATIONS ONLY | ||
| AUDIO SETTING | STEREO ALLOWED | Choose whether mono or stereo sound is played. |
| FORCED MONO |
SYSTEM: see the next section.
15.1.3. System menu
All setting options for the SYSTEM menu that you can configure in all operating modes can be found here.
| SYSTEM | TIME | SET TIME/DATE, see also “7.13. Setting the time and date manually” on page 56 | |
| AUTO UPDATE | Choose whether or not the date and time are set automatically via the DAB or FM signal. | ||
| SET 12/24 HOUR | Set the 12-hour or 24-hour time format. | ||
| SE DATE FOR-MAT | Set the date format. | ||
| BACKLIGHT | TIMEOUT | Set how many seconds are to elapse before the display dims. | |
| ON LEVEL | Select the maximum display brightness. | ||
| LANGUAGE | Select the menu language “7.12. Setting the lan-guage” on page 56 | ||
| FACTORY RE-SET | Reset to factory settings All stored settings and stations will be de-leted. All stored settings and stations will be de-leted. | ||
| SOFTWARE UPGRADE | Updating the software | ||
| SW VERSION | Display of software version | ||
16. Resetting the device
The device can be reset as described in the previous section under SYSTEM / FACTORY RESET.
17. Troubleshooting
If a fault occurs, first see whether you can resolve the problem yourself. You might find this overview useful.
| Fault Possible cause Corrective action | ||
| No sound | The current volume is set too low. | Increase the volume. |
| The mute setting is activated. Switch off the mute setting. | ||
| When the device is connected via AUX/LINE IN or Bluetooth: The volume of the external device is too low. | Increase the volume on the external device. | |
| Headphones are connected. The sound playback on the loudspeakers is interrupted if headphones are connected. | Unplug the headphone jack plug from the headphone socket. | |
| No or poor radio reception | The station signals are too weak. | Adjust the frequency of the stations.Move the radio to a different location or change the direction of the antenna to improve the reception, if necessary. |
| CD is not played. | Condensation has formed. | Pull the mains plug out of the mains outlet and wait until the device and the CD has adapted to the environmental conditions. |
| Incorrect CD format. | The device only supports the CD formats specified in the technical data. | |
| The CD is dirty or incorrectly inserted. | Clean the CD and insert it into the CD compartment with the label facing upwards. | |
| No function | The mains plug is not inserted correctly. | Check if the mains plug is inserted in the outlet correctly. |
| The device is disrupted by a thunderstorm, static charge or another external factor. | Pull the mains plug out of the outlet and then plug it in again. | |
18. Cleaning
Only use a slightly damp cloth with mild cleaning solution or an antistatic cloth. Ensure that no liquids penetrate the device.
▶ Wipe the device housing regularly with a slightly damp cloth or an antistatic cloth.
19. Storing the device when not in use
If you do not intend to use the device over a longer period of time, store it in a cool, dry place and make sure that it is protected from dust and extreme temperature fluctuations.
Remove the mains adapter from the mains socket.
20. Disposal

PACKAGING
Your device has been packaged to protect it from damage in transit. The packaging is made of materials that can be recycled in an environmentally friendly manner.

DEVICE
All old devices marked with the symbol shown must not be disposed of in normal household waste.
In accordance with Directive 2012/19/EU, the device must be properly disposed of at the end of its service life.
This involves separating the materials in the device for the purpose of recycling and minimising the environmental impact.
Take old devices to an electrical scrap collection point or a recycling centre.
Contact your local waste disposal company or your local authority for more information on this subject.

BATTERIES
Do not dispose of used batteries with normal household rubbish. Batteries must be disposed of correctly. For this purpose, retailers that sell batteries and local collection points provide containers in which you can dispose of them. Contact your local waste disposal company or your local authority for more information.
In connection with the sale of batteries or the supply of devices containing batteries, we are obliged to draw your attention to the following:
As the end user, you are legally required to return used batteries.
The crossed-out wheelie bin symbol means that the battery must not be disposed of with household rubbish.
21. Technical specifications
| Power supply | |
| Voltage AC 100-240 V~ 50/60 Hz | |
| Power consumption Approx. 20 W | |
| Power consumption in standby mode 0.8 W | |
| Output power 2 x 15 watt RMS | |
| Remote control batteries 1 x 1.5 V R03/LR03/AAA | |
| Radio | |
| FM band 87.5–108 MHz | |
| DAB band III 174.928–239.200 MHz | |
| RDS Yes | |
| Station memory 40 (DAB), 40 (FM) | |
| CD player | |
| Laser output Class 1 laser product | |
| Supported formats | CD-R, CD-RW, audio CD, MP3 CD |
| Bluetooth | |
| Version | 5.0 |
| Profile | A2DP, AVRCP |
| Range | Up to 10 metres (without obstacles) |
| Frequency range | 2402–2480 MHz |
| Maximum transmission power | 3.1 dBm |
| Connections for external functions | |
| FM antenna Wire antenna | |
| AUX 3.5 mm jack | |
| USB input | Standard USB host (version 2.0) with up to 32 GB and MP3 decoding1 |
| USB output voltage DC 5 V max. 500 mA | --- |
| Environmental conditions | |
| Temperatures In operation: 5 °C to +35 °C | |
| Not in operation: 5 °C to +35 °C | |
| Humidity In operation: < 80% | |
| Not in operation: < 80% | |
| Dimensions/weight | |
| Width x height x depth | main unit: 180 x 135 x 240 mm speaker: 154 x 252 x 128 mm |
| Weight 3.2 kg | |
CE
22. Service information
Please contact our customer service team if your device ever stops working in the way you want or expect it to. There are several ways for you to contact us:
- In our Service Community, you can meet other users as well as our staff, and you can also share your experiences and pass on your knowledge.
You will find our Service Community at http://community.medion.com.
• Alternatively, use our contact form at www.medion.com/contact.
- You can also contact our customer service team via our hotline or by post.
| Opening times Multimedia products (PCs, notebooks, etc.) | |
| Mon-Fri: 07:00-23:00Sat-Sun: 10:00-18:00 | J +49 (0)201 22099-111 |
| Household & home electronics | |
| J +49 (0)201 22099-222 | |
| Mobile telephones, tablets & smartphones | |
| J +49 (0)201 22099-333 | |
| Service address | |
| MEDION AG45092 EssenGermany | |

You can download this user manual and many other user manuals from our service portal at www.medion.com/de/service/start/.
You will also find drivers and other software for a wide range of devices there.
You can scan the QR code shown to download the user manual onto your mobile device from the service portal.
23. Legal notice
Copyright © 2021
Date: 23.06.2021
All rights reserved.
This user manual is protected by copyright.
Mechanical, electronic and any other forms of reproduction are prohibited without the written permission of the manufacturer.
Copyright is owned by the company:
MEDION AG
Am Zehnthof 77
45307 Essen
Germany
Please note that you cannot use the above address for returns. Always contact our customer service team first.
24. Privacy statement
Dear Customer,
We wish to inform you that we, MEDION AG, Am Zehnthof 77, 45307 Essen, Germany process your personal data as a data controller.
For matters regarding data protection, we are supported by our company data protection officer, who can be contacted at MEDION AG, Datenschutz, Am Zehnthof 77, D – 45307 Essen; datenschutz@medion.com. We process your data for the purpose of warranty processing and associated processes (e.g. repairs) and rely on the sales contract concluded with us when processing your data.
Your data will be provided to repair service providers contracted by us for the purpose of warranty processing and associated processes (e.g. repairs). We generally store your personal data for a period of three years in order to fulfil your legal warranty rights.
You have the right to be informed of the personal data concerned as well as the right to rectification, erasure, restriction of processing, the right to object to processing and the right to data portability.
In the case of the right to be informed and the right to erasure, restrictions apply according to paragraphs 34 and 35 of the BDSG (Federal Data Protection Act) (Art. 23 of the GDPR). In addition, there is a right of appeal to a competent data protection supervisory authority (Article 77 of the GDPR in conjunction with paragraph 19 of the BDSG). For MEDION AG, this is the state official for data protection and freedom of information North Rhine-Westphalia, PO box 200444, 40212 Düsseldorf, Germany, www.ldi.nrw.de.
The processing of your data is necessary for warranty processing: it is not possible to process the warranty without the provision of the required data.