— Radio — Mode d'emploi PDF")
LIFE S66004 (MD 43461) - Radio MEDION - Free user manual and instructions
Find the device manual for free LIFE S66004 (MD 43461) MEDION in PDF.
| Brand | MEDION |
| Model | LIFE S66004 (MD 43461) |
| Product type | DAB+/FM alarm clock radio with Bluetooth |
| Dimensions (W x H x D) | 85 x 85 x 49 mm |
| Power supply | 230 V ~ 50 Hz, 6 W |
| Output power | 1 x 3 W RMS |
| Frequency ranges | FM: 87.5 – 108 MHz; DAB: 174 – 240 MHz |
| Bluetooth | Version 5, class II, range approx. 10 m |
| Main functions | DAB+ and FM radio, Bluetooth, dual alarm, sleep function, equalizer, information display (DLS) |
| Station memory | Up to 40 DAB presets and 40 FM |
| Alarm | 2 independent alarms with source selection (buzzer, DAB, FM), snooze, adjustable duration and volume |
| Sleep function | Adjustable timer: 15, 30, 45, 60 or 90 minutes |
| Equalizer | Presets: Classic, Pop, Rock, Jazz, Speech, My EQ (adjustable) |
| Menu languages | English, German, French, Italian, Spanish, Dutch, Norwegian, Polish, Finnish |
| Ambient temperature (operation) | 5 °C to 35 °C |
| Ambient temperature (storage) | 0 °C to 45 °C |
| Permissible humidity | 30% – 70% (non-condensing) |
| Maintenance and cleaning | Unplug before cleaning; use a soft, dry cloth; avoid solvents and chemicals |
| Safety | Do not open the casing; use only indoors; avoid moisture and excessive heat; protection class II |
| Package contents | Radio, user manual, warranty card |
Frequently Asked Questions - LIFE S66004 (MD 43461) MEDION
User questions about LIFE S66004 (MD 43461) MEDION
0 question about this device. Answer the ones you know or ask your own.
Ask a new question about this device
Download the instructions for your Radio in PDF format for free! Find your manual LIFE S66004 (MD 43461) - MEDION and take your electronic device back in hand. On this page are published all the documents necessary for the use of your device. LIFE S66004 (MD 43461) by MEDION.
USER MANUAL LIFE S66004 (MD 43461) MEDION
MEDION Service Center
text_image
QR code image containing encoded data, no visible human-readable text- Information about this user manual ....72
1.1. Explanation of symbols 73
-
Proper use
-
Safety instructions ...... FR
3.1. Operating safety
3.2. Connecting the device 84
3.3. Cleaning the device 86 IT
-
Package contents
-
EU declaration of conformity ....89 NL
5.1. Trademark information
- Device overview
6.1. Front view
6.2. Top view
- Getting started
7.1. Connecting the device 92
7.2. Switching the device on/off 92
7.3. Adjusting the aerial 93
7.4. Setting the volume 93
7.5. Setting the menu language 93
7.6. Setting the date and time 94
8. Radio mode
8.1. DAB mode....
8.2. FM mode
8.3. Viewing information on the display .....100
9. Setting the alarm 101
9.1. Activating/deactivating the alarm.....103
9.2. Stopping the alarm/activating the snooze function....103
10. Sleep timer
- Settings 10 11.1. Menu overview 10
- Bluetooth mode ....EN 12.1. Connecting Bluetooth devices for the first time....112 FR 12.2. Control ....113
- Cleaning ......ES
- Storing the device ...... 114
- Troubleshooting 11
- Disposal 11
- Technical specifications 118
- Service information
- Legal Notice
- Service information
- Legal Notice
- Privacy statement
1. Information about this user manual

Thank you for choosing our product. We hope you enjoy using this device.
Please read the safety instructions and the user manual carefully before using the device for the first time.
Note the warnings on the device and in the user manual.
Always keep the user manual close to hand. If you sell the device or give it away, please ensure that you also pass on this user manual. It is an essential component of the product.
1.1. Explanation of symbols
If a block of text is marked with one of the warning symbols listed below, the hazard described in that text must be avoided to prevent the potential consequences described there from occurring.

DANGER!
Warning: risk of fatal injury!

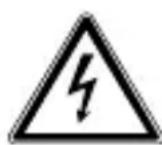
WARNING!
Warning: risk of possible fatal injury and/or serious irreversible injuries!
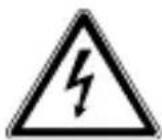
WARNING!
Warning: risk of electric shock!

NOTICE!
Follow the instructions to avoid property damage!

More detailed information about using the device!

Follow the instructions in the user manual!
• Bullet point/information on steps during operation
▶ Instruction to be carried out
CE
CE labelling
Products that feature this symbol meet the requirements of the EU directives (see EU declaration of conformity section).

Protection class II
Electrical devices in protection class II are electrical devices that permanently have double and/or reinforced insulation and do not have the option of connecting a protective earth. The housing of an electrical device in protection class II, with surrounding insulating material, might either form all of the additional or reinforced insulation, or part of it.

Symbol for alternating current (AC)
2. Proper use
Your plug-in radio is an entertainment electronics device and is suitable for music and sound play-back of digital and analogue radio programmes, as well as playback of audio data transmitted via Bluetooth®.
The device is only intended for private use and not for industrial/commercial use.
Please note that we shall not be liable in cases of improper use:
▶ Do not modify the device without our consent and do not use any auxiliary equipment that we have not approved or supplied.
▶ Only use replacement parts or accessories that we have supplied or approved.
▶ Comply with all the information in this user manual, especially the safety instructions. Any other use is considered improper and can cause personal injury or property damage.
3. Safety instructions

WARNING!
Risk of injury!
Risk of injury to persons with limited physical, sensory or mental abilities (for example, partially disabled people or older people with limited physical or mental abilities) or to those without experience and knowledge (such as older children).
▶ Keep the device and its accessories out of the reach of children.
This device can be used by children over the age of 8 and by persons with reduced physical, sensory or mental abilities or by those without experience and/or knowledge, if they are supervised or have been instructed in the safe use of the device and have understood the dangers that result from it.
▶ Children must not be allowed to play with the device.
▶ Cleaning and user maintenance must not be carried out by children.
▶ Children younger than 8 should be kept away from the device.
- Keep all packaging materials used (plastic bags, pieces of polystyrene etc.) out of the reach of children.
▶ Do not allow children to play with the packaging material.
3.1. Operating safety
WARNING!
Risk of electric shock!
Risk of injury from electric shock due to live parts.
▶ Check the device for damage before using the device for the first time, and after each use.
▶ Do not use the device if the device shows visible signs of damage.
▶ Contact the MEDION Service Centre without delay if you discover that the device has been damaged during transport or if you experience any technical problems.
▶ Do not open the device housing.
The device housing does not contain any parts that require cleaning or maintenance.
In the event of damage to the device or if liquids or foreign bodies get into the device, unplug the device from the power socket immediately.
If the device has been moved from a cold to a warm space, condensation may form inside the device. The resulting condensation may damage the device. The device can be operated safely as soon as it has reached room temperature.
▶ Unplug the device from the power socket if you are away for a long period or in the event of a thunderstorm.
3.2. Connecting the device
▶ Only connect the device to a properly installed, earthed and fused socket.
Before using the device, check that the voltage information on the device matches the local supply voltage.
The power socket must be easily accessible so that you can unplug the device from the mains quickly if necessary.

NOTICE!
Damage to the device/short circuit
Unfavourable environmental conditions such as moisture, excessive heat or insufficient ventilation may cause damage to the device.
▶ Only use the device indoors in dry rooms.
▶ Do not expose the device to extreme temperatures or tropical conditions.
The device may only be used and stored at ambient temperature, as stated in the technical specifications.
▶ Check the following when connecting the device:
- Do not expose the device to direct sources of heat (e.g. heaters).
-
There is a sufficient gap in relation to other objects and the device is not covered in order to ensure that there is always sufficient ventilation.
-
Do not leave the device in direct sunlight.
- Contact with moisture, water or splashes is avoided, and no liquid-filled objects (for example, vases) are placed on or near the device.
- The device is not exposed to dripping or sprayed water.
- The device is not placed close to magnetic fi elds (e.g. television sets or other speakers).
- No naked flames (e.g. lit candles) are placed near the device.
3.3. Cleaning the device
Before cleaning, unplug the device from the power socket.
▶ Use a soft, dry cloth to clean the device.
▶ Avoid the use of chemical solutions and cleaning products because these may damage the device surface and/or the labels on it.
4. Package contents

DANGER!
Risk of choking and suff ocation!
There is a risk of choking and suffocation due to swallowing or inhaling small parts or plastic wrap.
▶ Keep the plastic packaging out of the reach of children.
▶ Please check your purchase to ensure that all items are included. If anything is missing, please contact us within 14 days of purchase.
The following items are supplied with your product:
- Plug-in radio
- User manual and warranty card
5. EU declaration of conformity
MEDION AG hereby declares that the radio equipment type MD 43461 complies with the directive 2014/53/EU (RE directive), as well as the directive 2009/125/EC (ecodesign directive) and the directive 2011/65/EU (RoHS directive). The complete EU declaration of conformity is available at: www.medion.com/conformity.
5.1. Trademark information
The Bluetooth ^® word mark and logos are registered trademarks of Bluetooth SIG, Inc. and are used by Medion AG under license.
Other trademarks are the property of their respective owners.
6. Device overview
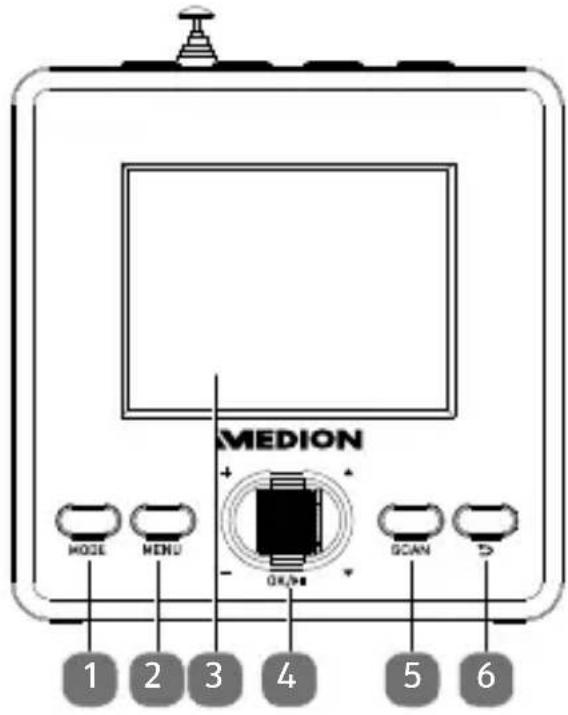
6.1. Front view
text_image
MEDION MODE MENU OK/No SCAN D 1 2 3 4 5 61) MODE – select operating mode
2) MENU – open menu
3) Display
4) +/- - turn: increase/decrease volume; ▲/▼ - turn: navigate up/down through the menu OK/▶ II - press: confirm selection in menu, station/track info, start/pause playback; press and hold in DAB mode: switch station view
5) SCAN – DAB/FM: start station search
6) -back button
6.2. Top view
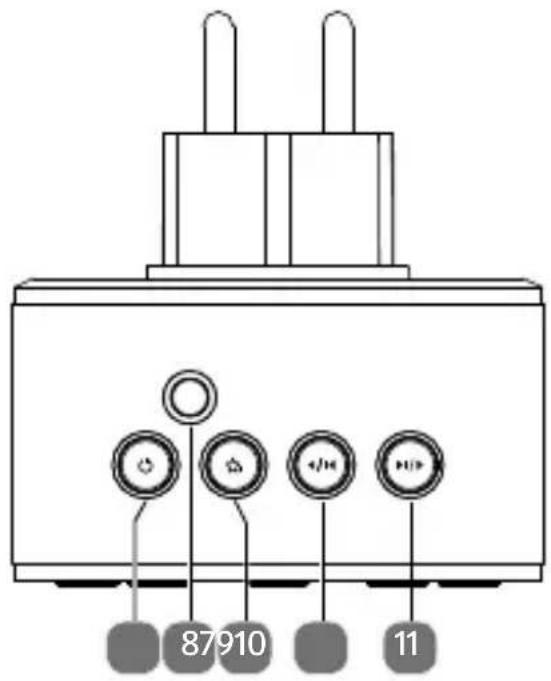
text_image
87910 117) switch device on/switch to standby mode
8) Telescopic aerial
9) ☆+– press in DAB/FM mode: open list of stored stations; press and hold in DAB/FM mode: store station
10) ◀/◄─ press in DAB mode: open list of stations; press in FM mode: select lower frequency; press and hold: search backwards
11) ▶/▶ press in DAB mode: open list of stations; press in FM mode: select higher frequency; press and hold: search forwards
7. Getting started
7.1. Connecting the device
Connect the device to a properly installed 230 V \~ 50 Hz earthed power socket. This socket must be freely accessible at all times.
7.2. Switching the device on/off
▶ Press the button to switch on the device.
▶ To switch the device to standby mode, press the button again. The time will appear on the display.
7.3. Adjusting the aerial
▶ Pull out the telescopic aerial completely.

The aerial should be fully extended to ensure good signal reception and sound quality. When adjusting the telescopic aerial, the stations may have to be searched again.
7.4. Setting the volume
▶ Turn the -/+ controller up and down to adjust the volume.
7.5. Setting the menu language
The menu language is set to English as standard. You can change this setting to German, Spanish, French, Italian, Dutch, Norwegian, Polish or Finnish.
Proceed as follows to change the menu language:
When the device is switched on, press the MENU button.
▶ Turn the ▲/▼ controller to select SYS. EINSTELLEN (SYSTEM SETTINGS) in the menu.
▶ Press the OK controller to confirm your selection.
▶ Turn the ▲/▼ controller to select SPRACHE (LANGUAGE) in the menu.
▶ Press the OK controller to confirm your selection.
▶ Turn the ▲/▼ controller and select the required language.
▶ Press the OK controller to confirm your selection.
▶ Press MENU repeatedly to exit the menu.
7.6. Setting the date and time
When the device is switched on for the first time, the date and time are set automatically using the radio signal. If you need to adjust the date and time, follow the instructions described in section "11. Settings" on page 103.
8. Radio mode
You can use this radio to receive FM and DAB stations.
Your radio has the Dynamic Label Segment (DLS) information service, which displays information such as artist, song titles or current traffic news on the display.
When the device is switched on for the first time, the date and time are set automatically using the radio signal.

Follow the instructions described in section "11.
Settings" on page 103 to set basic settings such as preferred language and time.
8.1. DAB mode
When DAB mode is used for the first time, the device automatically searches for all DAB stations that can be received and stores them permanently. This means that the station search only needs to be carried out once.
▶ Press the MODE button repeatedly until DIGITAL RADIO is shown on the display.
A status bar and the number of stations found are shown on the display.
Once the station search is complete, the stations are listed in alphabetical order and the first station in the list is displayed.

You can perform a search at any time later using the FULL SCAN menu (described on Page 103).
Alternatively, press the SCAN button to start the search.
8.1.1. Setting DAB stations
▶ Press the ◀/◄ or ►/► button to open the list of stations.
▶ Turn the ▲/▼ controller to select the desired DAB station from the station list.
▶ Press OK to play the station.
8.1.2. Storing DAB stations
You can store up to 40 preset DAB stations.
▶ Start by setting the desired station by following the instructions described in the previous section.
▶ Press and hold the button until SAVE TO PRESET appears on the display.
▶ Turn the ▲/▼ controller to select a memory slot from 1–40.
Then press the OK controller to store the station. A confirmation message appears on the display.
8.1.3. Calling up DAB stations
▶ Press the ☆ button. PRESET RECALL will appear on the display.
▶ Turn the ▲ /▼ controller to select a memory slot from 1–40.
▶ Press the OK controller to confirm. The station is played.
8.2. FM mode
You can listen to FM radio in this mode.
▶ Press the MODE button once or several times until FM appears on the display.
8.2.1. Storing stations automatically
▶ Press the SCAN button. The station search starts. All stations found are stored by frequency.
8.2.2. Searching for FM stations
▶ Press and hold the /ar button to start a quick search backwards/forwards. The station search stops when the next strongest station signal is reached.
▶ Briefly press the/◄ or ►button to set the frequency of the next station straight away.
8.2.3. Storing FM stations
You can store up to 40 preset FM stations.
▶ Start by setting the desired station by following the instructions described in the previous section.
▶ Press and hold the button until SAVE TO PRESET is shown on the display.
▶ Turn the ▲ /▼ controller to select a memory slot from 1–40.
▶ Press the OK controller to confirm.
The station is now stored in the corresponding memory slot.
8.2.4. Calling up stored FM stations
▶ Press the button.
▶ Turn the ▲/▼ controller to select the memory slot of the station you want to play.
▶ Press the OK controller to confirm.
8.3. Viewing information on the display
In DAB or FM mode, press the OK button to view the following information in sequence on the display:
station information, programme section, station name (DAB), channel number/frequency, mono/stereo (FM), signal error/signal strength (DAB), bit rate/DAB variant (DAB), date/week-day.
Press and hold the OK button to run through different ways of displaying the station information.
9. Setting the alarm
You can set two alarm times.
When the device is switched on, press the MENU button.
▶ Turn the ▲/▼ controller to select SYSTEM SETTINGS in the menu.
▶ Press the OK controller to confirm your selection.
▶ Turn the ▲/▼ controller to select ALARM in the menu.
▶ Press the OK controller to confirm your selection.
▶ Turn the ▲/▼ controller to select alarm 1 or 2 on the display.
▶ Press the OK controller to confirm your selection.
You can set the alarm selected in the menu that follows.
▶ Turn the ▲/▼ controller to open the menu item.
▶ Press the OK controller to open a menu or select an option.
▶ Press to return to a previous menu.
- ALARM: Deactivate (turn off) or activate (turn on) alarm.
- FREQUENCY: Choose the alarm frequency: daily, once, weekends, workdays.
- WAKE UP TIME: Set the alarm time.
- SOURCE: Select the buzzer, DAB radio or FM radio as your alarm sound.
- DURATION: Set the duration of the alarm.
- VOLUME: Set the volume of the alarm.
The alarm has been set. The alarm symbol and set alarm time appear on the display once the alarm has been set.
▶ Press MENU repeatedly to return to the time view.
9.1. Activating/deactivating the alarm
▶ Turn the ▲/▼ controller in standby mode to select alarm 1 or 2 on the display.
▶ Press the OK controller to confirm your selection.
▶ Turn the ▲/▼ controller to select ALARM in the menu.
▶ Press the OK controller repeatedly to turn the alarm on/off.
▶ Press MENU repeatedly to exit the menu.
9.2. Stopping the alarm/activating the snooze function
When the alarm sounds, activate the snooze function by pressing the OK controller. The time until the next alarm will count down on the display. You can extend that time by pressing the OK controller again.
▶ Press the button to just deactivate the alarm or cancel the snooze function.
10. Sleep timer
It is possible to set a sleep timer on the device. After the set time, the device automatically switches to standby mode.
When the device is switched on, press the MENU button.
▶ Turn the ▲/▼ controller to select SYSTEM SETTINGS in the menu.
▶ Press the OK controller to confirm your selection.
▶ Turn the ▲/▼ controller to select SLEEP in the menu.
▶ Press the OK controller to confirm your selection.
▶ Turn the ▲/▼ controller to select the required duration (15, 30, 45, 60, 90 minutes).
▶ Press the OK controller to confirm your selection.
▶ Press MENU repeatedly to exit the menu.
While the set timer elapses, a moon symbol and the time remaining will appear on the display.
▶ Press the button to switch off the sleep timer early.
11. Settings
In order to set the time and date, the device must be switched on. System settings can only be adjusted when the device is switched on.

Any adjustments to the device settings are retained when the device is in standby mode.
Proceed as follows to navigate in the menu and make settings:
▶ Press the MODE button once or several times to select either the DAB or FM operating mode. The menu items are different depending on the operating mode.
▶ Press the MENU button to display the menu.
▶ Turn the ▲/▼ controller to select a specific menu or item.
▶ Press the OK button to open a specific menu or to confirm a setting.
▶ You can return to the previous menu by briefly pressing again.
11.1. Menu overview
| STATION LIST (DAB operating mode only) | |
| Display the list of stations. | |
| SCAN SETTING (FM operating mode only) | |
| ALL STATIONS | Select whether to search for all (even weak) or only strong stations. |
| STRONG STATIONS ONLY | |
| FULL SCAN (DAB operating mode only) | |
| Perform automatic search in DAB mode. | |
| MANUAL TUNE (DAB operating mode only) | |
| Manually select station blocks/frequencies. | |
| AUDIO SETTING (FM operating mode only) | |
| STEREO ALLOWED | Choose whether mono or stereo sound is played. |
| FORCED MONO | |
| PRUNE INVALID (DAB operating mode only) | |
| YES | Delete all DAB stations that cannot be received in the current region.NO |
| DRC (DAB operating mode only) | ||
| HIGH | Dynamic Range Control (DRC): compression selection; default setting: off . | |
| LOW | ||
| OFF | ||
| SYSTEM SETTING | ||
| SLEEP | SET SLEEP TIMER | Set sleep timer. |
| ALARM ALARM | M 1/2 | Set two separate alarm times; switch the alarm on or off . |
| EQUALISER | CLASSIC,POP,ROCK,JAZZ,SPEECH,MY EQ | Select a sound profi le to adjust the sound. |
| MY EQSETUP | Set the bass and treble for theMY EQsound profi le. | |
| TIME/DATE | SET TIME/DATE | Manually set the date and time. |
| AUTO UPDATE | Choose whether or not the date and time are set automatically via the DAB or FM signal. | |
| SET 12/24 HOUR | Set whether to display the time in 12- or 24-hour format. | |
| SET DATE FORMAT | Set the date format. | |
| CLOCK STYLE | Select how the time appears in standby mode. | |
| BACKLIGHT | TIMEOUT | Select the period of inactivity after which the display should switch off. |
| ON LEVEL | Select the desired display lighting intensity. | |
| DIM LEVEL | Specify the desired dimmed display lighting intensity. | |
| LANGUAGE | Select the menu language. | |
| FACTORY RESET | Reset to factory settings. | |
| SOFTWARE UPDATE | Software update (by Service Centre only). | |
| SOFTWARE VERSION | Display software version. | |
12. Bluetooth mode
You can use Bluetooth to play tracks wirelessly from external devices such as MP3 players or mobile phones with Bluetooth on this DAB radio.
▶ Press the MODE button repeatedly until BLUETOOTH is shown on the display.
12.1. Connecting Bluetooth devices for the first time
▶ Switch on Bluetooth mode as described above. Enable the Bluetooth function on your external device as well. The DAB radio is in pairing mode.
Perform pairing on the external device. Refer to the user manual for your external device for more information. The name of the radio is "MD 43461".
▶ CONNECTED will appear on the display when the pairing process is complete. The external device can be used with the radio.
If you want to stop data transfer via Bluetooth, switch off the Bluetooth function on the external device or press MODE to switch to a different mode.
Known external devices, which have already been paired once, will be connected again automatically in the future. It is not necessary to pair the devices again. To reconnect, simply activate Bluetooth mode on both devices.
12.2. Control
You can control how tracks are played, the volume and a range of special functions on your external device and on the DAB radio. What functions are available is dependent on your external device and the software in use. In principle, these buttons on the device are intended for control via Bluetooth:
| -/+ (controller) | Reduce/increase volume |
| ▲ / ▼ (controller) | Previous track/next track |
| OK | Start/pause playback |
13. Cleaning
Before cleaning, unplug the mains plug from the socket.
▶ Use a soft, dry cloth to clean the device. Avoid the use of chemical solutions and cleaning products because these may damage the device surface and/or the labels on it.
14. Storing the device
- Store the device in a dry, dust-free location away from direct sunlight.
15. Troubleshooting
If the device stops working properly, please refer to the troubleshooting table shown below to see if you can resolve the problem yourself.
Never attempt to repair the device yourself. If a repair is necessary, please contact our Service Centre or a suitable authorised repair workshop.
| Cause Troubleshooting | |
| Sound cannot be heard | ▶ Check the volume level on the output device and on the radio. If necessary, increase the volume. |
| It is not possible to connect other devices via Bluetooth | ► The distance between the audio output device and the radio is too great. Do not exceed a distance of 10 m to the radio. ► Try reconnecting (see “12. Bluetooth mode” on page 110). |
| Station reception is poor | ► Adjust the telescopic aerial. |
| No function ► For | mains operation, check the power supply. |
16. Disposal

Packaging
Your device has been packaged to protect it from damage in transit. The packaging is made of materials that can be recycled in an environmentally friendly manner.

Device
The device is fitted with an integrated rechargeable battery. At the end of its service life, do not dispose of the device in the normal household rubbish. Instead, contact your local authority to find out how to dispose of it in an environmentally friendly manner at collection points for electrical and electronic scrap.
17. Technical specifications
| Power supply 230 V ~ 50 Hz, 6 W | |
| Output power for mains operation | 1 x 3 W RMS |
| Dimensions (W x H x D) 85 x 85 x 49 mm | |
| Ambient temperature (operation) | 5°C–35°C |
| Ambient temperature (storage) | 0°C–45°C |
| Humidity 30%–70% (non-condensing) | |
| FM frequency band 87.5–108 MHz | |
| DAB frequency range 174–240 MHz | |
| Bluetooth® | |
| Version V5, Class II | |
| Frequency range/MHz 240 | 2–2480 MHz |
| Max. transmission power < | 6 dBm |
| Range Approx. 10 m, depending on environmental conditions | |
CE
18. Service information
Please contact our Customer Service team if your device ever stops working the way you want or expect it to. There are several ways for you to contact us:
- In our Service-Community, you can meet other users, as well as our staff, and you can exchange your experiences and pass on your knowledge there. You will find our Service-Community at community.medion.com.
• Alternatively, use our contact form at www.medion.com/contact. - You can also contact our Service team via our hotline or by post.
| Opening times Hotline number UK | |
| Mon – Fri: 08.00 – 20.00Sat – Sun: 10.00 – 16.00 | 0333 3213106 |
| Service address | |
| MEDION Electronics Ltd.120 Faraday Park, Faraday Road, DorcanSwindon SN3 5JF, WiltshireUnited Kingdom | |

text_image
QR code image containing encoded data, no visible human-readable textYou can download this and many other sets of operating instructions from our service portal at www.medionservice.com.
You can also scan the QR code on the side of the screen, to download the operating instructions onto your mobile device from the service portal.
19. Legal Notice
Copyright © 2022
Date: 01.09.2022
All rights reserved.
These operating instructions are protected by copyright. Mechanical, electronic and any other forms of reproduction are prohibited without the written permission of the manufacturer.
Copyright is owned by the company:
MEDION AG
Am Zehnthof 77
45307 Essen
Germany
Please note that you cannot use the address above for returns. Please always contact our Customer Service team first.
20. Service information
Please contact our Customer Service team if your device ever stops working the way you want or expect it to. There are several ways for you to contact us:
- In our Service-Community, you can meet other users, as well as our staff, and you can exchange your experiences and pass on your knowledge there. You will find our Service-Community at community.medion.com.
• Alternatively, use our contact form at www.medion.com/contact. - You can also contact our Service team via our hotline or by post.
| Opening times Hotline number UK | |
| Mon – Fri: 08.00 – 20.00Sat – Sun: 10.00 – 16.00 | 0333 3213106 |
| Service address | |
| MEDION Electronics Ltd.120 Faraday Park, Faraday Road, DorcanSwindon SN3 5JF, WiltshireUnited Kingdom | |

text_image
QR code image containing encoded data, no visible human-readable textYou can download this and many other sets of operating instructions from our service portal at www.medionservice.com.
You can also scan the QR code on the side of the screen, to download the operating instructions onto your mobile device from the service portal.
21. Legal Notice
Copyright © 2022
Date: 01.09.2022
All rights reserved.
These operating instructions are protected by copyright. Mechanical, electronic and any other forms of reproduction are prohibited without the written permission of the manufacturer.
Copyright is owned by the company:
MEDION AG
Am Zehnthof 77
45307 Essen
Germany
Please note that you cannot use the address above for returns. Please always contact our Customer Service team first.
22. Privacy statement
Dear Customer,
We wish to inform you that we, MEDION AG, Am Zehnthof 77, 45307 Essen, Germany, process your personal data as a data controller.
For matters regarding data protection, we are supported by our company data protection officer who can be contacted at MEDION AG, Datenschutz, Am Zehnthof 77, 45307 Essen, Germany; datenschutz@medion.com. We process your data for the purpose of warranty processing and associated processes (e.g. repairs) and rely on the sales contract concluded with us when processing your data.
Your data will be provided to repair service providers contracted by us for the purpose of warranty processing and associated processes (e.g. repairs). We generally store your personal data for a period of three years in order to fulfil your legal
warranty rights.
You have the right to be informed of the personal data concerned as well as the right to rectification, the right to erasure, the right to restriction of processing, the right to object to processing and the right to data portability.
In the case of the right to be informed and the right to erasure, restrictions apply according to paragraphs 34 and 35 of the BDSG (Federal Data Protection Act) (Art. 23 of the GDPR). In addition, there is a right of appeal to a competent data protection supervisory authority (Article 77 of the GDPR in conjunction with paragraph 19 of the BDSG). For MEDION AG, this is the state official for data protection and freedom of information North Rhine-Westphalia, PO box 200444, 40212 Düsseldorf, Germany, www.ldi.nrw.de.
The processing of your data is necessary for warranty processing: it is not possible to process the warranty without the provision of the required data.
1. Sommaire
natural_image
Symbol of a trash bin with crossed-out lines and a solid black rectangle below (no text or labels)Appareil
text_image
QR code image containing encoded data, no visible human-readable texttext_image
QR code image containing encoded data, no visible human-readable textMEDION Service Center
ENAME, S.A