
MR10 - Detector RIDGID - Free user manual and instructions
Find the device manual for free MR10 RIDGID in PDF.
| Product Type | Magnetic Locator |
| Brand | Ridgid |
| Model | MR10 |
| Length | 1 m (39.25 in) |
| Power Supply | 6 AA 1.5 V alkaline batteries |
| Display | Black and white LCD |
| Audible Signal | Mylar speaker |
| Construction | Aluminum tube |
| Operating Temperature | -18 to 49 °C |
| Storage Temperature | -25 to 60 °C |
| Main Functions | Ferrous metal detection, polarity indication, AUTO NULL function |
| Use | Locating valves, boxes, manholes, manhole covers, well casings |
| Cleaning | Damp soft cloth, do not immerse |
| Safety | Avoid electrical contact, do not use for explosives, wear safety glasses |
| Included Accessories | Carrying case, 6 AA batteries, instruction manual |
| Warranty | Lifetime warranty (warranty conditions) |
| Recycling | Compliant with EU directives (2012/19/EU and 2006/66/EC) |
| Immersion Rating | Lower part up to display (61 cm) waterproof |
Frequently Asked Questions - MR10 RIDGID
User questions about MR10 RIDGID
0 question about this device. Answer the ones you know or ask your own.
Ask a new question about this device
Download the instructions for your Detector in PDF format for free! Find your manual MR10 - RIDGID and take your electronic device back in hand. On this page are published all the documents necessary for the use of your device. MR10 by RIDGID.
USER MANUAL MR10 RIDGID
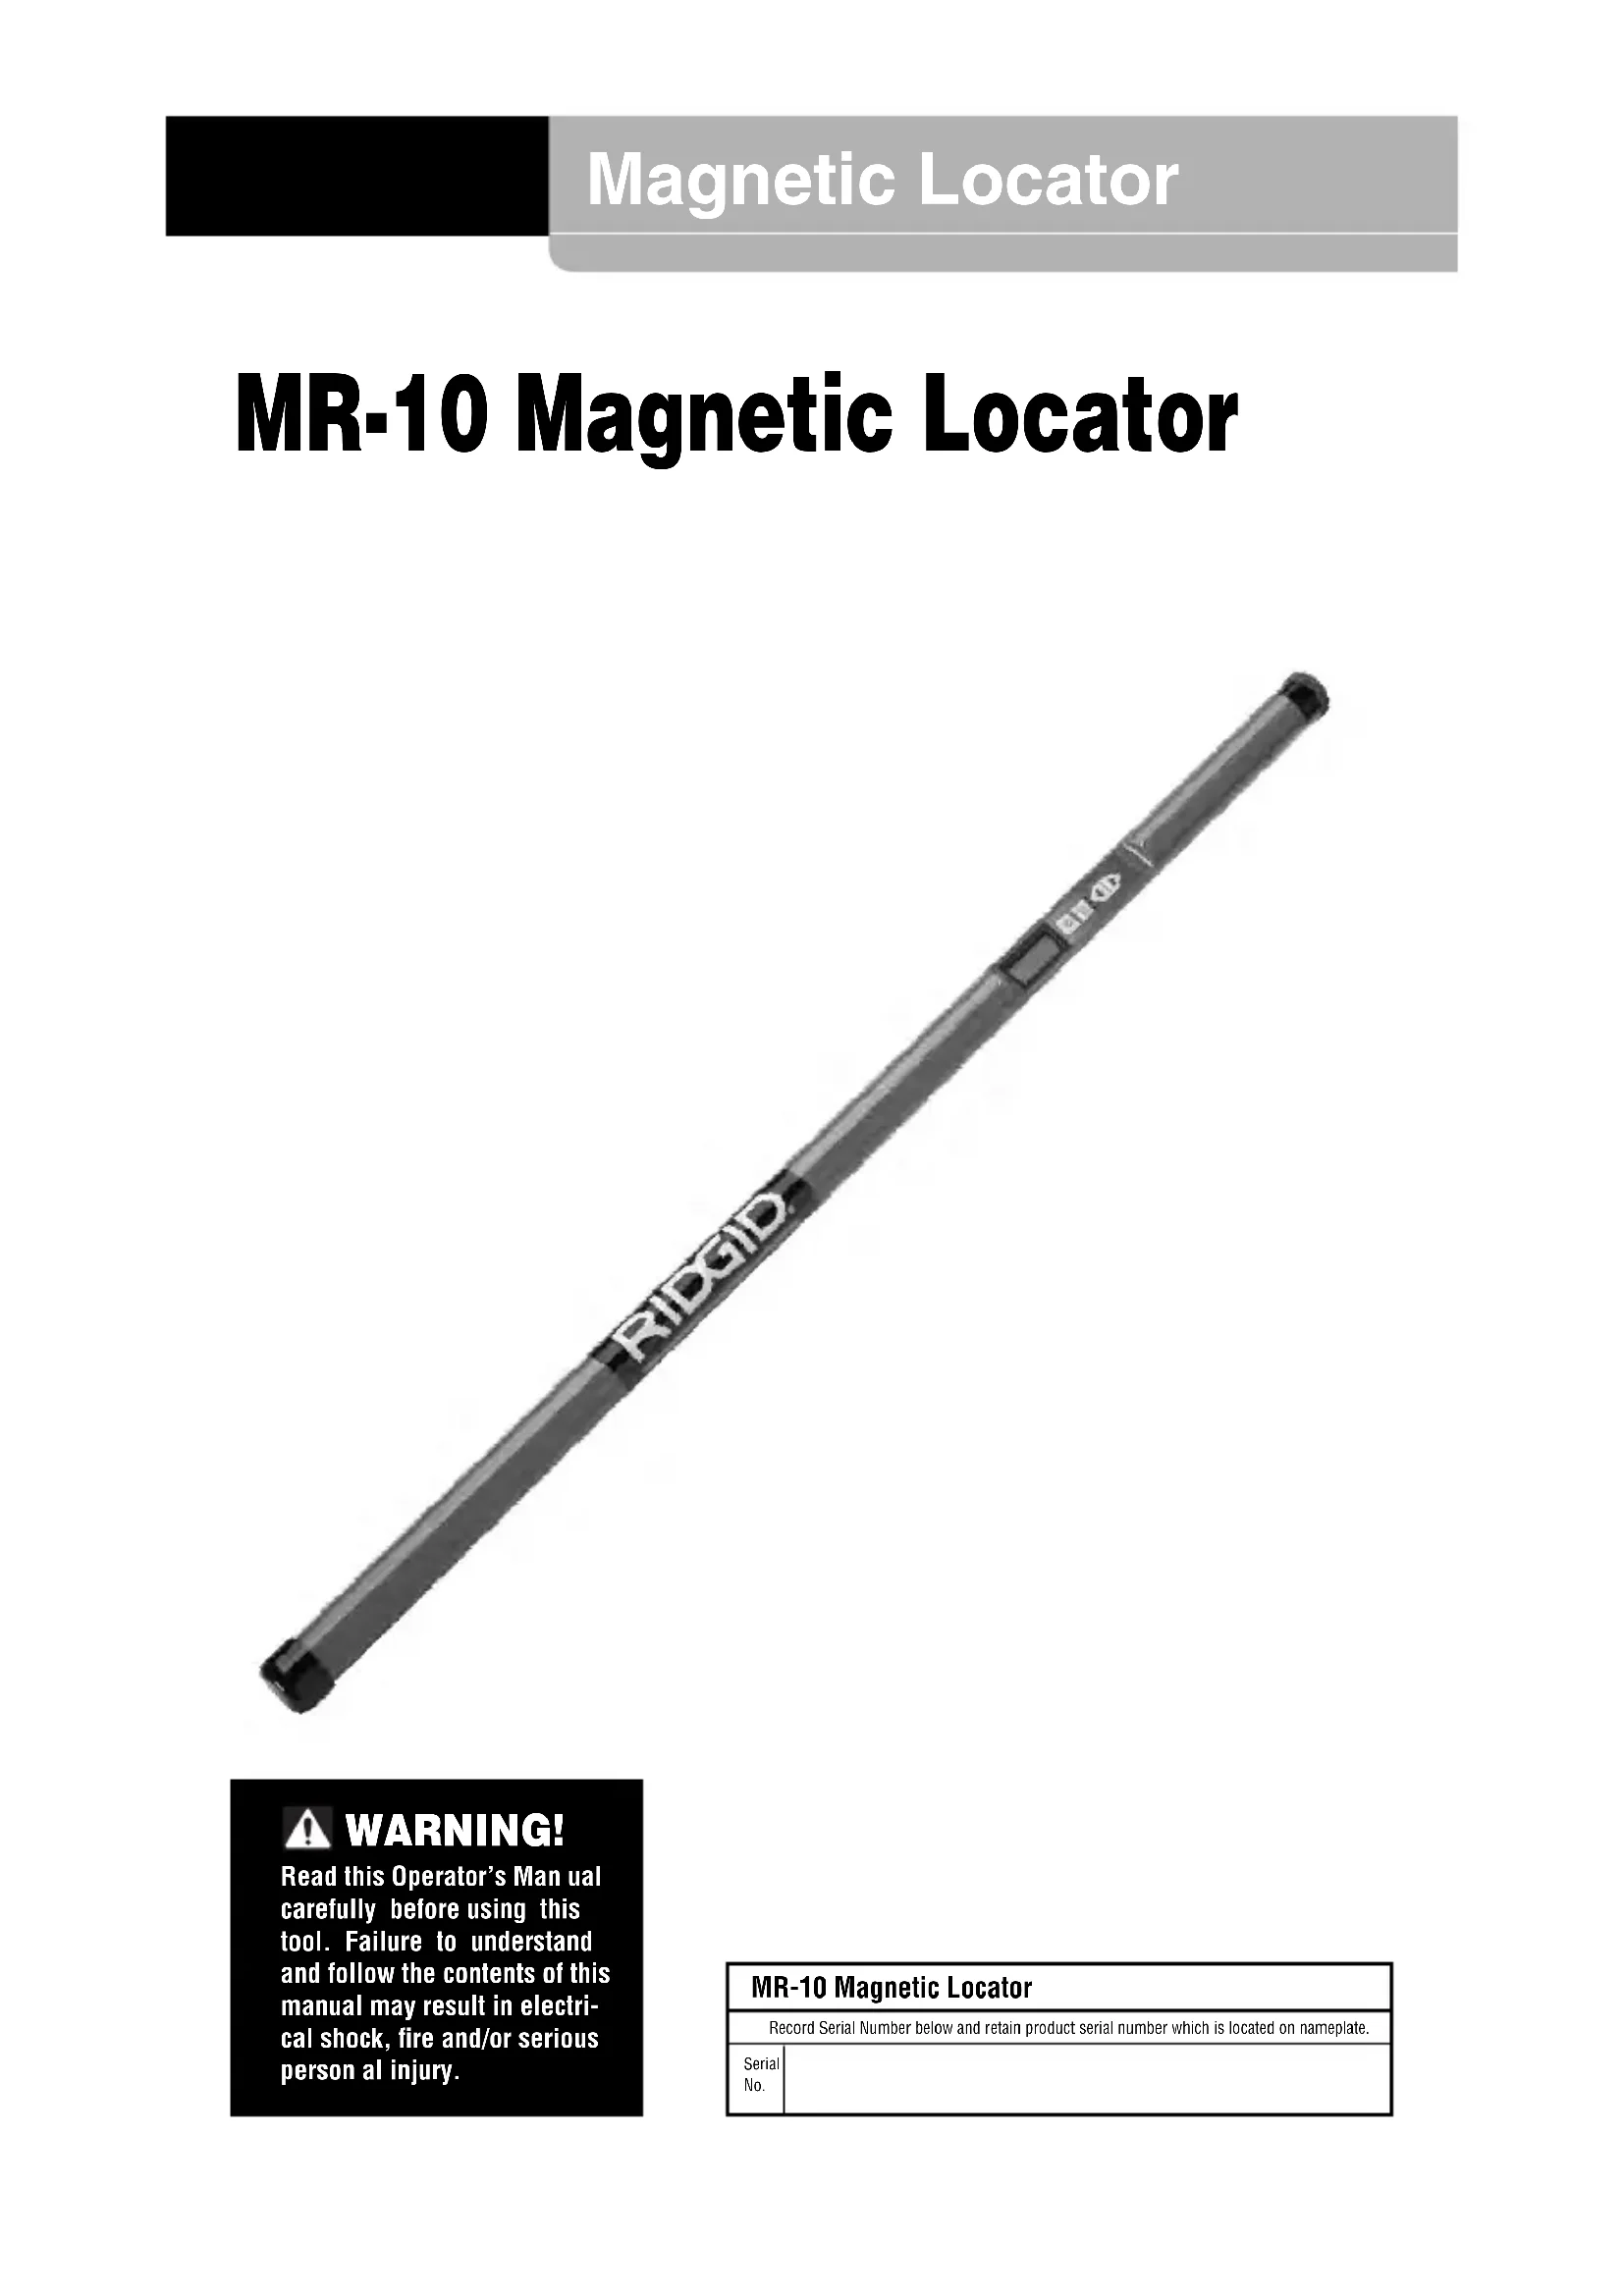
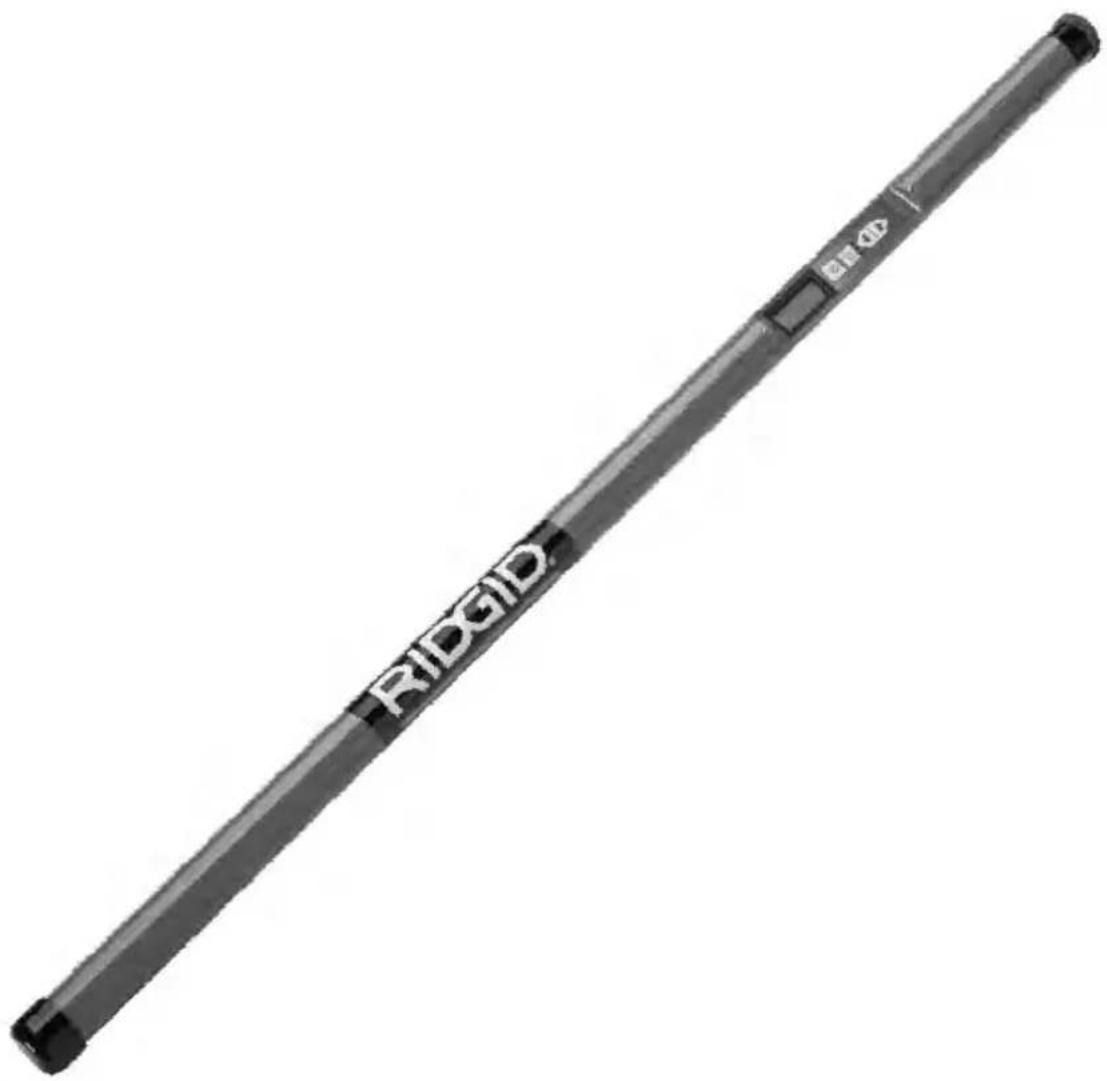
MR-10 Magnetic Locator
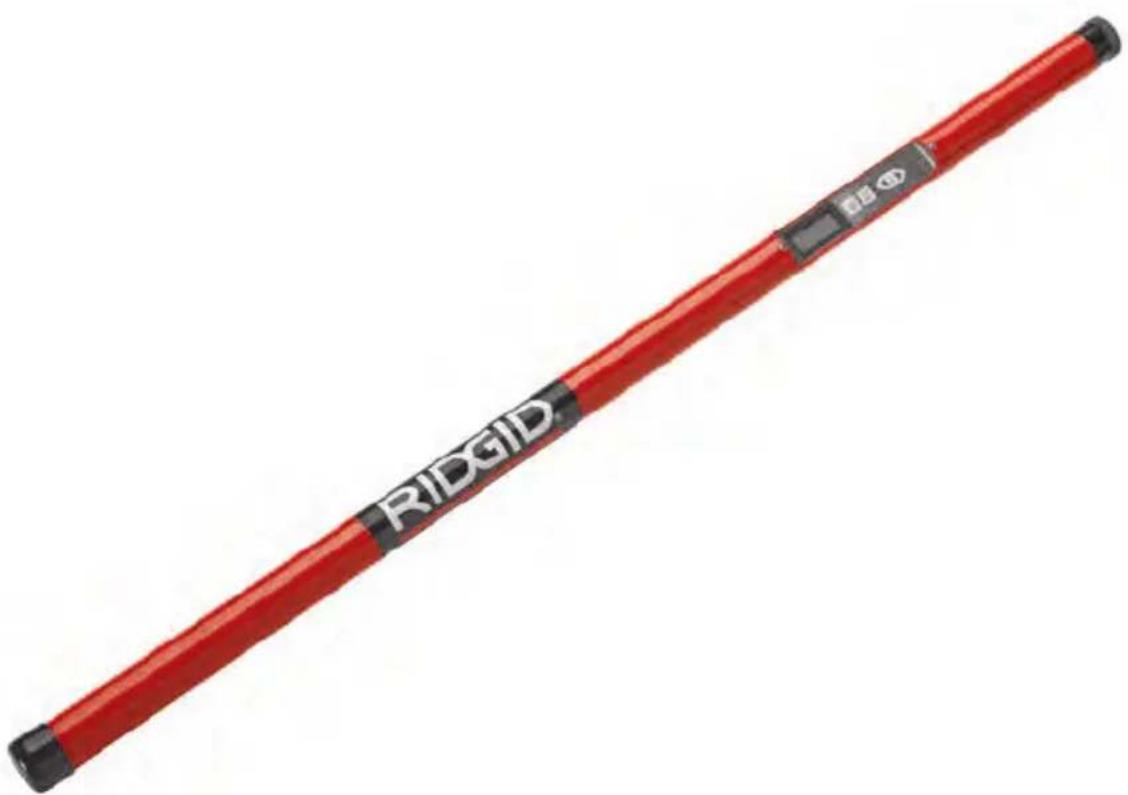

WARNING!
Read this Operator's Manual carefully before using this tool. Failure to understand and follow the contents of this manual may result in electrical shock, fire and/or serious personal injury.
- Français – 11
Recording Form for Machine Serial Number 1
Safety Symbols 2
General Safety Information
Work Area Safety 2
Electrical Safety 2
Personal Safety 2
Equipment Use and Care....2
Service....3
Specific Safety Information
MR-10 Magnetic Locator Safety....3
Description, Specifications and Standard Equipment
Description....3
Specifications....4
Standard Equipment 4
Controls....4
Icons....4
FCC Statement 4
Electromagnetic Compatibility (EMC) 4
Changing/Installing Batteries 5
Pre-Operation Inspection....5
Set-Up and Operation 5
Locator General Considerations 6
General Locating 6
Specific Locating....7
Polarity 7
AUTO NULL....8
Operation in Snow and Water 8
Maintenance
Cleaning....8
Calibration....8
Storage....8
Service and Repair....8
Disposal....9
Battery Disposal....9
Lifetime Warranty ....Back Cover
*Original Instructions - English
MR-10 Magnetic Locator

WARNING!
Read this Operator's Manual carefully before using this tool. Failure to understand and follow the contents of this manual may result in electrical shock, fire and/or serious personal injury.
MR-10 Magnetic Locator
| Record Serial Number below and retain product serial number which is located on nameplate. | |
| Serial No. | |
Safety Symbols
In this operator's manual and on the product, safety symbols and signal words are used to communicate important safety information. This section is provided to improve understanding of these signal words and symbols.

This is the safety alert symbol. It is used to alert you to potential personal injury hazards. Obey all safety messages that follow this symbol to avoid possible injury or death.

DANGER indicates a hazardous situation which, if not avoided, will result in death or serious injury.

WARNING indicates a hazardous situation which, if not avoided, could result in death or serious injury.

CAUTION indicates a hazardous situation which, if not avoided, could result in minor or moderate injury.
NOTICE
NOTICE indicates information that relates to the protection of property.

This symbol means read the operator's manual carefully before using the equipment. The operator's manual contains important information on the safe and proper operation of the equipment.

This symbol means always wear safety glasses with side shields or goggles when handling or using this equipment to reduce the risk of eye injury.

This symbol indicates the risk of electrical shock.
General Safety Information
WARNING
Read all safety warnings, instructions, illustrations and specifications provided with this tool. Failure to follow all instructions listed below may result in electric shock, fire and/or serious injury.
SAVE ALL WARNINGS AND INSTRUCTIONS FOR FUTURE REFERENCE!
Work Area Safety
- Keep your work area clean and well lit. Cluttered or dark areas invite accidents.
- Do not operate equipment in explosive atmospheres, such as in the presence of flammable liquids, gases or dust. E quip ment can create sparks which may ignite the dust or fumes.
- Keep children and by-standers a way while operating equipment. Distrac tions can cause you to lose control.
Electrical Safety
- Avoid body contact with earthed or ground ed surfaces such as pipes, radiators, ranges and refrigerators. There is an increased risk of electrical shock if your body is earthed or grounded.
- Do not expose equipment to rain or wet conditions. Water en tering equipment will increase the risk of electrical shock.
Personal Safety
- Stay alert, watch what you are doing and use common sense when operating equipment. Do not use equipment while you are tired or under the influence of drugs, alcohol or medication. A moment of inattention while operating equipment may result in serious personal injury.
- Do not overreach. Keep proper footing and balance at all times. This enables better control of the power tool in unexpected situations.
- Use personal protective equipment. AI - ways wear eye protection. Protective equipment such as dust mask, non-skid safety shoes, hard hat or hearing protection used for appropriate conditions will reduce personal injuries.
Equipment Use and Care
- Do not force equipment. Use the correct equipment for your application. The correct equipment will do the job better and safer at the rate for which it is de-
- signed.
- Do not use equipment if the switch
does not turn it ON and OFF. Any tool that can not be controlled with the switch is dangerous and must be repaired.
- Disconnect the batteries from the equipment before making any adjustments, changing accessories, or storing. Such preventive safety measures reduce the risk of injury.
- Store idle equipment out of the reach of children and do not allow persons unfamiliar with the equipment or these instructions to operate the equipment. Equipment can be dangerous in the hands of untrained users.
- Maintain equipment. Check for missing parts, breakage of parts and any other condition that may affect the equipment's operation. If damaged, have the equipment repaired before use. Many accidents are caused by poorly maintained equipment.
- Use the equipment and accessories in accordance with these instructions, taking into account the working conditions and the work to be performed. Use of the equipment for operations different from those intended could result in a hazardous situation.
- Use only accessories that are recommended by the manufacturer for your equipment. Accessories that may be suitable for one piece of equipment may become hazardous when used with other equipment.
- Keep handles dry and clean; free from oil and grease. Allows for better control of the equipment.
Service
- Have your equipment serviced by a qualified repair person using on ly identical replacement parts. This will ensure that the safety of the tool is maintained.
Specific Safety Information
WARNING
This section contains important safety information that is specific to the locate tool.
Read these precautions carefully before using the RIDGID MR-10 Magnetic Loca - tor to reduce the risk of electrical shock or other serious injury.
SAVE THESE INSTRUCTIONS!
Keep this manual with the tool for use by the operator.
MR-10 Magnetic Locator Safety
- Do not place the Magnetic Locator anywhere electrical contact may occur. This increases the risk of electrical shock.
- Locating equipment uses magnetic fields that can be distorted and interfered with. Utilities may be present in a given area. Follow local guidelines and one call/call before you dig service procedures. Exposing a utility is the only way to verify its existence, location and depth.
- Do not use for locating explosives, ordinance or other hazardous materials.
- Avoid traffic. Pay close attention to moving vehicles when using on or near roadways. Wear visible clothing or reflector vests.
The EC Declaration of conformity (890-011-320.10) will accompany this manual as a separate booklet when required.
If you have any question concerning this RIDGID® product:
- Contact your local RIDGID distributor.
- Visit www.RIDGID.com to find your local RIDGID contact point.
- Contact Ridge Tool Technical Service Department at rttechservices@emerson.com, or in the U.S. and Canada call (800) 519-3456.
Description, Specifications and Standard Equipment
Description
The RIDGID MR-10 Magnetic Locator is a highly sensitive handheld locator specifically designed to detect the magnetic field from ferrous objects, such as buried curb stops, property markers, valve boxes, manhole or vault covers, well casings, and other iron and steel objects.
The locator responds to the difference in the magnetic field strength between two sensors. The Magnetic Locator provides an audio signal, and visual indications of both signal strength and polarity on detecting presence of a ferrous object.
Specifications
Display......Black and White LCD
Speaker......Mylar Speaker
Body Material/
Construction ....Aluminum Tube with Recessed Controls
Length 39.25" (100 cm)
Operating
Temperature ....0° F to +120° F (-18° C to +49° C)
Storage Temperature...-13°F to +140°F (-25°C to +60°C)
IP Protection ......IP54
Power Supply ....6 x AA Alkaline Batteries, 1.5 Volts
Weight.....1.7 lbs. (0,77 kg)
Standard Equipment
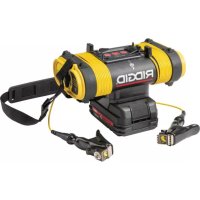
The MR-10 Magnetic Locator package includes the following items:
• MR-10 Magnetic Locator
- 6 x AA Alkaline Batteries
- Carry Case
• Operator's Manual Pack

Figure 1 – MR-10 Magnetic Locator
Controls
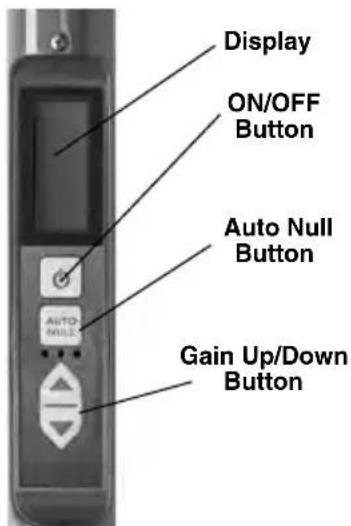
Figure 2 – Controls
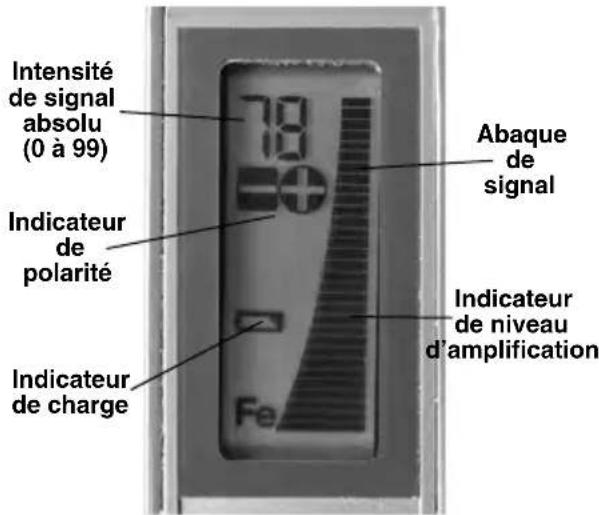
Icons

Figure 3 – Display/Icons
FCC Statement
This equipment has been found to comply with the limits for a Class B digital device, pursuant to part 15 of the FCC Rules. These limits are designed to provide reasonable protection against harmful interference in a residential installation.
This equipment generates, uses, and can radiate radio frequency energy and, if not installed and used in accordance with the instructions, may cause harmful interference to radio communications.
However, there is no guarantee that interference will not occur in a particular installation.
If this equipment does cause harmful interference to radio or television reception, which can be determined by turning the equipment OFF and ON, the user is encouraged to try to correct the interference by one or more of the following measures:
- Reorient or relocate the receiving antenna.
- Increase the separation between the equipment and receiver.
- Consult the dealer or an experienced radio/ - TV technician for help.
Electromagnetic Compatibility (EMC)
The term electromagnetic compatibility is taken to mean the capability of the product to function smoothly in an environment where electromagnetic radiation and electrostatic discharges are present and without causing electromagnetic interference to other equipment.
NOTICE The RIDGID MR-10 Magnetic Loca -from electric shock and other causes to conforms to all applicable EMC standards. and prevent equipment damage.
However, the possibility of it causing interference in other devices cannot be precluded.
Changing/Installing Batteries
The MR-10 Magnetic Locator is supplied without the batteries installed. When the low battery indicator appears on screen, the batteries need to be replaced. Remove the batteries prior to storage to avoid battery leakage.
- With device OFF, unscrew the battery compartment cover (Figure 4). If needed, remove batteries.
natural_image
Close-up of a cylindrical mechanical component with a flanged cap and a plus/minus label (no text or symbols on the main subject)Figure 4 – Changing the Batteries
- Install six new AA alkaline batteries (LR6) observing correct polarity as indicated in the battery compartment.
NOTICE Use the batteries that are of same type. Do not mix battery types. Do not mix new and used batteries. Mixing batteries can cause overheating and battery damage
- Securely reinstall the battery compartment cover.
Pre-Operation Inspection
WARNING
Before each use, inspect your MR-10 Magnetic Locator and correct any problems to reduce the risk of serious injury
- Make sure the unit is OFF.
- Remove the batteries and inspect for signs of dam age. Re place if necessary. Do not use locator if the batteries are damaged.
- Clean the equipment. This aids inspection and helps prevent the tool from slipping from your grip.
- Inspect the locator for any damaged or missing parts. Make sure the warning label is present and readable (Figure 5). If any issues are found, do not use the magnetic locator until the issues have been repaired.
Figure 5 – Warning Label
Set-Up and Operation
WARNING

Do not place the Magnetic Locator anywhere electrical contact may occur. This increases the risk of electrical shock.
Locating equipment uses magnetic fields that can be distorted and interfered with. Utilities may be present in a given area. Follow local guidelines and one call/call before you dig service procedures. Ex - pos ing a utility is the only way to verify its existence, location and depth.
Avoid traffic. Pay close attention to moving vehicles when using on or near roadways. Wear visible clothing or reflector vests.
Set up and operate the Magnetic Locator according to these procedures to reduce the risk of injury from electric shock and other causes, and prevent tool damage.
-
Check for an appropriate work area as indicated in the General Safety Section.
-
Determine the correct equipment for the application, see Description and Specifications sections.
Equipment for other locating applications can be found by consulting the Ridge Tool Catalog, online at www.RIDGID.com
- Make sure that all equipment has been properly inspected.
-stones, snow, ice, water and the ground itself. These have no effect on the performance of the locator (unless they contain ferrous or magnetic materials).
This manual gives general instructions for use of the locator. Each specific use will be different and depends on the exact set of circumstances present. Locating is aided by applying good practices prior to turning the magnetic locator on. Use visual cues and past history to start your locate in an appropriate spot.
Locator General Considerations
The MR-10 Magnetic locator detects magnetic fields. It is specifically intended for use detecting the magnetic field from ferrous materials (iron based materials such as cast iron and steel) generated in the presence of the earth's magnetic field. It will also detect magnetic fields from magnets, electrical fields and other sources.
The magnetic field from ferrous materials depends on the size, distance and orientation of the ferrous part to the locator. In general,
- the larger the ferrous metal, the greater the signal.
- The closer the ferrous metal, the greater the signal.
- The signal is greater near the ends of long, slender parts, such as pipes or rods.
- The signal is greater near the edges of flat parts such as plates.
There can be multiple sources of magnetic fields in an area. This includes items on your person, such as steel toes in boots, tools in pockets, etc. These can interfere with the locating process.
Magnetic fields can be distorted and interfered with. Because of this, the locator cannot be certain to locate specific items, and cannot determine the exact distance to the item. Exposing the source of the magnetic field is the only way to verify its existence, location and depth.
Utilities (such as natural gas or water piping, electric lines or wires) may be present in a given area. Follow local guidelines and one call/call before you dig service procedures prior to digging. Do not use this locator for locating electrically generated magnetic fields.
The locator will not find and is not affected by the presence of nonferrous objects, such as copper, aluminum, wood, plastic, concrete,
General Locating
- Turn ON the magnetic locator by pressing the ON/OFF button. The screen will turn on.
The gain level is set to medium range by default.
-
Hold the magnetic locator 1"-3" (25 - 75mm) above the ground.
-
Sweep from side to side while walking at a normal pace. Observe the Signal Strength and listen to the audio tone. The signal strength will be highest and audio tone rise in pitch when the locator is pointing in the direction of a magnetic field. The signal will fall as the locator moves away from a magnetic field. Move toward higher signals.
If there is excessive magnetic signal and it is difficult to determine the highest signal, increase the locator height from the ground. This will minimize the magnetic signal from smaller items (Figure 6).
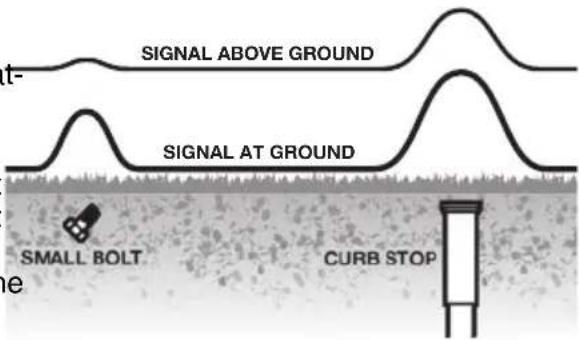
Figure 6 – Raising the Locator Minimizes Unwanted Signals
- Continue toward higher signal strength - audio tone will rise in pitch with signal strength. When nearing the signal source, the bar graph may go off scale and audio tone will be at maximum pitch. If this happens, decrease the gain by pressing the Gain Down Button and repeat the process for better location. See "Polarity" and
"AUTO NULL" sections for information to improve locates. See Figures 7 and 8 for locating signal patterns.
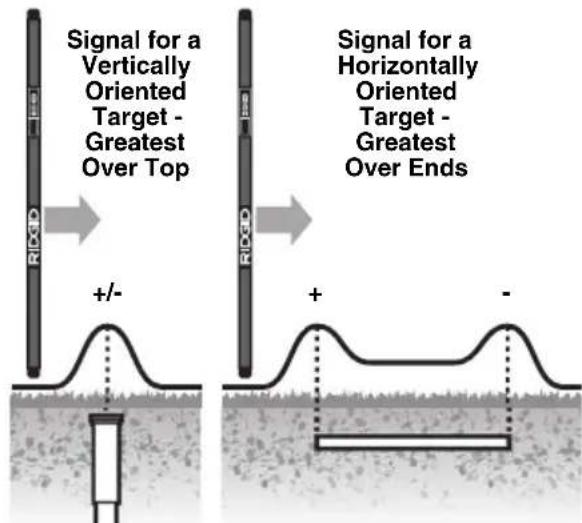
Figure 7 – Signals and Polarity from Vertical and Horizontal Targets
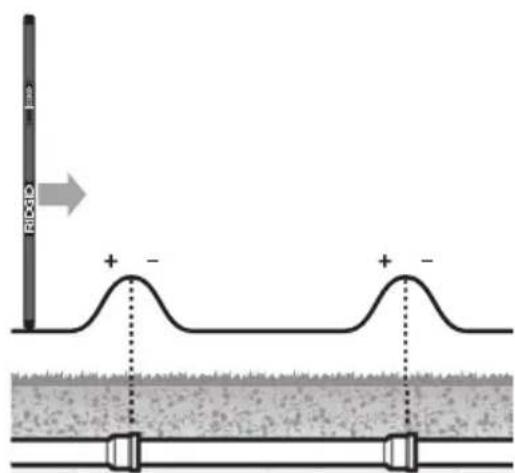
A - Along Pipe
B - Crossing Pipe
Figure 8 – Signal Patterns from Cast-Iron Pipe
Specific Locating
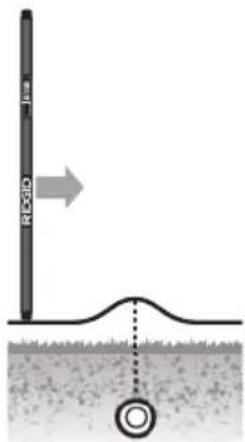
- When the signal source has been generally located, move the locator to the vertical position.
- Lower the gain if necessary.
- Move the locator in a cross pattern (Figure 9).
The signal bar graph and audio tone will be highest when locator is over the target.
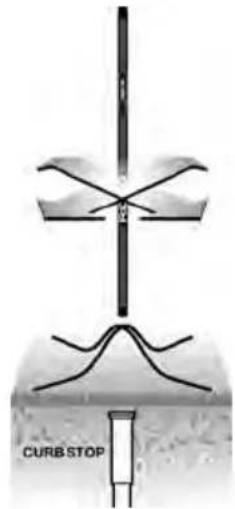
Figure 9 – Specific Locate Signal
Polarity
The MR-10 Magnetic Locator includes a feature to determine the polarity of a magnet. Polarity can be used to help better identify an object during locating.
All magnets have two poles (+ and -, positive and negative), and those poles generally follow the shape of the object. For instance, a long, thin object such as pipe will typically have a pole at either end. The orientation of the object being located may be implied through the use of polarity.
A long thin ferrous object oriented vertically, such as a pipe, survey spike, rebar or nail will show a single pole, either positive or negative. A long thin ferrous object oriented horizontally, such as a pipe or rebar will show a strong reading at either end (pole) with little signal in between the poles. One end will be positive and the other negative. See Figure 8. When locating along a run of pipe, you may see the polarity reading flip from positive to negative or vise versa at the joint. This will only happen if the pipe ends are isolated (not connected) to each other.
Polarity can often aid the user when identifying a target from non-targets as the polarity may flip from positive to negative
AUTO NULL
In environments with a persistent magnetic signal, such as along a chain link fence or a metal building wall, the Auto Null feature allows the locator be re-zeroed to eliminate the readings from that persistent magnetic signal.
While in the persistent magnetic field (but a - way from the objects that you are trying to locate), press the AUTO NULL button. The Absolute signal strength should reset to zero (Figure 10). Continue locate as before.
To turn off Auto Null and reset the unit to normal settings and sensitivity, cycle the power OFF, then ON.
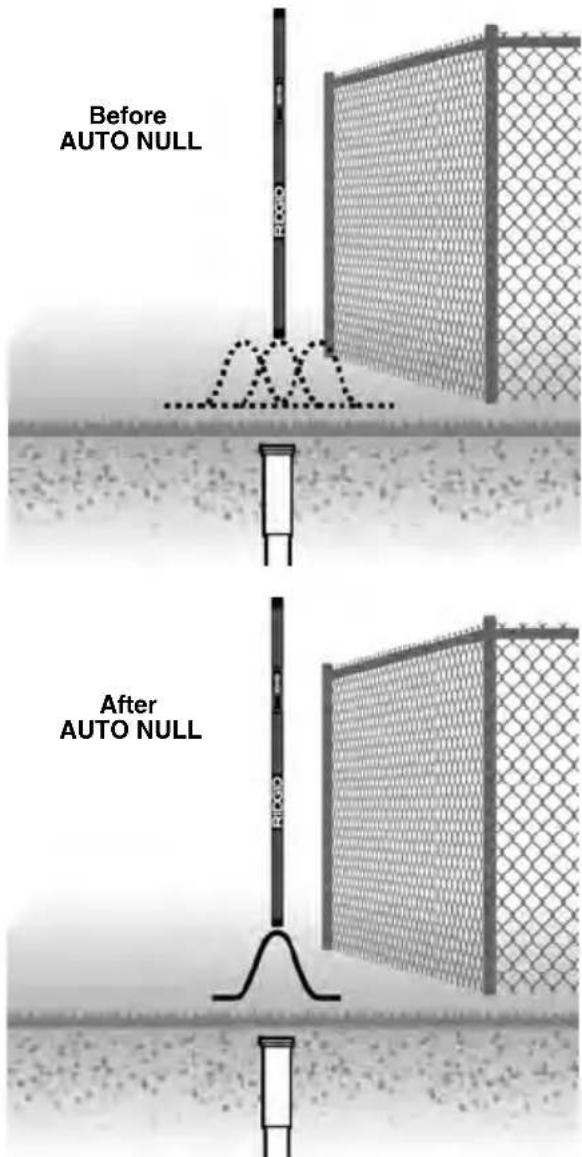
Figure 10 – AUTO NULL Feature
Operation in Snow and Water
The lower 24" (610 mm) of the locator, below the display, can be submerged into water or buried in snow.
NOTICE Do not submerge the display unit in water. The MR-10 Magnetic Locator is waterproof up to display only. The display/control panel is not waterproof, and excessive water will damage it.
Maintenance
Cleaning
Do not immerse the MR-10 Magnetic Locator in water. Wipe off dirt with a damp soft cloth. Avoid rubbing too hard. Do not use aggressive cleaning agents or solutions.
Calibration
The RIDGID MR-10 Magnetic Locator is factory calibrated and only requires recalibration if repaired.
Storage
WARNING The RIDGID MR-10 Magnetic Locator must be kept indoors when not in use. Store the machine in a locked area that is out of reach of children and people unfamiliar with MR-10 Magnetic Locator. Recommended storage temperature is -13°F to +140°F (-25°C to +60°C). Remove the batteries before storage or shipping to avoid battery leakage.
Service and Repair
WARNING
Improper service or repair can make the RIDGID MR-10 Magnetic Locator unsafe to operate.
Service and repair of the MR-10 Magnetic Locator must be performed by a RIDGID Independent Service Center.
For information on your nearest RIDGID In - depen dent Service Center or any service or repair questions:
- Contact your local RIDGID distributor.
- Visit www.RIDGID.com to find your local RIDGID contact point.
- Contact Ridge Tool Technical Service Department at rtctechservices@emerson.com, or in the U.S. and Canada call (800) 519-3456.
Disposal
Parts of the RIDGID MR-10 Magnetic Locator contain valuable materials and can be recycled. There are companies that specialize in recycling that may be found locally. Dispose of the components in compliance with all applicable regulations. Contact your local waste management authority for more information.
For EC Countries: Do not dispose of elec trical equipment with household waste!
According to the European Guide - line 2012/ 19/EU for Waste Electrical and Electronic Equipment
and its imple men tation into national legislation, electrical equipment that is no longer usable must be collected separately and disposed of in an environmentally correct manner.
Battery Disposal
For EC countries: Defective or used batteries must be recycled according to the guideline 2006/66/EEC.
Protection IP ......IP54
Alimentation....6 piles alcalines type AA de 1,5 Volt
Poids....1,7 livres (770 g)
Equipements de base
Figure 2 – Commandes
Icones
natural_image
Close-up of a cylindrical mechanical component with a flanged base and a separate circular cap, showing no visible text or symbols.Figure 4 – Remplacement des piles
Figure 5 – Avertissement
natural_image
Two black-and-white icons: a stylized figure holding a megaphone next to an open circle (no text or symbols)natural_image
Close-up of a mechanical component with a cylindrical cap and threaded shaft, no visible text or symbolsnatural_image
Two black-and-white icons: a stick figure holding a megaphone and a circular symbol with a pair of eyeglasses (no text or symbols)natural_image
Close-up of a cylindrical mechanical component with a flanged base and a separate circular cap, showing no visible text or symbols.natural_image
Close-up of a mechanical component with a threaded base and a cap, no visible text or symbolsElyria, Ohio 44035-6001
U.S.A.
Authorized Representative:
RIDGE TOOL EUROPE N.V.
Research Park, Haasrode
B-3001 Leuven
Belgium
CE Conformity
This instrument complies with the European Council Electromagnetic Compatibility Directive 2004/108/EC using the following standards: EN 61326-1:2006, EN 61326-2-1:2006.
Conformité CE
RIDGID ^® tools are warranted to be free of defects in workmanship and material.
How long coverage lasts
This warranty lasts for the lifetime of the RIDGID® tool. Warranty coverage ends when the product becomes unusable for reasons other than defects in workmanship or material.
How you can get service
To obtain the benefit of this warranty, deliver via prepaid transportation the complete product to RIDGE TOOL COMPANY, Elyria, Ohio, or any authorized RIDGE INDEPENDENT SERVICE CENTER. Pipe wrenches and other hand tools should be returned to the place of purchase.
What we will do to correct problems
Warranted products will be repaired or replaced, at RIDGE TOOL'S option, and returned at no charge; or, if after three attempts to repair or replace during the warranty period the product is still defective, you can elect to receive a full refund of your purchase price.
What is not covered
Failures due to misuse, abuse or normal wear and tear are not covered by this warranty. RIDGE TOOL shall not be responsible for any incidental or consequential damages.
How local law relates to the warranty
Some states do not allow the exclusion or limitation of incidental or consequential damages so the above limitation or exclusion may not apply to you. This warranty gives you specific rights, and you may also have other rights, which vary, from state to state, province to province, or country to country.
No other express warranty applies
This FULL LIFETIME WARRANTY is the sole and exclusive warranty for RIDGID products. No employee, agent, dealer, or other person is authorized to alter this warranty or make any other warranty on behalf of the RIDGE TOOL COMPANY.

Parts are available online at RIDGIDParts.com

Ridge Tool Company
400 Clark Street
Elyria, Ohio 44035-6001
U.S.A.
Ce qui est couvert


- MR-10 Magnetic Locator
- WARNING!
- General Safety Information
- Specific Safety Information
- Description, Specifications and Standard Equipment
- Maintenance
- Safety Symbols
- NOTICE
- WARNING
- SAVE ALL WARNINGS AND INSTRUCTIONS FOR FUTURE REFERENCE!
- Work Area Safety
- Electrical Safety
- Personal Safety
- Equipment Use and Care
- Service
- SAVE THESE INSTRUCTIONS!
- MR-10 Magnetic Locator Safety
- Description
- Specifications
- Standard Equipment
- FCC Statement
- Electromagnetic Compatibility (EMC)
- Changing/Installing Batteries
- Pre-Operation Inspection
- Set-Up and Operation
- Locator General Considerations
- General Locating
- Specific Locating
- Polarity
- AUTO NULL
- Operation in Snow and Water
- Cleaning
- Calibration
- Storage
- Service and Repair
- Improper service or repair can make the RIDGID MR-10 Magnetic Locator unsafe to operate.
- Disposal
- Battery Disposal
- Equipements de base
- Icones
- Authorized Representative:
- CE Conformity
- Conformité CE
- How long coverage lasts
- How you can get service
- What we will do to correct problems
- What is not covered
- How local law relates to the warranty
- No other express warranty applies
- Parts are available online at RIDGIDParts.com
- Ridge Tool Company
- Ce qui est couvert
Brand : RIDGID
Model : MR10
Category : Detector