
SeekTech ST305R - Detector RIDGID - Free user manual and instructions
Find the device manual for free SeekTech ST305R RIDGID in PDF.
| Product Type | Multi-frequency Transmitter for Locating Buried Conductors |
| Brand | RIDGID |
| Model | SeekTech ST-305R |
| Dimensions (L x W x H) | 198 x 116 x 104 mm |
| Weight (without batteries) | 1.03 kg |
| Power Supply | Rechargeable Li-ion 18 V battery, 6 C-cell batteries (alkaline 1.5 V or 1.2 V NiMH/Ni-Cad), or AC adapter (35 W min) |
| Output Power | 0.5 W / 2 W / 5 W |
| Default Frequencies | 1 kHz, 8 kHz, 33 kHz, 262 kHz (or 93 kHz depending on region) |
| Operating Modes | Direct connection, inductive clamp, inductive |
| Cable Length | 3 m |
| High Voltage Indicator | Yes (LED and audible alarm, supports up to 240 V AC) |
| Operating Temperature | -10°C to 50°C |
| Relative Humidity | 5 to 95% |
| Maximum Altitude | 4,000 m |
| Safety | FCC Part 15 compliant, high voltage protection, use with personal protective equipment |
| Maintenance and Cleaning | Clean with a damp cloth, no abrasive or liquid cleaners |
| Spare Parts and Repairability | Replaceable batteries, AC adapter available, repair by RIDGID authorized service center |
| General Information | Used with a SeekTech receiver to locate buried pipes, cables and wires |
Frequently Asked Questions - SeekTech ST305R RIDGID
User questions about SeekTech ST305R RIDGID
0 question about this device. Answer the ones you know or ask your own.
Ask a new question about this device
Download the instructions for your Detector in PDF format for free! Find your manual SeekTech ST305R - RIDGID and take your electronic device back in hand. On this page are published all the documents necessary for the use of your device. SeekTech ST305R by RIDGID.
USER MANUAL SeekTech ST305R RIDGID
Read this Operator's Manual carefully before using this tool. Failure to understand and follow the contents of this manual may result in electrical shock, fire, and/or serious personal injury.
- Français - 19
- Espanol - 39
For support and additional information about using your SeekTech ST-305/R go to support.seesnake. com/st305r or scan this QR code.

Table of Contents
Introduction
Regulatory Statements. 3
Safety Symbols 3
General Safety Rules
Work Area Safety. 4
Electrical Safety. 4
Personal Safety 4
Equipment Use and Care 5
Battery Use and Care 5
Pre-Operation Inspection
Product Overview
Description 7
ST-305R Specifications 7
ST-305 Specifications 8
Standard Equipment. 8
Components 8
Operating Instructions
ST-305/R Safety 9
High Voltage Indicator. 9
Operation Overview. 10
Powering the ST-305/R. 10
Keypad Overview 11
Keypad Keys and Functions 11
Keypad Graphics and LEDs 11
Cable Lead Clips 12
Direct Connect Mode 12
Inductive Clamp Mode. 14
Inductive Mode 15
Air-Coupling 16
Locating 17
Maintenance
Product Support 17
Cleaning 17
Transport and Storage 17
Service and Repair. 18
Disposal 18
Battery Disposal 18
*Original Instructions - English
Introduction
The warnings, cautions, and instructions discussed in this operator's manual cannot cover all possible conditions and situations which may occur. It must be understood by the operator that common sense and caution are factors that cannot be built into this product, but must be supplied by the operator.
Regulatory Statements

The EC Declaration of Conformity (890-011-320.10) will accompany this manual as a separate booklet when required.

This device complies with Part 15 of FCC rules. Operation is subject to the following two conditions: (1) This device may not cause harmful interference, and (2) this device must accept any interference received, including interference that may cause undesired operation.
Safety Symbols
In this operator's manual and on the product, safety symbols and signal words are used to communicate important safety information. This section is provided to improve understanding of these signal words and symbols.
This is the safety alert symbol. It is used to alert you to potential personal injury hazards. Obey all safety messages that follow this symbol to avoid possible injury or death.

DANGER
DANGER indicates a hazardous situation which, if not avoided, will result in death or serious injury.

WARNING
WARNING indicates a hazardous situation which, if not avoided, could result in death or serious injury.

CAUTION
CAUTION indicates a hazardous situation which, if not avoided, could result in minor or moderate injury.
NOTICE
NOTICE indicates information that relates to the protection of property.

This symbol means read the operator's manual carefully before using the equipment. The manual contains important information on the safe and proper operation of the equipment.

This symbol means always wears safety glasses with side shields or goggles when handling or using this equipment to reduce the risk of eye injury.

This symbol indicates the risk of electrical shock.
General Safety Rules

WARNING


Read all safety warnings and instructions. Failure to follow the warnings and instructions may result in electric shock, fire, and/or serious injury.
SAVE THESE INSTRUCTIONS!
Work Area Safety
- Keep your work area clean and well lit. Cluttered or dark areas invite accidents.
- Do not operate equipment in explosive atmospheres, such as in the presence of flammable liquids, gases, or dust. Equipment can create sparks which may ignite the dust or fumes.
- Keep children and bystanders away while operating equipment. Distractions can cause you to lose control.
- Avoid traffic. Pay close attention to moving vehicles when using on or near roadways. Wear visible clothing or reflector vests.
Electrical Safety
- Avoid body contact with earthed or grounded surfaces such as pipes, radiators, ranges, and refrigerators. There is an increased risk of electrical shock if your body is earthed or grounded.
-
An improperly grounded electrical outlet can cause electrical shock and/or severely damage equipment. Always check work area for a properly grounded electrical outlet. Presence of a three-prong or GFCI outlet does not ensure that the outlet is properly grounded. If in doubt, have the outlet inspected by a licensed electrician.
-
Do not expose equipment to rain or wet conditions. Water entering equipment will increase the risk of electrical shock.
- Do not abuse the cord. Never use the cord for carrying, pulling, or unplugging the power tool. Keep cord away from heat, oil, sharp edges, and moving parts. Damaged or entangled cords increase the risk of electric shock.
- If operating equipment in a damp location is unavoidable, use a ground fault circuit interrupter (GFCI) protected supply. Use of a GFCI reduces the risk of electric shock.
- Keep all electrical connections dry and off the ground. Do not touch equipment or plugs with wet hands to reduce the risk of electrical shock.
Personal Safety
- Stay alert, watch what you are doing, and use common sense when operating equipment. Do not use equipment while you are tired or under the influence of drugs, alcohol, or medication. A moment of inattention while operating equipment may result in serious personal injury.
- Use personal protective equipment. The appropriate use of protective equipment such as safety glasses, a dust mask, non-skid safety shoes, a hard hat, high visibility clothing, and hearing protection will reduce personal injuries.
- Do not overreach. Keep proper footing and balance at all times. This enables better control of the equipment in unexpected situations.
- Dress properly. Do not wear loose clothing or jewelry. Keep your hair, clothing, and gloves away from moving parts. Loose clothes, jewelry, and long hair can be caught in moving parts.
Equipment Use and Care
-
Do not force equipment. Use the correct equipment for your application. The correct equipment will do the job better and safer at the rate for which it is designed.
-
Do not use equipment if the power switch does not turn it on and off. Any equipment that cannot be controlled with the power switch is dangerous and must be repaired.
-
Disconnect the plug from the power source and/or the battery pack from the equipment before making adjustments, changing accessories, or storing. Preventive safety measures reduce the risk of injury.
-
Store idle equipment out of the reach of children and do not allow persons unfamiliar with the equipment or these instructions to operate the equipment. Equipment can be dangerous in the hands of untrained users.
-
Maintain equipment. Check for misalignment or binding of moving parts, missing parts, breakage of parts, and any other condition that may affect the equipment's operation. If damaged, have the equipment repaired before use. Many accidents are caused by poorly maintained equipment.
-
Use the equipment and accessories in accordance with these instructions; taking into account the working conditions and the work to be performed. Use of the equipment for operations different from those intended could result in a hazardous situation.
-
Use only accessories that are recommended by the manufacturer for your equipment. Accessories that may be suitable for one piece of equipment may become hazardous when used with other equipment.
-
Keep handles dry, clean, and free from oil and grease. This allows for better control of the equipment.
Battery Use and Care
-
Use equipment only with specifically designated battery packs. Use of any other battery packs may create a risk of injury and fire.
-
Recharge only with the charger specified by the manufacturer. A charger suitable for one type of battery pack may create a risk of fire when used with another battery pack.
-
Do not probe battery with conductive objects. Shorting of battery terminals may cause sparks, burns, or electrical shock. When the battery pack is not in use, keep it away from other metal objects, like paper clips, coins, keys, nails, screws or other small metal objects that can make a connection from one terminal to another. Shorting the battery terminals together may cause burns or a fire.
-
Under abusive conditions, liquid may eject from battery; avoid contact. If contact occurs, flush with water. If liquid contacts eyes, seek medical help. Liquid ejected from the battery may cause irritation or burns.
-
Do not cover charger while in use. Proper ventilation is required for correct operation. Covering charger in use could result in fire.
-
Use and store batteries and chargers in dry, appropriate temperature areas. Extreme temperatures and moisture can damage batteries and result in leakage, electrical shock, fire or burns.
-
Properly dispose of batteries. Exposure to high temperatures can cause the batteries to explode; do not dispose of in a fire. Some countries have regulations concerning battery disposal. Follow all applicable regulations.
-
See the Battery and Battery Charger Operator's Manual for additional information.
Pre-Operation Inspection

WARNING
To reduce the risk of serious injury from electrical shock or other causes, and to prevent damage to your equipment, inspect all equipment and correct any problems before each use.
To inspect all equipment, follow these steps:
- Power off your equipment.
- Disconnect and inspect all cords, cables, and connectors for damage or modification.
- Clean any dirt, oil, or other contamination from your equipment to ease inspection and to prevent it from slipping from your grip during transportation or use.
- Inspect your equipment for any broken, worn, missing, misaligned, or binding parts, or any other condition which might prevent safe, normal operation.
- Refer to the instructions for all other equipment to inspect and make sure it is in good, usable condition.
-
Check your work area for the following:
-
Adequate lighting.
-
The presence of flammable liquids, vapors, or dust that may ignite. If present, do not work in area until sources have been identified and corrected. The equipment is not explosion proof. Electrical connections can cause sparks.
-
A clear, level, stable, and dry place for the operator. Do not use the equipment while standing in water.
-
Examine the job to be done and determine the correct equipment for the task.
- Observe the work area and erect barriers as necessary to keep bystanders away.
See additional product specific safety information and warnings starting on 9.
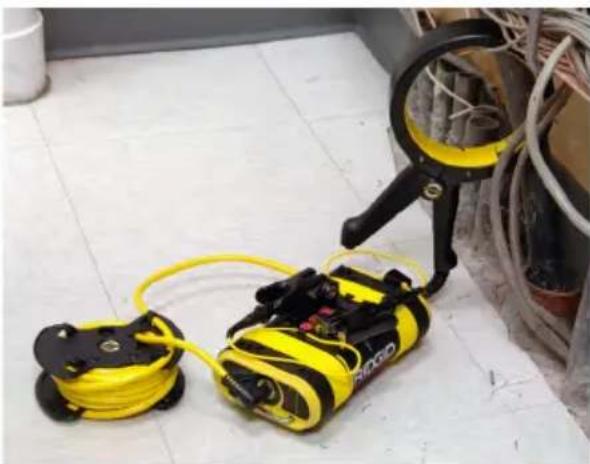
Product Overview
Description
ST-305/R is used to refer to both the ST-305R and the ST-305 throughout this manual. The ST-305R and ST-305 are functionally identical. The only difference is the ST-305R can be used with a rechargeable battery and internal C-cell batteries. The ST-305 is only operational with internal C-cell batteries.
The RIDGID SeekTech ST-305 and ST-305R are compact yet powerful multi-frequency transmitters that can be used, in conjunction with a RIDGID SeekTech receiver, to find buried conductors such as pipes, cables, and wires. This allows the line's location to be correctly marked so it can be exposed for repair or avoided during excavation.

| ST-305R Specifications | |
| Weight without batteries | 1.03 kg [2.27 lb] |
| Dimensions | |
| Length 198 mm [7.8 in] | |
| Width 116 mm [4.6 in] | |
| Height 104 mm [4.1 in] | |
| Cable lead length | 3 m [10 ft] |
| Output power 0.5, 2, 5 W Nominal | |
| Power Source | 18 V Li-lon rechargeable battery, six C-cell batteries (1.5 V alkaline or 1.2 V NiMH or Ni-Cad rechargeable), or AC adapter |
| Current settings | |
| Internal batteries | 25 mA – 400 mA |
| 18 V Li-lon battery | ≤ 1,000 mA |
| AC adapter ≤ 1,000 mA | |
| Default frequencies | 1 kHz, 8 kHz, 33 kHz, and 262 kHz |
| Operating environment | |
| Temperature | -10°C to 50°C [14°F to 122°F] |
| Storage temperature | -20°C to 60°C [-4°F to 140°F] |
| Relative humidity | 5% to 95% |
| Altitude 4,000 m [13,120 ft] | |
| ST-305 Specifications | |
| Weight without batteries | 0.86 kg [1.9 lb] |
| Dimensions | |
| Length 198 mm [7.8 in] | |
| Width 116 mm [4.6 in] | |
| Height 76 mm [3 in] | |
| Cable lead length | 3 m [10 ft] |
| Output power 0.5, 2, 5 W Nominal | |
| Power Source | Six C-cell batteries (1.5 V alkaline or 1.2 V NiMH or Ni-Cad rechargeable) |
| Current settings | |
| Internal batteries | 25 mA – 400 mA |
| Default frequencies | 1 kHz, 8 kHz, 33 kHz, and 262 kHz (US) or 93 kHz (Europe) |
| Operating environment | |
| Temperature | -10°C to 50°C [14°F to 122°F] |
| Storage temperature | -20°C to 60°C [-4°F to 140°F] |
| Relative humidity | 5% to 95% |
| Altitude 4,000 m [13,120 ft] | |
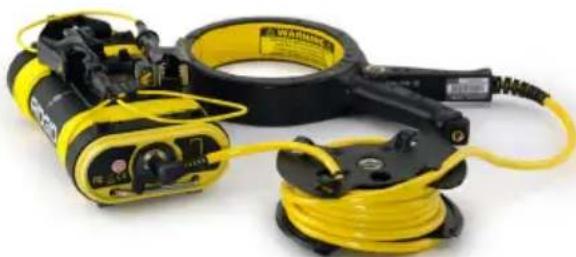
Standard Equipment
- ST-305R or ST-305
Operator's manual - 6 C-cell batteries (Alkaline)
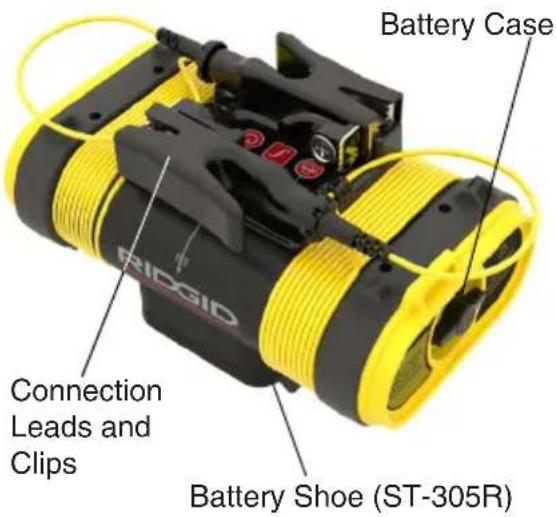
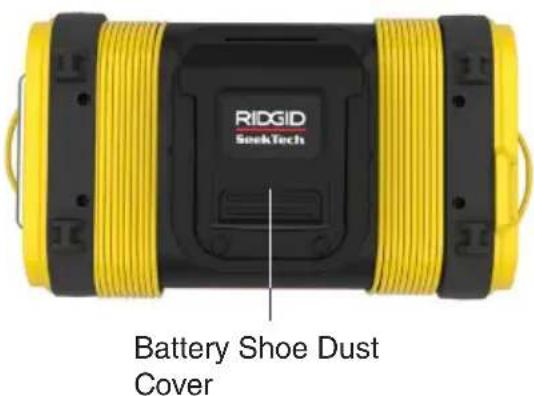
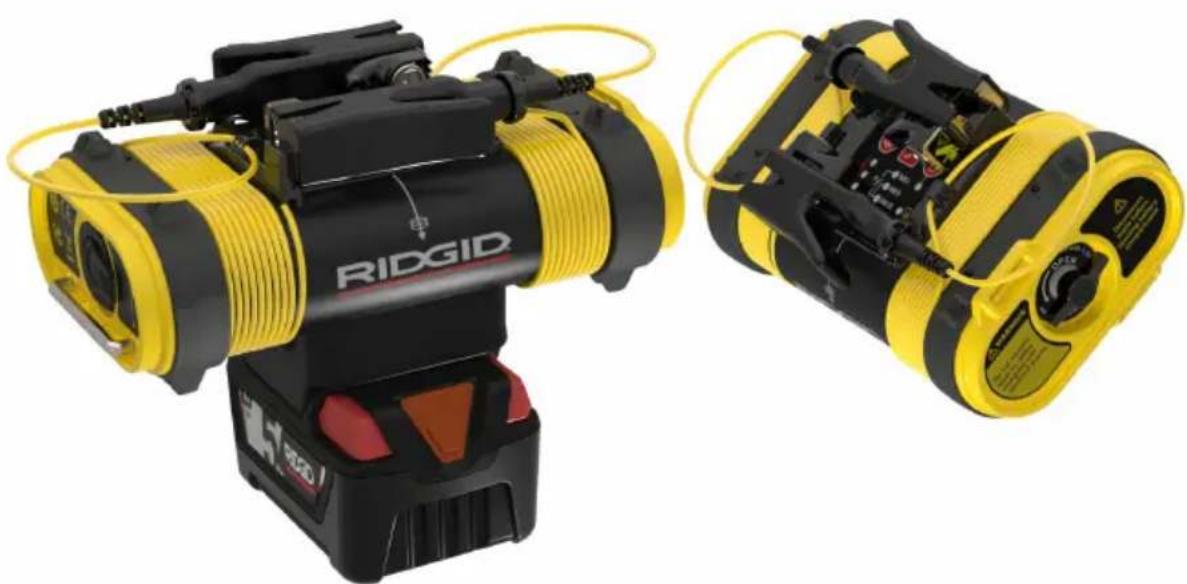
Components
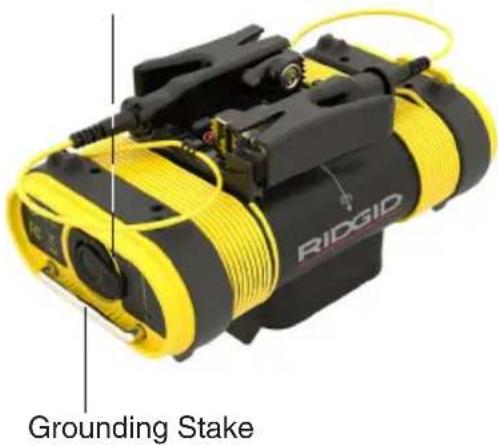
Inductive Clamp Jack
Operating Instructions
WARNING
This section contains important safety information that is specific to the ST-305/R. Read these precautions carefully before using the ST-305/R to reduce the risk of electrical shock, fire, or other serious injury.
SAVE ALL WARNINGS AND INSTRUCTIONS FOR FUTURE REFERENCE!
ST-305/R Safety
- Read and understand this operator's manual, and the instructions for any other equipment in use and all warnings before operating the ST-305/R. Failure to follow all instructions and warnings may result in property damage and/or serious personal injury. Keep this manual with the equipment for future use.
- Operating the equipment while in water increases the risk of electrical shock. Do not operate the ST-305/R if the operator or equipment are standing in water.
The ST-305/R is not designed to provide high voltage protection and isolation. Do not use where a danger of high voltage contact is present. -
Always attach leads before turning the ST-305/R on and always power off the ST-305/R before disconnecting the leads to reduce the risk of electrical shock.
-
Follow local guidelines and call before digging. Locating equipment uses electromagnetic fields that can be distorted and interfered with. More than one utility may be present in a given area. Follow local guidelines and service procedures. Confirm location of utilities before digging.
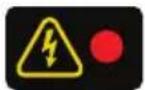
High Voltage Indicator
The ST-305/R is designed to withstand up to 240 VAC between the two leads. This protection is not intended to be used continuously and excess current may be forced through the ST-305/R. To reduce the risk of electrical shock, do not touch the transmitter, cords, or connections during this time. Use high voltage precautions to disconnect the ST-305/R.
If the ST-305/R senses excess current, a warning beep sounds and the High Voltage LED on the keypad is lit.
Operation Overview

WARNING

Wear eye protection when appropriate to protect your eyes against dirt and other foreign objects. Follow operating instructions to reduce the risk of injury from electrical shock and other causes.
The default frequencies that come with the ST-305/R are:
- 1 kHz [1,024 Hz]
- 8 kHz [8,192 Hz]
33 kHz [32,768 Hz]
93 kHz [93,623 Hz] or 262 kHz [262,144 Hz]
Note: High frequency is 93 kHz or 262 kHz depending on your region.
The ST-305/R has three operating modes that can be used during a locate. Which mode you use depends on the circumstances of the locate.
Direct Connect - The leads connect directly to the target conductor and a suitable ground.
Inductive Clamp The optional inductive clamp encircles the target conductor when metal-to-metal contact is not possible or unable to produce the desired result.
Inductive The ST-305/R is placed over a conductor. The internal antenna induces a signal on to the target conductor.
Powering the ST-305/R

WARNING
Disconnect external leads from any energized utility before opening the battery compartment. To prevent overheating and leakage, do not mix battery types or brands and do not combine new and used batteries. Always remove the batteries before shipping or storing the ST-305/R.
Li-Ion 18 V Battery
A Li-Ion 18 V rechargeable battery can be used simultaneously with the internal C-cell batteries. If the voltage falls below 15.4V or if the battery dies, the ST-305R switches to internal batteries.
C-Cell Batteries
To install C-cell batteries, rotate the knob on the battery holder counter-clockwise until the battery compartment releases. Pull straight back on the knob to remove the cover. Insert the 6 batteries as shown on the inside decals.
Note: Rechargeable C-cell batteries do not recharge in the ST-305/R.
AC Adapter
For indoor use only, the ST-305R can also be powered by an external AC adapter no less than 35 W. Read and follow the instructions as specified by the manufacturer of the AC adapter before using it with the ST-305R.
Note: The AC adapter does not recharge the 18 V battery.
Keypad Overview
Keypad Keys and Functions

Inductive Mode Key
Toggle between Inductive Mode and Direct Connect Mode.

Frequency Key
Cycle through frequency options.

Power/ Select Key
Power the unit on or off (long press, >3 seconds, to power off). Cycle through power levels.
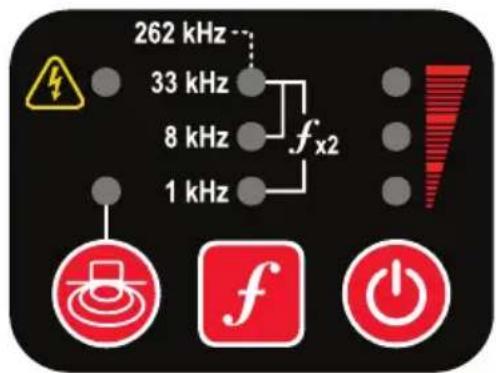
Keypad Graphics and LEDs
High Voltage Warning
On when high voltage is encountered.
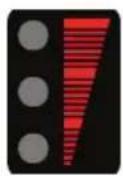
Power/ Battery Indicator
At start-up, displays the estimated battery level. During use, indicates the relative level of output power.
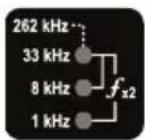
Frequency Indicator
Indicates frequency in use or when expanded frequency settings are active. High frequency is 93 kHz or 262 kHz depending on your region.
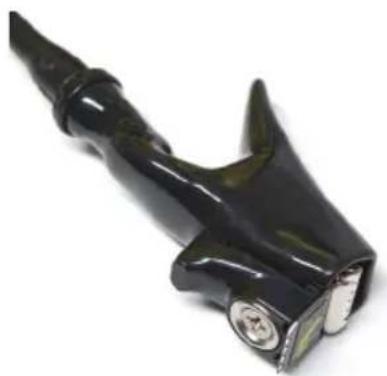
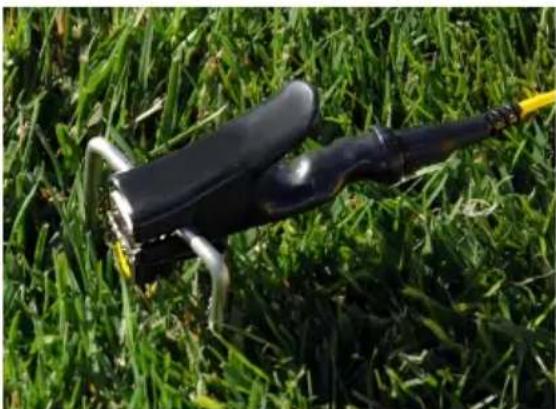
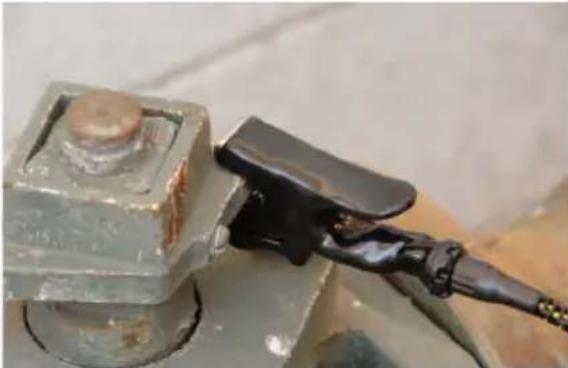
Cable Lead Clips
The ST-305/R features cable lead clips that can be attached mechanically or magnetically. Before connecting the leads, use the teeth on the clip to scrape off rust or paint. When the metal is exposed you can either clip onto the target with the teeth or use the magnet to make the connection.
NOTICE The cable lead clips contain strong magnets. Do not place the clips near data storage devices, credit cards, or other magnetically encoded data.
Sounds of the ST-305/R
Sounds are associated with specific events or states. Sounds may be toggled on or off by pressing the Frequency key f and Power key simultaneously.
| Sounds of the ST-305/R | |
| Power on 4 short beeps | |
| Power off 3 short beeps | |
| Inductive Clamp 2 short beeps | |
| Inductive Mode | 1 long beep, 2 short beeps |
| Low battery warning | Rapid series of beeps |
Direct Connect Mode
Direct Connect Mode is most commonly used when the target utility is readily accessible. Do not use Direct Connect Mode on energized (live) conductors. The transmitter is not designed to connect to live conductors.
-
Choose connection locations for the ground stake and the target conductor. Place the transmitter, powered off, on the ground between these two locations.
-
Insert the ground stake into the earth as far as possible. Wet the earth around the ground stake to improve grounding and to lower the resistance of the ground. With the ST-305/R still powered off, attach the lead clip to the ground stake.
Instead of using the provided grounding stake, the lead clip can be attached to other objects such as a shovel blade or a metal rod sunk into the earth. Using larger grounding objects may improve grounding by increasing the surface area in contact with the earth.
Note: Always connect the lead to the ground stake before connecting another lead to the target line to direct any current within the target conductor away from the user.
- At the target conductor, scrape away any dirt, paint, corrosion, or other coatings and attach the other cable lead clip with either the teeth or the magnet.
Good contact between the cable lead and the target conductor lowers the resistance of the circuit and produces a stronger tracing signal.
Note: Non-conductive pipes, such as those made of clay or plastic, cannot carry a tracing current without a trace wire. Plastic pipes typically have a trace wire installed with the pipe for tracing purposes. Clip the cable lead to the trace wire to enable tracing.
Expanded Frequency Settings
While in Direct Connect Mode, the transmitter can be used with high or dual frequencies.
-
Long press (>3 seconds) the Frequency key to set the transmitter to high frequency.
-
Short press the Frequency key to cycle through dual frequency options or return to the high frequency. Expanded frequency options include:
-
262kHz or 93kHz only.
-
33 kHz and 1 kHz dual frequency transmission.
-
33 kHz and 8 kHz dual frequency transmission.
The LED associated with each frequency is lit when that frequency is in use.
- Long press the Frequency key f again to return to standard frequency options.
Note: High frequency is 93kHz or 262kHz depending on your region. Expanded frequency settings are only available in Direct Connect Mode.
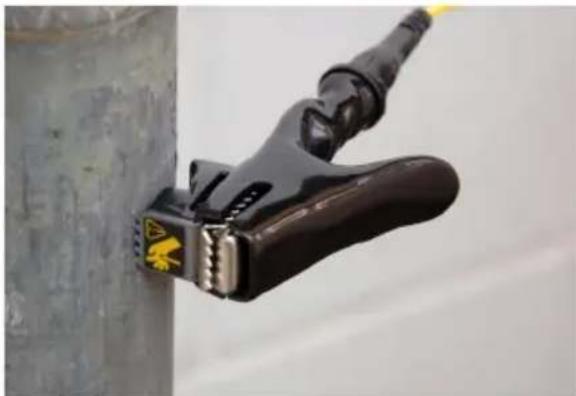
Inductive Clamp Mode
Read the Operator's Manual for the Inductive Clamp before using it with the ST-305/R. It includes important safety information and operating instructions.
Use the ST-305/R with an inductive clamp by following these steps:
-
Before connecting the inductive clamp, confirm that the target conductor is not live and grounded on both ends, and that the ST-305/R is powered off. The ST-305/R is not designed to be connected to live conductors.
-
Insert the inductive clamp plug into the jack on the ST-305/R below the keypad.
-
Place the jaws of the inductive clamp around the target conductor, ensuring that they close completely. The LEDs on the clamp are lit when the jaws are closed and the ST-305/R is powered on.
- Press the Power key TheST-305/R automatically switches to Inductive Clamp Mode and disables the cable leads.
Note: In Inductive Clamp Mode, the ST-305/R defaults to 50 percent power level to conserve battery power.
-
Select and set the same frequency on both the receiver and transmitter.
-
Check the connections and adjust the current as needed during the locate.
-
When finished, press the Power key to power off the ST-305/R before disconnecting the inductive clamp.
Inductive Mode
Disconnect the lead clips from any external conductors before switching the ST-305/R to Inductive Mode. If the lead clips are connected to an external conductor and the ST-305/R is switched to Inductive Mode, a warning appears and operator override is required.
Do not use clips and leads in Inductive Mode. The ST-305/R automatically sets the frequency to 33kHz the first time Inductive Mode is used. After the first use, the ST-305/R automatically uses the frequency last used in Inductive Mode. The two frequencies available in Inductive Mode are 8kHz and 33kHz .
NOTICE
Do not place two ST-305/ Rs in Inductive Mode with the power on within 3m [10 ft] of each other.
The output of each ST-305/R can overload the electronics and damage one or both units.
Use the ST-305/R in Inductive Mode by following these steps:
- Place the ST-305/R so the white orientation arrows located on top of the ST-305/R are aligned with the target conductor.
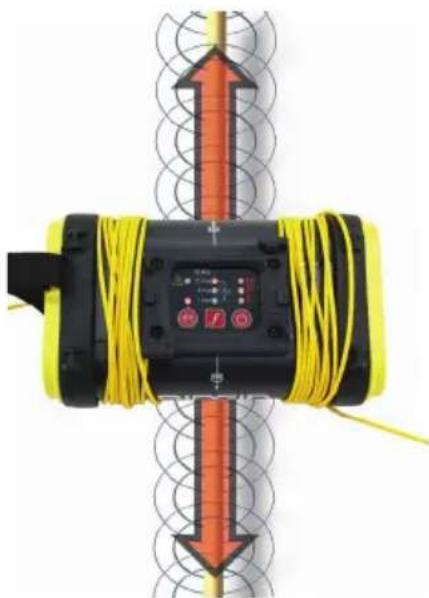
- Press the Power key to power on the ST-305/R. Press the Inductive Mode key to toggle the ST-305/R between Direct Connect Mode and Inductive Mode.
Ground both ends of the utility for the best signal induction.
-
To power on and use the receiver, refer to the receiver's Operator Manual. Ensure the frequency on the receiver matches the ST-305/R. If the receiver signal increases when held near the ST-305/R, it is correctly picking up the transmitted frequency.
-
After completing the locate, press the Power key to power off the ST-305/R.
Air-Coupling
Any transmitter in Inductive Mode generates a field through the air around it; including the ground underneath. If within air-coupling range of the ST-305/R, the receiver will measure this field instead of the target conductor. Air-coupling will distort readings and misconstrue the location of the target conductor.
Air-coupling effects can dominate the received signal over a wide range (greater than 20m [70 ft]) if the induced utility is deep and poorly grounded. Very weak induction and deep utilities will result in greater air-coupling distances. Always confirm the detection of utilities and the readings of depth measurements.
Air-coupling does not depend on the output power of the transmitter and cannot be reduced by turning down the power. Air-coupling only depends on the ratio of the field from the transmitter compared to the induced field in the target utility.
The effect of air-coupling can vary continuously so be aware of the difference between the transmitter's field and the induced field of the utility being traced. While both will have the same frequency, the transmitter's field is only strong enough to obscure the utility's signal in the region around the transmitter itself.
Be sure to look overhead for power lines that could also confuse the locate.
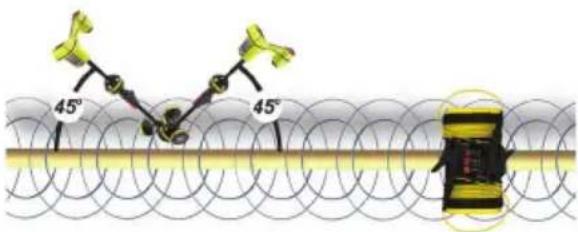
Testing for Air-Coupling
To test for air-coupling, tilt the receiver at a 45 degree angle towards the ST-305/R and ensure the lower antenna of the receiver touches the ground. Afterwards, tilt the receiver 45 degrees away from the ST-305/R and observe the depth reading. If the depth reading changes significantly, air-coupling may be affecting the accuracy of the locate.
Alternatively, test for air-coupling by standing 6m [20 ft] away from the ST-305/R. With the lower antenna on the ground, take note of the indicated depth measurement on the receiver. Raise the receiver vertically 45~cm [18 in] and observe the change in the depth indication. If the receiver only reads the conductor, the depth should increase accordingly. If the receiver is air-coupling, the depth indication does not change by 45~cm [18 in], but changes disproportionately.
Locating
WARNING
To reduce the risk of electrical shock, power off the ST-305/R before disconnecting the leads and remove the lead from the target conductor before removing the lead from the ground stake.
Note: When the ST-305/R is powered on and in Direct Connect Mode, only hold the cable leads by the plastic sheathing. Do not touch the metal scraper tip, teeth, or magnet.
- With one cable lead attached to the ground stake and the other attached to the target conductor, press the Power key to power on the ST-305/R.
Upon start up, the ST-305/R measures the current flowing through the target conductor and beeps to indicate output. Faster beeps indicate a higher output current.
- Select a frequency by pressing the Frequency key f until the desired frequency is selected. Long press (>3 seconds) the Frequency key to select the expanded frequency option for dual or high frequencies.
- Follow the instructions in the receiver's Operator's Manual to power on and use the receiver. Ensure the frequency on the receiver matches the ST-305/R. If the receiver signal increases when held near the ST-305/R, it is correctly picking up the transmitted frequency.
- After completing the locate, press the Power key to power off the ST-305/R.
Maintenance
Product Support
For support and additional information about using your ST-305/R, visit support. seesnake.com/st305r.
Cleaning
WARNING
Disconnect all cords and cables and remove batteries prior to cleaning the ST-305/R to reduce the risk of electrical shock.
Do not use liquid or abrasive cleaners on the ST-305/R. Clean the ST-305/R with damp cloth. Do not allow any liquid to enter the ST-305/R.
Transport and Storage
- Store in a locked area out of the reach of children and people unfamiliar with its purpose.
- Store in a dry place to reduce risk of electrical shock.
- Store away from heat sources such as radiators, heat registers, stoves, and other products (including amplifiers) that produce heat.
Storage temperature should be -20^ to 60^ [-4°F to 140°F]. - Do not expose to heavy shocks or impacts during transport.
- Remove the battery before shipping and before storing for extended periods of time.
Service and Repair

WARNING
Improper service or repair can cause the ST-305/R to be unsafe to operate.
Service and repair of the ST-305/R must be performed at a RIDGID Independent Authorized Service Center. To maintain the safety of the tool, make sure a qualified repair person services your equipment using only identical replacement parts. Discontinue using the ST-305/R, remove the batteries, and contact service personnel under any of the following conditions:
- The equipment does not operate normally when operating instructions are followed.
The equipment exhibits a distinct change in performance. - The equipment has been dropped or damaged.
- Liquid has been spilled or objects have fallen into the equipment.
For information on your nearest RIDGID Independent Service Center or any service or repair questions:
- Contact your local RIDGID distributor.
- Go to www.RIDGID.com.
- Contact Ridge Tool Company Technical Service Department at rttechservices@emerson.com or, in the U.S. and Canada, call 1-800-519-3456.
Disposal
Parts of the unit contain valuable materials that can be recycled. There are companies that specialize in recycling that may be found locally. Dispose
of the components in compliance with all applicable regulations. Contact your local waste management authority for more information.
For EC countries: Do not dispose of electrical equipment with household waste!
According to the European Guideline 2012/19/EU for Waste Electrical and Electronic Equipment and its implementation into national legislation, electrical equipment that is no longer usable must be collected separately and disposed of in an environmentally-correct manner.
Battery Disposal
For EC countries: Defective or used battery packs/batteries must be recycled according to the guideline 2006/66/EC.
SeekTech®
ST-305R et ST-305

AVERTISSEMENT!
Li-Ion 18 V Pile rechargeable
Mode Pince inductive
- 1 kHz [1,024 Hz]
- 8 kHz [8,192 Hz]
33 kHz [32,768 Hz]
93 kHz [93,623 Hz] o 262 kHz [262,144 Hz]
De眼看, the manure is already in the field. The manure is already in the field. The manure is already in the field.
Localización
ADVERTENCIA
Ridge Tool Europe NV (RIDGID)
Belgium
© 2020 Ridge Tool Company. All rights reserved.
Every effort has been made to ensure that the information in this manual is accurate. Ridge Tool Company and its affiliates reserve the right to change the specifications of the hardware, software, or both as described in this manual without notice. Visit RIDGID.com for current updates and supplemental information pertaining to this product. Due to product development, the photos and other presentations specified in this manual may differ from the actual product.
RIDGID and the RIDGID logo are trademarks of Ridge Tool Company, registered in the USA and other countries. All other registered and unregistered trademarks and logos mentioned herein are the property of their respective owners. Mention of third-party products is for informational purposes only and constitutes neither an endorsement nor a recommendation.
Printed in USA 2020/08/12
999.995.232.10
748-025-0076-00-0A


- Table of Contents
- Introduction
- General Safety Rules
- Pre-Operation Inspection
- Product Overview
- Operating Instructions
- Maintenance
- Regulatory Statements
- Safety Symbols
- DANGER
- WARNING
- CAUTION
- NOTICE
- SAVE THESE INSTRUCTIONS!
- Work Area Safety
- Electrical Safety
- Personal Safety
- Equipment Use and Care
- Battery Use and Care
- Description
- Standard Equipment
- SAVE ALL WARNINGS AND INSTRUCTIONS FOR FUTURE REFERENCE!
- ST-305/R Safety
- High Voltage Indicator
- Operation Overview
- Powering the ST-305/R
- Li-Ion 18 V Battery
- C-Cell Batteries
- AC Adapter
- Keypad Keys and Functions
- Keypad Graphics and LEDs
- Cable Lead Clips
- Sounds of the ST-305/R
- Direct Connect Mode
- Expanded Frequency Settings
- Inductive Clamp Mode
- Inductive Mode
- Air-Coupling
- Testing for Air-Coupling
- Locating
- Product Support
- Cleaning
- Transport and Storage
- Service and Repair
- Improper service or repair can cause the ST-305/R to be unsafe to operate.
- Disposal
- Battery Disposal
- SeekTech®
- ST-305R et ST-305
- AVERTISSEMENT!
- Li-Ion 18 V Pile rechargeable
- Mode Pince inductive
- Localización
- ADVERTENCIA
Brand : RIDGID
Model : SeekTech ST305R
Category : Detector