
Elementa 300 - Speaker HECO - Free user manual and instructions
Find the device manual for free Elementa 300 HECO in PDF.
| Product type | Passive 2-way bass-reflex bookshelf speakers |
| Brand | Heco |
| Model | Elementa 300 |
| Category | Loudspeaker |
| Dimensions (W x H x D) | 226 x 368 x 307 mm |
| Weight | 6.8 kg |
| Power supply | Passive (amplifier connection) |
| Speaker type | 2-way bass reflex |
| Nominal power (RMS / peak) | 90 W / 150 W |
| Impedance | 4 – 8 Ohm |
| Frequency range | 32 – 45,000 Hz |
| Recommended amplifier power | 30 – 150 W |
| Efficiency (1W/1m) | 90 dB |
| Included accessories | Rubber spikes |
| Main features | Stereo, bi-wiring, bi-amping, treble adjustment +2 dB |
| Care and cleaning | Clean with a mild household cleaner. Do not use furniture polish. |
| Safety | Avoid distortion, do not overload the speaker, turn off the amplifier before connecting |
| Warranty | 5 years (valid for the original owner) |
| Repairability | Contact the dealer or Heco after-sales service |
Frequently Asked Questions - Elementa 300 HECO
User questions about Elementa 300 HECO
0 question about this device. Answer the ones you know or ask your own.
Ask a new question about this device
Download the instructions for your Speaker in PDF format for free! Find your manual Elementa 300 - HECO and take your electronic device back in hand. On this page are published all the documents necessary for the use of your device. Elementa 300 by HECO.
USER MANUAL Elementa 300 HECO
At the end of the product's useful life, please dispose of it at appropriate collection points provided in your country.
Gummispikes Gummispikes Gummispikes
Congratulations on your fine new loudspeakers and thank you very much for choosing HECO! You have made an excellent choice. The high-quality speakers produced by HECO are renowned all over the world.
Please study the instructions and information below carefully before using your new loudspeakers.
fitting tHe feet (eleMenta 700 only)
The (2) feet included in the delivery package must be fitted to the loudspeaker before use. To do this, place the speakers on a clean, stable base with the bottom facing upwards. It is better not to remove the protective bag until after fitting has been completed so as to avoid damage to the paint surface.
First fit the four metal spikes to the two metal traverses, as shown in Fig. 1: Two spikes each (x) are screwed into the threaded holes in the traverses (w) from below as far as they will go. From above, the plastic washers (y) are first placed over the protruding threads and the lock screw (z) is then fitted and tightened.
Now fit the two pre-assembled feet using the M6 screws provided, as shown in Fig. 1.
The metal spikes (x) are height-adjustable so as to guarantee the stability of the speaker. To do this, loosen the top lock nut (z) and adjust the spike by turning it. Once the right setting has been found, tighten the lock nut again.
Rubber inserts are screwed into the bottom of the cone spikes. These ensure optimum stability on smooth, hard floor coverings, such as laminate or tiles. The rubber inserts can be replaced with metal inserts (included in the package). This variation is better suited for carpets, for example.
geneRal InfoRMation aBout ConneCting youR HeCo eleMenta loudSPeaKeRS
Please always use a good quality loudspeaker connection cable from an audio dealer. To prevent impairment of sound quality, we recommend cables with cross-sections of at least 2.5 mm^2 for lengths up to 3 m and at least 4 mm^2 for lengths above 3 m.
Always turn off the amplifier or receiver before connecting or disconnecting loudspeaker cables. Place the loudspeakers in their planned positions and cut the cables to the right length. The cables for both channels should always be exactly the same length.
Strip 10 – 15 mm of insulation from the ends of the cables. Twist the ends – this is much better than tinning them with solder – insert them in the terminals and tighten the terminal screws firmly. (Fig. 2)
For good sound it is imperative that the cables must be connected in such a way that the speakers are “in phase”. This means that the black negative terminals on the speakers (-) must be connected to the negative (-) terminals on the amplifier, the red positive (+) speaker terminals to the positive (+) amplifier terminals. To make this easier one wire of most speaker cables is marked with a coloured strip or a ridge in the insulation.
Before switching on the system double-check all your connections and make sure that the terminal screws are tight and that there are no short circuits caused by stray wire filaments – this could cause serious damage to your amplifier!
tHe HeCo eleMenta loudSPeaKeRS In SteReo Mode
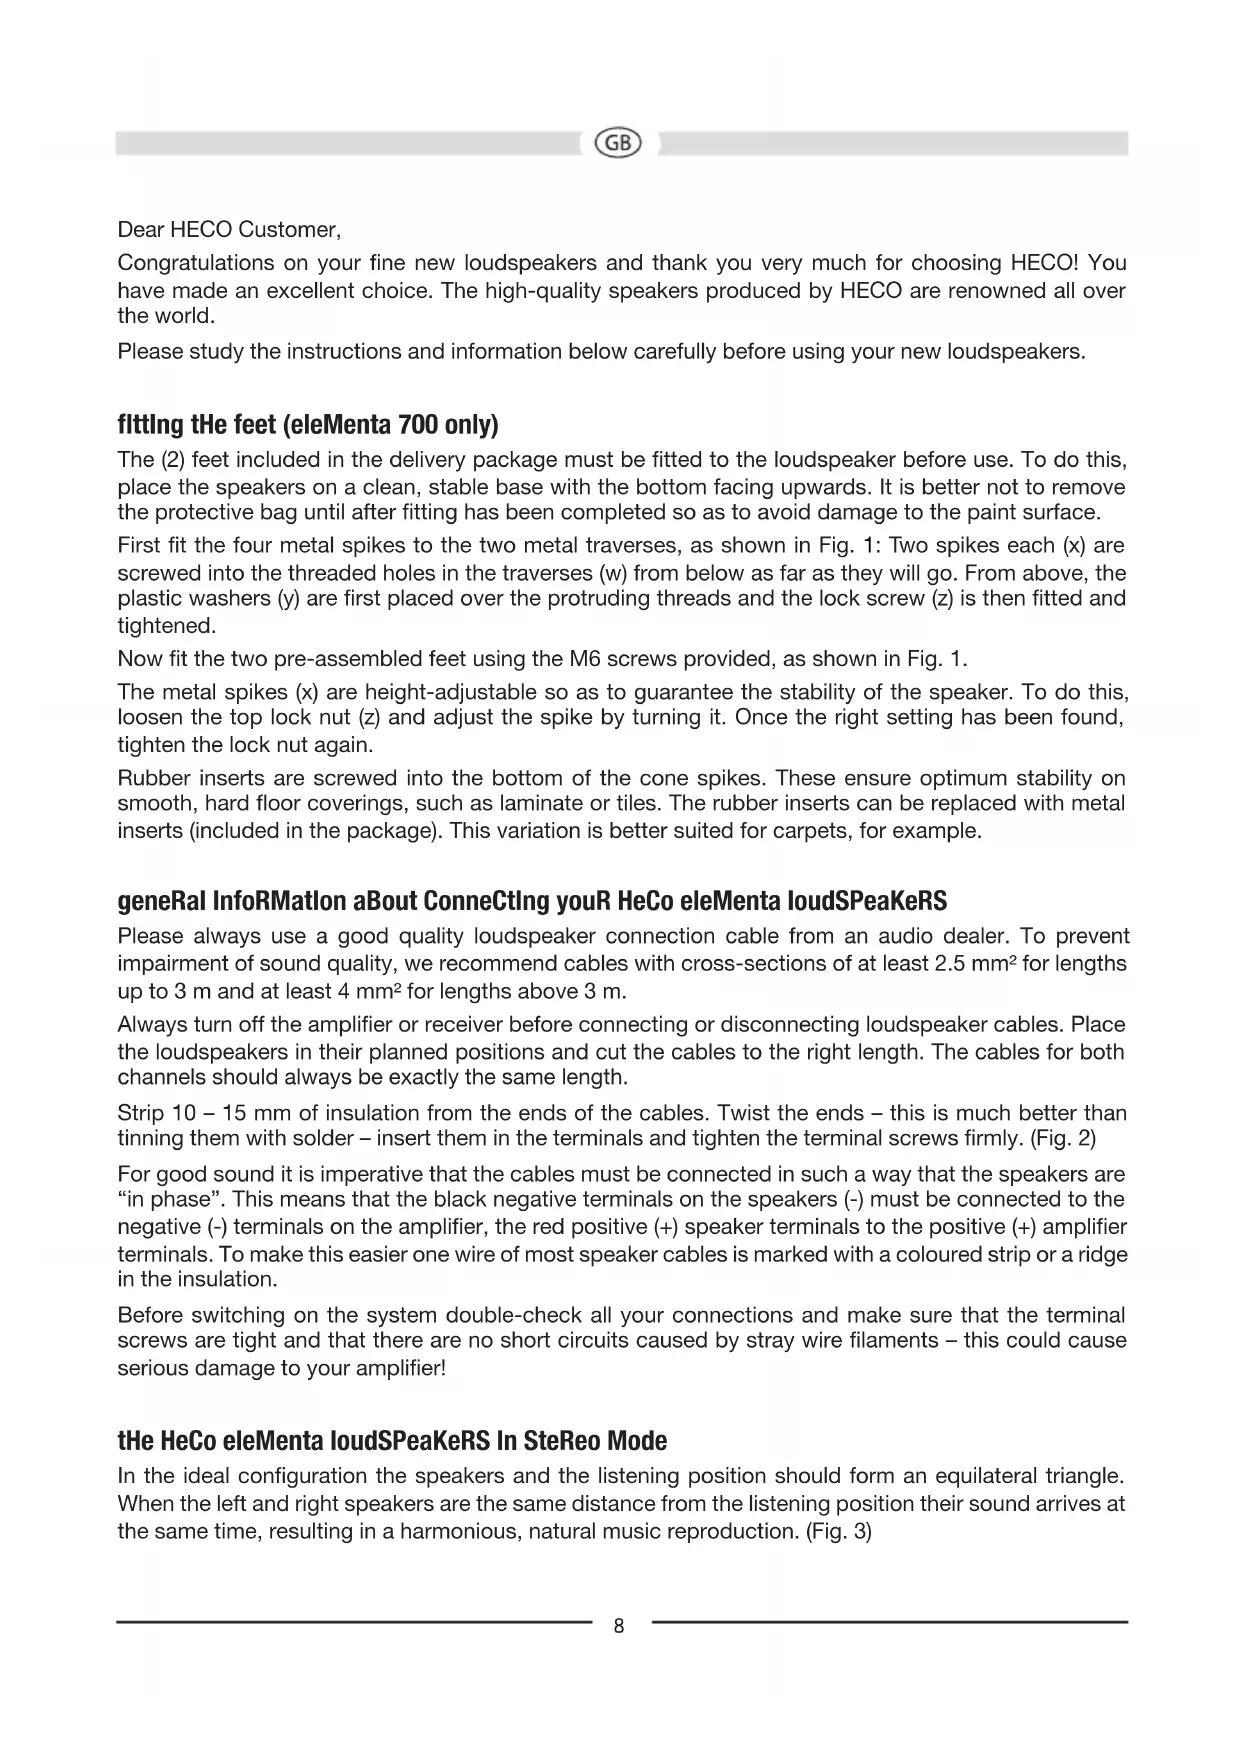
In the ideal configuration the speakers and the listening position should form an equilateral triangle. When the left and right speakers are the same distance from the listening position their sound arrives at the same time, resulting in a harmonious, natural music reproduction. (Fig. 3)
There should be a clear line of sight between the loudspeakers and the listening position. Any sound-absorbing or reflecting obstacles in the path will distort the sound. When you install the loudspeakers the following distances should be maintained:
Floorstanders: at least 20 cm away from the rear wall and at least 30 cm from the side walls. This will prevent excessive emphasis of the bass range.
Bookshelf speakers: shelf loudspeakers should also be as free-standing as possible, the distance to the sides and rear to walls and items should be at least 10 cm, the tweeters should be located at ear height.
Spikes (floorstanders): you should use the supplied spikes when setting the speakers up. This isolates them from the supporting surface, preventing unpleasant resonance effects. You can choose between metal and hard rubber spikes for the standing speakers. The spikes are screwed into the threaded bushes on the bottom of the speaker.
HECO ELEMENTA LOUDSPEAKERS AS A FRONT OR REAR LOUDSPEAKER
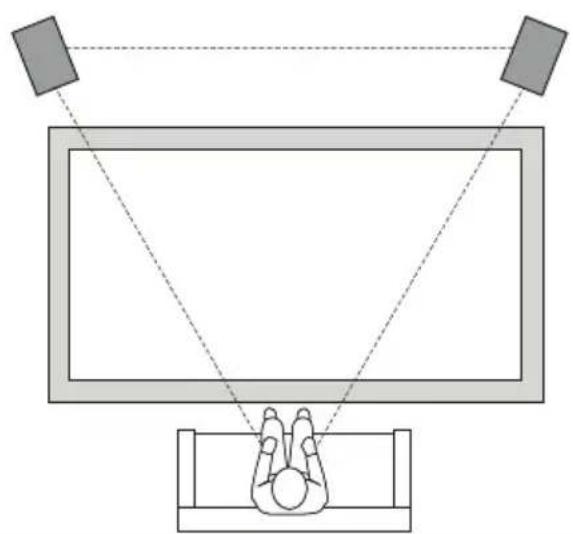
The front loudspeakers are positioned at ear height on the left and right as equidistant from the television as possible. The rear loudspeakers are placed at ear height or a little above on the left and right besides or better behind the listening position. (Fig. 4)
CONNECTOR PANEL ON THE HECO ELEMENTA LOUDSPEAKERS / BI-WIRING AND BI-AMPING HECO ELEMENTA 700
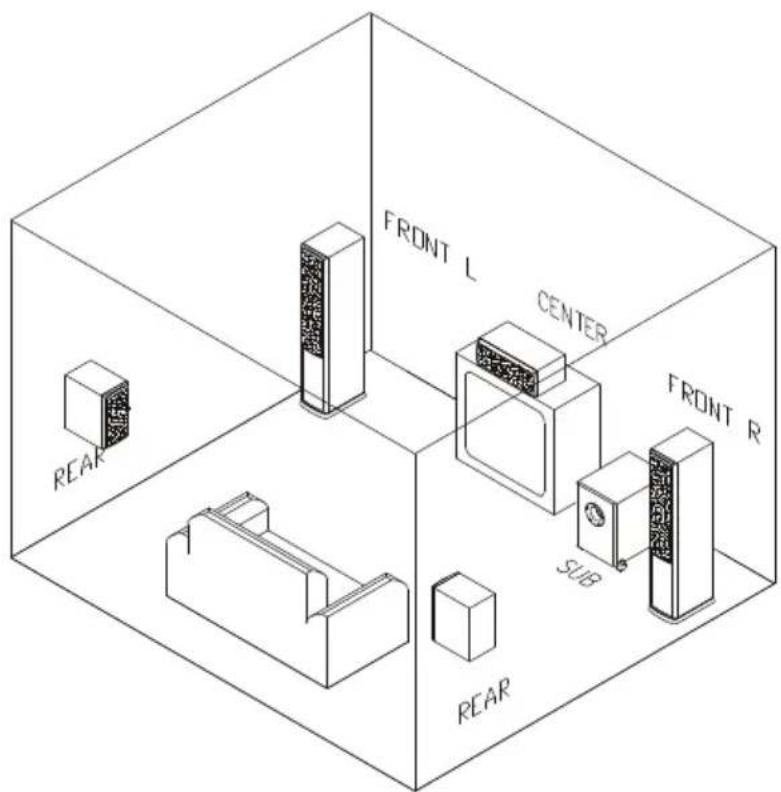
The connector panels on the ELEMENTA speakers are equipped with 5 terminal screws, enabling bi-wiring/bi-amping in addition to conventional connection to an amplifier. The upper terminals are connected to the treble and mid-treble side of the crossover and the lower terminals to the bass side. An additional connector terminal enables a 2dB treble boost option.
Bi-wiring means using separate cables to carry the high and low audio frequencies. Bi-amping takes this idea one step further and uses separate power amplifiers as well as separate cables for high and low frequencies. Bi-amping in particular produces an additional improvement in sound reproduction quality.
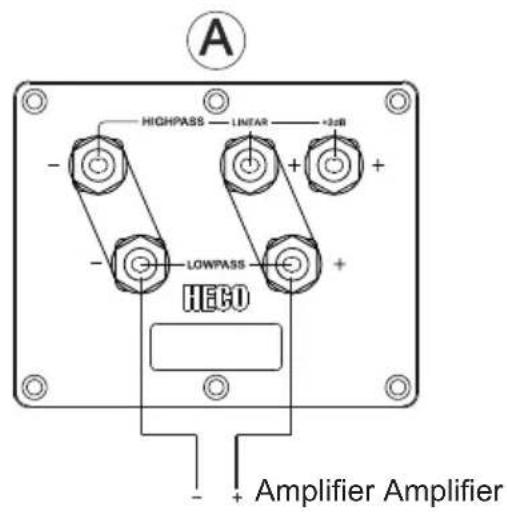
For conventional connections, metal bridges are installed as standard to make the +2dB treble adjustment active. The bridge can be switched to the linear setting by unscrewing the corresponding terminals. (Fig.5)
The terminals have to be removed for bi-wiring and bi-amping mode. Fig. 6 and fig. 7 show the connection to the amplifier(s).
The right treble setting depends on the room, the positioning of the speakers and, of course, personal taste. The +2dB setting is recommended for rooms with heavy upholstered furniture and curtains, for example, which have a muffling effect.
HECO ELEMENTA 300, CENTER 30
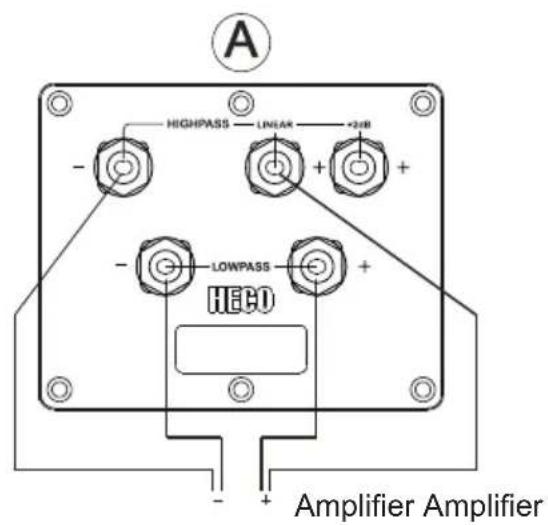
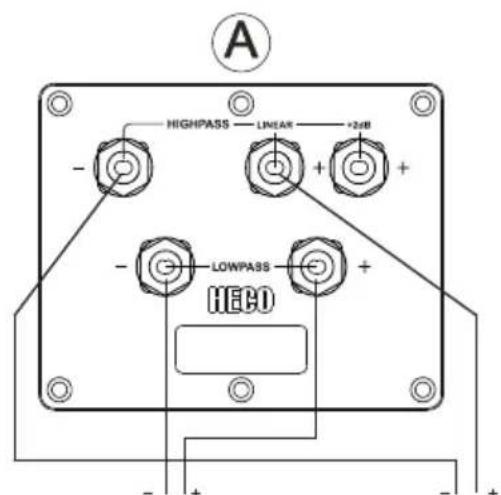
Bi-wiring means using separate cables to carry the high and low audio frequencies. Bi-amping takes this idea one step further and uses separate power amplifiers as well as separate cables for high and low frequencies. Bi-amping in particular produces an additional improvement in sound reproduction quality. The special connection terminals of the ELEMENTA loudspeakers support both conventional connection and operation in bi-wiring and bi-amping modes. There are four screw terminals on each speaker. The top pair are for the tweeter (high frequencies), the lower pair for the woofer (low frequencies). The factory-installed metal strips connecting the positive and negative terminals are for conventional 2-wire connection and must be removed for bi-wiring and bi-amping operation. The pictures below show the correct set-up for conventional operation (Fig. 8a), bi-wiring (Fig. 8b) and bi-amping (Fig. 8c).
HeCo eleMenta CenteR 30
The ELEMENTA CENTER 30 loudspeaker visually and acoustically ideally matches the other ELEMENTA models. The loudspeaker is placed immediately underneath the television set. Otherwise please adhere to the general recommendations outlined in the previous chapters.
HeCo eleMenta SuB 3830a
The ELEMENTA SUB 3830A active subwoofer visually and acoustically ideally matches the other loudspeakers in the ELEMENTA series. Please refer to the separate operating instructions supplied with this product.
ConneCtIng to an aV ReCelVeR
Fig. 9 shows the connecting to an AV receiver.
How to aVold daMage to youR Valuable SPEaKeRS
All HECO loudspeakers are designed and built for optimum sound reproduction with the tone controls in the central position – i.e. with “linear” amplifier output. Turning up the bass and treble controls too far delivers more power to the woofers and/or tweeters, and at high volumes this can actually destroy the speaker units!
If the output of your amplifier is significantly higher than the rated power handling capacity of your speakers extremely high volumes can physically destroy your speakers. This doesn't actually happen often but you should be aware that it is possible.
Weak amplifiers with low output ratings can actually be more dangerous for your speakers at medium volumes because weak amplifiers may overload much faster than powerful ones and this causes measurable and audible distortion, which is extremely dangerous to your loudspeakers.
Always turn the volume down immediately as soon as you hear distortion! If you like listening to loud music make sure that your amplifier can deliver at least as much power as the speakers' power-handling rating.
tHe Sound you Can't HeaR...
Amplifiers, tuners and CD players can all produce inaudible high-frequency signals – and this doesn't only apply to cheap products. If your tweeters fail at low or medium volumes you should have a qualified technician check your system components for dangerous inaudible signals.
MaintenanCe
The surface is best cleaned with a mild household cleaner. On no account use furniture polish or similar products.
SPeCIfICatlonS
eleMenta 700 eleMenta 300 eleMenta Center 30
Configuration: 3-way bass reflex 2-way bass reflex 2-way bass reflex
Power-handling capacity: 200 / 300 W 90 / 150 W 110 / 170 W
Impedance: 4 – 8 ohms 4 – 8 ohms 4 – 8 ohms
Frequency response: 25 – 45 000 Hz 32 – 45 000 Hz 32 – 45 000 Hz
Recommended amplifier output:
Efficiency (1W/1m): 92 dB
Dimensions (WxHxD):
Accessory:
30 - 300 W
226 x 1100 x 352 mm
Metal spikes
Rubber spikes
30 - 150 W
90 dB
226 x 368 x 307 mm
Rubber spikes
30 - 170 W
90 dB
510 x 178 x 278 mm
Rubber spikes
Subject to technical change.
Très cher client,
Impédance: 4 – 8 Ohm
Bande passante: 32 – 45 000 Hz
ELEMENTA HÖGTALARE I STEREODRIFT
natural_image
Diagram showing two mechanical components with arrows indicating motion, no text or symbols present3
natural_image
Diagram of a room layout with two square units and a central object, connected by dashed lines to a monitor (no text or symbols)4
text_image
FRONT L CENTER FRONT R SUB REAR REAR5
text_image
A HIGHPASS — LINAR — +2dB — + HECO LOWPASS + - + Amplifier Amplifier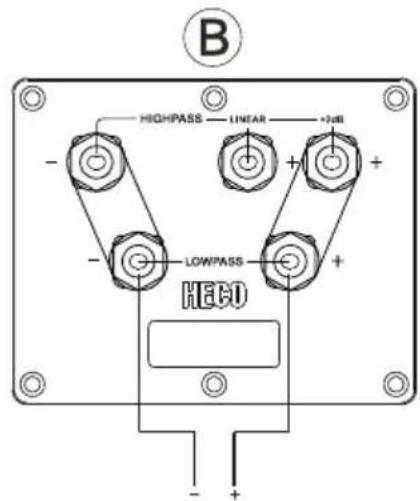
text_image
B HIGHPASS —— LINEAR —— +2dB - + - + LOWPASS HECO6
text_image
A HIGHPASS LINIAX +2dB - + - LOWPASS HECD - + Amplifier Amplifier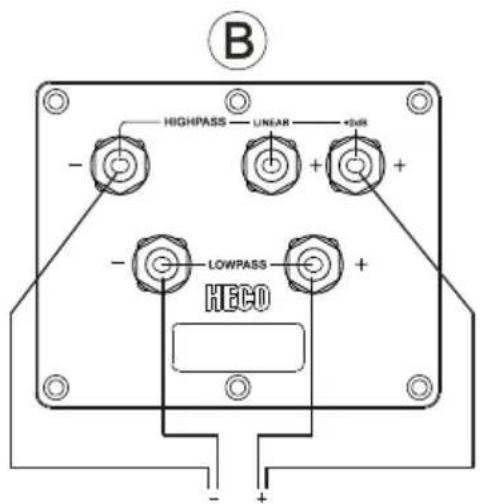
text_image
B HIGHPASS — UNEAR — +248 — — — LOWPASS HECO — +7
text_image
A HIGHPASS —— LINEAR —— +2dB - + + + - LOWPASS HECO - + - +
text_image
B HIGHPASS — LINEAR — 2dB — + + - — LOWPASS HECO — + - + - +Amplifier 1 Amplifier 2 Amplifier 1 Amplifier 2
8a |
8b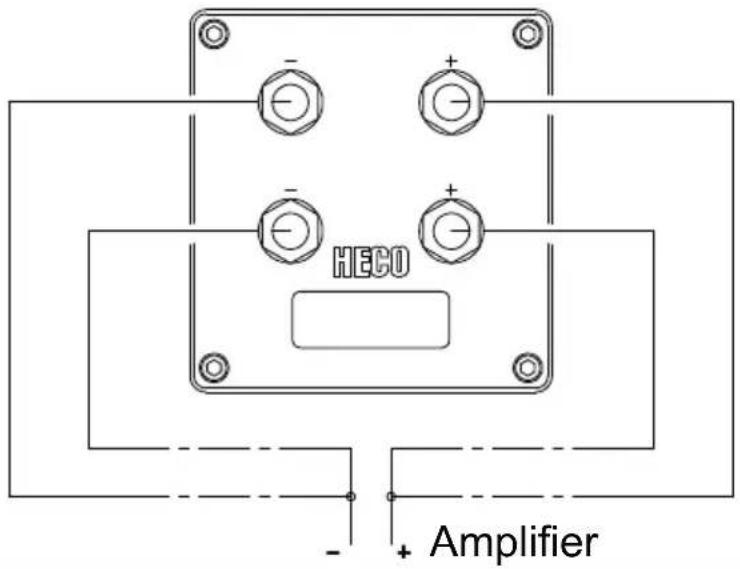 |
8c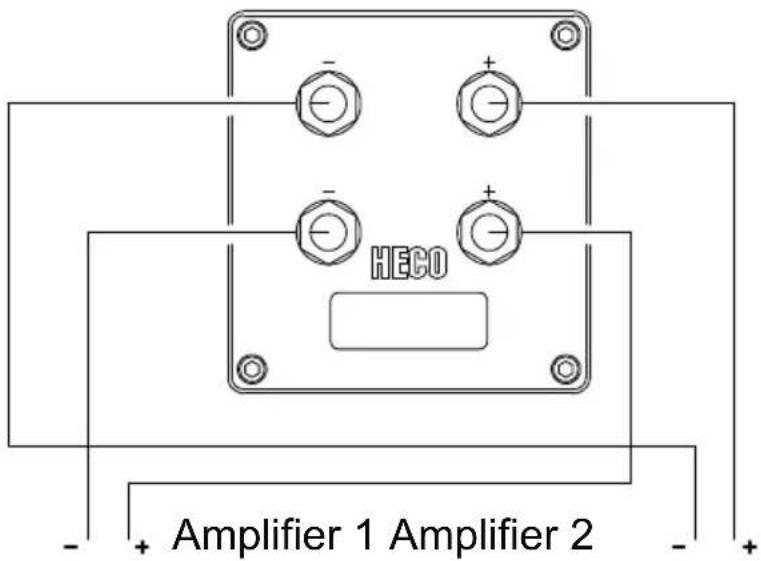 |
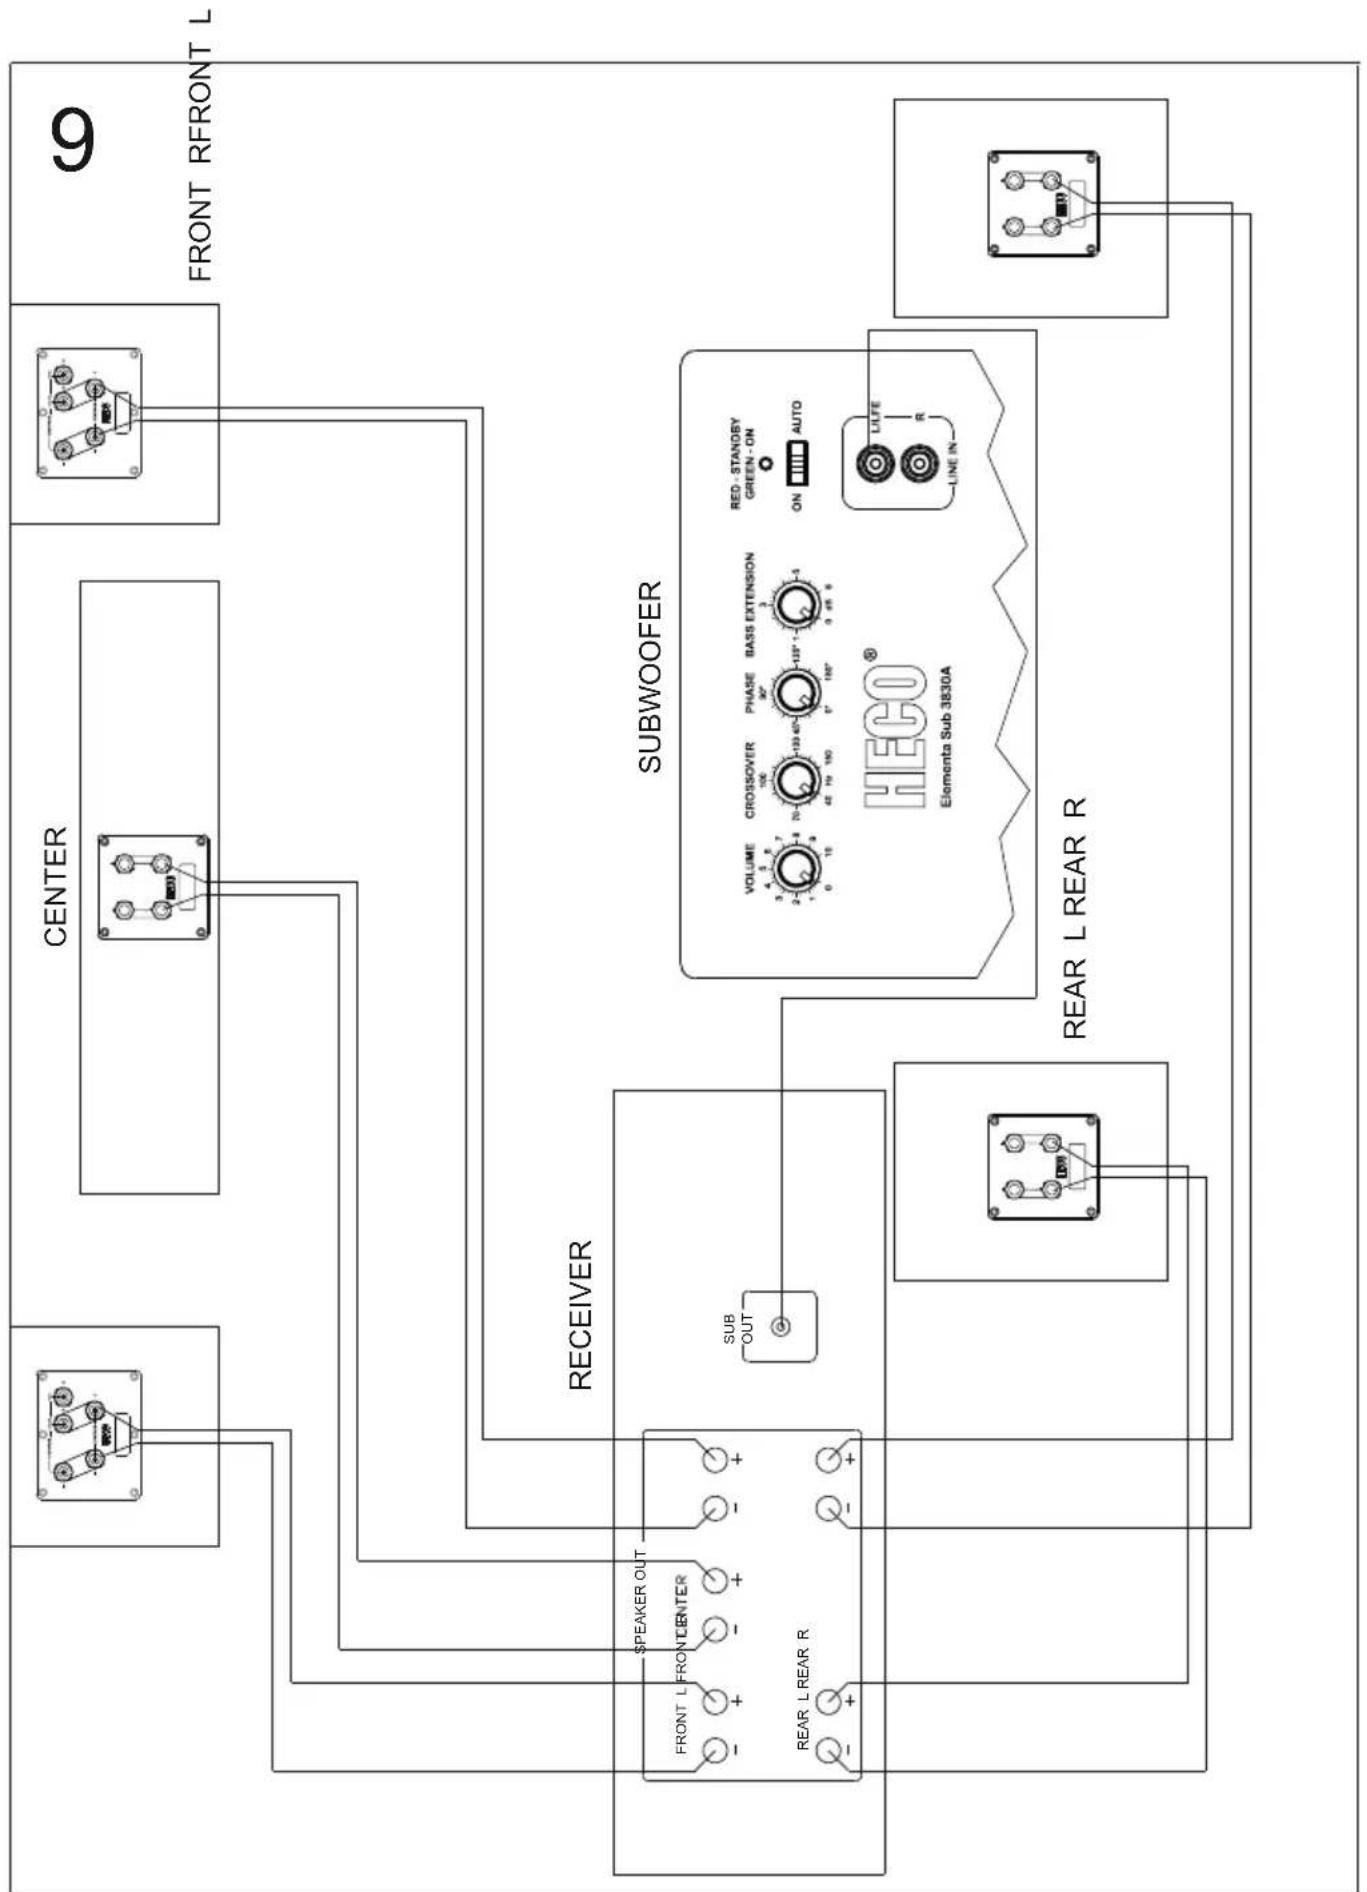
flowchart
graph TD
    A["FRONT RFRONT L"] --> B["CENTER"]
    B --> C["RECEIVER"]
    C --> D["SPEAKER OUT FRONT L FRONT CENTER"]
    C --> E["SUB OUT REAR L REAR R"]
    C --> F["SUBWOOFER"]
    F --> G["HECO® Elomenta Sub 3830A"]
    G --> H["LINE IN"]
    G --> I["LULFE"]
    G --> J["ON AUTO"]
    G --> K["VOLUME 4-7 2-1 0-10 10-15 15-20 20-25 25-30 30-35 35-40 40-45 45-50 50-55 55-60 60-65 65-70 70-75 75-80 80-85 85-90 90-95 95-100"]
    G --> L["LINE IN"]
    G --> M["LULFE"]
    G --> N["ON AUTO"]
D
Congratulations! You have made a wise selection in becoming the owner of a HECO HiFi equipment. Due to high quality HECO HiFi products have earned an excellent reputation through the western world. And this high quality standard enables us to grant a 5-years warranty for HECO HiFi products.
The equipments are checked and tested continuously during the entire production process. In case you have problems with your HECO HiFi equipment, kindly observe the following:
- The guarantee period commences with the purchase of the component and is applicable only to the original owner.
- During the guarantee period we will rectify any defects due to faulty material or workmanship by replacing or repairing the defective part at our discretion. Further claims, and in particular those for price reduction, cancellation of sale, compensation for damages or subsequential damages, are excluded.
- Unauthorized tampering with the equipment will invalidate this guarantee.
- Consult your authorized dealer first, if guarantee service is needed. Should it prove necessary to return the component to the factory, please insure that • the component is packed in original factory packing in good condition • your enclose your receipt as proof of purchase.
- Excluded from the guarantee are: • Illuminates • Wear parts • Shipping damages, either readily apparent or concealed (claims for such damages must be lodged immediately with forwarding agent, the railway express office or post office). • Scratches in cases, metal components, front panels, etc. (You must notify your dealer directly of such defects within three days of purchase.) • Defects caused by incorrect installation or connection, by operation errors (see operating instructions), by overloading or by external force. • Equipments which have been repaired incorrectly or modified or where the case has been opened by persons other than us. • Consequential damages to other equipments. • Reimbursement of cools, without our prior consent, when repairing damages by third parties.
F
Name and address of the dealer/stamp
Käufer/Customer
Name/Name
Straße/Street
PLZ, Ort/City
Land/Country
Kaufdatum/buying date
No warranty without receipt!
HECO®
Lise-Meitner-Str. 9 • D-50059 Pulheim • Germany
Tel. +49 (0) 2234 / 807 - 0 • Fax +49 (0) 2234 / 807 - 399
Internet: http://www.heco-audio.de