
CC8 - Battery charger VOLTCRAFT - Free user manual and instructions
Find the device manual for free CC8 VOLTCRAFT in PDF.

| Product type | Battery charger |
| Brand | Voltcraft |
| Model | CC8 |
| Dimensions (L x W x H) | 230 x 150 x 34 mm |
| Weight | Approximately 620 g (unit + adapter) |
| Power supply | 12 V/DC 3 A via mains adapter 100-240 V AC, 50-60 Hz |
| Number of slots | 10 independent slots (8 for round batteries + 2 for 9 V batteries) |
| Compatible battery types | Li-ion (3.2 V - 3.8 V), LiFePO4 (3.65 V), Ni-MH (1.2 V), Ni-Cd (1.2 V), 9 V batteries (Ni-MH, Li-ion, LiFePO4) |
| Maximum charging current | 2000 mA (only slots 1 and 8 for Li-ion/LiFePO4) |
| Default charging current | 500 mA |
| Protection functions | Protection against reverse polarity, short circuits and overcharging |
| Charge control | Delta V (-dv) control for end-of-charge detection |
| Display | LCD screen with backlight (automatic dimming after 25 s) |
| Operating temperature | -20 to +40 °C, ≤ 85% relative humidity |
| Storage temperature | 0 to +70 °C, ≤ 85% relative humidity |
| Maintenance and cleaning | Clean with a dry, lint-free cloth; do not use aggressive chemicals |
| Safety | Follow safety instructions; do not use outdoors; avoid moisture |
Frequently Asked Questions - CC8 VOLTCRAFT
User questions about CC8 VOLTCRAFT
0 question about this device. Answer the ones you know or ask your own.
Ask a new question about this device
Download the instructions for your Battery charger in PDF format for free! Find your manual CC8 - VOLTCRAFT and take your electronic device back in hand. On this page are published all the documents necessary for the use of your device. CC8 by VOLTCRAFT.
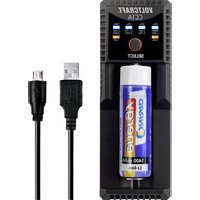
USER MANUAL CC8 VOLTCRAFT
CC-8 Round Cell Charger
Item No. 2521584 Page 14 - 24
F Notice d'emploi
- Introduction 15
- Explanation of symbols 15
- Intended use 15
- Delivery content 16
- Up-to-date operating instructions 16
- Features and functions 16
- Safety instructions 17
a) General information 17
b) Power adaptor 18
c) Charger. 18
d) Rechargeable batteries 19
e) Installation site 19
- Operating elements 20
- LCD description 21
- Connect charger to power outlet 21
- Charging batteries 22
a) Round cell batteries 22
b) 9 V block batteries 22
c) Manually adjust the charging current (round cells only) 22
a) Product 23
b) (Rechargeable) batteries 23
- Technical data 24
a) General 24
b) Power Adaptor 24
1. Introduction
Dear customer,
Thank you for purchasing this product.
This product complies with the statutory national and European requirements.
To maintain this status and to ensure safe operation, you as the user must observe these operating instructions!

These operating instructions are part of this product. They contain important notes on commissioning and handling. Also consider this if you pass on the product to any third party. Therefore, retain these operating instructions for reference!
If there are any technical questions, please contact: www.conrad.com/contact
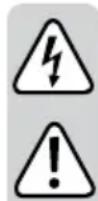
2. Explanation of symbols

The symbol with the lightning in the triangle is used if there is a risk to your health, e.g. due to an electric shock.

The symbol with the exclamation mark in the triangle is used to indicate important information in these operating instructions. Always read this information carefully.

The arrow symbol indicates special information and advice on operation.

product is intended for use in dry indoor rooms only; it must not become damp or wet.
3. Intended use
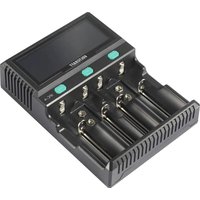
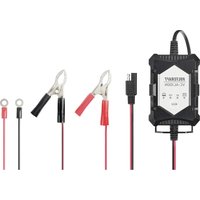
The device is intended to be used as a battery charger and can be used with Ni-Mh, Ni-Cd, LiFePO4, and Li-ion4 rechargeable batteries. The charger is compatible with a maximum cylindrical battery length of 74mm . The charger has ten independent battery charging slots which include two for 9 V block type batteries. The display shows information such as the voltage, current, capacity, and percentage charged for the selected slot.
It is intended for indoor use only. Do not use it outdoors. Contact with moisture, e.g. in bathrooms, must be avoided under all circumstances.
For safety and approval purposes, you must not rebuild and/or modify this product. If you use the product for purposes other than those described above, the product may be damaged. In addition, improper use can result in short circuits, fires, electric shocks or other hazards. Read the instructions carefully and store them in a safe place. Make this product available to third parties only together with its operating instructions.
All company names and product names are trademarks of their respective owners. All rights reserved.
4. Delivery content
- Charger
Power adaptor - Operating instructions
5. Up-to-date operating instructions
Download the latest operating instructions at www.conrad.com/downloads or scan the QR code shown. Follow the instructions on the website.

6. Features and functions
- Delta V (-dV) control
- Reverse polarity protection
- Short circuit protection
Over charge protection
2000 mA fast charge up to 2x batteries (simultaneously)
7. Safety instructions
Read the operating instructions carefully and especially observe the safety information. If you do not follow the safety instructions and information on proper handling in this manual, we assume no liability for any resulting personal injury or damage to property. Such cases will invalidate the warranty/guarantee.
a) General information
- The device is not a toy. Keep it out of the reach of children and pets.
- Do not leave packaging material lying around carelessly. This may become dangerous playing material for children.
- Protect the appliance from extreme temperatures, direct sunlight, strong jolts, high humidity, moisture, flammable gases, steam and solvents.
- Do not place the product under any mechanical stress.
-
If it is no longer possible to operate the product safely, take it out of operation and protect it from any accidental use. Safe operation can no longer be guaranteed if the product:
-
is visibly damaged,
- is no longer working properly,
- has been stored for extended periods in poor ambient conditions or
-
has been subjected to any serious transport-related stresses.
-
Please handle the product carefully. Jolts, impacts or a fall even from a low height can damage the product.
- Consult an expert when in doubt about the operation, safety or connection of the appliance.
- Maintenance, modifications and repairs must only be completed by a technician or an authorised repair centre.
- If you have questions which remain unanswered by these operating instructions, contact our technical support service or other technical personnel.
- In schools, educational centres, hobby and self-help workshops, the operation of the product is to be supervised by trained employees.
b) Power adaptor
- The mains outlet must be located near to the device and be easily accessible.
- As power supply, only use the supplied mains adaptor.
- Only connect the power adaptor to a normal mains socket connected to the public supply. Before plugging in the power adaptor, check whether the voltage stated on the power adaptor complies with the voltage of your electricity supplier.
- Never connect or disconnect power adaptors if your hands are wet.
- Never unplug the power adaptor from the mains socket by pulling on the cable; always use the grips on the plug.
- When setting up the product, make sure that the cable is not pinched, kinked or damaged by sharp edges.
- Always lay the cables so that nobody can trip over or become entangled in them. This poses a risk of injury.
- For safety reasons, disconnect the power adaptor from the mains socket during storms.
c) Charger
- This charger only works with Ni-Mh, Ni-Cd, LiFePO4, and Li-ion type batteries. Never use the charger with other types of batteries as this could result in explosion, cracking or leaking causing damage to property and/or personal injury.
- Never use the product immediately after it has been brought from a cold room into a warm one. The condensation generated could destroy the product. Allow the product to reach room temperature before connecting it and putting it to use. This may take several hours.
- When the charger is not in use, disconnect it from the power supply and remove any batteries from the charging slots.
- The battery data displayed on the LCD is for reference only and may differ from those measured with professional equipment.
d) Rechargeable batteries
- Correct polarity must be observed while inserting the rechargeable batteries.
- Rechargeable batteries should be removed from the device if it is not used for a long period of time to avoid damage through leaking. Leaking or damaged rechargeable batteries might cause acid burns when in contact with skin, therefore use suitable protective gloves to handle corrupted rechargeable batteries.
- Rechargeable batteries must be kept out of reach of children. Do not leave rechargeable batteries lying around, as there is risk that children or pets swallow them.
- Rechargeable batteries must not be dismantled, short-circuited or thrown into fire. Never recharge non-rechargeable batteries. There is a risk of explosion!
- Never charge the rechargeable battery of the product unattended.
- Never damage the rechargeable battery. Damaging the casing of the rechargeable battery might cause an explosion or a fire!
- Never short-circuit the contacts of the rechargeable battery. Do not throw the battery or the product into fire. There is a danger of fire and explosion!
- The instructions given by the manufacturer of the respective rechargeable batteries must be followed during the charging process.
- Do not cover the charger
- When charging, place the product on a surface that is not heat-sensitive. It is normal that a certain amount of heat is generated during charging.
- Select a stable, flat, clean, sufficiently large place for the charger.
- Do not place the charger on a flammable surface (e.g. carpet, tablecloth). Always use a suitable, non-flammable, heatproof base.
- Do not place the charger on the surface of valuable furniture without suitable protection. The impact of heat could lead to colour or material changes. Scratches or pressure points may occur on the furniture surface.
- Keep the device away from easily flammable materials (e.g. drapes, paper), liquids (e.g. gasoline) or gases. There is a risk of fire and explosion!
8. Operating elements
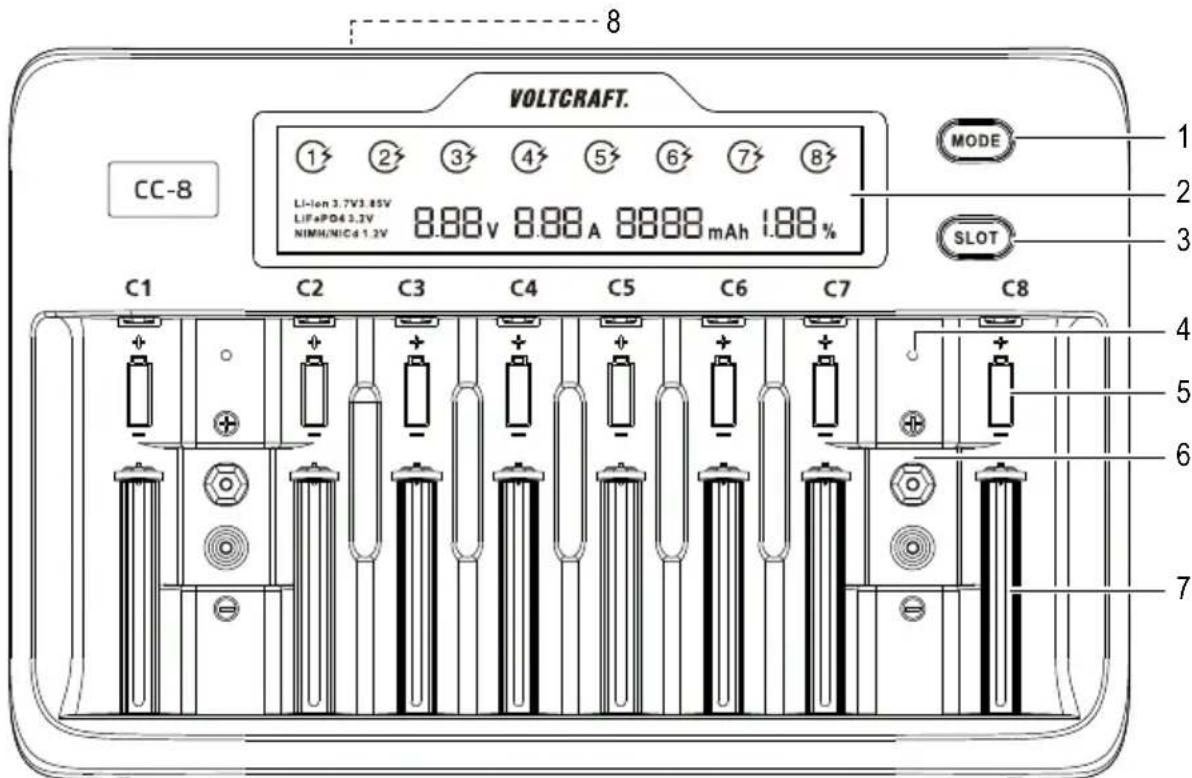
1 MODE button
2 LCD Display
3 SLOT button
4 Status indicator
-Green: 9V battery not connected or fully charged.
-Red: 9 V battery connected and charging.
5 charging slot
6 9 V block battery bay
7 Spring-loaded battery holder
8 Power input: IN:DC12V
9. LCD description
| Display Display | |
| 13 | A flashing indicates that charging is in progress. The number indicates which slot(s) is/are active. |
| Li-ion Lithium-ion battery inserted | |
| LiFePO4 Lithium iron phosphate battery inserted | |
| NiMH/NiCd | NiMH: Nickel metal hydride battery inserted. NiCd: Nickel-cadmium battery inserted |
| V Battery voltage | |
| Null Battery not connected | |
| Full Battery is fully charged | |
| Err Battery polarity is reversed, non-rechargeable battery inserted. | |
| mAh Battery electric charge | |
| % Percentage charged | |
| A Charging current | |
10. Connect charger to power outlet

When not using the device, disconnect the charger from the power supply and remove any inserted batteries.
- Connect one end of the adaptor to the power input (8) on the charger, and the other end to a suitable power supply.
- The LCD display (2) will light up to indicate the charger is receiving power.
- If no batteries are inserted, the LCD display will show Null.
11. Charging batteries
a) Round cell batteries

The maximum charging current of 2000mA is available for Li-ion/LiFePO4 type batteries and applicable to charging slots 1 and 8 only. All other slots must be empty.
- Load a battery into an available charging slot (5), matching polarities shown in the slot.
- Press the SLOT button (3) repeatedly to view the status of each inserted battery.
- When a battery is full, the LCD will show: 100% , 0.00 A, Full.
| Description SLOT Button | |
| Status indicator Press the SLOT button to cycle through active slots. | |
| LCD back light Press the SLOT button once to turn the backlight on after auto dimming. |
b) 9 V block batteries
Load a battery into an available 9 V block battery bay (6). The status indicator (4) will light red when the battery is charging and turn green when fully charged.
c) Manually adjust the charging current (round cells only)

Battery types LiFePO4 and 3.85 V Li-ion should be manually adjusted. For other supported battery types, the charging slots automatically detect the current and voltage required for charging. The default charging current is 500mA .
Refer to section "14. Technical data" on page 24 for information about the charging current corresponding to different battery types.
Single slot
- Press the SLOT button (3) to select a battery slot.
- Press and hold the MODE button (1) until the current "-A" begins to flash.
- Press the MODE button repeatedly to select different values.
All slots
- Double-click the MODE button until the current "--- A" begins to flash for all slots with batteries inserted in them.
- Press the MODE button repeatedly to select different values.
| Description MODE | Button |
| Enter charging current settings | Press the MODE button (immediately after inserting the battery) to change the battery type. Single slot: Press the SLOT button (3) to select a battery slot. Press and hold the MODE button (1) until the current “---- A” begins to flash. Press the MODE button repeatedly to select different values. All slots: Double-click the MODE button until the current “---- A” begins to flash for all slots with batteries inserted in them. Press the MODE button repeatedly to select different values. |
| LCD backlight Press the MODE button once to turn the backlight on after auto dimming. | |
12. Care and cleaning

Do not use any aggressive cleaning agents, rubbing alcohol or other chemical solutions as they can cause damage to the housing and malfunctioning.
- Remove any inserted batteries and disconnect the product from the mains before each cleaning.
- Clean the product with a dry, fibre-free cloth.
13. Disposal
a) Product
Electronic devices are recyclable waste and must not be disposed of in the household waste. At the end of its service life, dispose of the product in accordance with applicable regulatory guidelines. Remove any inserted (rechargeable) batteries and dispose of them separately from the product.
b) (Rechargeable) batteries

You as the end user are required by law (Battery Ordinance) to return all used (rechargeable) batteries. Disposing of them in the household waste is prohibited.
Contaminated (rechargeable) batteries are labeled with this symbol to indicate that disposal in the domestic waste is forbidden. The designations for the heavy metals involved are: Cd = Cadmium, Hg = Mercury, Pb = Lead (name on (rechargeable) batteries, e.g. below the trash icon on the left). Used (rechargeable) batteries can be returned to collection points in your municipality, our stores or wherever (rechargeable) batteries are sold.
You thus fulfill your statutory obligations and contribute to the protection of the environment.
14. Technical data
a) General
Input voltage / current. 12 V/DC 3 A
Charging current. Default: 500 mA Li-Ion / LiFePO4: 200 - 2000 mA Ni-MH / Ni-Cd: 200 - 1000 mA
Output combination 1 Li-lon 4.2 V, 4.35 V battery: 8 × (200mA / 500mA / 800mA) 6 × 1000mA 2 × 2000mA (charging slots 1 and 8 only)
Output combination 2. LiFePo4 3.65 V battery:
8 x (200 mA / 500 mA / 800 mA)
6 x 1000 mA
2 x 2000 mA (charging slots 1 and 8 only)
Output combination 3. Ni-MH / CD 1.48 V battery: 8 × (200 ~mA / 500 ~mA / 800 ~mA / 1000 ~mA)
Output combination 4 Ni-MH / Li-Ion / LiFePo4 9 V block battery: 1 × 60 mA , 2 × 60 mA
Supported battery types. Li-Ion (3.2 V, 3.6 V, 3.7 V, 3.8 V) IMR, INR, ICR LiFePo4: 10340, 14500, 16340 (RCR123A), 17500, 17650, 17670, 18490, 18500, 18650, 20700, 21700, 22650, 26500, 26650 Ni-MH/Cd (1.2 V): A, AA, AAA, AAAA, C, SC 9V block Ni-MH/CD, Li-ion and LiFePO4
Charging slots. 10 (8 + 2) independent channels
Type-C battery. max. 5 pcs (simultaneously)
LCD backlight 25s automatic dimming
Protection .... Short circuit, reverse polarity, over charge
Operating conditions. 0 to +40^,≤ 85% RH (non-condensing)
Storage conditions. 0 to +70^,≤ 85% RH (non-condensing)
Chere cliente, cher client,
France (email): technique@conrad-france.fr
Copyright 2021 by Conrad Electronic SE.
This is a publication by Conrad Electronic SE, Klaus-Conrad-Str. 1, D-92240 Hirschau (www.conrad.com).
All rights including translation reserved. Reproduction by any method, e.g. photocopy, microfilming, or the capture in electronic data processing systems require the prior written approval by the editor. Reprinting, also in part, is prohibited. This publication represent the technical status at the time of printing.
Copyright 2021 By Conrad Electronic SE.
Copyright 2021 by Conrad Electronic SE.
Copyright 2021 by Conrad Electronic SE.
- Introduction
- Explanation of symbols
- Intended use
- Delivery content
- Up-to-date operating instructions
- Features and functions
- Safety instructions
- a) General information
- b) Power adaptor
- c) Charger
- d) Rechargeable batteries
- Operating elements
- LCD description
- Connect charger to power outlet
- Charging batteries
- a) Round cell batteries
- b) 9 V block batteries
- c) Manually adjust the charging current (round cells only)
- Single slot
- All slots
- Care and cleaning
- Disposal
- a) Product
- b) (Rechargeable) batteries
- Technical data
- a) General
Brand : VOLTCRAFT
Model : CC8
Category : Battery charger