14445.SL - Thermostat Vimar - Free user manual and instructions
Find the device manual for free 14445.SL Vimar in PDF.

| Product type | Electronic chronothermostat |
| Power supply | 120-230 V~ ±10%, 50-60 Hz |
| Maximum consumption | 1 W |
| Output type | Changeover relay 6(2) A 230 V~ |
| Control type | ON/OFF |
| Adjustment range (heating/cooling) | +5 °C to +35 °C |
| Adjustment range (frost protection) | +4 °C to +15 °C |
| Adjustable hysteresis | 0.1 °C to 1 °C |
| Accuracy in heating (15-25 °C) | ≤ ±0.5 °C |
| Accuracy in cooling (20-30 °C) | ≤ ±0.5 °C |
| Display and programming resolution | 0.1 °C |
| Programming | Daily/weekly, 2 fixed + 2 user, 3 temperature levels |
| Display | Time-backlit LCD screen |
| Clock backup (lithium battery) | Approximately 20 days |
| Main functions | Auto/Manual, cut-off, heating/cooling, frost protection, telephone control, PIN password, self-diagnosis |
| Available languages | Italian, English, French, Spanish, German |
| Protection rating | IP40 |
| Electrical class | Class II |
| Operating temperature | 0 °C to +40 °C |
| Recommended installation | Height 1.5 m, indoors dry, away from heat sources |
| Maintenance and cleaning | Clean with a soft dry cloth; do not use abrasive products |
| Safety | Micro-disconnection, password protection, compliance with IEC standards |
Frequently Asked Questions - 14445.SL Vimar
User questions about 14445.SL Vimar
0 question about this device. Answer the ones you know or ask your own.
Ask a new question about this device
Download the instructions for your Thermostat in PDF format for free! Find your manual 14445.SL - Vimar and take your electronic device back in hand. On this page are published all the documents necessary for the use of your device. 14445.SL by Vimar.
USER MANUAL 14445.SL Vimar
10. CONFORMITÀ NORMATIVA.
Direttiva BT.
Direttiva EMC.
Space for noting the three-digit PIN number used as the lockout password.
(see "Password", page 22)
CONTENTS.
- Description 16
- Scope.... 16
- Installation.... 16
- Front view and view of controls.... 17
- Connections
5.1. Connection diagrams 18
5.2. Remote telephone actuator 19
- Using the electronic time-programmable thermostat
6.1. Operation 20
6.2. Settings 21
6.3. Programming 22
- Reset procedure 24
- Characteristics 24
- Installation rules 26
- Conformity to standards 26

VIMAR
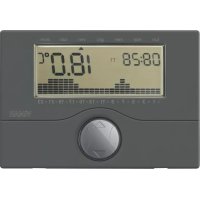
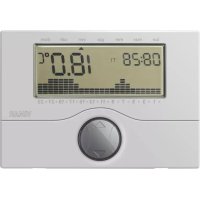
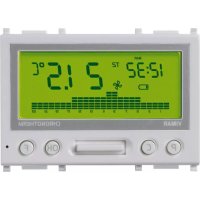
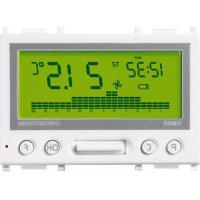
1. DESCRIPTION.
Electronic timer-thermostat for ON/OFF ambient temperature control (heating and air-conditioning), daily/weekly programming, class I temperature control device (contribution 1%), change-over relay output 6(2) A 230 V\~, power supply 120-230 V\~ 50/60 Hz - 2 modules.
2. SCOPE.
The chronothermostat is suitable for ambient temperature control by regulating the supply circuit of the burner or heat pump (heating), or the supply circuit of the air conditioner (air conditioning), to maintain ideal temperature conditions seven days a week. Its multiple functions enable the user to choose between the fixed programs stored in memory, or to create personalised programs.
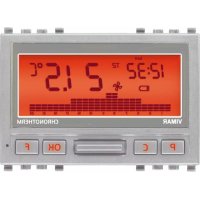
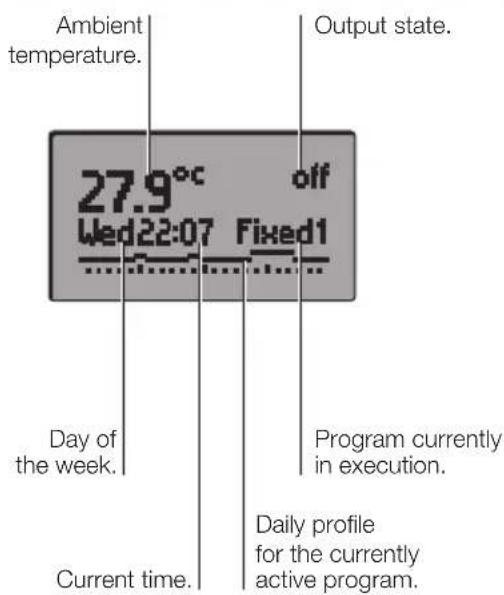
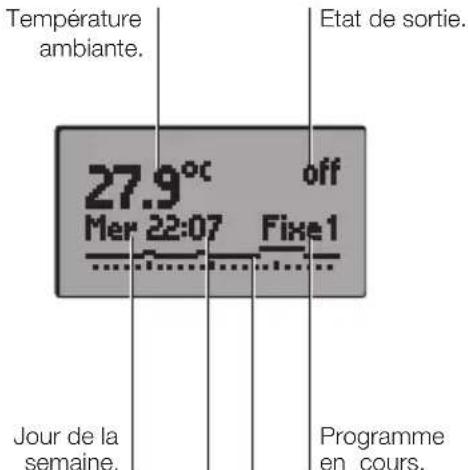
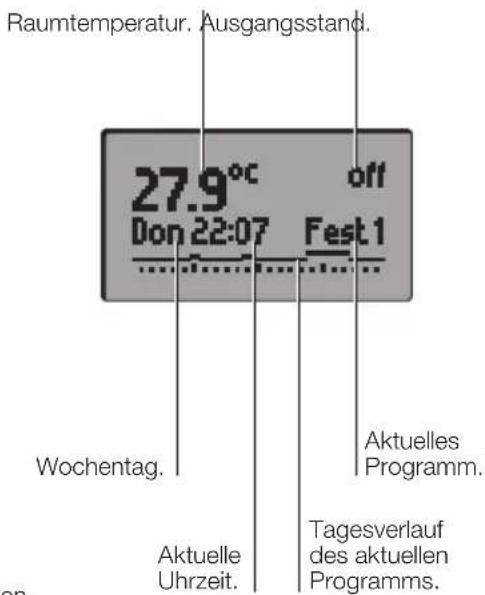
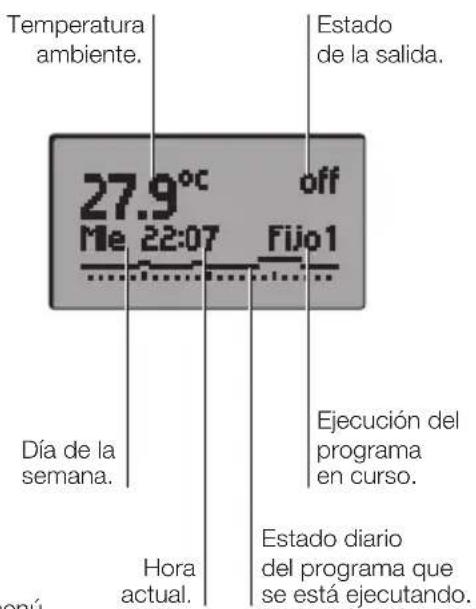
The roomy display shows the ambient temperature, the day of the week, the time, the status of the heating or air conditioning system and the daily temperature profile for the currently active program. There is a simple and intuitive procedure for programming all the parameters, assisted by interactive menus (all instructions shown on the display), using the 4 buttons on the front of the chronothermostat.
3. INSTALLATION.
The thermostat must be installed in flush or surface mounting boxes with frames and plates at a height of 1,5 m above floor level, in an appropriate position for measuring the ambient temperature; do not position the instrument inside niches, behind doors and curtains, close to heat sources or in areas influenced by outside weather conditions. In particular, it should not be installed on perimeter walls or near electrical devices which generate heat (e.g. dimmers or lamps).
The thermostat is designed for use in dry, dust-free areas with an ambient temperature between 0 °C and +40 °C.

VIMAR
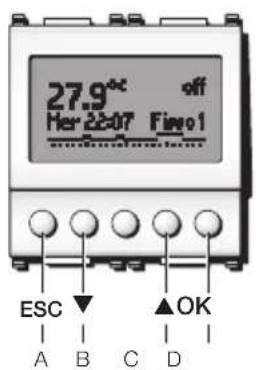
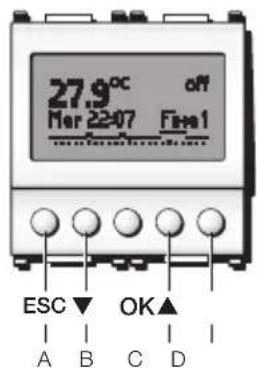
4. FRONT VIEW AND VIEW OF CONTROLS.
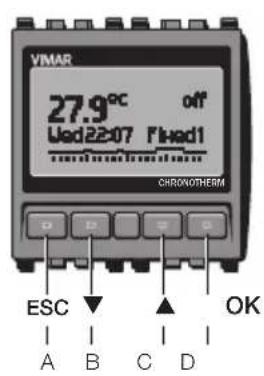
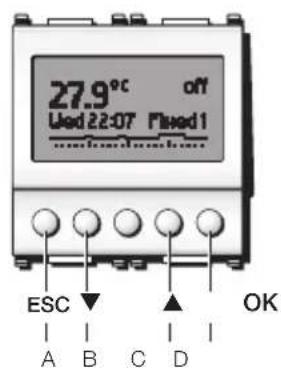
ESC (button A) : Delete or return to the preceding screen.
button B) : Scroll down in the settings or menus.
▲ (button C): Scroll up in the settings and menus.
OK (button D): Confirm and proceed to the next screen.

VIMAR
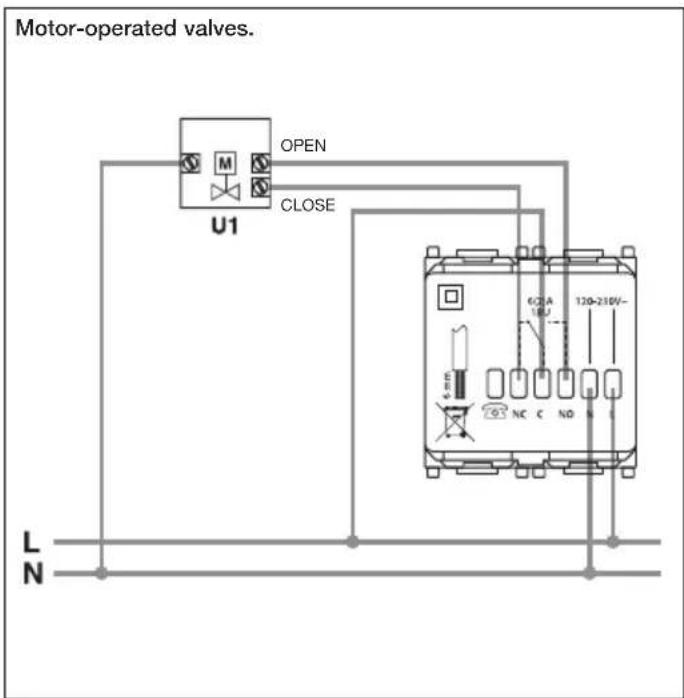
5. CONNECTIONS.
5.1 - Connection diagrams.

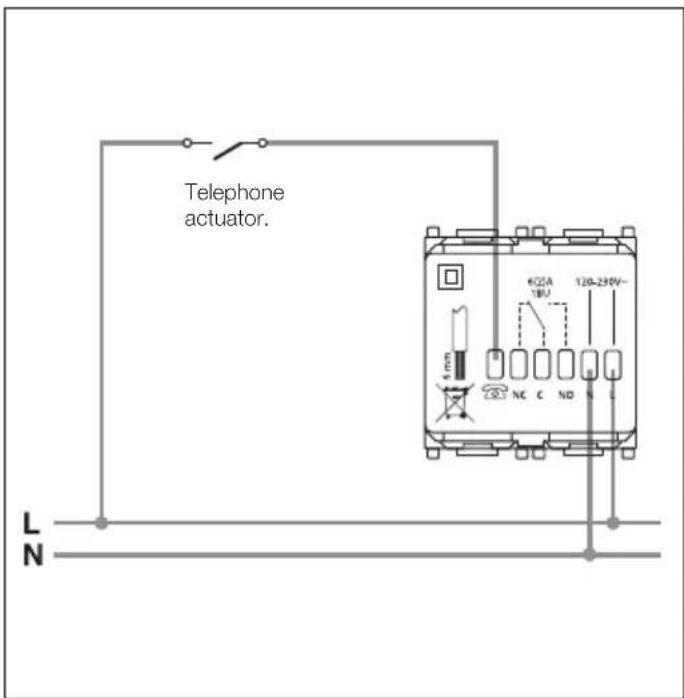
5.2 - Phone dialler control.
It is possible to control the timer-thermostat remotely with a phone dialler.
By closing the contact connecting the terminal 🔒 to the line L, the timer-thermostat is forced onto manual operation and the four keys
A, B, C and D are locked (if any key is pressed the display will show Man blinking for approximately 3 s.)
On opening the contact the timer-thermostat goes onto:
- Antifreeze mode if heating is on;
- OFF if air-conditioning is on.
In this phase the keys of the timer-thermostat are not locked and it is possible to operate the device.

VIMAR
6. USING THE ELECTRONIC TIME-PROGRAMMABLE THERMOSTAT.
To program the electronic thermostat, from the starting screen of the display, press any one of the four front buttons.
The following icons appear:
- "Esc" (button A): cancels the selection.
- “▼” (button B): displays the value of the currently active temperature set-point (Ts) and, when the button is next pressed, allows this value to be reduced by the desired amount; pressing “Set” (button D) causes this new value to remain active until the next programmed temperature set-point change, after which the program stored in memory is resumed.
- “▲” (button C): displays the value of the currently active temperature set-point (Ts) and, when the button is next pressed, allows this value to be increased by the desired amount; pressing “Set” (button D) causes this new value to remain active until the next programmed temperature set-point change, after which the program stored in memory is resumed.
- "Menù" (button D): used for accessing the "Operation" menu.
- Press “▼” (button B): the “Settings” and “Programming” menu items appear; “▲” (button C) scrolls up in the menu, “ok” (button D) selects the desired menu, and “Esc” (button A) returns to the starting screen.
6.1 OPERATION.
Selects the operating mode of the programmable thermostat, choosing between "Auto/Manual", "Switching off", "Heating/Air Con.", "Antifreeze".
- Confirm "ok" (button D) = scroll menu using "▼" (button B) and "▲" (button C), select setting using "Set" (button D) for "Auto/Manual", "Switching off", "Heating/Air Con.", "Antifreeze".
- AUTO/MANUAL.
Configures the programmable thermostat for either automatic or manual operation.
In "Automatic" mode, the temperature is regulated by the currently active programme stored in memory (see "Select Prog.", page 22).
In "Manual" mode, the switch-on and switch-off of the heating or cooling system can be controlled manually:
- “▼” (button B): displays the value of the currently active temperature set-point (Ts) and, when the button is next pressed, allows this value to be reduced as required.
- “▲” (button C): displays the value of the currently active temperature set-point (Ts) and, when the button is next pressed, allows this value to be increased as desired.

VIMAR
- Press "Set" (button D) to confirm the selection or "Esc" (button A) to revert to the preceding setting.
- SWITCHING OFF.
Allows the system to be switched off immediately, or after a pre-established time delay.
• HEATING/AIR CON.
Configures the programmable thermostat for either heating or cooling.
- ANTIFREEZE.
Defines a minimum temperature threshold to prevent the pipes from freezing up or to ensure the temperature does not drop below an established safety level.
6.2 SETTINGS.
Used for setting "Clock", "Hysteresis", "Temp. Scale.", "Language", "Display", "Password" and "Calibration".
- Confirm "ok" (button D) = scroll menu using "▼" (button B) and "▲" (button C), select setting using "ok" (button D).
- CLOCK.
Used for setting the current date and time.
- HYSTERESIS.
Adjusts the value of the temperature hysteresis parameter. Hysteresis is the amount by which the ambient temperature can deviate from the set-point before the system is switched on and off. By adapting the hysteresis parameter to the type of system, it is possible to prevent repeated switch-on and switch-off around the set-point value; systems with high inertia (for example with cast iron radiators) require a low hysteresis value, whereas systems with low inertia (for example fan-convectors) require a higher value.
Example.
If the ambient temperature is set to 20 °C and the temperature differential is set to 0.3 °C, the system will come on when the ambient temperature falls to 19.9 °C and will go off when it reaches 20.3 °C.
- TEMP. SCALE.
Used for setting the units of measurement for temperature, choosing between degrees Celsius and degrees Fahrenheit.
- LANGUAGE.
Used for setting the language in which the instructions are displayed, choosing between Italiano, English, Français, Español and Deutsch.
- DISPLAY.
Allows the user to adjust the display contrast.

VIMAR
- PASSWORD.
Allows the user to configure, change or disable a 3-digit PIN password to prevent unauthorized access to the thermostat functions, settings and programs.
Attention!
Remember to make a note of the PIN number in the special space provided on pg. 14.
- CALIBRATION.
Used for compensating for any differences between the actual ambient temperature and the value shown on the display, because certain installation conditions may alter the thermostat's reading of the ambient temperature.
6.3 PROGRAMMING.
Used for selecting the program to be executed "Select Prog.", for editing the user programs "Modify Program" and for displaying and/or changing the temperature set-points used in the various programmes "Temp. Levels".
- Confirm "ok" (button D) = scroll menu using "▼" (button B) and "▲" (button C), select setting with "ok" (button D).
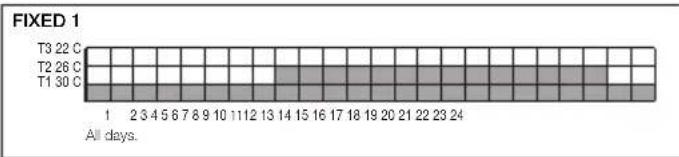
- SELECT PROG.
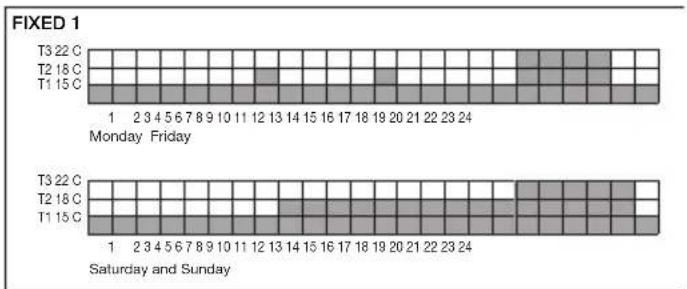
Used for selecting an automatic program, choosing between 2 standard fixed programs (Fixed1 and Fixed2 - see side pictures) and-2 user programs which can be freely personalised (Prog1 and Prog2).
- MODIFY PROGRAM.
Used for modifying the 2 user programs (Prog1 and Prog2), for both Heating and Air conditioning, to personalise them as desired.
- Select Heating or Air conditioning.
- Select Prog1 or Prog2.
- Confirm or modify the program name.
- Modify (the name of the day blinks): select day of the week whose program is to be modified.
- Choose between Modify Day, New and Copy Day:
- Modify Day.
Modifies a program previously stored in memory. Programming begins with time step "00:00-00:20" and ends with the set-point for time step "23:40-24:00". The duration of each time step is 20 minutes; the temperature set-points (T1, T2, T3) entered for each time step must be confirmed by pressing "Set" (button D).
- NEW.
Creates a new program of temperature set-points for the chosen day. Programming begins with time step "00:00-00:20" and ends with the set-point for time step "23:40-24:00".
- COPY DAY.
Copies the programme of a previously configured day into the current day.
• TEMP. LEVELS.
Displays and/or modifies the values of the temperature set-points T1, T2, T3 for both heating and cooling programs.
Fixed programs for Heating.
bar
FIXED 1 | Time | Day | Value | |---|---|---| | Monday | T3 22 C | 1 | | Monday | T2 18 C | 2 | | Monday | T1 15 C | 3 | | Friday | T3 22 C | 4 | | Friday | T2 18 C | 5 | | Friday | T1 15 C | 6 | | Friday | T3 22 C | 7 | | Friday | T2 18 C | 8 | | Friday | T1 15 C | 9 | | Friday | T3 22 C | 10 | | Friday | T2 18 C | 11 | | Friday | T1 15 C | 12 | | Friday | T3 22 C | 13 | | Friday | T2 18 C | 14 | | Friday | T1 15 C | 15 | | Friday | T3 22 C | 16 | | Friday | T2 18 C | 17 | | Friday | T1 15 C | 18 | | Friday | T3 22 C | 19 | | Friday | T2 18 C | 20 | | Friday | T1 15 C | 21 | | Friday | T3 22 C | 22 | | Friday | T2 18 C | 23 | | Friday | T1 15 C | 24 | | Saturday and Sunday | T3 22 C | 3 | | Saturday and Sunday | T2 18 C | 4 | | Saturday and Sunday | T1 15 C | 5 | | Saturday and Sunday | T3 22 C | 6 | | Saturday and Sunday | T2 18 C | 7 | | Saturday and Sunday | T1 15 C | 8 | | Saturday and Sunday | T3 22 C | 9 | | Saturday and Sunday | T2 18 C | 10 | | Saturday and Sunday | T1 15 C | 11 | | Saturday and Sunday | T3 22 C | 12 | | Saturday and Sunday | T2 18 C | 13 | | Saturday and Sunday | T1 15 C | 14 | | Saturday and Sunday | T3 22 C | 15 | | Saturday and Sunday | T2 18 C | 16 | | Saturday and Sunday | T1 15 C | 17 | | Saturday and Sunday | T3 22 C | 18 | | Saturday and Sunday | T2 18 C | 19 | | Saturday and Sunday | T1 15 C | 20 | | Saturday and Sunday | T3 22 C | 21 | | Saturday and Sunday | T2 18 C | 22 | | Saturday and Sunday | T1 15 C | 23 | | Saturday and Sunday | T3 22 C | 24 | Monday (Friday) - Values shown in the table above the grid. The values in the table below are the numbers inside the cells.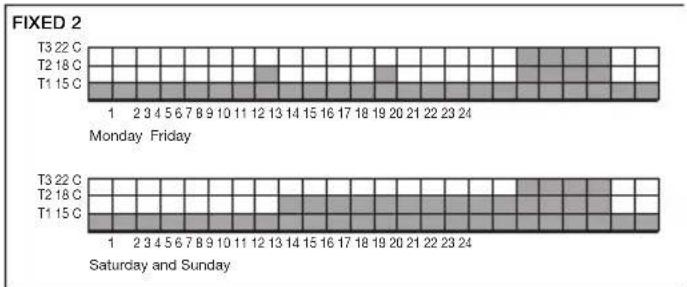
bar
FIXED 2 | Day | Time | Activity Level | |---|---|---| | Monday | T3 22 C | 1 | | Monday | T2 18 C | 2 | | Monday | T1 15 C | 3 | | Friday | T3 22 C | 4 | | Friday | T2 18 C | 5 | | Friday | T1 15 C | 6 | | Friday | T3 22 C | 7 | | Friday | T2 18 C | 8 | | Friday | T1 15 C | 9 | | Friday | T3 22 C | 10 | | Friday | T2 18 C | 11 | | Friday | T1 15 C | 12 | | Friday | T3 22 C | 13 | | Friday | T2 18 C | 14 | | Friday | T1 15 C | 15 | | Friday | T3 22 C | 16 | | Friday | T2 18 C | 17 | | Friday | T1 15 C | 18 | | Friday | T3 22 C | 19 | | Friday | T2 18 C | 20 | | Friday | T1 15 C | 21 | | Friday | T3 22 C | 22 | | Friday | T2 18 C | 23 | | Friday | T1 15 C | 24 | | Saturday and Sunday | T3 22 C | 1 | | Saturday and Sunday | T2 18 C | 2 | | Saturday and Sunday | T1 15 C | 3 | | Saturday and Sunday | T3 22 C | 4 | | Saturday and Sunday | T2 18 C | 5 | | Saturday and Sunday | T1 15 C | 6 | | Saturday and Sunday | T3 22 C | 7 | | Saturday and Sunday | T2 18 C | 8 | | Saturday and Sunday | T1 15 C | 9 | | Saturday and Sunday | T3 22 C | 10 | | Saturday and Sunday | T2 18 C | 11 | | Saturday and Sunday | T1 15 C | 12 | | Saturday and Sunday | T3 22 C | 13 | | Saturday and Sunday | T2 18 C | 14 | | Saturday and Sunday | T1 15 C | 15 | | Saturday and Sunday | T3 22 C | 16 | | Saturday and Sunday | T2 18 C | 17 | | Saturday and Sunday | T1 15 C | 18 | | Saturday and Sunday | T3 22 C | 19 | | Saturday and Sunday | T2 18 C | 20 | | Saturday and Sunday | T1 15 C | 21 | | Saturday and Sunday | T3 22 C | 22 | | Saturday and Sunday | T2 18 C | 23 | | Saturday and Sunday | T1 15 C | 24 | The chart displays a single bar for the 'Monday' period. The 'Friday' period is not explicitly labeled but corresponds to the date of the week.
VIMAR
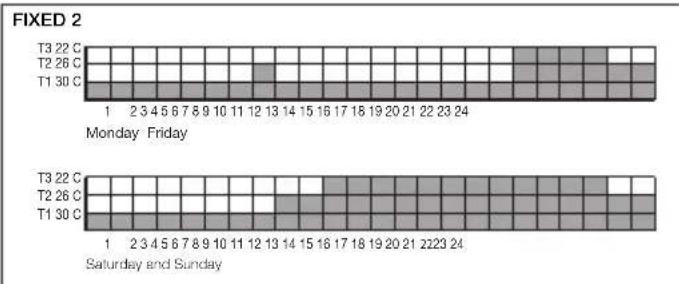
Fixed programs for Air conditioning.
bar
FIXED 2 | Day | Temperature (°C) | |---|---| | Monday | 1 | | Friday | 2 3 4 5 6 7 8 9 10 11 12 13 14 15 16 17 18 19 20 21 22 23 24 | | Saturday and Sunday | 1 | | Sunday | 2 3 4 5 6 7 8 9 10 11 12 13 14 15 16 17 18 19 20 21 22 23 24 |7. RESET PROCEDURE.
- Simultaneously press the four buttons (button A, button B, button C, button D).
- Confirm with "Yes" (button D).
All the programmable parameters revert to the default conditions (first power-up): the clock is reset to zero, all user programs are deleted, the 3 temperature set-points for automatic operation revert to their default values).
8. CHARACTERISTICS.
• Supply voltage: 120-230 V\~± 10% 50-60 Hz.
• Absorption max: 1 W.
- Front controls: "Esc"/"Mod"/"No", "▲", "▼", "Set"/"ok"/"Yes"
- Clock backup battery duration: about 20 days, with rechargeable lithium buffer battery.
• Output: change-over relay output.
• Type of regulation: ON/OFF.
• Temperature sampling frequency:
- every 5 s, with an average of the values acquired in 20 seconds;
- instantaneous, in the event of a parameter being changed by the user.
- Updating of display data: every 20 s.

VIMAR
- Ambient temperature display range: 0 °C +40 °C.
• Resolution of the reading: 0,1 °C.
• Resolution of the settings: 0,1 °C. - Precision of the reading in heating mode:
- ≤ ±0.5 °C between +15 °C and +25 °C;
- ≤ ±0,8 °C at the temperature extremes.
- Precision of the reading in air conditioning mode:
- ≤ ±0,5 °C between +20 °C and +30 °C;
- ≤ ±0.8 °C at the temperature extremes.
- Software settings: possibility of compensating the temperature reading with a software offset (± 3 °C max) to adapt the measurement to the specific installation conditions.
• Hysteresis: adjustable between 0,1 °C and 1 °C.
• Thermostat operating range: - +4 °C - +15 °C in antifreeze mode;
- +5 °C - +35 °C in heating or cooling mode.
- Clock accuracy: ≤ ± 1 s a day.
- Principal functions:
- hourly temperature settings in 20-minute steps;
- 3 programmable temperature set-points for heating + 3 temperature set-points for cooling;
- weekly programming;
-
2 fixed programs and 2 user configurable programs (for both heating and cooling);
-
possibility of overriding the program to vary the temperature;
- programs retained even in the event of a power outage;
- regulation for both heating and cooling systems;
- antifreeze function;
- possibility of timed switch off;
- turn on and off with a phone dialler;
- instructions in 5 languages (Italian, English, French, Spanish, German)
- device reset;
- self-diagnostic functions: automatically activated at regular intervals during normal operation, to check the state of the temperature probe, the state of the display driver, the efficiency of the EEPROM memory, the efficiency of the backup stage;
- button lockout function with 3-digit PIN number to prevent unauthorised access to all the device functions and programs (for example, when installed in a public place);
- Timed back-lit display, activated by pressing one of the four push buttons.
- Protection degree: IP40.
• Class II equipment:
• Number of manual cycles: 3.000.
• Number of automatic cycles: 100.000. - Type of contact opening: micro-disconnect.
- Type of action: 1BU.

VIMAR
- Tracking index: PTI175.
- Pollution rating: 2 (normal).
• Voltage pulse: 4.000 V - Ambient temperature range during transport: -25^ + 60^ .
- Operating temperature: T40 (0 °C +40 °C).
• ErP classification (Reg. EU 811/2013): class I, contribution 1% - Software class: A.
9. INSTALLATION RULES.
Installation should be carried out by qualified personnel in compliance with the current regulations regarding the installation of electrical equipment in the country where the products are installed.
10. CONFORMITY TO STANDARDS.
LV Directive.
EMC Directive.
Standards EN 60730-1, EN 60730-2-7, EN 60730-2-9.

WEEE - Information for users
If the crossed-out bin symbol appears on the equipment or packaging, this means the product must not be included with other general waste at the end of its working life. The user must take the worn product to a sorted waste center, or return it to the retailer when purchasing a new one. Products for disposal can be consigned free of charge (without any new purchase obligation) to retailers with a sales area of at least 400 m ^2 , if they measure less than 25 cm. An efficient sorted waste collection for the environmentally friendly disposal of the used device, or its subsequent recycling, helps avoid the potential negative effects on the environment and people's health, and encourages the reuse and/or recycling of the construction materials.

VIMAR
10. CONFORMITE AUX NORMES.
LV Directive. EMC Directive.
Standards EN 60730-1, EN 60730-2-7, EN 60730-2-9.


bar
| Period | Δευτέρα + Παρασκειή | Σάββατο και Κυριακή | |---|---|---| | T3 22 C | 1 | 1 | | T2 26 C | 2 | 2 | | T1 30 C | 3 | 3 | | T3 22 C | 4 | 4 | | T2 26 C | 5 | 5 | | T1 30 C | 6 | 6 | | T3 22 C | 7 | 7 | | T2 26 C | 8 | 8 | | T1 30 C | 9 | 9 | | T3 22 C | 10 | 10 | | T2 26 C | 11 | 11 | | T1 30 C | 12 | 12 | | T3 22 C | 13 | 13 | | T2 26 C | 14 | 14 | | T1 30 C | 15 | 15 | | T3 22 C | 16 | 16 | | T2 26 C | 17 | 17 | | T1 30 C | 18 | 18 | | T3 22 C | 19 | 19 | | T2 26 C | 20 | 20 | | T1 30 C | 21 | 21 | | T3 22 C | 22 | 22 | | T2 26 C | 23 | 23 | | T1 30 C | 24 | 24 | The chart displays two rows of bars: the top row represents the first value in the second row, and the bottom row represents the second value in the third row. The x-axis is labeled with values from '1' to '24'. The y-axis is not explicitly labeled but corresponds to the position of the bars. There are no labels for the bars in either row.