Pitchblack X Pro - DJ Equipment KORG - Free user manual and instructions
Find the device manual for free Pitchblack X Pro KORG in PDF.
| Product type | Chromatic tuner for guitar/bass |
| Brand | Korg |
| Model | Pitchblack X Pro |
| Detection accuracy | ±0.1 cent |
| Detection range | E0 (20.60 Hz) ~ C8 (4186 Hz), sine wave |
| Reference pitch | A4 = 436 ~ 445 Hz (1 Hz steps) |
| Display | 3D VU meter with 5 color patterns |
| Display modes | Traditional, stroboscopic, semi-stroboscopic, focus (±10 cents) |
| Ultra Buffer | Yes, preserves tone with long cables and pedalboards |
| Inputs | INPUT1 (front, 6.35 mm mono jack), INPUT2 (rear, 6.35 mm mono jack) |
| Outputs | OUTPUT1 (front, 6.35 mm mono jack), OUTPUT2 (rear, 6.35 mm mono jack) |
| Mute function | Yes, cuts signal to outputs |
| Cable test function | Yes, via CABLE CHECK jack (mono cables only) |
| Power supply | 9V DC AC adapter (included) |
| Power consumption | 2.5 W (maximum) |
| Auto power-off | Yes, after 4 hours of no signal or operation (can be disabled) |
| Dimensions (unit only) | 430 mm × 50 mm × 44 mm (rubber feet included) |
| Dimensions (with rack) | 482 mm × 50 mm × 44 mm |
| Weight | 379 g (tuner only) |
| Rack mounting | Yes, adapters included (EIA 19" standard) |
| Included accessories | AC adapter, screws ×4, washers ×4, rack adapters ×2, precautions |
| Maintenance | Wipe with a dry cloth. Do not use solvents. |
| Safety | Use only the supplied AC adapter. Unplug during storms or prolonged non-use. |
| Repairability | Spare parts available via Korg after-sales service |
Frequently Asked Questions - Pitchblack X Pro KORG
User questions about Pitchblack X Pro KORG
0 question about this device. Answer the ones you know or ask your own.
Ask a new question about this device
Download the instructions for your DJ Equipment in PDF format for free! Find your manual Pitchblack X Pro - KORG and take your electronic device back in hand. On this page are published all the documents necessary for the use of your device. Pitchblack X Pro by KORG.
USER MANUAL Pitchblack X Pro KORG
Tuning procedure....5
Reference pitch settings....5
Meter display setting....6
Meter display color settings 7
Cable check function....7
Installing rack-mounting adapters....8
Using rack-mounting adapters as a stand 8
Specifications....9
Introduction
Thank you for purchasing the Korg Pitchblack X Pro Chromatic Tuner. To help you get the most out of your new instrument, please read this manual carefully.
Main Features
- Ultra-high tuning accuracy of + / - 0.1 cents
- A newly developed ULTRA BUFFER keeps tone intact even through long cables and pedal boards
- “3D visual meter display” design offers wide viewing range and high visibility
- Selectable meter colors from 5 patterns
- Cable checker function
- Easily detachable Rack-angles - No screw driver needed!
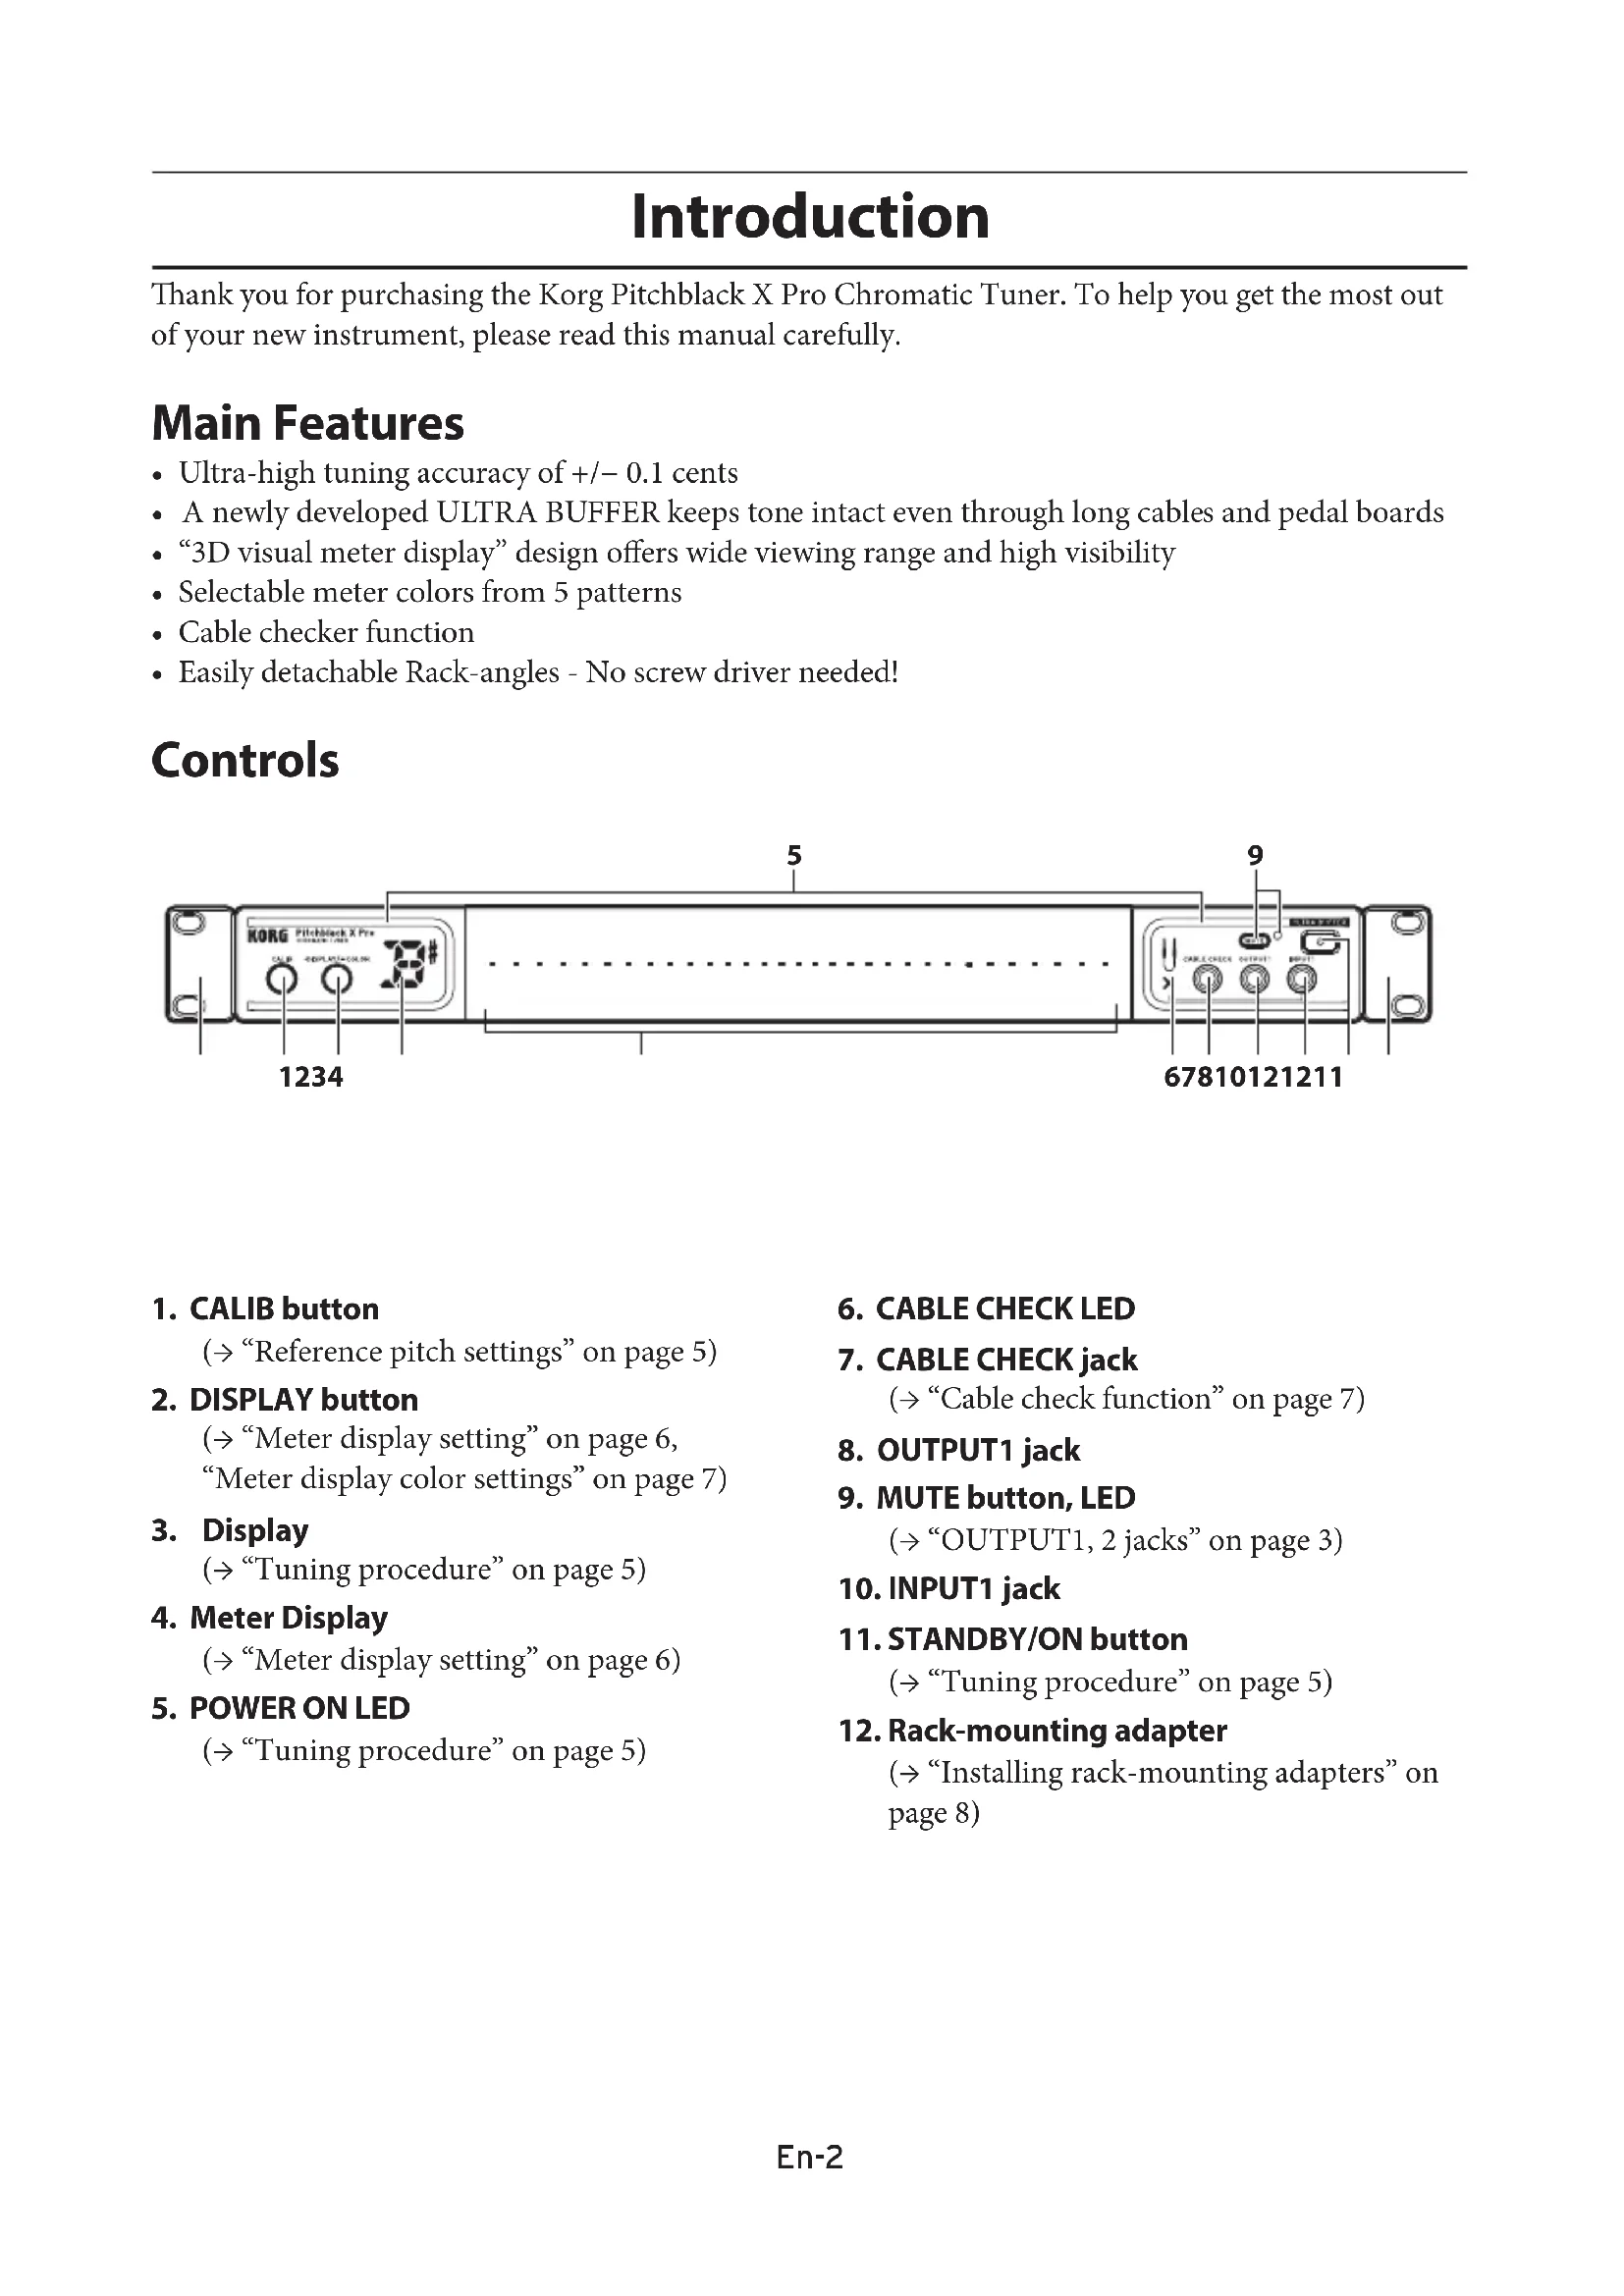
Controls
text_image
KORG Pitchblack X Pro 1234 5 9 678101212111. CALIB button
(→ "Reference pitch settings" on page 5)
2. DISPLAY button
(→ “Meter display setting” on page 6, “Meter display color settings” on page 7)
3. Display
(→ "Tuning procedure" on page 5)
4. Meter Display
(→ "Meter display setting" on page 6)
5. POWER ON LED
(→ “Tuning procedure” on page 5)
6. CABLE CHECK LED
7. CABLE CHECK jack
(→ "Cable check function" on page 7)
8. OUTPUT1 jack
9. MUTE button, LED
(→ "OUTPUT1, 2 jacks" on page 3)
10. INPUT1 jack
11. STANDBY/ON button
(→ “Tuning procedure” on page 5)
12. Rack-mounting adapter
(→ “Installing rack-mounting adapters” on page 8)
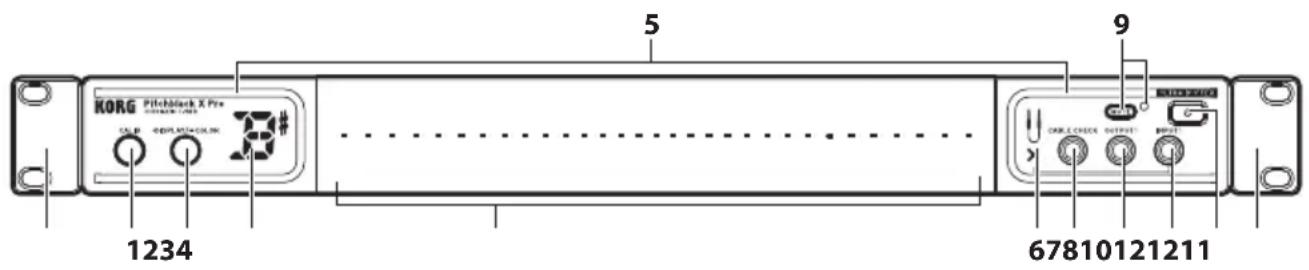
Connections
text_image
AC adapter (included) To AC outlet DC 9V OUTPUT2 INPUT 2 To effect pedals, amps or other equipment Guitar, bass, etc. INPUT 10OUTPUT1 To effect pedals, amps or other equipment Guitar, bass, etc.Turn off the power to all devices before you connect an instrument to avoid damaging your equipment.
The INPUT1, INPUT2, OUTPUT1, OUTPUT2 and CABLE CHECK jacks are for mono signals only. Stereo (TRS) cables will not work.
INPUT1 jack
Connect a cable from the INPUT1 jack to the instrument to be tuned.
INPUT2 jack
Connect a cable from the INPUT2 jack to the instrument to be tuned. If a cable is connected to the INPUT1 jack on the front panel, this jack will be disabled and cannot be used.
OUTPUT1, 2 jacks
Connect a cable from the OUTPUT jack to your effect pedals, amp, etc.
The signals that are input from either the INPUT1 or the INPUT2 jack pass through the buffer and are respectively sent to the OUTPUT1 and OUTPUT2 jacks.
Press the MUTE button to enable or disable the mute function for the signal that's output from the OUTPUT1 and OUTPUT2 jacks. When the mute function is enabled, the MUTE LED will light up, and the signal will not be output from the OUTPUT1 and OUTPUT2 jacks.
NOTE: When the tuner is in standby power mode, no signal is output from the OUTPUT1 and OUTPUT2 jacks.
CABLE CHECK jack
Connect one end of a standard mono instrument cable to the INPUT1 jack and the other end to the CABLE CHECK jack.
NOTE: Noise may occur if a cable is connected to the CABLE CHECK jack after a cable was connected to the INPUT1 jack.
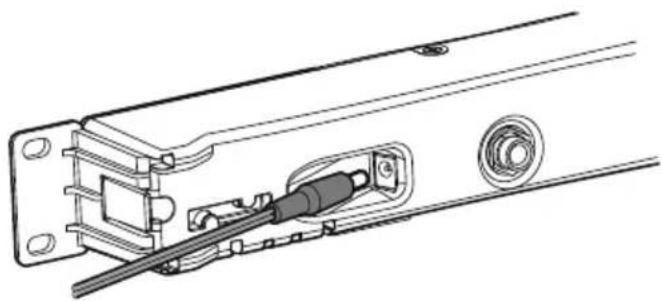
DC 9 V jack
Connect the included AC adapter to this jack.
Never use any AC adapter other than the one that's included. This may cause a malfunction.
natural_image
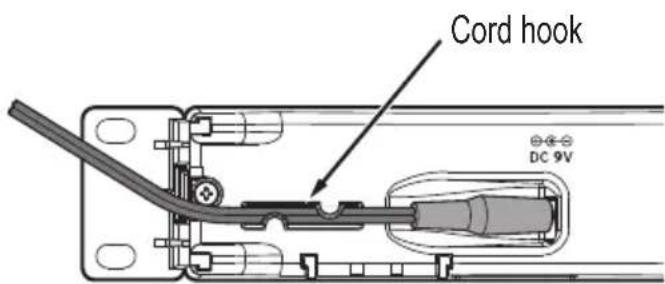
Technical line drawing of a mechanical assembly with no visible text or symbolsFasten the AC adapter's power cord in place by hooking it on the cord hook to prevent the included AC adapter's plug from being disconnected from the terminal.
text_image
Cord hook DC 9VOperation
Tuning procedure
- Connect the instrument to be tuned to the INPUT1 jack or to the INPUT2 jack.
NOTE: If a plug is connected to the INPUT1 jack on the front panel, the INPUT2 jack on the rear panel will be disabled and cannot be used.
- Press the STANDBY/ON button to turn on the tuner.
The POWER ON LED will light up, and the calibration setting (0–9) will flash in the note display for a few seconds.
NOTE: If there is no user input for up to 4 hours, the auto power-off function will automatically put the tuner in the standby power mode. Holding down the MUTE button and pressing the STANDBY/ON button while the tuner is turned on will disable the auto power-off function.
- Set the calibration, meter display and display color as necessary.
(→“Reference pitch settings” on page 5, “Meter display setting” on page 6, “Meter display color settings” on page 7).
-
Play a single note on your instrument.
-
Tune while watching the meter display. The note display will indicate the note name that is closest to the pitch you input.
Reference pitch settings
Set the reference pitch for tuning (the A note in the middle of the piano keyboard = A4). The default setting is “0: 440 Hz”.
- Press the CALIB button.
The current setting is shown for several seconds on the display (lit → blinking).
- While the current setting is shown, press the CALIB button to set the reference pitch.
Each time you press the CALIB button you will cycle through the following settings.
0: 440 Hz, 1: 441 Hz, 2: 442 Hz, 3: 443 Hz, 4: 444 Hz,
5: 445 Hz, 6: 436 Hz, 7: 437 Hz, 8: 438 Hz, 9: 439 Hz
- When you've chosen the desired setting, wait for two seconds without pressing any buttons.
The new setting will blink in the note name display indicating that the reference pitch has been set, and you can now use the tuner normally.
Meter display setting
You can specify the display pattern that's shown on the meter's display. You can choose one of four display patterns.
The default setting is "1: Regular meter".
- Press the DISPLAY button.
The current setting is shown for several seconds on the display (lit → blinking).
- While this setting is shown, press the DISPLAY button to select the desired display pattern.
The setting will change each time you press the button.
1: Regular meter

Tune your instrument so that the center LED of the meter display is lit up.
The LED illumination will move from the center toward the right if the note is sharp, or from the center toward the left if the note is flat.
2: Strobe meter

Tune your instrument so that the illumination stops flowing in the meter display. The illumination will flow from left to right if the note is sharp, or from right to left if the note is flat.
3: Half-strobe meter

Tune your instrument so that the stream stops and only the center LED is lit up. The right side of the meter display will strobe if the note is sharp, and the left side of the meter display will strobe if the note is flat. When the pitch is correct, only the center LED will light up.
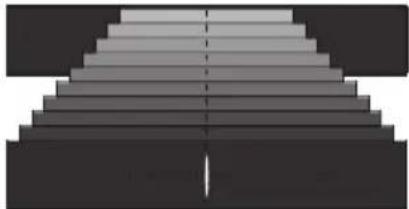
- Focus meter
natural_image
Abstract geometric pattern with gradient shading and a vertical dashed line (no text or symbols)This mode enlarges the meter display within a ±10 cent range, for even more precise tuning.
Tune your instrument so that the center LED of the meter display is lit up.
When the tuning of the inputted note is within ±10 cents, the POWER ON LED changes to red and the meter changes color. Also, the meter view enlarges to show the ±10 cent range.
The meter returns to the regular display when the tuning falls outside of the ±10 cent range.
- When you've chosen the desired setting, wait for two seconds without pressing any buttons. The display indication will blink several times, and the meter display setting will be made. The tuner will then return to its normal state, allowing you to tune.
Meter display color settings
You can specify the color of the meter display. There are five color combinations to choose from.
- Long-press the DISPLAY button.
The POWER ON LED will blink, and the color number appears in the note display. - While the POWER ON LED is blinking, press the DISPLAY button to select the color.
- Once you've made the setting, wait for about two seconds without pressing any buttons.
The meter display color setting will be made, and you can now use the tuner normally.
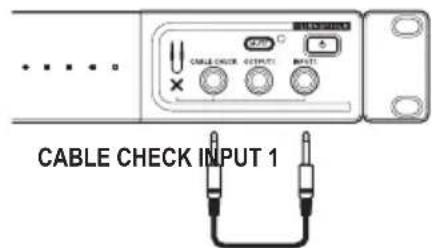
Cable check function
When the cable is connected, the cable check function will start and the results will be shown on the CABLE CHECK LEDs.
text_image
CABLE CHECK INPUT 1| Normal:Abnormal: |
NOTE: Cable checking can only be done with mono cables. Stereo cables cannot be checked.
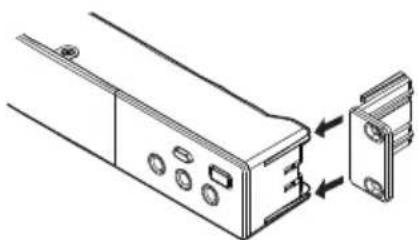
Installing rack-mounting adapters
By installing the included rack-mounting adapters, the tuner can be attached to an EIA standard rack or case, etc., with the appropriate rack screws.
NOTE: There is no difference between the left and right rack-mounting adapters.
Installation
Align the rack-mounting adapters with the mounting slots on the tuner, and then slide in the adapters from the back. Securely install the adapters so that they lock into place and will not slip out.
If the tuner is attached to the rack without sufficiently installing the adapters, the tuner may fall and become damaged.
natural_image
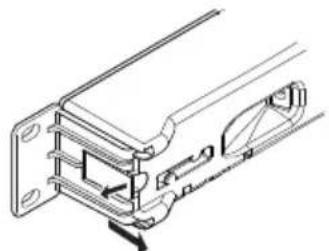
Technical line drawing of a device with two components, one showing internal components and arrows indicating assembly (no text or symbols)Removal
Release the lock on the back of the tuner, and then slide out the adapter to remove it.
Rack-mounting holes
Use these holes to attach the tuner to an EIA standard rack or case with the included screws.
natural_image
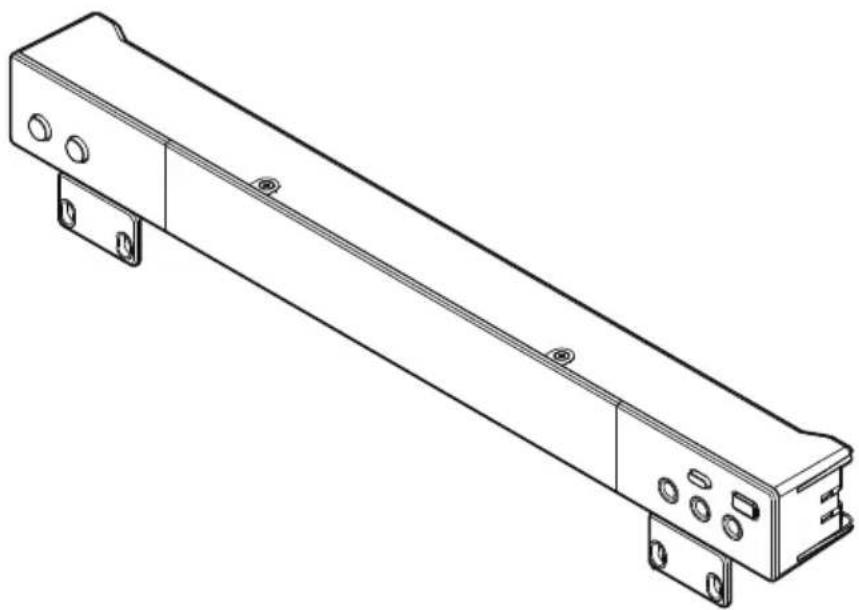
Technical line drawing of a mechanical assembly with no visible text or symbolsUsing rack-mounting adapters as a stand
By installing the rack-mounting adapters in the mounting slots on the bottom of the tuner, it can be positioned at an easy-to-read angle when it is placed on a table.
natural_image
Technical line drawing of a mechanical or electronic component with mounting flanges and a central rod (no text or symbols)Specifications
Tuning: 12-note equal temperament
Detection range: E0 (20.60 Hz)–C8 (4186 Hz), sine wave
Reference pitch: A4 = 436–445 Hz (1 Hz steps)
Detection accuracy: ±0.1 cent
Input impedance: 1 MΩ (when tuner is on)
Connects: Front: INPUT1 jack (1/4 "/6.3 mm monaural phone jack), OUTPUT1 jack (1/4"/6.3 mm monaural phone jack), CABLE CHECK jack (1/4"/6.3 mm monaural phone jack) Rear: INPUT2 jack (1/4"/6.3 mm monaural phone jack), OUTPUT2 jack (1/4"/6.3 mm monaural phone jack), DC 9 V jack
Power supply: 9V ⊕-●-AC adapter
Dimensions (W× D× H)
430 mm × 50 mm × 44 mm (16.93" × 1.97" × 1.73"); tuner only, including extensions
With rack-mounting adapters:
482mm× 50mm× 44mm(18.98''× 1.97''× 1.73'') ; including extensions
Weight: Tuner only: 379 g / 13.37 oz.
Included items: Customer Notice (Dear Customer), Precautions, AC adapter,
Screws × 4, washers × 4, Rack-mounting adapter × 2
* Appearance and specifications are subject to change without notice for improvement.
Pitchblack X Pro
CHROMATIC TUNER
natural_image
Technical line drawing of a mechanical assembly with no visible text or symbols5:445 Hz, 6:436 Hz, 7:437 Hz, 8:438 Hz, 9:439 Hz
natural_image
Abstract grayscale gradient pattern with no text or symbolstext_image
CABLE CHECK INPUT 1natural_image
Technical line drawing of a mechanical device with two components and directional arrows indicating assembly or alignment (no text or symbols)Dépose
natural_image
Technical line drawing of a mechanical assembly with no visible text or symbolsnatural_image
Technical line drawing of a mechanical or electronic component with mounting flanges and a central rod (no text or symbols)Fiche technique
12. Rack-Montageadapter
natural_image
Technical line drawing of a mechanical assembly with no visible text or symbols5: 445 Hz, 6: 436 Hz, 7: 437 Hz, 8: 438 Hz, 9: 439 Hz
natural_image
Abstract geometric pattern with gradient shading and a vertical dashed line (no text or symbols)text_image
CABLE CHECK INPUT 1| Normal:Anormal: |
natural_image
Technical line drawing of a device housing with mounting holes and a separate panel assembly (no text or symbols)Herausnehmen
natural_image
Technical line drawing of a mechanical assembly with no visible text or symbolsnatural_image
Technical line drawing of a mechanical assembly with mounting flanges and a central rod (no text or symbols)Technische Daten
natural_image
Technical line drawing of a mechanical assembly with no visible text or symbols5: 445 Hz, 6: 436 Hz, 7: 437 Hz, 8: 438 Hz, 9: 439 Hz
natural_image
Abstract grayscale gradient pattern with a vertical dashed line dividing the top and bottom (no text or symbols)text_image
CABLE CHECK INPUT 1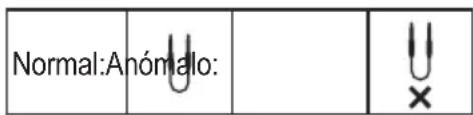
text_image
Normal:Anómalo:natural_image
Technical line drawing of a mechanical component with mounting holes and a separate housing (no text or symbols)Extracción
natural_image
Technical line drawing of a mechanical assembly with no visible text or symbolsnatural_image
Technical line drawing of a mechanical or electronic component with mounting flanges and a central rod (no text or symbols)Especificaciones
Dimensiones (Anch. × Prof. × Alt.):
natural_image
Technical line drawing of a mechanical assembly with no visible text or symbolsnatural_image
Abstract grayscale gradient pattern with a vertical dashed line and a central vertical mark (no text or symbols)text_image
CABLE CHECK INPUT 1| 正常時 | 異常時 |
natural_image
Technical line drawing of a mechanical component with mounting holes and a separate housing (no text or symbols)natural_image
Technical line drawing of a mechanical bracket assembly (no text or symbols)natural_image
Technical line drawing of a mechanical component with mounting flanges and mounting holes (no text or symbols)仕様
音律: 12平均律