DBHR13211BDD1 - Humidifier DANBY - Free user manual and instructions
Find the device manual for free DBHR13211BDD1 DANBY in PDF.

| Product type | Atomizing humidifier |
| Brand | Danby |
| Model | DBHR13211BDD1 |
| Water tank capacity | 2.5 L (estimated) |
| Power supply | 120 V ~ 60 Hz |
| Power rating | 25 W (estimated) |
| Dimensions (approx.) | 30 x 20 x 30 cm |
| Weight (approx.) | 2.5 kg |
| Atomization levels | Low, medium, high |
| Timer | 1 h, 2 h, 4 h, 8 h |
| Humidity setting | 40% to 60% RH + continuous mode (F) |
| Sleep mode | Yes (turns off display and light) |
| Rotation of atomization outlet | 360° |
| Aromatherapy | Compartment with round filter for essential oils |
| Air filter | Square filter washable in warm water |
| Automatic shut-off | Yes, when tank is empty (displays P1) |
| Recommended cleaning | Every 3 days; use distilled or demineralized water |
| Warranty | 1 year on functional parts (2-month extension upon registration) |
| Country of manufacture | China (presumed) |
Frequently Asked Questions - DBHR13211BDD1 DANBY
User questions about DBHR13211BDD1 DANBY
0 question about this device. Answer the ones you know or ask your own.
Ask a new question about this device
Download the instructions for your Humidifier in PDF format for free! Find your manual DBHR13211BDD1 - DANBY and take your electronic device back in hand. On this page are published all the documents necessary for the use of your device. DBHR13211BDD1 by DANBY.
USER MANUAL DBHR13211BDD1 DANBY
Do the right thing.*
OWNER'S MANUAL MANUEL DU PROPRIÉTAIRE MANUAL DEL PROPIETARIO
HUMIDIFIER
Owner's Manual....1 - 7
HUMIDIFICATEUR
Welcome to the Danby family.
We are proud of our quality products and we believe in dependable service. We suggest that you read this owner's manual before plugging in your new appliance as it contains important operation information, safety information, troubleshooting, and maintenance tips to ensure the reliability and longevity of your appliance.
You are entitled to the warranty coverage as described in the owner's manual provided with your new appliance.
- Please write down your appliance information below. You must keep the original proof of purchase receipt to validate and receive warranty services.
- Register your product online and receive a FREE 2 MONTH WARRANTY EXTENSION after fi lling out a product survey, at www.danby.com/support/product-registration/
Model Number:
Serial Number:
Date of Purchase:
Need Help?
- Read your Owner's Manual for installation help, troubleshooting, and maintenance assistance.
- Visit www.Danby.com to access self-service tools, FAQs and much more by searching your model number in the search bar.
- For the Quickest Customer Service, please fill out the web form at www.danby.com/support. Your submission will go directly to an expert on your particular appliance. Our average response times are between 20 minutes and 2 hours, during EST business hours.
- Call 1-800-263-2629 - please note that during peak hours, hold times can exceed one hour.
SAFETY INSTRUCTIONS
- Read all instructions before using the appliance.
- The humidifi er should always be placed on a fi rm, fl at, waterproof surface at least 4 feet (1.2 m) from the bedside and 12 inches (30 cm) from the wall, out of reach of patients, children and pets.
- Be sure the humidifi er is in a stable position and the power cord is away from heated surfaces.
- Keep the power cord away from walkways to avoid a tripping hazard.
- Do not use outdoors; this appliance is intended for indoor use.
- Plug and unplug the humidifi er with dry hands.
- Be sure to unplug the appliance by pulling on the plug and not the cord.
- Shut off and unplug the humidifi er before moving it. Never tilt, move or attempt to empty the humidifi er when it is operating.
- Empty the water tank and base before moving the humidifier in case of water leakage.
- Use both hands when carrying the full tank of water.
- Do not pour water in any openings other than the water tank.
- Do not drop or insert any object into any openings on the appliance.
- Do not block intake or output vents.
- Do not add any additives, medications, inhalants, scented products or essential oils into the water tank or base.
- Do not operate the humidifi er without water.
- Unplug the humidifi er when not in operation or when cleaning.
- To avoid bacterial breeding, the humidifi er requires regular cleaning. Refer to cleaning and maintenance.
- Never pour water on the base and do not immerse it in liquids.
-
Unplug the humidifi er and clean the water tank when the appliance will not be in operation for more than 3 days.
-
Do not operate the humidifi er when the cord or plug has been damaged.
- If the power supply cord is damaged, it must be replaced by the manufacturer, its service agent or similarly qualified persons to avoid hazard.
- Do not attempt to repair or adjust any electrical or mechanical functions of this appliance. Doing so will void the warranty.
- Please use distilled or demineralized water, below 104°F (40°C), to maintain best indoor air quality.
• Children shall not play with the appliance. - Cleaning and user maintenance shall not be made by children without supervision.
- Be aware that high humidity levels may encourage the growth of biological organisms in the environment.
- Do not permit the area around the humidifi er to become damp or wet. If dampness occurs, turn the output of the humidifi er down. If the humidifi er output volume cannot be turned down, use the humidifi er intermittently. Do not allow absorbent materials, such as carpeting, curtains, drapes or tablecloths to become damp.
- Never leave water in the reservoir when the appliance is not in use.
- Empty and clean the humidifi er before storage. Clean the humidifi er before next use if it has been in storage.
- Warning: Micro-organisms that may be present in the water or in the environment where the appliance is used or stored, can grow in the water reservoir and be blown into the air causing very serious health risks when the water is not renewed and the tank is not properly cleaned every 3 days.
- Empty the tank and refi ll it every third day. Before refi lling, clean it with fresh tap water and a mild cleaner. Remove any scale, deposits or fi lm that has formed on the sides of the tank or interior surfaces and wipe all surfaces dry.
OPERATING INSTRUCTIONS
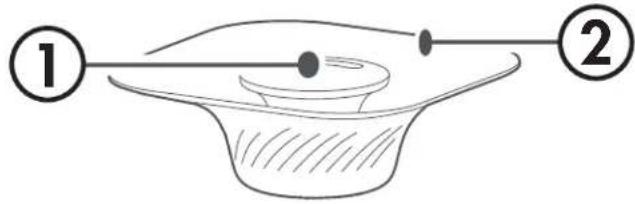
FEATURES
- Atomization outlet
- Upper cover
- Mist duct
- Water tank
- Water tray
- Base
- Control panel
- Aromatherapy box and filters (on bottom, not pictured)
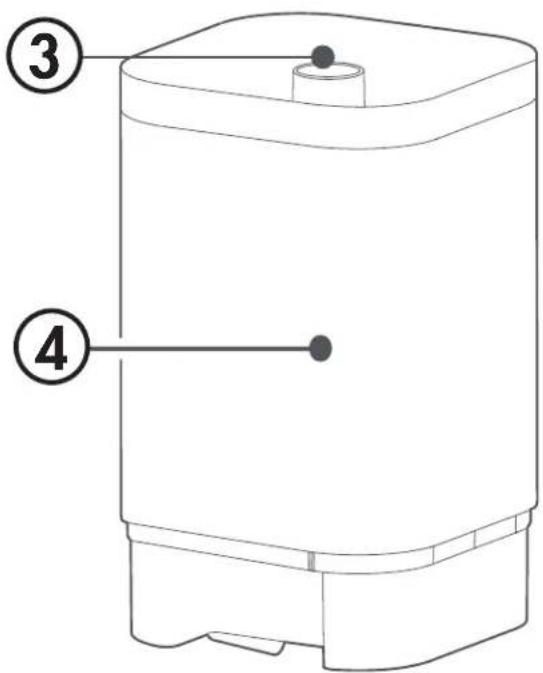
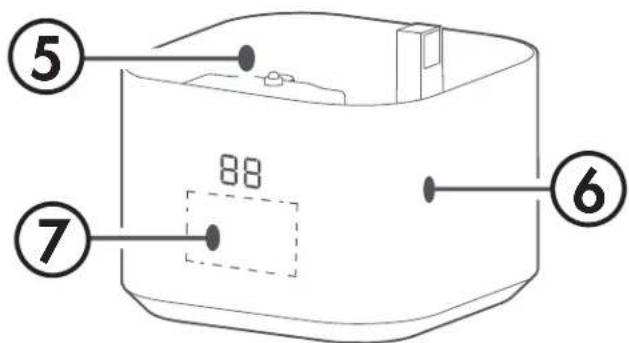
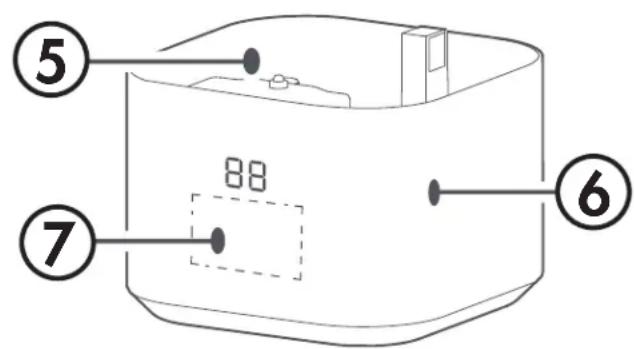
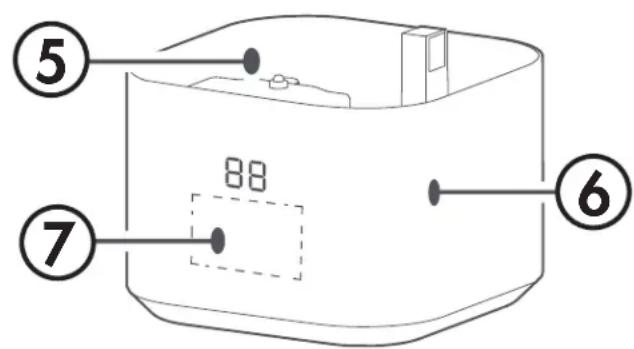
CONTROL PANEL
| Buttons Descrption | |
 | Humidity displayThe current ambient humidity will show on the display. |
 | Power buttonPress to turn the appliance on or off. |
 | Atomization buttonThe atomization level will set the size of the water droplets created by the appliance. Press this button repeatedly to set the atomization level: small, medium or large. |
 | Light buttonPress to turn the light on or off. |
 | Timer buttonThe timer can be used to set the appliance to automatically turn off after 1, 2, 4 or 8 hours. Press this button repeatedly to set the timer. |
 | Humidity level buttonThe humidity level can be set between 40 - 60% relative humidity. Press this button repeatedly to set the humidity level. At 60%, press this button again to display F, which indicates the appliance has been set to continuous humidifi cation. Press this button again to return to 40%. |
 | Sleep buttonPress to set sleep mode. This will set the appliance to run with the light and display turned off. Press this button again to return to normal functioning. |
OPERATING INSTRUCTIONS
INSTRUCTIONS FOR USE
- Be sure to unplug the power cord before filling with water.
- Do not overfill the water tank.
- Do not add water through the atomization outlet.
- Do not add essential oils, perfumes or other additives to the water.
• Use purifi ed water below 104°F (40°C).
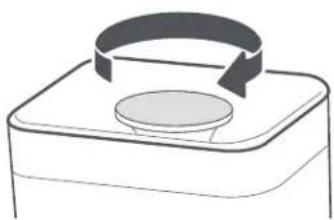
ATOMIZER DIRECTION ADJUSTMENT
The atomization outlet can be rotated 360^ . Turn the atomizer in the desired direction to direct the flow of atomized water vapour.
natural_image
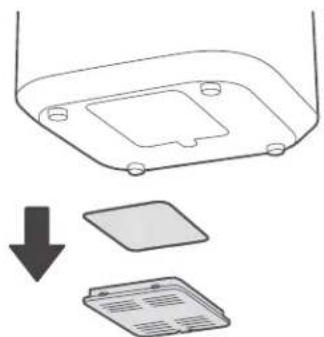
Simple line drawing of a rectangular container with a circular top and a curved arrow indicating rotation (no text or symbols)AROMATHERAPY BOX
The aromatherapy box is located on the bottom of the base. Aromatherapy liquids can be added to the round fi Iter and the smell will be circulated with the water vapour.
The square air fi lter is also found in the aromatherapy box and the flow of air can be impacted if it becomes dirty. The fi lter can be cleaned by rinsing with warm water.
natural_image
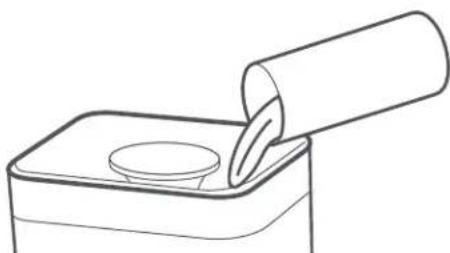
Diagram showing a device with a lid and a document below, indicating a download or write operation (no text or symbols present)FILLING THE WATER TANK
There are 3 different ways to fill the water tank.
- Fill the water tank directly through the water inlet.
natural_image
Line drawing of a container with a cup and a cylindrical object inserted into it (no text or symbols)- Remove the upper cover and fill the water tank.
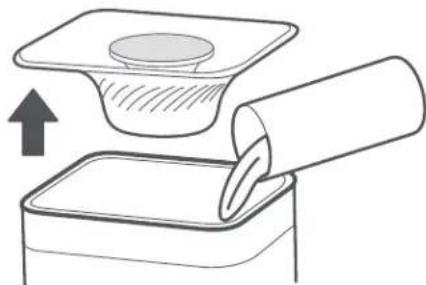
natural_image
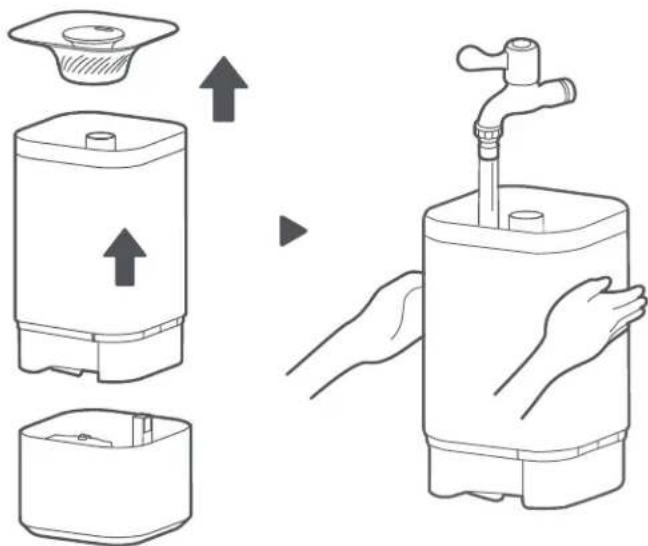
Illustration of a mechanical press or stamping process with a cylindrical component and an upward arrow (no text or symbols)- Remove the upper cover. Hold the water tank with both hands and lift upwards to remove it from the base. Place the tank under a water tap to fill it with water. When reinstalling the tank on the base, ensure the logo side of the water tank faces toward the same side as the control panel.
CLEANING AND MAINTENANCE
AIR FILTER
The square air filter is found in the aromatherapy box on the bottom of the humidifier. The aromatherapy box also includes the round aromatherapy filter.
The flow of air can be impacted if either of these fi liters becomes dirty. Clean the aromatherapy box and fi liters by rinsing them with warm water.
CLEANING
- Unplug the power cord before cleaning.
- Remove scale and debris from the humidifi er tank regularly.
- Clean the water tank every 3 days.
- Wipe the water tank with a soft, wet cloth to clean it.
- The water tray and atomizer can be cleaned with mild detergent. Rinse thoroughly after cleaning.
- The humidifi cation amount will vary, depending on the temperature and humidity in the room.
This equipment has been tested and found to comply with the limits for Consumer ISM equipment, pursuant to Part 18 of the FCC Rules. These limits are designed to provide reasonable protection against harmful interference in a residential installation. This equipment generates, uses, and can radiate radio frequency energy and, if not installed and used in accordance with the instructions, may cause harmful interference to radio communications. However, there is no guarantee that interference will not occur in a particular installation.
If this equipment does cause harmful interference to radio or television reception, which can be determined by turning the equipment off and on, the user is encouraged to try to correct the interference by one or more of the following measures:
- Reorient or relocate the receiving antenna.
- Increase the separation between the equipment and receiver.
- Connect the equipment into an outlet on a circuit different from that to which the receiver is connected.
- Consult the dealer or an experienced radio/TV technician for help.
Changes or modifications not approved by the party responsible for FCC and Industry Canada compliance could void the user's authority to operate the equipment.
This device complies with Canadian CAN ICES-1 / NMB-1.
TROUBLESHOOTING
Appliance will not operate
- Plug is not fully inserted into the wall outlet
- Blown fuse or circuit breaker
• The water tank is not properly installed
• The water tank is empty
Atomized water has an unpleasant smell
- The water or tank is dirty and needs to be cleaned
Noise
• The water tank is not properly installed
• The humidifi er is uneven or tilted
Not humidifying enough
- The air filter is dirty and needs to be cleaned; the air filter is the square found in the aromatherapy box on the bottom of the appliance
• The water tank is empty
Not humidifying with water in the tank
- Excessive tilting of the appliance can cause it to show that the water level is low when it is actually full; ensure the appliance is on a flat, level surface
Display shows --
- This symbol will display if the appliance has recently been plugged in and is starting up; once the start up is complete, this symbol will disappear
Display shows P1
- The water tank is empty or requires more water; if the humidifi er is not on a level surface, the water tank fl oat might be too low and the appliance will display this error. If the humidifi er is full of water and showing this error, ensure that it is on a fl at, level surface. The humidifi er requires enough water to cover the fl oat.
LIMITED "CARRY IN" WARRANTY
This quality product is warranted to be free from manufacturer's defects in material and workmanship, provided that the unit is used under the normal operating conditions intended by the manufacturer.
This warranty is available only to the person to whom the unit was originally sold by Danby Products Limited (Canada) or Danby Products Inc. (U.S.A.) (hereafter "Danby") or by an authorized distributor of Danby, and is non-transferable.
TERMS OF WARRANTY
Plastic parts are warranted for thirty (30) days from the date of purchase, with no extensions provided.
First 12 months
During the first twelve (12) months, any functional parts of this product found to be defective, will be repaired or replaced, at warrantor's option, at no charge to the original purchaser.
To obtain service
Contact the dealer where the unit was purchased, or contact the nearest authorized Danby service depot, where service must be performed by a qualified service technician. If service is performed on the unit by anyone other than an authorized service depot, all obligations of Danby under this warranty shall be void.
It is the responsibility of the purchaser to transport the appliance to the nearest authorized service depot.
Transportation charges to and from the service location are not protected by this warranty and are the responsibility of the purchaser.
Nothing within this warranty shall imply that Danby will be responsible or liable for any spoilage or damage to food or other contents of this appliance, whether due to any defect of the appliance, or its use, whether proper or improper.
EXCLUSIONS
Save as herein provided, by Danby, there are no other warranties, conditions, representations or guarantees, express or implied, made or intended by Danby or its authorized distributors and all other warranties, conditions, representations or guarantees, including any warranties, conditions, representations or guarantees under any Sale of Goods Act or like legislation or statute is hereby expressly excluded. Save as herein provided, Danby shall not be responsible for any damages to persons or property, including the unit itself, howsoever caused or any consequential damages arising from the malfunction of the unit and by the purchase of the unit, the purchaser does hereby agree to indemnify and hold harmless Danby from any claim for damages to persons or property caused by the unit.
GENERAL PROVISIONS
No warranty or insurance herein contained or set out shall apply when damage or repair is caused by any of the following:
1) Power failure.
2) Damage in transit or when moving the appliance.
3) Improper power supply such as low voltage, defective house wiring or inadequate fuses.
4) Accident, alteration, abuse or misuse of the appliance such as inadequate air circulation in the room or abnormal operating conditions (i.e. extremely high or low room temperature).
5) Use for commercial or industrial purposes (i.e. If the appliance is not installed in a domestic residence).
6) Fire, water damage, theft, war, riot, hostility, acts of God such as hurricanes, floods etc.
7) Service calls resulting in customer education.
8) Improper Installation (i.e. Building-in of a free standing appliance or using an appliance outdoors that is not approved for outdoor application, including but not limited to: garages, patios, porches or anywhere that is not properly insulated or climate controlled).
Proof of purchase date will be required for warranty claims; retain bills of sale. In the event that warranty service is required, present the proof of purchase to our authorized service depot.
Warranty Service
Carry In
Danby Products Limited
PO Box 1778, Guelph, Ontario, Canada N1H 6Z9
Telephone: |519| 837-0920 FAX: |519| 837-0449
1-800-263-2629
04/17
Danby Products Inc
PO Box 669, Findlay, Ohio, U.S.A. 45840
Telephone: (419) 425-8627 FAX: (419) 425-8629
PANNEAU DE COMMANDE
natural_image
Simple line drawing of a rectangular container with a circular top and curved arrow indicating rotation (no text or symbols)BOÎTE D'AROMATHÉRAPIE
natural_image
Diagram showing a device with a lid and a document below, indicating a download or file operation (no text or symbols present)REMLISSAGE DU RÉSERVOIR D'EAU
natural_image
Line drawing of a container with a cup and a cylindrical object inserted (no text or symbols)natural_image
Illustration of a mechanical process showing a rotating component being inserted into a container (no text or symbols)NETTOYAGE ET ENTRETIEN
FILTRE À AIR
Danby Products Limited
PO Box 1778, Guelph, Ontario, Canada N1H 6Z9
PANEL DE CONTROL
natural_image
Simple line drawing of a rectangular container with a circular top and curved arrow indicating rotation (no text or symbols)natural_image
Diagram showing a device with a lid and a document below, indicating a download or file operation (no text or symbols present)natural_image
Line drawing of a container with a lid and a cylindrical object inserted into it (no text or symbols)natural_image
Illustration of a mechanical press or stamping process with a cylindrical component and an upward arrow (no text or symbols)LIMPIEZA Y MANTENIMIENTO
FILTRO DE AIRE
Danby Products Limited
PO Box 1778, Guelph, Ontario, Canada N1H 6Z9
Telephone: (519) 837-0920 FAX: (519) 837-0449
1-800-263-2629
04/17
Danby Products Inc.
PO Box 669, Findlay, Ohio, U.S.A. 45840
Telephone: (419) 425-8627 FAX: (419) 425-8629
NOTES / REMARQUES / NOTAS :
Danby Products Limited, Guelph, ON, Canada N1H 6Z9 Danby Products Inc., Findlay, Ohio, USA 45840