
DDR050BJWDB - Humidifier DANBY - Free user manual and instructions
Find the device manual for free DDR050BJWDB DANBY in PDF.


| Product Type | Dehumidifier |
| Brand | Danby |
| Model | DDR050BJWDB |
| Dehumidification Capacity | 50 pints (approx. 23.7 liters per day) |
| Dimensions (approx.) | 50 cm (H) x 35 cm (W) x 25 cm (D) |
| Weight (approx.) | 15 kg |
| Power Supply | 115 V, 60 Hz |
| Rated Power | 700 W |
| Noise Level | 50 dB |
| Water Tank (Bucket) | Capacity approx. 5.7 liters |
| Main Functions | Smart dehumidification, 24h timer, continuous mode, two fan speeds |
| Display | Digital with humidity indicator and error code |
| Continuous Drain | Yes, gravity drain with garden hose (not included) |
| Air Filter | Washable, cleaning reminder every 250 hours |
| Auto Defrost | Yes, indicator light and compressor stop |
| Operating Temperature | 5°C to 32°C |
| Adjustable Humidity | 35% to 85% in 5% increments |
| Maintenance | Clean filter every 2 weeks, clean drain openings |
| Safety | Automatic shut-off when bucket full, frost protection, grounded |
| Warranty | 2 years parts, 30 days plastic parts |
Frequently Asked Questions - DDR050BJWDB DANBY
User questions about DDR050BJWDB DANBY
0 question about this device. Answer the ones you know or ask your own.
Ask a new question about this device
Download the instructions for your Humidifier in PDF format for free! Find your manual DDR050BJWDB - DANBY and take your electronic device back in hand. On this page are published all the documents necessary for the use of your device. DDR050BJWDB by DANBY.
USER MANUAL DDR050BJWDB DANBY
Do the right thing.*
OWNER'S MANUAL MANUEL DU PROPRIÉTAIRE MANUAL DEL PROPIETARIO
DEHUMIDIFIER
Owner's Manual....1 - 9
DÉSHUMIDIFICATEUR
Welcome to the Danby family.
We are proud of our quality products and we believe in dependable service. We suggest that you read this owner's manual before plugging in your new appliance as it contains important operation information, safety information, troubleshooting, and maintenance tips to ensure the reliability and longevity of your appliance.
You are entitled to the warranty coverage as described in the owner's manual provided with your new appliance.
- Please write down your appliance information below. You must keep the original proof of purchase receipt to validate and receive warranty services.
- Register your product online and receive a FREE 2 MONTH WARRANTY EXTENSION after fi lling out a product survey, at www.danby.com/support/product-registration/
Model Number:
Serial Number:
Date of Purchase:
Need Help?
- Read your Owner's Manual for installation help, troubleshooting, and maintenance assistance.
- Visit www.Danby.com to access self-service tools, FAQs and much more by searching your model number in the search bar.
- For the Quickest Customer Service, please fill out the web form at www.danby.com/support. Your submission will go directly to an expert on your particular appliance. Our average response times are between 20 minutes and 2 hours, during EST business hours.
- Call 1-800-263-2629 - please note that during peak hours, hold times can exceed one hour.

Important Safety Information READ AND FOLLOW ALL SAFETY INSTRUCTIONS
SAFETY REQUIREMENTS
This appliance is not intended for use by persons (including children) whose physical, sensory or mental capabilities may be different or reduced, or who lack experience or knowledge, unless such persons receive supervision or training to operate the appliance by a person responsible for their safety.
Children should be supervised to ensure that they do not play with the appliance.
To avoid risk of electric shock, do not operate this dehumidifi er in an area that is likely to accumulate standing water. If this condition develops, disconnect the power supply before stepping into the water.
Do not store or use combustible materials such as gasoline or other fl ammable vapors or liquids in the vicinity of this or any other appliance.
Do not insert fingers or other objects into grills or openings in the appliance.
Do not cover or block the intake and exhaust openings.
Do not operate the appliance without the filter installed.
Do not operate the appliance near heat sources.
This appliance is intended for indoor, residential applications only. Do not use this dehumidifi er outdoors. Do not use this dehumidifi er for commercial or industrial applications.
GROUNDING INSTRUCTIONS
This appliance must be grounded. Grounding reduces the risk of electrical shock by providing an escape wire for the electrical current.
This appliance has a cord that has a grounding wire with a 3-prong plug. The power cord must be plugged into an outlet that is properly grounded. If the outlet is a 2-prong wall outlet, it must be replaced with a properly grounded 3-prong wall outlet. The serial rating plate indicates the voltage and frequency the appliance is designed for.
WARNING - Improper use of the grounding plug can result in a risk of electric shock. Consult a qualified electrician or service agent if the grounding instructions are not completely understood, or if doubt exists as to whether the appliance is properly grounded.
Do not connect the appliance to extension cords, adapters or together with another appliance in the same wall outlet.
Do not splice the power cord. Do not under any circumstances cut or remove the third ground prong from the power cord.
If the power supply cord is damaged, it must be replaced by the manufacturer, its service agent or similar qualified person in order to avoid hazard.
OPERATING INSTRUCTIONS
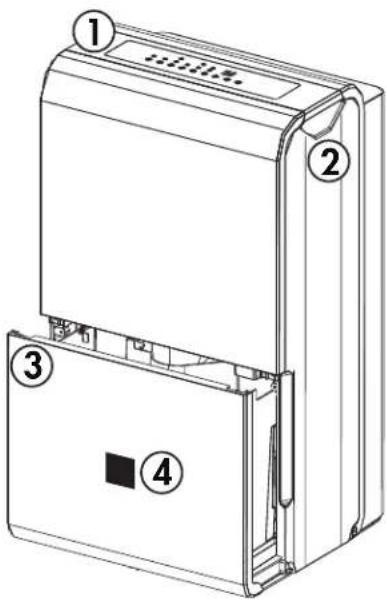
FEATURES
- Control panel
- Handles (both sides)
- Water bucket
- Water level indicator
- Air outlet
- Air filter
- Continuous drain outlet
- Power cord storage strap
- Power cord storage band
- Power cord

CONTROL PANEL
- Auto defrost light: The light will illuminate when frost builds up on the evaporator coils. The compressor will cycle off and the fan will continue to run until the frost melts.
- Bucket full light: The light will illuminate when the bucket is full or incorrectly positioned inside the cabinet. The compressor and fan operation will stop as a safety feature. When the bucket is emptied or correctly re-positioned the dehumidifi er will resume operation automatically.
- Display: Shows the actual (± 5% accuracy) room humidity level in a range of 30% to 90%. Otherwise, displays selection when programming humidity or timer.
- Smart dehumidify: This function will automatically adjust the humidity level with the fl uctuating room temperatures. The humidity level cannot be adjusted in this setting, it will stabilize between 45% - 55%. Press the humidity adjust buttons to cancel this feature.
- Filter button: The check fi Iter light will illuminate after 250 hours of operation. After cleaning the fi Iter, press the fi Iter button to turn off the light.
- Continuous button: Press to activate the continuous dehumidifying operation.
- Fan button: Press to select normal or high fan speed. The light will illuminate when set to high fan speed.
- Timer button: Press to set the timer.
- Humidity adjust buttons: The humidity level can be set within a range of 35% to 85% relative humidity in 5% increments. For drier air, set to a lower percentage value. For more damp air, set a higher percentage value.
- Power button: Press to turn the dehumidifi er on or off.

OPERATING INSTRUCTIONS
OPERATION
- Place the dehumidifier on a smooth, level floor that is strong enough to support the appliance with a full bucket of water.
- Do not place the dehumidifi er on carpeting as this can block air flow around the appliance. Do not force casters to move over carpeting as the appliance can become unbalanced and spill water.
- To maintain efficiency, operate the appliance in an enclosed area. Keep nearby doors and windows closed.
- Maintain a minimum clearance of 40 cm (16 inches) around the air outlets and 20 cm (8 inches) on other sides of the appliance to allow for proper air circulation.
- The recommended ambient operating temperature is between 5^ C ( 41^ F) and 32^ C ( 90^ F).
- Any time the appliance is placed on its back or side, it must be allowed to stand upright for 6 hours before plugging in to avoid damage to internal components.
- The default humidity setting is 40% and high fan speed. Depending on humidity conditions the dehumidifi er may not start automatically under the default setting. This means the humidity in the surrounding air is less than 40%. Press the down button to lower the set humidity until the set humidity is lower than the ambient humidity.
- For optimal performance, ensure that the humidity setting is 10% lower than the ambient humidity. It is normal for the ambient humidity to vary up to 5% above or below the set humidity.
- It is recommended in normal conditions to set the humidity between 40-45%.
- It is normal for the dehumidifi er to exhaust warm air from the air outlet.
- The power cord storage band can be found in the water bucket and it can be installed by pressing it onto the back of the cabinet until it clicks.
TIMER
Auto Off
- When the dehumidifi er is turned on, press the timer button to activate the auto off timer.
- Press the humidity adjust buttons to change the set time in 0.5 hour increments up to 10 hours and then in 1 hour increments up to 24 hours.
Auto On
- When the dehumidifi er is turned off, press the timer button to activate the auto on timer.
- Press the humidity adjust buttons to change the set time in 0.5 hour increments up to 10 hours and then in 1 hour increments up to 24 hours.
Using Auto On and Auto Off Together
The auto on and auto off timers can be used at the same time by first setting one and then the other.
For example, if the dehumidifi er is running, you can set the auto off timer to let it run for a set amount of time before turning off and then set the auto on timer to turn it back on at a later time.
Or, if the dehumidifi er is not running, you can set the auto on timer to turn it on at a later time and then set the auto off timer to shut it off after running for a period of time.
Note: The timer will not cycle the dehumidifi er on and off indefinitely. The auto on and auto off timers will function one time and then the dehumidifi er will return to regular functioning.
Turning the dehumidifi er on or off at any time or changing the timer setting to 0.0 will cancel the timer settings.
OPERATING INSTRUCTIONS
WATER REMOVAL
There are two ways to remove collected water from the appliance.
1. Water Bucket
The dehumidifi er will automatically collect condensed water in the water bucket. When the bucket is full, the compressor and fan will turn off and the full bucket indicator light will turn on. The display will show "P2".
To empty the bucket, gently remove it from the appliance by gripping both sides and pulling outward. Be cautious when removing the bucket, it will be full and can be heavy.
Do not place the water bucket directly on the floor. The bottom of the bucket is uneven and it will fall over and spill water.
Empty the bucket and replace it in the appliance. The dehumidifi er will not function without the bucket installed.
Never tamper with or attempt to defeat the water level fl oat system. Proper installation of the water bucket is crucial in maintaining reliable operation.
2. Continuous Drain
Water can be removed using the continuous drain with a standard garden hose and female threaded end (not provided).
Before using any automatic drain functions, check that all drain ports are clean. There is one drain port inside the bucket compartment of the appliance, remove the bucket to see it. There is one drain port on the back of the appliance where the female threaded end and garden hose attach. All drain ports should be cleaned with a pipe cleaner prior to use.
To use the continuous drain you must purchase a garden hose and female threaded end.
The required dimensions are:
• Female threaded end: ID:M=1''
• Garden hose: ID≥Φ5/16"
Remove the cover from the continuous drain outlet and attach the female threaded end and the garden hose to the back of the appliance. Direct the other end of the garden hose to a bucket or floor drain.
Ensure that the garden hose is not bent and goes straight down from the back of the appliance. The continuous drain is only activated by gravity so any bends or upward motion in the hose will stop the water from draining.
The garden hose should be cut so that it is no more than 1.8 m (6 feet) long. If the drain hose is too long water may not drain completely which can lead to stagnant water and mildew build up inside the hose.
Notes:
- Do not clean the drain ports with anything more rigid than a pipe cleaner as this can damage the appliance.
- If the drain ports are clogged or dirty it can cause water to leak from the bottom of the appliance.
- There is no drain pump in this appliance. The continuous drain is fed by gravity alone.
CARE & MAINTENANCE
AIR FILTER
The air fi liter should be cleaned approximately every 2 weeks. The air fi liter may require more frequent cleaning if there is significant dander or fur in the air.
Approximately every two weeks, the fi Iter indicator light on the control panel will illuminate as a reminder to clean the fi Iter. Follow the steps below to clean the fi Iter and return the appliance to normal functioning.
- The air fi liter is located behind the rear intake grill. To remove the air fi liter, grasp the fi liter tab on the bottom of the grill and slide it downward.
- Use a vacuum cleaner with a soft brush attachment to remove any large debris or dust build up from the air filter.
- Wash the filter in lukewarm, soapy water, below 40^ C ( 104^ F), or use a neutral cleaning agent.
- Rinse the filter with clean water and dry thoroughly before reinstalling in the appliance.
- Press the filter button on the control panel to resume normal functioning.
Note: Do not operate the appliance without the air filter installed.
CLEANING
To avoid possible electric shock, ensure that the appliance is unplugged before performing any cleaning or maintenance.
The outside of the appliance can be wiped clean with a soft cloth or with a lukewarm, damp cloth if necessary.
Do not use gasoline, benzene, thinner or any other chemicals to clean this appliance as these substances can cause damage to the fi nish and deformation of plastic parts.
Never pour water directly onto the appliance as this will cause deterioration of electrical components and wiring insulation.
Ensure that the drain ports on the interior of the appliance and the drain ports on the back of the appliance are free of dirt and calcium build up.
Note: Do not clean the drain ports with anything more rigid than a pipe cleaner as this can damage the appliance.
Note: If the drain ports are clogged or dirty it can cause water to leak from the bottom of the appliance.
END OF SEASON CARE
Unplug the dehumidifi er and ensure the fi lter is clean. Ensure the bucket is empty and then allow both the bucket and the dehumidifi er to dry completely before storing for the off season. It could take a few days for water inside the dehumidifi er to completely evaporate. You can speed up this process by wiping the bucket with a dry cloth and ensuring the lower drain of the dehumidifi er has been emptied. Store the dehumidifi er covered in a dry location.
FREQUENTLY ASKED QUESTIONS
What is the best humidity setting?
We recommend setting your dehumidifi er between 40-45%.
Is the air that comes out of the dehumidifi er supposed to be hot?
Yes, usually this air feels warm.
Why isn't the dehumidifi er collecting any water?
There may not be enough humidity in your environment or the relative humidity might be set higher than ambient humidity.
Does the fan run continuously?
In continuous mode, the fan will run continuously.
In smart dehumidify mode or manual mode the fan will cycle on and off.
Can I use an extension cord?
No, the dehumidifi er is built to operate using the power cord provided.
Does the timer cycle on and off forever?
The on and off timers can be used at the same time however, they will only cycle one time and then resume normal functioning.
How do I hook up my direct drain?
To use the continuous drain you must purchase a garden hose and female threaded end.
The dimensions required are:
• female threaded end: ID:M=1''
• garden hose: ID≥Φ5/16".
Remove the cover from the continuous drain outlet and attach the female threaded end and the garden hose to the back of the appliance. Direct the other end of the garden hose to a bucket or floor drain.
Does the fi Iter light come on when it is dirty?
The filter light comes on automatically after about 250 hours of use even if the filter is clean. Clean the filter and then press the filter button to turn the filter light off.
What is the plastic piece in the bucket?
This rounded piece is called a buckle and is clipped on to the back of the dehumidifi er. It is used to wrap the power cord during long term storage of the dehumidifi er.
TROUBLESHOOTING
Appliance will not operate
- Plug is not fully inserted into the wall outlet
- Blown fuse or circuit breaker
- Ambient humidity is lower than the set humidity
- Bucket is full or is not in the proper position
Insuffi cient dehumidifying
- Air filter is dirty
- Blocked air flow
• Appliance size is too small for application - Ambient humidity is lower than the set humidity
Noise
- Air filter is dirty
- Bucket is not in proper position
• Floor surface is not level
Odors
- Formation of mold or mildew on internal wet surfaces
- Place an algaecide tablet in the water bucket
Water on floor
- Hose connection is loose
- Drain cover has been removed
Frost build up
- When ambient temperature is below 5°C (41°F) frost may form
- Switch the appliance to fan only mode until the frost melts
ERROR CODES
If the display panel shows any of the below error codes, unplug the appliance, let it stand for 5-10 minutes and then plug it back in. If the error persists, call for service.
AS - Humidity sensor error
ES - Temperature sensor error
P2 - Full bucket or bucket not in the correct position
DISPOSAL
This appliance may not be treated as regular household waste, it should be taken to the appropriate waste collection point for recycling of electrical components. Check for local regulatory compliance regarding approved and safe disposal of this appliance.
LIMITED "CARRY IN" WARRANTY
This quality product is warranted to be free from manufacturer's defects in material and workmanship, provided that the unit is used under the normal operating conditions intended by the manufacturer.
This warranty is available only to the person to whom the unit was originally sold by Danby Products Limited (Canada) or Danby Products Inc. (U.S.A.) (hereafter "Danby") or by an authorized distributor of Danby, and is non-transferable.
TERMS OF WARRANTY
Plastic parts are warranted for thirty (30) days from the date of purchase, with no extensions provided.
First 24 months
During the first twenty four (24) months, any functional parts of this product found to be defective, will be repaired or replaced, at warrantor's option, at no charge to the original purchaser.
To obtain service
Contact the dealer where the unit was purchased, or contact the nearest authorized Danby service depot, where service must be performed by a qualified service technician. If service is performed on the unit by anyone other than an authorized service depot, all obligations of Danby under this warranty shall be void.
It is the responsibility of the purchaser to transport the appliance to the nearest authorized service depot.
Transportation charges to and from the service location are not protected by this warranty and are the responsibility of the purchaser.
Nothing within this warranty shall imply that Danby will be responsible or liable for any spoilage or damage to food or other contents of this appliance, whether due to any defect of the appliance, or its use, whether proper or improper.
EXCLUSIONS
Save as herein provided, by Danby, there are no other warranties, conditions, representations or guarantees, express or implied, made or intended by Danby or its authorized distributors and all other warranties, conditions, representations or guarantees, including any warranties, conditions, representations or guarantees under any Sale of Goods Act or like legislation or statute is hereby expressly excluded. Save as herein provided, Danby shall not be responsible for any damages to persons or property, including the unit itself, howsoever caused or any consequential damages arising from the malfunction of the unit and by the purchase of the unit, the purchaser does hereby agree to indemnify and hold harmless Danby from any claim for damages to persons or property caused by the unit.
GENERAL PROVISIONS
No warranty or insurance herein contained or set out shall apply when damage or repair is caused by any of the following:
1) Power failure.
2) Damage in transit or when moving the appliance.
3) Improper power supply such as low voltage, defective house wiring or inadequate fuses.
4) Accident, alteration, abuse or misuse of the appliance such as inadequate air circulation in the room or abnormal operating conditions (i.e. extremely high or low room temperature).
5) Use for commercial or industrial purposes (i.e. If the appliance is not installed in a domestic residence).
6) Fire, water damage, theft, war, riot, hostility, acts of God such as hurricanes, floods etc.
7) Service calls resulting in customer education
8) Improper Installation (ie. Building-in of a free standing appliance or using an appliance outdoors that is not approved for outdoor application, including but not limited to: garages, patios, porches or anywhere that is not properly insulated or climate controlled).
Proof of purchase date will be required for warranty claims; retain bills of sale. In the event that warranty service is required, present the proof of purchase to our authorized service depot.
Warranty Service
Carry In
Danby Products Limited
PO Box 1778, Guelph, Ontario, Canada N1H 6Z9
Telephone: |519| 837-0920 FAX: |519| 837-0449
1-800-263-2629
04/17
Danby Products Inc
PO Box 669, Findlay, Ohio, U.S.A. 45840
Telephone: (419) 425-8627 FAX: (419) 425-8629

PANNEAU DE CONTRÔLE
Comment raccorder mon drain direct?
Danby Products Limited
PO Box 1778, Guelph, Ontario, Canada N1H 6Z9

PANEL DE CONTROL
Danby Products Limited
PO Box 1778, Guelph, Ontario, Canada N1H 6Z9
Telephone: (519) 837-0920 FAX: (519) 837-0449
1-800-263-2629
04/17
Danby Products Inc.
PO Box 669, Findlay, Ohio, U.S.A. 45840
Telephone: (419) 425-8627 FAX: (419) 425-8629
NOTES / REMARQUES / NOTAS :
NOTES / REMARQUES / NOTAS :
NOTES / REMARQUES / NOTAS :
Danby Products Limited, Guelph, ON, Canada N1H 6Z9 Danby Products Inc., Findlay, Ohio, USA 45840


- Welcome to the Danby family.
- Need Help?
- Important Safety Information READ AND FOLLOW ALL SAFETY INSTRUCTIONS
- SAFETY REQUIREMENTS
- GROUNDING INSTRUCTIONS
- OPERATING INSTRUCTIONS
- FEATURES
- CONTROL PANEL
- OPERATION
- TIMER
- Auto Off
- Auto On
- Using Auto On and Auto Off Together
- WATER REMOVAL
- Water Bucket
- Continuous Drain
- Notes:
- CARE & MAINTENANCE
- AIR FILTER
- CLEANING
- END OF SEASON CARE
- FREQUENTLY ASKED QUESTIONS
- What is the best humidity setting?
- TROUBLESHOOTING
- Appliance will not operate
- Insuffi cient dehumidifying
- Noise
- Odors
- Water on floor
- Frost build up
- ERROR CODES
- DISPOSAL
- LIMITED "CARRY IN" WARRANTY
- TERMS OF WARRANTY
- EXCLUSIONS
- GENERAL PROVISIONS
- PANNEAU DE CONTRÔLE
- Comment raccorder mon drain direct?
- PANEL DE CONTROL
Brand : DANBY
Model : DDR050BJWDB
Category : Humidifier