
Foton 30 - Laminating machine GBC - Free user manual and instructions
Find the device manual for free Foton 30 GBC in PDF.

| Product type | Automated laminating machine |
| Brand | GBC |
| Model | Foton 30 |
| Dimensions (L × H × D) | 577 × 245 × 478 mm |
| Weight | 9.5 kg |
| Power supply | 120 V, 60 Hz, NEMA 5-15P plug |
| Fuse | Yes (internal, non-replaceable) |
| Max film width | 306 mm (outside North America) |
| Laminating speed | Up to 29.1 in/min (700 mm/min) depending on thickness |
| Preheat time | 3.5 to 4 minutes depending on thickness |
| Operating modes | Auto/Auto, Manual/Auto, Manual/Manual |
| Auto shut-off | After 15 minutes of inactivity |
| Duty cycle | 80 documents per week |
| Support weight (auto) | 64 to 120 g/m² (high reliability) |
| Support weight (manual) | 64 to 250 g/m² |
| Warranty | 2 years or 5,000 laminations |
| Roller cleaning | Lint-free damp cloth, isopropyl alcohol if adhesive |
| Safety | Hot surface (>126.7°C), unplug before maintenance |
Frequently Asked Questions - Foton 30 GBC
User questions about Foton 30 GBC
0 question about this device. Answer the ones you know or ask your own.
Ask a new question about this device
Download the instructions for your Laminating machine in PDF format for free! Find your manual Foton 30 - GBC and take your electronic device back in hand. On this page are published all the documents necessary for the use of your device. Foton 30 by GBC.
USER MANUAL Foton 30 GBC
Document Number: CBT10000 Rev B Do not duplicate without written permission from ACCO Brands
natural_image
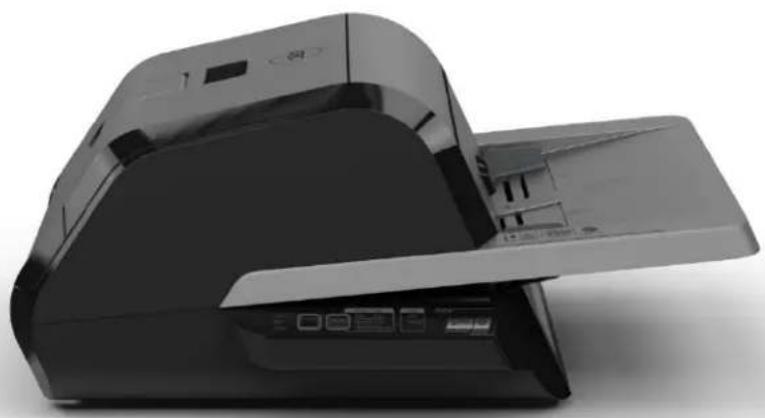
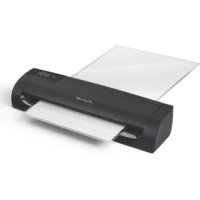
Exterior view of a black printer with open lid and paper feed (no visible text or symbols)ACCO Brands reserves the right to make changes to this publication and to the products described in it without notice. All specifications and information concerning products are subject to change without notice. Reference in this publication to information or products protected by copyright or patent does not convey any license under the rights of ACCO Brands or others. ACCO Brands assumes no liability arising from infringements of patents or any other rights of third parties.
This publication is copyrighted © 2024 by ACCO Brands. All rights reserved.
1. Safety
YOUR SAFETY, AS WELL AS THE SAFETY OF OTHERS IS IMPORTANT TO ACCO. IN THIS INSTRUCTION MANUAL AND ON THE PRODUCT ARE IMPORTANT SAFETY MESSAGES. BEFORE YOU INSTALL OR USE THE MACHINE, READ AND FOLLOW ALL THE SAFETY NOTICES CAREFULLY IN THIS CHAPTER.
Observe all the safety information provided. Observe all safety warnings. Never remove safety warnings or other information from the equipment.
Read all of the instructions and save these instructions for further use.

The safety alert symbol precedes each safety notice in this manual. The symbol indicates a potential personal safety hazard to you or others, as well as cause product damage or property damage.

This safety alert symbol indicates a potential electrical shock. It warns you not to open the laminator and expose yourself to hazardous voltage.
DO NOT OPEN. NO USER SERVICABLE PARTS INSIDE. REFER SERVICING TO QUALITFIED SERVICE PERSONAL.
THE FOLLOWING WARNINGS ARE FOUND ON THE FOTON 30 AUTOMATED LAMINATOR.


CAUTION Hot Surface: Laminator rollers can be in excess of 260^ F/126.7°C. Please use caution and do not touch the rollers.

WARNING: Do not attempt to service or
repair the laminator.

WARNING: Do not connect the
laminator to an electrical supply or attempt to operate the laminator until you have completely read these instructions. Maintain these instructions in a convenient location for future reference.
General safeguards
- Use this laminator only for its intended purposes as according to the specifications outlined in the operating instructions.
- Keep hands, long hair, loose clothing and articles such as necklaces or ties away from the front of the feed rollers to avoid entanglement and entrapment.
- When opening the top door of the laminator, avoid contact with the internal rollers when laminator is powered on or shortly after the laminator has been turned off. The rollers can reach temperatures in excess of 260° F / 126.7° C.
- Keep hands and fingers away from the path of the sharp film cutter blade located at the film exit.
- Do not place the laminator on an unstable cart, stand or table. An unstable surface may cause the laminator to fall resulting in serious bodily injury. Avoid quick stops, excessive force and uneven floor surfaces when moving the laminator on a cart or stand.
- Do not defeat or remove electrical and mechanical safety equipment such as interlocks, shields and guards.
- Do not insert objects unsuitable for lamination.
- Do not expose laminator to liquids.
Electrical Safeguards
- The equipment should be connected to an easily accessible and grounded (3-pin) receptacle (socket outlet) near the equipment.
- This laminator must be connected to a supply voltage corresponding to the electrical rating as indicated on the serial plate located on the rear of the machine.
- Unplug the laminator before moving it, or when it is not in use for an extended period of time.
- Do not operate the laminator with a damaged power supply cord or plug.
- Do not overload electrical outlets as this can result in fire or shock.
- Do not alter the attachment plug. This plug is configured for the appropriate electrical supply.
• The unit is intended for indoor use only. - Disconnect the attachment plug from the receptacle to which it is connected and keep the power supply cord in your possession while moving the laminator.
- Do not operate the laminator with a damaged power supply cord or attachment plug, upon occurrence of a malfunction, or after laminator has been damaged. Contact an authorized GBC service representative for assistance.

CAUTION: The receptacle must be located
near the equipment and easily accessible. Do not use an extension cord.
GBC Technical Service
To order replacement accessories, service, parts, or an Equipment Maintenance Agreement, please contact GBC Technical Service and Support at:
United States
ACCO Brands GBC Technical Service and Support
4 Corporate Drive Lake Zurich, IL 60047-8997
www.gbc.com
1-800-723-4000
Canada
Ontario and Quebec - 1-800-268-3310
All other Provinces - 1-800-268-3447
Local 905-595-3100
Callcentre@GBCCanada.com
Mexico
(55) 1500 5778
Lada SIN costo: 01 800 759 6825
ACCO Brands USA LLC, ACCO Brands, 4 Corporate Drive, Lake Zurich, IL 60047 (in Mexico, ACCO Brands Mexicana, Neptuno 43, Fraccionamiento Nueva Industrial Vallejo México 07700 D.F. México), (in Canada, ACCO Brands Canada Inc., 7381 Bramalea Road, Mississauga ON L5S1C4) (each, respectively, "ACCO Brands") warrants to the original purchaser that this ACCO Brands product is free from defects in workmanship and material under normal use and service for a period of: two (2) years or 5000 laminates whichever comes first for parts.
ACCO Brands' obligation under this warranty is limited to replacement or repair, at ACCO Brands' option, of any warranted part found defective by ACCO Brands without charge for material or labor. Any replacement, at ACCO Brands' option, may be the same product or a substantially similar product that may contain remanufactured or refurbished parts. This warranty shall be void in the following circumstances:
(i) if the product has been improperly installed or misused,
(ii) if the product has been damaged by negligence or accident, or
(iii) if the product has been altered by anyone other than ACCO Brands or ACCO Brands' authorized agents.
Without limiting the generality of the previous paragraph, ACCO Brands' obligation under this limited warranty does not include:
(iii) damage caused to the rollers by knives, razors, or other sharp tools; by any foreign objects falling into the working area of the laminator; or by cleaning the laminator with solutions or materials that harm its surfaces;
For warranty execution, please contact ACCO Brands at: 800-723-4000 or www.gbccconnect.com in the USA 800-263-1063 or www.gbccanada.com in Canada (55) 1500 5578 or www.accomexico.mx in Mexico
TO THE EXTENT ALLOWED BY APPLICABLE LAW, THIS WARRANTY IS IN LIEU OF ALL OTHER EXPRESSED WARRANTIES. REPRESENTATIONS OR PROMISES INCONSISTENT WITH OR IN ADDITION TO THIS WARRANTY ARE UNAUTHORIZED AND SHALL NOT BE BINDING ON ACCO BRANDS. TO THE EXTENT PERMITTED BY APPLICABLE LAWS, ANY IMPLIED WARRANTIES (IF APPLICABLE) ARE LIMITED IN DURATION TO THE DURATION OF THIS WARRANTY. SOME STATES AND JURISDICTIONS DO NOT ALLOW LIMITATIONS ON HOW LONG AN IMPLIED WARRANTY LASTS, SO THE ABOVE LIMITATION MAY NOT APPLY TO YOU. TO THE EXTENT PERMITTED BY APPLICABLE LAW, IN NO EVENT SHALL ACCO BRANDS BE LIABLE FOR ANY SPECIAL, INCIDENTAL, PUNITIVE, EXEMPLARY, CONSEQUENTIAL OR SIMILAR DAMAGES, WHETHER OR NOT FORESEEABLE. SOME STATES AND JURISDICTIONS DO NOT ALLOW THE EXCLUSION OR LIMITATION OF SPECIAL, INCIDENTAL, PUNITIVE, EXEMPLARY, CONSEQUENTIAL, OR SIMILAR DAMAGES, SO THE ABOVE EXCLUSION OR LIMITATION MAY NOT APPLY TO YOU.
FOR CONSUMERS WHO HAVE THE BENEFIT OF CONSUMER PROTECTION LAWS OR REGULATIONS IN THEIR JURISDICTION OF PURCHASE OR, IF DIFFERENT, IN THEIR JURISDICTION OF RESIDENCE, THE BENEFITS CONFERRED BY THIS WARRANTY ARE IN ADDITION TO ALL RIGHTS AND REMEDIES CONVEYED BY SUCH CONSUMER PROTECTION LAWS AND REGULATIONS.
To the extent permitted by law, this warranty is not transferable and will automatically terminate if the original product purchaser sells or otherwise disposes of the product.
This warranty gives you specific legal rights. Other rights, which vary from jurisdiction to jurisdiction, may exist. In addition some jurisdictions do not allow (i) the exclusion of certain warranties, (ii) limitations on how long an implied warranty lasts and/or (iii) the exclusion or limitation of certain types of costs and/ or damages, so the above limitations may not apply.
3. Specifications
| Model | FOTON 30 Automated Laminator |
| Operating Speed | 3mil (75mic) 29.1"/min (700mm)4mil (100mic) 25.6"/min (670mm)5mil (125mic) 23.6"/min (650mm) |
| Operation Modes | Auto Feed / Auto CutManual Feed / Auto CutManual Feed / Manual Cut |
| Warm-up Time | 3.5 min. 75mic/3mil3.5 min. 100mic/4mil4 min. 125mic/5mil |
| 30 Sheets 75gsm paper | |
| Maximum Film Width | 12.01" (306mm) – Rest of World11.5" (292mm) – North America |
| Maximum Document Thickness | 250gsm Manually Fed |
| Document Lengths Supported | Minimum 6" (152mm)Maximum 17" (432mm) |
| Document Widths Supported | Minimum 5" (127 mm)Maximum 11.69" (297mm) |
| Auto Feeder Media Weight | High Reliability: 64 – 120 gsmVariable Reliability: 121 – 220 gsm |
| Manual Feed Media Weight | 64 – 250 gsm |
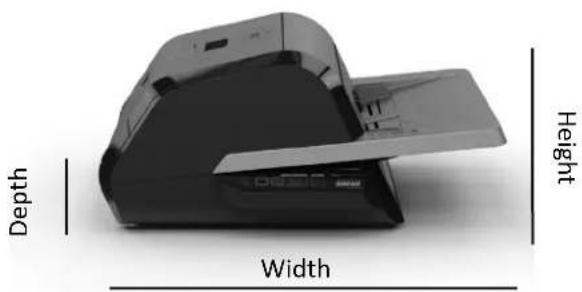
| Dimensions:WidthHeightDepthWeight | Machine: Shipping:22.7" (57.7 cm) 27" (68.6 cm)9.6" (24.5 cm) 15" (38.1 cm)18.8" (47.8 cm) 22.7" (57.8 cm)21lbs (9.5kgs) 32.8lbs (14.9kg) |
| Auto Shut Off | 15 minutes of inactivity |
| Duty Cycle | 80 documents per week |
| Electrical RequirementsVoltageReceptacle | 120V, 60HzNEMA 5–15P |
| Fuse | Yes (internal & non-replaceable) |
| Operating Environment | 41–95 (F) / 5–35 (C)Maximum Altitude of 2,000m |
natural_image
Exterior view of a printer with labeled dimensions: Depth, Width, and Height (no additional text or symbols)Figure 1. Foton 30 Dimensions
FCC Class B Notice
This device complies with Part 15 of the FCC Rules.
Operation is subject to the following two conditions:
• This device may not cause harmful interference.
- This device must accept any interference received, including interference that may cause undesired operation.
NOTE: This equipment has been tested and found to comply with the limits for a Class B digital device, pursuant to Part 15 of the FCC Rules. These limits are designed to provide reasonable protection against harmful interference in a residential installation. This equipment generates, uses, and can radiate radio frequency energy and, if not installed and used in accordance with the instructions, may cause harmful interference to radio communications. However, there is no guarantee that interference will not occur in a particular installation. If this equipment does cause harmful interference to radio or television reception, which can be determined by turning the equipment off and on, the user is encouraged to try to correct the interference by one or more of the following measures:
- Reorient or relocate the receiving antenna.
- Increase the separation between the equipment and receiver.
- Connect the equipment into an outlet on a circuit different from that to which the receiver is connected.
- Consult the dealer or an experienced radio/TV technician for help.
Canada Class B Notice - Avis
Canada, Class B
This Class B digital apparatus complies with Canadian ICES-003.
Modifications
Any modifications made to this device that are not approved by ACCO Brands may void the authority granted to the user by the FCC and/or by Industry Canada to operate this equipment.
4. Installation
Service

WARNING: Do not attempt to service or repair the laminator. Failure to observe this warning could result in severe personal injury or death.
Disconnect the plug from the receptacle and contact Customer Service when one or more of the following has occurred.
- The power supply cord or attachment plug is damaged.
• Liquid has been spilled into the laminator. - The laminator is malfunctioning after being mishandled.
- The laminator does not operate as described in these instructions.
Installation
- Shipping damage should be brought to the immediate attention of the delivering carrier.
- Place the laminator on a stable flat surface capable of supporting 50 lbs.
- The surface should be at least 30" high to assure comfortable positioning during operation. All four rubber feet should be on the supporting surface.
- Connect power cord to an appropriate power source. Avoid connecting other equipment to the same branch circuit to which the laminator is connected as this may cause nuisance tripping of the circuit breaker or blown fuses.
- The laminator should be positioned to allow exiting film to drop freely to a flat surface. Accumulation of laminated documents as they exit the laminator may cause a jam.
- Avoid placing laminator near sources of heat or cold. Avoid locating the laminator in the direct path of forced, heated or cooled air.
Caring for Foton 30
The only maintenance required by the operator is to periodically clean the rollers. Keeping the rollers clean ensures that your finished items will not be damaged by dirt and adhesive buildup.

CAUTION: the following procedure is performed the laminator is hot. Use extreme caution.

WARNING: Do not apply cleaning fluids or ts to the rollers.

WARNING: Do not attempt to laminate ves marked 'Flammable'.

WARNING: Do not expose laminator to liquids.
- Power the machine on, wait for it to completely warm up.
- Open the laminator door using the silver latch.
- Clean the top rollers with a clean, damp lint-free cloth. If there are any adhesive build-ups, you may use isopropyl alcohol instead of water.
- Lift leading film edge up to the handle of the cartridge.
- Clean the bottom rollers with a clean, damp lint-free cloth. If there are any adhesive build-ups, you may use isopropyl alcohol instead of water.
- Place the leading film edge into proper position and close the door.
- Press and hold the RUN/STOP button for 5–7 seconds to manually advance the rollers.
- Open the laminator door using the silver latch.
- Repeat steps 4–6.
Note: Do not use metal scouring pads to clean the heat rollers!

WARNING: Do not laminate glitter and/or
metallic items. Damage to the rollers may result.
The side covers and feed table can be cleaned with a lint-free cloth and a mild detergent.

natural_image
Three-step diagram showing a printer being opened, then closed, and finally assembled into a cylindrical device (no text or symbols present)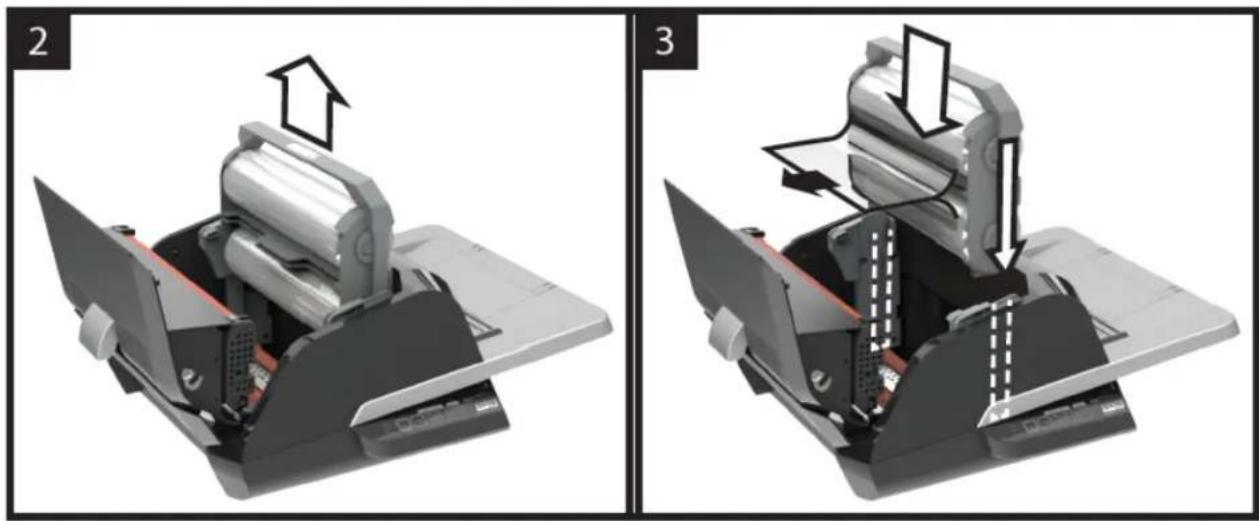
natural_image
Two-panel mechanical assembly diagrams showing internal components and motion, labeled 2 and 3 (no text or symbols on the diagrams themselves)
natural_image
Three-step diagram showing a printer presser's internal mechanism, with no visible text or symbols.
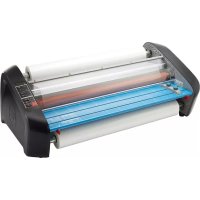
5. Feature Guide
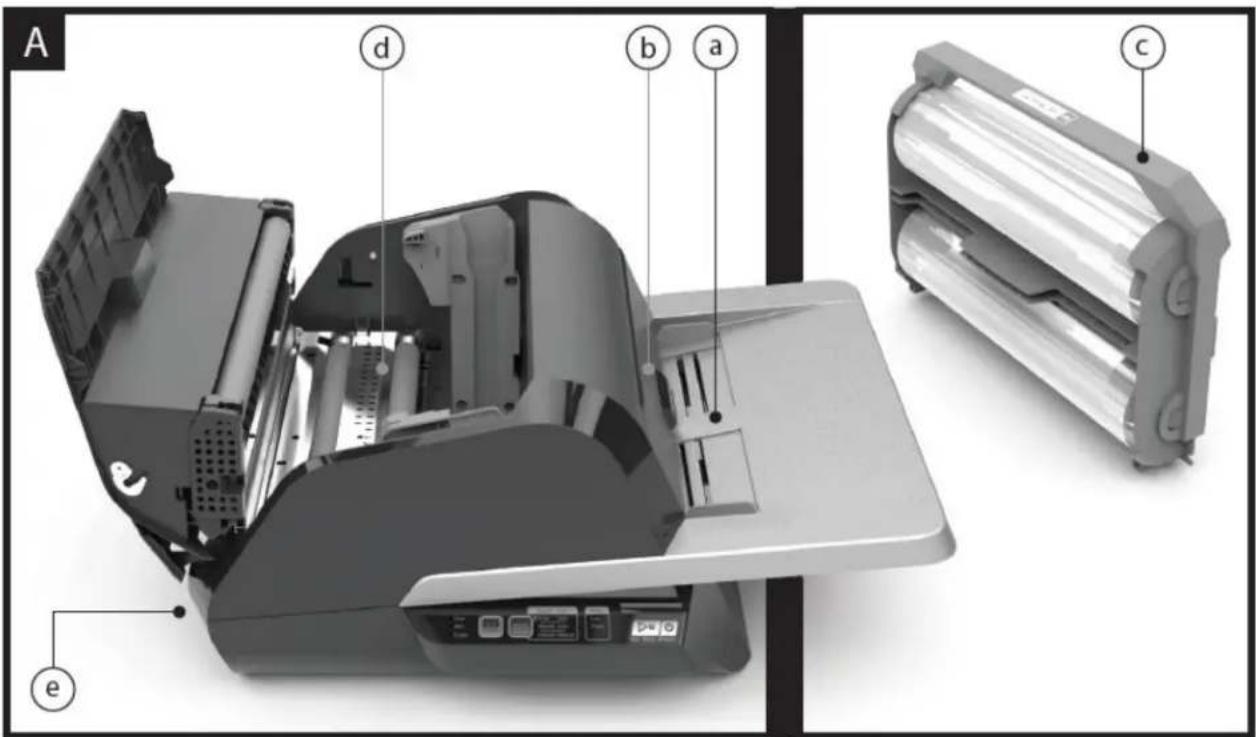
A. GETTING TO KNOW YOUR LAMINATOR:
(Shown in image A above)
a. FEED TRAY & SIDE GUIDES:
i. Place document(s) to be laminated and use the slide guides to minimize skew. Flip out extension for larger documents.
b. FEEDER/FEEDER DOOR:
i. Feeds document into laminator. A red light on the door will indicate that a misfeed has occurred. Open the door to clear any misfeeds.
c. LAMINATOR DOOR:
i. Door that gives access to the inner parts of the laminator: rollers, film cartridge, etc. ii. To Open: pull on the silver latch and lift up. iii. To Close: gently lower using the silver latch, and push latch closed. DO NOT push down on the laminator door to close.
d. FILM CARTRIDGE:
i. Refill the reloadable film cartridge when empty or ii. Replace the cartridge when a different thickness is required. See CARTRIDGE FILM LOADING for details.
e. LAMINATORS ROLLERS:
i. Rollers heat up to activate the adhesive on the film and apply the pressure to ensure the film sticks to the document.
f. AUTO TRIMMER:
i. When in Auto Cut modes, the trimmer finds the leading and trailing edge of the document and cuts the film. In Manual Cut mode, it will cut the film when the CUT button is pressed.
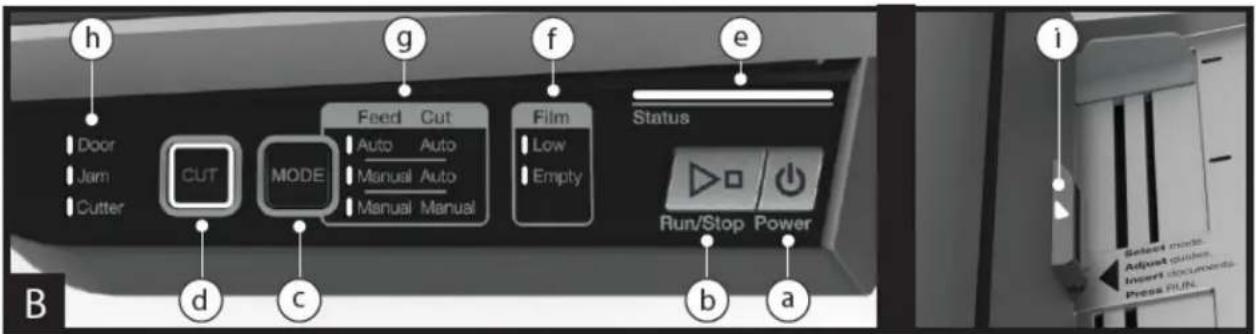
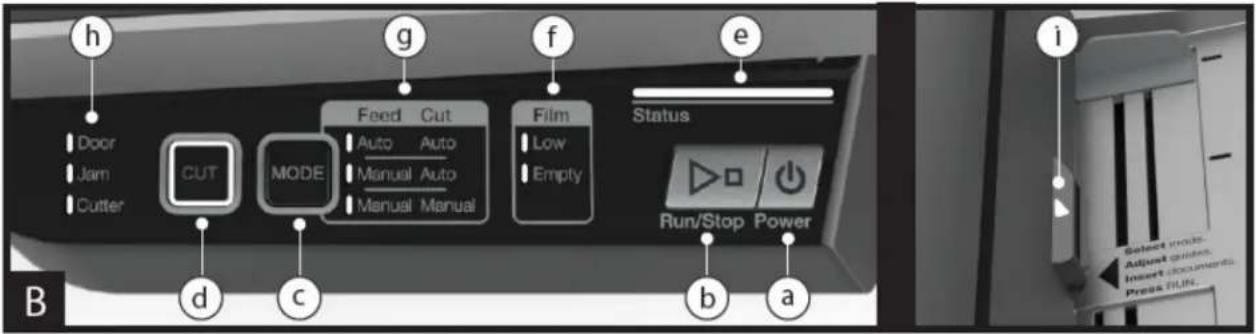
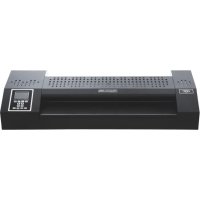
B. CONTROL PANEL: (Shown in image B above)
BUTTONS
a. POWER – turns the machine on/off. After 15 minutes of no use, the machine will automatically turn off.
b. RUN/STOP – used to start and stop the laminator.
i. Dual Function – Manual Advance: Continuously hold the button to manually advance the laminator rollers. This can be used to clear jams and debris for cleaning.
c. MODE – allows users to toggle through three modes of operation.
i. Auto Feed / Auto Cut – best for standard paper sizes printed on 20–32lb bond paper. ii. Manual Feed / Auto Cut – best for standard paper sizes on heavy paper stocks that won't Auto Feed. iii. Manual Feed / Manual Cut – best for odd shaped and non-rectangular documents.
iii. Manual Feed / Manual Cut – best for odd shaped and non-rectangular documents.
d. CUT – pressing this button will cycle the trimmer to cut the film one time. This button is primarily used in Manual Cut mode.
INDICATORS
e. STATUS – communicates the status of the machine:
i. Solid Green = ready to use
ii. Green Blinking Sequence = running
iii. Solid Amber = warming up
iv. Amber Blinking Sequence = warming up and RUN command accepted. Will begin laminating once ready.
v. Solid Red = error status
f. FILM – LED light will indicate when film is low (approx. 30% remaining) or is empty.
i. Low = Amber LED light
ii. Empty = Red LED light
g. MODE – green LED light identifies what mode of operation the machine is in.
h. ERROR MESSAGE – communicates error messages that need to be resolved.
i. DOOR: one or both doors are open
ii. JAM: the machine may encounter two types of jams:
-
Laminator jam: push and hold the RUN button to manually advance the rollers to clear itself.
-
Feeder jam: open the feeder door and remove the paper.
iii. CUTTER: trimmer cannot complete full cut cycle
i. MANUAL FEED INDICATOR – Located on the Feeder Door, Illuminates GREEN when the laminator is ready for a document to be manually fed.
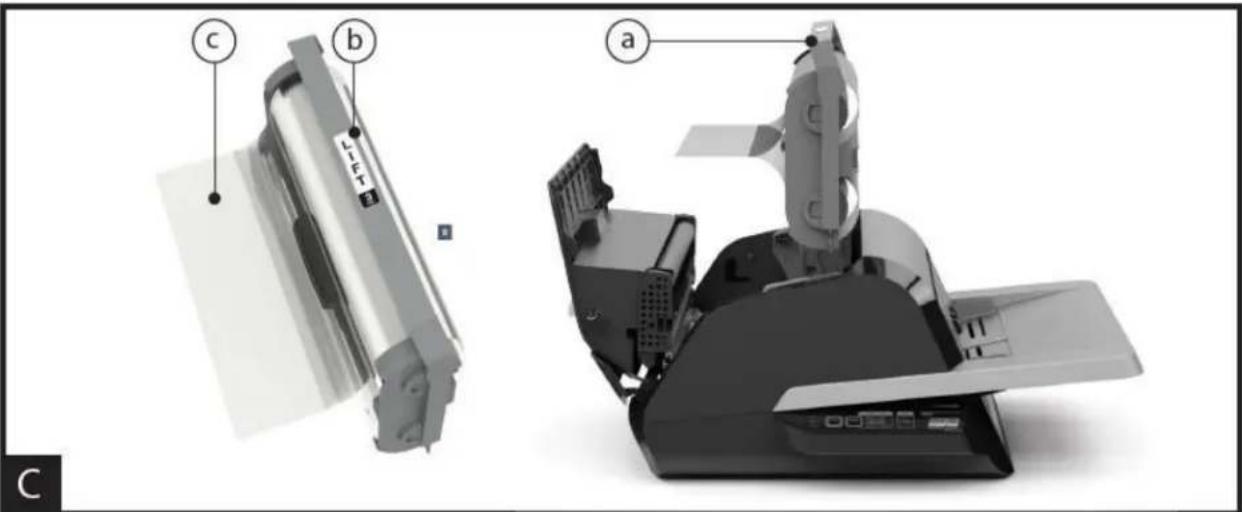
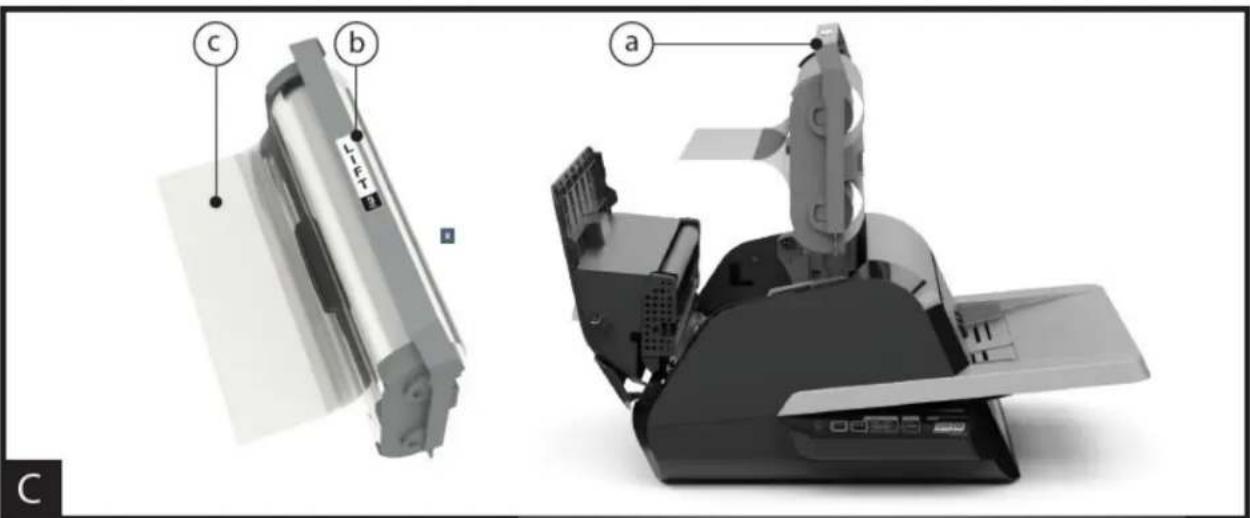
C. FILM CARTRIDGE: (Shown in image C above)
a. RELOADABLE CARTRIDGE – inserts into the laminator.
b. CARTRIDGE REFILL – replaced when film is empty.
c. CARTRIDGE LABEL – indicates film thickness. Located on top of handle.
d. FILM LEADER – the first 3–4" (75–100mm) of sealed laminating film provided on the film cartridge. The film leader must be placed facing the exit of the machine.
6. Operation
OPERATION MODES:
AUTO FEED / AUTO CUT
Note: Best for standard paper sizes printed on 20–32lb bond (75–120 gsm) paper.
- Press the POWER button to turn the machine ON. The machine will automatically start in Auto Feed / Auto Cut mode.
- Place your document(s) in the FEED TRAY.
- Slide the Side Guides to fit your document(s) to minimize skew during lamination.
- Press the RUN button:
Note: If RUN is pressed before the machine has completely warmed up, the status bar will be AMBER blinking in a sequence. The laminator has accepted the command and will start automatically when machine reaches proper temperature.
- Document(s) will be automatically laminated and automatically trimmed as they exit the machine.
Note: If you hit stop while the document is still feeding through the laminator, the machine will finish laminating the document before stopping.
MANUAL FEED / AUTO CUT
Note: Best for standard rectangular paper sizes on heavy paper stocks that won't Auto Feed.
- Press the POWER button to turn the machine ON.
- Select the Manual Feed / Auto Cut mode by pressing the Mode button.
- Wait for the machine to reach proper temperature: solid green STATUS light.
- Place only the first document in the FEED TRAY. The document must be placed in the center of the Feed Tray and far enough into the feeder to grab your document.
- Press the RUN button. The document will begin to feed into the laminator.
- After your first document begins laminating, wait for the MANUAL FEED indicator to illuminate green. Once illuminated, the machine can be manually fed the next document. Repeat this process one sheet at a time until the job is complete.
- Documents will be manually laminated and automatically trimmed as they exit the machine.
- After the final document has been cut and exits the machine will automatically stop.
MANUAL FEED / MANUAL CUT
Note: This mode is best used for odd-shaped or non-rectangular documents that won't Auto Feed.
- Press the POWER button to turn the machine ON.
- Select the Manual Feed / Manual Cut mode by pressing the Mode button.
- Wait for the machine to reach proper temperature: solid green STATUS light.
- Place only the first document in the FEED TRAY. The document must be placed in the center of the Feed Tray and far enough into the feeder to grab your document.
- Press the RUN button. The document will begin to feed into the laminator.
- After your first document begins laminating, wait for the MANUAL FEED indicator to illuminate green. Once illuminated, the machine can be manually fed the next document. Repeat this process one sheet at a time until the job is complete.
- Press the CUT button to cycle the trimmer anytime you want to cut the film.
Note: It is recommended to press the CUT button after you see the entire document exit the machine to avoid cutting the document.
-
After the final document has exited the machine, press the STOP button to stop the lamination process.
-
Once lamination has stopped, press CUT to cut the remaining film that has exited the machine.
CARTRIDGE FILM LOADING
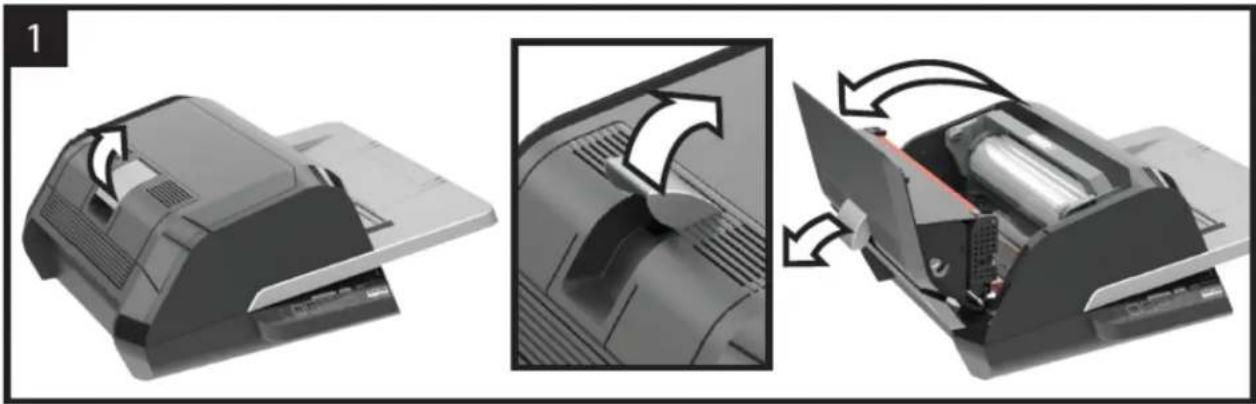
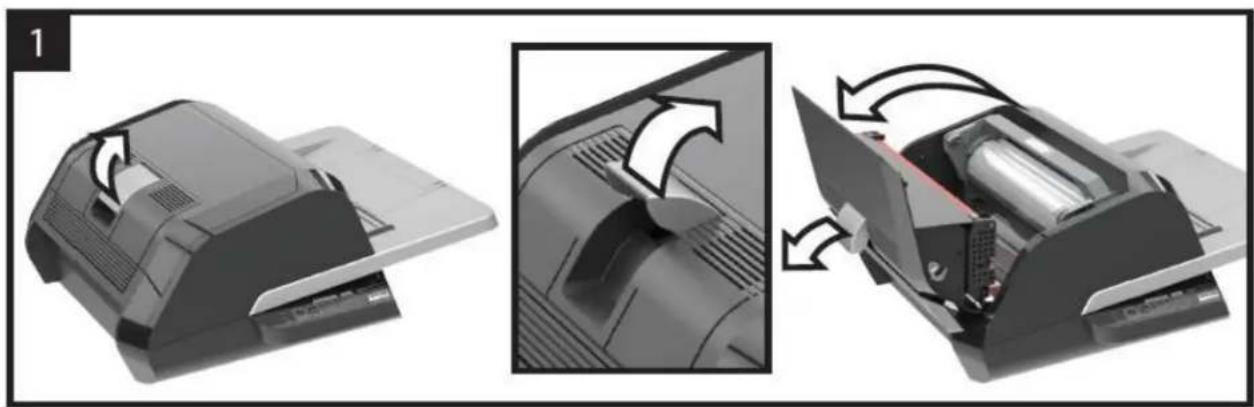
(Reference Images 1–4 to demonstrate process)

CAUTION: the following procedure might be performed while the laminator is hot. Use extreme caution.
Note: The film cartridges have an End of Roll sticker which the laminator will automatically detect. Once detected, the laminator will stop feeding any remaining documents in the feed tray. The sticker may appear on the last document but can be removed from the laminate.
- Open Laminator Door: Open the laminator door by fully raising the silver latch on the top of the machine and pull up until door fully opens.
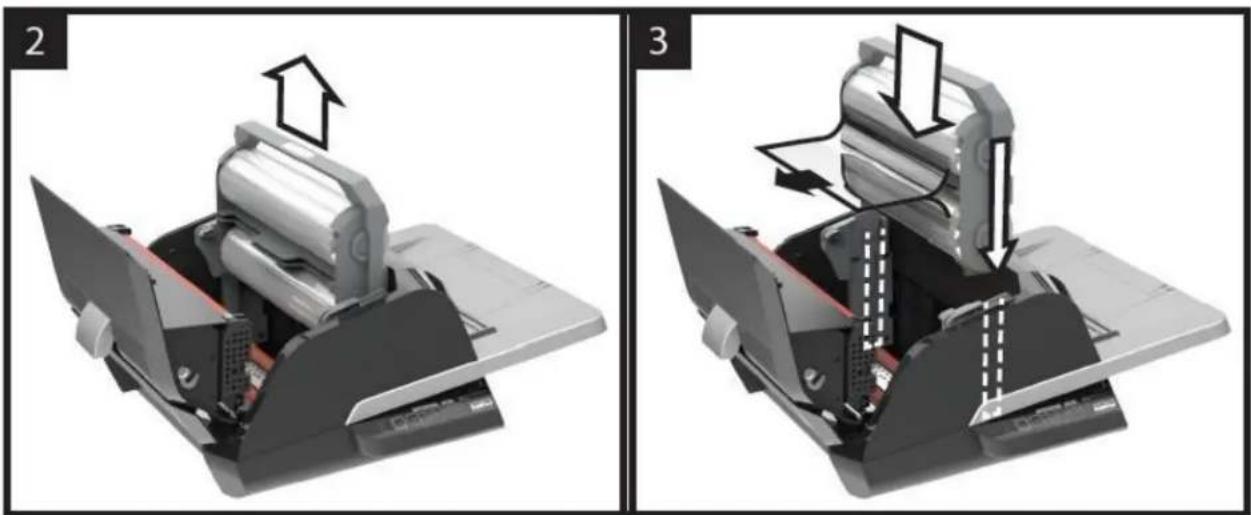
- Remove Cartridge: Lift upward on the cartridge handle to remove the installed cartridge.
CAUTION: Full cartridges tend to be heavy.
- Remove Empty Refill: Open the left and right latching arms by pressing down on the white tab and pivoting the arms 180 degrees.
- Insert New Refill: Insert a Refill pack into the cartridge, close the latching arms and press until they lock.
CAUTION: Only install a Refill into a cartridge with similar color latching arms.
- Insert Cartridge: Insert the replacement cartridge by aligning the edges of the cartridge over the grey channel guide in laminator and lowering.
Note: Film leader should be inserted away from the feeder, facing towards the exit of the machine.
- Close Laminator Door: Close the laminator door by gently lowering the door and fully close the silver hatch on top. DO NOT push down on the laminator door to close; use the latch.
- Ensure Cartridge is Fully Inserted: Film Empty indicator will be illuminated when no cartridge is installed or if the cartridge is not fully seated on the bottom.
- Automatically Thread: When the laminator reaches proper temperature, the machine will finish threading film and feed approximately 9" (22.9 cm) of film to eliminate potential wrinkles in the film.
| TROUBLESHOOTING | ||
| SYMPTOM | POSSIBLE CAUSE | CORRECTIVE ACTION |
| Pressing the Power button does not turn machine ON | The power cord may not be inserted all the way into outlet | Fully insert plug into outletMake sure the outlet has power |
| Status Indicator Red: | Door Error Indicator Red:Paper Jam Error Indicator Red:Film Empty Indicator Red:Cutter Error Indicator Red | Remove any paper from the feeder tray. Open and Close both the laminator door and the feeder door. Ensure they are fully closed.Open the feeder door and remove any paper from the feeder tray. Close the feeder door.If the above does not clear the error, press and hold the RUN button for 10 seconds to manually feed film. Film should begin to exit the machine and Jam should clear.If Jam error remains, open laminator door and look to see if film leader is caught on an obstacle or the rollers. DO NOT CUT the film. Lift-up the film leader and replace it in proper position. Shut Laminator door and hold the run button for 10 Seconds.Cartridge End of Roll label has been detected. Replace the film cartridge with new cartridge and shut the laminator door.The cutter could not initiate a cut or did not finish a cut.Press the manual cut button one time to try and activate the cutter. Not resolved, try the following:Observe the film at the exit of the laminator to see if the film is not cut or partially cut.Film isnotcut:Press and hold the RUN button for about 10–20 seconds to manually advance the film. If there is laminated media in the exit of the laminator, hold the RUN button until the media has fully exited the laminator. Now press the manual cut button to see if the cutter is activated.Film isPartiallyCut:Open the laminator door and look to see if you can see the trimmer blade. It will be near the back of the laminator partway through the film. Using scissors cut the film hanging out the exit of the laminator. Then using caution not to put your fingers near the trimmer knife, carefully remove the cartridge. Close the laminator door and try to manually cycle the cutter. If the cutter works Re-insert your cartridge. Might need to trim off the leading edge of film where the cutter jammed. If you need to trim the film leave 4 inches (100mm) of sealed film as the cartridge leader. Reinsert the cartridge. The machine once warmed-up will automatically thread the film and activate the trimmer.If the cutter does not work after the above steps contact your service provider. |
| Film wrinkles on output | Film is misaligned | Press and hold the RUN button to manually advance the film. After 5–20 inches (125–500mm) of film has been advanced the wrinkle should work themselves out. If wrinkle clear press the manual cut button and you are ready to begin.If wrinkles still present, open the laminator door. Grasp the film exiting the laminator and hold it taut while closing the laminator door. Repeat above step and wrinkles should disappear. |
| Film edges are not evenly aligned | Top and bottom rolls of film are not matched properly. | Press and hold the RUN button to manually advance the film. After 5 inches (125 mm). Grasp the film exiting the laminator and hold it taut while closing the laminator door. |
| Documents are skewed in the film when exiting | Documents fed in skewed | Before loading paper, try tapping the leading edge of the paper on a flat surface and then repeat with the bottom or top edge to get your paper properly squared.Insert your media in the auto feeder and slide the edge guide up to edge of your media. |
| Experiencing frequent double feeds | Paper has heavy static | Try fanning the media or placing in a paper jogger prior to feeding it. If issues persist use the Manual Feed / Auto Cut mode. |
| Experiencing frequent misfeeds | Rollers are slipping on media and do not feed sheets | Try fanning the media or placing in a paper jogger prior to feeding it. If issues persist use the Manual Feed / Auto Cut mode.If misfeeds continue use the Manual Feed / Auto Cut operation mode and manual feed the media one sheet at a time. |
GBC® FOTON® 30
natural_image
Exterior view of a black printer with open lid and internal compartments (no visible text or symbols)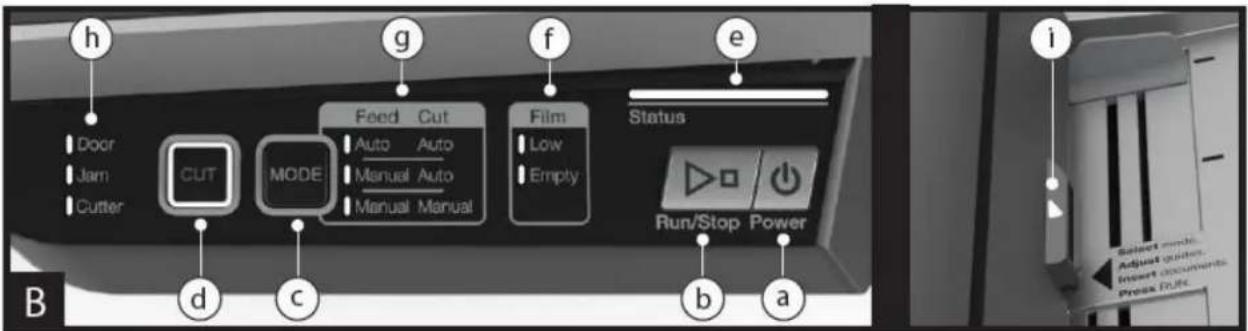
natural_image
Two-panel diagram showing a mechanical device with internal components and directional arrows, no text or symbols present.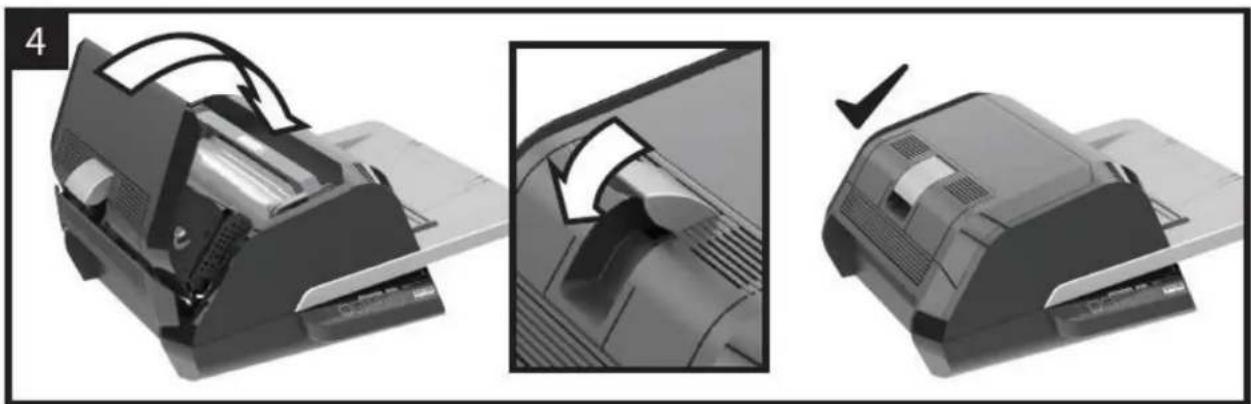
natural_image
Three-step diagram showing a printer presser's internal mechanism, with no visible text or symbols.
MANUAL FEED/MANUAL CUT
natural_image
Black printer with open lid and paper tray, no visible text or symbols
Service technique de GBC
ACCO Brands GBC Technical Service and Support
4 Corporate Drive Lake Zurich, IL 60047-8997
www.gbc.com
1-800-723-4000
Canada

natural_image
Three-step diagram showing a printer being opened, then closed, and finally assembled into a cylindrical device (no text or symbols present)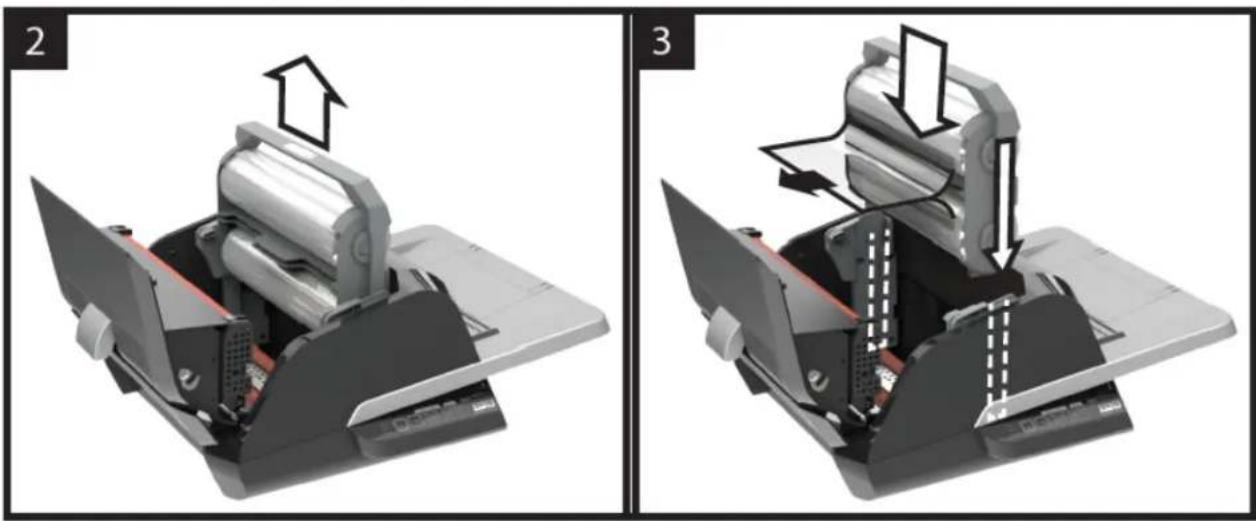
natural_image
Two-panel mechanical assembly diagram showing internal components and motion directions (no text or symbols)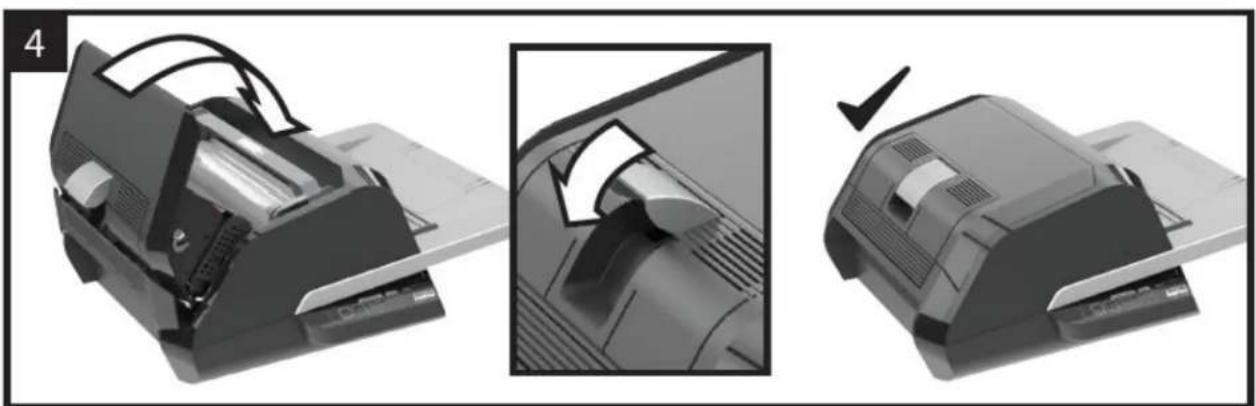
natural_image
Three-step illustration of a printer presser's internal mechanism, showing blade deformation and press application (no text or symbols)

- Safety
- General safeguards
- Electrical Safeguards
- GBC Technical Service
- United States
- Canada
- Mexico
- Specifications
- FCC Class B Notice
- Canada Class B Notice - Avis
- Canada, Class B
- Modifications
- Installation
- Service
- Installation
- Caring for Foton 30
- Feature Guide
- GETTING TO KNOW YOUR LAMINATOR:
- CONTROL PANEL: (Shown in image B above)
- BUTTONS
- INDICATORS
- Operation
- OPERATION MODES:
- AUTO FEED / AUTO CUT
- MANUAL FEED / AUTO CUT
- MANUAL FEED / MANUAL CUT
- CARTRIDGE FILM LOADING
- GBC® FOTON® 30
- MANUAL FEED/MANUAL CUT
- Service technique de GBC
Brand : GBC
Model : Foton 30
Category : Laminating machine