
DigexX940S - Riflescope PULSAR - Free user manual and instructions
Find the device manual for free DigexX940S PULSAR in PDF.
| Product type | Infrared (IR) illuminator for digital night vision scope |
| Brand | Pulsar |
| Model | Digex X940S |
| Radiation wavelength | 940 nm (invisible) |
| Lens diameter | 28 mm |
| Optical power of the IR illuminator | Up to 700 mW |
| Power supply | 3 - 4.2 V (APS2 or APS3 battery) |
| Average operating time | 3 h (APS2) or 4.5 h (APS3) |
| Operating temperature range | -25 °C to +50 °C |
| Compatibility | Digex N450/N455/C50 scopes |
| Dimensions (L/H/W) | 129 / 84 / 75 mm |
| Weight (with battery) | 195 g |
| Package contents | IR illuminator, rechargeable APS2 battery, user manual, hex key, APS3 battery cap, cloth, case |
| Installation | Mounting via ring clamp with eccentric lever |
| Power adjustment | Rotary knob (8) to adjust intensity |
| Spot position adjustment | Unlock ring (9), then orient the lens |
| Battery indicator | LED (3): green (3.2-4.2 V), orange (<3.2 V), red (disconnected) |
| Maintenance | Clean with a soft cloth dampened with synthetic detergent; lenses with a soft brush or ethyl alcohol |
| Precautions | Do not immerse in water, do not disassemble, use the supplied charger, wait 30-40 min after moving from cold to warm |
Frequently Asked Questions - DigexX940S PULSAR
User questions about DigexX940S PULSAR
0 question about this device. Answer the ones you know or ask your own.
Ask a new question about this device
Download the instructions for your Riflescope in PDF format for free! Find your manual DigexX940S - PULSAR and take your electronic device back in hand. On this page are published all the documents necessary for the use of your device. DigexX940S by PULSAR.
USER MANUAL DigexX940S PULSAR
natural_image
Black optical binocular device with lens and grip (no text or symbols visible)User Manual
PULSAR DIGEX X850S / X940S
IR Illuminator
English | Français | Deutsch | Español | Italiano | Русский
EN Improvements may be made to the design of this product to enhance its user features. The term of a possible repair of the product is 5 years.
FR La configuration peut être modifiée afin d'améliorer l'utilisation d'un appareil. Le délai de réparation possible du produit est de 5 ans.
DE Änderungen im Design zwecks höherer Gebrauchseigenschaften des Produkts vorbehalten.
Die Reparatur des Produkts ist innerhalb von 5 Jahren möglich.
ES El diseño de este producto está sujeto a modificaciones con fines de mejorar sus propiedades del consumo.
El plazo para una posible reparación del producto es de 5 años.
IT Per migliorare le proprietà del prodotto nella sua costruzione possono essere apportate delle modifiche.
Il termine per una possibile riparazione del prodotto è di 5 anni.
RU Для улучшения потребительских свойств изделия в его конструкцию могут вноситься усовершенствования.
Срок возможного ремонта изделия составляет 5 лет.

PULSAR DIGEX IR ILLUMINATOR
User Manual
PULSAR DIGEX IR ILLUMINATOR - X850S / X940S
L'ILLUMINATEUR IR PULSAR DIGEX - X850S / X940S
IR-STRAHLER PULSAR DIGEX - X850S / X940S
ILUMINADOR IR PULSAR DIGEX - X850S / X940S
ILLUMINATORE IR PULSAR DIGEX - X850S / X940S
ИК-ОСВЕТИТЕЛЬ PULSAR DIGEX - X850S / X94S
1-4
5-8
9-12
13-16
17-20
21-24
ENGLISH
FRANÇAIS
DEUTSCH
ESPAÑOL
ITALIANO
РУССКИЙ
Specifications
Model Digex - X850S Digex - X940S
| SKU 79197 79198 | |
| Type LED LED | |
| Wavelength, nm 850 940 | |
| Lens diameter, mm 28 | |
| Optical power of IR illuminator, mW Up to 800 Up to 700 | |
| Power supply, V 3 - 4.2 | |
| Average operating time, h | 3 (APS2 Battery Pack) or 4.5 (APS3* Battery Pack) |
| Operating temperature range, °C (°F) -25...+50 (-13...+122) | |
| Riflescope compatibility Digex N450/N455/C50 | |
| Dimensions (L/H/W), mm (inch) | 129/84/75 (5.08x3.31x2.95) |
| Weight (with battery), g (oz) | 195 (6.88) |
* Sold separately
Package Contents
- Digex S IR illuminator
- APS2 battery pack
- User Manual
-
Allen wrench
-
APS3 battery cover
- Cloth
- Carrying case
Description
Pulsar Digex S attachable infrared Illuminators are designed for use with Digex digital riflescopes. Infrared illuminators provide additional illumination of observed objects when using digital night vision devices in low light conditions (no moon, heavy cloud cover, etc.) or in complete darkness. The special design of the illuminator guarantees a clear and clean image across the entire field of view. The Digex - X940S IR illuminator operates in an invisible range providing covert observation. Using Pulsar Digex S IR illuminators you can:
- identify the observed object more accurately;
• see the selected object in detail; - increase the observation range;
- adjust the spot position within the riflescope field of view.
Pulsar Digex S illuminators have a high-power IR diode providing a greater viewing range.
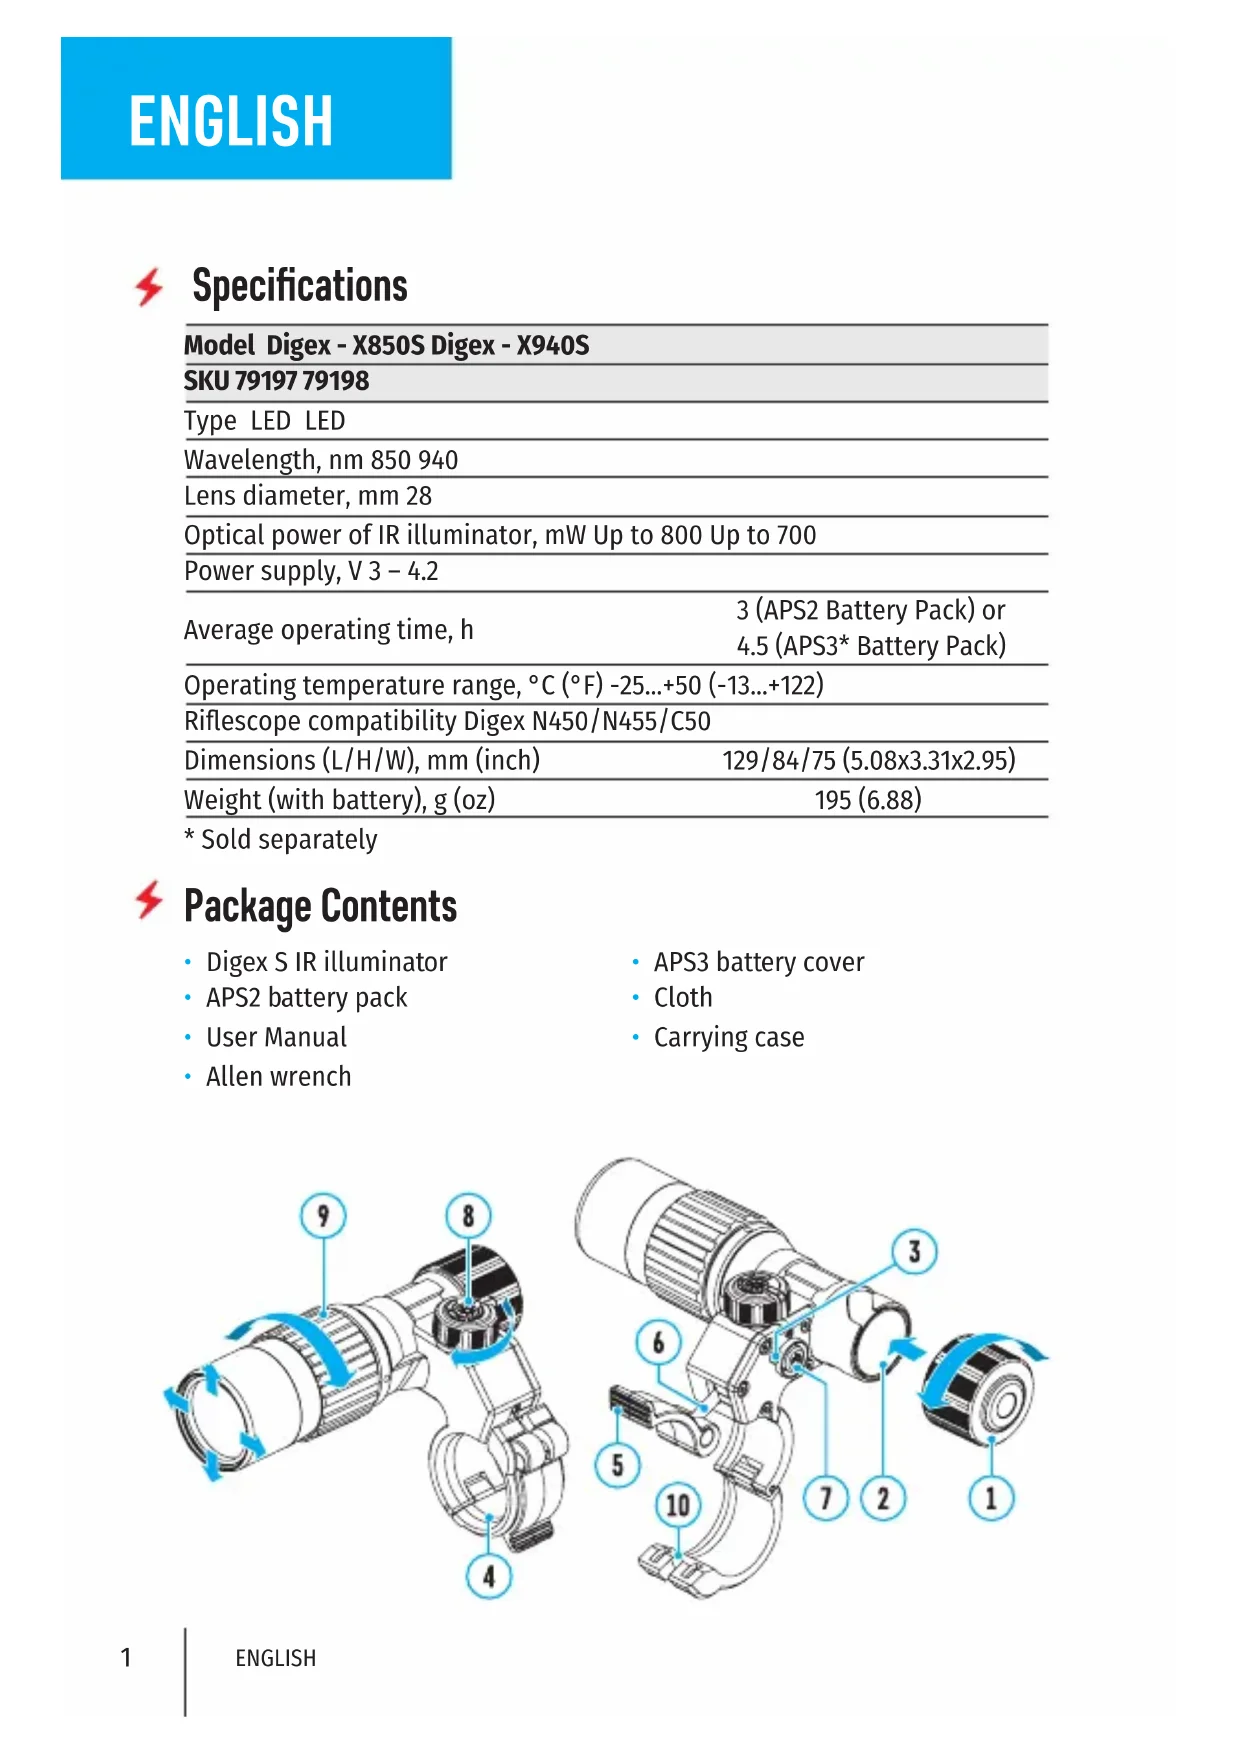
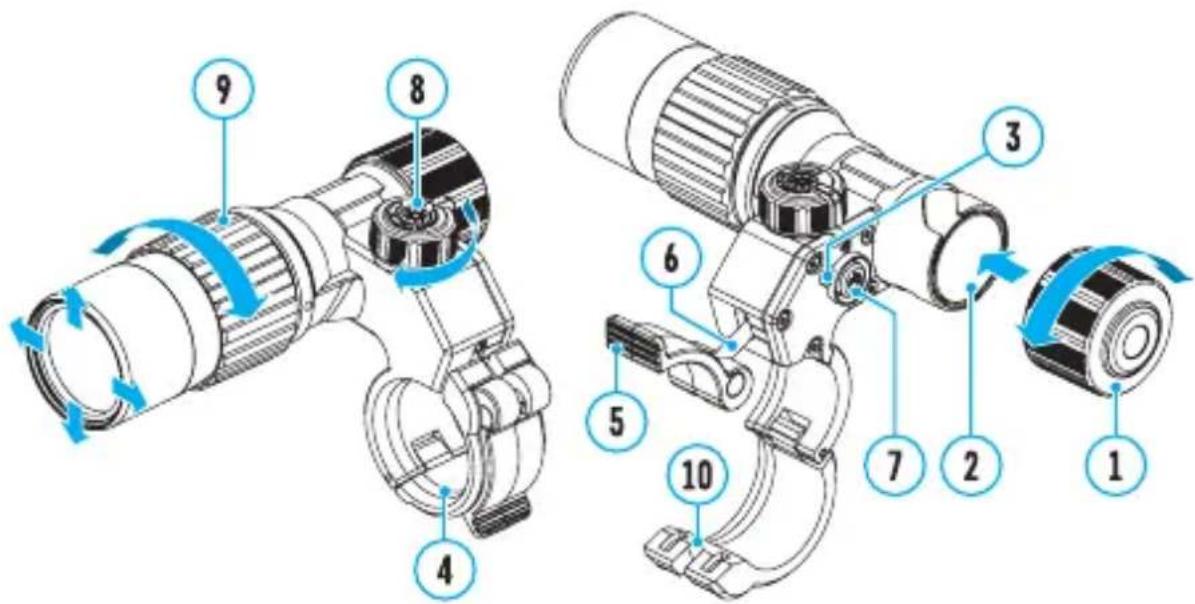
Installing the Battery Pack in the IR Illuminator
The IR illuminator Pulsar Digex S is powered by APS2 (or APS3*) battery pack.
- To install the battery in the IR illuminator, turn the battery cover (1) counterclockwise and remove it.
• Install the battery into the battery compartment (2) along the special guides in the IR illuminator body designed for it. - When properly installed, the battery is fixed in the battery compartment (2).
- Close the battery compartment cover, turning it clockwise.
The illuminator is equipped with LED indicator (3) making possible the current battery level monitoring. Indication modes are in the table below:
IR Operating Mode
The illuminator is on, power supply 3.2 - 4.2 V
The illuminator is on, power supply <3.2 V, an approximate operating time before the IR illuminator turns off is 30 minutes
The illuminator is off
*Sold separately
Installing the IR Illuminator on the Riflescope
- Open the mount ring (4) of the IR illuminator.
- Raise the eccentric lever (5) and put the mount on the riflescope body so that the mount half rings encircle the riflescope body.
- Align the eccentric axis (6) with the groove (10) of the moving half ring.
- Lock the eccentric lever (5) position by lowering it down.
- The mount with the IR illuminator should be located as close as possible
to the body of the riflescope lens.
- In case of loosening or insufficient fixing of the IR-illuminator on the riflescope, raise the eccentric lever (5). Tighten the eccentric axis (6) 1-2 turns using the supplied Allen key. Then lower the lever and check the fixation of the IR-illuminator on the riflescope. If necessary, repeat the above steps until the required degree of fixation of the IR-illuminator is achieved.
Switching on and Adjusting
- Turn on the IR illuminator by pressing the button (7) on the side of the illuminator housing.
- Turn the knob (8) of the IR illuminator to adjust the lighting power.
- To adjust the light spot position in the riflescope field of view, loosen the ring (9) of the IR illuminator by turning it in the direction of the arrow in the figure.
- Turn on the riflescope to control the position of the light spot on the display. Use the hinge system of the IR illuminator lens, to achieve the required position of the light spot in the riflescope field of view. Once well adjusted, fix the IR illuminator ring (9).
- Turn off the IR illuminator by pressing the IR button.
Maintenance
- Clean the outer surface with a cloth slightly soaked in synthetic detergent.
- Flick the dust off the lenses with a soft brush.
- If necessary, clean the lens with a soft cotton cloth moistened with ethyl alcohol or special multi-layer lens liquid.
- Condensation may form on optical surfaces when moving the illuminator from cold to warm. It is a common occurrence and the condensate should disappear within an hour.
Precautions
- Do not allow water to enter the illuminator body. This can disable it.
- Independent alterations or repairs of the illuminator are prohibited. Contact the manufacturer for qualified support if any issues arise.
- When using the battery at sub-zero temperature, the battery capacity decreases, this is normal and not a defect.
- Do not charge the battery immediately after bringing it from cold to warm place. Wait for 30-40 minutes so that the battery may warm up.
-
To charge the battery, always use the unit supplied with your device (may not be included in the package contents). The use of any other charger may irreparably damage the battery pack or the charger and may cause fire.
-
Do not leave the battery unattended while it is being charged.
- After being stored for a long time, the battery should be partially charged: it should not be completely charged or completely discharged.
- Do not submerge the battery.
- Do not dismantle or deform the battery. Do not drop or strike the battery.

Troubleshooting
| Malfunction Possible cause Solution | ||
| Uneven light emission of IR spot. | Dirty lens. Clean the lens as described in the Maintenance section. | |
| Illuminator does not turn on by pressing the power button. | Discharged battery. Insert a charged battery. | |
| Dirty contacts. Check for debris and dirt on the terminals in the battery compartment. | ||
| Low light emission of IR spot. | Dirty lens. Clean the lens as described in the Maintenance section. | |
| The IR illuminator knob (8) is in the position of a minimum transmission power. | Set the optimum power by turning the IR illuminator knob (8). | |

Specification
Description
Beschreibung
Descripción
Descrizione
Описание
- PULSAR DIGEX X850S / X940S
- IR Illuminator
- PULSAR DIGEX IR ILLUMINATOR
- User Manual
- Specifications
- Package Contents
- Description
- Installing the Battery Pack in the IR Illuminator
- IR Operating Mode
- Installing the IR Illuminator on the Riflescope
- Switching on and Adjusting
- Maintenance
- Precautions
- Beschreibung
- Descripción
- Descrizione
- Описание
Brand : PULSAR
Model : DigexX940S
Category : Riflescope