PowerLine XL - Indoor filter EHEIM - Free user manual and instructions
Find the device manual for free PowerLine XL EHEIM in PDF.
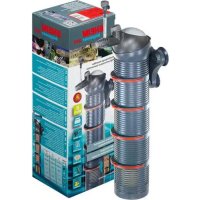
| Product Type | Internal aquarium filter |
| Brand | EHEIM |
| Model | PowerLine XL |
| Dimensions (L x W x H) | Approx. 28 x 12 x 10 cm |
| Weight | Approx. 1.5 kg |
| Power Supply | 230 V / 50 Hz |
| Power Consumption | 11 W |
| Max Flow Rate | 1000 L/h |
| Filtration | Mechanical and biological (filter cartridges) |
| Additional Functions | Air diffuser with regulation, outflow tubing for surface movement |
| Mounting | Suction cups, adjustable orientation |
| Minimum Immersion | See figure in the instruction manual |
| Routine Maintenance | Cleaning the pump with the EHEIM brush set (ref. 4009560), washing or alternating replacement of cartridges |
| Spare Parts Available | Filter cartridges (ref. 2615480), tray with cartridge (ref. 7478860) |
| Repairability | Disassemblable pump, spare parts available via EHEIM customer service |
| Safety | Unplug before maintenance, form a drip loop on the cable, do not clean in dishwasher, magnetic fields (precautions for pacemakers) |
| Usage | Indoor, freshwater or saltwater aquarium |
| Warranty | 2 years (according to EHEIM conditions) |
| Country of Origin | Germany |
Frequently Asked Questions - PowerLine XL EHEIM
User questions about PowerLine XL EHEIM
0 question about this device. Answer the ones you know or ask your own.
Ask a new question about this device
Download the instructions for your Indoor filter in PDF format for free! Find your manual PowerLine XL - EHEIM and take your electronic device back in hand. On this page are published all the documents necessary for the use of your device. PowerLine XL by EHEIM.
USER MANUAL PowerLine XL EHEIM
natural_image
Green and black industrial equipment with ventilation grilles (no visible text or symbols)2048


de Innenfilter
en Internal filter
fr Filtre intérieur
nl Binnenfilter
sv Innerfilter
no Innvendig filter
fi Sisäsuodatin
da Indvendig filter
it Filtro interno
es Filtro interior

text_image
1048 7440148 4002960 7478900 7440300 7478860 7289750 2615480 7478860 7271100 7478250 7264509 7289800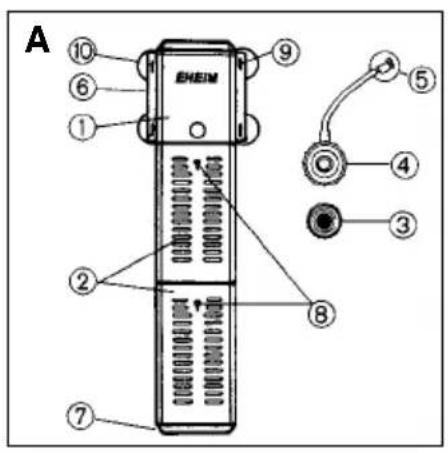
natural_image
Mechanical assembly diagram showing a motor with rotating shaft and housing, no text or symbols present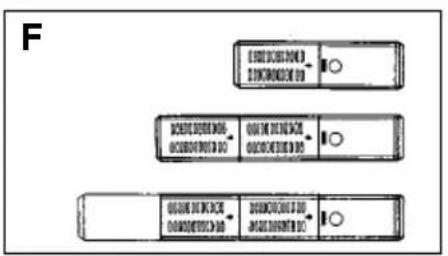
flowchart
graph TD
    A["Start"] --> B{Condition: 1.0?}
    B -->|Yes| C["Process Step 1"]
    B -->|No| D["Process Step 2"]
    C --> E["End"]
    D --> F["End"]

text_image
A 7440359 7264400 7645990 (50 Hz) 7645980 (60 Hz) 7440300 7433720 (2048/2448) 7264509
natural_image
Technical line drawing of an electric motor and its internal gear assembly (no text or symbols)
natural_image
Technical line drawing of a mechanical assembly with a central gear and housing (no text or symbols)Sicherheitshinweise

IMPORTANT SAFETY INSTRUCTIONS
WARNING — To guard against injury, basic safety precautions should be observed, including the following.
a)
READ AND FOLLOW ALL SAFETY INSTRUCTIONS.
b) DANGER — To avoid possible electric shock, special care should be taken since water is employed in the use of aquarium equipment. For each of the following situations, do not attempt repairs by yourself; return the appliance to an authorized service facility for service or discard the appliance.
1) If the appliance falls into the water, DON'T reach for it! First unplug it and then retrieve it. If electrical components of the appliance get wet, unplug the appliance immediately. (Non-immersible equipment only)
2) If the appliance shows any sign of abnormal water leakage, immedi-
ately unplug it from the power source. (Immersible equipment only).
3) Carefully examine the appliance after installation. It should not be plugged in if there is water on parts not intended to be wet.
4) Do not operate any appliance if it has a damaged cord or plug, or if it is malfunctioning or has been dropped or damaged in any manner.
5) To avoid the possibility of the appliance plug or receptacle getting wet, position aquarium stand and tank to one side of a wall-mounted receptacle to prevent water from dripping onto the receptacle or plug.
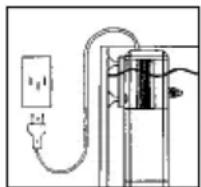
A "drip-loop", shown in the figure below, should be arranged by the user for each cord connecting an aquarium appliance to a receptacle. The "drip-loop" is that part of the cord below the level of the receptacle, or the connector if an extension cord is used, to prevent water traveling along the cord and coming in contact with the receptacle.
text_image
POWER SUPPLY CORD DRIP LOOPIf the plug or socket does get wet, DON'T unplug the cord. Disconnect the fuse or circuit breaker that supplies power to the appliance. Then unplug and examine for presence of water in the receptacle.
c) Close supervision is necessary when any appliance is used by or near children.
d) To avoid injury, do not contact moving parts or hot parts such as heaters, reflectors, lamp bulbs, and the like.
e) Always unplug an appliance from an outlet when not in use, before putting on or taking off parts, and before cleaning. Never yank cord to pull plug from outlet. Grasp the plug and pull to disconnect.
f) Do not use an appliance for other than intended use. The use of attachments not recommended or sold by the appliance manufacturer may cause an unsafe condition.
g) Do not install or store the appliances where it will be exposed to the weather or to temperatures below freezing.
h) Make sure an appliance mounted on a tank is securely installed before operating it.
i) Read and observe all the important notices on the appliance.
j) If an extension cord is necessary, a cord with a proper rating should be used. A cord rated for less amperes or watts than the appliance rating may overheat. Care should be taken to arrange the cord so that it will not be tripped over or pulled.
k) This appliance has a polarized plug (one blade is wider than the other). As a safety feature, this plug will fit in a polarized outlet only one way. If the plug does not fit fully in the outlet, reverse the plug. If it still does not fit, contact a qualified electrician. Never use with an extension cord unless plug can be fully inserted. Do not attempt to defeat this safety feature.
Exception: This instruction may be omitted for an appliance that is not provided with a polarized attachment plug.
1) "SAVE THESE INSTRUCTIONS".
GROUNDING INSTRUCTIONS
This appliance should be grounded to minimize the possibility of electric shock. This appliance is equipped with an electric cord having an equipment grounding conductor and a grounding-type plug. The plug must be plugged into an outlet that is properly installed and grounded in accordance with all appropriate codes and ordinances.
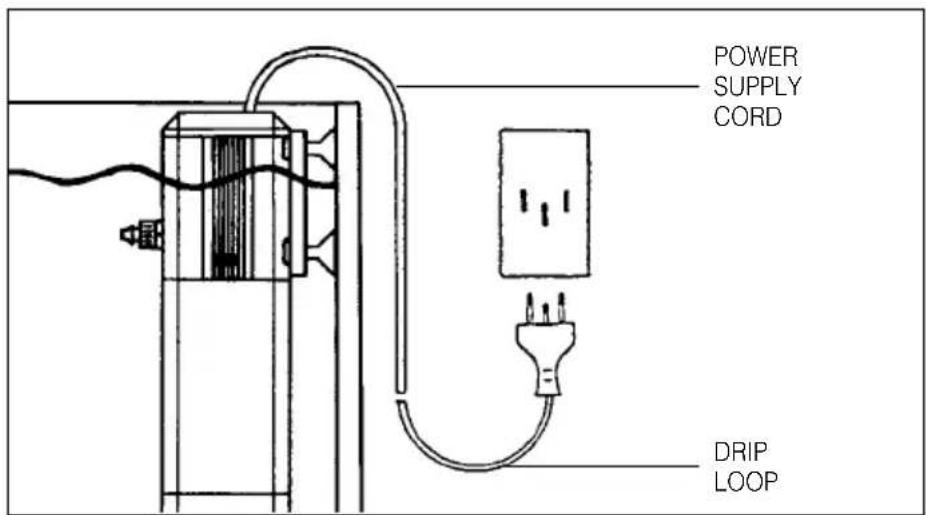
This appliance is for use on a nominal 120 V circuit, and has a grounding plug that looks like the plug illustrated in Sketch A. A temporary adapter which looks like the adapter illustrated in Sketches B and C, may be used to connect this plug to a two pole receptacle as shown in Sketch B if a properly grounded outlet is not available. The temporary adapter should be used only until a properly grounded outlet can be installed by a qualified electrician. The green colored rigid ear (lug, etc.) extending from the adapter must be fastened to a permanent ground such as a properly grounded outlet box.

text_image
GROUNDING PIN (A) (B) COVER OF GROUNDED OUTLET BOX ADAPTER (C) GROUNDING MEANS GROUNDING PIN (D)English
EHEIM
Safety instructions

For indoor use only. For use with aquariums.

All electrical equipment in the water must be disconnected from the mains during care and maintenance work.
It is imperative to disconnect the filter from the mains prior to opening it.

The connecting line of this device can not be replaced. When the line is damaged, the device must no longer be used. Contact your specialised dealer or your EHEIM Service Centre.

This equipment is not intended for use by persons (including children) with limited physical, sensory or mental abilities or for persons with no experience or knowledge unless they are supervised by a person responsible for safety or unless they have received from such a person instructions on how to use the equipment. Children should be supervised to ensure that they do not play with the equipment.

20 cm

Notice: These devices produce magnetic fields which might cause electronic and mechanical disturbances or damages. This is to pacemakers. Please consult the manuals of medical equip-he required safety margins.

Attention: Maintenance work presents the risk of crushing the fingers due to high magnetic forces.

For your own safety, we recommend to form a drip loop with the connection cable to prevent any water running along the cable from intruding into the socket. When using a multiple socket or an external power supply unit, position them atop the filter's power connection.

Take the necessary precautions when handling components that can discharge static electricity.

Do not clean the unit – or parts of it – in the dishwater. Not dishwater resistant!

Do not dispose of this product as normal household waste. Take it to your local refuse collection side.

The product is qualified in accordance with the respective national regulations and guidelines and meets EC standards.
Internal filter 2048
Model: see type plate on pump housing
Function
A
① Pump ② Filter module with cartridge ③ Discharge connection
④ Diffusor ⑤ Air regulating valve ⑥ Retaining plate ⑦ Filter bot-
tom ⑧ Closing slide ⑨ Clamping plug ⑩ Suction cup.
Installation
B
Clip clamping plug into apertures in retaining plate. Install suction pads. If preferred, the retaining plate can be attached to one side of the pump, permitting the filter to be installed facing in any direction.
C/D
Screw in either discharge connection (C) or diffusor (D) as required.
Discharge connection: used fo good water surface movement. Height of filter is regulated by means of perforated locking device on mounting support. Diffusor: This is preferable for aquariums without plants. The oxygen supply can be regulated by the air regulating valve.
Open filter shutter and secure filter in aquarium (for minimum immersion depth, see diagram C). Connect electrical plug to initiate filter operation.
Putting into operation
E Modules can be easily separated by the application of light pressure on the locking points at the sides.
The cartridges (order no. 2615480) should be washed out and replaced alternately to prevent the biological filtering process from being interrupted. This is necessary when the pump performance becomes noticeably reduced. CAUTION: Make sure you close the filter shutter before removing the filter.
F The filtering area can be changed individually by reducing or extending the modules. (Accessory item – order no. 7478860, filter module with filter cartridge.)
Universal centrifugal pump 1048
A ① Motor ② Threaded adaptor ③ Clamping ring ④ Pump parts
Servicing and maintenance
B/C Remove power supply plug. Release clamping ring (B) and remove pump parts as per drawing (A). Clean pump thoroughly with EHEIM brush set (order no. 4009560) (C). Clean pump under running water, then reassemble in correct sequence.
CAUTION: The pump has not to run dry.
Français
EHEIM
Reproduction or copying – even parts thereof – only with the express permission of the producer.