USER MANUAL Professionel 4+ 250 EHEIM
natural_image
Four identical black battery units with red buttons, arranged in a row (no visible text or symbols)
natural_image
Exterior view of a modern industrial device with wireless signal icon (no text or symbols)
250 T
(Typ 2371)
not for USA / CAN
350 T
(Typ 2373)
not for USA / CAN

natural_image
Two black and silver cylindrical water heaters with red buttons, no visible text or symbols


text_image
Exploded view diagram of a multi-tiered electronic device with numbered components and labeled parts

flowchart
graph TD
    A["Implant with pins"] --> B["Insertment into plate"]
    B --> C["Close-up of plate"]
    C --> D["Retraction with hook"]
    D --> E["Adjustment to EHEIM device"]
    E --> F["Retraction with catheter"]
    F --> G["End"]

text_image
professionel 5e - 350
Typ 2274

natural_image
Technical line drawing of a mechanical component with mounting holes and a curved base (no text or symbols)
2271 2273/ 2274

natural_image
Cross-sectional diagram of a mechanical device showing internal components and layered structure (no text or symbols)

natural_image
Cross-sectional diagram of a mechanical device showing internal layers and components (no text or symbols)
2275

natural_image
Cross-sectional diagram of a mechanical device showing internal layered structure with granular material (no text or symbols)
2371

natural_image
Cross-sectional diagram of a mechanical device showing internal components like gravel, insulation, and heat exchanger (no text or labels)
2373

natural_image
Cross-sectional diagram of a mechanical device showing internal components like gravel, sand, and housing (no text or labels)
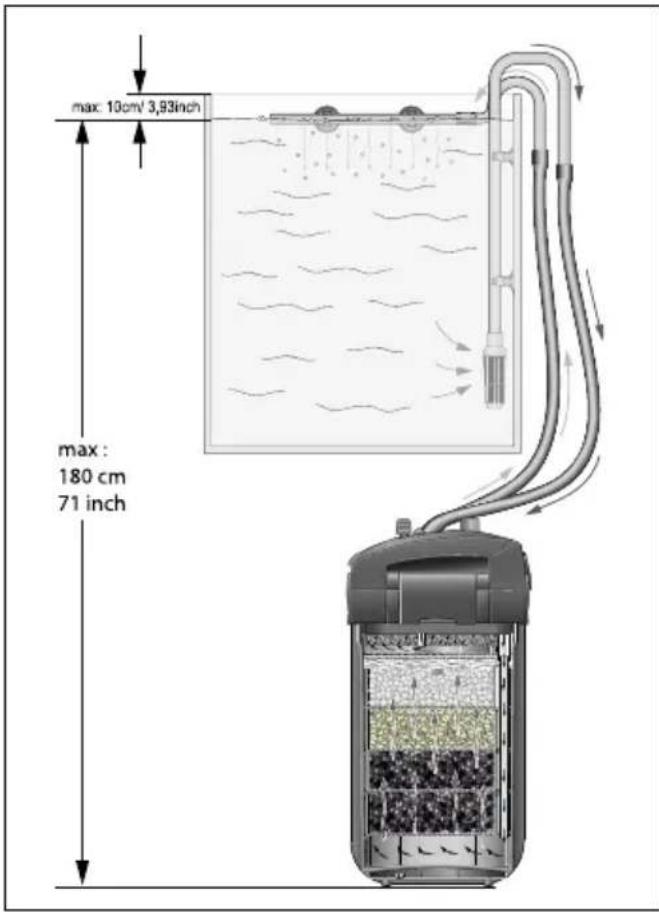
text_image
max: 10cm/ 3,93inch
max:
180 cm
71 inch

natural_image
Pure mechanical diagram showing a lever and rod assembly without any text, numbers, or symbols
- (1. - 22.)

text_image
1.
EHEM
SARO
text_image
4.

natural_image
3D diagram showing a container being placed on a grain pile, with arrows indicating direction (no text or symbols)

text_image
13.
natural_image
Diagram of a mechanical component with directional arrows indicating motion or force (no text or symbols)

text_image
Warning symbols and icons: red warning triangle with exclamation mark, green checkmark, and red X symbol on a 3D object.

text_image
8.

natural_image
Diagram showing airflow or heat transfer between two mechanical components (no text or symbols)
text_image
9.
ENLOW- SUBSTIN PRO
natural_image
Mechanical clamp or lever mechanism diagram with red arrows indicating motion direction (no text or symbols)

text_image
16.
click
SHEM

text_image
17.
CHEM
POT & PENT

text_image
mac
10 cm/ 3,93 inch
18.

natural_image
Illustration of hands using a sewing machine to adjust a sewing machine (no text or symbols visible)

natural_image
Illustration of a water dispenser with red arrows indicating flow or movement (no text or symbols)

text_image
prof. 5°
20.

text_image
21.

text_image
22.
1-2x
8.1 (1. - 12.)
text_image
1.

text_image
1.
2.
2.

natural_image
3D diagram of a mechanical assembly with blue components and red arrows indicating motion or force (no text or symbols)
natural_image
Illustration of a hand pressing down on a blue plastic component with an upward arrow (no text or symbols)

natural_image
Illustration of a hand using a blue plastic tray to lift a white object, no text or symbols present
natural_image
Illustration of a medical procedure with a blue liquid-filled container and a handle (no text or symbols)

natural_image
Illustration of a hand pressing down on a blue mechanical component with a red arrow indicating force (no text or symbols)

text_image
8.
text_image
9.

natural_image
Diagram of a medical procedure in progress, showing fluid flow around a central chamber with red arrows indicating direction (no text or symbols)

text_image
11.

natural_image
Illustration of hands using a sewing machine to adjust or install a component (no text or symbols visible)
8.2 (1.-16.)
text_image
1.
text_image
2.

text_image
3.

text_image
4.
text_image
5.
ENEIN- SUBSTRAT PRO

natural_image
Diagram of a mechanical or architectural component with layered structure and no visible text or symbols
8.3 (1.-11.)
text_image
Warning symbols and icons: red warning triangle with exclamation mark, green checkmark with cross, and gray briefcase.
natural_image
Diagram of a pipe connection with a brush and tubing, no text or symbols present

natural_image
Diagram of a mechanical device with arrows indicating motion or force direction (no text or symbols)

text_image
7.
text_image
7.
1/3!
natural_image
Diagram of a mechanical device with blue housing and red arrows indicating force or movement (no text or symbols)

natural_image
Mechanical assembly diagram showing a gear-like component with a highlighted section and arrow (no text or symbols)

text_image
8.12.
text_image
8.
EHEIM - SUBSTRAT p6

natural_image
Diagram of a medical procedure with a blue container and red arrows indicating flow or movement (no text or symbols)

text_image
3.

text_image
9.
text_image
9.
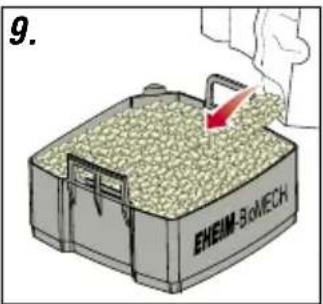
EHEIM-3oMECH

text_image
14.

natural_image
Mechanical component diagram showing a gear assembly with a highlighted section (no text or symbols)

text_image
10.

text_image
10.
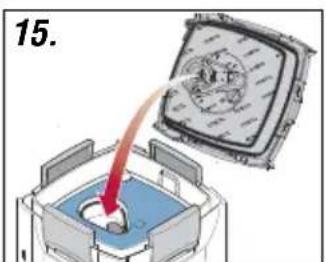
text_image
15.
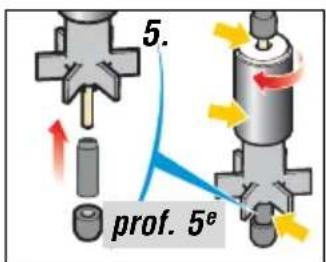
text_image
5.
prof. 5e

natural_image
Illustration of hands using a sewing machine to adjust or install a component (no text or symbols visible)
natural_image
Illustration of hands using a sewing machine to adjust or install a component (no text or symbols visible)

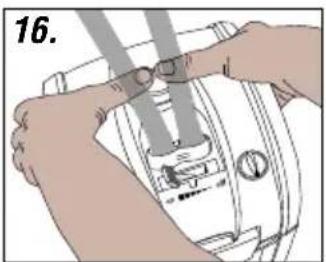
text_image
6.


IMPORTANT SAFETY INSTRUCTIONS
WARNING! RISK OF ELECTRIC SHOCK! This pump has not been investigated for use in swimmung pools areas! DO NOT RUN DRY!
WARNING – To guard against injury, basic safety precautions should be observed, including the following.
a) READ AND FOLLOW ALL SAFETY INSTRUCTIONS.
b) DANGER – To avoid possible electric shock, special care should be taken since water is employed in the use of aquarium equipment. For each of the following situations, do not attempt repairs by yourself; return the appliance to an authorized service facility for service or discard the appliance.
1) If the appliance falls into the water, DON'T reach for it! First unplug it and then retrieve it. If electrical components of the appliance get wet, unplug the appliance immediately.
2) Carefully examine the appliance after installation. It should not be plugged in if there is water on parts not intended to be wet.
3) Do not operate any appliance if it has a damaged cord or plug, or if it is malfunctioning or has been dropped or damaged in any manner.
4) To avoid the possibility of the appliance plug or receptacle getting wet, position aquarium stand and tank to one side of a wall-mounted receptacle to prevent water from dripping onto the receptacle or plug.
A "drip loop", shown in the figure, should be arranged by the user for each cord connecting an aquarium appliance to a receptacle. The "drip loop" is that part of the cord below the level of the receptacle, or the connector if an extension cord is used, to prevent water traveling along the cord and coming in contact with the receptacle.
If the plug or socket does get wet, DON'T unplug the cord. Disconnect the fuse or circuit breaker that supplies power to the appliance. Then unplug and examine for presence of water in the receptacle.
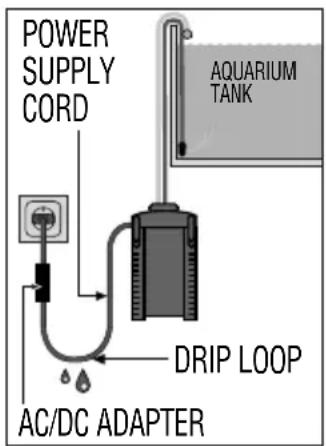
text_image
POWER
SUPPLY
CORD
AQUARIUM
TANK
DRIP LOOP
AC/DC ADAPTER
c) Close supervision is necessary when any appliance is used by or near children.
d) To avoid injury, do not contact moving parts or hot parts such as heaters, reflectors, lamp bulbs, and the like.
e) Always unplug an appliance from an outlet when not in use, before putting on or taking off parts, and before cleaning. Never yank cord to pull plug from outlet. Grasp the plug and pull to disconnect.
f) Do not use an appliance for other than intended use. The use of attachments not recommended or sold by the appliance manufacturer may cause an unsafe condition.
g) Do not install or store the appliance where it will be exposed to the weather or to temperatures below freezing.
h) Make sure an appliance mounted on a tank is securely installed before operating it.
i) Read and observe all the important notices on the appliance.
j) If an extension cord is necessary, a cord with a proper rating should be used. A cord rated for less amperes or watts than the appliance rating may overheat. Care should be taken to arrange the cord so that it will not be tripped over or pulled.
k) Unit type 2274: Use only the AD/DC adapter supplied with the filter. If it is to be used as a spare part, you must specify the EHEIM order number 7212538 for replacement.
1) "SAVE THESE INSTRUCTIONS".
FCC WARNING STATEMENT (USA only)
FCC CAUTION This device is
This device complies with part 15 of the FCC Rules. Operation is subject to the following two conditions:
(1) This device may not cause harmful interference, and (2) this device must accept any interference received, including interference that may cause undesired operation.
Any changes or modifications not expressly approved by the party responsible for compliance could void the user's authority to operate the equipment.
NOTE: This equipment has been tested and found to comply with the limits for a Class B digital device, pursuant to Part 15 of the FCC Rules. These limits are designed to provide reasonable protection against harmful interference in a residential installation. This equipment generates, uses and can radiate radio frequency energy and, if not installed and used in accordance with the instructions, may cause harmful interference to radio communications. However, there is no guarantee that interference will not occur in a particular installation. If this equipment does cause harmful interference to radio or television reception, which can be determined by turning the equipment off and on, the user is encouraged to try to correct the interference by one or more of the following measures:
- Reorient or relocate the receiving antenna.
- Increase the separation between the equipment and receiver.
- Connect the equipment into an outlet on a circuit different from that to which the receiver is connected.
- Consult the dealer or an experienced radio/TV technician for help.
Translation of the original operating manual Aquarium exterior filters professionel 4+ 250, 250T, 350, 350T and 600 Aquarium exterior filters professionel 5e 350
1. General user instructions

Before using the appliance for the first time, the operating manual must be read fully and understood. Consider the operating manual as part of the product and keep in a safe and accessible location. Enclose this operating manual if passing the appliance on to a third party.
Symbol explanation
The following symbols are used on the appliance:

The appliance must only be used indoors, and exclusively for aquariums.

The appliance is of protection class I.

The appliance is of protection class II.

The appliance is of protection class III.
IP X4 The symbol advises that the device is protected against splashed water.

The appliance is certified according to the relevant national regulations and directives, and conforms to EU standards.
The following symbols and signal words are used in this operating manual:

DANGER!
The symbol indicates imminent danger from electric shock that can result in death or serious injury.

DANGER!
The symbol indicates imminent danger that can result in death or serious injury.

WARNING!
The symbol indicates imminent danger that can result in moderate to minor injury or a health risk.

HOT SURFACE!
The symbol advises of an imminent risk from hot surfaces that can cause burn injuries.

CAUTION!
The symbol indicates the danger of material damage.

Note with useful information and tips.

Reference to a figure; in this case, reference to figure A.

You are prompted for an action.
2. Application
The appliance and all parts included in the scope of delivery are intended for private use and must only be used:
Aquarium exterior filters professionel 4+ 250, 350 and 600 Type 2271, 2273 and 2275)
Aquarium exterior filters professionel 5e 350 (Type 2274)
- For the cleaning of aquarium water in fresh and salt water aquariums.
- indoors
- in compliance with the technical data.
Aquarium exterior filtersprofessionel 4+ 250T (type 2371) and 350T (type 2373)
- For cleaning of aquarium water in freshwater aquariums.
- indoors
• in compliance with the technical data.
The following limitations apply to the appliance:
- do not use for commercial or industrial purposes.
• the water temperature may not exceed 35^ C.
- Corrosive, highly flammable, aggressive or explosive substances, foodstuffs and drinking water must not be conveyed.
- never operate without a water flow.
3. Safety instructions
Risks for persons and property can arise from this appliance if the appliance is improperly used or not used as intended or if the safety instructions are not heeded.
For your safety

- Do not let the appliance packaging and small parts get into the hands of children or people who are unaware of how to handle them, as hazards can arise (danger of suffocation!). Keep away from animals.
- Only for EU countries:
This appliance can be used by children from the age of 3 and by persons with reduced physical, sensory or mental capabilities or lack of experience and/or knowledge if they are supervised and have been instructed in the safe use of the appliance and have understood the resulting dangers. Children must not play with the appliance. Cleaning and user maintenance must not be carried out by children unless they are supervised.
- This equipment is not intended for use by persons (including children) with limited physical, sensory or mental abilities or for persons with no experience or knowledge unless they are supervised by a person respond for safety or unless they have received from such a person instructions on how to use the equipment. Children should be supervised to ensure that they do not play with the equipment.

- Before use, carry out a visual inspection to ensure that the appliance, especially the mains cable and plug, are undamaged.
- Do not use the device if it does not function properly or if it is damaged.
- Never use the appliance with a damaged mains cable.
- The connecting line of this device can not be replaced. When the line is damaged, the device must no longer be used.
• Repairs must only be carried out by an EHEIM service centre.
- Do not carry the appliance by the mains cable, and to disconnect from the mains, always pull on the plug and not on the cable or appliance.
- Protect the mains cable against heat, oil and sharp edges.
- Only carry out the work described in these instructions.

- Never make technical modifications to the appliance.
- Only use original spare parts and accessories for the appliance.
- The device should be protected by means of a residual current protective device with a maximum rated residual current of 30 mA. Ask your electrician.
- If they are not being used, always disconnect all devices in the aquarium from the power supply before you install/remove any parts and before all cleaning and maintenance work.
- Protect the mains socket and mains plug against moisture. It is recommended to form a drip loop with the mains cable to prevent any water running along the cable to the mains socket.
- The electrical data of the appliance must match the data of the mains supply. You will find this data on the type plate, the packaging or in these instructions.
- The unit type 2274 may only be used with the supplied power supply. If a replacement is required, the original EHEIM power supply unit art. no. 7212538 must be used.

text_image
POWER
SUPPLY
CORD
DRIP LOOP
AC/DC ADAPTER
AQUARIUM
TWAK
Just for Aquarium exterior filters professional4+ 250T (Typ 2371) and 350T (Typ 2373)

- Risk of burn injuries! The device is very hot during and directly after operation. Never touch hot parts or the heater unit (38)!
- Never operate the heater dry. DANGER OF BURNS!
4. Component overview (see I)
- Filter mat blue 2. Prefilter seal 3. Prefilter flap 4. Prefilter 5. Cover grating 6. Filter pad white 7. Filter inserts 8. Locking clips 9. Filter tank 10. Rubber buffers 11. Hose locking device 12. Locking lever 13. Safety adapter 14. Bracket 15. Float 16. Suction aid 17. Pump head 18. Range Xtender knob 19. Adapter bar 20. Status LED (professionel 5e - Typ 2274) 21. Profile seal 22. Pump wheel 23. Pump cover 24. Hoses 25. Outlet elbow 26. Nozzle pipe 27. Suction pipe 28. Sucker with terminal clamp 29. Suction basket 30. Power supply unit (professionel 5e - Typ 2274) 31. Power cable
5. Connection and commissioning (Filter)
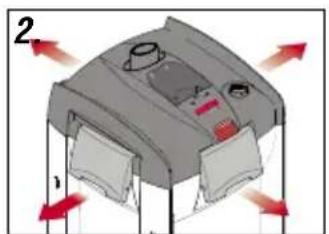
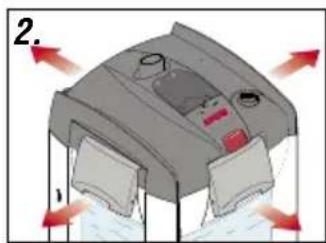
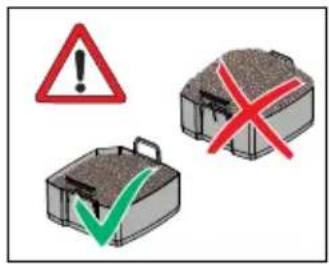
- Set the locking lever (12) to „OFF“ and press the adapter bar (19) until the safety adapter (13) disengages. 2. Open the locking clips (8) by pulling the clips' lower edge. 3. Remove the pump head (17). 4. Remove all inserts (7). Caution: Do not overfill filter inserts as, otherwise, their accurate fit is no longer assured. 5. Fill the filter inserts with EHEIM filter media. 6. Rinse the filled filter inserts with water.

Note: Easier cleaning with EASY CLEAN function.
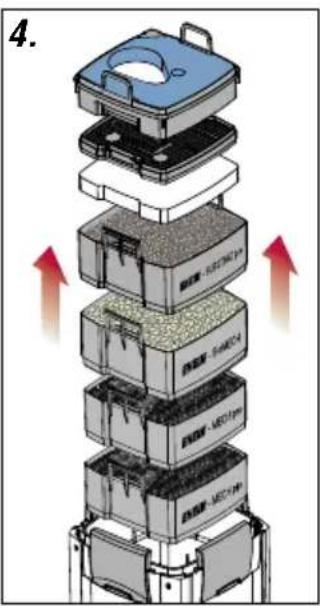
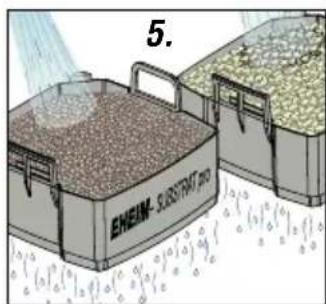
- Close the filled filter cartridge with the screened cover (5). 8. Shake filter insert. Repeat this procedure with all filter cartridges. Caution: insert the white filter fleece into the very top filter cartridge and close it with the screened cover. 9. Then, re-insert the filter cartridges in the following sequence into the filter container (9):
In professionel 4+ - 250 (Typ 2271) and 250 T (Typ 2371): 1. Filter cartridge with EHEIM MECH pro. 2. Filter cartridge with EHEIM SUBSTRAT pro, white filter fleece and screened cover.
In professionel 4+ - 350 (Typ 2273), 350 T (Typ 2373) and professionel 5e - 350 (Typ 2274): 1. Filter cartridge with EHEIM MECH pro. 2. Filter cartridge with EHEIM bioMECH. 3. Filter cartridge with EHEIM SUBSTRAT pro, white filter fleece and screened cover.
In professionel 4+ - 600 (Typ 2275): 1. Filter cartridge with EHEIM MECH pro. 2. Filter cartridge with EHEIM MECH pro. 3. Filter cartridge with EHEIM bioMECH. 4. Filter cartridge with EHEIM SUBSTRAT pro, white filter fleece and screened cover.

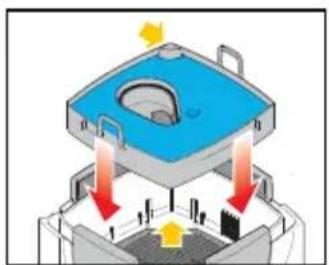
- Insert the prefilter (4) with the blue filter mat (1) (place onto supports → arrows). 11. Attach the pump head (17) (observe fitting position) and close the locking clips (8).
Note: Use original EHEIM hoses only.
- Attach the pre-assembled hose accessories (see II) to the aquarium. 13. Cut hoses (23) to the desired length and attach to the fittings. 14. Plug the hoses (24) onto the safety adapter (13) down to the limit stop. 15. Attach the hose locking device (11). 16. Push the safety adapter (13) into the pump head (17) until it audibly latches. 17. Set the locking lever (12 to „ON“. 18. Assure the nozzle pipe (26) is suspended above the water surface. 19. Rapidly press the suction aid (16) several times consecutively until the filter tank (10) automatically fills with water (no water must be present in the prefilter!). 20. Plug in the power supply unit (30) at the pump head (17) (only in professionel 5e - 350 Type 2274). 21. Plug in the power cable (31) of the filter Caution: Operate the heater only (by plugging in the heater power cable) when the water starts circulating and the filter supplies water 22. To vent the priming aid (16) press again 1 or 2 times and push the nozzle tube (26) into the desired position.
6. Operation (only on professionel 5e 350, Type 2274)
System Requirements
WiFi-enabled terminal device (smartphone, tablet, notebook etc.)
6.1 Creating a Network
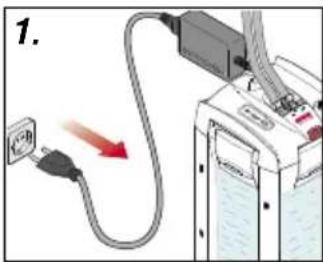
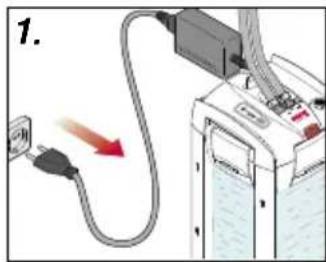
Insert the plug of the mains cable into the mains socket.
- Status LED (20) flashes white: Network of the unit is being created.
- Status LED lights up blue: Device has created network.
6.2 Connecting to the Wi-Fi network
Open the network settings of your terminal device (smartphone, tablet, notebook etc.). Connect the terminal device to the WiFi network (SSID) EHEIM Filter XXXXXXXX. Enter the network security key.
You will find the label with the SSID as well as the network security key (Key) on the bonnet of the filter or scan the QR code 1 to establish a connection.
6.3 Calling up the website
Open your web browser and enter the following address: http://192.168.1.1
You can also use the QR code 2 (see label) to open the web page in the browser.
6.4 Initial configuration
Select the desired language from the language selection and follow the instructions for the initial configuration.
Reset
Touch the touch field below the status LED (20) with a finger for approx. 8-10 seconds until the status LED lights up in a colour change. If the status LED lights up green, the reset is completed and the unit creates its network again. Network security key (Key) and QR code 1 are invalid. Connection to the network is possible without a network security key.
Meaning Status LED (20)
- Status LED flashes white: Network is being created.
- Status LED lights up blue: Device has created network and is ready for operation.
- Status LED lights up green: Device is connected to another EHEIMdigital device.
7. Thermofilter professionel 4+ - 250 T (Typ 2371) / 350 T (Typ 2373), see III
Only thermofilter: 33. Control indicator („ON“ / „OFF“) 34. LED indicator in Celsius (°C) 35. Status indicator for target temperature in Celsius (°C) 36. Pushbutton 37. Display in Fahrenheit (°F) 38. Heating spiral.
| Setting range of the target temperature | 18° – 34°C 64° – 93°F |
| Factory setting of the target temperature | 24°C / 75°F |
| Factory setting of the temperature unit | Celsius (C) / Fahrenheit (F) |
| Switching hysteresis | ±1°C |
| Power consumption | 210 W |
| Voltage | see type plate on canister bottom |
7.1 Operation
A Control indicator (33) is not lit up = Heater off.
B Control indicator (33) is lit up = Heater is heating.
7.2 Display mode
C The actual temperature is displayed. Indicator is lit up, status indicator of target temperature (35) is off.
Pressing the pushbutton (36) once will display the target temperature stored. The status indicator for target temperature (35) lights up. After about 5 sec., the indicator changes back to the actual temperature.
7.3 Setting mode for target temperature
The factory setting for the target temperature = 24°C (75°F).
How to set the temperature:
D Press and hold the pushbutton (36) for approx 3 sec. The target temperature blinks (temperature indicator (34) and the status indicator for the target temperature (35) blinks).
E Set the desired target temperature by pressing the pushbutton briefly. Pressing once = increase by 1°C (2°F). When the maximum set point of 34°C (93°F) is reached, the indicator will begin again at 18°C (64°F).
F When the desired target temperature is set, wait until the indicator blinks again. Then press and hold the pushbutton (36) for approx 3 sec. in order to store the desired target temperature. After 15 sec. without an entry, the indicator returns to the display mode, and the previous setting will be maintained (child guard).
7.4 System messages


Control indicator lights up. The actual temperature and target temperature are displayed alternatively.
Control indicator is off. The actual temperature and target temperature are displayed alternatively.
The target temperature set is more than 2^ C above the water temperature.
The target temperature set is more than 2^ C below the water temperature.
- The water temperature set has not yet been reached (may take up to 24 hrs).
- The water volume is too large. Raise the ambient temperature and/or reduce the water volume.
- Lower the temperature of the aquarium water by colder fresh water, cold packs, or the like.
- Reduce the ambient temperature. Heater cannot cool.
8 Maintenance and care

The control panel indicates the filter elements to be cleaned.
- Implement maintenance works in case of reduced filter capacity (approx. every 3 to 6 months).
- First, clean prefilter (8.1).
- If prefilter cleaning insufficient: Clean all filter inserts (general cleaning 8.2).
- If general cleaning insufficient: Clean the pump chamber. (8.3).
8.1 Prefilter cleaning

Note: Renew the blue filter mat after the third cleaning.
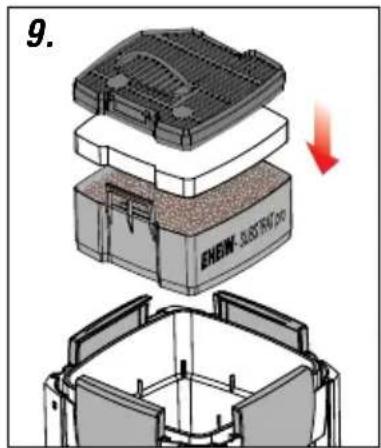
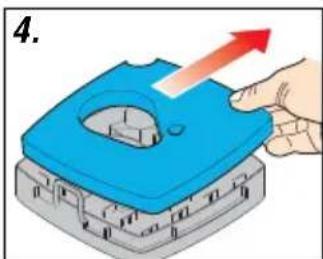
- Disconnect the power cable (31). 2. Disassemble the safety adapter (13) and the pump head (17) (chapter 5, step 1 - 3). 3. Remove the prefilter (4). 4. Remove the blue filter mat (1). 5. Rinse the blue filter mat (1) under running, lukewarm water (replace if required). 6. Empty the prefilter (4) and rinse it. 7. Insert the blue filter mat (1) into the prefilter (4). 8. Insert the prefilter (4) with the blue filter mat (1) (place onto supports → arrows). 9. Check and, if required, clean the seals and treat them with EHEIM care spray (No. 4001000). 10. The prefilter flap (3) must be unobstructed. 11. Attach the pump head (17) (observe fitting position) and close the locking clips (8). 12. Put the filter system into operation (chapter 5, step 16 - 22).
8.2 General cleaning
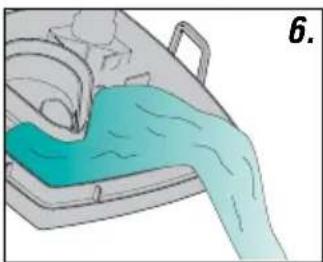
- Disconnect the power cable (31). 2. Disassemble the safety adapter (13) and the pump head (17) (chapter 5, step 1 - 3). 3. Remove the pre-filter (3), the filter cartridge with the screened cover and white filter fleece. Renew the white filter fleece (6) during each cleaning process. 4. Remove all filter inserts. 5. Rinse the filter inserts (7) and filter media with water until they are clean (see EASY CLEAN function chapter 5, step 7 + 8). 6. Empty the filter tank (9).

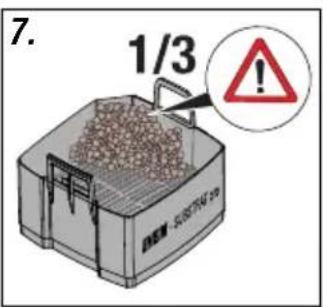
Note: Only carry out steps 7 to 8 during every third to fourth general cleaning. By mixing used and new substrate media, the required bacteria cultures remain intact.

Caution: Do not overfill filter inserts as, otherwise, their accurate fit is no longer assured.
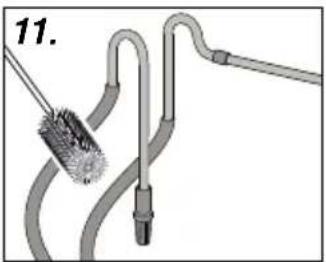
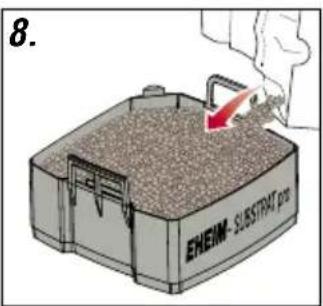
- Leave one-third of the used EHEIM SUBSTRAT pro and EHEIM bioMECH in the filter cartridge. 8. Re-fill two-thirds of the used EHEIM SUBSTRAT pro and EHEIM bioMECH. 9. If required, completely renew EHEIM MECH pro. 10. Re-insert all filters and filter inserts (chapter 5, step 7 - 9). 11. Clean the hose system using an EHEIM universal cleaning brush (No. 4005570). 12. Insert the prefilter (4) with the blue filter mat (1) (place onto supports → arrows). 13. The prefilter flap (3) must be unobstructed. 14. Check and, if required, clean the seals and treat them with EHEIM care spray (No. 4001000). 15. Attach the pump head (17) (observe fitting position) and close the locking clips (8). 16. Put the filter system into operation (chapter 5, step 16 - 22).
8.3 Cleaning the pump chamber

Caution: The caramic axis may break. Clean carefully!
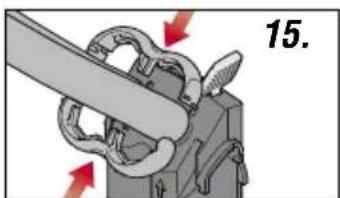
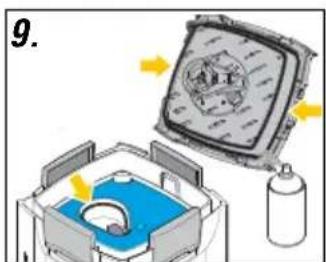
- Disassemble the safety adapter (13) and the pump head (17) (chapter 5, step 1 - 3). 2. Turn the pump cover (23) and remove it. 3. Disassemble the pump wheel (22). 4. Clean the pump chamber, pump cover, pump wheel and lubrication duct with the EHEIM cleaning set (No. 4009560). 5. The pump wheel (22) must be clean and unobstructed (see arrows). Observe the installation position of the ceramic sleeve (a) (only in professionel 5e- 350 Type 2274). 6. Insert the pump wheel (22) into the pump chamber. 7. Close the pump chamber with the pump cover (23) observing the cut-out and studs (arrows). 8. Disassemble the bracket (14) and the float (15) on the top side of the pump head (17) and clean them. 9. Install the check valve (14/15) (observing the installation position; the float must be unobstructed). 10. Attach the pump head (17) (observe fitting position) and close the locking clips (8). 11. Put the filter system into operation (chapter 5, step 16 - 22).
9 What to do if . . .
... Top part of filter can't be closed?
| Cause | Solution |
| Filter inserts have been inserted wrongly. | Push filter inserts and pre-filter in until they lie flush on top of each other. |
| Filter inserts are too full. | Do not overfill filter inserts. If need be, clean the touching surfaces. |
| Gasket not fitted properly. | Insert correctly into the groove provided in the upper part of the filter. Check for damage and if necessary replace. |
... Top of filter leaks?
| Cause | Solution |
| Closing clips not closed properly. | Close all clips properly. |
| Sealing areas or gasket soiled. | Clean seal areas and spray lightly with EHEIM silicone grease spray (Order no. 4001000). |
| Sealing ring not fitted, inserted wrongly or damaged. | Insert sealing ring correctly or renew. |
... Primer does not work?
| Cause | Solution |
| Prefilter flap in prefilter not closed. | Check the prefilter flap for pollution and, if required, clean it.The prefilter flap must be unobstructed (see chapter 8.2, step 13). |
| Prefilter is filled with water. | Empty prefilter, repeat priming. Priming only works with empty prefilter. |
| Check valve polluted/defective. | Clean and, if required, replace the check valve (see chapter 8.3). |
... Pump does not work?
| Cause | Solution |
| No mains supply. | Plug in to mains. |
| Shaft broken. | Renew shaft (see list of spares). |
| Impeller missing or blocked by bits of gravel, shells or similar. | Fit impeller, clean pump chamber. |
... Filter performance has greatly deteriorated?
| Cause | Solution |
| Safety adapter lever position not correct. | Check lever setting and adjust. |
| Safety adapter soiled. | Remove safety adapter; open shut-off lever and clean openings with EHEIM cleaning brush (no. 4005570). |
| Hose installation has too little flow. | Check that there are no kinks or marked narrowing of cross-section. |
| Hose installation soiled. | Clean hose installation with universal cleaning brush (no. 4005570). |
| Strainer blocked. | Remove coarse dirt, clean strainer. |
| Filter media heavily soiled. | Clean filter media. |
| Filter media filled into a net bag. | Never put long-term filter media in net bags or nylon stockings. This leads to a drastic reduction in pump performance within a short time. |
| Filter media not cleaned properly. | Clean the filter masses thoroughly according to chapter 8. |
| Filter media wrongly assembled. | Check filter mass assembly for correct sequence (chap. 5, step 9). |
| Filter pad not renewed. | Be sure to renew the filter pad each time you clean. |
| Pump is dirty. | Clean pump chamber, cooling and lubrication channel with EHEIM cleaning brush set (no. 4009560). |
| Water is not circulating properly. | Take filter into operation by priming (as described in the instructions). Make sure that the water runback (delivery side) is above the surface of the water during filling so that air is optionally bled from the device. |
| Too many accessories installed on the hose system. | Connected accessories reduce filter performance. Check and remove unnecessary accessories or operate via a separate water system. |
... Air in the filter?
| Cause | Solution |
| Filter location. | The top edge of the pump head should be at least 10 cm beneath the surface of the water. It is better to place it underneath the aquarium. |
| Air is being sucked in via the hose installation. | Check that hose connector is fitted properly, and may be check whether hoses leak. |
| Additional air supply (membrane pump). | Do not install diffuser in the vicinity of the suction pipe. |
| Filter media heavily soiled. | Clean filter media. |
| Filter media have been placed in net bags. | Never put long-term filter media in net bags or nylon stockings. |
... The pump causes loud operating noise?
| Cause | Solution |
| Ceramic sleeve not or incorrectly installed.(only in professionel 5e - 350 Type 2274). | Correctly install or, if required, replace the ceramic sleeve. |
| Ceramic axis broken. | Replace the ceramic axis. |
10 Decommissioning and disposal
Storage

- Uninstall the device from the aquarium.
- Clean the appliance.
- Store the appliance in a frost-proof place.
Disposal

When disposing of the appliance, heed the respective statutory regulations. Information on the disposal of electrical and electronic appliances in the European Union: Within the European Union, disposal of electrically operated appliances is governed by national regulations that are based on the EU Directive 2012/19/EU on waste electrical and electronic equipment (WEEE). The appliance may no longer be disposed of with the municipal or household waste. The appliance will be accepted free of charge at municipal collection points or recycling centres. The product packaging is made up of recyclable materials. Dispose of them in an environmentally responsible manner and take them for recycling.
11 Technical data
See page 214
12 Spare parts
See page 215
8.2 Nettoyage principal
Élimination/destruction

6.3 De website openen
The full text of the EU declaration of conformity is available at the following internet address: www.eheim.com

text_image
2274:
7212538
4005843
7212258
7428718
7428728
7428680
7428460
2617710
7428770
7428580
7428970
7372628
7428770
7428770
7211568
2271/2273/
2275/2371/
2373:
7444390
2271/2371: 7603420 (50 Hz)
7603350 (60 Hz)
2273/2275/
2373: 7603330 (50 Hz)
7603340 (60 Hz)
2274:
7603220
7334538
7480970
7428608
7428608
7428780
7428590
7428470 (2271)
7428480 (2273)
7428480 (2274)
7428490 (2275)
7675518 (2371)
7675538 (2373)
7405750
4015150
7334528
7447150
7312698
Reproduction or copying – even parts thereof – only with the express permission of the producer.