
M27 - Coffee machine La Cimbali - Free user manual and instructions
Find the device manual for free M27 La Cimbali in PDF.
| Product type | Professional espresso coffee machine |
| Brand | La Cimbali |
| Model | M27 |
| Number of groups | 2 or 3 (depending on version) |
| Power supply | Three-phase (3~ 400V) or single-phase (230V) depending on version |
| Boiler pressure | 1.2 bar |
| Main functions | Espresso, steam, hot water, cup warmer |
| Controls | Electronic keypad with buttons for short/long doses, continuous dispensing, programming |
| Body material | Stainless steel |
| Safety | Safety valve, automatic shut-off in case of insufficient water level |
| Group cleaning | Daily with specific product (Service Line range) |
| Steam wand cleaning | After each use, clean exterior and purge steam |
| Drip tray cleaning | Daily, rinse with hot water |
| Max mains water pressure | 6 bar (if higher, install a reducer to 2-3 bar) |
| Ambient operating temperature | 5 °C to 32 °C |
| Noise level | ≤ 80 dB(A) |
| Spare parts | Original parts available from customer service |
| Repairability | Interventions by qualified personnel only |
Frequently Asked Questions - M27 La Cimbali
User questions about M27 La Cimbali
0 question about this device. Answer the ones you know or ask your own.
Ask a new question about this device
Download the instructions for your Coffee machine in PDF format for free! Find your manual M27 - La Cimbali and take your electronic device back in hand. On this page are published all the documents necessary for the use of your device. M27 by La Cimbali.
USER MANUAL M27 La Cimbali
USE AND INSTALLATION
UTILISATION ET INSTALLATION
GEBRAUCH UND INSTALLATION
USO E INSTALACION
USO E INSTALLAÇAO 使
用与安装
1
Italiano
Translation of the original instructions
François
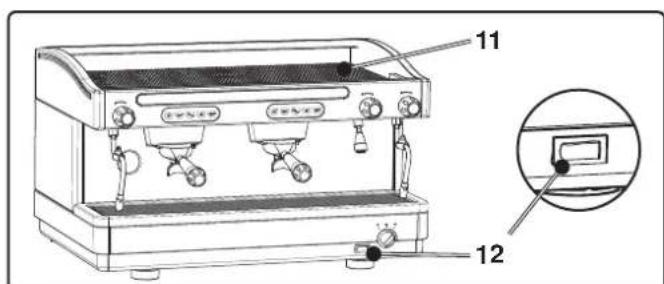
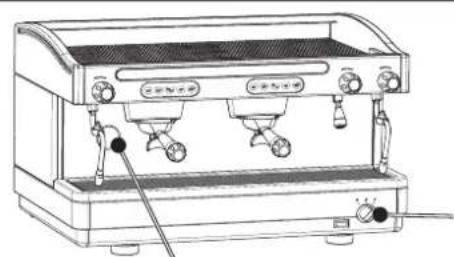
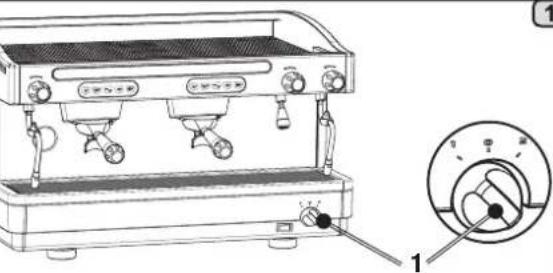
1 Main ON/OFF switch
2 Pushbutton Panel / Coffee dispensing switch
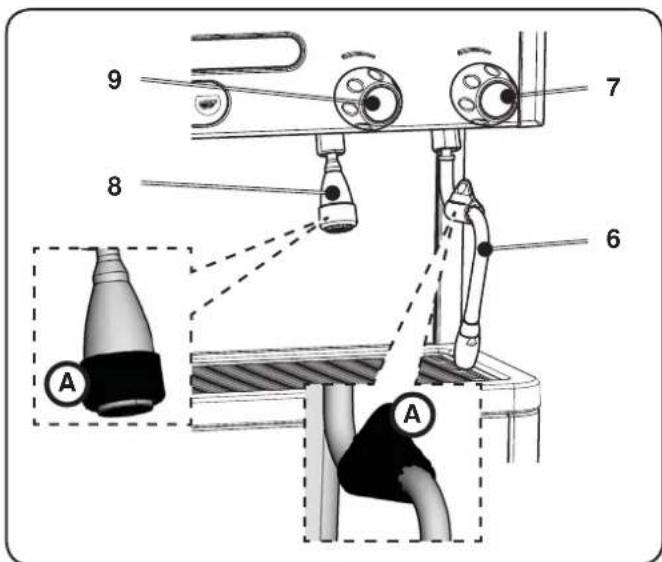
6 Swivel steam jet pipe
7 Steam adjustment knob
8 Hot water dispensing pipe
9 Hot water dispensing knob
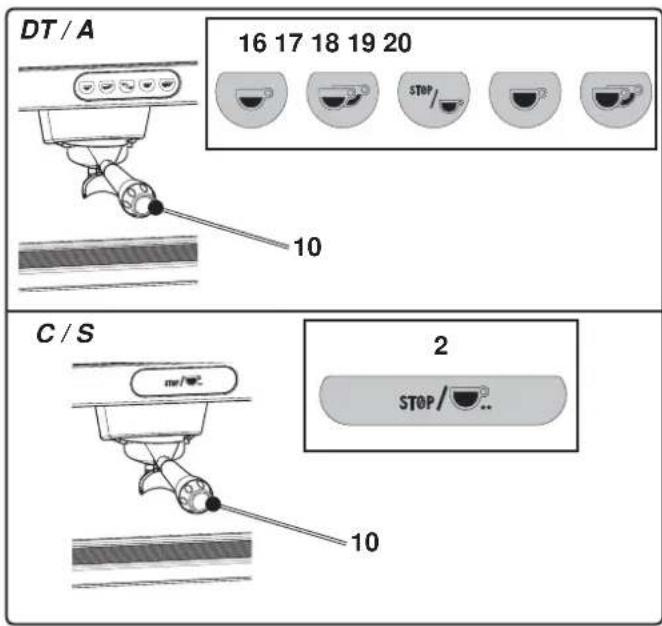
10 Filter holder
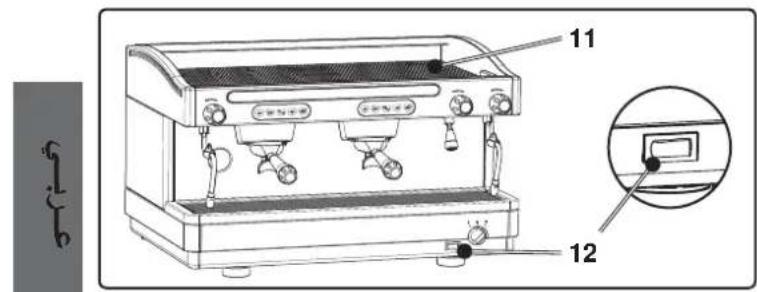
11 Cup tray
12 Machine "ON" indicator light (green)
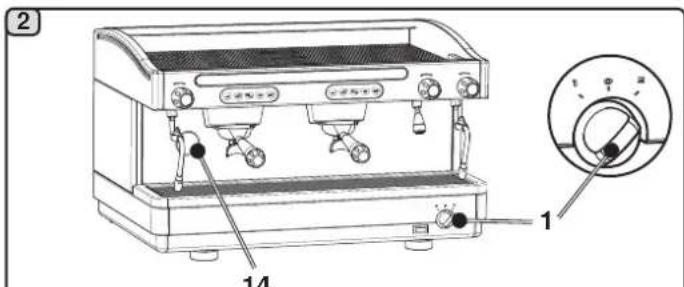
14 Boiler pressure gauge
15 Pan
16 Dispensing push button - 1 short coffee
17 Dispensing push button - 2 short coffees
18 Continual dispensing /STOP / Prog - push button
19 Dispensing push button - 1 long coffee
20 Dispensing push button - 2 long coffees
FR LEGENDE
This page is intentionally left blank.
WARNING: Hot surface
ATTENTION: Surface chaude
Dear Madam, Dear Sir,
Congratulations on your new machine!
With this purchase, you have chosen an advanced espresso coffee machine built using the most cutting edge technology. This machine not only offers you a perfect combination of efficiency and functionality, but also provides you with all the tools you need to do your job in the best possible way. We recommend that you take some time to read this Use and Maintenance Booklet. It will help you become more familiar with your new espresso machine, which we're sure you are looking forward to using.
Wishing you all the best.
- General Rules 2
- Installation Rules 3
- Electrical Installation Rules 4
- Water Installation Rules 4
- Installation Check-up 5
- Rules for the worker operating the machine 6
- Caution 7
- Maintenance and Repairs 7
- Dismantling the machine 8
USE
- Day-to-day operation 8
- Cup-Warmer (when provided) 8
- Delivery of the coffee 9
- Other hot beverage 9
- Cleaning and maintenance 10
- Defects - Malfunctions 12
ILLUSTRATIONS VII
Service Line XI
1. General Rules

Please read the warnings and rules in this User's Manual carefully before using or handling the machine in any way because they provide important information regarding safety and hygiene when operating the machine. Keep this booklet handy for easy reference.
- The machine was designed solely for preparing espresso coffee and hot beverages using hot water or steam, and for warming cups.
- The machine must be installed in a place where it is only used by carefully trained staff that knows the risks tied to using the machine.
- The machine is for professional use only.
- This appliance can be used by children aged from 8 years and above and persons with reduced physical, sensory or mental capabilities or lack of experience and knowledge if they have been given supervision or instruction concerning use of the appliance in a safe way and understand the hazards involved.
Children shall not play with the appliance.
Cleaning and user maintenance shall not be made by children without supervision.
- The machine must not be left unattended.
- The machine must not be used outdoors.
- If the machine is stored in rooms where the temperature can drop below freezing, empty the boiler and water circuit tubes.
- Do not expose the machine to atmospheric agents (rain, sun, and cold).
- Do not clean the machine with jets of water.
- Noise: assessed acoustic pressure level 80 dB(A) (+/-2.5dB)
If the power supply cord is damaged, it can only be replaced by qualified and authorized technicians. - If the machine is used improperly or for purposes other than those described above, it can be a source of danger. The manufacturer will not be held responsible for damages caused by improper use of the machine.
2. Installation Rules

WARNING
Installation, dismantling, and adjustments must only be performed by qualified and authorized technicians.
Carefully read the warnings and rules in this manual because they provide important information regarding safe installation, use and maintenance of the machine.
Keep this booklet handy for easy reference.

-
Staff responsible for moving the machine must realize the risks in moving heavy loads. Move the machine carefully, using the correct lifting equipment (fork lift, for example). If moving the machine by hand, make sure:
-
enough people are available for the task, depending on the machine weight and difficult handling;
-
to always use the necessary safety gear (shoes/gloves).
-
After removing the machine from its packing materials, make sure that the machine and its safety devices are intact.
- Packing materials (plastic bags, polystyrene foam, staples, etc.) must be kept out of the reach of children because they are potentially hazardous. They must not be released into the environment, but sent to special waste-disposal centres.
- Before plugging in the machine, make sure that the information on the nameplate (voltage, etc.) matches that of the electrical and water systems.
- Check the condition of the power supply cord; if it is damaged it must be replaced.
- Completely unwind the power supply cable.
- The coffee machine should sit on a flat, stable surface at least 20mm from walls and from the counter. Keep in mind that the highest surface on the machine (the cup warmer tray) sits at a height of at least 1.2 meters. Make sure there is a shelf nearby for accessories.
- Room temperature must range between 10^ and 32^ (50°F and 90°F).
- An electrical outlet, water connections, and a drain with siphon must be in the immediate vicinity.
- Do not install in rooms (kitchens) that are cleaned with jets of water.
- Do not obstruct openings or ventilation and heat vents.
- Do not install the machine outdoors.

3. Electrical Installation Rules
Prior to installation, make sure there is a circuit breaker installed with a distance between the contacts that allows for complete disconnection when there is a category III overload and that provides protection against current leakage equal to 30mA . The circuit breaker must be installed on the power supply in compliance with installation rules.
If the power supply is not working properly, the machine can cause transitory voltage drops.
The electrical safety of this machine is only ensured when it is correctly connected to an efficient earthing system in compliance with the electrical safety laws in force. This fundamental safety requirement must be verified. If in doubt, request that a qualified electrician inspect the system. The manufacturer cannot be held responsible for any damage caused by the lack of an earthing system on the electrical supply.
Do not use adaptors, multiple plugs, and/or extension cords.

Check that the type of connection and voltage correspond with the information on the nameplate: see illustrations chapter figure 1.
The machines are fitted with power-supply cables in the factory, specific to the type required: three-phase Y connection (5 wires) or three-phase connection (4 wires), or single-phase connection (3 wires).
IT IS NOT PERMITTED TO CHANGE THE ELECTRICAL SUPPLY.
4. Water Installation Rules
WATER REQUIREMENTS
Water used in coffee machines must be potable and suitable for human consumption (see laws and regulations in force). Check on the machine's water inlet that the pH and chloride values comply with current law.
If the values do not fall within the limits, an appropriate water treatment device must be inserted (respecting the local laws and compatible with the machine).
If the machine uses water with a hardness exceeding 8^ (4.5^) , a specific maintenance plan must be implemented according to the hardness detected and machine usage.
WARNING
Only use the supplied parts for installation. If other parts are installed, they must be new (unused pipes and gaskets for the water connection) and they must be able to come in contact with potable water suitable for human consumption (according to local laws in force).
WATER CONNECTIONS
Place the machine on a flat surface and stabilize it by adjusting and securing the feet.
Hook up the water connections as shown in the Illustrations chapter Figure 2, respecting the hygiene, water safety, and anti-pollution laws in the country of installation.
Note: If the water pressure can rise above six bar, install a pressure reducer set at 2-3 bar. See Illustrations chapter Figure 3.
Water draining tube: place the end of the water draining tube in a drain with a siphon for inspection and cleaning.
IMPORTANT: The curves of the draining tube must NOT bend as shown in Illustrations chapter Figure 4.
5. Installation Check-up

WARNING: AFTER INSTALLATION, CHECK TO SEE IF THE MACHINE IS WORKING PROPERLY (see the Installation Module C).
WATER CONNECTIONS
- No leaks from the connections or tubes
FUNCTIONING
- Boiler and operating pressures are normal.
- The pressure gauge is working properly.
- The self-leveling device is working properly.
The expansion valves are working properly

WARNING: ONCE THE MACHINE HAS BEEN INSTALLED AND IS READY FOR USE, BEFORE ALLOWING THE WORKER TO START USING THE MACHINE, WASH THE INTERNAL COMPONENTS ACCORDING TO THE INSTRUCTIONS BELOW:
GROUPS
- Hook up the filter holders to the groups (without coffee).
- Let each group dispense water for about a minute.
HOT WATER
- Continuously dispense hot water (pressing the appropriate button) until at least 6 liters of water have been used for a machine with 2 groups and 9 liters for a machine with 3 groups (see the "Hot water dispensing" chapter in the User's Manual).
STEAM
- Dispense steam from the nozzles for about a minute, using the appropriate buttons.
6. Rules for the worker operating the machine
BEFORE YOU START

WARNING: BEFORE YOU START OPERATING THE MACHINE, WASH THE INTERNAL COMPONENTS FOLLOWING THE INSTRUCTIONS INDICATED BELOW.
THESE STEPS MUST BE REPEATED AT LEAST ONCE A DAY AND WHEN THE MACHINE HAS NOT BEEN OPERATED FOR MORE THAN 8 HOURS.
Groups
- Hook up the filter holders to the groups (without coffee).
- Let each group dispense water for about a minute.
Hot Water
- Continuously dispense hot water (pressing the appropriate button) until at least 6 liters of water have been used for a machine with 2 groups and 9 liters for a machine with 3 groups (see the "Hot water dispensing" chapter in the User's Manual).
Steam
- Dispense steam from the nozzles for about a minute, using the appropriate buttons.
ON THE JOB
Steam dispensing
- Before heating the beverage (water, milk, etc.), open the steam nozzle for at least 3 seconds and let the steam escape so that the condensation is eliminated.
Coffee dispensing
- If the machine has not been used for more than an hour, before making coffee, dispense about 100 cc and discard the liquid.
Hot water dispensing
- If the machine has not been used for more than an hour, before using the hot water, dispense about 200 cc and discard the liquid.
Cleaning the coffee circuits
- Please read the specific section in the user's manual to learn how to clean these circuits.

Danger of burns
The areas marked with this sign become hot. Great care should be taken when in the vicinity of these areas.

WARNING: Hot surface
ATTENTION: Surface chaude
The manufacturer disclaims all liability for damages to items or persons due to improper use or due to the coffee machine being used for reasons other than its intended use.
Never work the coffee machine with wet hands or naked feet.
Danger of Burns
Do not place the hands or other parts of the body close to the coffee distribution points, or near to the steam and hot water nozzles.
Ensure that the machine is not handled by children or persons who have not been instructed in its correct use.
Cup-warming plate
Place only coffee cups, cups and glasses to be used in conjunction with the coffee machine on the cup-warming plate.
Ensure that the coffee cups are completely drained before placing them on the cup-warming plate.
No other objects shall be placed on the cupwarming plate.

MACHINE CLOSE-DOWN
When the machine is left unattended for a prolonged period (for example out of hours), carry out the following steps:
- Remove the plug or turn off the main switch;
- Close the water tap.
Non-compliance with these safety measures exonerates the manufacturer from all liability for malfunctions, damage to property and/or injury to persons.
8. Maintenance and Repairs
If the machine is not working properly, turn off the machine, turn off the main off-on switch, and call the service centre.
If the power-supply cord is damaged, switch off the machine and request a replacement from the service center.

To ensure safety during operation, it is absolutely necessary to:
· follow all the manufacturer's instructions ;
have qualified and authorized technicians periodically check that all safety devices are intact and functioning properly (the first inspection within three years of purchase and every year after that).

WARNING
Maintenance by unqualified individuals can jeopardize the safety and conformity of the machine.
Only use qualified, authorized technicians for repairs.
WARNING
Only use original spare parts guaranteed by the manufacturer.
If original spare parts are not used, the manufacturer's warranty will no longer be valid.
WARNING
After maintenance, perform the installation CHECK-UP as indicated in the specific section of the user's manual.
9. Dismantling the machine
Pursuant to European Directive 2002/96/EC on electrical waste (WEEE), users in the Europe-an community are advised of the following.
Electrical equipment cannot be disposed of as ordinary urban waste: it must be disposed of according to the special EU directive for the recycling of electric and electronic equipment.
GRUPPO CIMBALI electrical equipment is marked with a pictogram of a garbage can inside a barred circle. This symbol means that the equipment was sold on the market after August 13, 2005, and must be disposed of accordingly.
Due to the substances and materials it contains, inappropriate or illegal disposal of this equipment, or improper use of the same, can be harmful to humans and the environment.
Improper disposal of electric equipment that fails to respect the laws in force will be subject to administrative fines and penal sanctions.
USE
10. Day-to-day operation

"Before setting the machine at work, make sure that:
- the main electric power switch is on;
- the mains water cock has been turned on".
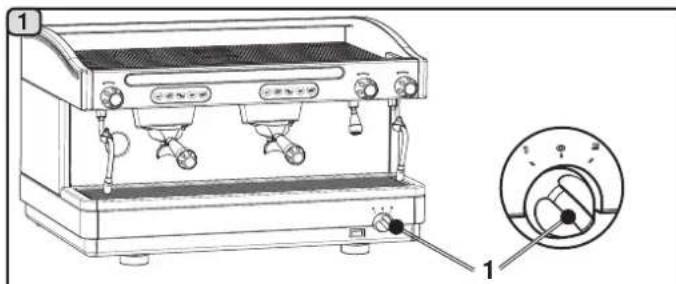
Turn the master switch (1) to position 1. If the water level in the boiler is less than the minimum required, the boiler is filled up to the correct level.
Turn the master switch (1) to position 2.
"Heating" now begins.
Wait until the operating pressure (approx. 1.2 bar) appears on the manometer (14).
At this point, the machine is ready for use.
11. Cup-Warmer (when provided)
Place only coffee cups, cups and glasses to be used in conjunction with the coffee machine on the cup-warming plate.
Ensure that the coffee cups are completely drained before placing them on the cup-warming plate.
No other objects shall be placed on the cup-warming plate (11).
Press the button (12) and check to see that the light turns on.
12. Delivery of the coffee
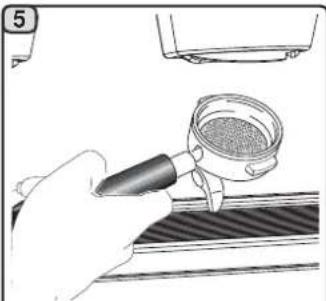
Fit and tighten the filter holder (10) on the coffee dispenser unit, positioning the cup (or cups) under the nozzle (or nozzles) of the filter holder (10).
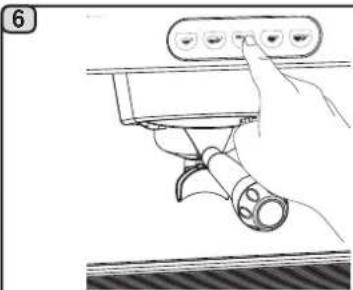
DT/A version. Press the coffee dispensing push button (16, 17, 19, 20) for the required serving; the machine will stop automatically.
Press the push button (18) for continuous dispensing. Dispensing, whether for dosed servings or in the continuous dispensing mode, can be interrupted at any time by pressing the STOP push button (18).
C/S version. Press the coffee dispensing button (2) and dispense.
When the desired dose is obtained, press button (2) again to stop dispensing.

Do not remove the coffee filter before the coffee dispensing has completed.
13. Other hot beverage

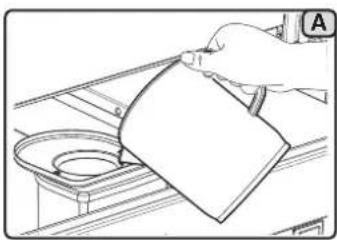
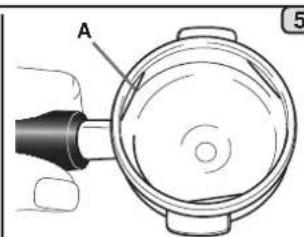
Scalding hazard! Use the appropriate insulating devices (A) to move the water and steam wands.
Steam dispensing
Completely immerse the right or left steam nozzle (6) into the container with the liquid to be heated; turn the steam adjustment knob (7) to start dispensing. Wait until the beverage has reached the desired temperature. Afterwards, turn the knob (7) clockwise to stop the steam from exiting.

Cleaning of steam dispensing pipes At the conclusion of each steam dispensing phase:
- Using a clean sponge, wash with hot water removing any organic residue present. Rinse carefully.
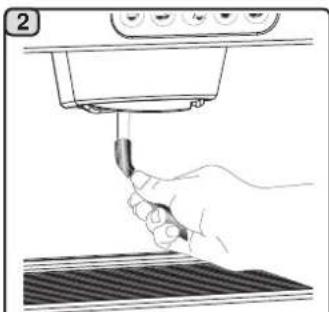
- clean the inside of the steam nozzle as follows:
Turn the nozzle towards the cup tray and carefully activate steam dispensing at least once.
Dispensing hot water
Place a container beneath the hot water tube (8) and turn the hot water dispensing knob (9) counter-clockwise. When the desired amount is reached, stop the hot water by turning the knob (9) clockwise.
14. Cleaning and maintenance

For correct application of the food safety system (HACCP), please follow the instructions in this paragraph. Washing must be carried out using original "Service Line" products, see details on the last page. Any other product could make the materials in contact with food unsuitable.

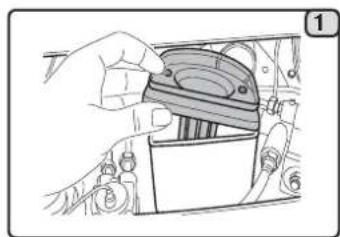
CLEANING DISPENSING UNIT - This operation must be made on all the groups at the end of each working day. Do not remove the filter holder during coffee dispensing.

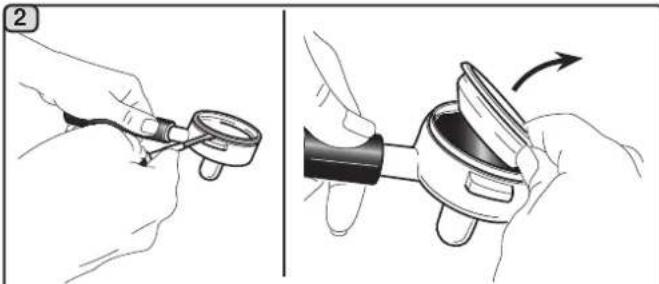
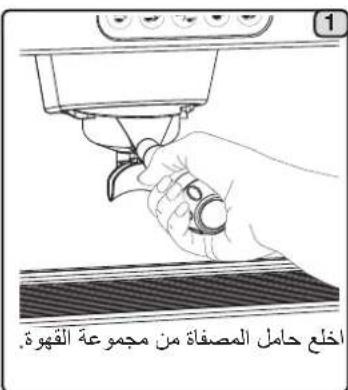
Remove the filter holder from the coffee group.
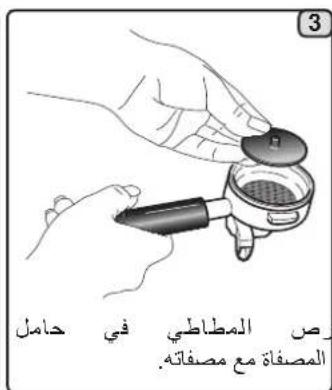
Using a brush, clean the cover gasket.
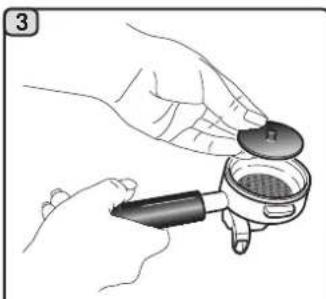
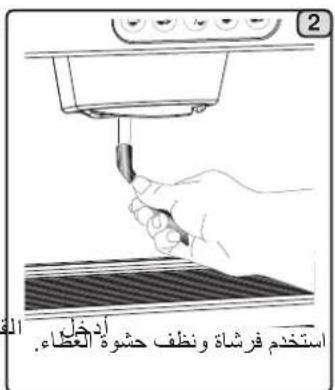
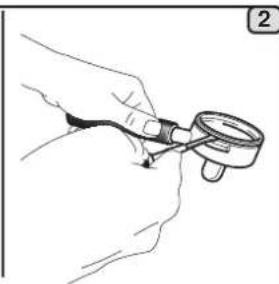
Insert the rubber disk into the filter-holder with its filter.

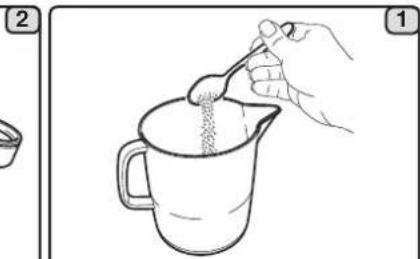
Pour in a packet or dosing cupful of detergent powder.
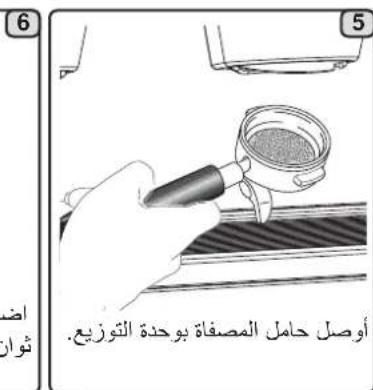
Attach the filter-holder to the dispenser unit.
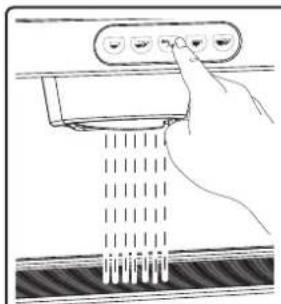
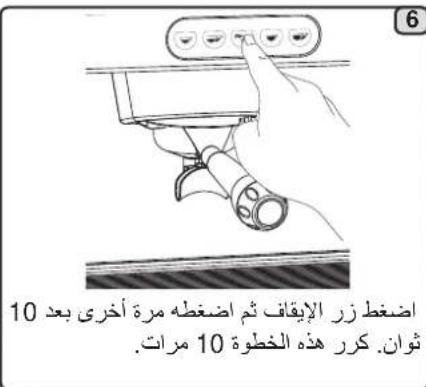
Press the stop button and press it again after 10 seconds. Repeat this step 10 times.

Remove the filter holder; Press the stop button and execute the rinse cycle with water for about 30".
FILTER-HOLDERS - This operation must be made on all the filter-holders at the end of each working day

Put a liter of cold water in a suitable container and add detergent.
Remove the filters from the filter-holders.

Soak the filters and the filter-holders in this solution for about 15 minutes.
Remove any residue with a sponge and rinse well with cold water.

Remove any residue with a sponge and rinse well with cold water.
STEAM AND HOT WATER DISPENSING PIPES - This operation must be made at the end of each working day
Using a clean sponge, wash with hot water removing any organic residue present. Rinse carefully.
To clean the inside of the steam nozzle, follow these steps: Turn the nozzle towards the cup tray and carefully activate steam dispensing at least once.
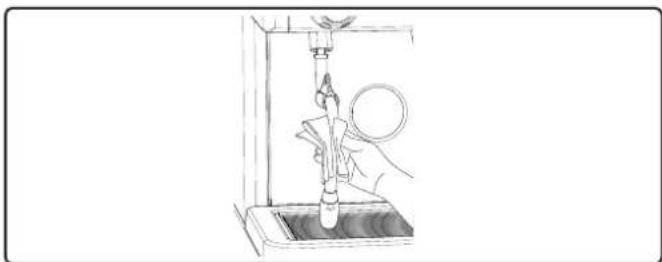
NOTE: the procedures described below can also be carried out when the machine is switched off.
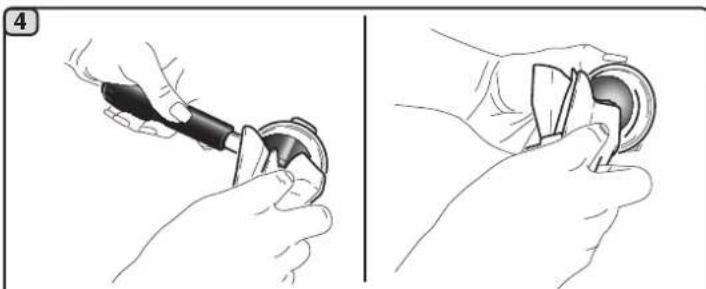
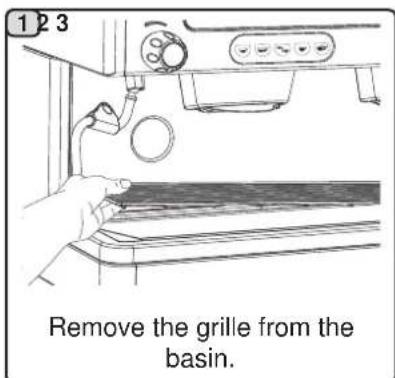
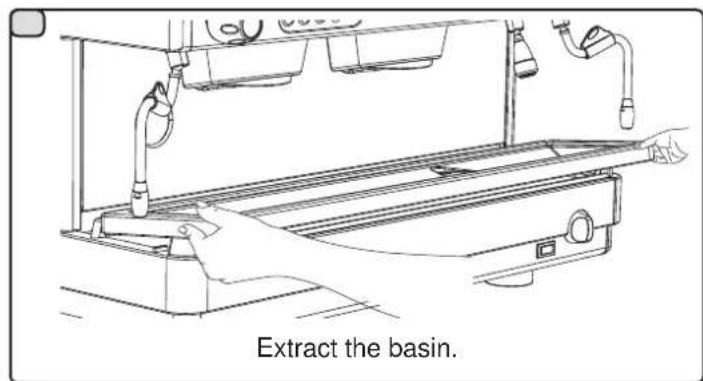
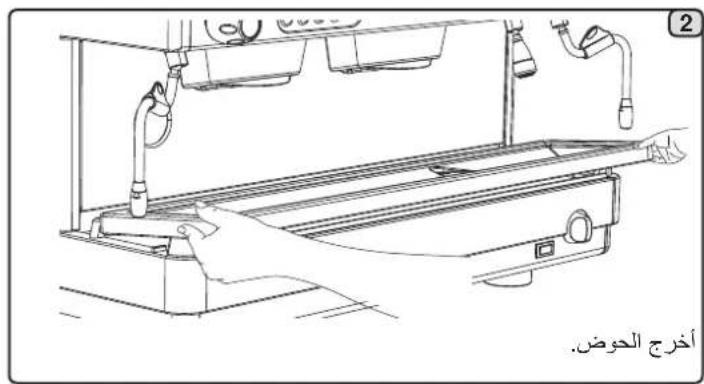
GRILLE AND DRIP BASIN - This operation must be made at the end of each working day

DISCHARGE BASIN
-
This operation must be made every 7 days
-
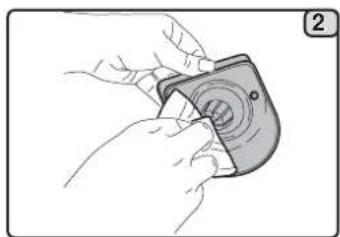
After removing the tray, remove the lid to the draining tray.
- Remove any residues with a sponge and rinse well with cold water.


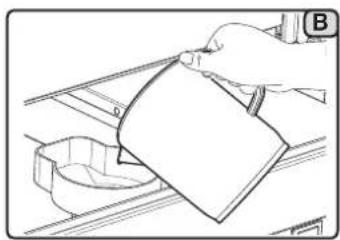
- This operation must be made at the working day
Pour about a liter of hot water into the discharge basin to remove any discharge residues.


BODYWORK - This operation must be made at the end of each working day
Use a soft cloth and cleaning products WITHOUT ammonia or abrasives, removing any organic residue present in the work area.
NOTE. Do not spray liquids into the panel slots.

15. Defects - Malfunctions
Direct action by the customer
Before calling service personnel, to avoid useless expense, check whether the machine problem corresponds to one of the cases listed below.
| PROBLEM | CAUSE | SOLUTION |
| The coffee machine is not working. | No electricity supply. | Check the electricity supply. Check the position of the ON/OFF switch (1). |
| The coffee machine is not heating up. | ON/OFF switch (1) position incorrect. | Turn the ON/OFF switch (1) to position 2. |
| Leaking from the filter holder rim (10). | Underpan gasket dirty with coffee. | Clean using the special brush provided. |
| Coffee dispensing time too short. | Coffee ground too coarse. Coffee too old. | Use a finer grind. Use new coffee. |
| Coffee drips out of machine. | Filter holes blocked or filter holder (10) outlet hole dirty. Coffee ground too fine. | Clean. Use a coarser grind. |
| Loss of water under the machine. | Discharge well clogged up. Discharge pan hole blocked. | Clean. Clean. |
| Machine heated up, but it does not dispense coffee. | Water supply or water softener tap closed. No water in system. | Open. Wait until water is available or call a plumber. |
5. Check-up d-installation

WARNING: Hot surface
ATTENTION: Surface chaude
Plan chauffe-tasses:
WARNING: Hot surface
ATTENTION: Surface chaude
WARNING: Hot surface
ATTENTION: Surface chaude
WARNING: Hot surface
ATTENTION: Surface chaude
WARNING: Hot surface
ATTENTION: Surface chaude
a a a a a a a a a a a a a a a a a a a a a a a a a a a a a a a a
1

aallll 1234567890123456789012345678901234567890123456789012345678901234567890123456789012345678901234567890123456789
()
1 1
sLj jai ygag a slal jgljbi agall oajpallnol
Lai (i) jaiy Aii 10jui i aui iui i jui piiaiu
y
aalal g aagll aabla aai baa (lae g aai g) eall aegle sddl lglal j 51 cayy
J 1 J 1 J 1 J 1 J 1 J 1 J 1 J 1 J 1 J 1 J 1 J 1 J 1 J 1 J 1 J 1 J 1 J 1 J 1 J 1 J 1 J 1 J 1 J 1 J 1 J 1 J 1 J 1 J 1 J 1 J 1 J 1 J 1 J 1 J
b_odd = 2
.
y
m = 311
.
( 12 - 12) + ·s + ( 12 - 12 + 12) + ( 12 - 12 + ·s + 12 - 12)
b_5 = 10
.
J 1


5.5
(C 15 jai bai ai jai) aayaa ayj yaaaiyaiyaiyaiyaiyaiyaiyaiyaiyaiyaiyaiyaiyaiyaiyaiyaiyaiyaiyaiyaiyaiyaiyaiyaiyaiyaiyaiyaiyaiyaiyaiyaiyaiyaiyaiyaiyaiyaiyaiyaiyaiyai

y
1
AaiX
Cilalll llaalall Cllgall Jucl aIslal Juaai Jiaill Jauill cllll Jaaai jala qaiy iay s yj 2

10
.
1 9 6 6 6 6 6 6 6 6 6 6 6 6 6 6 6 6 6 6 6 6 6 6
(1) (2)
.
.3

J 30 J 31
yall 1300a b 84 aill iai 111
a a a a a a a a a a a a a a a a a a a a a a a a a a a a a a a a a a a a a a a a
aill 1y g aiall y g iall piai
1 Kall aas gill 15y yal: al all aol glc s galsll cale gall aal gall gall gai jia
(a) (a) (a) (a) (a) (a) (a) (a) (a) (a) (a) (a) (a) (a) (a) (a) (a) (a) (a) (a) (a) (a) (a) (a)
Ailal Jaaa Jaaa Jaaa Jaaa aee 4.5) aae 8 jslly
()
algal
J 1
ailllll llll llll lllllllllllllllll
- kill, kay, 1ill (k) y, p, g, g, g, g, g, g, g, g, g, g, g, g, g, g, g, g, g, g, g, g, g

WARNING: Hot surface
ACHTUNG: Heisse Oberfläche
ATTENTION: Surface chaude
ATTENZIONE: Superficie calda
jduw:
j
i 1

a
) 1g 2000

aaii jaiy i jai y bao aaii jaiin jaiy jaiy jaiy jaiy jaiy jaiy jaiy jaiy jaiy jaiy jaiy jaiy jaiy jaiy jaiy jaiy jaiy jaiy jaiy jaiy jaiy jaiy jaiy jaiy jaiy jaiy jaiy jaiy jaiy jaiy jaiy jaiy jaiy jaiy
a jll 1234567890123456789012345678901234567890123456789012345678901234567890123456789012345678901234567890123456789
J 111111111111111111111111
aaii 1
1g 1

aL 1 1 1 1 1 1 1 1 1 1 1 1 1 1 1 1 1 1 1 1 1 1 1 1 1 1 1 1
ai a ai 分母最小值为 k .
L 8 15

Cicgagall
( ,)
m = 311
9 y n 6 Jai jy (aill jll l bai ll j) Jnlyjll clll g . (paill jll j "jnlll clll jg" (jil) cie gao aill iiai slall co jil
J
x1 = 2,x2 = - 4
Jaeil
j
3 3
aegell
300 100 g jg g g g g g g g g g g g g g g g g g
jslall slal jgi
3200 gj j j j j j j j j j j j j j j j j j j j j j j
oogai jilgdu
jglll olaa aaii iiae ie jaeal paaanall llae alil jolal e jol ol


aegal 12

jlll 10)
.(10) slalall Jol (cJg j) aJg Jai (jLill
(20·19·17·16) 8j j j j j j j j j j j j j j j j j j j j j j j j j j j j j j j j j j j j j j j j j j j j j
-
-
-
-
-
-
-
-
-
-
-
-
-
-
-
-
-
-
-
-
-
-
- 1.
-
-
-
-
-
-
-
-
-
-
-
-
-
-
-
-
-
-
-
-
-
jzjj (18)
i 1
(18) STOP
(2)gj jj C/S
2) jll aaiiaa aaiiaai
0gall jgi jao claiy Jia gao all aal jiu

saii 13

A (A) A ailll J jell lss
joll oall

J
Jilall 6 1504 (6) 1504 1504 1504 1504 1504 1504 1504 1504 1504 1504 1504 1504 1504 1504 1504 1504 1504 1504 1504 1504 150
y
aaii i aaii jaii jaii aaiia aaii aaii aaii aaii aaii aaii

jslall lll jz
aal aal alll aal aal aal aal aal
Aclull jac olj (9)


A. 1,2,3\ A. 1,2,3\
J 1 1 1 1 1 1 1 1 1 1 1 1 1 1 1 1 1 1 1 1 1 1 1 1 1 1 1 1 1 1 1 1 1 1 1 1 1 1 1 1 1 1 1 1 1 1
alil llll 1y y
a
Jaa
aagai jai jai .10
14

2g(1)
(14) jaiolai 1.2 1jai jai jai jai jai jai jai jai jai jai jai jai jai jai jai jai jai jai jai jai jai jai jai jai jai jai jai jai jai jai jai jai jai jai jai jai jai jai jai jai jai jai jai jai jai jai jai
1 1 (1) j
().11
a 11111111111111111111111
Juslll aiei agil o gill iLslo
a a a a a a a a a a a a a a a a a a a a a a a a
.(11)
12
a

aaii aai iaiy ai y jiaai lal y jia g aai aai i aai
a a a a a a a a a a a a a a a a a a a a a a a a a a a a a a a a


1 2
J 1
Lae ay 5 aiei e aeie 1 1 -
a 100000000000000000000000000000000000000000000000000000000

HACCP) 1

aaii aiaal laiie g jao yjgai gaiyai gaiyai gaiyai gaiyai gaiyai


clally 30
Jy 15 yjg jg lalal jll o0e / - gaaal Jg


gulal Jolgsj gullal
piXe 1 jll
15 1

(A) 1


ailll llll llll kai j 2 g pao n a j d jy j y j y j y j y j y
alall alalal jaiali jaiil (A
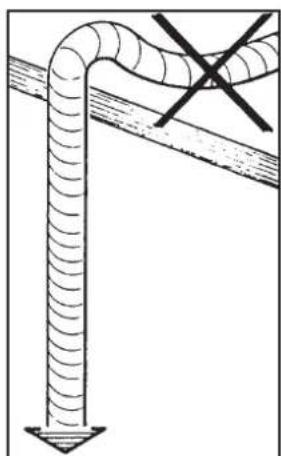
Fig. Abb.4
插图4
4
Install a water feeding tap
(for pressure beyond this value, install a pressure reducer)
uysususususususususususususususususususususususususususususususususususususususus
(benill jia
SCARICO A
PAVIMENTO
DRAIN
DRAIN
BODENABFLUSS
ALVIADERO
DESCARGA
地漏
Min.-最小
050mm.
( 2) =
一 50

This page is intentionally left blank.
© Copyright by GRUPPO CIMBALI S.p.A., Milano
EN GRUPPO CIMBALI reserves the right to make changes to the machines in accordance with the needs of individual countries and on the basis of technological progresses.
This publication may not, either in whole or in part, be used, copied or published without the written authorisation of GRUPPO CIMBALI S.p.A.
© Copyright by GRUPPO CIMBALI S.p.A., Milan, Italy
All rights reserved.
© Copyright by GRUPPO CIMBALI S.p.A., Milan
This page is intentionally left blank.
The GRUPPO CIMBALI Company's client service, the aim of which is to assure top coffee-machine performance for its clients at all times, also offers its ECO LINE, a series of specific cleaning products expressly designed for this purpose.
ECO LINE - Cleaning products
A) For cappuccino makers in liquid form 610-004-159;
B) For dispensers, filter-holders, coffee cups in powder form 610-004-250;
C) For dispensers, filter-holders, coffee cups in sachets 610-004-244;
D) For superautomatic-machine dispensers in tablet form 610-004-226.
Order directly from your local distributor and refer to the particular item you require by its number, as shown above.
FR GRUPPO CIMBALI et la "SERVICE LINE"
The Manufacturer reserves the right to modify the appliances presented in this publication without notice
jaii jaii jaii jaii jaii jaii jaii jaii jaii jaii jaii jaii jaii jaii jaii jaii jaii jaii jaii jaii jaii jaii jaii jaii jaii jaii jaii jaii jaii jaii jaii jaii jaii jaii jali

GRUPPO CIMBALI SpA - 20082 BINASCO (MILANO) ITALY

CERT. NR. 50 100 3685 / 10877 / 11721


- FR LEGENDE
- USE
- General Rules
- Installation Rules
- WARNING
- Electrical Installation Rules
- Water Installation Rules
- WATER REQUIREMENTS
- WATER CONNECTIONS
- Installation Check-up
- FUNCTIONING
- GROUPS
- HOT WATER
- STEAM
- Rules for the worker operating the machine
- BEFORE YOU START
- ON THE JOB
- Steam dispensing
- Coffee dispensing
- Hot water dispensing
- Cleaning the coffee circuits
- Danger of burns
- Cup-warming plate
- MACHINE CLOSE-DOWN
- Maintenance and Repairs
- To ensure safety during operation, it is absolutely necessary to:
- Dismantling the machine
- Day-to-day operation
- Cup-Warmer (when provided)
- Delivery of the coffee
- Other hot beverage
- Dispensing hot water
- Cleaning and maintenance
- FILTER-HOLDERS - This operation must be made on all the filter-holders at the end of each working day
- DISCHARGE BASIN
- Defects - Malfunctions
- Direct action by the customer
- Check-up d-installation
- Plan chauffe-tasses:
- 5.5
- .3
- aegal 12
- saii 13
- 1,2,3\ A. 1,2,3\
- Jaa
- ().11
- ECO LINE - Cleaning products
- FR GRUPPO CIMBALI et la "SERVICE LINE"
Brand : La Cimbali
Model : M27
Category : Coffee machine