Gloria SAE - Coffee machine ASTORIA - Free user manual and instructions
Find the device manual for free Gloria SAE ASTORIA in PDF.
| Brand | Astoria |
| Model | Gloria SAE |
| Category | Espresso coffee machine |
| Machine type | Professional heavy-duty |
| Number of groups | 2, 3 or 4 depending on version |
| Pump pressure | 8-9 bar |
| Boiler pressure | 0.8-1.2 bar |
| Electrical supply | 230 V / 50 Hz (depending on country) |
| Power | Approximately 2000-3000 W |
| Main functions | Espresso, cappuccino, latte, hot milk, hot water, steam |
| Dose programming | Yes, via electronic keypad and programming key |
| Cappuccino system | Integrated device with suction hose and autosteamer (ASD) |
| Cup warmer | Yes, adjustable from 70 to 110 °C |
| Water softener | Integrated, regenerable resins (8/12/16 liters) |
| Display | LCD with pressure, temperature, time, and message information |
| Body materials | Stainless steel |
| Daily cleaning | Filters and filter holders with hot water |
| Weekly cleaning | Dispensing groups, shower head, thermal tank |
| Monthly cleaning | Steam pipes (orifices) |
| Periodic maintenance | Softener regeneration every 15 days, annual check by after-sales service |
| Safety | Mandatory grounding, safety valve, main switch, thermal protection |
| Spare parts | Filters, gaskets, filter holders, grinder burrs, steam pipes |
| Repairability | Authorized technical support, original parts |
| Warranty | 12 months on components (excluding electrical and wear parts) |
Frequently Asked Questions - Gloria SAE ASTORIA
User questions about Gloria SAE ASTORIA
0 question about this device. Answer the ones you know or ask your own.
Ask a new question about this device
Download the instructions for your Coffee machine in PDF format for free! Find your manual Gloria SAE - ASTORIA and take your electronic device back in hand. On this page are published all the documents necessary for the use of your device. Gloria SAE by ASTORIA.
USER MANUAL Gloria SAE ASTORIA
ASD - automatic steamer device
DS - drink selection
instruction manual for user
ASD - automatic steamer device
DS - drink selection
GLORIA
text_image
Technical diagram showing four steps of a mechanical device with labeled parts A, B, C, and D.Beccuccio a 3 tazze
text_image
Diagram of a mechanical device with numbered components and directional arrows indicating flow or movement.
natural_image
Diagram of a mechanical device with two ports and downward arrows indicating flow or movement (no text or symbols)
natural_image
Diagram of a cylindrical device with internal tubing and directional arrows indicating flow or movement (no text or symbols)natural_image
Illustration of a magnifying glass casting on a tray with three small objects (no text or symbols)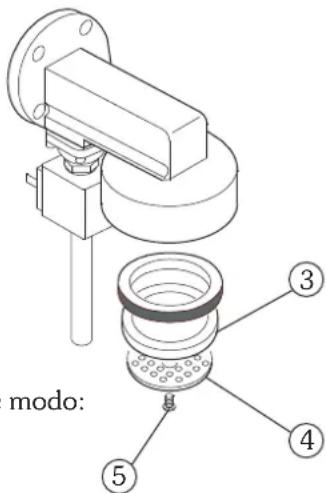
text_image
modo:natural_image
Technical line drawing of a mechanical device with no visible text or symbolsCappuccinatore
text_image
Labeled diagram of a espresso machine with numbered parts and an inset showing its internal control panel.2. Pulsantiere
natural_image
Three circular icons with crescent moon symbols above, no text or labels present
text_image
stop prognatural_image
Technical diagram of a coffee machine with labeled parts (no text or symbols beyond label)natural_image
Line drawing of a coffee maker with funnel and side cup (no text or symbols)
natural_image
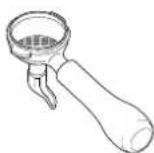
Line drawing of a mechanical tool or connector with a meshed top and handle (no text or symbols)text_image
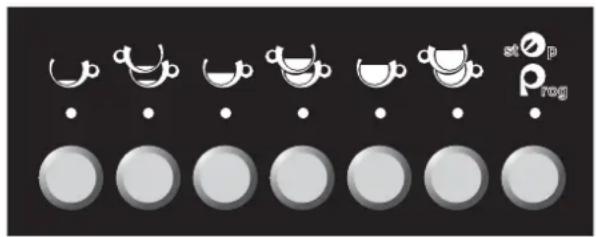
Image showing a row of coffee cups with white teapot icons and corresponding circular icons below, likely representing tea or coffee meal options.PROGRAMMAZIONE DOSI CAFFE'
text_image
Technical diagram of a espresso machine with labeled parts and component annotationstext_image
Technical diagram of a mechanical device with numbered components and directional arrows indicating motion or assembly.SAE DISPLAY
natural_image
Three circular icons with crescent moon symbols above, arranged horizontally on a dark background (no text or labels)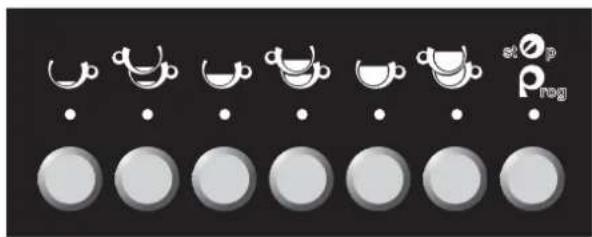
text_image
stop Pregnatural_image
Technical diagram of a coffee machine with labeled parts (no text or symbols present)natural_image
Line drawings of a coffee maker and its corresponding manual pump (no text or symbols)natural_image
Technical line drawing of a espresso machine with no visible text or symbols
o il tasto PROG

natural_image
Technical line drawing of a espresso machine with labeled parts (no text or symbols beyond labels)ASD - automatic steamer device
DS - drink selection
text_image
stop p lognatural_image
Row of grayscale circular icons with white teacups and dots, no text or symbols present6.2 Programmazione
text_image
Labeled diagram of a espresso machine showing numbered parts for assembly or maintenance reference.10. DS drink selection
10.1 Utilizzo
natural_image
Simple line drawing of a milk carton with a tube and label (no text or symbols beyond the label)
text_image
Cappuccino Latte Foamed Milk Hot Milk Latte Macchiato Auto Steamer Additional Hot Milk11. ASD automatic steamer device
11.1 Utilizzo
text_image
Auto Steamer Tasto autosteamer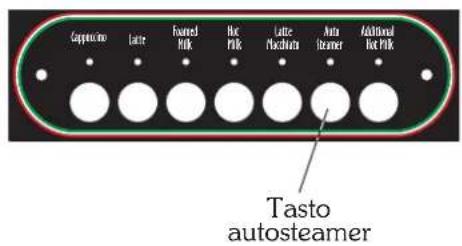
text_image
Coppuccino Lattice Fourned Milk Hot Milk Lattice Machinera Auto Steamer Additional Hot Milk Tasto autosteamer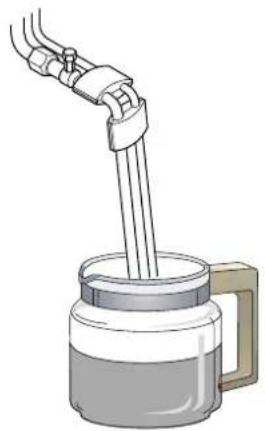
natural_image
Illustration of a hand pouring liquid into a container with a handle (no text or symbols)
natural_image
Illustration of a micrometer with a glass jar and connecting tubing (no text or symbols)PORRE TUBI LATTE IN ACOUR
PREMERE IL TASTO "AGG. LATTE" 3 SEC.

ASD - automatic steamer device
DS - drink selection
GLORIA
text_image
Technical diagram showing four steps of a mechanical device with labeled parts A, B, C, and D.Pitón para 3 tazas
text_image
Diagram of a mechanical device with numbered components and directional arrows indicating flow or movement.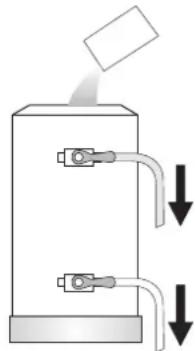
natural_image
Diagram of a mechanical device with two ports and downward arrows indicating flow or movement (no text or symbols)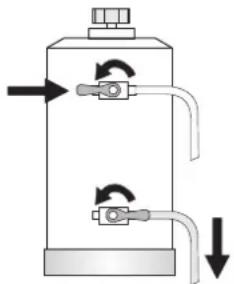
natural_image
Diagram of a cylindrical device with internal components and directional arrows indicating flow or movement (no text or symbols)natural_image
Illustration of a tray with three small objects and a magnifying glass, no text or symbols present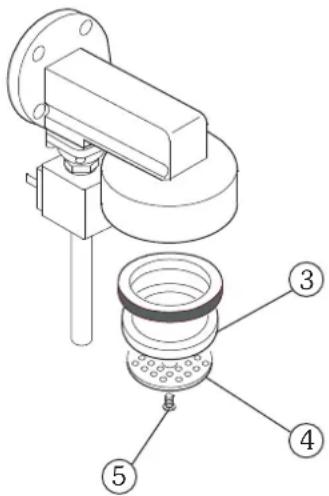
text_image
Technical diagram of a mechanical assembly with numbered parts labeled 3, 4, and 5
natural_image
Technical line drawing of a mechanical device with no visible text or symbolsCapuchinador
text_image
Labeled diagram of a coffee machine with numbered parts and a close-up inset showing internal components.2. Botoneras

natural_image
Three circular icons with crescent moon symbols above, no text or labels present
text_image
stop prognatural_image
Technical diagram of a coffee machine with labeled parts (no text or symbols beyond label)natural_image
Line drawing of a coffee maker with funnel and side mount (no text or symbols)
natural_image
Line drawing of a mechanical lever handle with a meshed top and handle (no text or symbols)text_image
Image showing a row of coffee cups with white teacups above and a small 'ρ' logo on the right, likely indicating a brand or product.text_image
Technical diagram of a espresso machine with labeled parts and component annotationstext_image
Technical diagram of a espresso machine with labeled parts 1 and 2
text_image
Labeled diagram of a sewing machine with numbered parts for identification
natural_image
Three circular icons with white crescent moon symbols on a dark background, no text or labels present.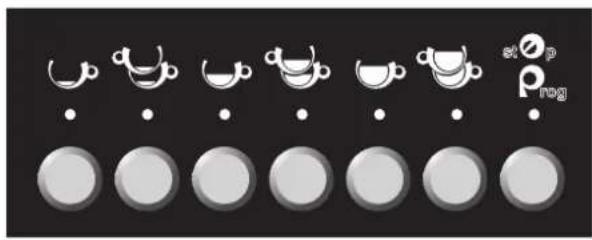
text_image
stop no p rognatural_image
Technical diagram of a coffee machine with labeled parts (no text or symbols present)natural_image
Line drawings of a coffee maker and its corresponding manual pump (no text or symbols)natural_image
Technical line drawing of a espresso machine with no visible text or symbolsnatural_image
Technical line drawing of a espresso machine with labeled parts (no text or symbols present)ASD - automatic steamer device
DS - drink selection
natural_image
Row of grayscale circular icons with white cups and dots, no text or symbols presentnatural_image
Row of circular icons with white teacups and dots, arranged in rows (no text or symbols)6.2 Programación
text_image
Labeled diagram of a coffee machine with numbered parts for identification10. DS drink selection
10.1 Utilización
natural_image
Simple line drawing of a milk carton with a tube and connector (no text or symbols)
text_image
Cappuccino Latte Foamed Milk Hot Milk Latte Macchiato Auto Steamer Additional Hot Milk11. ASD automatic steamer device
11.1 Utilización
text_image
Coppiuto Latte Fourned Milk Hot Milk Latte Placchura Auto Steamer Additional Hot Milk Botón autosteamer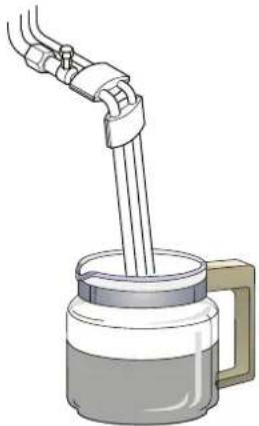
natural_image
Illustration of a hand pouring liquid into a container with a handle (no text or symbols)
natural_image
Illustration of a micrometer with a handle and tubing (no text or symbols)text_image
Auto SteamerASD - Automatic Steamer Device
DS - drink selection
GLORIA
text_image
Technical diagram showing four steps of a mechanical device with labeled components A, B, C, and D.Bec à 3 tasses
text_image
Diagram of a mechanical device with numbered components and directional arrows indicating flow or movement.
natural_image
Diagram of a mechanical device with two ports and downward arrows indicating flow or movement (no text or symbols)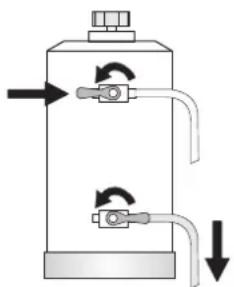
natural_image
Diagram of a cylindrical tank with internal tubing and directional arrows indicating flow or movement (no text or symbols)natural_image
Technical line drawing of a mechanical device with no visible text or symbolstext_image
Labeled diagram of a coffee machine with numbered parts and an inset showing a control panel with Chinese characters.2. Claviers
natural_image
Three circular icons with crescent moon symbols above, no text or labels present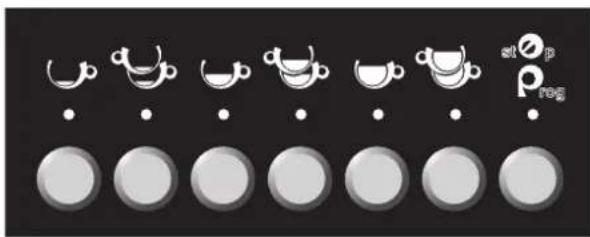
text_image
stop prog| 1 Café espresso | |
| 2 Cafés espresso | |
| 1 Café moyen | |
| 2 Cafés moyens | |
| 1 Café long | |
| 2 Cafés longs | |
| atoprog | Stop / Prog |
| Eau chaude |
natural_image
Technical diagram of a coffee machine with labeled parts (no text or symbols beyond label)natural_image
Line drawing of a coffee maker with funnel and side base (no text or symbols)
natural_image
Line drawing of a mechanical tool or connector with a handle and central mesh (no text or symbols)text_image
Image showing a row of coffee cups with icons and labels, likely representing a cooking or cooking process.PROGRAMMATION DOSES CAFÉ
text_image
Technical diagram of a espresso machine with labeled parts and component annotationstext_image
Technical diagram of a espresso machine with labeled parts 1 and 2
text_image
Labeled diagram of a coffee machine with numbered parts for identification
text_image
Technical diagram of a mechanical device with numbered components and Chinese explanatory text on the left.SAE DISPLAY
natural_image
Three circular icons with white crescent moon symbols, no text or labels present
text_image
stop P NOG| TOUCHE UTILISATION | TOUCHE PROGRAMMATION | |
| 1 Café espresso | MODE | |
| 2 Cafés espresso | ENTER | |
| 1 Café moyen | AUGMENTATION | |
| 2 Cafés moyens | DIMINUTION | |
| 1 Café long | ____ | |
| 2 Cafés longs | ____ | |
| stOprog | Stop | PROGRAMMATION |
| Eau chaude | ____ |
natural_image
Technical diagram of a coffee machine with labeled parts (no text or symbols present)natural_image
Line drawings of a coffee maker and its side view (no text or symbols)natural_image
Line drawing of a espresso machine with no visible text or symbolstext_image
4 st o p P rog OFF. ② 3text_image
Technical diagram of a espresso machine with labeled parts and numbered annotation10.2 Programmation ALLUMAGE
10.4 Programmation JOURS DE REPOS
MISE A O CALCULS P APPUYERS + 3 SEC.
ALARME DOSEURS 000 000 000 000
text_image
TOTAL CAFÉS 00000000 MISE A O CALCULS? APPUYERS + 3 SEC. MISE A DONNEESS
ASD - Automatic Steamer Device DS - drink selection
text_image
stop p log| TOUCHE UTILISATION | TOUCHE PROGRAMMATION | |
| 1 Café espresso | MODE | |
| 2 Cafés espresso | ENTER | |
| 1 Café moyen | AUGMENTATION | |
| 2 Cafés moyens | DIMINUTION | |
| 1 Café long | ____ | |
| 2 Cafés longs | ____ | |
| st O_p rog | Stop | PROGRAMMATION |
| Eau chaude | ____ |
2.3 Clavier DS - Drink selection
natural_image
Row of circular icons with white teacups and dots, arranged in rows (no text or symbols)6.2 Programmation
text_image
Labeled diagram of a coffee machine with numbered parts for identification
10. DS drink selection
10.1 Utilisation
natural_image
Simple line drawing of a milk carton with a tube and label (no text or symbols beyond the label)
text_image
Cappuccino Latte Foamed Milk Hot Milk Latte Macchiato Auto Steamer Additional Hot Milk10.2 Programmation des doses
10.2.3 Programmation LAIT AVEC NUAGE DE CAFÉ - CHAUD -
11. ASD automatic steamer device
11.1 Utilisation
text_image
Auto Steamer Touche autosteamer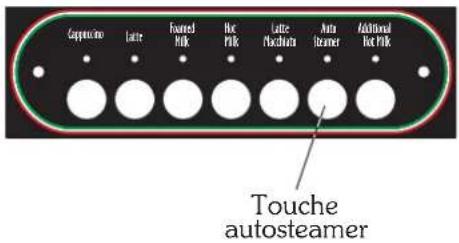
text_image
Copper wire Latte Foxted milk Hot milk Latte plasticator Auto stamer Additional hot milk Touche autosteamer
natural_image
Illustration of a hand pouring liquid into a container with a handle (no text or symbols)
text_image
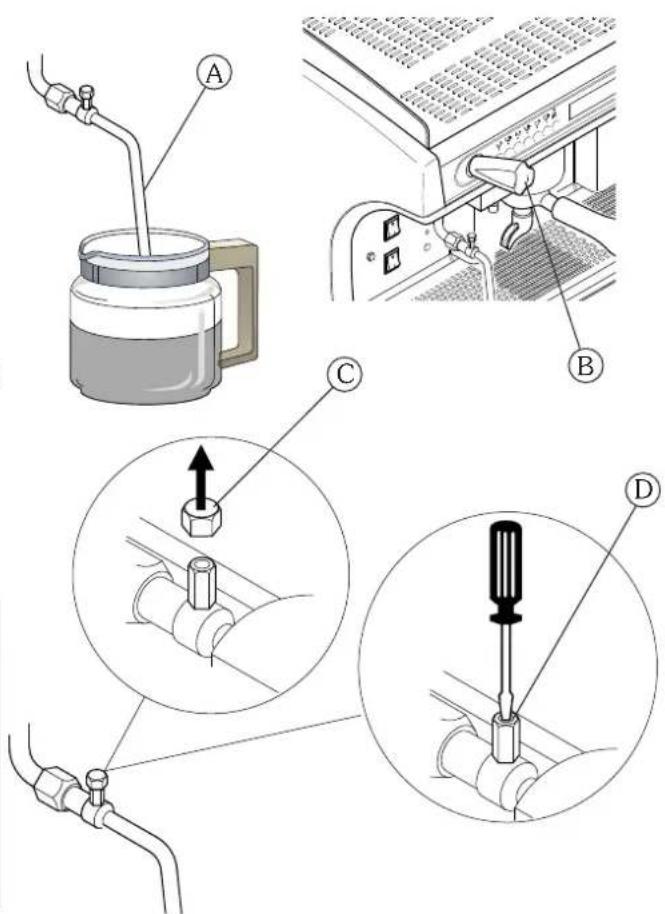
Technical diagram showing mechanical assembly with labeled parts A and B, including a bolted joint and two circular insets for detail views.LAVAGE APPAREIL CRAPPUCCINO
PLONGER TUYAUX LAIT DANS L'EAU
APPUYER SUR LA TOUCHE "AJOUT LAIT" 3 SEC.
natural_image
Illustration of a glass mug with a side arm and a tube inserted into it, connected by a wire (no text or symbols)METTRE LES TUYAUX DU LAIT DANS L'EAU
APPUYER BOUTON "ABOUT LAIT" 3 SEC.

14.4 Programmation JOURS DE REPOS
text_image
Auto SteamerMISE A O CALCULS P APPUYER + 3 SEC.
MISE A O DONNESS
i
ASD - Automatic Steamer Device
DS - drink selection
GLORIA
instruction manual for user - ENGLISH
Read carefully ...... page 4
How to use this manual ...... page 4
General notices ...... page 4
Guarantee page 5
Presentation ...... page 5
Accessories ...... page 6
Softener......page 7
Cleaning ...... page 8
Checks and Maintenance ...... page 9
Suggestions on how to obtain a good cup of coffee .. page 10
List of hazards ...... page 10
Gloria AL-AEP-SAE page 11
Gloria SAE DISPLAY page 21
Gloria SAE DISPLAY with ASD-DS ...... page 31
GLORIA
instruction manual for user - ENGLISH
Read carefully
all parts of this manual before using the product.
The espresso coffee machine that you have purchased has been designed and manufactured with innovative methods and technology which ensure long lasting quality and reliability.
This booklet will guide you in discovering the advantages of purchasing this product. You will find notes on how to get the best out of your machine, how to always keep it efficient and what to do if you come up against any difficulties.
Keep this booklet in a safe place. If you lose it you can ask the manufacturer for another copy.
ENJOY YOUR READING ... AND YOUR COFFEE
How to use this manual
The manufacturer has the right to make any improvements on the product. We also guarantee that this booklet reflects the technical state of the product at the time it is marketed.
We take the opportunity to invite the customers to make any proposals for improvement of the product or the manual.
General warnings
- After removing the packaging, check the condition of the appliance. If in doubt, do not use it but contact the retailer directly.
- The packaging material must not be left in the reach of children in that they are a potential source of danger. It is advised to keep the packaging until after the guarantee has expired.
- Before using the machine, make sure that the mains voltage corresponds to the information on the data plate of the machine.
- The installation must be done in accordance with the safety standards in force and by qualified and prepared personnel. Incorrect installation may be harmful to people, property or animals.
- This appliance is completely safe only if it is connected to an effective earth system, executed as required by current safety standards. It is important to have compliance with this requirement checked. If in doubt, have the system carefully checked by qualified personnel. The manufacturer cannot be considered responsible for any damage caused by an incorrect grounding device.
- Upon installation of the machine, qualified personnel will be required to install a main switch as required by current safety regulations, with a distance of contact aperture greater than or equal to 3 mm.
- It is not advisable to use extensions or electrical adaptors with multiple outlets. If their use is indispensable only use simple or multiple plug adaptors and extensions which are in accordance with the safety standards in force. Never exceed the capacity value in kW indicated on the simple adaptor or on the extensions and the maximum power value indicated on the adaptor.
- The espresso coffee machine is intended for the preparation of hot beverages such as coffee, tea or warm milk. This appliance is to be used only for its intended purpose. Any other use is considered improper and therefore dangerous. The manufacturer cannot be responsible for any damage caused by incorrect and unreasonable use.
- Before any maintenance deactivate the appliance from the electrical network through the bi-polar switch.
-
For daily cleaning follow that which is indicated in this manual.
-
When using the electrical appliance several safety standards must be observed :
- do not touch the appliance when hands or feet are wet or damp;
- do not use the appliance in bare feet;
- do not use extensions in rooms where there are showers or baths;
- do not pull on the power cord to disconnect the appliance from the power outlet;
- do not leave the appliance exposed to atmospheric agents (rain, sun, etc.)
-
do not allow the appliance to be used by children or incapable people.
-
In case of breakdowns or poor functioning turn off the appliance, and unplug it. Do not attempt any repairs; call for specialised technical assistance.
- Any repairs must be done only by the manufacturer or an authorised assistance centre using exclusively original spare parts. If this instruction is not observed the safety of the appliance is compromised and cancels the guarantee.
- The power cord of the appliance must not be replaced by the user. If the cable is damaged turn the machine off and contact only professionally qualified personnel.
- If you should decide not to use the appliance any longer, unplug it and have it drained of water by qualified personnel.
- To guarantee that the machine is efficient for its correct functioning it is indispensable to follow the manufacturer's instructions, having periodical maintenance and a check of all the safety devices done by qualified personnel.
- Do not expose your hands or other body parts in the direction of the coffee delivery spouts or in the direction of the steam and hot water delivery terminals. The steam and the water that exit the nozzles can cause burns.
- When functioning, the steam and water nozzles and the filter-holder cups are overheated and are to be handled with care only in the indicated parts.
- Cups must be placed on the special cup-heating surface only after having been thoroughly dried.
- The dishes belonging to the machine itself are to be placed on the cup-heater surface. It is incorrect to place any other object.
- Any unauthorised handling of any parts of the machine renders any guarantee null and void.

GUARANTEE
12 months on all components except electrical and electronic components and expendable pieces.
Presentation
The espresso coffee machine is for strictly professional use. It is designed for the preparation of hot drinks such as tea, cappuccinos and weak, strong and espresso coffee, etc. A range of accessories is available to guarantee practical and functional use of the machine.
If the model has two or more groups it can be used by two or more people simultaneously. This characteristic, together with the fact that the machine is able to deliver drinks continuously without any problems, guarantees its intensive use.
Following are the instructions for correct use of the machine. The various accessories supplied with the appliance will also be examined.

The user must have sufficient instructions to correctly operate the machine. It is recommended not to carry out any operations on the machine which can tamper with or alter its functionality. WHEN THE MACHINE IS OPERATIVE THE BOILER CONTAINS STEAM AND HOT WATER THAT ARE UNDER PRESSURE.
Accessories
Cappuccino maker
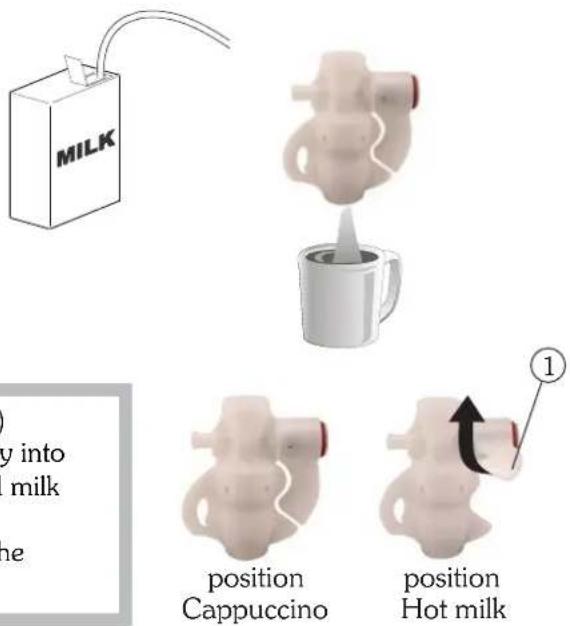
- Put the suction tube inside the milk;
- place the jug under the spout of the cappuccino maker;
- turn the steam tap counter-clockwise, upon reaching the desired amount, close the steam tap;
• pour the foamed milk into the cups with coffee.

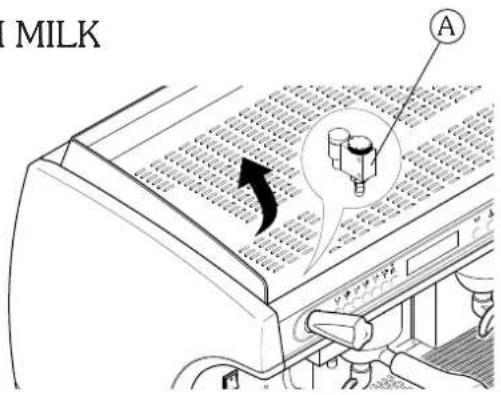
To obtain delivery of warm milk without foam, lift the tab (1) upwards. For better results, we suggest not dispensing directly into the coffee cup, but into a jug or pot, then putting the foamed milk with the coffee. Be sure the cappuccino maker is kept clean as described in the chapter "Cleaning".
text_image
MILK y into milk ne position Cappuccino position Hot milk ①Milk foaming nozzle
- Insert the nozzle (A) in the milk so that the sprayer is completely covered;
• turn the steam tap (B) counter-clockwise;
• wait for the milk to heat and foam; - upon reaching the desired temperature and foaming turn the steam tap (B) clockwise.
To adjust milk foaming proceed as follows:
- Use a wrench to unscrew component (A) of the milk foaming nozzle;
- Use a screwdriver on the screw (D) located inside the part:
- to reduce foaming turn clockwise
- to increase foaming turn counter-clockwise

To keep the milk foaming device in perfect working order, it is advisable to carry out a delivery dry run after each use.
Keep the ends of the of the nozzle clean at all times by means of a cloth dampened in lukewarm water.
Use the utmost caution with the milk foaming nozzle, as high-temperature steam is present.
text_image
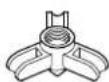
Technical diagram showing four steps of a mechanical assembly: pouring, pressing into a device, adjusting a bolt, and connecting a valve to a hose.3-cup spout
To deliver 3 cups of coffee simultaneously, use the 3-cup spout (use about 21 gr. of ground coffee).
S oftener
Mains water contains insoluble salts, which cause the build-up of lime scale deposits in the boiler and in other parts of the machine. The softener makes it possible to eliminate or substantially reduce the presence of these mineral salts.
The resin softener has the property of retaining the calcium contained in the water. For this reason after a certain period the resins are saturated and are to be regenerated with coarse kitchen salt (NaCL, sodium chloride) or special water softening salt. It is very important to regenerate the softener within the established times.
The regeneration is to be done regularly every 15 days. However, in locations with very hard water, it will be necessary to regenerate more frequently. The same is true of places in which there is a large consumption of hot water for tea or other uses.
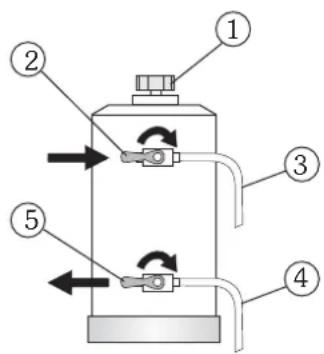
Softener regeneration
Proceed as follows:
• move levers (2) and (5) from left to right;
- Remove the lid by loosening the knob (1).
- Release enough water through the pipe (3) to make room for the amount of salt as required depending on the model (see table).
- Clean any salt or resin residue from the gasket located on the lid.
- Put the lid back in place by screwing the knob (1) down securely and move the lever (2) back from right to left.
- Let the salt water drain from the small tube (4) until the water is no longer salty (about 30-60 minutes). The salt allows the accumulated mineral salts to be released.
- Bring the lever (5) from right to left back to its initial position.
text_image
Diagram of a mechanical device with numbered components and directional arrows indicating flow or movement.
natural_image
Diagram of a mechanical device with two ports and downward arrows indicating flow or movement (no text or symbols)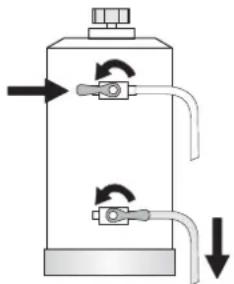
natural_image
Diagram of a vertical cylindrical device with internal tubing and directional arrows indicating flow or movement (no text or symbols)| Model softener | Amount of salt |
| 8 litres 1.0 kg | |
| 12 litres 1.5 kg | |
| 16 litres 2.0 kg |

The build-up of lime scale in the hydraulic circuit and boiler inhibit thermal exchange, thus compromising proper operation of the machine. Heavy incrustation in the boiler may cause long machine shutdowns and in any case invalidate any guarantee, because this symptom indicates that regeneration has been neglected.
In order to keep the softener and hence the machine in perfect operating condition, it is necessary to perform regeneration periodically based on the use of the softener and the hardness of the water that is used.
The table alongside shows the values of the quantity of softened water based on the hardness of the water in the various units of measure:
- F°: French degree
- D°: German degree = 1.8 °F
- mg CaCO _3
Amount of softened water based on hardness
| F^ 30^ | 40^ | 60^ | 80^ | salt | |
| D^ 16.5^ | 22^ | 33^ | 44^ | ||
| mg CaCO_3 | 30 | 40 | 60 | 80 | |
| 8 litres 1000 lt | 900 lt | 700 lt | 500 lt | 1.0 kg | |
| 12 litres 1500 lt 1350 lt | 1050 lt 750 lt 1.5 kg | ||||
| 16 litres 2100 lt 1800 lt | 1400 lt 1000 lt 2.0 kg | ||||
For further information on installation, start-up and regeneration of the softener, refer to the relative instruction manual.
Cleaning
For perfect cleaning and efficiency of the appliance, several simple cleaning operations are necessary on the functional parts and accessories as well as the body panels. The indications given here are applicable for normal use of the coffee machine. If the machine is heavily used then cleaning should be performed more frequently.
Filter and filter-holder
The filters and the relative filter-holders must be cleaned daily in hot water. The best thing to do is to let them soak in hot water overnight so that the fatty coffee deposits can dissolve.
It is advisable to add an envelope or tablet of special detergent to the water, and then to rinse everything off with water.
Failure to clean the filters and filter holders daily will compromise the quality of the coffee and will also cause problems such as bad extraction and coffee grounds at the bottom of the cup.
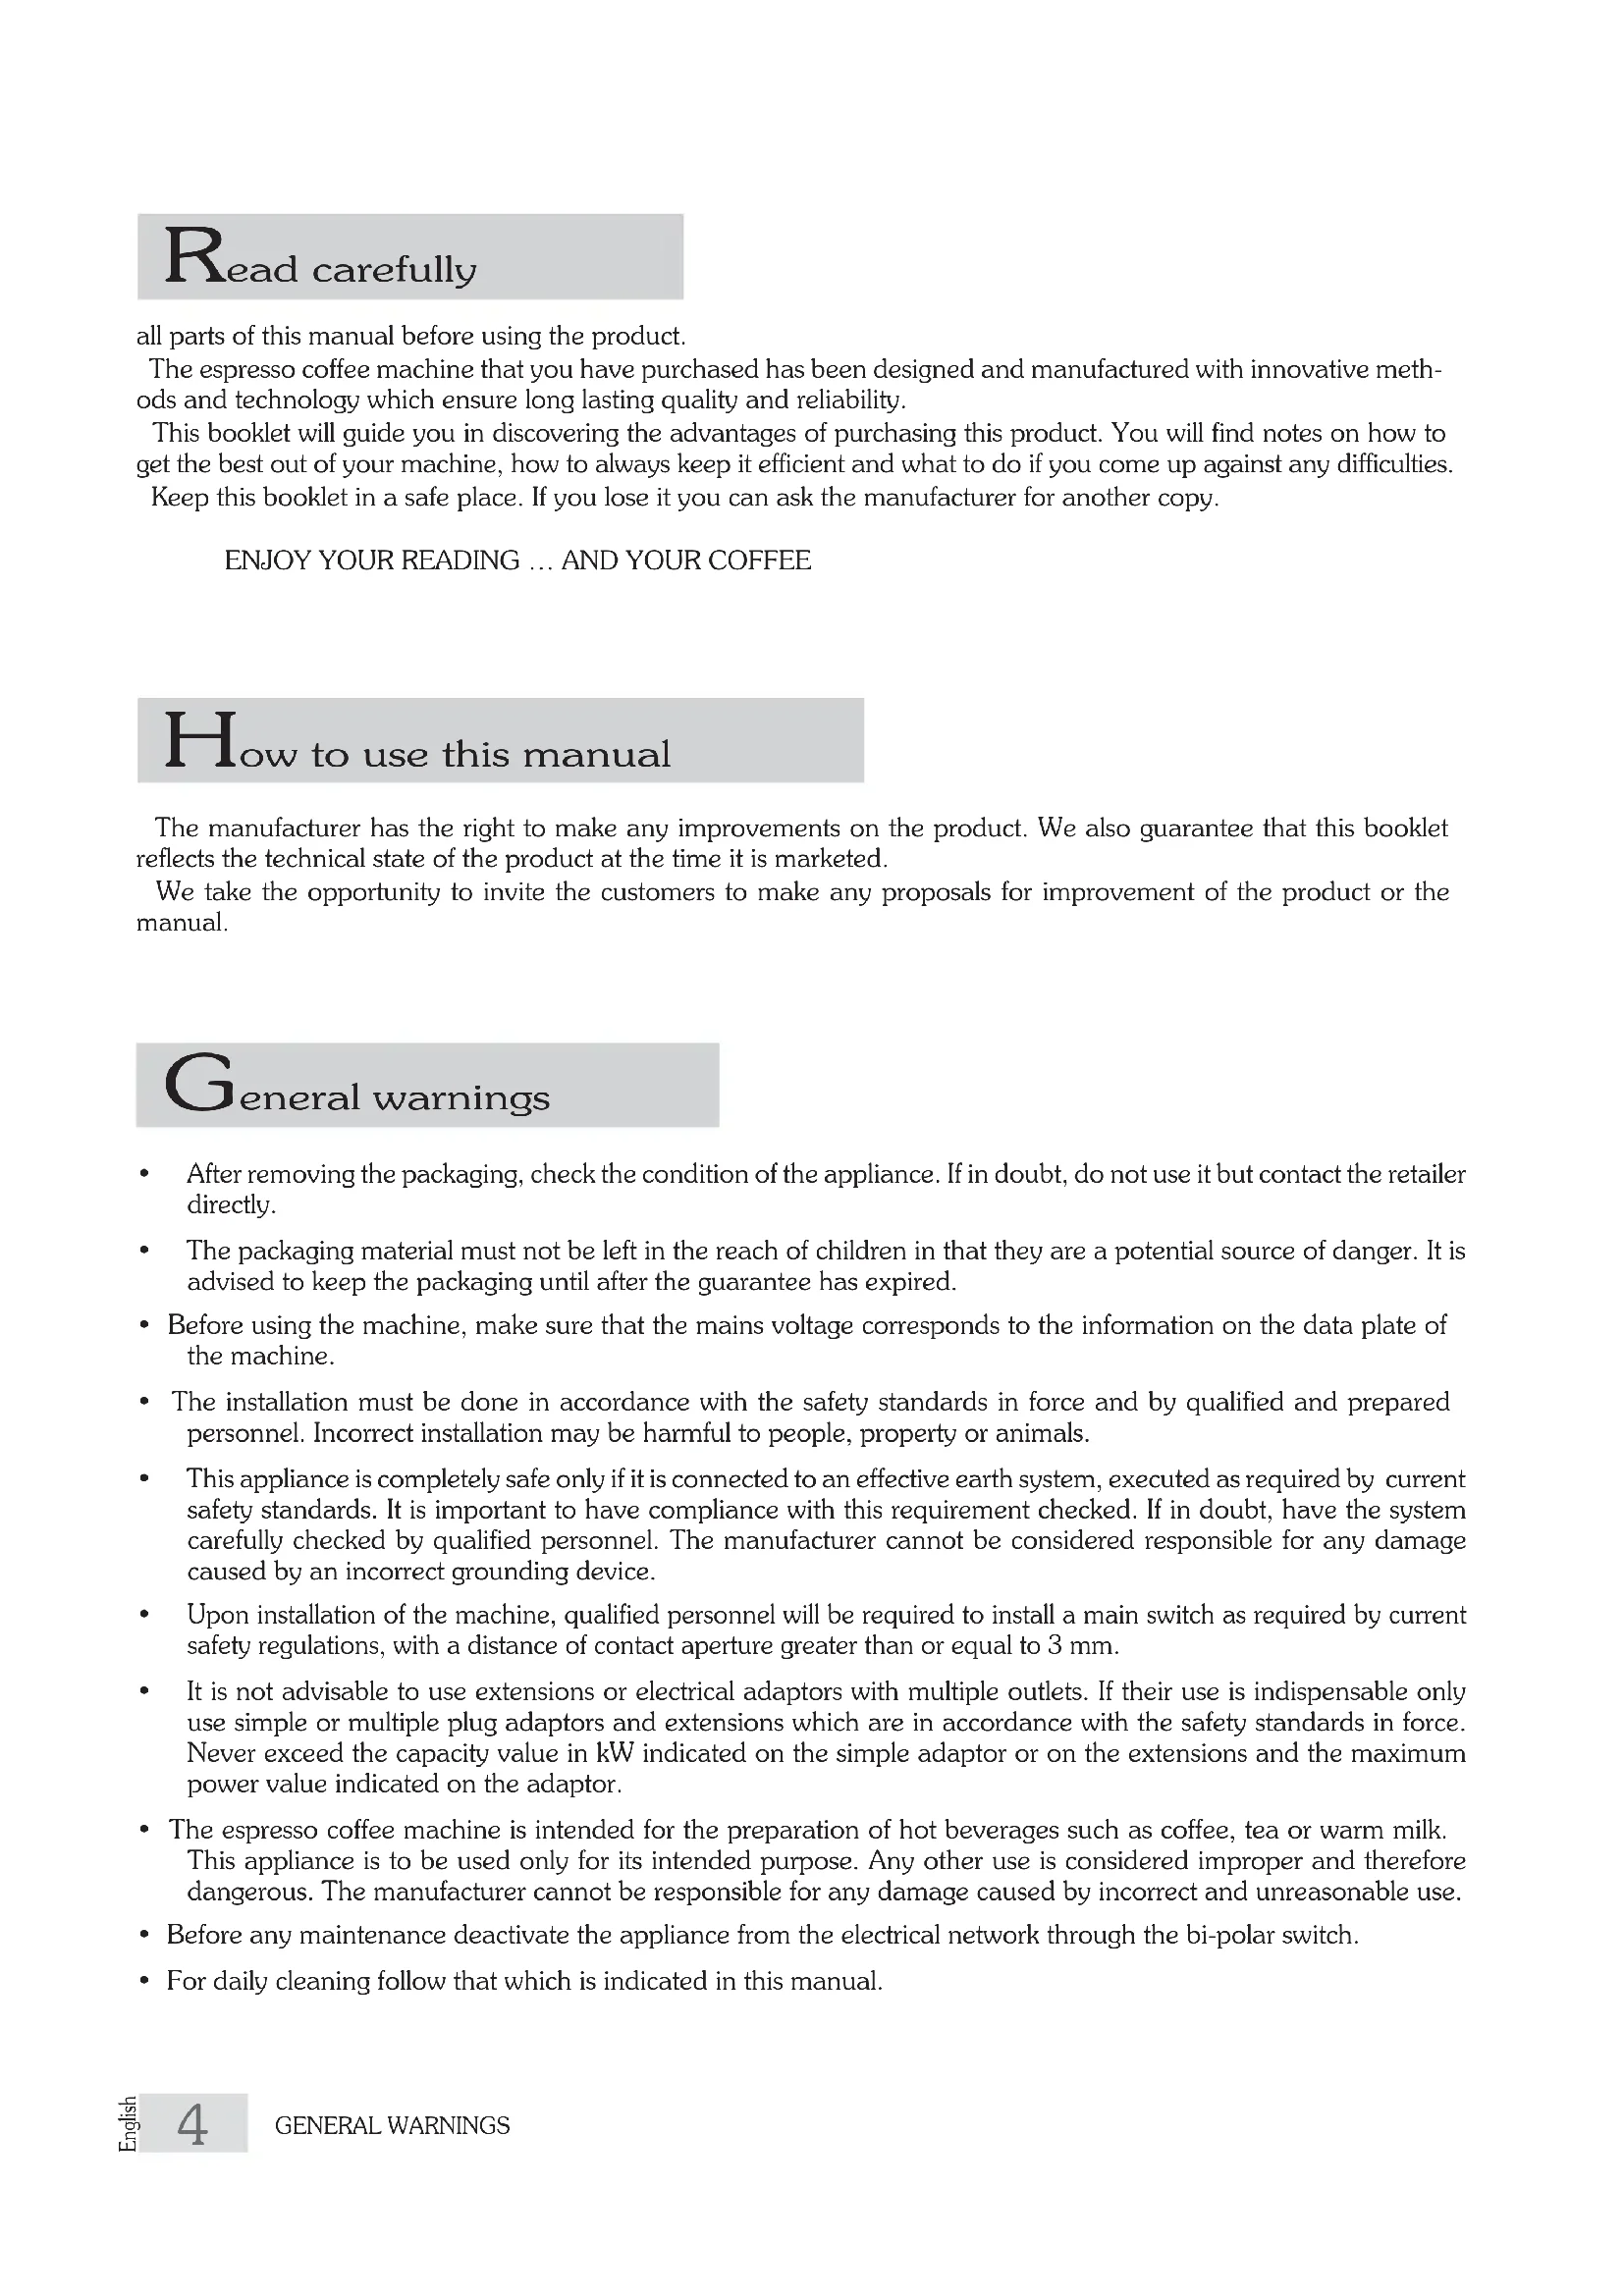
Perforated disk and containment ring
Both the shower plate (4) and its containment ring (3) should be cleaned weekly in hot water. To do this loosen the screw (5) and remove the two elements from the dispensing unit.
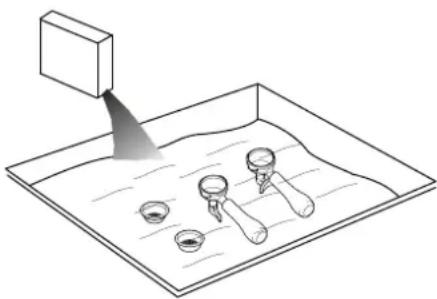
Steam nozzles
The steam pipes must be kept clean at all times. Check the ends of the steam nozzles and clean them monthly, clearing out the exit holes with a small needle.
natural_image
Diagram of a lab setup with a tilted rectangular block and three labeled test tubes on a tray (no text or symbols)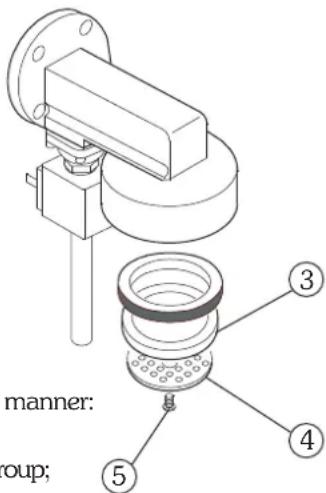
text_image
manner: roup;Delivery groups (except for AL version)
The cleaning of the internal parts of the delivery groups is to be performed weekly in the following manner:
- replace the normal filter of the filter-holder with a solid one;
- pour a teaspoon of a suitable detergent powder on the solid filter, and attach the filter-holder to the group;
- use the delivery switch to set the group in operation;
- repeat the above operations until the water comes out clean;
- turn off and remove the filter-holder from the group;
- rinse a final time, so as to remove any residual detergent.

Do not use a solid filter to clean the machines with a lever group (AL)
Body
The body panels should be cleaned with a cloth soaked in warm water. Do not use abrasive detergents since the panels could get scratched.
Grinder-doser
Every week clean the bell jar and the dosing device with a cloth soaked in lukewarm water, both inside and out.
Heated storage
Once the coffee in the heated storage container is finished, clean it as follows:
- remove the filter using a cloth and avoiding direct contact with the hot parts;
• empty the coffee grounds out of the filter and wash it with lukewarm water; - remove the plastic funnel and wash it with lukewarm water;
• clean the container with a damp cloth and dry it;
• put the filter and funnel back in place.

When cleaning, always use cloths that are completely clean and hygienic.

natural_image
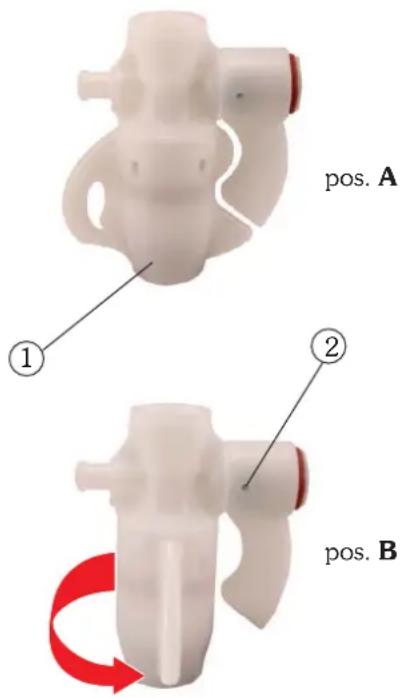
Technical line drawing of a cylindrical industrial device with mounting flanges and control knobs (no text or symbols)Cappuccino maker
Use special care in cleaning the cappuccino maker, following the procedures indicated here:
- initially wash by placing the immersion tube in water and run a delivery for a few seconds;
• turn the rotating body (1) 90° to pos.B (closure of milk outlet duct); - holding the aspiration tube in the air, dispense steam (cappuccino maker dry run);
- wait about 20 seconds to allow for internal cleaning and sterilisation of the cappuccino maker;
- close the steam and put the rotating body back in pos.A;
- if the air intake hole is blocked (2), clear it gently with a pin.

It is advisable to clean the cappuccino after each period of continued use so as to avoid malfunctions and to ensure the hygiene of the system
text_image
pos. A ① ② pos. BChecks and Maintenance
To ensure perfect safety and efficiency of the machine over time, it is necessary to carry out maintenance. In particular, it is advisable to ask Technical Service to carry out an overall check of the machine at least once a year.
Automatic
Check the following on a regular basis:
- check pump pressure with a pressure gauge which should indicate a pressure of around 8-9 bar. In case of anomalies contact technical service;
- also with a pressure gauge, check the boiler pressure, which should be about 0.8-1.2 bar. This may also require the assistance of technical service;
- check the wear of the filters, if there is damage to the edges and check if coffee grounds are getting into the cup. If necessary replace the filters.
Grinder-doser
Check the following on a regular basis:
- check the dose, which should be about 6-7 gr. at a time and adjust the amount as necessary;
• always monitor the degree of grinding and modify as required; - check the wear of the grinders. They will need to be replaced if there is too much powder in the ground coffee (the grinders usually last for about 600 kg of coffee).
Softener
Do the following on a weekly basis:
• perform regeneration of the softener as described in chapter 9 (for the softener in the manual version);
- check that there is salt in the container (for the softener in the automatic version);
Multihead anti-lime system
Check proper lighting of the green LED and check if any other LEDs are on:
- LED green system OK
- LED red system partially out of order (*)
- LED off system completely out of order (*)
(*) contact technical service
Suggestions on how to obtain a good cup of coffee
To obtain a high-quality coffee, it is important that water hardness of the water used does not exceed 4-5 °F (French degrees). In the water hardness exceeds these values, it is advisable use a water softener.
Avoid using a water softener if water hardness is less than 4^ F. If the taste of chlorine in the water is especially strong, a special filter should be installed.
It is not advisable to keep large stores of coffee beans. Never grind large amounts of coffee. Use the amount the doser holds and if possible use it by the end of the day. Never purchase ground coffee as it expires quickly.
After the machine has not been used for a period of time (2-3 hours) make a few dry runs. Be sure to carry out regular cleaning and maintenance.
List of hazards
This chapter describes possible hazards for the user if the specific safety standards described in this booklet are not adhered to.
The appliance must be connected to an efficient grounding system
If this is not done, the appliance can be a source of dangerous electrical discharges in that it is no longer able to discharge electricity to earth.
Do not use running water to wash
The use of pressurized water directly on the machine can seriously damage electrical appliances. Never use water jets to wash any part of the appliance.
Be careful with the steam nozzles and hot water
During use, the steam nozzles and hot water may overheat, thus becoming a source of danger. Handle such parts carefully. Never direct steam or hot water jets directly on parts of the body.
Do not work on the machine when it is supplied with electrical power.
Before carrying out any intervention on the machine you must turn it off by means of the main network switch or better yet, disconnecting the connection terminals in the network. Never remove any body panel when the machine is supplied with electrical power.
Never work on the hydraulic system before having emptied it.
All work regarding the hydraulic system and the relative boiler are to be avoided when there is still water and pressure in the system. You must therefore empty it beforehand, closing the mains cock and dry-running the delivery group for a short time. Switch off the machine and open all the steam and water cocks and taps. With the pressure zero, completely empty the boiler, unscrewing the special pipe fitting situated on the lower part of it.
If the above procedure is not correctly carried out, opening any part of the hydraulic system can cause a sudden outlet of overheated water under pressure.
Lever machines
Never lower the lever if there is no coffee in the filter, or if the filter holder is not installed on the group: the sudden upwards movement of the lever may damage the appliance and injure individuals.
Gas machines
Periodically check for gas leaks in the system by applying a soapy solution to the ducts.
For safety reasons, close the gas heating system when the machine is not in use (at night or during hours of closure)
Use of the appliance
This espresso coffee machine is an appliance exclusively for professional use. Any other type of use is considered wrong and therefore dangerous. Never allow children or incapable persons to use the machine.
Non-observance of the above-described standards can cause serious harm to people, property or animals.
Never work on the electronic apparatus when the machine is still supplied with electrical energy.
Shut down the machine completely by unplugging it from the mains before carrying out any operation.
AL-AEP-SAE
- General description ...... page 12
- Push button panel ...... page 12
- Preparation of the machine ...... page 13
- Start-up page 13
- Grinding and dosing coffee ...... page 14
- Making coffee ...... page 15
6.1 Version AL page 15
6.2 Version AEP page 15
6.2 Version SAE ...... page 16 - Preparation of hot beverages ...... page 17
7.1 Hot water delivery (manual version) ...... page 17
7.2 Hot water delivery (automatic version) ...... page 17
7.3 Steam delivery...... page 17 - Cup heater page 18
- Heated storage ...... page 19
GLORIA
instruction manual for user - ENGLISH
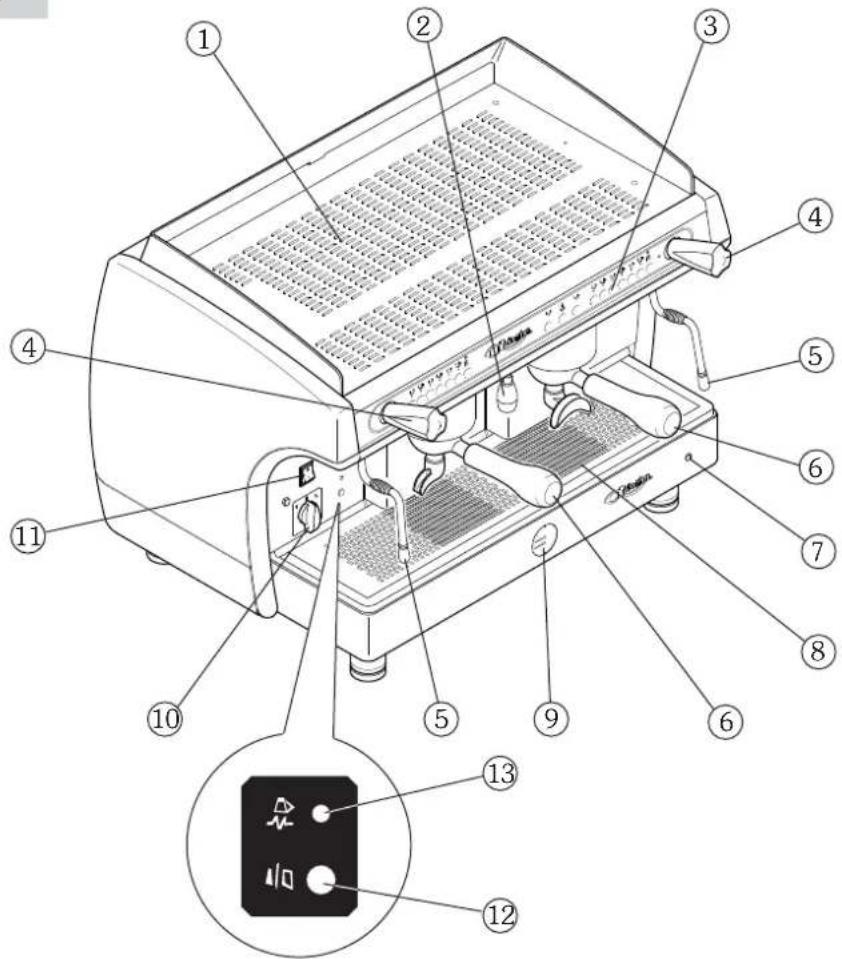
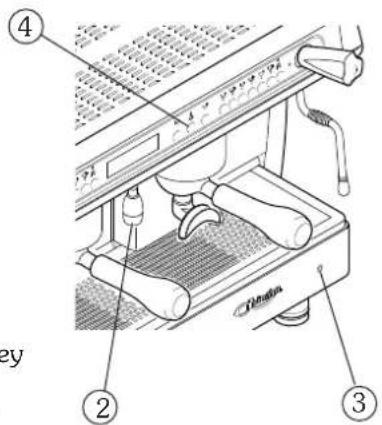
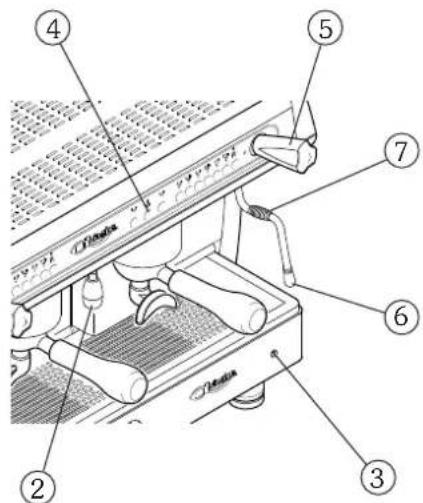
1. Machine description
- Cup heater surface
- Hot water nozzle
- Push button panel
- Steam knob
- Steam nozzle
- Filter holder
- Programming key
- Cup holding grille
- Boiler / pump pressure gauge
- Machine start-up
- Cup heater switch
- Machine on indication light
- Cup heater on indication light
text_image
Technical diagram of a espresso machine with numbered parts and an inset showing its internal control panel.2. Push button panel

natural_image
Three circular icons with crescent moon symbols above, no text or labels present
natural_image
Row of circular icons with white cups and dots, no text or symbols present| 1 Espresso coffee | |
| 2 Espresso coffees | |
| 1 Medium coffee | |
| 2 Medium coffees | |
| 1 Long coffee | |
| 2 Long coffees | |
| atoprog | Stop / Prog |
| Hot water |
3. Preparation of the machine
The preparation of the machine and its installation must be carried out by qualified personnel.

Use of the machine without all the installation operations having been carried out by technical personnel could damage it seriously.
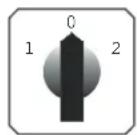
4. Turning on the machine
4.1 Electric heating
Before starting the machine, make sure that the level of water in the boiler is higher than the minimum level on the level-check window (1). If there is no water (first installation or after boiler maintenance), it is necessary to fill the boiler in advance, so as to prevent overheating of the heating element. Proceed as follows:
- Open the water tap of the water mains and of the softener.
- Turn the switch to position “1” (electrical power supplied to the pump for automatic boiler filling and machine services) and wait for the boiler to be automatically filled with water;
- Turn the switch to position "2" (full electrical power supplied, including the heating element in the boiler) and wait for the machine to warm up completely.

- during the machine's warm-up phase (roughly 20 minutes), the negative pressure valve will release steam for a few seconds until the valve itself closes
- before using the machine, run deliveries dry with the filter holder attached for a few seconds to release any air which may be in the circuit, so that the delivery groups are completely heated
- before using the machine, dispense a few servings of coffee to test the grinding and to check the operating pressure of the machine
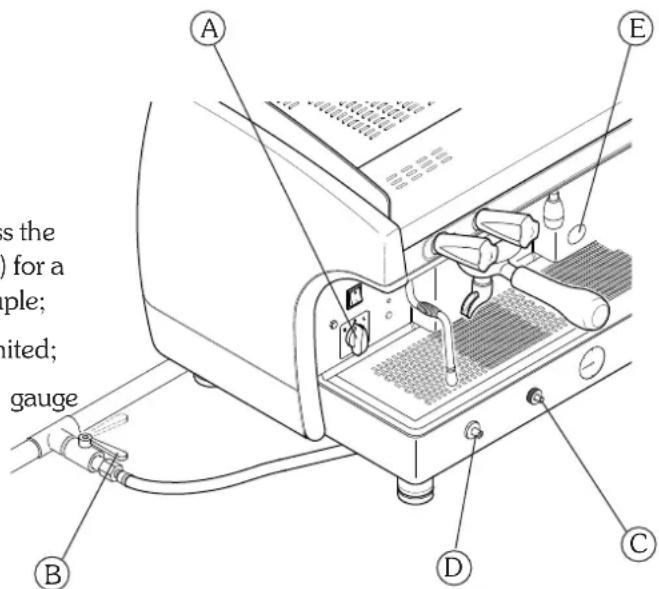
4.2 Gas heating (if there is a gas system)
- Turn the main switch (A) to position 1;
- open the gas valve (B) on the mains;
- hold down the push button (C) and, at the same time, press the on button (D). Once the flame ignites, hold down knob (C) for a few seconds, to allow proper activation of the thermocouple;
- then check through the window (E) that the flame has ignited;
- wait for the operating pressure indicated on the pressure gauge to reach the working value of 1-1.2 bar;
text_image
A B C D E Is the of a ple; nited; gauge4.3 Electric + gas heating (if gas system is present)
- Proceed as indicated in paragraph 4.2 "Gas heating";
- after checking that the flame has ignited, turn the main switch (A) to position 2. In this way the boiler heating element is powered and operating pressure will be reached more quickly;
- wait for the operating pressure indicated on the pressure gauge to reach the working value of 1-1.2 bar;

For reasons of safety, gas heating must be shut down during long periods of disuse of the machine (during the night or when the establishment is closed). It is not advisable to put cloths or other objects on the cup heater, as this obstructs normal air flow.

natural_image
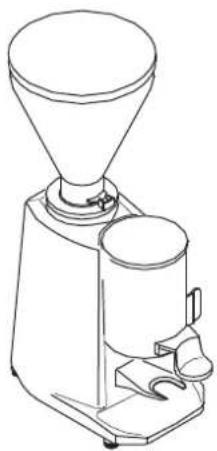
Line drawing of a mechanical device with labeled component A, showing internal components and wiring (no text or symbols beyond label)5. Grinding and dosing coffee
Place the grinder-doser in a convenient place near the machine. Grinding and dosing of coffee must take place in accordance with the instructions of the manufacturer of the grinder-doser. To achieve good quality espresso coffee we suggest the following:
- do not keep large amounts of coffee in whole beans. Observe the expiry date indicated by the producer;
- grind the volume of coffee based on use, place the amount the doser contains and if possible use it before the end of the day;
- if possible, never buy coffee that is already ground as it expires quickly. If necessary, by it in small vacuum-sealed packages.
Fill the filter with a dose of ground coffee (circa 6-7 go.) and press it with the press. Attach the filter holder to the dispensing group.

To prevent the seal wearing too soon clean the edge of the filter before engaging the filter holder on the dispensing unit. Do not excessively tighten the filter holder to the dispensing group.
natural_image
Line drawing of a coffee maker with funnel and side tray (no text or symbols)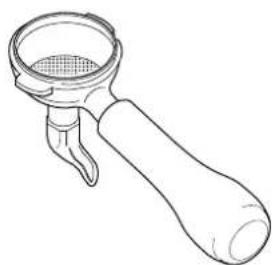
natural_image
Line drawing of a mechanical tool handle with a meshed circular component (no text or symbols)6. Making coffee
6.1 Version AL
- put the coffee cup under the dispensing spout.
• pull the lever all the way down;
• wait for a few seconds (3÷5 seconds); - raise the lever until you meet some resistance, then release it;
- wait until coffee delivery is complete.
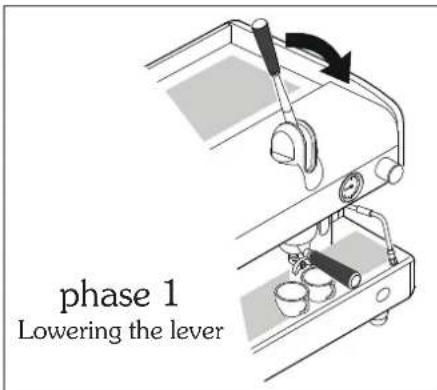
text_image
phase 1 Lowering the lever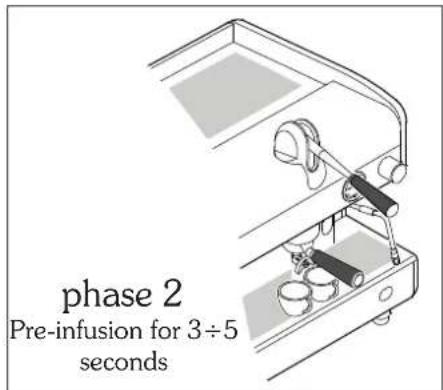
text_image
phase 2 Pre-infusion for 3÷5 seconds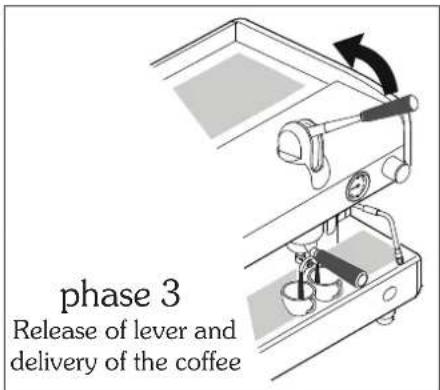
text_image
phase 3 Release of lever and delivery of the coffee
Never perform the above actions without coffee in the filter or without the filter holder attached to the delivery group. The rapid upward movement of the lever may cause damage to the appliance, individuals or property.
Delivery time deepens on grinding and the amount of coffee in the filter holder.
6.2 AEP version
- put the coffee cup under the dispensing spout.
- Press the desired delivery switch. You will have the delivery which can be stopped by means of the same switch once the desired amount of coffee in the cup is obtained.
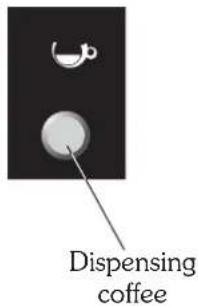
text_image
Dispensing coffee6.3 SAE version
COFFEE DELIVERY
- put the coffee cup under the dispensing spout;
- press the desired dose key and wait for coffee to be delivered (LED comes on);
- to stop delivery of coffee in advance, press the delivery key again or press the key STOP;
- in the event of anomalies or if the push button panel is locked, use the manual delivery switch.
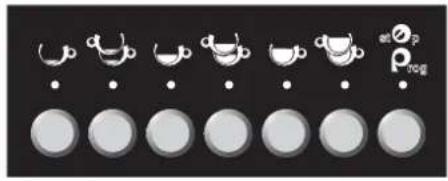
text_image
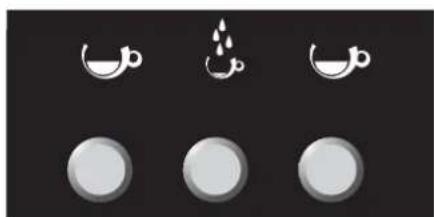
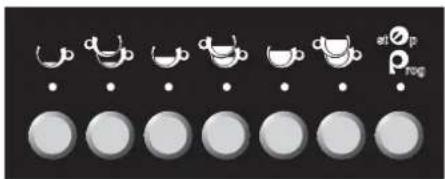
a b c d e f gCOFFEE DOSE PROGRAMMING
- Turn the programming key (A) to the ON position;
- Hold the STOP/PROG the push button panel
key down for 5 seconds: all LED on come on; - Press the dose key to be programmed (e.g. 1 espresso coffee ^b );
- Wait for dispensing. To confirm the dose press the dose key or the STOP/PROG key st_p again.
- Repeat this operation for the other dose keys.

- Upon conclusion of the programme, press the key STOP/PROG st ^2 p until all LEDs go off on the push button panel, and turn the Prog programming key to OFF.
For models with 2-3-4 groups it is possible to program simultaneously all machine push button panels using only the right push button panel. It is however advisable to check the programming of the other push button panels.

text_image
Technical diagram of a espresso machine with labeled parts and component annotations7. Preparation of hot drinks
7.1 Hot water delivery (manual version)
To dispense hot water, turn the tap knob counter-clockwise(1): the hot water coming out of the nozzle (2) will be proportional to the opening of the tap.
7.2 Hot water delivery (automatic version)
DISPENSING HOT WATER
- Put the cup under the hot water spout (2);
- press the hot water key (4): wait for the delivery of water;
- to stop delivery in advance, press the hot water delivery key (4) again or press the key PROG/STOP at _p .
PROGRAMMING DOSE OF HOT WATER
• Turn the programming key (3) to ON;
- Put the cup under the hot water spout (2);
- press the Key PROG/STOP on the right push button panel until all dose key LEDs come on;
- press the hot water delivery key (4)
- upon reaching the desired dose confirm by again pressing the key for hot water delivery(4);
- upon completion of programming, turn the programming key (3) back to the OFF position.
7.3 Steam delivery
To dispense steam, turn the tap knob counter-clockwise (5): the steam coming out of the nozzle (6) will be proportional to the opening of the tap.
text_image
Technical diagram of a espresso machine with labeled parts 1 and 2
text_image
Labeled diagram of a coffee machine with numbered parts for identification
Carefully move the steam nozzle with the anti-burn nozzle (7) and do not touch the hot water nozzle: contact with the hot water and steam may be harmful to individuals, animals or property.
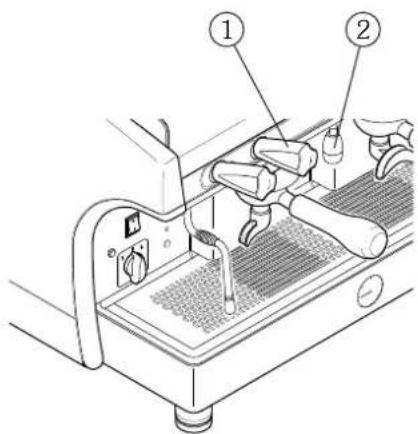
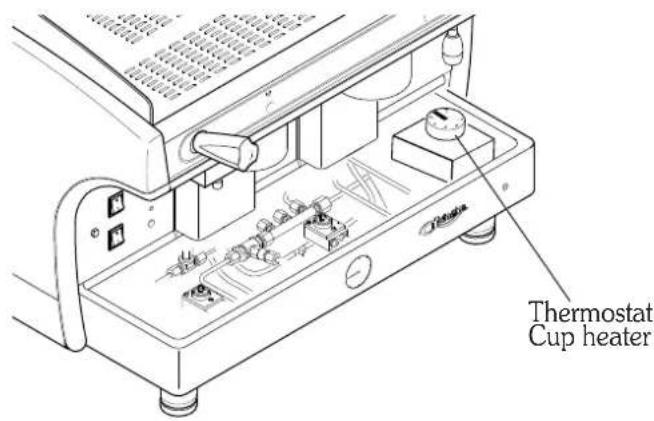
8. Cup heater
8.2 AL - AEP version
To activate, deactivate or adjust the cup heater proceed as follows:
- remove the cup support grille;
- remove the drip tray;
- turn the thermostat; the temperature will be in proportion to the value indicated on the thermostat.
| 0 = cup warmer off |
| 30 = minimum temperature |
| 60 = medium temperature |
| 90 = maximum temperature |
text_image
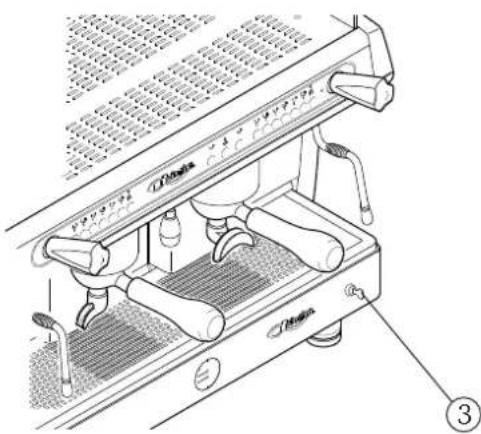
Thermostat Cup heater8.2 SAE version
To activate. de-activate of adjust the cup heater, proceed as follows:
- Turn the programming key to OFF and the cup-heater switch to ON;
- Upon start-up of the machine, hold down the key PROG at _p : on the push button panel, the flashing LED will indicate the current configuration of the cup heater as shown in the drawing below;
- To modify configuration of the cup heater, at machine start-up hold down the key PROG _prog^atOp until the flashing LED on the push button panel comes on steady;
- Press the key that corresponds to the desired configuration;
- Press PROG Prog^stp to confirm the operation.
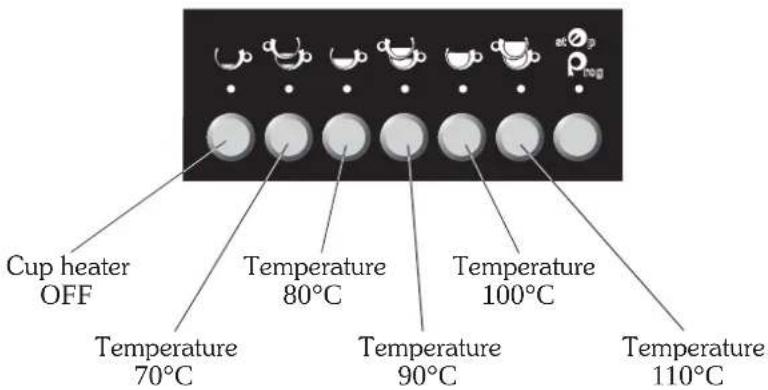
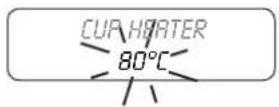
text_image
Cup heater OFF Temperature 80°C Temperature 100°C Temperature 70°C Temperature 90°C Temperature 110°Ci
It is possible to turn off the cup heater by simply placing in the OFF position the switch located above the main switch of the machine.
9. Heated storage
This is composed of a recipient where a substantial amount of coffee is produced (2.5 litres) which is stored in reserve when there is high demand for this beverage (breakfasts, conferences, etc.).
PREPARATION
- raise the lid (1) pulling the knob (2) to the left and raising the lever;
- place the ground coffee (approx.130 gr.) in the filter (3) and close, clicking the knob into the safety position;
- open the water tap (4) by turning it counter-clockwise. Upon reaching the desired amount (maximum capacity 2.5 litres) close the tap;
- when the operation is complete, residual pressure must be discharged with the discharge valve (5) located under the heat storage group.
DELIVERY
Coffee is drawn from the container by using the lever of the dispenser (5) located in the middle of the lower part. The remaining coffee can be heated by means of a steam tap (6) located on the right hand side.

Always open the bleed valve (7) before opening the lid. Failure to do so may cause serious harm to property, individuals or animals.

text_image
Technical diagram of a mechanical device with numbered components and Chinese annotationsSAE DISPLAY
- General description ...... page 22
- Push button panel ...... page 22
- Preparation of the machine ...... page 23
- Start-up page 23
- Grinding and dosing coffee ...... page 24
- Making coffee ...... page 24
- Dispensing hot water ...... page 25
- Counts page 25
- Cup heater page 26
- Programming of machine parameters ...... page 26
- Resetting data ...... page 28
- Signals ...... page 29
GLORIA
instruction manual for user - ENGLISH
1. Machine description
- Display
- Manual coffee dispensing buttons and hot water dispensing
- Push button for coffee selections and programming
- Steam knob
- Steam nozzle
- Filter holder
- Programming key
- Cup holding grille
- Boiler / pump pressure gauge
- Hot water nozzle
- ON switch
- Cup heater switch
- Machine on indication light
- Cup heater on indication light
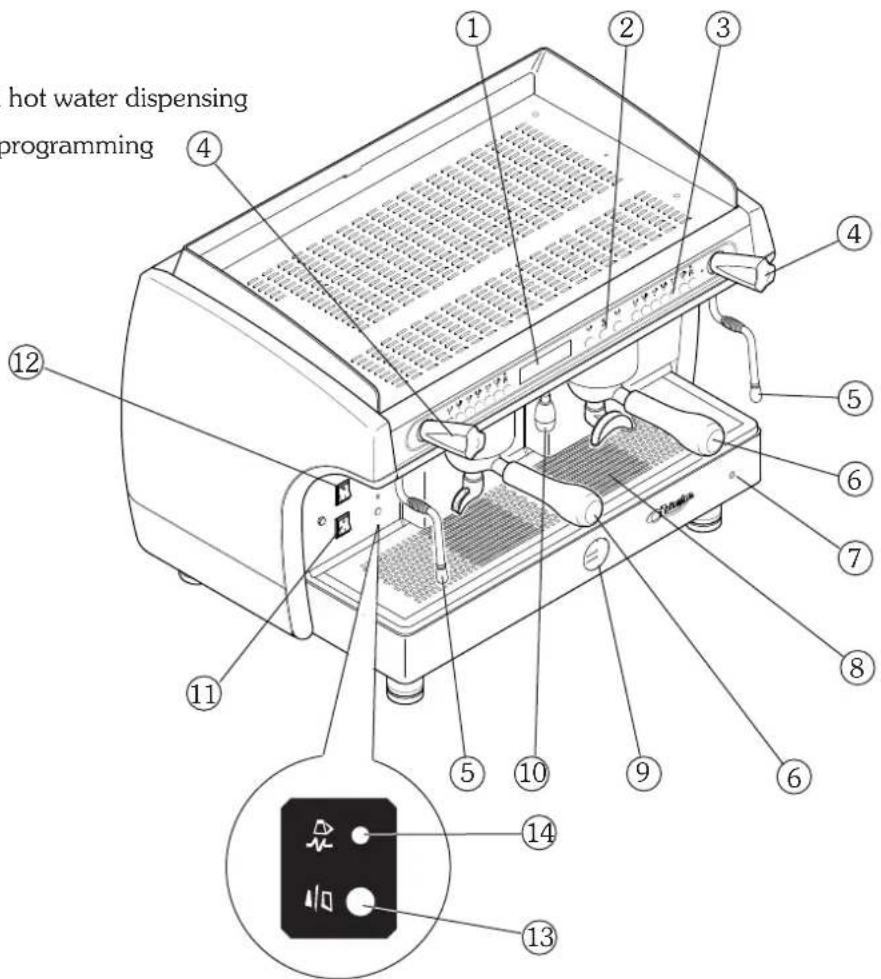
text_image
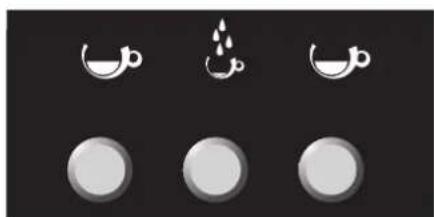
hot water dispensing programming ① ② ③ ④ ⑤ ⑥ ⑦ ⑧ ⑨ ⑩ ⑪ ⑫ ⑬ ⑭ ⑮ ⑯ ⑰ ⑱ ⑲2. Push button panel
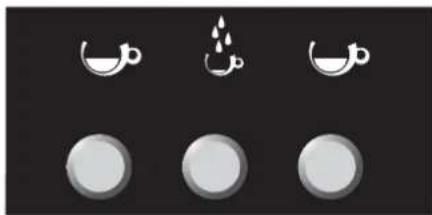
natural_image
Three circular icons with white crescent and droplet symbols on a dark background, no text or labels present.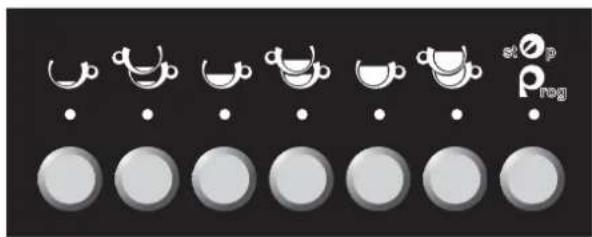
text_image
stop Prog| KEYUSE | KEYPROGRAMMING | |
| 1 Espresso coffee | MODE | |
| 2 Espresso coffees | ENTER | |
| 1 Medium coffee | INCREASE | |
| 2 Medium coffees | DECREASE | |
| 1 Long coffee | ____ | |
| 2 Long coffees | ____ | |
| stoprog | Stop / Prog | PROGRAMMING |
| Hot water | ____ |
3. Preparation of the machine
The preparation of the machine and its installation must be carried out by qualified personnel.

Use of the machine without all the installation operations having been carried out by technical personnel could damage it seriously.
4. Turning on the machine
• Pres the main switch(11) of the machine;
- Wait for possible automatic re-filling of water in the boiler;
- Wait a few seconds longer for the auto-test to be carried out;
PLEASE WAIT FOR FUNCTIONAL TEST
TEST RESULT - OK -
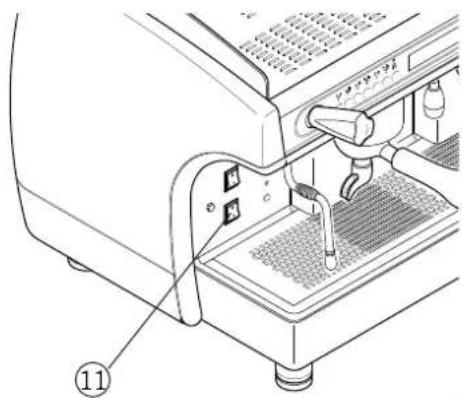
natural_image
Technical diagram of a coffee machine with labeled parts (no text or symbols present)- The machine is ready for use when the following message is displayed:
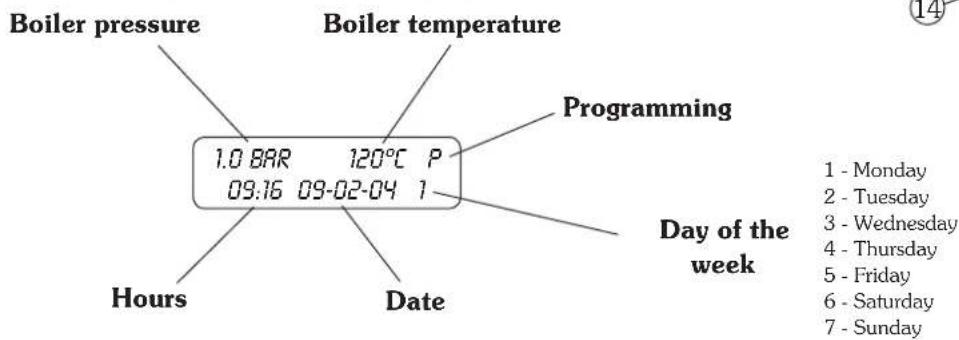
Boiler pressure Boiler temperature
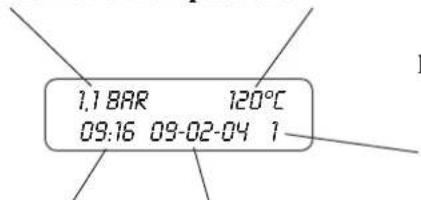
text_image
1.1 BAR 120°C 09:16 09-02-04 1Hours Date
Day of the week
1 - Monday
2 - Tuesday
3 - Wednesday
4 - Thursday
5 - Friday
6 Saturday
7 - Sunday

If the temperature is lower than 90^ C (machine warm-up phase), the message LOW appears on the display.
With the programming key in the ON position, the machine can be partially switched off (heating element and selections disabled) also by simultaneously pressing the keys 🎥 🎥 for 3 seconds. To put the machine back in service press again the keys simultaneously for 3 seconds.

- during the machine's warm-up phase (roughly 20 minutes), the negative pressure valve will release steam for a few seconds until the valve itself closes
- before using the machine, run deliveries dry with the filter holder attached for a few seconds to release any air which may be in the circuit, so that the delivery groups are completely heated
- before using the machine, dispense a few servings of coffee to test the grinding and to check the operating pressure of the machine
5. Grinding and dosing coffee
Place the grinder-doser in a convenient place near the machine. Grinding and dosing of coffee must take place in accordance with the instructions of the manufacturer of the grinder-doser. To achieve good quality espresso coffee we suggest the following:
- do not keep large amounts of coffee in whole beans. Observe the expiry date indicated by the producer;
- grind the volume of coffee based on use, place the amount the doser contains and if possible use it before the end of the day;
- if possible, never buy coffee that is already ground as it expires quickly. If necessary, by it in small vacuum-sealed packages.
Fill the filter with a dose of ground coffee (circa 6-7 gr.) and press it with the press. Attach the filter holder to the dispensing group.

text_image
To prevent the seal wearing too soon clean the edge of the filter before attaching the filter holder to the dispensing unit. Do not excessively tighten the filter holder to the dispensing group.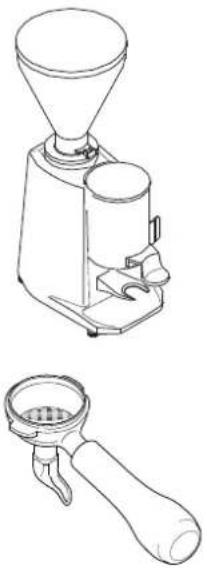
natural_image
Line drawings of a coffee maker and its corresponding manual lever (no text or symbols)6. Making coffee
6.1 Delivery of coffee doses
- put the coffee cup under the dispensing spout.
- press the desired dose key: wait for coffee to be delivered (LED comes on);
- to stop delivery of coffee in advance, press the delivery key again or press the key STOP;
- in the event of anomalies or if the push button panel is locked, use the manual switch.
6.2 Programming coffee doses
For models with 2-3-4 groups it is possible to program simultaneously all machine push button panels using only the right push button panel. It is however advisable to check the programming of the other push button panels:
- Turn the programming key (A) to ON (P flashes on the display);
- Hold the PROG ^st key down for 5 seconds: all LED on the push button panel come on; _rog
- Press the dose key to be programmed (e.g. 1 espresso coffee );
- Wait for dispensing. To confirm the dose press the dose key ⬆ or the PROG key
- Repeat this operation for the other dose keys.
- Upon conclusion of the programme, press the key st p PROG until all LEDs go off on the push button panel, and turn the programming key to OFF.
text_image
d d d s1∅p ρreg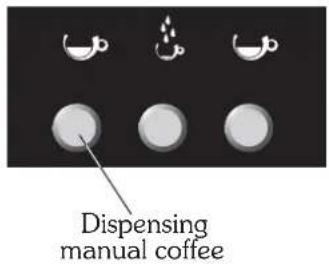
text_image
Dispensing manual coffee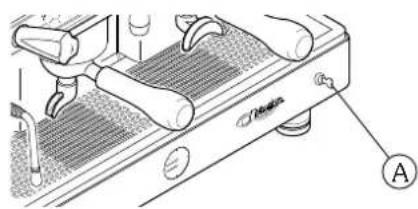
natural_image
Technical line drawing of a mechanical device with no visible text or symbols
7. Dispensing hot water
7.1 Hot water programming
- Turn the programming key (3) to ON ( P flashes on the display);
- Put the cup under the hot water spout (2);
- press the key PROG/STOP P_prog of the right push button panel, lighting all dose key LEDs ;
- press the hot water delivery key (4)
- when the desired dose has been attained, confirm by pressing the PROG key
- upon completion of programming, turn the programming key (3) back to OFF.
text_image
Technical diagram of a sewing machine with numbered parts labeled ②, ③, and ④7.2 Hot water delivery
- Put the cup under the hot water spout (2);
- press the hot water key (4) : wait for the delivery of water;
• to stop delivery in advance, press the hot water delivery key (4)

again or press the key PROG/STOP


Do not touch the hot water nozzle: contact with the hot water and steam may be harmful to individuals, animals or property.
8. Counts
Allows the visualisation of the count of the work carried out by the machine (with the programming key set to OFF):
1) Keep the PROG key _rog on the right push button panel pressed for 5 seconds; the display shows the total number of selections carried out;
2) by pressing the selection keys (tea or coffee) the display shows the number of selections of the corresponding key;
3) press twice the PROG key _rog^op to exit counts.
TOTAL COFFEES 000000
COUNTERS 000000

To reset dose counts see chapter 13 "Data reset"
9. Cup heater

placed above the turn on machine
To activate, deactivate or adjust the cup heater, turn the cup heater switch switch to ON (with the programming key on OFF) and proceed as follows:
- Hold down the key PROG of the right hand push button panel for 5 seconds;
- Press again the PROG switch at p displaying the message
- Use the increase (+) and decrease (-) keys of the right push button panel to modify the temperature of the cup heater shown on the display;
- keep the PROG key P_rog^stOp pressed to confirm the operation.

To deactivate the cup heater set a temperature lower than 70^ C (the display shows ---- ) or turn the heater switch on OFF (placed above the machine start switch).
10. Programming of machine parameters
text_image
Technical diagram of a coffee machine with labeled parts and measurement scaleTurn the programming key (3) to ON (P flashes on the display).
Keep the MODE key 🤒 of the right push button panel pressed for at least 3 seconds to have access to programming.
Use the MODE key of the right hand push button panel to scroll the various areas of the programming menu.
Use the ENTER key of the right hand push button panel 🙏 to move from a parameter to the next one within the same area.
To modify the value of each parameter, use the a^b increase and decrease keys of the right hand push button panel

The system automatically exits the programming phase a few seconds after the last operation carried out. When programming is finished, turn the programming key back on OFF.
The programming of the electronic push button panel can be carried out only when the programming switch is on ON.
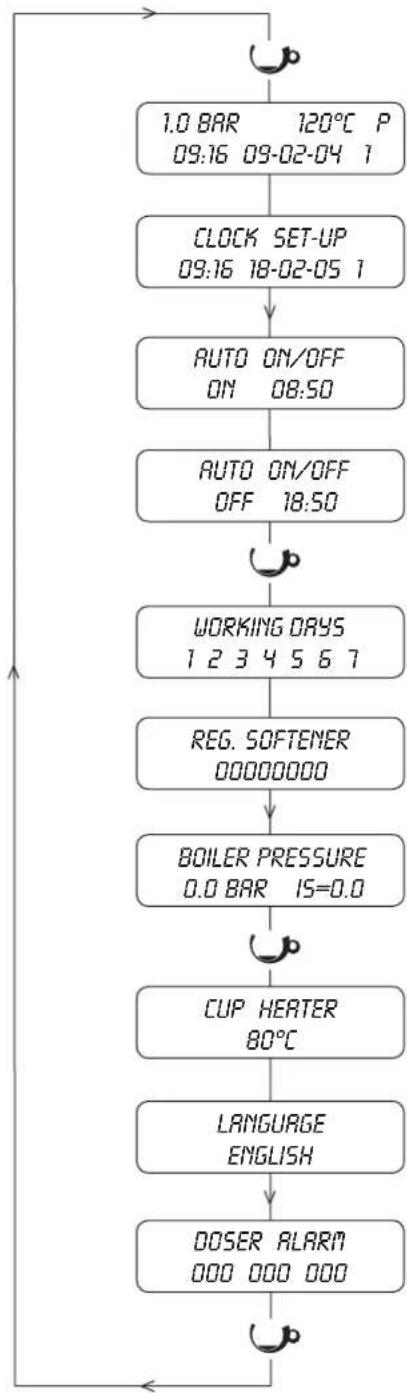
flowchart
graph TD
A["1.0 BAR 120°C P\n09:16 09-02-04 1"] --> B["CLOCK SET-UP\n09:16 18-02-05 1"]
B --> C["AUTO ON/OFF\nON 08:50"]
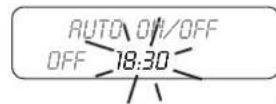
C --> D["AUTO ON/OFF\nOFF 18:50"]
D --> E["WORKING DAYS\n1 2 3 4 5 6 7"]
E --> F["REG. SOFTENER\n00000000"]
F --> G["BOILER PRESSURE\n0.0 BAR 15=0.0"]
G --> H["CUP HEATER\n80°C"]
H --> I["LANGUAGE ENGLISH"]
I --> J["DOSER ALARM\n000 000 000"]
J --> K["Feedback to A"]
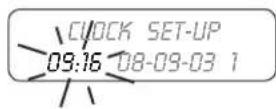
10.1 Programming of CLOCK and DATE
Change of hour, date and day of :
1) Hold down the key MODE ⬤ of the right hand push button panel for 3 seconds;
2) use the keys _b to change the parameter during the flashing phase;
3) Press the ENTER key to move on to the next parameter;
4) Press the MODE key 🧑 to move on to the next programming.
10.2 START-UP programming
Programming of the automatic switching on of the machine:
1) set the machine switching on time with the keys
2) press the ENTER key 🤅 to pass from hours to minutes and vice versa;
3) press the MODE key 📋 to pass on to the next programming.

10,3 SHUT DOWN programming
Programming of the automatic switching off of the machine:
1) set the machine shut down time with the keys _b^a ;
2) press the ENTER key 🤅 to move from hours to minutes and vice versa;
3) press the MODE key 📋 to move on to the next programming.
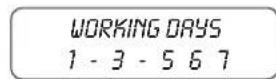
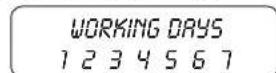
10.4 REST DAY programming
To program machine shutdown for rest day(s), follow the instructions below:
1 - Monday
2 - Tuesday
Days 2 - Tuesday 3 - Wednesday
of the 4 - Thursday
week 5 - Friday
5 - Friday
6 - Saturday
7 - Sunday
Shutdown
1) Choose the day(s) for shutdown by scrolling with the keys
2) Use the key ENTER 🔔 to set the dash "-" at the day(s) of desired shutdown.
Switching ON
To eliminate machine shutdown, use the ENTER key 🤒 to reset the numerical value of the day.
Example of machine shutdown on Tuesday and Thursday
Example of machine with no days set for shutdown

Also activate the ON and OFF times, see paragraphs 10.2 and 10.3
10.5 WATER SOFTENER REGENERATION programming
Programming of the automatic warning of water softener regeneration:
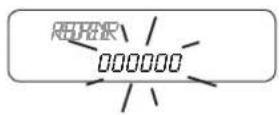
1) with the keys _b set the water quantity (increments of 50 l.);
2) press the MODE key ⬆ to move on to the next programming.
10.6 CUP HEATER programming
Temperature programming and activation of cup heater:
1) enter programming;
2) set the temperature with the keys

3) press the MODE key 📋 to move on to the next programming.
The cup heater is deactivated if the set temperature is lower than 70^ C.
10.7 LANGUAGE programming
Programming of the language displayed:
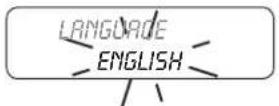
1) enter programming;
2) set the language with the keys
3) press the MODE key 📊 to move on to the next programming.
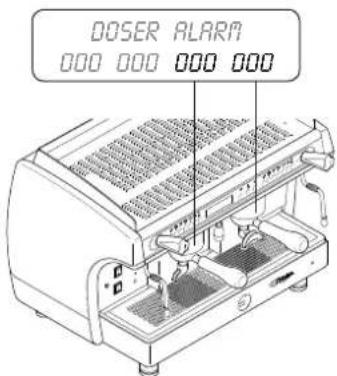
text_image
DOSER ALARA 000 000 000 00010.8 DOSERS alarm
Control of the dosers alarm. The 4 data displayed are relevant to the brewing groups. The first datum on the right is relevant to the first group on the right and so on for the others.
11. Resetting data to zero
11.1 Resetting of dosers alarm
1) Turn the programming switch to ON;
2) Use the MODE key 📋 to scroll the menu until dosers alarm
3) Press the key d_b to start the resetting;
4) Press the UP ARROW key ( ) for at least 3 seconds to confirm the zero setting.
DOSER ALARM 000 000 021 007
RESET COUNTING P PRESS + 3 SEC.
DOSER ALARM 000 000 000 000
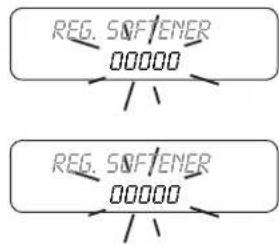
11.2 Reset of water litres count for softener regeneration
1) Turn the programming switch to ON;
2) Simultaneously press the 4 keys PROG of the left push button panel until the display shows the signal.
3) to bypass regeneration control, set a value of 00000 litres.
flowchart
graph TD
    A["REG. SOFTENER\n00000"] --> B["..."]
    C["REG. SOFTENER\n00000"] --> D["..."]
11.3 Resetting selection count to zero
1) Turn the programming switch on OFF;
2) Keep the PROG key pressed for 5 seconds;
3) Turn the programming switch on ON;
4) Press the key a to start the zero setting;
5) Press the UP ARROW key 📋 for at least 3 seconds to confirm the zero setting.
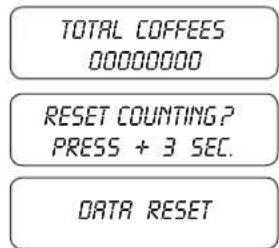
text_image
TOTAL COFFEES 00000000 RESET COUNTING? PRESS + 3 SEC. DATA RESET
The above procedure allows resetting to zero of the counts of each push button panel while leaving the total counts of the machine unchanged (life cycle of the machine).
12. Signals
| cause | solution | |
| 1.1 BAR 120°CBOILER FILLING | Boiler filled with water when using the machine for the first time or when refilling to reach the water level. | Wait for the boiler to be completely filled. |
| 1.1 BAR 120°CFILLING TIMEOUT | Time for filling the boiler with water longer than expected. | Make sure the water mains cock is opened.Switch the machine off and back on again.If the warning is still on after a few attempts, call Technical Assistance. |
| DOSER ALARM | Fault of the volumetric electronic control | Stop delivery by pressing the dose key. Call the Technical Assistance. |
| REG. SOFTENER | Water softener regeneration request | Carry out the water softener regeneration.To put off the warning turn the programming switch on ON and press simultaneously the 4 display keys for 5 seconds |

If the machine will not work call technical assistance.
SAE DISPLAY
ASD - Automatic Steamer Device
DS - drink selection
- General description ...... page 32
- Push button panel ...... page 33
- Preparation of the machine ...... page 34
- Start-up page 34
- Grinding and dosing coffee ...... page 34
- Coffee selections ...... page 35
- Dispensing hot water ...... page 36
- Selection counts ...... page 36
- Cup heater ...... page 37
- DS - drink selection ...... page 38
- ASD - Automatic Steamer Device ...... page 40
- Boiler pressure ...... page 41
- Washing page 41
- Programming of machine parameters ...... page 42
- Resetting data ...... page 46
- Signals ...... page 47
GLORIA
instruction manual for user - ENGLISH
1. Machine description
- Display
- Manual coffee dispensing buttons and hot water dispensing
- Push button for coffee selections and programming
- Hot water nozzle
- Hot water knob
- Steam nozzle
- Filter holder
- Programming key
- Cup holding grille
- Boiler / pump pressure gauge
- DS - Drink Selection / LCL - Milk Coffee Milk
- ASD - Automatic Steamer Device
- Machine ignition switch
- Cup heater switch
- Cappuccino maker
- Steam knob
- Cup heater surface
- ASD steam nozzle
- ASD temperature probe
- Cup heater on light
- Machine on indicator light
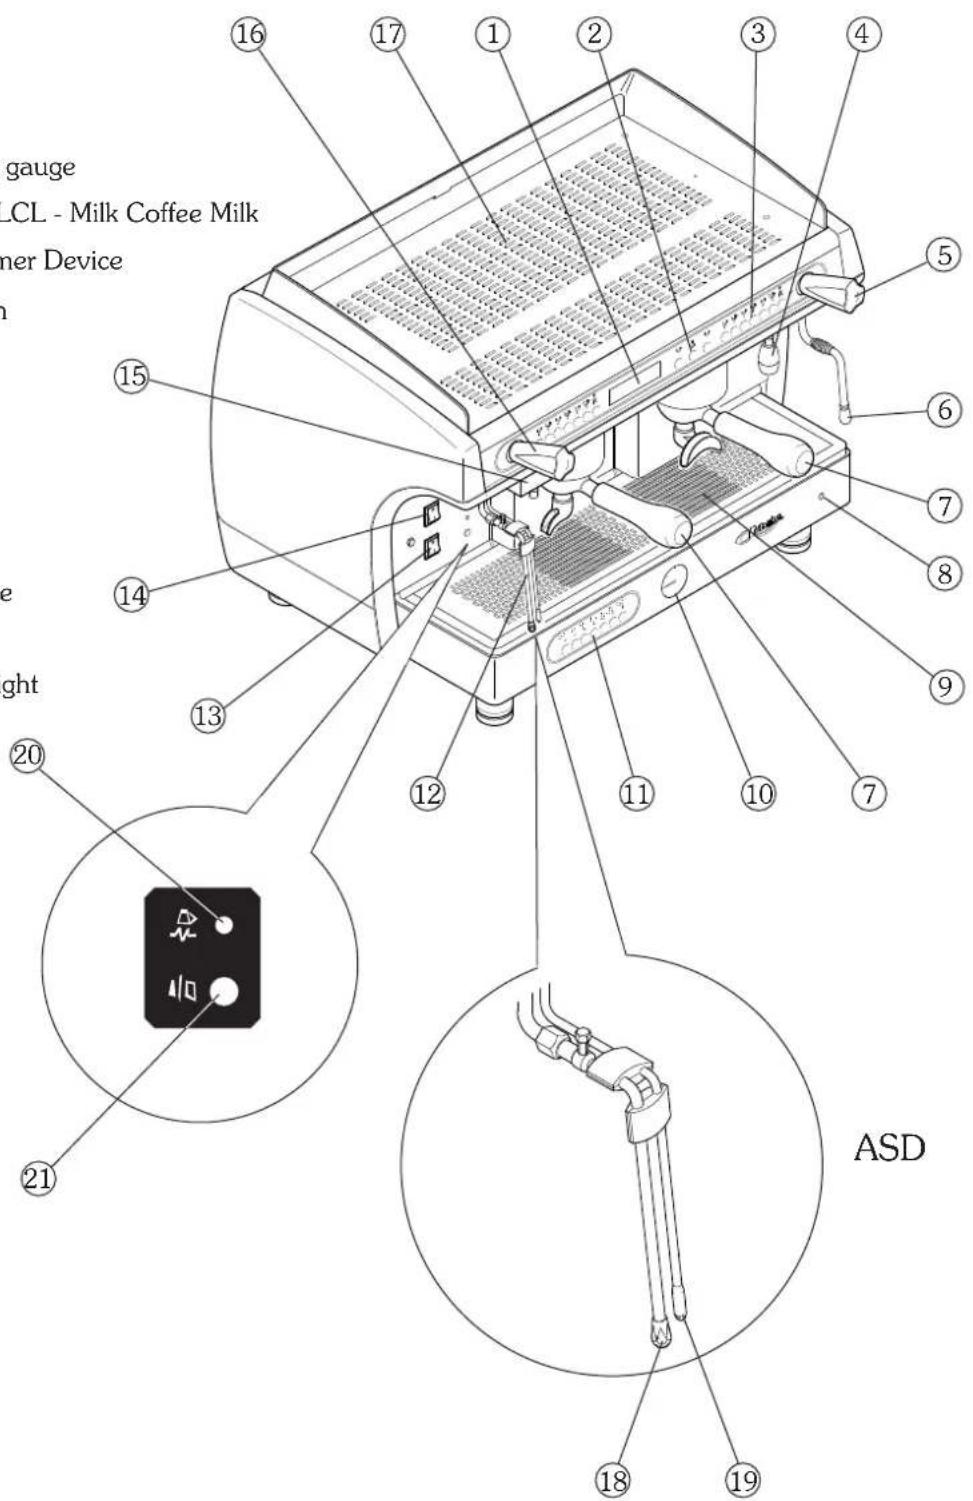
text_image
gauge LCL - Milk Coffee Milk ner Device ght ASD2. Push button panel
2.1 Manual coffee dispensing buttons Hot water dispensing buttons
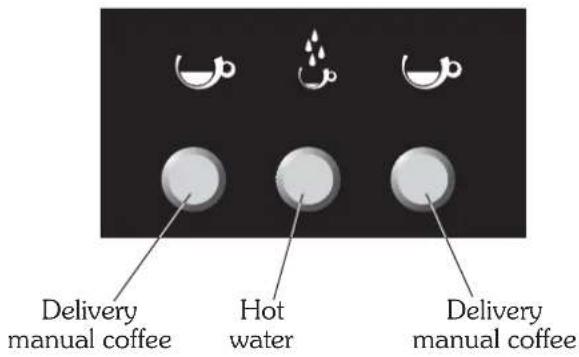
text_image
Delivery manual coffee Hot water Delivery manual coffee2.2 Push button panel for coffee selections Selection programming push button panel
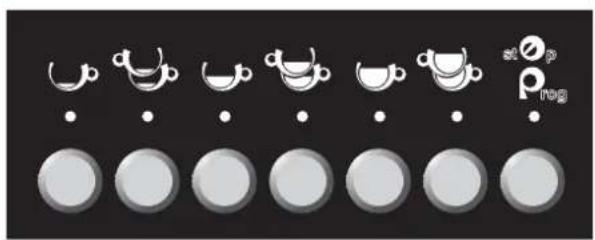
natural_image
Row of circular icons with white cups and dots, no text or symbols present| KEYUSE | KEYPROGRAMMING | |
| 1 Espresso coffee | MODE | |
| 2 Espresso coffees | ENTER | |
| 1 Medium coffee | INCREASE | |
| 2 Medium coffees | DECREASE | |
| 1 Long coffee | ____ | |
| 2 Long coffees | ____ | |
| st O_p rog | Stop / Prog | PROGRAMMING |
| Hot water | ____ |
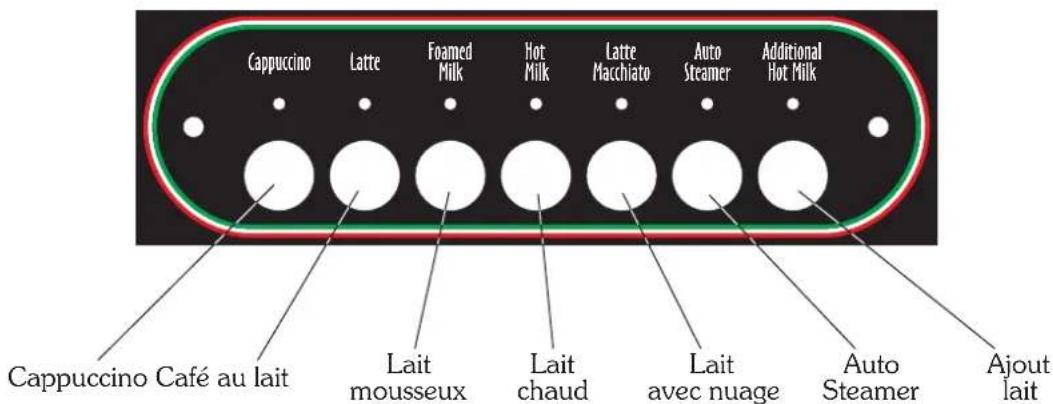
2.3 DS push button panel - Drink selection
text_image
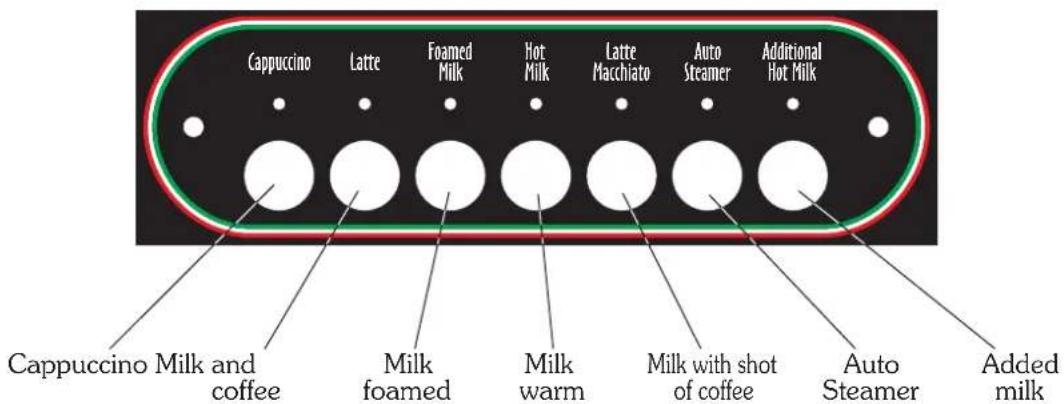
Cappuccino Latte Foamed Milk Hot Milk Latte Macchiato Auto Steamer Additional Hot Milk Cappuccino Milk and coffee Milk foamed Milk warm Milk with shot of coffee Auto Steamer Added milk3. Preparation of the machine
The preparation of the machine and its installation must be carried out by qualified personnel.

Use of the machine without all the installation operations having been carried out by technical personnel could damage it seriously.
4. Turning on the machine
- Press the main switch(14) of the machine;
- Wait for possible automatic re-filling of water in the boiler;
- Wait a few seconds longer for the auto-test to be carried out;
- The machine is ready for use when the following message is displayed:
PLEASE WAIT FOR FUNCTIONAL TEST TEST RESULT - OK -
text_image
Boiler pressure Boiler temperature Programming 1.0 BAR 120°C P 09:16 09-02-04 1 Hours Date Day of the week 1 - Monday 2 - Tuesday 3 - Wednesday 4 - Thursday 5 - Friday 6 - Saturday 7 - Sunday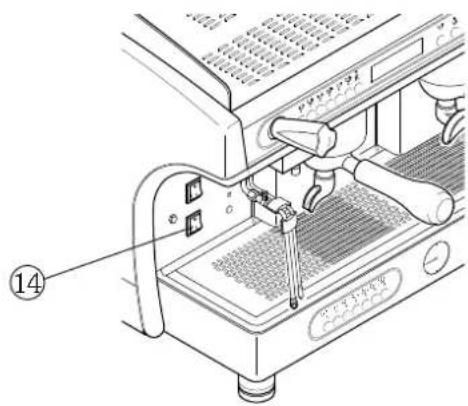
text_image
Technical diagram of a coffee machine with labeled parts and numbered annotation (14)
If the temperature is lower than 90^ C (heating up phase), on the display appears LOW. With the programming key in the ON position, the machine can be partially switched off (heating element and selections disabled) by simultaneously pressing the keys 📁 for 3 seconds.
To put the machine back in service press again the keys simultaneously for 3 seconds.
5. Grinding and dosing coffee
Place the grinder-doser in a convenient place near the machine. Grinding and dosing of coffee must take place in accordance with the instructions of the manufacturer of the grinder-doser. To achieve good quality espresso coffee we suggest the following:
- Do not keep large amounts of coffee beans on hand Observe the expiry date indicated by the producer.
- grind the volume of coffee based on use, place the amount the doser contains and if possible use it before the end of the day;
- if possible, never buy coffee that is already ground as it expires quickly. If necessary, by it in small vacuum-sealed packages.
Fill the filter with a dose of ground coffee (circa 6-7 gr.) and press it with the press. Attach the filter holder to the dispensing group.

To prevent the seal wearing too soon clean the edge of the filter before engaging the filter holder on the dispensing unit. Do not excessively tighten the filter holder to the dispensing group.
6. Coffee selections
6.1 Use
1) Fill the filter with the dose of ground coffee and press it with the coffee press;
2) Attach the filter holder to the dispenser assembly;
3) Place the cup under the filter holder;
4) Select the desired serving, for example, 1 espresso coffee (corresponding LED comes on) and wait for delivery to be completed.

To interrupt delivery ahead of time, press the STOP key again press the selected key again .
If the push button panel is locked, use the manual delivery button.
natural_image
Row of grayscale circular icons with white teacups and dots, no text or symbols present6.2 Programming
Always program the left-hand push button panel first and then the others, if necessary, as follows:
- Turn the programming key to the ON position( P flashes on the display);
- Fill the filter with the desired dose of ground coffee, press it with the coffee presser and attach the filter holder to the delivery group;
- Hold the PROG _atZp key down for at least 5 seconds (all LED on the push button panel come on);
- Select the dose to be programmed (e.g. 1 medium coffee 📄);
- Wait for delivery to be carried out;
- To confirm the dose press the dose key again (e.g. 1 medium coffee kg ) or the PROG key at _p P_rog .
- Repeat the operation for the other doses and for the other push button panels;
- To exit programming, press the PROG P_rog^st p key (the machine automatically exits programming if no selections are made for at least 25 seconds)
- Upon completion turn the programming key to the OFF position;

Programming of each dose must be carried out with ground coffee and not with previously used grounds.
7. Dispensing hot water
7.1 Hot water dispensing
- Put the cup under the hot water spout (2);
- press the hot water key (4) : wait for the delivery of water;
- to stop delivery in advance, press the hot water delivery key (4) again or press the key PROG/STOP at P_rog
text_image
Labeled diagram of a espresso machine showing numbered parts for assembly or maintenance reference.7.2 Hot water programming
• Turn the programming key (3) to ON;
- Put the cup under the hot water spout (2);
- press the PROG/STOP ^st p key and all dose key LED will come on;
• press the hot water delivery key (4) ;
- when the desired dose has been attained, confirm by pressing the PROG ^st p key
- upon completion of programming, turn the programming key (3) back to the OFF position.

Do not touch the hot water nozzle: contact with the hot water and steam may be harmful to individuals, animals or property.
8. Selection count
To view the sum of work performed by the machine, proceed as follows:
1) Turn the programming key to the OFF position;
2) Keep the PROG key _rog of the left push button panel pressed for at least 5 seconds until the display shows the total number of selections carried out;
3) By pressing the keys on the coffee selection push button panel or on the milk/cappuccino selections push button panel, it is possible to view the number of selections made with that key;
4) To exit automatically from selection counting, do not make any selections for at least 25 seconds.

To reset the counts see chap 15 - "Data resetting"
TOTAL COFFEES 000000
COUNTERS 000000
9. C up heater
9.1 Use
1) Place the cups to be heated on the appropriate surface;
2) Place the cup heater switch in the ON position.

For safety reasons it is advisable not to place cloths or other objects on the cup heater surface to keep the machine from overheating.
9.2 Adjustment
To activate, de-activate or adjust the cup heater, place the cup heater switch located above the machine on switch in the ON position and proceed as follows:

- Turn the programming key to the OFF position;
- Keep the PROG Prog^stp button pressed for at least 5 seconds;
• Repeatedly press the PROG at _p key until the display shows the message - Use the keys 🐎 on the left push button panel to modify the temperature of the auto-steamer shown on the display;
- keep the PROG key Prog^stOp pressed to confirm the operation.
- To exit programming, press the PROG key P_prog^atOp (the machine automatically exits programming if no selections are made for at least 10 seconds)
CUP HEATER 80°C

To deactivate the cup heater set a temperature lower than 70^ C (the display shows ---- ) or turn the heater switch on OFF (placed above the turn on machine switch).
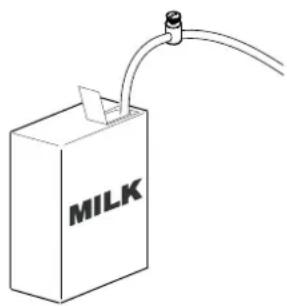
10. DS drink selection
10.1 Use
1) Insert the aspiration tube into the milk container;
2) For cappuccino, coffee and milk or milk with a shot of coffee, fill the filter with the dose of ground coffee and press it with the coffee press;
3) Attach the filter holder to the dispenser assembly;
4) Place the cup under the filter holder;
5) Select the desired serving and wait for completion of milk and coffee (the latter only for cappuccino, coffee and milk or milk with a shot of coffee).
natural_image
Simple line drawing of a milk carton with a tube and connector (no text or symbols)
To stop delivery ahead of time, press the selected key again.
If the dose consists of coffee and milk, press the selected key repeatedly until the cycle is com-
pletely interrupted. For manual delivery of warm milk, press the key
To interrupt dispensing of warm milk, press again the key
Additional Hot Milk
Additional Hot Milk

text_image
Cappuccino Latte Foamed Milk Hot Milk Latte Macchiato Auto Steamer Additional Hot Milk10.2 Programming coffee doses
Program the milk selections push button panel in the following way:
- Turn the programming key to the ON position ( P flashes on the display);
- Hold the PROG key P_rog^st p down on the left push button panel for at least 5 seconds (all LED on the push button panels come on);
10.2.1 Programming CAPPUCCINO and CAFFE LATTE
- Fill the filter with the desired dose of ground coffee, press it with the coffee presser and attach the filter holder to the delivery group;
- Select the dose to be programmed (e.g. cappuccino);
- Wait for milk delivery;
• To confirm the dose of milk, press the cappuccino key again. - Wait for coffee delivery;
• To confirm the dose of coffee, press the cappuccino key again.

The amount of cream can be modified with the regulator (A) located under the upper grille.
The sequence of delivery, be it first milk and then coffee or vice versa, is established in the machine programming phase (see chapter 14 "Programming machine parameters").
10.2.2 Programming FOAMED MILK and WARM MILK
- Select the dose to be programmed (e.g. foamed milk);
• Wait for milk delivery;
• To confirm the dose, press the foamed milk key.
text_image
MILK A10.2.3 Programming MILK WITH A SHOT OF COFFEE - COLD -
- Fill the filter with the desired dose of ground coffee, press it with the coffee presser and attach the filter holder to the delivery group;
- Select the button for milk with a shot of coffee:
• Wait for cold milk delivery:
• To confirm the dose of cold milk, press the key for milk with a shot of coffee again;
• Wait for delivery of warm milk with foam:
• To confirm the dose of warm milk with foam, press the key for milk with a shot of coffee again: - Wait for coffee delivery:
• To confirm the dose of coffee, press the key for milk with a shot of coffee again.
10.2.3 Programming MILK WITH A SHOT OF COFFEE - WARM -
• Fill the filter with the desired dose of ground coffee, press it with the coffee presser and attach the filter holder to the delivery group:
- Select the button for milk with a shot of coffee:
• Wait for delivery of warm milk without foam:
• To confirm the dose of warm milk without foam, press the key for milk with a shot of coffee again;
- Wait for the dispensing of warm milk with foam;
• To confirm the dose of warm milk with foam, press the key for milk with a shot of coffee again;
- Wait for a few seconds (advisably 15-20 seconds);
• To confirm the length of the pause, press the button for milk with a shot of coffee again:
• Wait for coffee delivery:
• To confirm the dose of coffee, press the key for milk with a shot of coffee again.

To configure the machine with MILK WITH SHOT OF COFFEE - WARM - or - COLD refer to chapter 14. When configuring the machine for the selection of MILK WITH SHOT OF COFFEE - WARM -, it will no longer be possible to deliver MILK WITH SHOT OF COFFEE - COLD -.
• To exit programming, press the PROG are made for at least 25 seconds)

key (the machine automatically exits programming if no selections
- Upon completion turn the programming key to the OFF position.
11. ASD automatic steamer device
11.1 Use
The autosteamer system makes it possible to make the milk foamy and to bring it up to a programmable temperature.
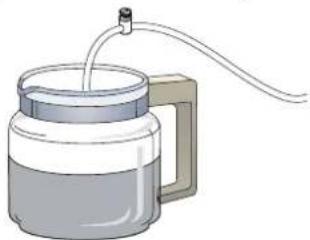
1) Immerge the ends of the autosteamer into the beverage to be heated;
2) Press the autosteamer key ;
3) Wait for steam delivery to be completed.

text_image
Auto Steamer Key autosteamer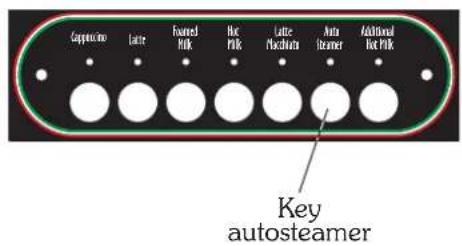
text_image
Capacitor Latte Fronted Milk Hot Milk Latte Switchbase Auto Steamer Additional Hot Milk Key autosteamer
natural_image
Illustration of a hand pouring liquid into a container with a handle (no text or symbols)
To stop delivery ahead of time, press the selected key again. By holding down the autosteamer key it is possible to extend steam delivery beyond the set temperature.

To keep the steam dispensers in perfect working order, it is advisable to carry out a delivery dry run after each use. Keep the ends of the autosteamer clean at all times by means of a cloth dampened in lukewarm water. Use the utmost caution with the autosteamer, as high-temperature steam is present.
11.2 HEATING TEMPERATURE adjustment
To adjust the activation temperature of the autosteamer, proceed as follows:
- Turn the programming key to the OFF position;
- Hold down the key PROG ^st p of the upper left hand push button panel for at least 5 seconds;
• Repeatedly press the PROG at _p key until the display shows the message
AUTOSTEEMER 65°C
- Use the keys b^d to modify the temperature of the autosteamer shown on the display;
- keep the PROG key pressed to confirm the operation.
- To exit programming, press the PROG key P_rog (the machine automatically exits programming if no selections are made for at least 10 seconds)

To activate or deactivate autosteamer operation, see chapter 14, "Machine programming". The system includes a maximum operation time of 4 minutes for the autosteamer.
11.3 MILK FOAMING adjustment
To adjust milk foaming with the ASD system, proceed as follows:
- Use a wrench to unscrew component (A) of the ASD steam nozzle;
- Use a screwdriver on the screw (B) located inside the part:
- to reduce foaming turn clockwise
- to increase foaming turn counter-clockwise
12. Boiler pressure
Function not active.
BOILER PRESSURE
0.0 BAR 15=0.0
13. Washing
13.1 Washing requested
The machine periodically suggests washing the milk circuit and the cappuccino maker. This signal depends on the type of programming setting (see chapter 14).
To carry out washing proceed as follows:
1) Place the milk tube in cold water;
2) Press the key Additional Hot Milk for three seconds (with programming key in the OFF position);
3) Wait for the washing cycle to be carried out (this takes roughly 30 seconds);
13.2 Voluntary washing
To perform washing of the milk circuit and of the cappuccino maker at any time, proceed as follows:
1) Immerge the two milk tubes in cold water;
2) Press the key Additional Hot Milk for three seconds (with programming key in the OFF position);
3) Wait for the washing cycle to be carried out (this takes roughly 30 seconds);
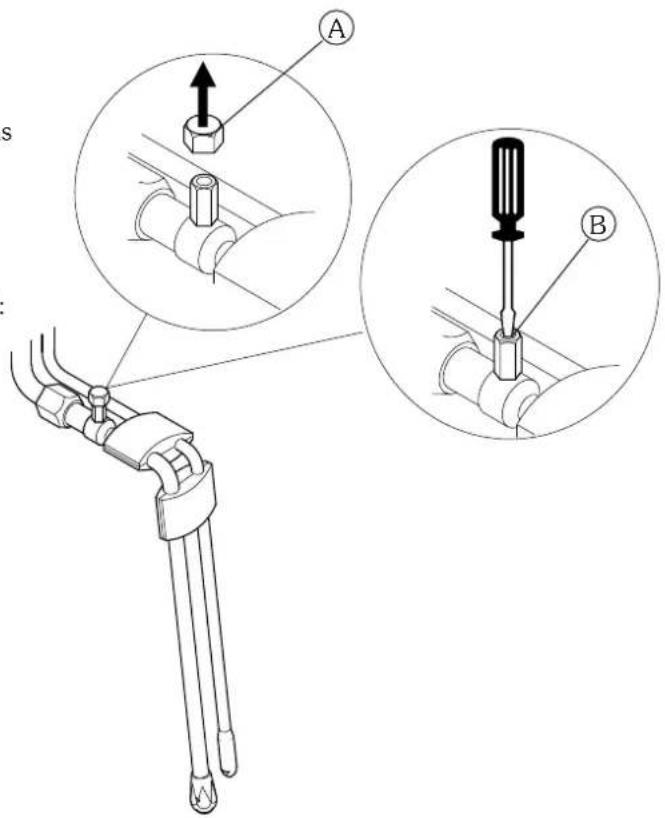
text_image
A BPUT MILK TUBES IN THE WATER
PRESS BUTTON "ROD. HOT MILK" 3 SEC.
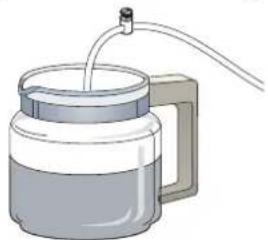
natural_image
Illustration of a cylindrical container with a side handle and piping (no text or symbols)PUT MILK TUBES IN THE WATER
PRESS BUTTON "ADD. HOT MILK" 3 SEC.

To interrupt the washing cycle before it has finished press the STOP button. To keep the cappuccino maker and its hydraulic circuit in perfect working order, it is advisable to perform washing regularly. Voluntary washing is possible only if the cappuccino maker has been enabled (see para. 14.11).
14. Programming of parameters of the machine
- Turn the programming key to the ON position ( P flashes on the display)
- Keep the MODE key pressed for at least 3 seconds to have access to programming.
- To scroll through the various areas of the programming menu (see alongside) use the MODE key
- Use the ENTER key move from a parameter to the next one within the same area.
• To modify the value of each parameter, use the increase and decrease keys.

All machine programming keys refer to the left push button panel.

With the programming key in the ON position, the selections are not active.
The system automatically exits the programming phase after about 20 seconds from the last operation carried out. When programming is finished, turn the programming key back on OFF.

flowchart
graph TD
    A["1.0 BAR 120°C P\n09:16 09-02-04 1"] --> B["Clock SET-UP\n09:16 18-02-05 1"]
    B --> C["AUTO ON/OFF\nON 08:50"]
    C --> D["AUTO ON/OFF\nOFF 18:50"]
    D --> E["WORKING DAYS\n1 2 3 4 5 6 7"]
    E --> F["REG. SOFTENER\n00000000"]
    F --> G["BOILER PRESSURE\n0.0 BAR 15=0.0"]
    G --> H["AUTOSTEAMER\n65 °C"]
    H --> I["CUP HEATER\n80°C"]
    I --> J["LANGUAGE\nENGLISH"]
    J --> K["DISPENSER ALARM\n000 000 000"]
    K --> L["CRAPPUCCINO\nYES / NO"]
    L --> M["CRAPPUCCINO\nMILK > COFFEE"]
    M --> N["AUTOSTEAMER\nYES / NO"]
    N --> O["WASH\nMIN: XXX NUM: XXX"]
    O --> P["THREE LAYER\nCOLD / WARM"]
14.1 Programming of CLOCK and DATE
Change of hour, date and day of :
1) Enter programming until showing on the display;
2) Keep the MODE key 📋 pressed for 3 seconds;
3) modify the parameter while flashing with the keys
4) to move to the next parameter press the key ENTER
5) to move to subsequent programming press the key MODE
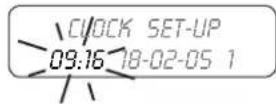
14.2 START-UP programming
Programming of the automatic switching on of the machine:
1) Enter programming until showing on the display;
2) set the machine start-up time with the keys
3) to move from hours to minutes and vice versa press the key ENTER
4) to move to the subsequent programming press the key MODE
5) to deactivate the "Start-up" function, set the time to 00:00.

14.3 SHUT DOWN programming
Programming of the automatic switching off of the machine:
1) Enter programming until showing on the display;
2) set the shutdown time of the machine with the keys
3) to move from hours to minutes and vice versa press the key ENTER
4) to move to the subsequent programming press the key MODE
5) to deactivate the "Shut down" function, set the time to 00:00.
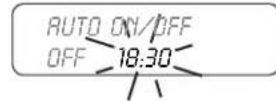

The "Start-up" and "Shut down" functions are active only for the days of the week when the "Rest day" function has not been activated.
14.4 REST DAY programming
To program machine shutdown for rest day(s), follow the instructions below:
1) Enter programming until showing on the display :
| Days of the week | 1 - Monday | 5 - Friday |
| 2 - Tuesday | 6 - Saturday | |
| 3 - Wednesday | 7 - Sunday | |
| 4 - Thursday |
WORKING DAYS 1 2 3 4 5 6 7
Shutdown
1) Choose the day(s) for shutdown by scrolling with the keys
2) Use the key ENTER to set the dash" - " at the day(s) of desired shutdown.
Example of machine shutdown on Tuesday and Thursday
WORKING DAYS 1 - 3 - 5 6 7
Switching ON
To eliminate machine shutdown, use the ENTER key to reset the numerical value of the day 📄.
Example of machine with no days set for shutdown
WORKING DAYS 1 2 3 4 5 6 7

For days of the week in which the "Rest day" function has been activated " - " the machine will remain off.
14.5 WATER SOFTENER REGENERATION programming
Programming of the automatic warning of water softener regeneration:
1) Enter programming until showing on the display;
2) set the amount of water (steps of 50 litres) with the keys
3) to move to the subsequent programming press the key MODE.
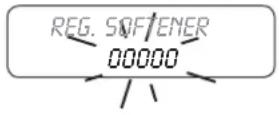

When the machine reaches 90% of the value set on the display a signal appears for 5 seconds. When the machine reaches 100% of the value set on the display a blinking signal appears.
To eliminate the blinking signal and reset the count of the litres of water to zero, with the programming key in the ON position press the 4 keys of the left push button panel simultaneously until the display shows the message "00000".
The regeneration control is bypassed by setting a value equal to 00000 litres.
14.6 BOILER PRESSURE programming
Service not active.
BOILER PRESSURE
0.0 BAR IS=0.0
14.7 AUTOSTEAMER TEMPERATURE programming
Programming the activation temperature of the autosteamer:
1) Enter programming until showing on the display;
2) set the temperature with the keys of the left push button panel;
3) to move to the subsequent programming press the key MODE ↻.
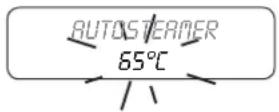

The actual temperature of the beverage may differ by a few degrees from the set temperature depending on the amount of the beverage heated.
14.8 CUP HEATER programming
Temperature programming and activation of cup heater:
1) Enter programming until showing on the display;
2) set the temperature (70-100°C) with the keys _b^a ;
3) press the MODE key ⬆ to move on to the next programming.

14.9 LANGUAGE programming
Programming of the language displayed:
1) Enter programming until showing on the display;
2) set the language with the keys
3) to move to the subsequent programming press the key MODE
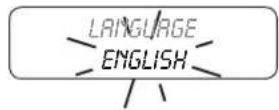

In English it is possible to choose between degrees Celsius (°C) and Fahrenheit (°F)
14.10 DOSERS alarm
Control of the dispensers alarm. The 3 values displayed correspond to the delivery groups.
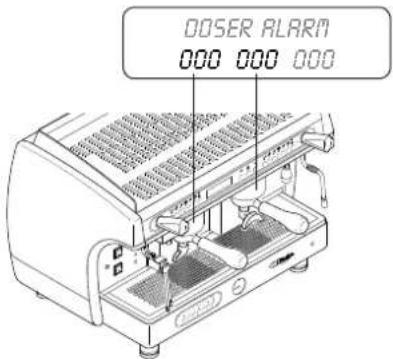
text_image
DOSER ALARM 000 000 00014.11 CAPPUCCINO MAKER activation
Activation or de-activation of the DS MILK SELECTION PUSH BUTTON PANEL.
1) Active or de-activate the operation of the push button panel with the keys
2) press the MODE key 📋 to move on to the next programming.


Setting NO bypasses the operation of the DS system (Drink Selection push button panel), (Automatic Steamer Device push button panel, see alongside).
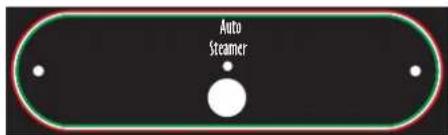
text_image
Auto Steamer14.12 Setting of CAPPUCCINO sequence (only with cappuccino maker enabled)
Programming for the CAPPUCCINO and MILK AND COFFEE selections of the milk selection push button panel.
1) Enter programming until showing on the display;
2) With the keys it is possible to set the dispensing sequence of milk and coffee as per the following rule:
- COFFEE > MILK first coffee, then milk
- MILK > COFFEE milk is delivered first, then coffee
- COFFEE + MILK Simultaneous delivery of coffee and milk
3) press the MODE key 📊 to move on to the next programming.
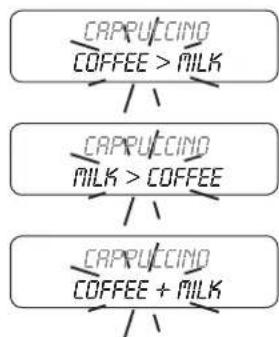
flowchart
graph TD
    A["CRAPPUCCINO COFFEE > MILK"] --> B["CRAPPUCCINO MILK > COFFEE"]
    B --> C["CRAPPUCCINO COFFEE + MILK"]
    C --> D["Feedback Loop"]
14.13 AUTOSTEAMER activation (ASD)
Activation or de-activation of the AUTOSTEAMER (ASD) selection on the DS push button panel.
1) Active or de-activate the operation of the autosteamer with the keys

2) press the MODE key ⬆ to move on to the next programming.
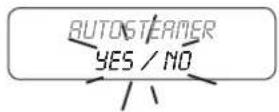
14.14 Programming of WASHING (only with cappuccino maker enabled)
Programming the request to carry out WASHING of the milk circuit and cappuccino maker.
1) Enter programming until showing on the display;;
2) use the keys 📋 to program the time in XXX minutes since last milk dispensing;
3) as an alternative, press the key ENTER and program the number of milk deliveries with the keys after which the running of a wash cycle will be requested;
4) Press the MODE key ⬆ to move on to the next programming.
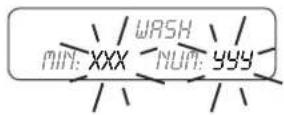
i
It is advisable to program only one of the two factors, setting a time or a number of selections, so as to avoid having an excessive number of requests of the machine.
14,15 Configuration of MILK WITH A SHOT OF COFFEE -COLD or -HOT-
To configure the machine proceed as follows:
1) Enter programming until showing on the display;
2) set the type of delivery for milk with a shot of coffee, COLD or HOT with the keys ;
3) to go back to the top of the menu press the MODE key

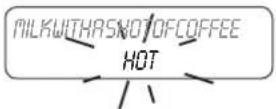
15. Resetting data to zero
15.1 Resetting of dosers alarm
1) Place the programming key in the ON position ;
2) with the key MODE ⬆ scroll the menu until the dispenser alarms;
3) to start resetting press the key
4) to confirm resetting press the key 📋 for 3 seconds.
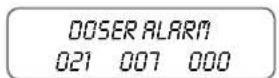

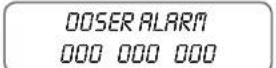
15.2 Resetting selection count to zero
1) Place the programming key in the OFF position;
2) hold down the key PROG of the left push button panel for 5 seconds;
3) place the programming key in the ON position ;
4) to start resetting press the key ;
5) to confirm resetting press the key for 3 seconds.
ESPRESSO GR1 00000000
RESET COUNTING? PRESS + 3 SEC.
DATA RESET
i
The procedure described above makes it possible to reset the counts of the single selections (group 1-2-3, milk selections), but not to reset the machine completely (machine life cycle).
Only the selections that use coffee, of the milk selections push button panel, will increase the total count of the machine.
15.3 Reset of water litres count for softener regeneration
1) Turn the programming switch to ON;
2) Simultaneously press the 4 keys PROG of the left push button panel until the display shows the signal.
3) to bypass regeneration control, set a value of 00000 litres.
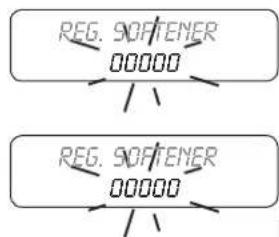
flowchart
graph TD
    A["REG. SOFTENER\n00000"] --> B["..."]
    C["REG. SOFTENER\n00000"] --> D["..."]
16. Signals
cause solution
| 1.0 BAR 120°CBOILER FILLING | Boiler filled with water when using the machine for the first time or when refilling to reach the water level. | Wait for the boiler to be completely filled. |
| 1.1 BAR 120°CFILLING TIMEOUT | Normal activation of time limit upon first filling of boiler with water. | Switch the machine off and back on again. |
| Time for filling the boiler with water longer than expected. | Make sure the water mains cock is opened.Switch the machine off and back on again. If the warning is still on after a few attempts, call Technical Assistance. | |
| DOSER ALARM | 1) Grinding too fine.2) Water supply valve closed3) Fault of the volumetric electronic control | 1) Adjust the grinding.2) Open the water supply valve3) Stop dispensing by pressing the serving key and call technical service |
| REG. SOFTENER | Lack of water softener regeneration. | Carry out the water softener regeneration.To eliminate this signal see chapter 15.3 |
i
If the machine will not work call technical assistance.
AL-AEP-SAE
SAE DISPLAY
SAE DISPLAY
ASD - Automatic Steamer Device
DS - Drink Selection
text_image
Technical diagram showing four steps of a mechanical device with labeled parts A, B, C, and D.text_image
Diagram of a mechanical device with numbered components and directional arrows indicating flow or movement.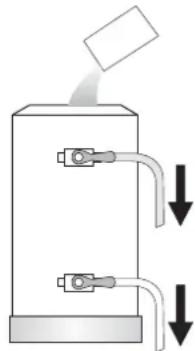
natural_image
Diagram of a mechanical device with two ports and downward arrows indicating flow or movement (no text or symbols)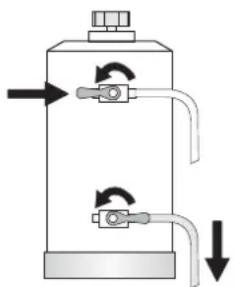
natural_image
Diagram of a cylindrical tank with internal tubing and directional arrows indicating flow or movement (no text or symbols)natural_image
Illustration of a magnifying glass casting on a tray with three small objects (no text or symbols)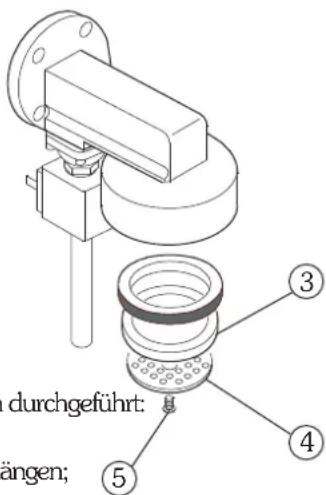
natural_image
Technical line drawing of a mechanical device with no visible text or symbolstext_image
Labeled diagram of a coffee machine with numbered parts and an inset showing its internal control panel.2. Tastenfelder

natural_image
Three circular icons with crescent moon symbols above, no text or labels present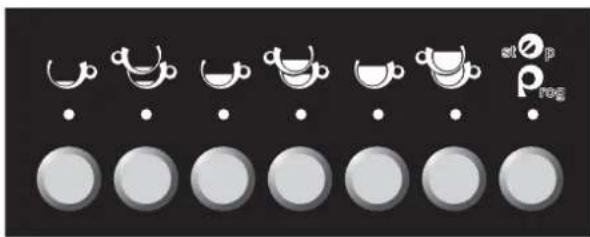
natural_image
Row of circular icons with white cups and dots, no text or symbols presentnatural_image
Technical diagram of a coffee machine with labeled parts (no text or symbols beyond label)natural_image
Line drawing of a coffee maker with funnel and side base (no text or symbols)
natural_image
Line drawing of a mechanical tool or connector with a meshed top and handle (no text or symbols)text_image
Image showing a row of coffee cups with small icons and labels, likely representing tea or coffee meal options.natural_image
Technical line drawing of a espresso machine with labeled parts (no text or symbols beyond labels)text_image
Technical diagram of a espresso machine with labeled parts 1 and 2
text_image
Labeled diagram of a mechanical device with numbered parts for identification
natural_image
Three circular icons with white crescent moon symbols above, arranged horizontally on a dark background (no text or labels)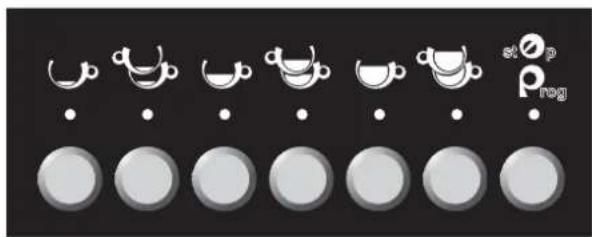
text_image
stop Pregnatural_image
Technical diagram of a mechanical device with labeled parts (no text or symbols present)natural_image
Line drawings of two types of coffee maker designs: top shows funnel, bottom shows handle (no text or symbols)natural_image
Technical line drawing of a mechanical device with no visible text or symbolsnatural_image
Technical line drawing of a espresso machine with labeled parts (no text or symbols present)flowchart
graph TD
    A["REG. ENTHARTER\n00000"] --> B["..."]
    C["REG. ENTHARTER\n00000"] --> D["..."]
ASD - Automatic Steamer Device
DS - Drink Selection
2.3 Tastenfeld DS - Drink selection
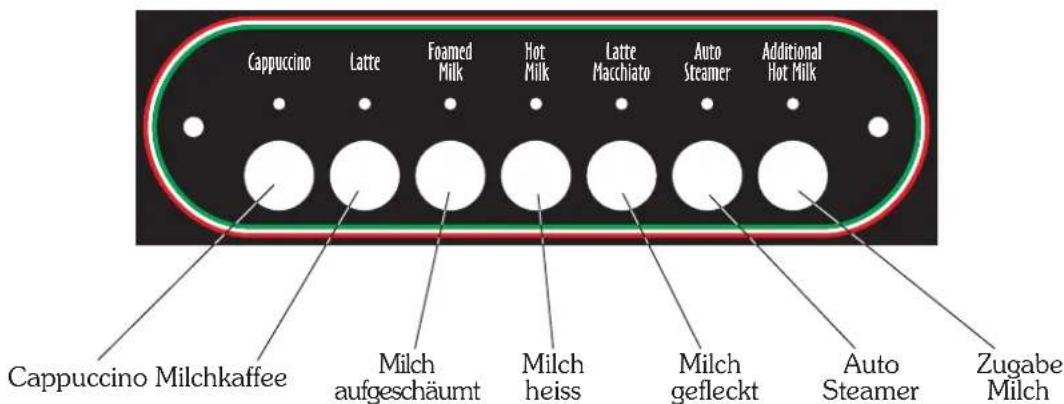
natural_image
Row of circular icons with white cups and dots, arranged in rows on a black background (no text or symbols)6.2 Programmierung
text_image
Labeled diagram of a espresso machine showing numbered parts for assembly or maintenance reference.natural_image
Simple line drawing of a milk carton with a tube and label (no text or symbols beyond the label)
text_image
Cappuccino Latte Foamed Milk Hot Milk Latte Macchiato Auto Steamer Additional Hot Milktext_image
Auto Steamer Taste Autosteamer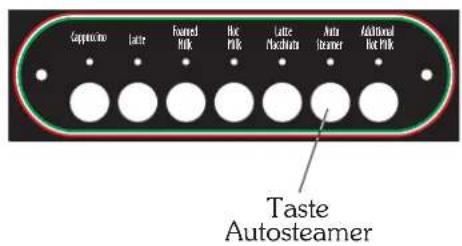
text_image
Cappuccino Latte Floured Milk Hot Milk Latte Machinera Auto Steamer Additional Hot Milk Taste Autosteamer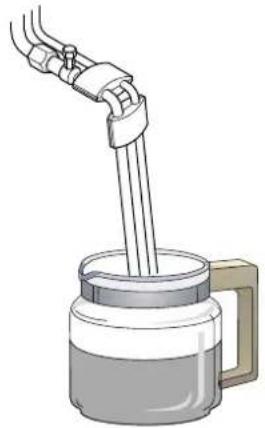
natural_image
Illustration of a hand pouring liquid into a container with a handle (no text or symbols)
KESSELDORUCK. 0.0 BAR IS=0.0
13. S pülung
text_image
Technical diagram showing mechanical assembly with labeled parts A and B, including a bolted joint and screwdriver insertion.WASCHUNG CRAPPUCCINATORE
MILK ROHR IN WASSER TANK
DRUECKEN 3 SEC. MILCH MANUELL
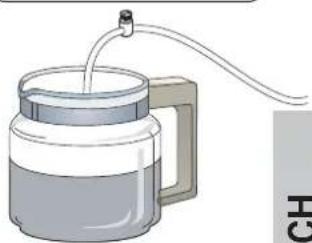
natural_image
Illustration of a micrometer with a tube inserted into it, no text or symbols presentMILK ROHR IN WASSER TANK
DRUECKEN 3 SEC. MILCH MANUELL

text_image
Auto SteamerASD - automatic steamer device
DS - drink selection
GLORIA
text_image
Technical diagram showing four steps of a mechanical device with labeled components A, B, C, and D.text_image
Diagram of a mechanical device with numbered components and directional arrows indicating flow or movement.
natural_image
Diagram of a mechanical device with two ports and downward arrows indicating flow or movement (no text or symbols)
natural_image
Diagram of a cylindrical tank with two valves and directional arrows indicating flow or movement (no text or labels)| Model waterontharder | Hoeveelheid zout |
| 8 liter 1,0 kg | |
| 12 liter 1,5 kg | |
| 16 liter 2,0 kg |
i
natural_image
Illustration of a magnifying glass over a tray with three small objects, no text or symbols present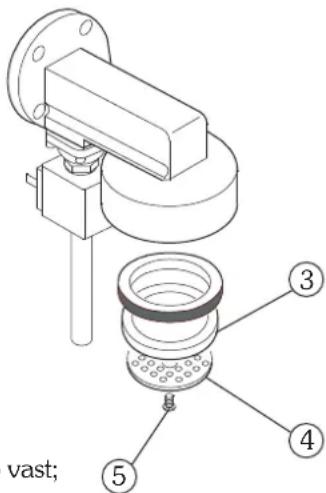
text_image
vast; ③ ④ ⑤
natural_image
Technical line drawing of a mechanical device with no visible text or symbolsMelkopschuimer
text_image
Labeled diagram of a coffee machine with numbered parts and an inset showing its internal control panel.2. Bedieningspanelen
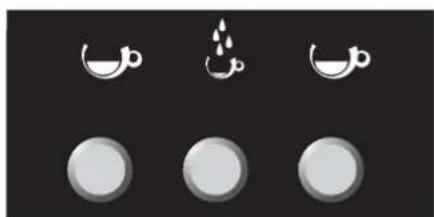
natural_image
Three circular icons with crescent moon symbols above, no text or labels present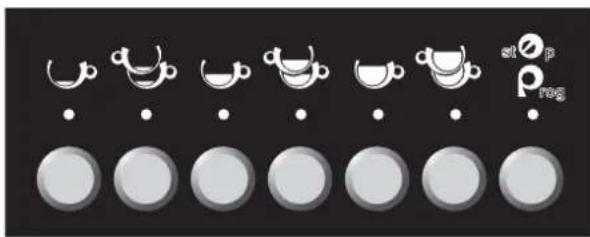
text_image
at ∅ p rog| 1 Espresso | |
| 2 Espresso's | |
| 1 Gemiddeld | |
| 2 Gemiddeld | |
| 1 Slappe koffie | |
| 2 Slappe koffie | |
| at ∅prog | Stop / Prog |
| Warm water |
natural_image
Technical diagram of a coffee machine with labeled parts (no text or symbols beyond label)natural_image
Line drawing of a coffee maker with funnel and side cup (no text or symbols)
natural_image
Line drawing of a mechanical lever handle with a mesh inner component (no text or symbols)6. Koffiezetten
6.1 Uitvoering AL
text_image
Image showing a row of coffee cups with small icons and labels, likely representing tea or coffee meal options.DE KOFFIEHOEVEELHEDEN PROGRAMMEREN
natural_image
Technical line drawing of a espresso machine with labeled parts (no text or symbols beyond labels)text_image
Technical diagram of a espresso machine with labeled parts 1 and 2DE HOEVEELHEID WARM WATER PROGRAMMEREN
text_image
Labeled diagram of a sewing machine with numbered parts for identification7.3 Stoomafgifte
text_image
Technical diagram of a mechanical device with numbered components and directional arrows indicating motion or assembly.SAE DISPLAY
- Algemene beschrijving ...... pag. 22
- Bedieningspaneel pag. 22
- Voorbereiding van de machine ...... pag. 23
- Aanzetten pag. 23
- De koffie malen en doseren ...... pag. 24
- Koffiezetten.... pag. 24
- Warm water aftappen ...... pag. 25
- Tellingen pag. 25
- Kopjesverwarmer pag. 26
- De machineparameters programmeren ...... pag. 26
- Nulstelling gegevens ...... pag. 28
- Meldingen pag. 29
GLORIA
natural_image
Three circular icons with white crescent moon symbols on black background, no text or labels present
text_image
stop Preg| GEBRUIKS TOETS | PROGRAMMEER TOETS | |
| 1 Espresso | MODE | |
| 2 Espresso's | ENTER | |
| 1 Gemiddeld | TOENAME | |
| 2 Gemiddeld | AFNAME | |
| 1 Slappe koffie | ____ | |
| 2 Slappe koffie | ____ | |
| st O_p rog | Stop | PROGRAMMERING |
| Warm water | ____ |
natural_image
Technical diagram of a coffee machine with labeled parts (no text or symbols present)natural_image
Line drawings of a coffee maker and its side view (no text or symbols)6. Koffiezetten
6.1 Koffieafgifte
natural_image
Technical line drawing of a mechanical device with no visible text or symbols
7. Warm water aftappen
7.1 Warm water programmeren
natural_image
Technical line drawing of a coffee machine with levers and control panel (no text or symbols)ASD - automatic steamer device
DS - drink selection
- Algemene beschrijving ...... pag. 32
- Bedieningspanelen pag. 33
- Voorbereiding van de machine ...... pag. 34
- Aanzetten pag. 34
- De koffie malen en doseren ...... pag. 34
- Koffiekeuzes ...... pag. 35
- Warm water aftappen ...... pag. 36
- Teller pag. 36
- Kopjesverwarmer ...... pag. 37
- DS drink selection ...... pag. 38
- ASD automatic steamer device ...... pag. 40
- Keteldruk ...... pag. 41
- Reiniging ...... pag. 41
- De machineparameters programmeren ...... pag. 42
- Nulstelling gegevens.... pag. 46
- Meldingen pag. 47
GLORIA
text_image
Image showing a row of circular icons with varying sizes and symbols, possibly representing food or beverage items.| GEBRUIKS TOETS | PROGRAMMEER TOETS | |
| 1 Espresso | MODE | |
| 2 Espresso's | ENTER | |
| 1 Gemiddeld | TOENAME | |
| 2 Gemiddeld | AFNAME | |
| 1 Slappe koffie | ____ | |
| 2 Slappe koffie | ____ | |
| stOprog | Stop | PROGRAMMERING |
| Warm water | ____ |
2.3 Bedieningspaneel DS - Drink selection
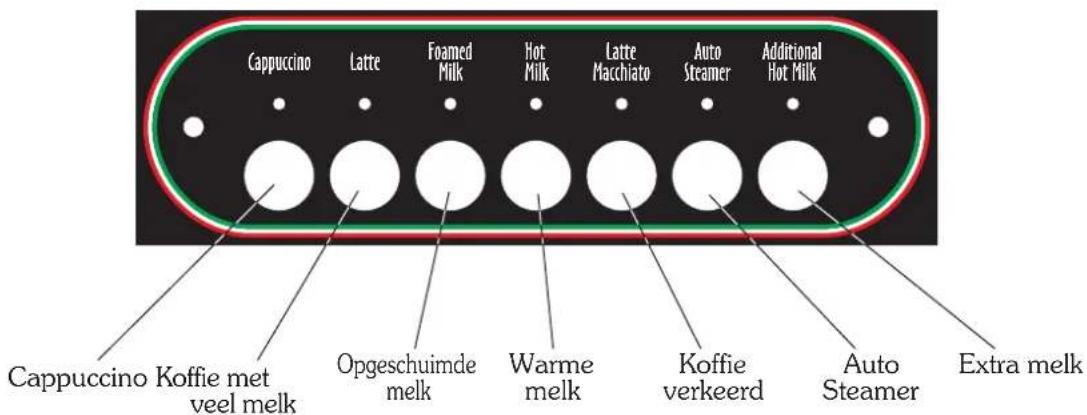
text_image
Cappuccino Latte Foamed Milk Hot Milk Latte Macchiato Auto Steamer Additional Hot Milk Cappuccino Koffie met veel melk Opgeschuimde melk Warme melk Koffie verkeerd Auto Steamer Extra melknatural_image
Row of grayscale circular icons with white teapot symbols, no text or labels present6.2 Programming
7. Warm water aftappen
7.1 Warm water aftappen
text_image
Labeled diagram of a espresso machine showing numbered parts for assembly or maintenance reference.7.2 Warm water programmeren
10. DS drink selection
10.1 Gebruik
natural_image
Simple line drawing of a milk carton with a tube and label (no text or symbols beyond the label)
text_image
Cappuccino Latte Foamed Milk Hot Milk Latte Macchiato Auto Steamer Additional Hot Milk11. ASD automatic steamer device
11.1 Gebruik
text_image
Capriculose Lattice Foamed Milk Hot Milk Lattice Machinera Auto Steamer Additional Hot Milk Toets autosteamer
natural_image
Illustration of a hand pouring liquid into a container with a handle (no text or symbols)
KETELORUK 0.0 ATM IS=0.0
13. Reiniging
DRUK TOETS "EXTRA MELK" 3 SEC. N
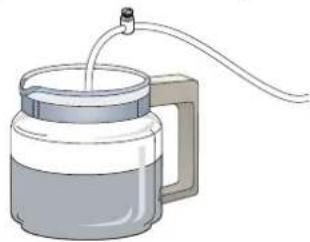
natural_image
Illustration of a micrometer with liquid and tubing (no text or symbols)LEG MELKSLANGEN IN WATER
DRUK TOETS "EXTRA MELK" 3 SEC. IN

text_image
Auto SteamerTel. +39.0438.6615 - Fax +39.0438.60657
www.astoria.com - info@astoria.com