
ELVOX 41016 - Fingerprint Reader Vimar - Free user manual and instructions
Find the device manual for free ELVOX 41016 Vimar in PDF.
| Product Type | Fingerprint Reader |
| Brand | Vimar |
| Model | ELVOX 41016 |
| Power Supply | 5 Vdc via audio/video module or external power supply (terminals 5V+ and 5V-) |
| Maximum Consumption | 260 mA |
| Operating Temperature | -25 °C to +55 °C |
| IP Protection Rating | IP54 |
| Impact Resistance (IK) | IK08 (Pixel series) |
| Relay Output | 1 relay F1, NO contact, 60 Vdc / 1 A max |
| Local Button Input | Yes (terminals CA+ and CA-) |
| Max Number of Fingerprints | 200 (installer + users) |
| User Types | Installer and normal user |
| USB Connection | Mini USB for configuration and update |
| RJ45 Connection | Not used |
| Pixel Series Compatibility | Modules 41001, 41003, 41004 (except 41000) |
| Configuration | Via SaveProg software or manual enrollment using installer fingerprint |
| Firmware Update | Via Winboot over USB connection |
| LED Indication | Status LED (blue/orange/green/red) and 2 function LEDs (green/red) |
| Cleaning and Maintenance | Clean the sensor with a soft, dry cloth. Do not use abrasive products. |
| Standards and Certifications | Compliant with applicable standards; WEEE, REACH (lead traces) |
Frequently Asked Questions - ELVOX 41016 Vimar
User questions about ELVOX 41016 Vimar
0 question about this device. Answer the ones you know or ask your own.
Ask a new question about this device
Download the instructions for your Fingerprint Reader in PDF format for free! Find your manual ELVOX 41016 - Vimar and take your electronic device back in hand. On this page are published all the documents necessary for the use of your device. ELVOX 41016 by Vimar.
USER MANUAL ELVOX 41016 Vimar
a) Fingerprint reader
b) LED status indication
c) LED function indication
e) Removable wiring terminal block
f) Connector for the connection to the previous electronic module
g) Connector for the connection to the next electronic module
h) Mini USB connector for connection to PC.
Leyenda
Connection terminal block description
| Terminal functions | |
| CA- | Additional relay control push button at terminals F1+ and F1-. |
| CA+ | |
| F1+ | “F1” relay output (NO contact). The contact can control resistive loads externally powered with maximum current 1 A and maximum voltage 48 Vdc (maximum voltage permitted by EN 62368-1 for the ES1/SELV). |
| F1- | |
| 5V- | Additional external power supply. Caution: observe the polarity when carrying out connection. |
| 5V+ | |
Fingerprint reader, 1 N/O relay output, to be completed with front cover
1 Description
When a preconfigured print is recognised as valid, depending on the pre-set fingerprint role, the device activates the "F1" local relay output, to control the opening of a lock, for example.
The device has an input for a local button that, if enabled, can be used to activate the F1 output directly.
Fingerprint programming is done with SaveProg or with installer fingerprints, duly registered on the module.
The device can be installed with 41001, 41003, 41004 modules in the Pixel series and in a stand-alone configuration, with a local power supply of 5V.
2 Features
- Supply voltage: 5 Vdc from Audio-Video or Audio modules, via a specific wiring harness, or from an additional power supply unit, on the 5V+ and 5V- terminals.
Absorption: 260 mA max - Operating temperature: -25^ / + 55^
IP54 degree of protection - Protection rating against impact IK08 (Pixel).
3 Terminals
- Local power supply (5 Vdc, 260 mA);
-F1 output relay, NO (60 Vdc, 1A); - Input for door command CA, NO.
4 Connections
- Connection to Pixel series modules.
- USB for configuration and updating
RJ45, not used
5 Configuration.
The fingerprint programming is done firstly with SaveProg. 2 types of user can be entered: installer or normal user. The installer fingerprint is used for learning normal users, while the user fingerprint is used to recognise the behaviour configured during installation. In order to reduce the risk of malfunctions due to injuries or other events, the installer should register at least 4 fingerprints using the fingers on both hands: 2 with installer role and 2 with user role. For the same reasons, for normal users at least 2 different fingerprints should be recorded.
Up to 200 prints can be recorded (the sum of the user and installer prints).
5.1 Management via SaveProg.
The print database can be configured via SaveProg. In particular, you can:
- Set the operating mode as stand-alone or with audio/vid
eo module;
- Add/Remove prints belonging to a user or installer.
- Change the fingerprint authorisations, from installer to user or vice versa.
In the stand-alone configuration you can:
- Set the relay activation time.
- Enable the CA input for local relay opening.
In the configuration with AV module, F1 relay opening times and CA enabling are set directly on the AV module.
Alongside a valid fingerprint, you can configure the AV module to open the fingerprint reader module relay or one of those present on the auxiliary modules, by configuring the AV module.
You can also configure the F1 relay as a common or exclusive lock for the speech unit.
Connect the PC to the USB and follow the SaveProg instruction documents for specific details.
In the event of an error, the function LEDs flash red. Make sure that:
- the AV module is compatible with the fingerprint reader (e.g. not item 41000);
- the fingerprint reader is communicating with the AV module (incorrect wiring);
- the AV module firmware version is up to date.
5.1.1 Fingerprint configuration
To configure a fingerprint, select the type of print using the "Add fingerprint" key: User or Installer.
Depending on whether the SaveProg option "Check Enabled" is ticked (default) or not, a preliminary check for the fingerprint in the database will or will not be performed before actual registration of the fingerprint takes place; the operating phase (check or registration) of device is signalled on the status LED and the function LEDs.
With "Check Enabled", on pressing the SaveProg key "Add Fingerprint", the device behaves as follows:
- the device signals the start of the fingerprint check phase by flashing the function LED green. The status LED remains blue.
- at the first swipe of the finger, a preliminary check is made to see if the fingerprint is already present in the database: if it is present (because it was acquired previously) the device immediately quits the check phase, extinguishes the flashing function LEDs and returns to normal operating mode (only the status LED remains lit blue); at the same time, SaveProg signals the prior existence of the fingerprint in the database.
If instead it is a new fingerprint (not present in the device database), the status LED changes from blue to steady orange (after briefly turning red) and the function LEDs stop flashing green (to signal the check phase), thereby indicating the actual registration/acquisition of the fingerprint. - At this point, the same finger should be swiped at least 3 times in succession for the fingerprint to be registered correctly and saved in the device database; at each
swipe, the status LED will rapidly flash orange during the processing stage and then will change to green, if the finger swipe is successful, or red if is not. The same status LED will then turn to steady orange to indicate that the device is waiting for another finger swipe.
- After all 3 acquisitions are completed successfully, the status LED and the 2 function LEDs will turn green for about 1 second: this indicates that the fingerprint has now been registered and saved in the database and the result is signalled by a SaveProg message.
- The device then prepares for acquisition of the next fingerprint/user, either returning to the check phase, if "Check Enabled" is selected, with the corresponding indication on the function LEDs, or, if not, entering directly into the acquisition phase (status LED lit orange) waiting for the 3 finger swipes.
- If a period of 10 seconds elapses without a finger swipe, the device will exit the check or acquisition phase and SaveProg will display the message "acquisition timeout". The device will then return to normal operating mode (with only the status LED lit blue), ready to accept a new command from SaveProg or to identify a finger swipe.
5.2 Manual Management
You can also implement the following procedure to register a user print:
- Press a fingerprint programmed as "installer";
- Within 5 s, press the print to be recorded as "user"; while waiting the orange LED remains on.
- To complete the fingerprint recording, the finger must be pressed 3 times. When recorded correctly, the central LED turns green for an instant. After all 3 acquisitions the central led and the 2 leds below turn green for approximately 1 second.
- The procedure is repeated from point 2, repeating the acquisition for any other users (the central LED turns orange and stays on).
If the acquisition is not correct, the central LED turns red for a few seconds. The operation must be repeated. After 5 s the procedure is exited and the central LED turns blue again.
To delete prints you always need to use SaveProg.
6 Normal operation
The fingerprint recognition is indicated by the module with the status LED and the two function LEDs both lit in GREEN for approximately 1 second.
The NON-recognition of a fingerprint is indicated by the module with the status LED and the two function LEDs both lit in RED for approximately 1 second.
Depending on the set configuration, the actions associated to the local button and the fingerprint recognition are respectively:
- Local button pressed or with fingerprint recognised:
-
with A/V ENABLED mode a notice is sent to the A/V module which will run the configured command.
-
in "local CA input" ENABLED mode, the "F1" relay is immediately switched on.
7 Updating
The device is updated with Winboot via the USB connection. To upgrade you need to disconnect the device from the auxiliary power supply and from the other modules, connect the USB to the PC and start the update. During the updating time (30sec) the LEDs are switched off and when restarting after the update the LEDs may change status with different colours.
8 Using the fingerprint reader
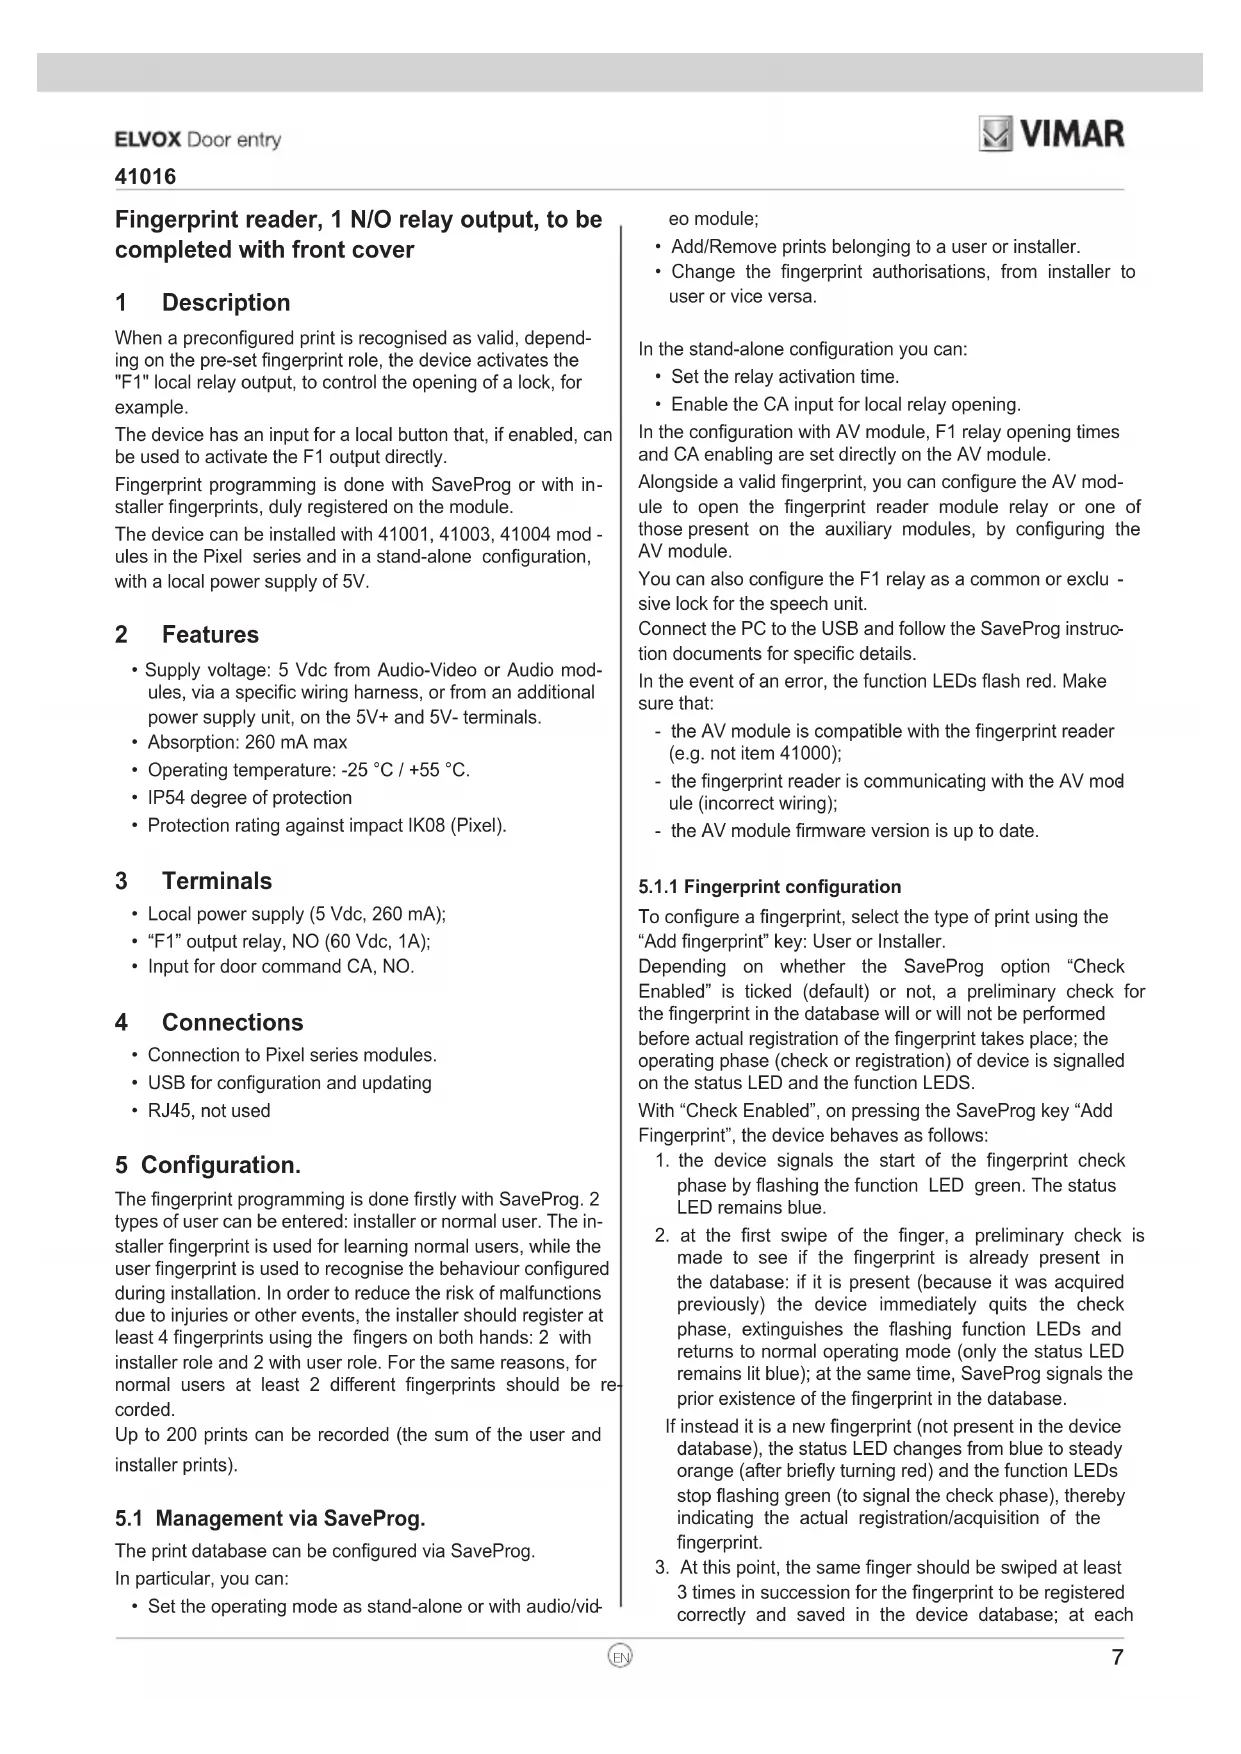
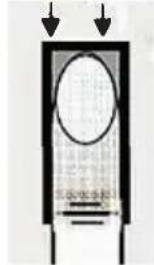
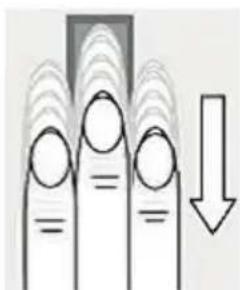
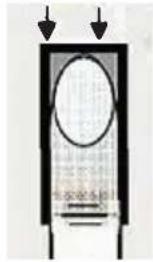
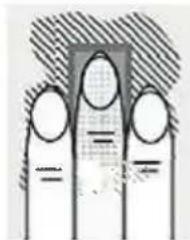
The best results are obtained using the middle finger with the index and ring fingers straight.
Place the finger joint directly on the sensor
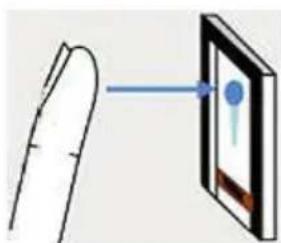
Make sure the finger is positioned in the centre of the scanning area, between the two finger guide edges.

Place the finger fully stretched so that it adheres perfectly to the sensor.
Then placing the finger on the scanner, the ideal position is with all fingers straight and close together.
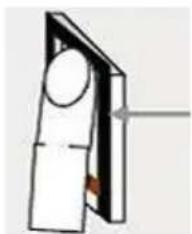
Move (the whole hand) downwards on the sensor, without bending the finger.
Take care to slide the finger at the right speed. CAUTION: The whole movement should take 1 - 1.5 seconds.
Do not move the position of the fingers while scanning (e.g. by bending the finger joint).
You do not need to put any pressure on the scanner.
Using this digital fingerprint reader correctly will ensure good results:
- You are advised to use the finger which you think has the best fingerprint lines. In particular, with poorly visible fingerprint lines you are advised to press down more lightly, so as not to flatten the lines and ensure correct recognition.
- Do not use the little finger or thumb.
- The fingerprint reader has an automatic learning system, which recognises changes in the user's habits and the growth of children's fingers, to improve recognition over time.
- To optimise the digital fingerprint recognition, each time a new fingerprint is saved or the system has not be used for long periods of time, perform at least five recognitions. If on any of the scans the finger is not recognised, repeat the recording procedure.
If none of the digital fingerprint scans are accepted, do as follows:
- Record the same fingerprint with your finger in several different positions, in order to increase the likelihood of recognition. In extreme cases, use up to 10 recordings of the same fingerprint.
- Wet fingers vary the state of the fingerprint. If you often have wet fingers, record the finger also when wet.
- Children's fingerprints are generally recognisable, depending on their size, usually from age five upwards.
The instruction manual is downloadable from the site www. vimar.com
Installation rules
Installation should be carried out by qualified personnel in compliance with the current regulations regarding the installation of electrical equipment in the country where the products are installed.
Conformity
EMC directive. RoHS directive.
Standards EN 62368-1, EN 61000-6-1, EN 61000-6-3 and EN IEC 63000.
REACH (EU) Regulation no. 1907/2006 - Art.33. The product may contain traces of lead.
WEEE - Information for users
If the crossed-out bin symbol appears on the equipment or packaging, this means the product must not be included with other general waste at the end of its working life. The user must take the worn product to a sorted waste center, or return it to the retailer when purchasing a new one. Products for disposal can be consigned free of charge (without any new purchase obligation) to retailers with a sales area of at least 400m^2 if they measure less than 25cm . An efficient sorted waste collection for the environmentally friendly disposal of the used device, or its subsequent recycling, helps avoid the potential negative effects on the environment and people's health, and encourages the re-use and/or recycling of the construction materials.
Directive EMC. Directive RoHS.
Normes EN 62368-1, EN 61000-6-1, EN 61000-6-3 et EN IEC 63000.
8 XpnooOeunc avayvwong daKTuI KwV aTOTUTWATW
Béltiota anotéleóμata επituyxáovotai otav xρησiμo
TIOIEIaTOeOAOdeltaKaiOdeltaKaiOapae-ooEivAraTOxpoVaioI.

TOTIOE1NOTE TIV apOpwan
TNS paAayac ateUeIa
TAVW OTV aiOthnpa.
Bebaiweite oTo do kTuAo exei toTOnTei oTo keVtpo Tns Cwns mTaTu wv duokpov-odnywTwv daKTu - Auv.
TToToEToToDakTuOio, KpatWvTaTo 10iaKai oe aToAunT Etaqn ToVaoThnpa.
Idavika,otav tottotheite to daKTuao OTO capwtn, TIPETIEVAIOWVEKAI ta UToAoIa DaKTua,KpatWvTa Ta koAAnueva.
Metakivote ta daKTuaa TPOs Ta kAtw naw otov aoentnpa (e oAoknpo To xepi),xupic va aAalaTe Tnv KAion Tou daKTuou.
- Leyenda
- Fingerprint reader, 1 N/O relay output, to be completed with front cover
- Description
- Features
- Terminals
- Connections
- Configuration.
- Management via SaveProg.
- Fingerprint configuration
- Manual Management
- Normal operation
- Updating
- Using the fingerprint reader
- Installation rules
- Conformity
- WEEE - Information for users
- XpnooOeunc avayvwong daKTuI KwV aTOTUTWATW
Brand : Vimar
Model : ELVOX 41016
Category : Fingerprint Reader