
Julie Ann - Radio Auna - Free user manual and instructions
Find the device manual for free Julie Ann Auna in PDF.

| Brand | Auna |
| Model | Julie Ann |
| Product type | Stereo system with turntable and radio |
| Power supply | 230 V~ 50 Hz |
| RMS power | 2 x 10 W RMS |
| Article numbers | 10035015, 10035016, 9035019 |
| Playback formats | CD, CD-R, CD-RW, MP3, vinyl records (33, 45, 78 rpm), USB |
| Radio | DAB+ and FM (RDS) |
| Connectivity | Bluetooth, AUX-IN (3.5 mm), USB port, DAB/FM antenna |
| Additional functions | USB recording, equalizer (POP/CLASSIC/ROCK/JAZZ/FLAT), programmable playback, repeat, shuffle, mute function |
| Remote control | Included (CR2025 battery) |
| Station memory | 10 DAB/FM stations |
| Laser safety | Class 1 laser device |
| Maintenance | Clean the casing with a soft cloth; wipe CDs from the inside out; do not use abrasive detergents |
| Recycling | Do not dispose of with household waste; take to a collection point for electrical and electronic equipment |
Frequently Asked Questions - Julie Ann Auna
User questions about Julie Ann Auna
0 question about this device. Answer the ones you know or ask your own.
Ask a new question about this device
Download the instructions for your Radio in PDF format for free! Find your manual Julie Ann - Auna and take your electronic device back in hand. On this page are published all the documents necessary for the use of your device. Julie Ann by Auna.
USER MANUAL Julie Ann Auna
INHALT
Technische Daten 3
natural_image
Technical line drawing of a rectangular electronic component with four mounting holes and a central internal slot (no text or symbols)natural_image
Simple line drawing of a rectangular electronic device with three vertical rods and a central connector (no text or symbols)natural_image
Line drawing of a rectangular electronic device with four vertical rods and a central connector (no text or symbols)natural_image
Technical diagram of a mechanical assembly with concentric circular components and a vertical guide rail (no text or labels)natural_image
Hand holding a small object with directional arrows indicating movement or force (no text or symbols)
natural_image
Hand holding a device with an upward arrow indicating motion (no text or symbols)GERÄTEÜBERSICHT
Vorderansicht

natural_image
Illustration of a hand pressing a mechanical component with an upward arrow (no text or symbols)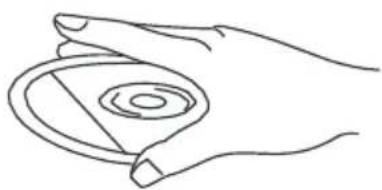
natural_image
Line drawing of a hand holding a circular object with concentric rings (no text or symbols)natural_image
Line drawing of two hands holding a circular object (no text or symbols)
Member of Berlin Brands Group
Handwerkerstr. 11
15366 Dahlwitz-Hoppegarten
Deutschland
natural_image
Symbol of a trash bin crossed out by a diagonal line, with no text or labels present.Berlin Brands Group UK Ltd
PO Box 1145
Oxford, OX1 9UW
United Kingdom
Congratulations on purchasing this equipment. Please read this manual carefully and take care of the following hints to avoid damages. Any failure caused by ignoring the items and cautions mentioned in the instruction manual are not covered by our warranty and any liability. Scan the QR code to get access to the latest user manual and other information about the product.

CONTENTS
Technical Data 25
Safety Instructions 27
Unit stand Assembly 29
Unpacking and setup 31
Product Overview 33
Phono Deck 36
Operating Instructions 37
CD Operation 39
Playing records 40
BT function 41
Aux in 41
DAB Radio 41
Care and Maintenance 43
Disposal Considerations 44
Declaration of Conformity 44
TECHNICAL DATA
| Item number | 1003501510035106 |
| Power supply 230 V~ 50 Hz | |
| RMS power 2x 10 W RMS |
EXPLANATION OF THE WARNING SYMBOLS
 | CAUTION |  |
| RISK OF ELECTRIC SHOCKDO NOT OPEN | ||
| AUTION: TO REDUCE THE RISK OF ELECTRIC SHOCK AND SERIOUS PERSONAL INJURY, DO NOT REMOVE ANY COVER. NO USER-SERVICABLE PARTS INSIDE. REFER SERVICING TO QUALIFIED SERVICE PERSONNEL ONLY. | ||
| WARNING. TO REDUCE THE RISK OF FIRE OR ELECTRICAL SHOCK, DO NOT EXPOSE THIS PRODUCT TO WATER, RAIN OR MOISTURE. | ||
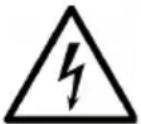 | Triangle with lightning plus explanation as follows:DANGEROUS VOLTAGE: The lightning flash with arrowhead symbol within the equilateral triangle is intended to alert the user to the presence of uninsulated dangerous voltage within the product's enclosure that may be of sufficient magnitude to constitute a risk of electric shock to persons. |
 | Triangle with exclamation point plus explanation as follows:ATTENTION: The exclamation point within the equilateral triangle is intended to alert the user to the presence of important operating and maintenance (servicing) instructions in the literature accompanying this product. |
NVISIBLE LASER RADIATION WHEN OPEN AND INTERLOCK FAILED OR DEFEATED. AVOID DIRECT EXPOSURE TO LASER BEAN.
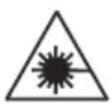
Laser safety
This equipment uses an optical laser system in the CD mechanism, which is equipped with built-in safety devices. Do not attempt to disassemble the unit, but contact qualified service personnel. Exposure to this invisible laser beam may be harmful to the human eye.
THIS IS A CLASS 1 LASER PRODUCT. USE OF CONTROLS OR ADJUSTMENTS OR PROCEDURES OTHER THAN THOSE SPECIFIED HEREIN MAY RESULT IN HAZARDOUS EXPOSURE OF THE LASER BEAM.
SAFETY INSTRUCTIONS
Read these instructions. All uses guidelines must be read before using the device. Keep the instructions for future use.
- Children over the age of 8 and persons with reduced physical, sensory or mental capabilities or those with a lack of experience and knowledge may only use the device if they are instructed on how to do so by a person responsible for their safety, or if they are supervised and understand the hazards associated with the use of the device.
- Attention, use and security guidelines must be respected.
- The device must not be used near water or be put in contact with moisture.
- Make sure has no liquid is spilled on device and device openings.
- Move device carefully, avoid shocks.
- Do not block the breakdown of the device outputs.
- Do not place the device near from a heat source (e.g. radiator). Do not expose it to the Sun.
- Plug the device as indicate on this information form.
- This device has a connection with overload protection. Replacement should only be done by an experienced technician or the device manufacturer.
- For cleaning the device, please follow the recommendations of the notice.
- The power cord should be unplugged when not using for a long period of time.
• Device shall be repaired by a qualified person when:
a. the power cord is damaged,
b. objects have fallen into the apparatus or a liquid has been spilled into device,
c. device was exposes to the rain,
d. device does not work correctly without notable exterior change,
e. device is broken.
- The user shall not try to maintain device beyond that which is described in this information form.
- The apparatus shall not be exposed to dripping or splashing and that no objects filled with liquids, such as vases, shall be placed on apparatus.
- To be completely disconnect the power input, the mains plug of apparatus shall be disconnected from the mains, as the disconnect devices is the mains plug of apparatus.
- The mains plug of apparatus should not be obstructed OR should be
easily accessed during intended use.
- Battery shall not be exposed to excessive heat such as sunshine, fire or the like.
- Excessive sound pressure form earphones and headphones can cause hearing loss.
- Minimum distance (8 cm) around the apparatus for sufficient ventilations;
- The ventilation should not be impeded by covering the ventilation opening with items such as newspaper, table-cloths, curtain etc;
- No naked flame sources such as lighted candles should be placed on the apparatus;
- Attention should be drawn to the environmental aspects of battery disposal;
- The use of apparatus in moderate climates.
- Danger of explosion if battery is incorrectly replaced.
- Replace only with the same or equivalent type.
- The main plug shall remain readily operable.
Before use
Avoid installing this unit in places exposed to direct sunlight or close to heat radiating appliances such as electric heaters, on top of other stereo equipment that radiates too much heat, places lacking ventilation or dusty areas, places subject to constant vibration and/or humid or moist areas.
Do not attempt to clean this unit with chemical solvents as this might damage the finish. Use a clean dry cloth. Operate controls and switches as described in the manual. Before turning On the power, make certain the AC power cord is plugged in.
Power source
- This system is designed to operate on normal 230V 50Hz AC only.
- Attempting to operate from any other power source may cause damage to the system, and such damage is not covered by your warranty.
- NOTE: If this plug will not fit into your outlet you probably have an outdated non-polarized AC outlet. You should have your outlet changed by a qualified licensed electrician.
UNIT STAND ASSEMBLY
-
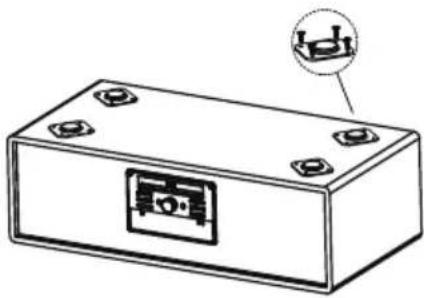
Take out the unit and the stands, put them on a smooth surface.
-
Disassemble the plastic parts(as the fig)
by removing the screws.
You may choose to put the unit on to the table surface with the plastics parts to avoid damage the table.
- Repeat to disassemble all of the 4 pcs..
natural_image
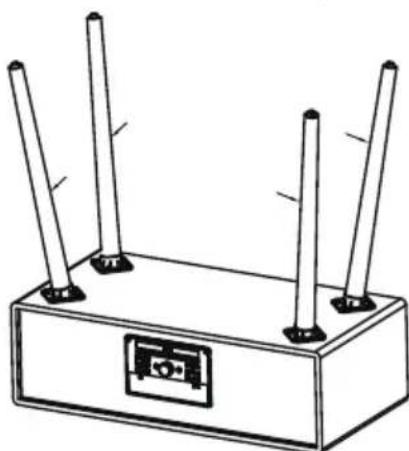
Technical line drawing of a rectangular electronic component with mounting holes and a central internal slot (no text or symbols)insert the wooden stand into the hole and tighten the screws.(Use the same screws of the disassembled the plastic part)
natural_image
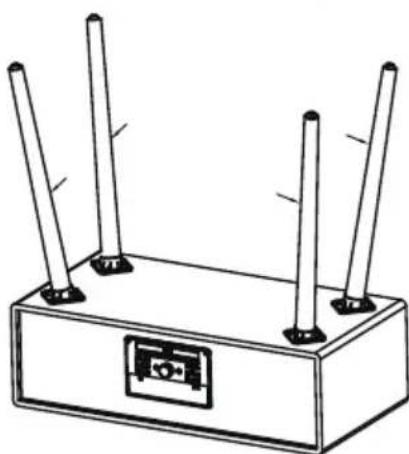
Simple line drawing of a rectangular electronic device with four vertical rods and a central connector (no text or symbols)If there is imbalance after the installation, remove the short legs and put 1 or 2 EVA pads to adjust the unit to be put well.
natural_image
Simple line drawing of a rectangular electronic device with four vertical rods and a central button (no text or symbols)UNPACKING AND SETUP
- Carefully remove the unit from the display carton and remove all packing material from the unit.
- Unwind the AC power cord and extend it to its full length.
- Unwind the FM Antenna wire and extend it to its full length.
- Place the unit on a stable level surface, which is convenient to an AC outlet out of a strong magnetic field.
- Connect the plug to your AC outlet.
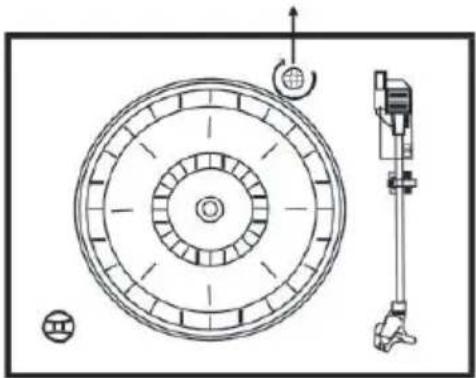
- Raise the lid to expose the phonograph. The phonograph has been secured for shipment with a transit screw.
- Use a coin or screwdriver to turn the transit screw clockwise.
- This will allow the turntable to "float"
- Remove the opaque white plastic stylus cover from the phonograph stylus by sliding it in the direction of the arrow.
- During this operation pay attention to the stylus, because the stylus damage is not covered by guarantee.
- Remove the twist-tie that was used to secure the tone arm during shipment.
- Release the tone arm lock lever.
- Connect the plug to your AC 230V,50Hz outlet.
transit screw
natural_image
Technical diagram of a mechanical assembly with concentric circular components and a vertical support structure (no text or labels)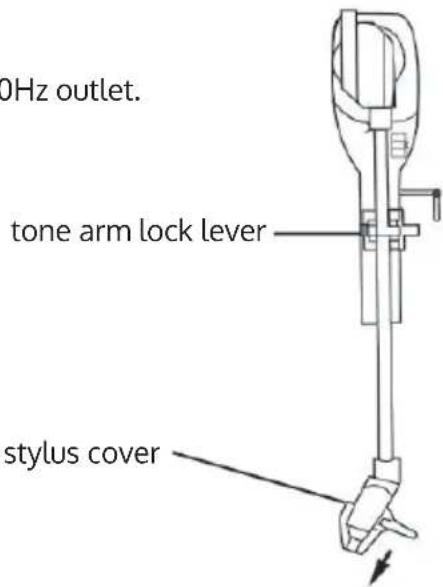
Protect your furniture
- This model is equipped with non-skid rubber 'feet' to prevent the product from moving when you operate the controls. These 'feet' are made from nonmigrating rubber material
- specially formulated to avoid leaving any marks or stains on your furniture. However certain types of oil based furniture polishes, wood preservatives, or cleaning sprays may cause the rubber 'feet' to soften, and leave marks or a rubber residue on the furniture.
- To prevent any damage to your furniture we strongly recommend that you purchase small self-adhesive felt pads, available at hardware stores and home improvement centres everywhere, and apply these pads to the bottom of the rubber 'feet' before you place the product on fine wooden furniture.
Lithium battery installation of remote control
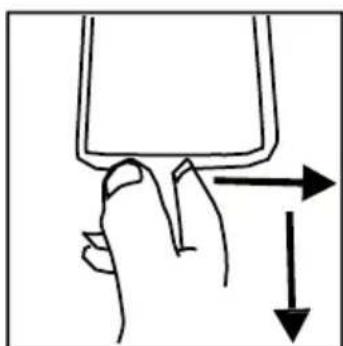
• The remote control requires one CR2025(3V) lithium battery.
- Hold and pressing the clasp with the thumb in the right direction of arrow in the illustration, and take out the battery compartment by sliding with forefinger in the direction to yourself. Take out the battery compartment from the remote control.
- Install a lithium battery (CR-2025) in the compartment with the positive polarity upturned level hold and push the battery compartment into the remote control lightly. It's okay once hear a click.
natural_image
Hand holding a small object with directional arrows indicating movement or force (no text or symbols)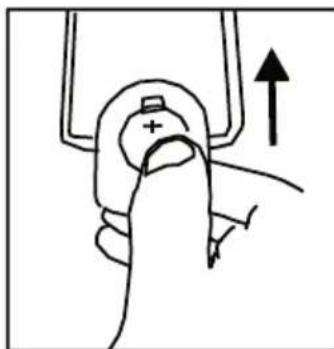
natural_image
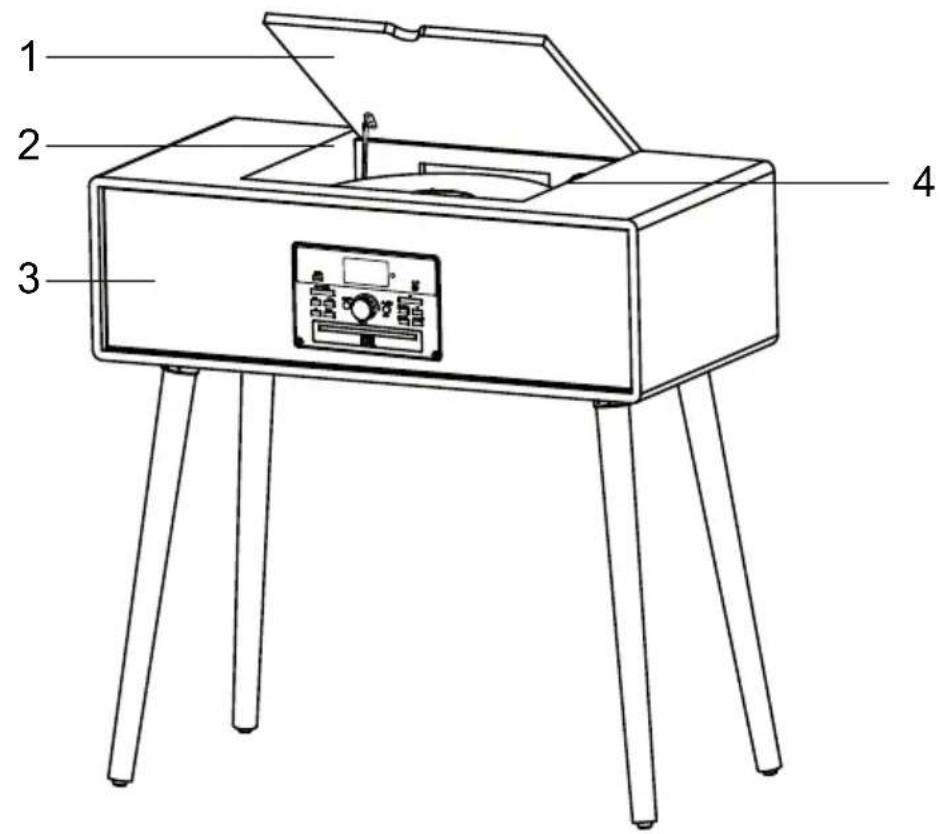
Hand holding a device with an upward arrow indicating motion (no text or symbols)PRODUCT OVERVIEW
Frontview

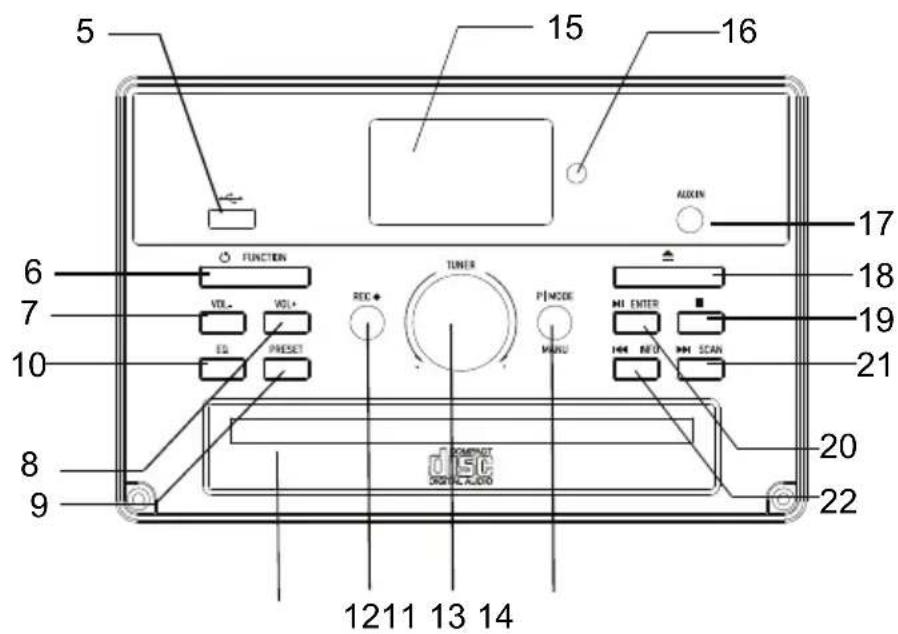
Control panel
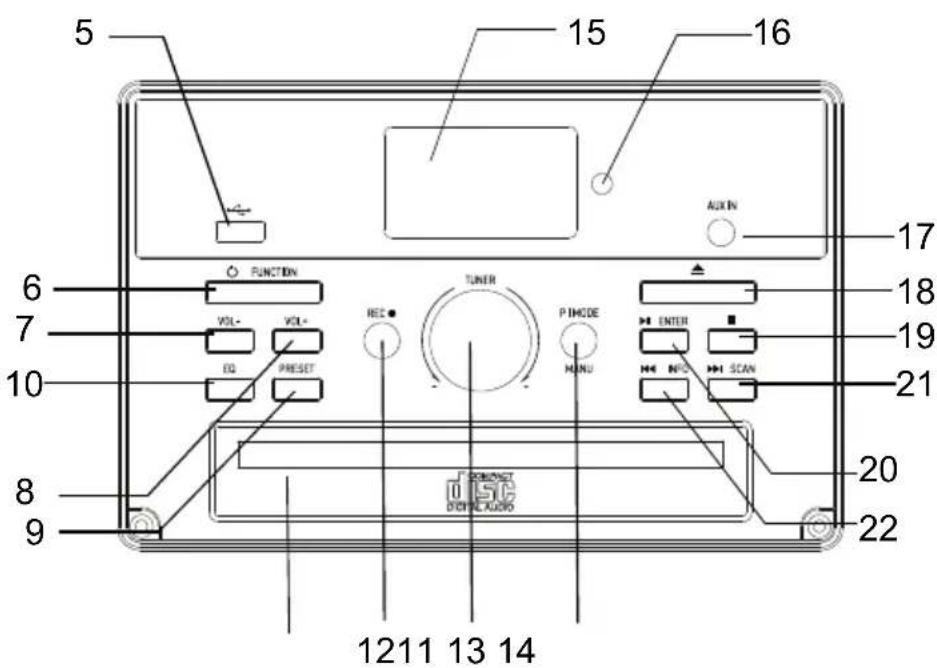
1 Phono Lid
12 Recordbutton
2 Phonograph Lid Support Bracket
13 TunerControl
3 Speakers
14 Play Mode /Manu button
4 Phonograph Plate
15 LCDdisplay
5 USB Socket
16 Remote control sensor
6 Power /Function button
17 Aux-inSocket
7 Vol-button
18 CD Open /Close
8 Vol + button
19 Recording Stop button
9 Presetbutton
20 Enter button (▶II)
10 EQ button
21 INFO button (◀)
11 CDDrawer
22 SCAN button(▶)
Rear view
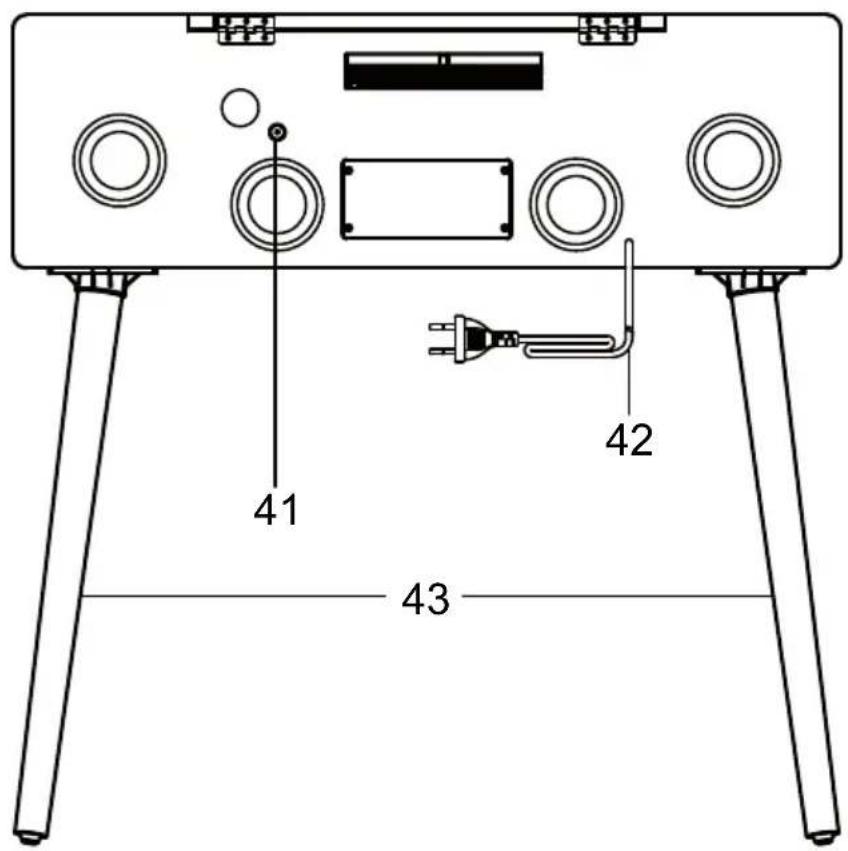
41 DAB/FM antenna
42 Power cord
43 Legs
Remote control
flowchart
graph TD
    A["23"] --> B["RECORD FUNCTION"]
    C["24"] --> D["VOL- EQ VOL+"]
    E["25"] --> F["P.MODE MENU"]
    G["26"] --> H["DN ENTER UP"]
    I["27"] --> J["STOP"]
    K["28"] --> L["27"]
    M["29"] --> N["30"]
    O["31"] --> P["32"]
    Q["33"] --> R["33"]
    S["34"] --> T["-10"]
    U["35"] --> V["+10"]
    W["36"] --> X["INFO PRESET SCAN"]
    Y["37"] --> Z["37"]
    AA["38"] --> AB["PROGRAM DELETE MUTE"]
    AC["39"] --> AD["39"]
    AE["40"] --> AF["40"]
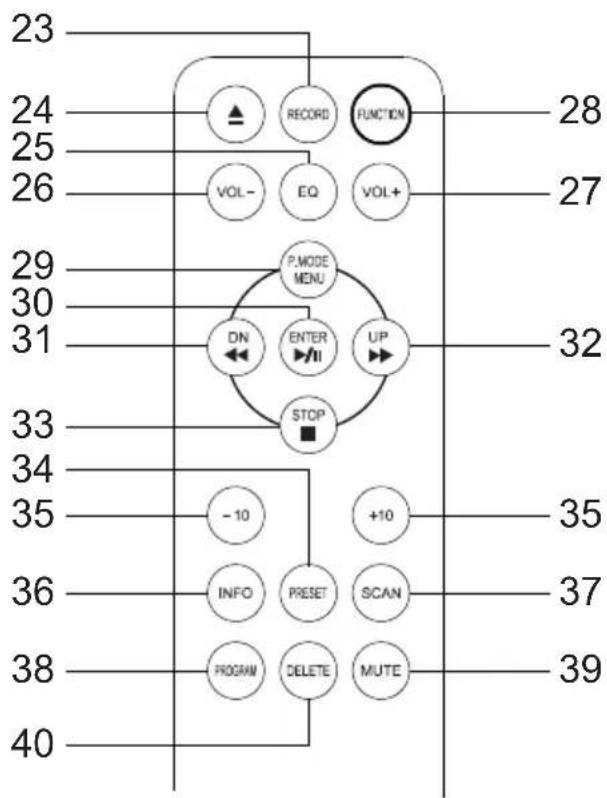
23 Record button
24 CD door open/close
25 Equalizer
26 Vol -
27 Vol +
28 Power on/off, Function
29 Play mode/Menu
30 Tuning knob/Enter
31 Skip-/Rewind
32 Skip+/Fast Forward
33 Stop
34 Preset
35 -/+ track
36 Info
37 Scan
38 Program button
39 Mute button
40 Delete button
PHONO DECK
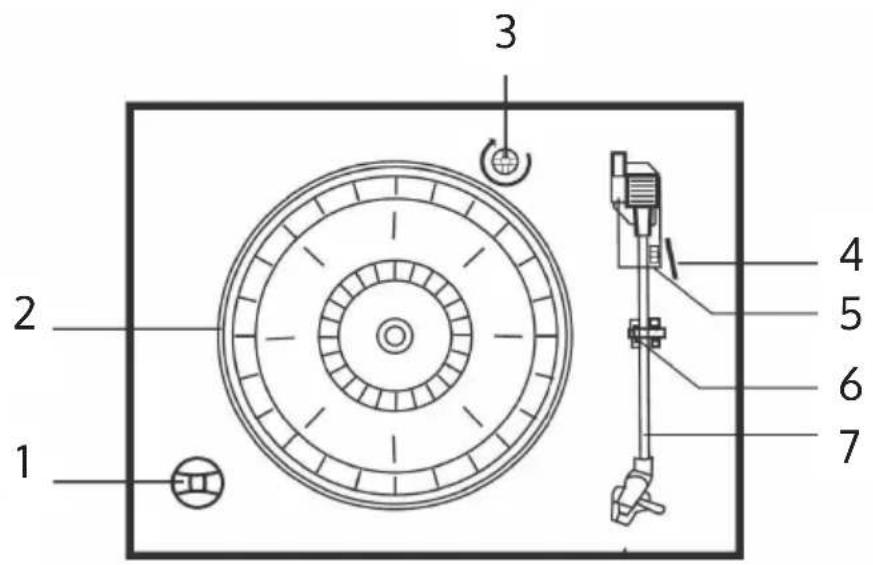
1 45-RPM-Adapter ("puck")
2 Turntable
3 Transit screw
4 Cue-lever
5 RPM selection(33, 45 & 78 UPM)
6 Tone arm lock
7 Tone arm and stylus
OPERATING INSTRUCTIONS
Power on
- To turn on the system, press the POWER/FUNCTION button on the front panel.
- Press the FUNCTION button to select your desired function
- Start to adjust the volume by using the VOLUME control
- When you have finished your listening, press the POWER button again to turn off the unit.
If nobody presses and holds the POWER button to turn off the unit after stopping playing, the unit will power off automatically after 10 minutes.
USB operation
- Press the FUNCTION button and enter USB mode.
- Insert a USB device into the USB socket. The player will begin to play the first track on the USB.
- MP3 icon will be shown while MP3 is detected.
- ▶ II ◀◀ ▶ and ■ functions are the same as in CD play mode
Playing in MP3 mode(under CD/USB operation)
Press the ▶ II button to start or pause playback of the selected track in the CD/USB mode.
While playing the track, the track number and folder number will display on the display screen. MP3 icon will also show on the display.
You can stop the playback at any time by pressing the ■ button.
Track Skip and high speed track search in CD/USB mode
During CD/USB playback, press UP/F-F(Fast Forward) or DN/F-R(Fast Reverse) button repeatedly will skip to higher or lower tracks. Release the button when your desired track number is shown. The disc will begin to play from your selected track.
To rapidly search forward or backward within a track and locate a specific passage of it, press and hold UP/F-F or DN/F-R button. The player will search forward or backward at a high speed. Release the button when you hear your desired passage and the playback will resume normal from that point.
To skip 10 tracks BACKWARDS/AFTERWARDS, press TRACK+10/TRACK-10 button on remote control.
Repeat/random function in CD/MP mode(under CD/USB operation)
Press the PLAY-MODE button on the front panel or REPEAT button on the remote control, the unit will repeat the playing track and ⏻ will display on the display screen.
Press it secondly, the unit will repeat all the tracks in the folder and "FOLDER" will appear on the display. Press it thirdly, the unit will repeat the whole album and "ALL" will show on the display. Press PLAY-MODE button fourthly or the RANDOM button on the remote control once, the unit will begin random playback and "RDM" will display on the screen. Press or to select tracks randomly. To cancel the random playback, press PLAY-MODE once. Press the STOP button to stop playing.
NOTE: There is no folder in the disc if no MP3 is detected. During playing the CD Disc, there is no repeat function.
Memory function in CD/MP3 mode
- In CD stop condition, press the PLAY-MODE button on the unit or PROGRAM button on the remote control and enter PROG mode.
- Press ◀ or ▶ to select your desired track, and press the PLAY-MODE or PROGRAM button to confirm.
- Repeat step 2 to program the track sequence.
- In MP3 mode under CD/USB operation, the setting procedure of MP3 memory is the same as that of CD memory mentioned above.
- Press the PLAY/PAUSE button to play the stored tracks, press ◀ or ▶ to select a track in the sequence saved.
- Press the STOP button to leave program mode. The entire program stored in memory is cancelled.
NOTE: You can store a total of 99 MP3 tracks and 20 CD tracks
Recording function
- While listening to PHONO/TAPE/CD/BT/AUX IN, press RECORD.
- Press RECORD again to confirm. During recording, the "USB" digit at the right top of the LCD will keep flashing until the recording is finished.
*NOTE that the encoding speed is 1:1.
- Press STOP to stop recording.
- The unit will create a folder in the USB device, that contain all recorded tracks.
Deleting recorded track or files
In USB playing mode, press the DELETE button on the remote control twice to delete the playing track.
Radio operation
- Press the POWER button on the front panel to turn the system 'on' and set the volume to a low level. Press FUNCTION button and enter FM mode.
- Rotate the TUNING control to tune the desired radio station.
- When you finished listening, press the POWER button again to turn the system off. The display backlight goes 'off'.
Fm operation
The FM antenna is located on the back cabinet. If necessary adjust the position and direction of this antenna for the best reception.
CD OPERATION
- Press the FUNCTION button and enter CD mode. The unit can play CD, CD-R and CD-RW.
- Press the OPEN/CLOSE button to open the CD drawer
- Place your disc(MP3 is compatible) in the CD drawer with the label side facing up.
- Press the OPEN/CLOSE button again to close the CD drawer. The disc will spin for a few seconds while the player is reading the disc, then the disc stops spinning and start to play the first track of the disc.
PLAYING RECORDS
This system includes a full-size, 3-speed, belt-drive turntable. You can play 33, 45 and 78 rpm records.
- Press the POWER button at the front panel and set the volume to a low level.
- To enter the PHONO mode. First, Press "FUNCTION" to switch to "AUX" mode. You may find that both "AUX & PHONO" appearing in the upper part of the LCD. Then, you can start to play the phono. You will also find the big characters in the LCD changed to "PHON", which indicates you are now in "PHONO" mode.
- Make sure that you have removed the stylus cover from the stylus and have released the tone arm lock that secured the tone arm to the tone arm rest.
- Set the turntable speed selector to the appropriate speed 33,45 or 78 rpm. If you are playing 45 rpm 'singles', place the 45 rpm adapter on the centre spindle.
- Place your record on the centre spindle.
- Raise the cue lever to lift the tone arm off its rest. Move the tone arm to the edge of the record. The turntable starts automatically. Use the cue lever to gently lower the tone arm onto the record.
- Adjust the VOLUME control to the desired level.
- When the tone arm reaches the end of the record it automatically returns to the tone arm rest and the record player stops.
- To turn the system 'off', press the POWER button again and the POWER indicator goes 'off'.
NOTE: Do not turn or stop the turntable manually. Moving or jarring the turntable without securing the tone arm clamp could result in damage to the tone arm.
IMPORTANT
To protect the turntable from damage during transportation, a silver transit screw is located at the upper right of the turntable platform. Before playing, place use a screwdriver to turn the transit screw in clockwise direction (screw going down) completely to unlock the turntable.
To clock the turntable again for transportation, please turn the screw in counter-clockwise direction.
BT FUNCTION
- Select BT mode by pressing BT button.
- Search from your mobile device "Julie Ann" and connect to play.
- Now you can transfer the music to the unit and all operations can only be operated from your device
NOTE: The connected mobile phone BT, if the mobile phone does not cancel the pairing of this BT, when the mobile phone turns on the BT again, it will connect automatically, no need to pair.
AUX IN
Press the POWER/FUNCTION button on the unit to AUX IN Mode, then insert the 3.5mm audio cable of external media players to the AUX IN jack on the unit. and use your external player to operate the playback.
DAB RADIO
- Turn the system on and set the volume to a low level. Press the FUNCTION button to enter DAB mode.
- Connect the DAB antenna onto the antenna socket at the back of the unit, the player will scan the DAB station automatically till receive the DAB stations are received.
- Rotate the TUNER/SELECT control to choose the DAB stations manually. Choose the desired DAB station and press the TUNER/SELECT control to confirm to play. If you tune to a DAB stereo station, the "stereo" will show on the screen.
- In DAB mode, press INFO to see further information on the playing DAB station on the screen, i.e Program Type / Program No. / Frenquency Range / Signal Strength / Time / Date etc.
Station Presets (FM & DAB)
- In DAB/FM playing mode, choose the desired radio station. Press and hold the PRESET button for 2 seconds, "Preset Store 1: (Empty)" will show on the screen, press the TUNER/SELECT control to confirm and "Preset 1 Stored" will show on the screen.
- Rotate the TUNER/SELECT control or press the SKIP+/- button on the remote control to choose the desired radio station programmed.
- Repeat the above 1 - 2 steps to program 10 desired DAB stations or 10 FM
stations.
- Press the PRESET button one time to play the stored tracks. Rotate the TUNER/SELECT control or press the SKIP+/- button on the remote control to choose the desired stored tracks.
Language Setting
During FM or DAB mode, press the MENU button to choose "System" by rotating TUNER/SELECT control, press it to enter system. Rotate the TUNER/SELECT control to choose "Language" and press it to enter language setting procedures. You can choose from English - Nederlands - Deutsch - Norsk - Svenska
Setting Time&Date
- During FM or DAB mode, press the MENU button to choose "System" by rotating the TUNER/SELECT control, press it to enter system setting procedures.
- Rotate the TUNER/SELECT control to choose "Time" and press it to enter time setting procedures, "TIME" "Set Time/Date" will show on the screen.
- Enter into "Set Time/Date": "Auto update" "Set 12/24 hour" will show on the screen by turn when you rotate the TUNER/SELECT control.
- "Auto update" after confirmed: "No update"/ "Update from Any" / "Update from DAB" and "Update from FM" will show on the screen by turn when you rotate the TUNER/SELECT control. You may choose your desired update mode by pressing theTUNER/SELECT control to confirm.
- "Set 12/24 hour" after confirmed: "Set 12 hour" "Set 24 hour" will show on the screen.
- Confirm 12 Hours or 24 Hours to start to set the time. "Set Time"/ "Hour" "Minute" ("AM or PM") will show on the screen. Rotate the press the TUNER/SELECT control to set.
- Time setting finished and start to set the date. "Set Date" "1-1-2013" will show on the screen. Rotate and press the TUNER/SELECT control to set.
Mute / EQ operation
Press the MUTE button on the remote control once, the speaker will be automatically turned off and the 'MUTE ON' letter will be displayed on the LCD. MUTE ON status can be cancelled by MUTE button or VOL+/- or EQ button. After MUTE is canceled The speaker audio sound output will be automatically Any function state directly presses the EQ button to output five different sound effects, POP/CLASSIC/ROCK/JAZZ/FLAT, you can select the sound quality to listen to music according to each person's favorite.
Factory reset
In the STAND BY state, press the host DN/F.R button once, then press and hold the PLAY/PAUSE button for 2 seconds to display: "System reset Please wait" until "System reset Ok", indicating completed to reset.
CARE AND MAINTENANCE
Care of the cabinets:
You should care for the cabinet as you would care for any piece of the furniture. When the cabinet becomes dusty wipe it with a sout, non-abrasive dust cloth. If the cabinet becomes smudged with fingerprints you may use any good quality commercial dusting and polishing spray cleaner, however avoid spraying the plastic or metal parts of this system. We recommend that you spray the cleaner on your dust cloth, not directly on the cabinet, to avoid getting any of the spray on the plastic or metal parts.
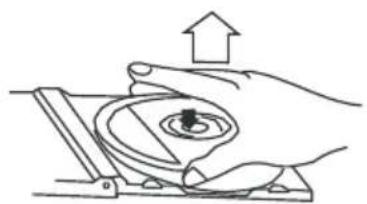
Compact disc care
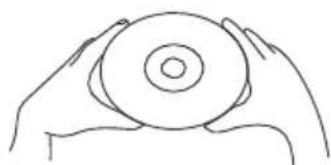
To remove a disc from its storage case, press down on the centre of the case and lift the disc out, holding it carefully by the edges.
natural_image
Illustration of a hand pressing a circular component with an upward arrow (no text or symbols)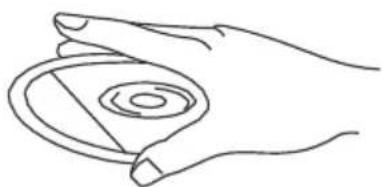
natural_image
Line drawing of a hand holding a circular object with concentric rings (no text or symbols)Fingerprints and dust should be carefully wiped off the discs recorded surface with a soft cloth. Unlike conventional records, compact discs have no grooves to collect dust and microscopic debris, so gently wiping with a soft cloth should remove most particles. Wipe in a straight line from the inside to the outside of the disc. Small dust particles and light stains will have absolutely no effect o.reproduction quality.
natural_image
Line drawing of two hands holding a circular object (no text or symbols)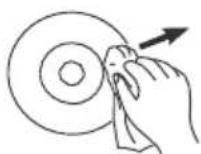
Clean the disc periodically with a soft, lint-free, dry cloth. Never use detergents or abrasive cleaners to clean the disc. If necessary, use a CD cleaning kit. Never write no or affix labels to the surface of compact discs.
DISPOSALCONSIDERATIONS

natural_image
Symbol of a trash bin crossed with a diagonal line, representing no waste or discharge (no text or labels)If there is a legal regulation for the disposal of electrical and electronic devices in your country, this symbol on the product or on the packaging indicates that this product must not be disposed of with household waste. Instead, it must be taken to a collection point for the recycling of electrical and electronic equipment. By disposing of it in accordance with the rules, you are protecting the environment and the health of your fellow human beings from negative consequences. For information about the recycling and disposal of this product, please contact your local authority or your household waste disposal service.
This product contains batteries. If there is a legal regulation for the disposal of batteries in your country, the batteries must not be disposed of with household waste. Find out about local regulations for disposing of batteries. By disposing of them in accordance with the rules, you are protecting the environment and the health of your fellow human beings from negative consequences.
DECLARATION OF CONFORMITY

Manufacturer:
Chal-Tec GmbH, Wallstrasse 16, 10179 Berlin, Germany.
Importer for Great Britain:
Berlin Brands Group UK Ltd PO Box 1145 Oxford, OX1 9UW United Kingdom
Hereby, Chal-Tec GmbH declares that the radio equipment type Julie Ann is in compliance with Directive 2014/53/EU. The full text of the EU declaration of conformity is available at the following internet address: use.berlin/10035015
For Great Britain: Hereby, Chal-Tec GmbH declares that the radio equipment type Julie Ann is in compliance with the relevant statutory requirements. The full text of the declaration of conformity is available at the following internet address: use.berlin/10035015
Chère cliente, cher client,
SOMMAIRE
Fiche technique 45
natural_image
Technical line drawing of a rectangular electronic component with four mounting holes and a central internal component (no text or symbols)natural_image
Line drawing of a rectangular electronic device with four vertical rods and a central button (no text or symbols)natural_image
Line drawing of a rectangular electronic device with four vertical rods and a central button (no text or symbols)DÉBALLAGE ET INSTALLATION
natural_image
Technical diagram of a mechanical assembly with concentric circular components and a vertical support mechanism (no text or labels)natural_image
Hand holding a small object with an arrow indicating direction (no text or symbols)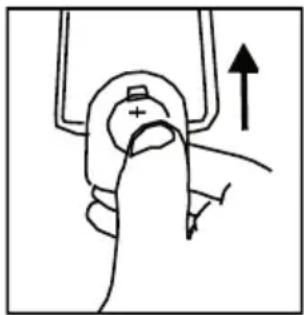
natural_image
Hand holding a device with an upward arrow, no visible text or symbolsAPERÇU DE L'APPAREIL
Vue de face

natural_image
Hand holding a mechanical component with an upward arrow, no visible text or symbols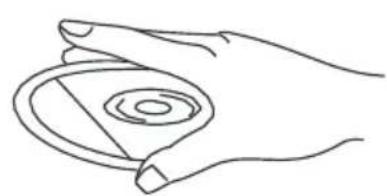
natural_image
Line drawing of a hand holding a circular object with concentric rings (no text or symbols)natural_image
Line drawing of two hands holding a circular object (no text or symbols)
natural_image
Symbol of a trash bin crossed with a diagonal line, representing no waste or discharge (no text or labels)DÉCLARATION DE CONFORMITÉ

Fabricant :
Chal-Tec GmbH, Wallstraße 16, 10179 Berlin, Allemagne.
CONTENIDO
Datos técnicos 65
natural_image
Technical line drawing of a rectangular electronic component with four mounting holes and a central internal component (no text or symbols)natural_image
Simple line drawing of a rectangular electronic device with four vertical rods and a central connector (no text or symbols)natural_image
Simple line drawing of a rectangular electronic device with four vertical rods and a central control panel (no text or symbols)DESEMBALAJE Y PUESTA EN MARCHA
natural_image
Technical diagram of a mechanical assembly with concentric circular components and a vertical guide rail (no text or labels)natural_image
Hand holding a small object with directional arrows indicating movement or force (no text or symbols)
natural_image
Hand holding a device with an upward arrow, no visible text or symbolsnatural_image
Illustration of a hand pressing a circular component with an upward arrow (no text or symbols)
natural_image
Line drawing of a hand holding a circular object with concentric rings (no text or symbols)natural_image
Line drawing of two hands holding a circular object (no text or symbols)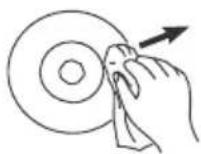
natural_image
Symbol of a trash bin crossed out by a diagonal line, with no text or labels present.Berlin Brands Group UK Ltd
PO Box 1145
Oxford, OX1 9UW
United Kingdom
INDICE
Dati tecnici 85
natural_image
Technical line drawing of a rectangular electronic component with mounting holes and a central internal slot (no text or symbols)natural_image
Simple line drawing of a rectangular electronic device with four vertical rods and a central connector (no text or symbols)natural_image
Simple line drawing of a rectangular electronic device with four vertical rods and a central control panel (no text or symbols)natural_image
Technical diagram of a circular mechanical component with internal concentric rings and a vertical guide rail (no text or labels)natural_image
Hand holding a small object with directional arrows indicating movement or force (no text or symbols)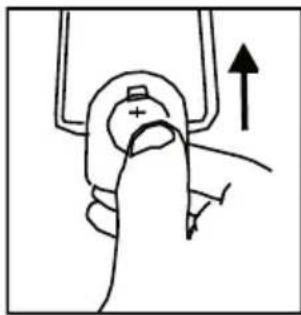
natural_image
Hand holding a mechanical component with an upward arrow indicating motion (no text or symbols)DESCRIZIONE DEL DISPOSITIVO
Lato anteriore


natural_image
Illustration of a hand pressing a circular component with an upward arrow (no text or symbols)
natural_image
Line drawing of a hand holding a circular object with concentric rings (no text or symbols)natural_image
Line drawing of two hands holding a circular object (no text or symbols)
natural_image
Symbol of a trash bin crossed out by a diagonal line, with no text or labels present.natural_image
Abstract white logo design on dark background, resembling stylized letter 'S' or wave form (no text or symbols)


- INHALT
- GERÄTEÜBERSICHT
- Member of Berlin Brands Group
- CONTENTS
- EXPLANATION OF THE WARNING SYMBOLS
- Laser safety
- SAFETY INSTRUCTIONS
- Before use
- Power source
- UNIT STAND ASSEMBLY
- UNPACKING AND SETUP
- Protect your furniture
- Lithium battery installation of remote control
- PRODUCT OVERVIEW
- Rear view
- Remote control
- PHONO DECK
- OPERATING INSTRUCTIONS
- Power on
- USB operation
- Playing in MP3 mode(under CD/USB operation)
- Track Skip and high speed track search in CD/USB mode
- Repeat/random function in CD/MP mode(under CD/USB operation)
- Memory function in CD/MP3 mode
- Recording function
- Deleting recorded track or files
- Radio operation
- Fm operation
- CD OPERATION
- PLAYING RECORDS
- IMPORTANT
- BT FUNCTION
- AUX IN
- DAB RADIO
- Station Presets (FM & DAB)
- Language Setting
- Setting Time&Date
- Mute / EQ operation
- Factory reset
- CARE AND MAINTENANCE
- Care of the cabinets:
- Compact disc care
- DISPOSALCONSIDERATIONS
- DECLARATION OF CONFORMITY
- Manufacturer:
- Importer for Great Britain:
- SOMMAIRE
- DÉBALLAGE ET INSTALLATION
- APERÇU DE L'APPAREIL
- DÉCLARATION DE CONFORMITÉ
- Fabricant :
- CONTENIDO
- DESEMBALAJE Y PUESTA EN MARCHA
- INDICE
- DESCRIZIONE DEL DISPOSITIVO
Brand : Auna
Model : Julie Ann
Category : Radio